SeaViewer DVR-SD User manual

Page 1 of 22 SeaViewer DVR-SD Manual 02/15/2011
SeaViewer Cameras, Inc
SeaViewer Cameras, IncSeaViewer Cameras, Inc
SeaViewer Cameras, Inc.
DVR-SD
SD Digital Video Recorder
User’s Manual
Please read this User’s Manual carefully t ensure that y u can use the device c rrectly and
safely. The c ntents f this manual are subject t change with ut n tice.

Page 2 of 22 SeaViewer DVR-SD Manual 02/15/2011
Imp rtant n tice:
1. Please read ver all cauti ns.
2. Please keep this manual f r future reference.
3. Please n tice all warning inf rmati n.
4. Please strictly f ll w the instructi ns in this manual while perating.
5. Please NEVER exp se this device t water.
6. Please d NOT use abrasive chemicals, cleaning s lvents r str ng detergents t clean the
device. Wipe the device with a s ft and dry cl th.
7. Please all w circulati n f air ar und unit during perati n f r c ling.
8. Please d n t exp se t extreme temperatures.
9. Use the device nly with the access ries c ming with it.
10. Av id dr pping the unit.
11. C ntact SeaViewer in the USA f r repair when needed. Ph ne 813.242.6160
12. The device can nly be installed h riz ntally. Installing vertically r ut f the h riz ntal
plane might cause injury r damage t the device and/ r its parts.
Warning
This device is NOT of waterproof; to prevent it from any accident of fire or
electric shock, please do NOT put any container with water on the device or
nearby. Do not e pose the device to moisture, or e treme temperatures.
Th
is lightning flash with
arr w symb l within an
equilateral triangle is
intended t alert users
that there might be
uninsulated danger us
v ltage which may cause
electric sh ck t pers n
when the c ver f
device is pened.
T
prevent fr m the risk f
electric sh ck, d NOT
rem ve t p c ver r back
c ver. There is NO
user-serviceable part
inside. Ask f r service fr m
qualified maintenance man.
The exclamati n p int within
an equilateral triangle is
intended t alert users the
imp rtant perating and
maintenance(servicing)
instructi ns in this manual.
CAUTION
RISK OF ELECTRIC SHOCK
DO NOT OPEN

Page 3 of 22 SeaViewer DVR-SD Manual 02/15/2011
TABLE OF CONTENTS
1. Main Features ................................................................................. 4
2. Overall description.......................................................................... 5
2.1 Fr nt Panel ....................................................................................5
2.2 Rem te C ntr l ..............................................................................7
3. Using the Recorder with the Remote Control ................................ 8
Step 1: Ch se rec rding quality...........................................................8
Step 2: start rec rding..........................................................................9
Step 3: Play back the files n SD CARD with DVR................................. 10
4. Adding additional SD or SDHC Cards ............................................ 13
Step 1: Ch sing a new SD r SDHC Card ........................................... 13
Step 2: f rmat the SD CARD ............................................................... 13
5. Using EXTERNAL Devices.............................................................. 14
5.1 Transfer the files t an ther device................................................ 14
5.2 Viewing the files n an ther device ............................................... 15
5.3 Editing the files n an ther device................................................. 15
6. Appendi ....................................................................................... 16
6.1 P wer supply ............................................................................. 16
6.2 Manage the p wer ..................................................................... 17
6.3 AV cables................................................................................... 19
6.4 Attaching a Camera.................................................................... 20
7. Specification ................................................................................. 21
8. List of Standard Accessories......................................................... 22

Page 4 of 22 SeaViewer DVR-SD Manual 02/15/2011
1. Main Features
Video And Audio
H.264 High Profile video compression, real time recording (25 fps(PAL) / 30 fps(NTSC) for one
channel. Frame rate adjustable to use less storage space.
AAC (Advanced Audio Compression) for audio.
D1 resolution, which supports 704x576(PAL) / 704x480(NTSC).
Power Input
Supp rts fr m +8V DC t +32VDC. Applicable with +12V r +24V battery.
If the p wer input p larity is inc rrect, the aut -pr tect functi n can prevent damage t
the rec rder and battery.
The rec rder can pr vide the camera with stable +12V DC p wer; DVR can detect a sh rt
n p wer circuit.
Can use igniti n t c ntr l the p wer with pti nal c nnect r c rd (additi nal).
Recording mode
C ntinu us rec rd.
Start rec rding aut matically when the DVR is turned n, if desired.
Supp rts scheduled rec rding.
Supp rts alarm rec rding with pti nal sens r and c nnect r c rd (additi nal).
Supp rts igniti n rec rding with pti nal c nnect r c rd (additi nal).
Shock Resistant
S lid State st rage perates with n m ving parts.
SD card plug and play
Support plug and play for SD card when not recording and playing.
Note: If you remove the SD card while recording or playing, you might damage the files on the
SD card. While recording or playing, the yellow light on the front panel will be on. So please
stop recording or playing until the yellow light turns off before you remove the SD card.
Speed and Vehicle status recording
The necessary hardware f r these functi ns is n t ffered.
Multiple player supported
You can use the following player to play back the record file on a computer.
the software provided by us
VLC media player
(
version1.0.0 or above
);
Storm player(Version 2009 or above
)
Winamp
(
Version 5.531 or above
)

Page 5 of 22 SeaViewer DVR-SD Manual 02/15/2011
2. Overall description
2.1 Front Panel
①:
P wer light (GREEN)
②:
RUN light (GREEN)
③:
Alarm light (RED)
④:
RECORD, SD Card present light (RED)
⑤:
System light (YELLOW)
⑥:
External IR c nnect r (n t used)
⑦:
USB 2.0 p rt (
DISABLED f r security reas ns
)
⑧:
Lan p rt (
DISABLED f r security reas ns
)
Get to know the status by the indication of PWR light
and RUN light:
1. Power light 2. RUN light Description
Blinking
Off
The DVR has p wer, but is turned
OFF. It will restart if POWER butt n is
pressed n the rem te.
Y u can safely rem ve the SD Card in
this status
On Steady
Blinking
DVR has P wer and is turned ON.
t turn OFF, h ld POWER Butt n n
rem te f r at least 3 sec nds.
3. Alarm light (Red)
Description
(n t used) (n t c nnected)
NET
PWR
RUN
ALARM
HDD
SYS
USB 2.0
①
②
③
④
⑤
⑥
⑦
⑧
st p
1
EX_IR

Page 6 of 22 SeaViewer DVR-SD Manual 02/15/2011
4. RECORD
light (RED)
5. SYSTEM light
(YELLOW)
Description
Off
Off
No Recording
Y u can rem ve the SD CARD in this
status
Blinks
On Steady
DVR is
RECORDING
D n’t rem ve the SD CARD in this
status. Please press “STOP” n
rem te t st p rec rding first.
Rem ving SD CARD in this status
may cause damage.
Flashes
Off
SD Card is being accessed
(such as Playing r F rmatting)
D n’t rem ve the SD CARD in this
status.
Page 7 of 22 SeaViewer DVR-SD Manual 02/15/2011
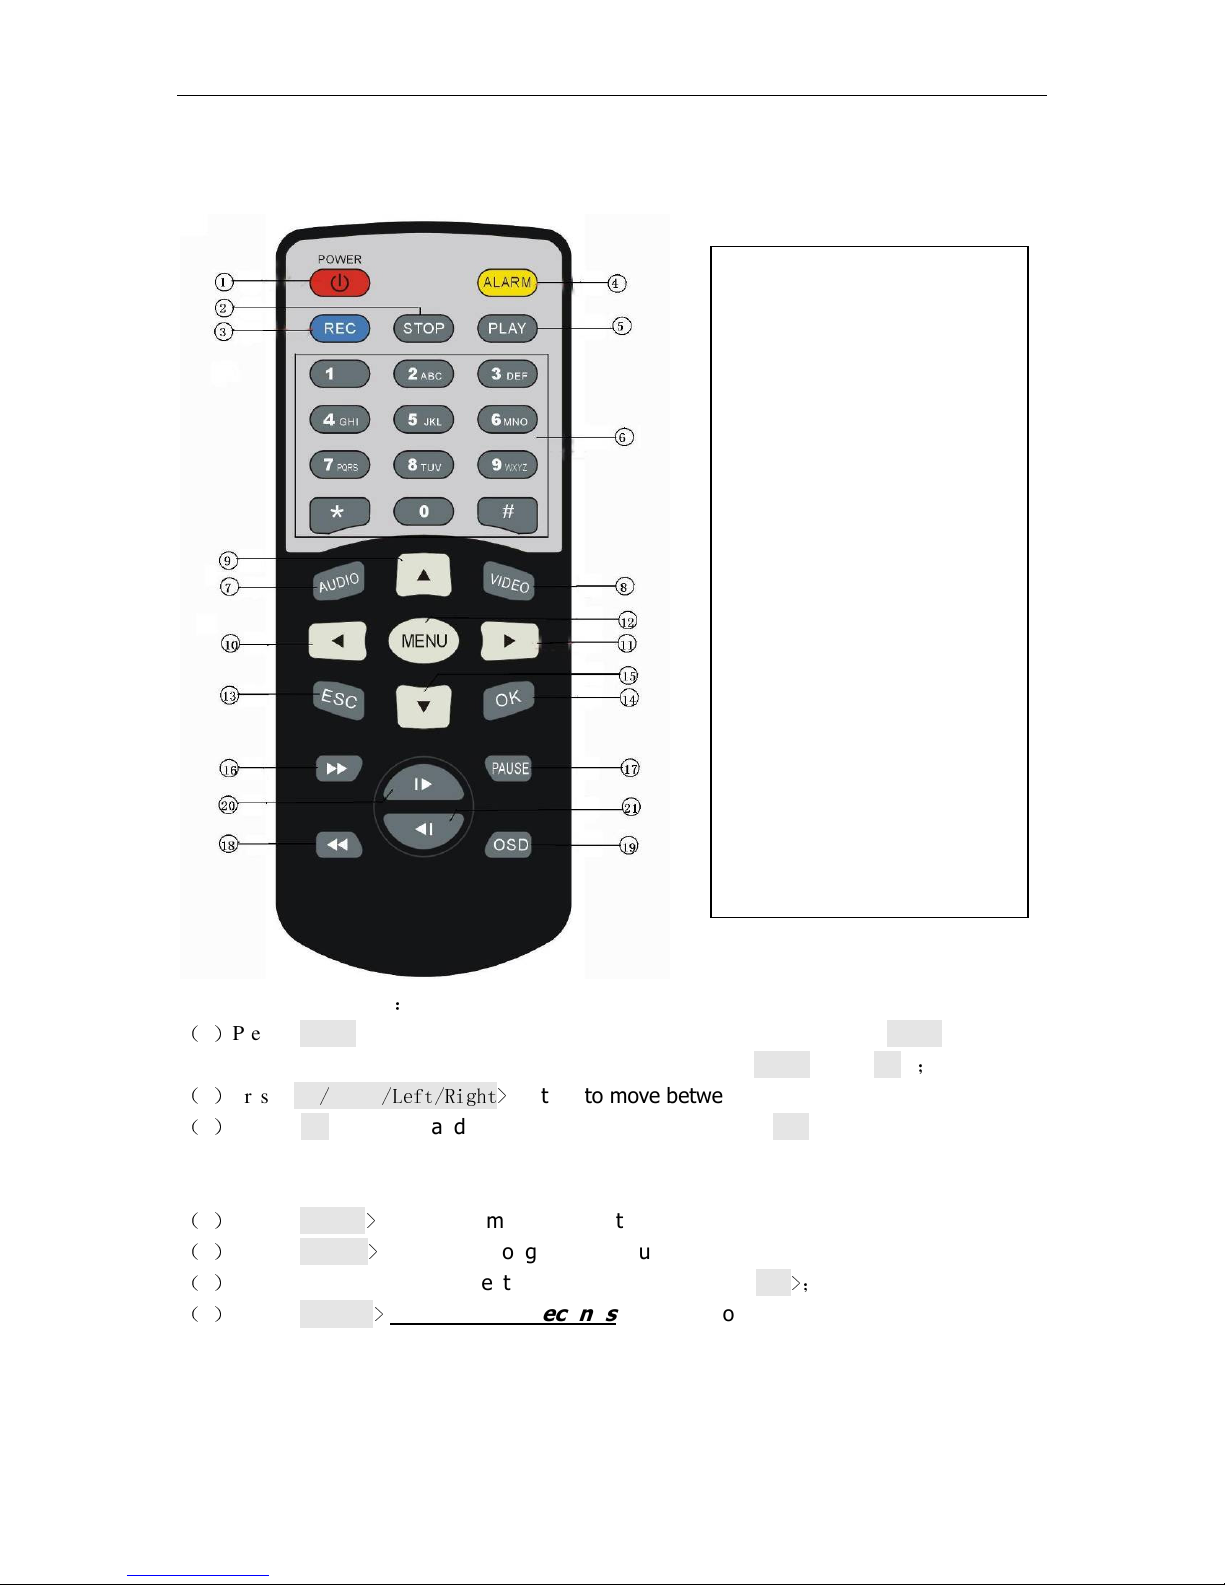
2.2 Remote Control
H w t use the rem te
:
(
1
)
Press
<MENU> t enter main menu r sub menu. Y u can als use <MENU> t select
am ng different values in the submenu. Y u can als use <MENU> as <OK>
;
(
2
)
Press <Up
/
Down
/Left/Right>
butt n t m ve between the different menu items;
(
3
)
Press
<OK> t save and exit the current menu. Press <ESC> t cancel and exit the
current menu. If y u m dify s mething in the menu, the rec rder will pr mpt t ask y u t
save r cancel y ur m dificati n;
(
4
)
Press
<VIDEO
>
t t ggle am ng different vide channels; We use nly Channel 1.
(
5
)
Press
<AUDIO
>
t t ggle am ng different audi channels; We use nly Channel 1.
(
6
)
T delete a character in a text edit field, y u can press
<Left
>;
(
7
)
Press
<POWER
>
for at least 3 seconds
t turn n/ ff the rec rder;
1. P wer
2. St p
3. Rec rd
4. Alarm
5. Play
6. Numbers
7. Audi
8. Vide
9. Up
10. Left
11. Right
12. Menu
13. ESC
14. OK
15. D wn
16. Fast F rward
17. Pause/Step
18. Fast Backward
19. OSD
20. Next
21. Previ us
Page 8 of 22 SeaViewer DVR-SD Manual 02/15/2011
3. Using the Recorder with the Remote Control
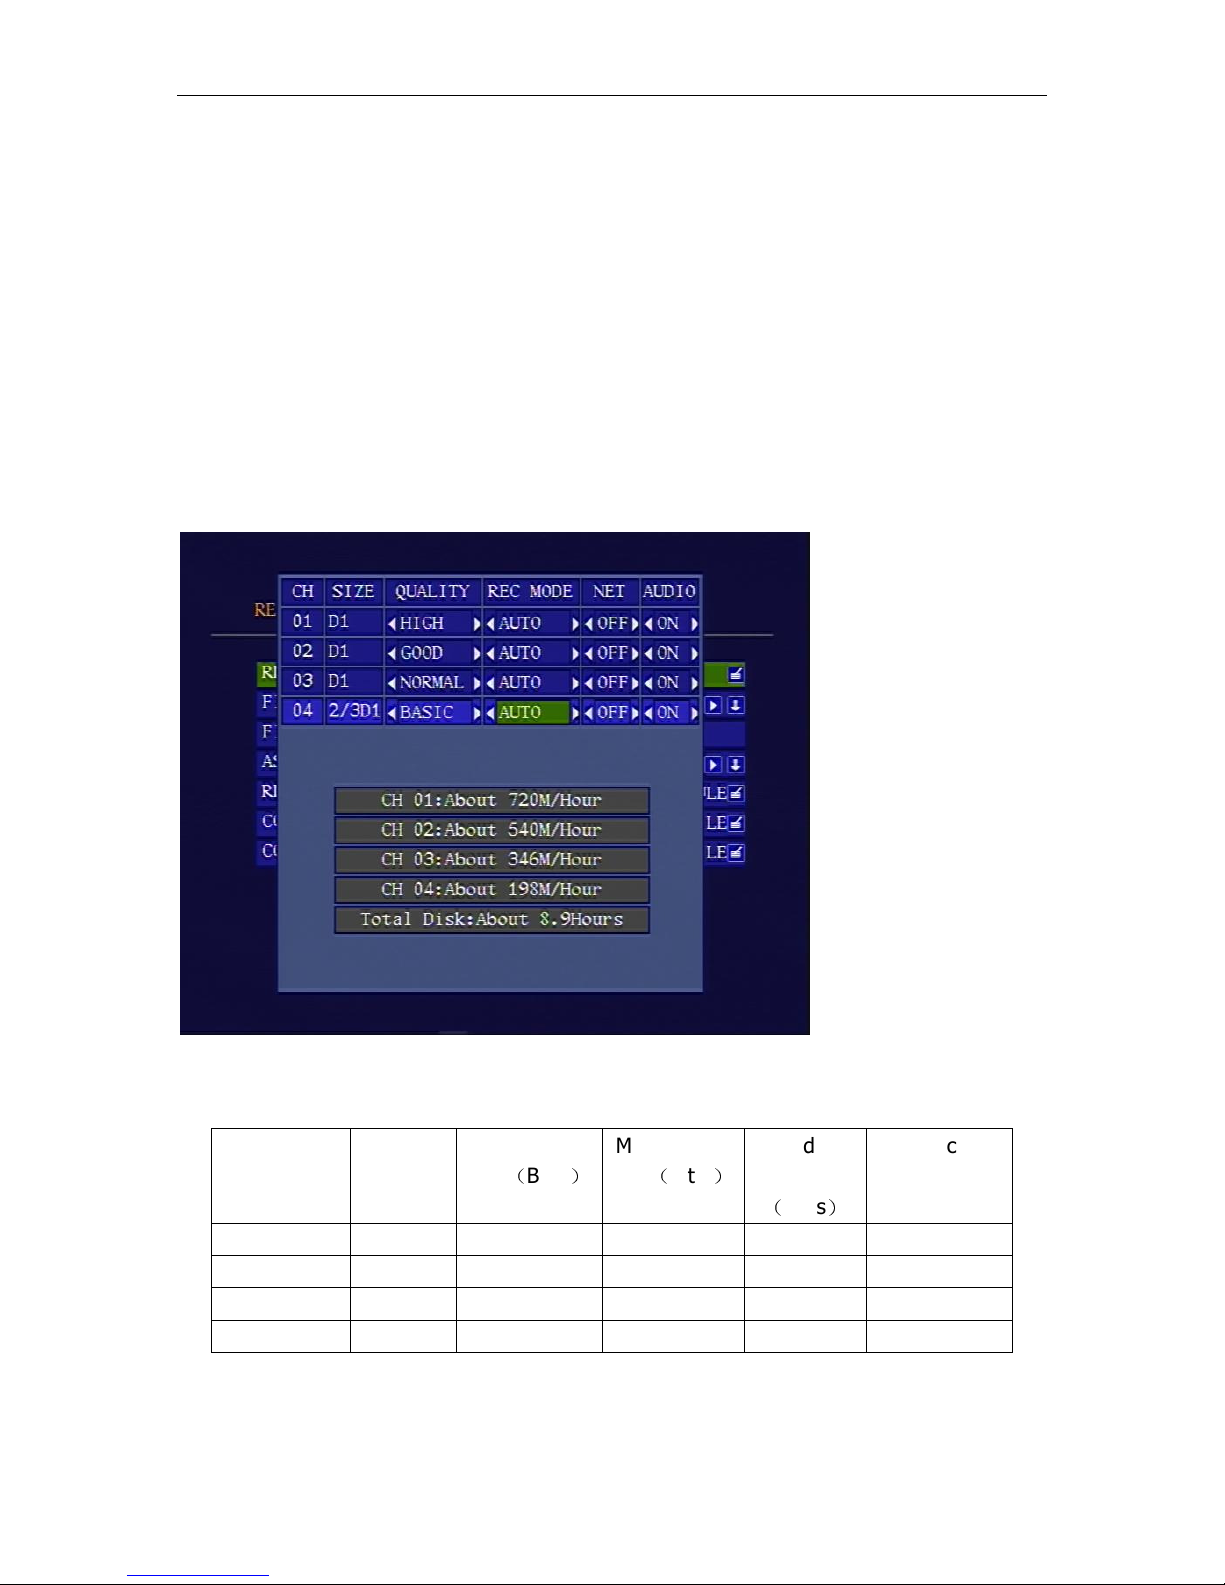
Step 1: Choose recording quality
Note: Recording Quality has already been set to High (highest-quality level) at the
factory. At this setting, the DVR will use approximately 720 MB per hour of recording.
With an 8 GB SD Card, this is about 11 hours of video. There is no need to change this
setting unless longer recording times are required.
Press <MENU> t enter the main menu and select “RECORD SETTINGS” in the “RECORD” sub
menu.
The detailed parameters f r each quality list as bel w:
Quality
Res luti n
Maximum bit
rate
(
Bit/s
)
Minimum bit
rate
(
Bit/s
)
Audi
Bitrate
(
Bit/s
)
Capacity
need
BASIC 2/3 D1 350K 210K 16K 119M/h ur
NORMAL D1 1000K 600K 16K 346M/h ur
GOOD D1 1200K 720K 16K 540M/h ur
HIGH D1 1500K 900K 16K 720M/h ur

Page 9 of 22 SeaViewer DVR-SD Manual 02/15/2011
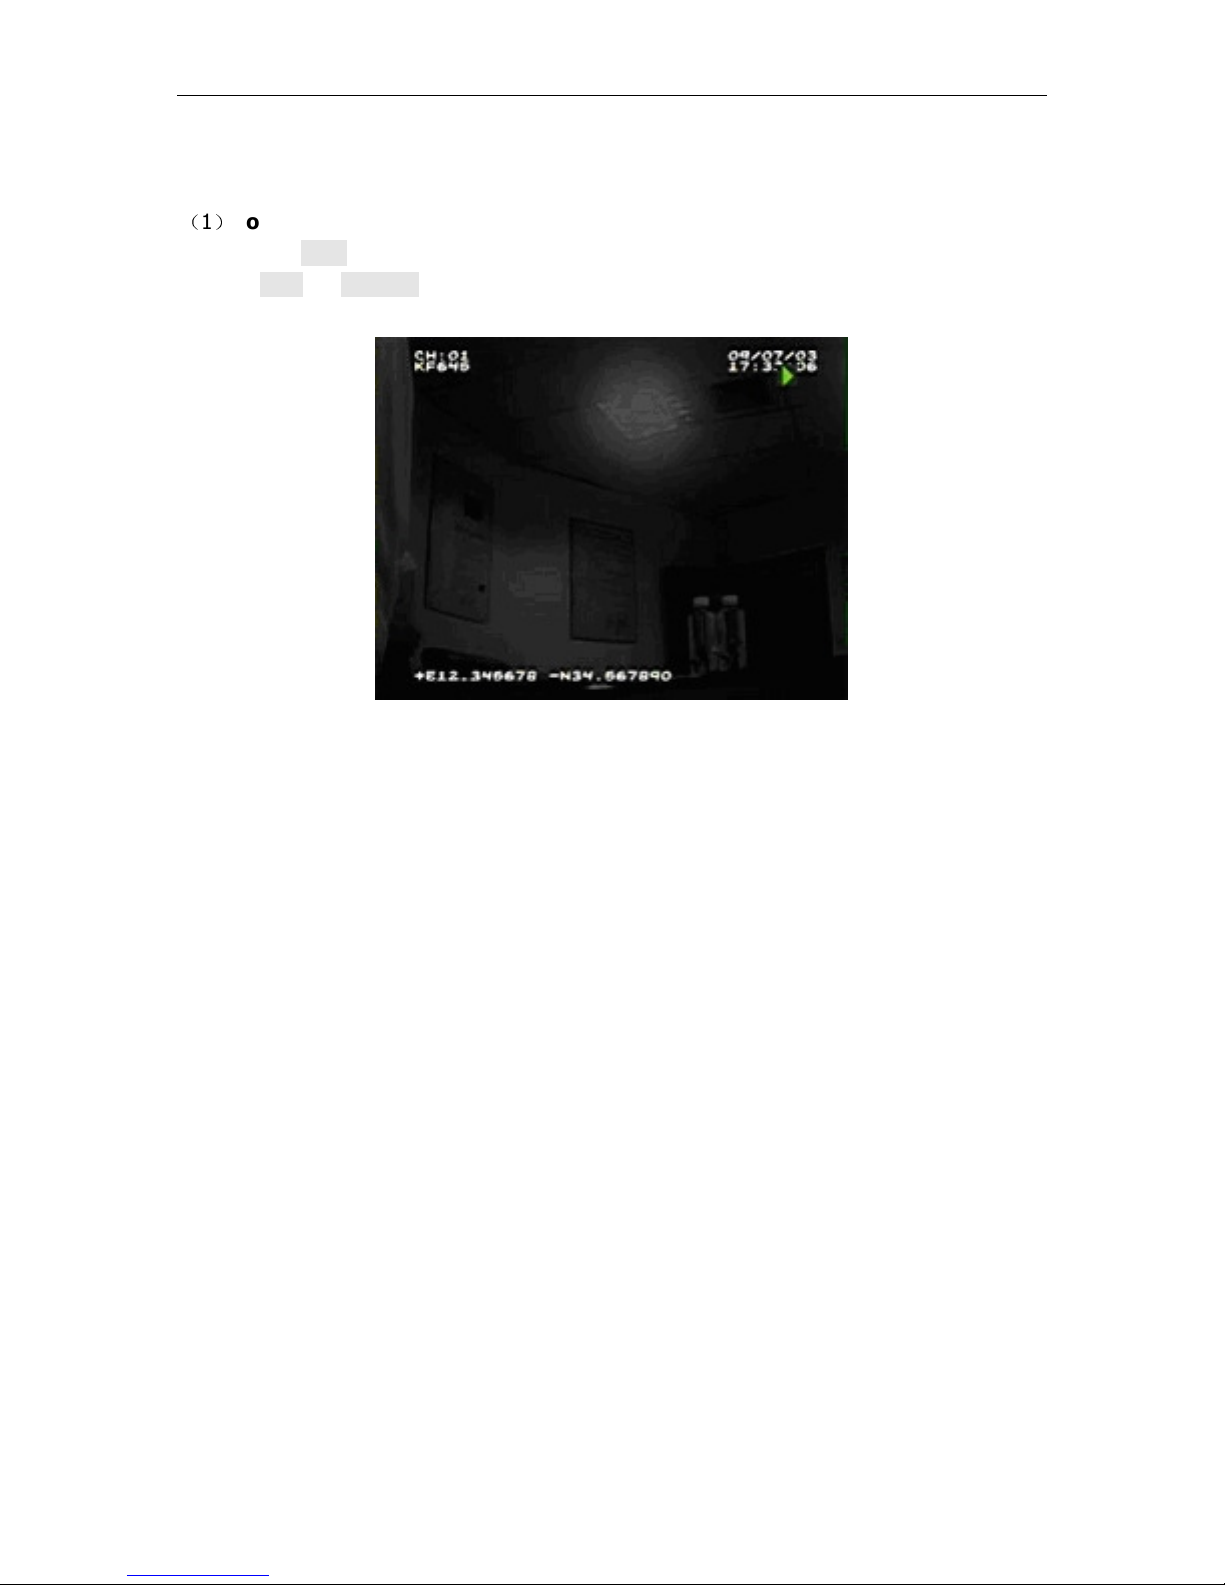
Step 2: start recording
Press < REC> n the rem te t start rec rding. There will be ne red d t at the t p-right f
the picture indicating rec rding.
Press <STOP> and then <OK> at the prompt to stop
recording. If you do not do this, the recorder may continue
to record, even if you press the <PLAY> button on the remote
to watch another recording on the screen.
Page 10 of 22 SeaViewer DVR-SD Manual 02/15/2011
Step 3: Play back the files on SD CARD with DVR
(
1
)
To play back the most recently recorded files in reverse-chr n l gical rder:
Press the <PLAY> butt n n the rem te, the rec rder will play back the m st recent file.
Press <Next>/<Previ us> t select the next r previ us file. The play status is indicated by a
green triangle n the t p right c rner f the screen.

Page 11 of 22 SeaViewer DVR-SD Manual 02/15/2011
(
2
)
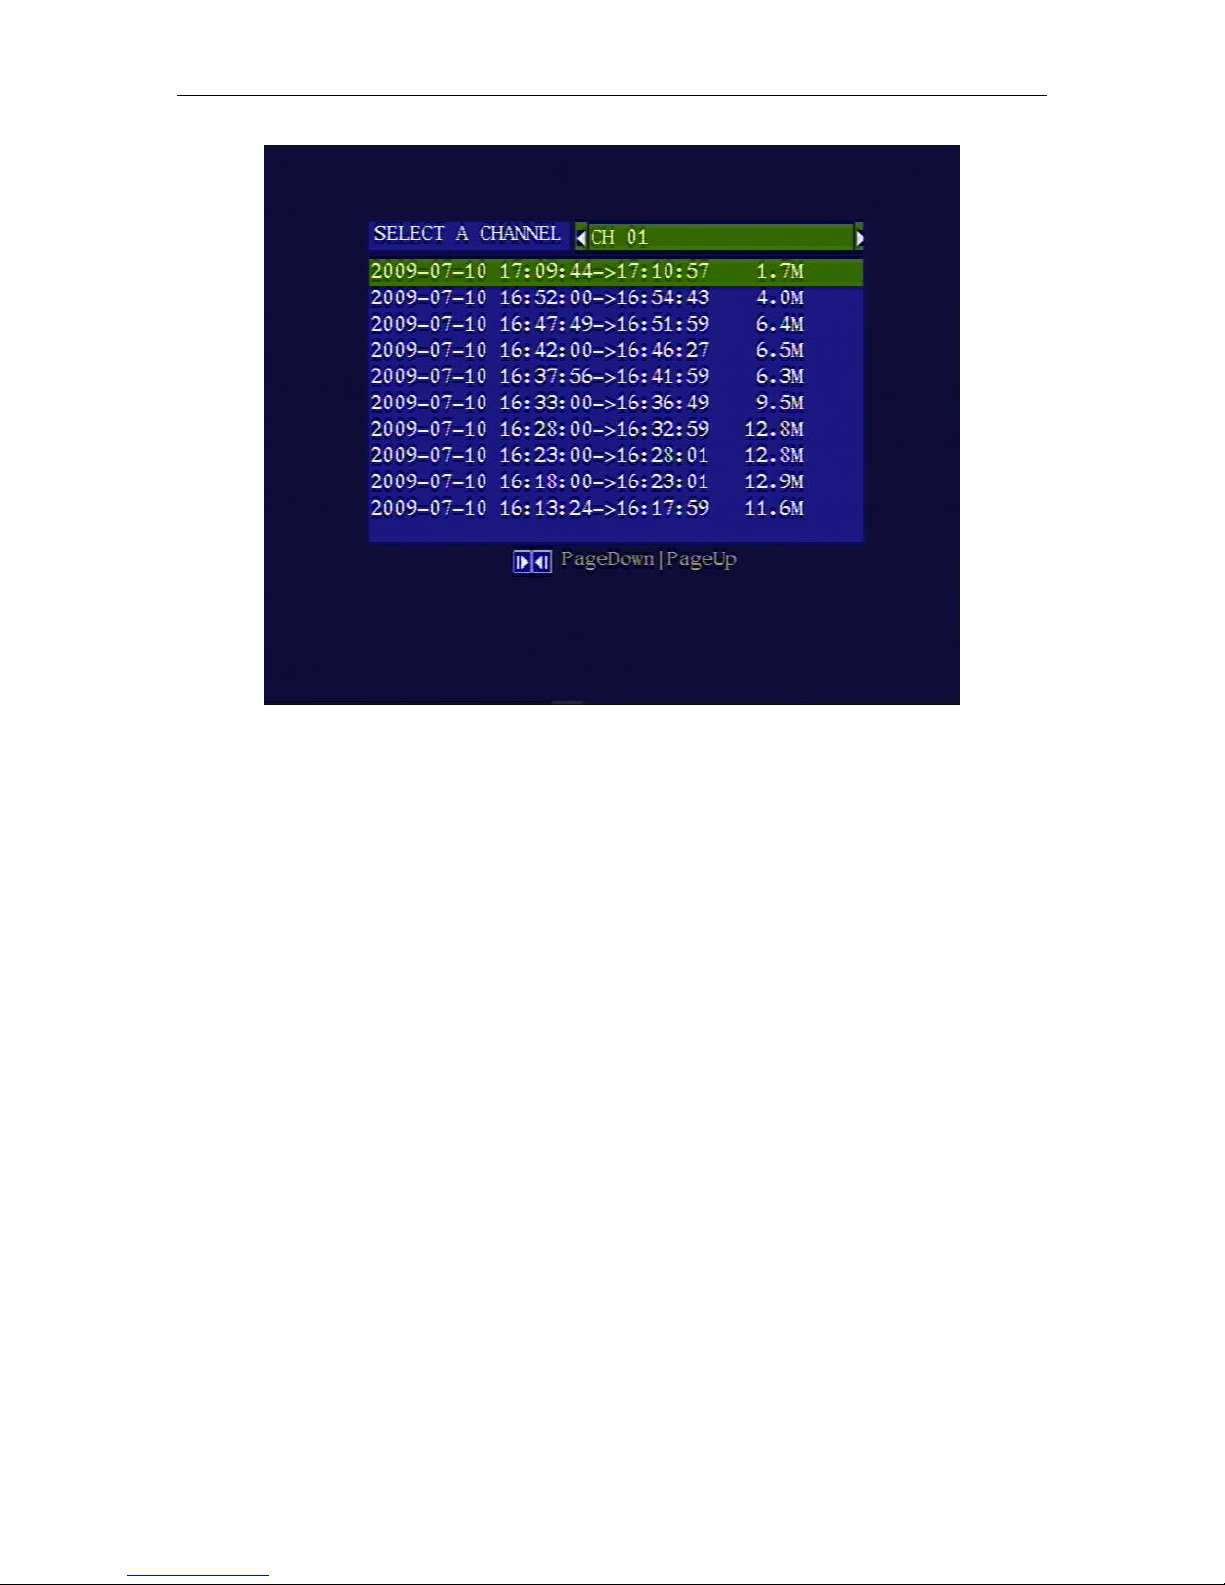
T seek and play back a file fr m a specific time:
Press <MENU> t enter the main menu and select “STORAGE”. Then select “SEARCH BY
TIME” in the sub menu. Select the time y u want t seek and ch se <OK>. The rec rder will
list the rec rd file ar und the time y u set. Then press <PLAY> t play the file.
Page 12 of 22 SeaViewer DVR-SD Manual 02/15/2011

Page 13 of 22 SeaViewer DVR-SD Manual 02/15/2011
4. Adding additional SD or SDHC Cards
Step 1: Choosing a new SD or SDHC Card
The DVR-SD can accept m st SD r SDHC Cards up t 64 GB capacity.
BUT: N t all brands f SD Cards are the same internal architecture. S me are m re
c mpatible than thers in different devices. If y u plan t acquire additi nal SD r SDHC
Cards, be sure t try a smaller capacity card fr m y ur ch sen manufacturer bef re investing
in a high-capacity, expensive Card.
NOTE: Ensure that DVR is turned
OFF
bef re rem ving, r inserting, an SD Card.
Step 2: format the SD CARD
Y u need t f rmat the SD CARD bef re using it. After inserting the new card and P wering up
the DVR-SD, Press <MENU> t enter the main menu and select “STORAGE” ic n, then
select “FORMAT” fr m the sub menu.
Ch se “YES” t f rmat the SD CARD. The f rmat pr cess will DELETE all pri r Data n the
Card, and may take s me time. Y u will see the capacity f the SD CARD after f rmatting.

Page 14 of 22 SeaViewer DVR-SD Manual 02/15/2011
5. Using EXTERNAL Devices
5.1 Transfer the files to another device
The SD Card may be rem ved, after turning OFF the DVR:
Push in slightly n the SD Card t release it, then pull it straight ut f the DVR.
S me devices have a built-in SD Card Sl t. If n t, the SD Card may be plugged int an SD
CARD Reader, which in turn may be plugged int the USB p rt f a c mputer r ther device.
As l ng as the device can rec gnize the SD CARD and the FAT32 file system, the files may be
transferred t the device.
IMPORTANT: T prevent c rrupti n f the SD Card file system, it is
rec mmended t immediately c py the files directly t the ther
device, and then FOLLOW THE PROPER REMOVAL PROCEDURE t
rem ve the SD Card bef re attempting t pen r manipulate the files
n y ur device (c mputer).

Page 15 of 22 SeaViewer DVR-SD Manual 02/15/2011
5.2 Viewing the files on another device
Transferred
video files may be played back on a PC using the basic vide player
s ftware we pr vide (SeaViewer_DVR_PLAYER_V1.03E.exe) r ne these c mm nly available
players:
- VLC media player
- St rm player
- WINAMP
- mplayerc
5.3 Editing the files on another device
Editing the video on a PC may be acc mplished with many third-party editing suites using
the CODECS listed bel w (available n the Internet):
- ffdsh w
- K-Lite C dec Pack (Standard installati n)
Page 16 of 22 SeaViewer DVR-SD Manual 02/15/2011
DO NOT ATTEMPT ANY OF THE OPERATIONS BELOW !
THE INFORMATION IN THE REMAINDER OF THIS DOCUMENT IS
PROVIDED FOR REFERENCE ONLY
6. Appendi
6.1 Power supply
1, P wer Input c nnect r
PIN C l r Descripti n
2 Red +12V (+24V) wire
4 Yell w Igniti n wire
6 Black Gr und wire
NOTE
1
.
The DVR uses DC p wer input, please be very careful when c nnecting t the “+” and “-”
f the p wer supply.
2
.
Wide v ltage range f 8V-32V f r the DVR. The DVR may be damaged if the v ltage c mes
t high. And the DVR may n t w rk if the v ltage c mes t l w.
3
.
P wer f the DVR sh uld be supplied by the battery.
4
.
All the cables f r c nnecting fr m p wer t the DVR sh uld be thick en ugh f r current
ver 5 Amperes.
5
.
T pr tect the battery fr m being damaged f sh rt circuit n the cable, the fuse sh uld be
placed very cl sed t the battery.
PIN 1 PIN 3 PIN 5
PIN2
PIN 4 PIN 6

Page 17 of 22 SeaViewer DVR-SD Manual 02/15/2011
6.2 Manage the power
(
((
(1)
))
)Use the ignition to control the power
1. C nnect the igniti n t the yell w wire f the p wer cable. And c nnect the red and black
wire t the “+” and “-” p le f battery.
2. Set the p wer ff delay. Select “POWER OFF DELAY” in the “POWER” sub menu. The
maxiam durati n f r the p wer ff delay is 86400 sec nds(24 h urs). If the p wer ff delay is
set t 0, the rec rder will turn ff immidiately if the igniti n is ff.
If the vehicle is using l w level as igniti n, y u need t set the igniti n signal t l w level.
(
((
(2)
))
)Turn on/off the recorder automatically
1. C nnect the DVR t the battery. Please n te that y u need t c nnect the yell w wire
(igniti n wire) t the “+” p le (+12V r +24V) f the battery.
Battery
Fuse
+
Rec rder
Red
wire
Igniti n
-
Yell w
wire
Black wire
DVR

Page 18 of 22 SeaViewer DVR-SD Manual 02/15/2011
2. Select “POWER ON” and “POWER OFF” in the “P wer” sub menu and set the time y u want
t turn n/ ff the rec rder.
If y u d n’t need t turn n/ ff the rec rder aut matically, set the “POWER ON” and “POWER
OFF” time t
“
00
:
00
”
.
Fuse
+
Rec rder
Red
wire
-
Yell w wire
Black
wire
Battery
DVR

Page 19 of 22 SeaViewer DVR-SD Manual 02/15/2011
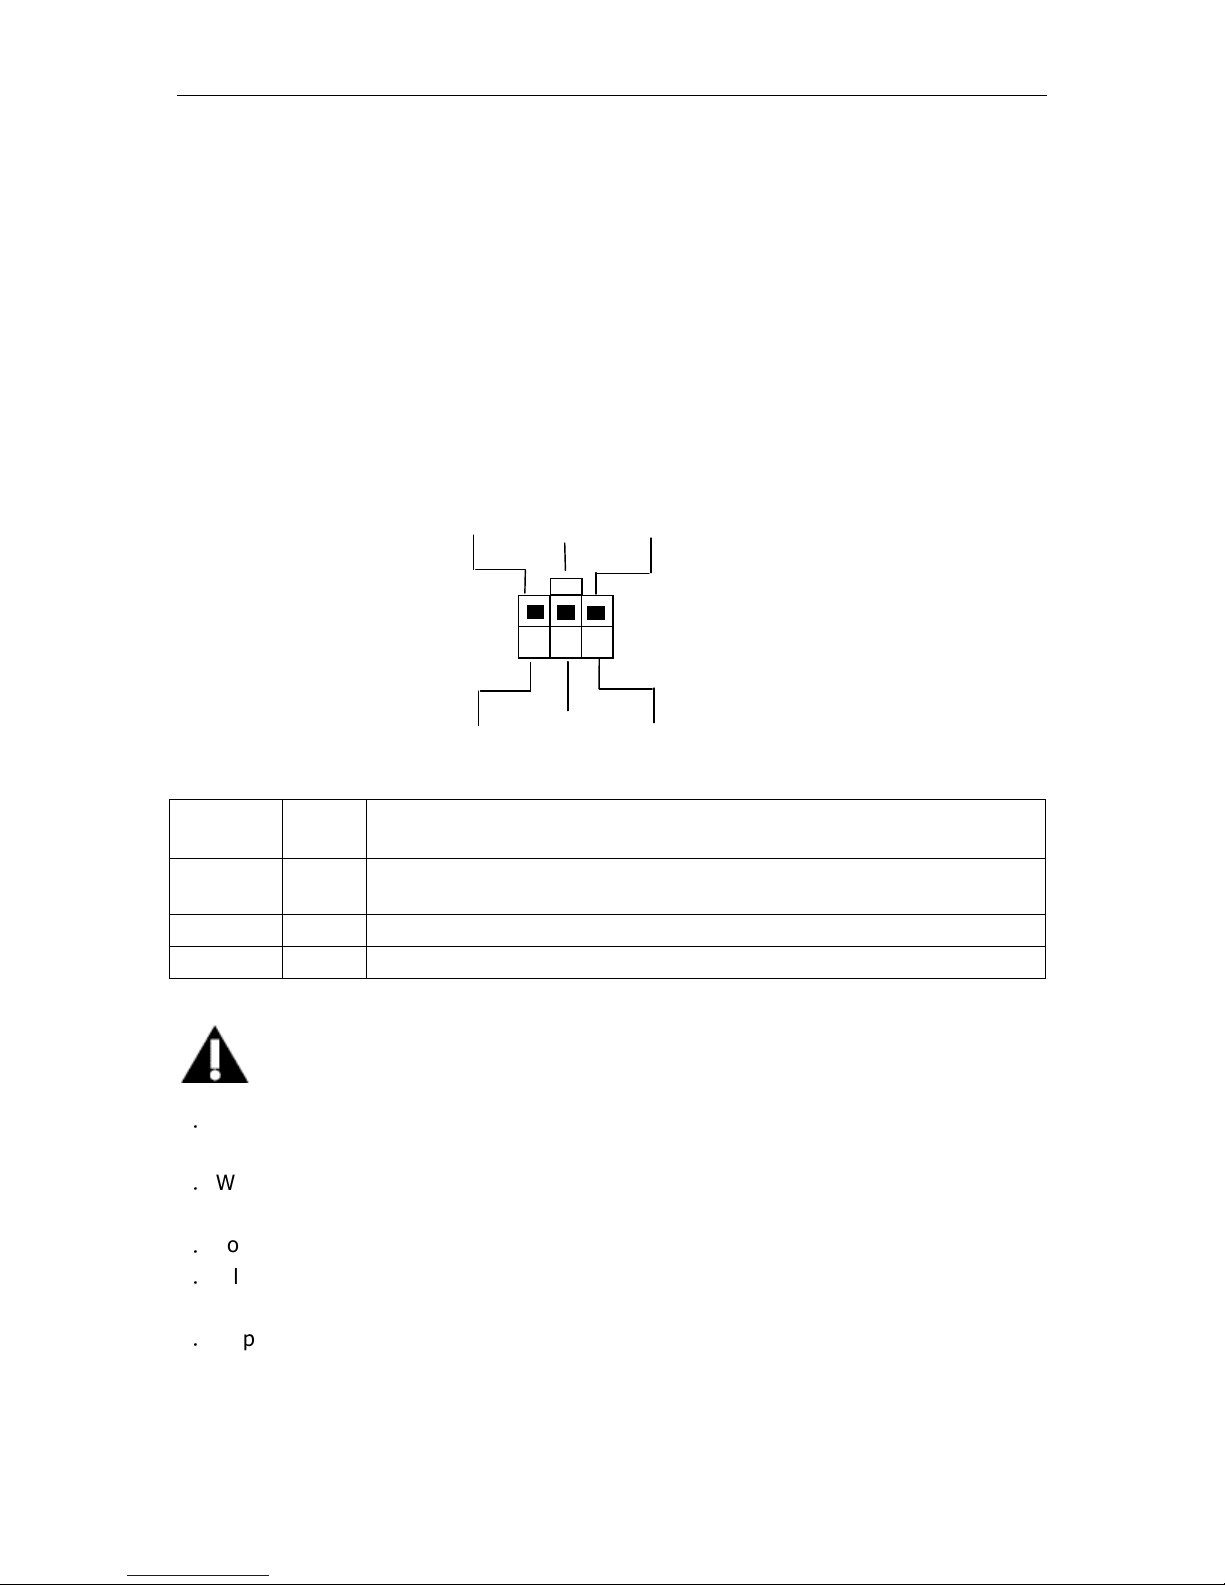
6.3 AV cables
1
)
AV cables
Mark Description
VIN Video input
AIN Audio input
12V Power output for camera(+12 VDC, Maximum current 1A)
GND Ground
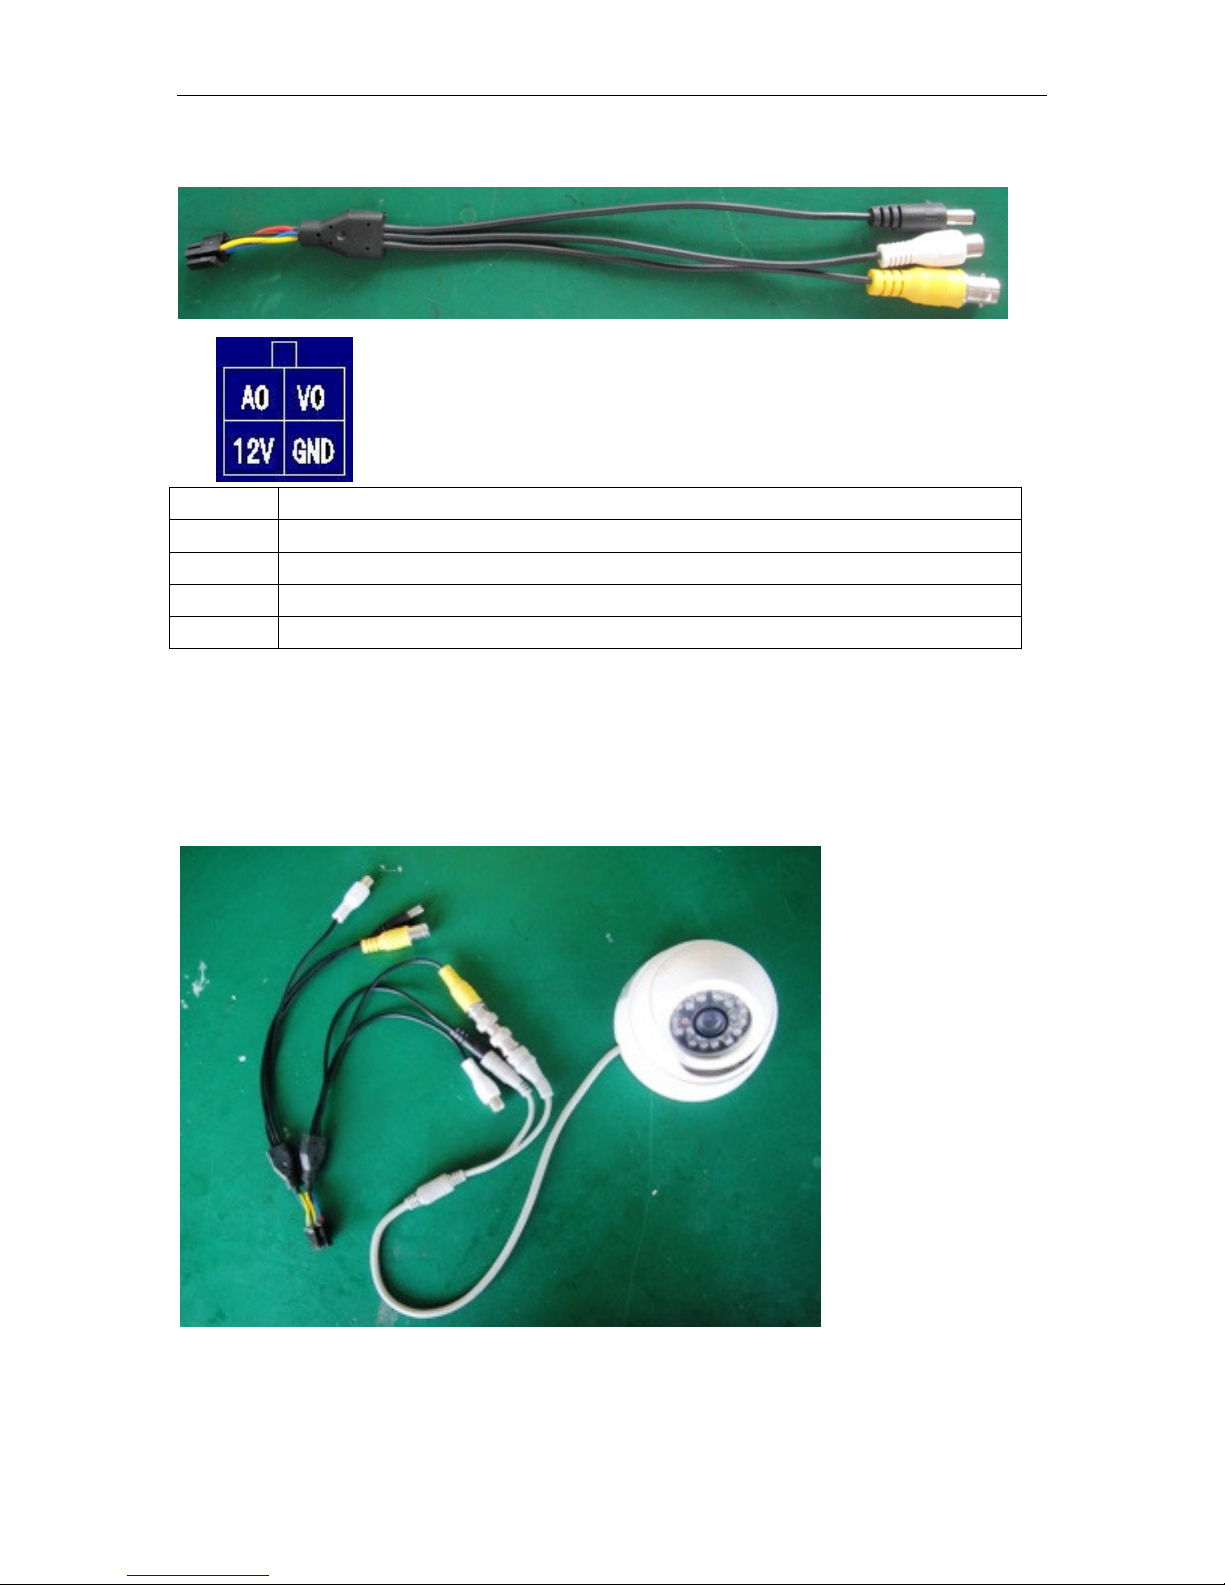
Page 20 of 22 SeaViewer DVR-SD Manual 02/15/2011
Mark Description
VO Video out
AO Audio out
12V Power output for camera(+12 VDC, Maximum current 0.5A)
GND Ground
6.4 Attaching a Camera
Connect the camera as the picture shows. The yellow connector is for video and the white connector is
for audio.
Table of contents


