TVonics DTR-Z500 User manual

Watch and record Digital TV, minus the contract
Digital TV Recorder User Guide

Important Safety Information
Thank you for choosing this
TVonics Freeview+ box.
Before using the Freeview+ box, please take a minute to read the following important safety
information.
Only use the supplied power adaptor.•
Do not place any objects on the unit.•
Do not cut o the supplied power adaptor’s plug.•
Leave a space of at least 10cm around the unit to allow for adequate ventilation.•
Place the unit on a stable surface.•
Do not place any magnetic objects (including speakers) on or near the unit.•
Do not allow the unit to get wet.•
Do not use the unit in hot, humid or excessively dusty places.•
Do not expose the unit to rain or moisture.•
Do not obstruct the fan on the rear of the unit.•
Do not expose the unit to shocks or vibrations as this could cause disk failure.•
To clean the unit, use a lightly dampened, soft cloth. Do not use any kind of abrasive cloth,•
sponge or cleaner.
To help prevent Screen burn on Plasma and LCD screens, use the Screen Saver feature•
whenever possible.
Do not attempt to open the unit. Refer all servicing to qualied service personnel.•
Environmental Information
This symbol on the product or in the instructions means that your electrical and
electronic equipment should be disposed at the end of its life separately from your
household waste. There are separate collection systems for recycling in the EU.
For more information, please contact the local authority or your retailer where you
purchased the product.
2

Table of contents
Important Safety Information.....................................................................................................................................2
Environmental Information .........................................................................................................................................2
Package Contents............................................................................................................................................................4
Getting Started
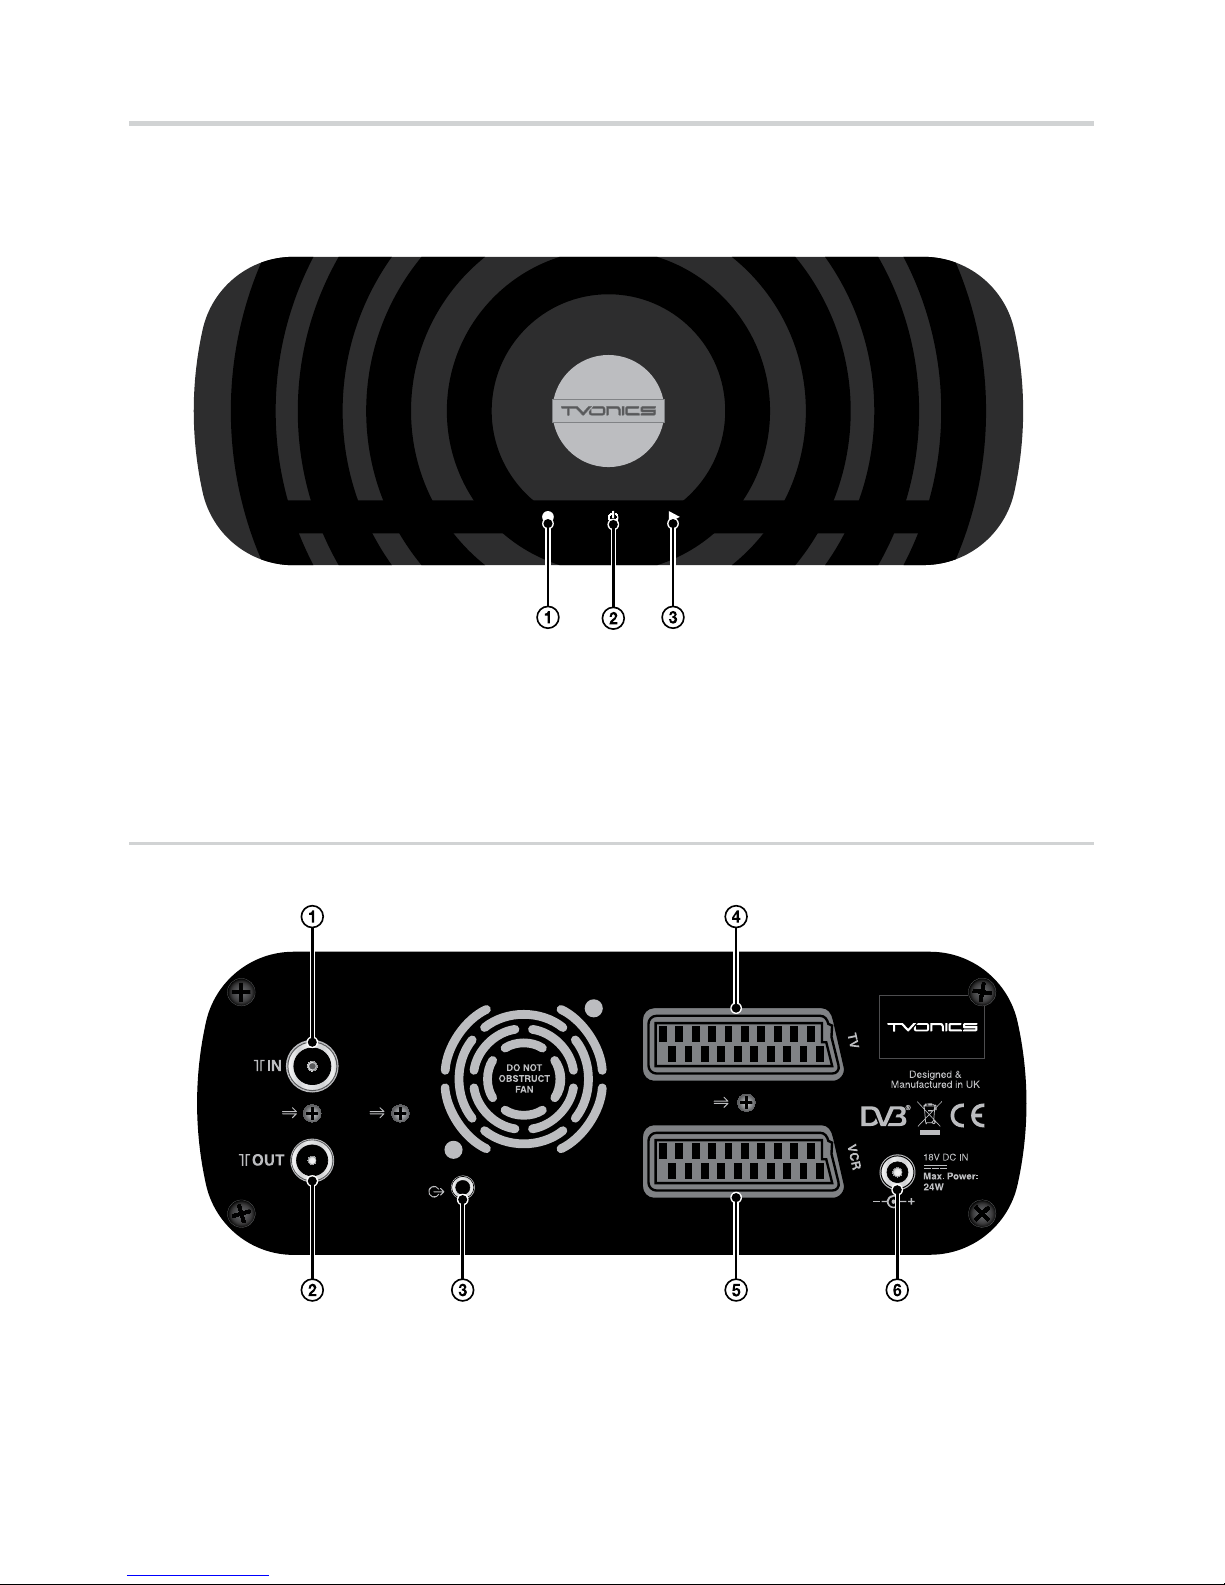
Overview of the Freeview+ box.................................................................................................................................5
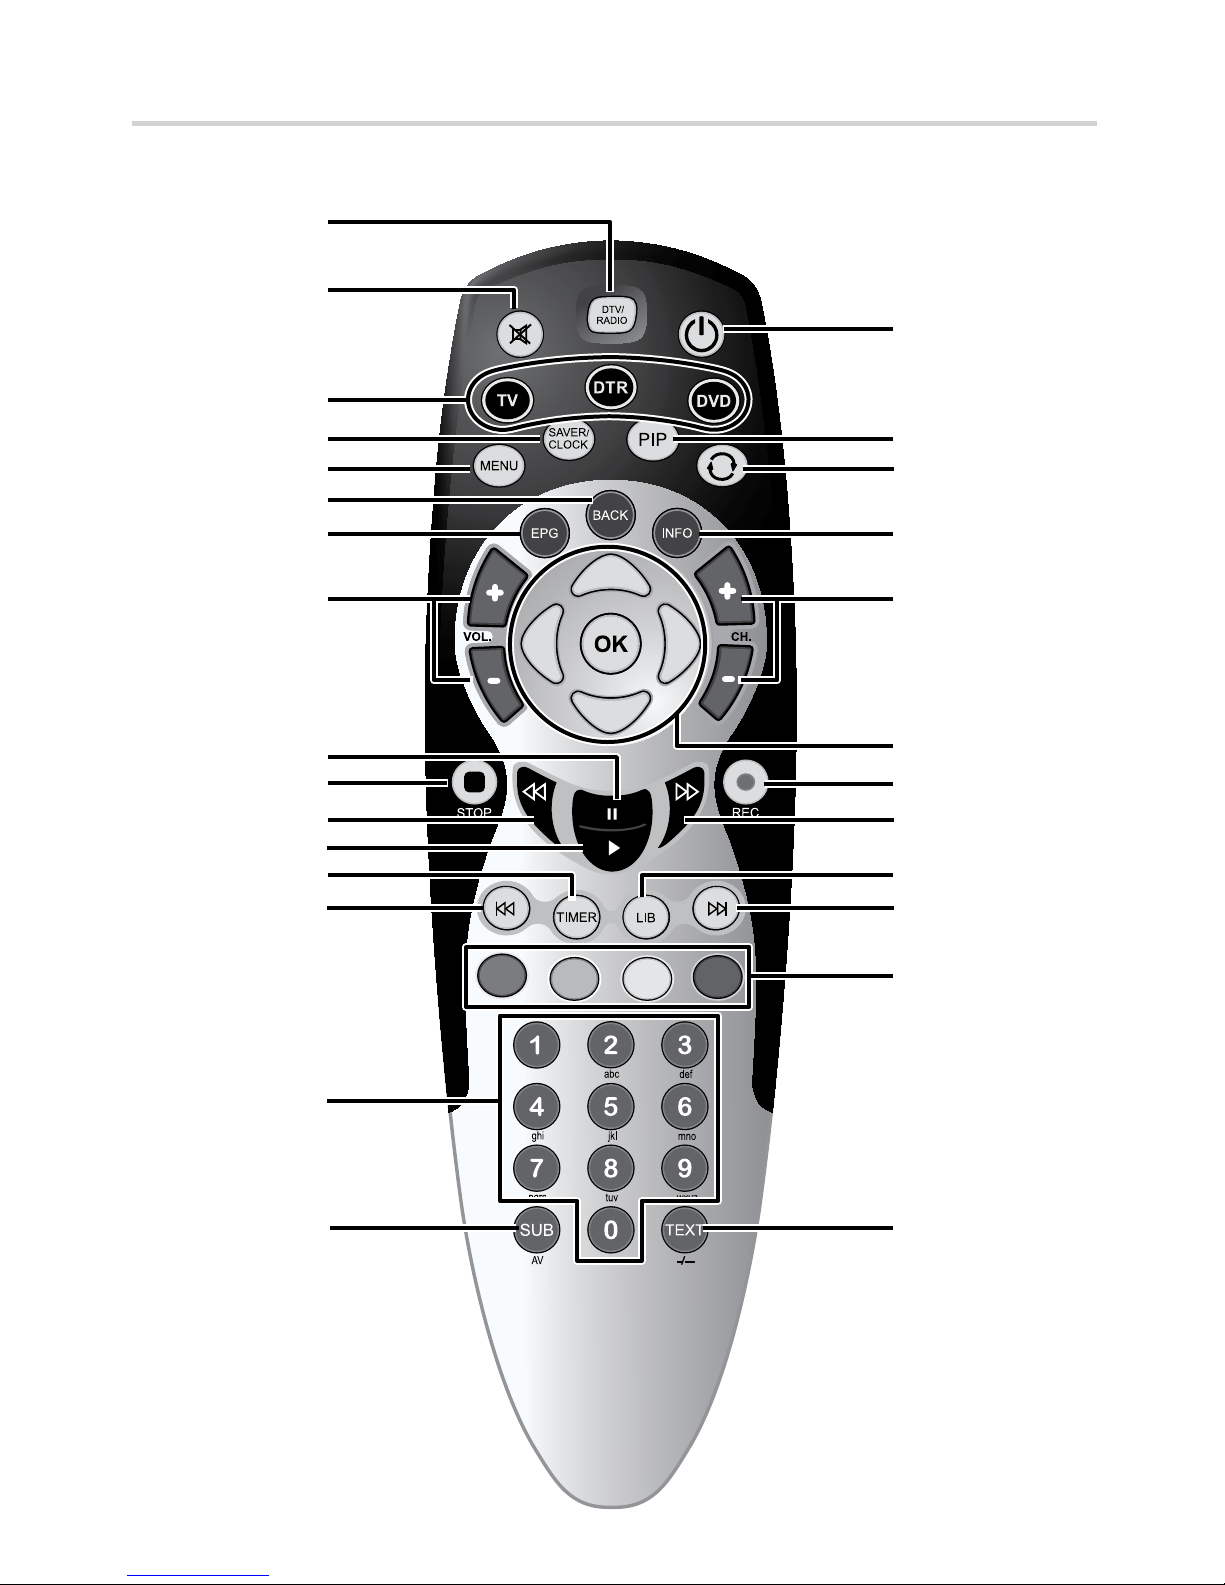
Overview of the Remote Control...............................................................................................................................6
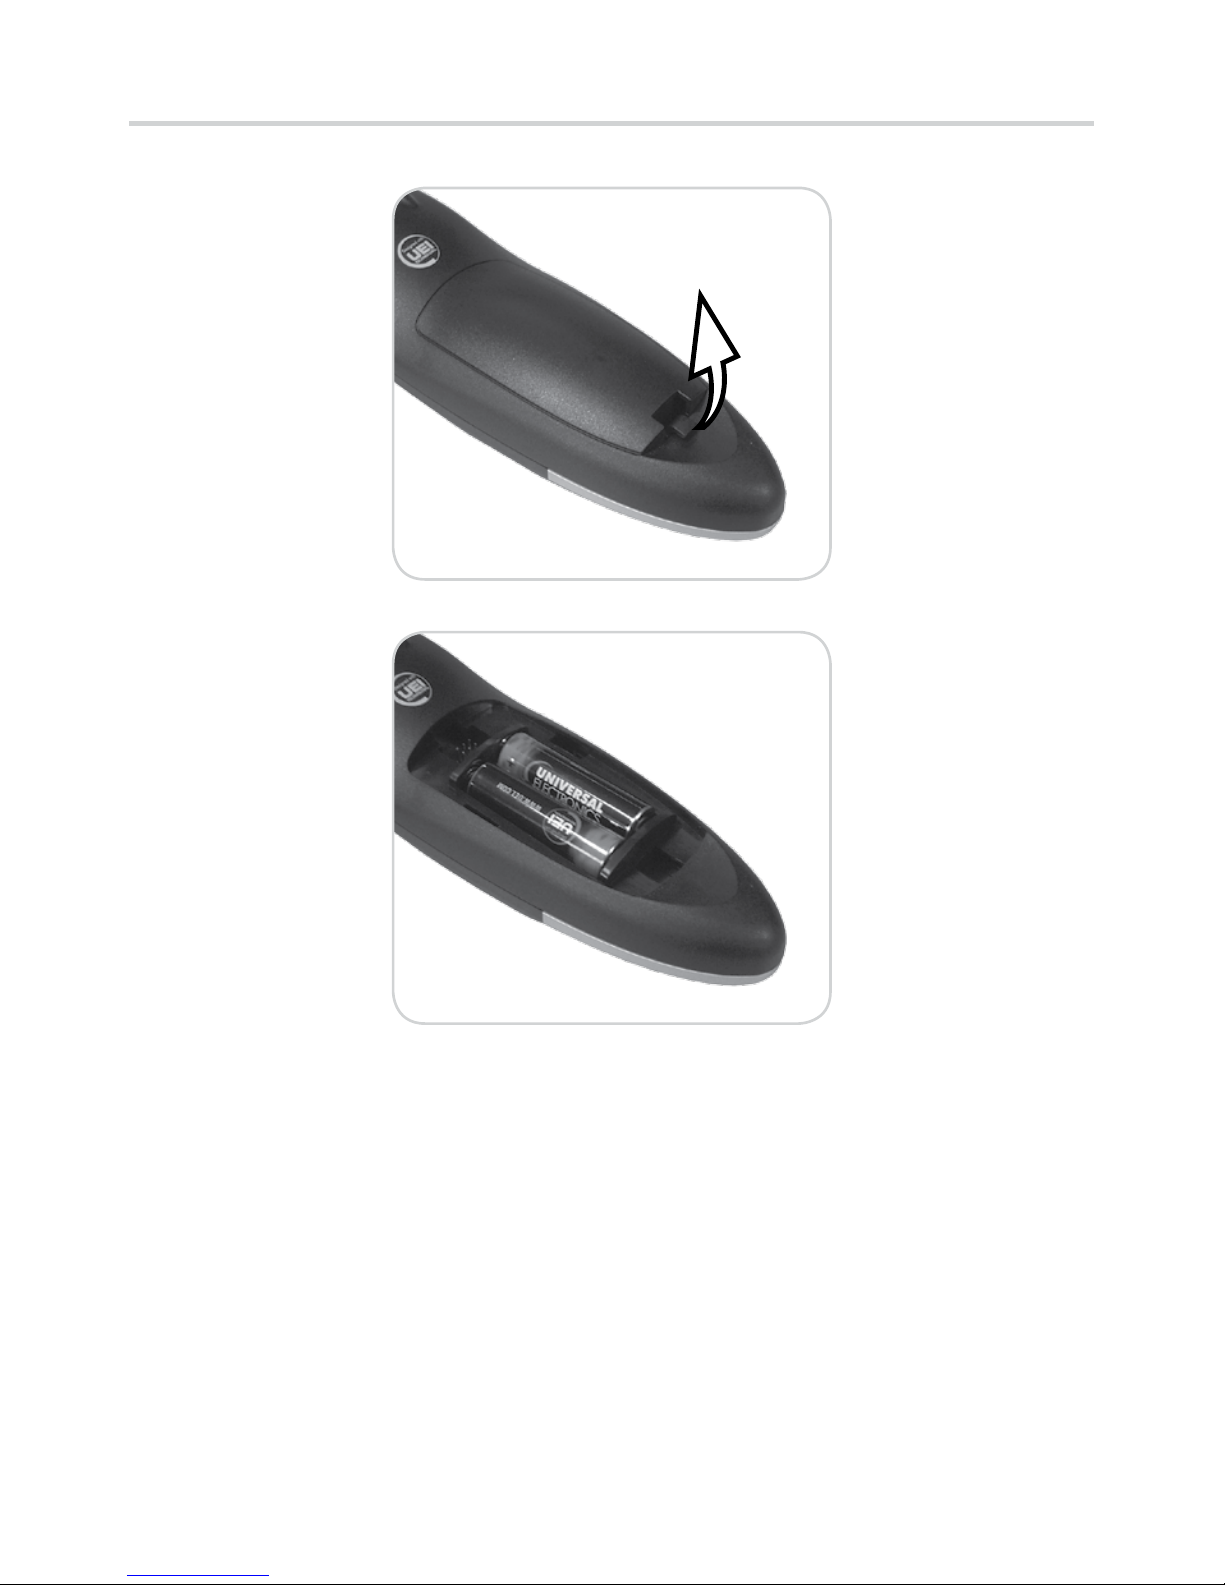
Inserting the Batteries into the Remote Control..................................................................................................8
Connecting your Freeview+ box ...............................................................................................................................9
Automatically Tuning.................................................................................................................................................. 10
Using your Freeview+ box
Everyday Use.................................................................................................................................................................. 12
The Electronic Programme Guide (EPG) .............................................................................................................. 13
The Channel List ........................................................................................................................................................... 14
The Info Display ............................................................................................................................................................ 15
Picture In Picture (PIP) ................................................................................................................................................ 16
Recording Programmes ............................................................................................................................................. 17
Pause Live TV.................................................................................................................................................................. 19
The Timers Screen ........................................................................................................................................................ 20
The Library Menu ......................................................................................................................................................... 22
Common Symbols........................................................................................................................................................ 24
Navigating the Menu.................................................................................................................................................. 25
Main Menu Options..................................................................................................................................................... 26
Programming the Remote Control ........................................................................................................................ 28
Automatically Programming the Remote Control ........................................................................................... 28
Finding the Remote Control’s Current Codes .................................................................................................... 29
Controlling a TV or DVD player................................................................................................................................ 30
Specications................................................................................................................................................................. 31
Troubleshooting ........................................................................................................................................................... 32
Remote Control Brand Codes .................................................................................................................................. 34
End User License........................................................................................................................................................... 35
3

Package Contents
Watch and record Digital TV, minus the contract
Digital TV Recorder User Guide
Quick Start Guide
Watch and record Digital TV, minus the contract
1Freeview+ box 2AA Batteries (2)
3Remote Control 4User Guide
5Quick Start Guide 6SCART Lead
7Power Adaptor 8RF Lead
4

Overview of the Freeview+ Box
Front
1Record Indicator
(Red = Recording in progress)
3Play Indicator
(Green = A recording is being played back)
2Power Indicator
(Green = On, Red = Standby)
Rear
1Aerial In (from aerial) 2Aerial Out (to TV)
3SPDIF/Digital Audio Output 4SCART (to TV)
5SCART (to VCR) 6DC Jack Input
5

Overview of the Remote Control
1
2
4
5
6
7
8
q;
9
qa
qf
qg
qh
wk
wj
wh
wg
wf
wd
ws
wa
w;
ql
qk
qj
qd
qs
3
6

1DTR/RADIO - Switches between Digital TV channels and Digital Radio channels.
2%- Turns the TV’s sound on/o*.
3MODE buttons - Sets the remote control to operate the Freeview+ box, a TV or DVD*.
4SAVER/CLOCK - Displays the Clock for 4 seconds. With the Clock displayed, press again to
display the Screen Saver.
5MENU - Displays/exits the menu.
6BACK - Returns to the previous level in the menu. Exits EPG, Info and Menu (rst level).
7EPG - Switches the Electronic Programme Guide (EPG) on/o.
8VOL. +/− - Adjusts the TV’s volume*.
9X- Pauses live TV and recordings.
q; x STOP - Stops playback when viewing recordings.
qa j- Rewinds live TV and recordings. Press repeatedly to increase the rewind speed.
qs B- Plays recording and resumes paused live TV and recordings.
qd TIMER - Displays the Timers screen.
qf l- Skips back 30 seconds when watching live TV or a recording. Press and hold to
skip to the start when viewing a recording or skip to the start of the pause buer when
watching live TV.
qg 0-9 - Selects channels, enter PIN, use Help pages.
qh SUB/AV - Displays subtitles (if available). In TV mode, changes the Video Input on the TV*.
qj TEXT/−/−− - Displays digital text (if available). In TV mode, selects double digit channel
numbers*.
qk Coloured buttons - Selects options in digital text/EPG/Channel List/menu (Red/Green/
Yellow/Blue).
ql L- Skips forward 30 seconds when viewing a recording. Press and hold to skip to the
end when viewing a recording.
w; LIB - Displays the Library of recorded programmes.
wa J- Fast forwards recordings. Press repeatedly to increase the fast forward speed. When
pausing live TV or recordings, press to watch in slow motion.
ws zREC - Records live TV. Sets highlighted programmes to timer record in the EPG.
wd OK/UP/DOWN/LEFT/RIGHT - Displays the Channel List/conrms a selection (OK button).
Navigate the EPG/menu/Channel List/Info menu (UP/DOWN/LEFT/RIGHT buttons).
wf CH. +/ − - Selects the next/previous channel.
wg INFO - Displays programme and recording information
wh - Returns to the previous channel watched. Switches between 4 and 24 hours advance in
EPG.
wj PIP - Enters Picture In Picture mode. For more information refer to page 15.
wk 1- Switches the Freeview+ box, TV* or DVD* on/into standby.
*Once the remote control has been programmed to operate your equipment. Refer to page 28.
7

Inserting the Batteries into the Remote Control
Always check the positive/negative symbols on the batteries to ensure they are inserted•
correctly.
Don’t forget to dispose of old batteries in an environmentally friendly way.•
8

Connecting your Freeview+ Box
Connection Lead Required
1From your aerial. Aerial Lead (not supplied).
2To your TV. SCART Lead (supplied).
3To your TV, VCR or DVD Recorder. RF Lead (supplied).
4To your Hi-Fi/Surround Sound System. 3.5mm jack plug lead/optical lead (not supplied).
5To your VCR/DVD Recorder. SCART Lead (not supplied).
6To the mains power outlet. Power Adaptor (supplied).
For safety reasons, DO NOT cut o the supplied power adaptor’s plug.
9

Automatically Tuning
Switch on your TV, then connect the Freeview+ box to the mains. The TV should automatically1.
switch to the correct AV channel and display the ‘Start up’screen below:
Start up screen
Press the [OK] button on the remote control to begin automatic tuning.
If the remote control does not work, press the [DTR] button and try again.
The Freeview+ box will now scan and store all available channels. Depending on the quality of2.
your reception, this may take several minutes. Please be patient and do not press any buttons.
Tuning progress screen
10

Automatically Tuning
3. When the automatic tuning has nished, a summary screen is displayed. The number of
channels found may vary according to your location and reception.
Automatic tuning summary screen
Press the [OK] button on the remote control remove the summary screen and start watching
digital TV.
11

Everyday Use
Changing channels
Type in the channel number using the [0]-[9] buttons. Alternatively, press the [CH+] and [CH-]
buttons to select the next/previous channel.
Channel hopping
Press the [ ] button to return to the previous channel watched.
Adjusting the volume*
Press the [VOL+] and [VOL-] buttons to increase/decrease the volume.
Muting the sound*
Press the [%]button to mute the sound. Press again to restore.
Using standby
When you’re not watching TV, you should set the Freeview+ box to standby. Press the [1]button
to switch between ON (green power light on the front panel) and STANDBY (red power light
on the front panel). It is safe to put the Freeview+ box into standby mode when you have set
programmes to record. The Freeview+ box will automatically wake up from standby mode to
make the recording. If you plan to leave the Freeview+ box unattended for a long period and
have not set any programmes to record, put the Freeview+ box into standby and wait for 20
seconds before switching it o at the mains.
Automatic standby
To help reduce the amount of electricity it uses, the Freeview+ box will automatically switch to
standby mode at 3am every day, if there has been a period of inactivity. If you are still watching
TV at this time, a screen will be displayed allowing you to stop the Freeview+ box entering
standby mode. If no button is pressed while this screen is displayed, the Freeview+ box will enter
standby mode after a few seconds. It is possible to deactivate this automatic standby mode by
setting the ‘Auto Standby’ option in the ‘Settings’ menu to ‘O’.
Displaying Digital Text
Press the [TEXT] button to display digital text (if available). Press again to exit digital text.
Displaying subtitles
Press the [SUB] button to display subtitles (if available). Press again to switch o the subtitles.
Displaying the screen saver and on screen clock
Press the [SAVER/CLOCK] button to display the clock for 4 seconds. With the clock displayed,
press the [SAVER/CLOCK] again to display the screen saver. Press any button to cancel the screen
saver.
Switching between TV and Radio channels
The Freeview+ box stores all the Digital TV channels together and all the Digital Radio channels
together. Press the [DTV/RADIO] button to quickly switch between Digital TV and Digital Radio
channels.
*Once the remote control has been programmed to operate your TV. Refer to page 28.
12

The Electronic Programme Guide (EPG)
The EPG displays programme information for the next 8 days (when transmitted by
broadcasters). You can also set programmes to be recorded from the EPG.
To Press
Access the EPG... [EPG] button.
Move around the EPG... [v/V/b/B]buttons.
Display the previous nine channels in the list... [RED] button.
Display the next nine channels in the list... [GREEN] button.
Move forward 4 or 24 hours... [BLUE] button.
(Press []to switch between 4 and 24 hours)
Move back 4 or 24 hours... [YELLOW] button.
(Press []to switch between 4 and 24 hours)
View information for the highlighted
programme...
[INFO] button. Press again to return to the
EPG.
Set a highlighted programme to record... [zREC] button. After pressing the [zREC]
button, if ‘Series Record’ is available for the
selected programme you can press the
[BLUE] button to record all programmes in
the series.
Preview a current programme (in the
background)...
[OK] button.
Exit the EPG and switch to a previewed
programme...
[OK button.
Exit the EPG... [EPG] or [BACK] button.
If you accidentally set a wrong programme to record, press the [zREC] button again to cancel.
Current
channel
List of
channels
Date of currently
displayed
programmes
Today’s date
and current
time
Time of
currently
displayed
programmes
Programme
information
13

The Channel List
The Channel List displays all the available channels.
To Press
Access the Channel List... [OK] button while watching TV.
Select channels... [v/ V]buttons.
Display the previous nine channels in the list... [RED] button.
Display the next nine channels in the list... [GREEN] button.
Switch to the selected channel... [OK] button.
Exit the Channel List... [BACK] button.
List of
channels
Highlighted
channel
14

The Info Display
When watching TV, the Info display gives brief information on the current and future
programmes (when the programme information is transmitted by broadcasters). You can also set
programmes to be recorded from the Info display. When watching a recording, the Info display
gives brief information on the recorded programme.
To Press
Access Info for the current programme/
recording...
[INFO] button.
View information for future programmes on
the current channel...
[B]button.
View information for programmes on other
channels...
[v/ V]buttons.
Change the Audio setting (if available)... [RED] button.
Change the Subtitle setting (if available)... [GREEN] button.
Switch to another channel (when viewing that
channel’s information...
[OK] button.
Set a future programme to record... [zREC] button. After pressing the [zREC]
button, if ‘Series Record’ is available for the
selected programme you can press the
[BLUE] button to record all programmes in
the series.
Exit Info... [INFO] or [BACK] button.
Selected
programme’s
details
Today’s
date and
current
time
Selected programme’s start
and end time
Programme
name
Channel
15

Picture In Picture (PIP)
Picture In Picture allows you to watch two channels at the same time. The sound from the main
picture is always played.
To Press
Switch on Picture In Picture... [PIP] button.
Move the PIP screen... [v/V/b/B ]buttons.
Select/highlight the PIP screen.. [PIP] button.
Change the channel displayed in the PIP
screen....
[CH +/-] buttons, when the PIP screen is
selected.
Change the channel displayed in the main
picture....
[0]-[9] buttons. The [CH +/-] buttons can also
be used when the PIP screen is not selected.
Swap the channels on the PIP screen and the
main picture...
[]button.
Exit Picture In Picture... [PIP] button, when the PIP screen is selected/
highlighted.
Picture In Picture is not available when recording programmes.
PIP screen
(highlighted)
16

Recording Programmes
This Freeview+ box has Twin Tuners, making it possible to record two programmes at the same
time.
When recording two programmes at the same time you can also:
- start to playback either of the recordings, even though they are still recording,
- playback a previously recorded programme - watch either of the programmes
being recorded.
When recording two programmes at the same time you can not:
- timeshift/pause live TV,
- use Picture In Picture,
- watch a third TV channel.
There are 4 dierent ways to record programmes:
1. Instant recording
While watching a programme, press• [zREC] to start recording.
Press• [xSTOP] to stop recording.
While the Instant Recording menu is displayed you can press [zREC] to set subsequent programmes on that
channel to record.
2. Recording from the Electronic Programme Guide (EPG)
With the required programme highlighted in the EPG, press• [zREC] to set the recording.
For full details on the EPG, refer to page 13.
3. Recording from the Info display
With the required programme highlighted in the Info display, press• [zREC] to set the
recording.
For full details on the Info display, refer to page 15.
4. Manually recording
You can manually set a recording from the Timers screen.
With the Timers screen displayed, press the [YELLOW] button to manually set a recording.
For full details on the Timers menu, refer to page 20.
The Freeview+ box will record programmes even if the programme is shown later than advertised e.g. due to a previous
programme overrunning. Please note, this is not applicable for timers set manually.
It is safe to put the Freeview+ box into standby mode when you have set programmes to record. The Freeview+ box will
automatically wake up from standby mode to make the recording.
When setting a recording for a programme that is part of a series, an on screen message will prompt you to press the [BLUE]
button to record the entire series (‘Series Record’).
The Freeview+ box will also automatically add 3 minutes to the end of each recording to make sure the entire programme
is recorded. However, if any subsequent recording starts during those 3 minutes, then the rst recording will be stopped to
allow the new recording to commence.
17

Recording Programmes
Your Freeview+ box can record up to two programmes at the same time.
If you attempt to record three or more programmes which overlap, you will be asked to either
select an alternative time to record the programme (Resolve conict) or cancel the recording
request you have just made (Cancel timer).
You will then be presented with a list of all the programmes which overlap.
If one of the programmes is repeated later in the week then, when it is highlighted, the box will
give you the option to press the Green button (Alternative) to record the repeated programme
instead. If none of the programmes are repeated, simply delete one of the planned recordings
by pressing the Red key (Delete).
18

Pause Live TV
Pausing live TV lets you pause a broadcast programme and continue watching it later. The
maximum length of time you can pause is 2 hours.
Pausing live TV
Press [X]to pause live TV. Press [B]to resume.
When live TV is paused, a timer banner is displayed indicating how long the programme has been paused.
The length of time you can pause a programme for can be adjusted in the menu. See‘Pause Buer Size’on
page 27.
Rewinding live and paused TV
Press [j]to rewind live TV. Press [B]to resume.
You can press ja further 3 times to rewind faster.
Fast forwarding paused TV
Press [J]to fast forward pause TV. Press [B]to resume.
You can press Ja further 3 times to fast forward faster.
Watching in slow motion
Press [X]to pause live TV or a recording.
Press [J]to watch in slow motion. Press [B]to return to normal.
Stopping pause
Press [xSTOP].
Timer
banner
19

The Timers Screen
The Timers screen displays all the programmes that are currently set to record. You can also set a
manual timer and modify or cancel an existing timer from the Timers screen.
To Press
Access the Timers menu... [TIMER] button.
Select a timer... [v/V] buttons.
View additional pages of timers (if available)... [b/B]buttons.
Delete the selected timer... [RED] button. If the timer selected is for a
series you will be asked whether to delete all
timers in the series or just this instance.
Modify the selected timer... [GREEN] button (see next page for more
details).
Manually set a timer... [YELLOW] button (see next page for more
details).
Show all timers currently set (including all
‘Series Record’ programmes) ...
[BLUE] button. Press again to display a
summary of all timers currently set.
Exit the Timers menu... [TIMER] or [BACK] button.
List of
timers
Today’s
date and
current
time
Size of
current
recordings
(approx)
symbol
indicates that
Series Record
is set
Size of
current
timers
(approx)
symbol
indicates
that the
timer is set
to repeat
Available
recording
space
(approx)
symbol
indicates
that the
timer is
protected
from
deletion
20
Table of contents
Other TVonics DVR manuals