Securefast AML2C User manual

T/AML2C/080
28th November 2019
Before Setup
Remove the Backplate from the Doorbell, unclip the baery
cover and remove the baery.
There is a clear plasc lm over the top of each baery.
Remove the lms and replace the baeries.
Connect the supplied USB Lead to the device and charge for 8
hours.
(This will require a 5V USB Mains Plug—not supplied)
Important: The product may power up when the baeries are rst
inserted; however, the device will not funcon correctly during the
installaon procedure unless it has been fully charged.
Download the iCSee App (NOT iCSee Pro) to your phone by
searching in the App Store or by scanning the QR Code below.
Turn o Mobile data (3G/4G) and connect to the available Wi.
Important: When seng up the iCSee app you
should allow any permissions it requests as
declining them may prevent the app from
funconing correctly; the screenshot displayed
on the le shows what permissions are
required.

T/AML2C/080
28th November 2019
Blue light solid - Startup
Blue light ashing - App remote monitor and setup
Red light ashing - Low baery
Doorbell Light Indicators
1) Registering for an Account
N.B: Local Login will allow you to have Temporary Access to the App as a Visitor- you can set up
devices but you will not have access to all the funcons.
a) Tap on “Sign Up” and complete the elds with the required informaon
Username – Must be unique. If rejected try a dierent one
Password – You will be prompted for the right number of upper case, lower case and numbers
Conrm password – Must match above
Email address – Used to reset passwords and for registraon
b) Tap on “Get Code” buon
c) Input the code you receive via email
d) Agree to the privacy statement
Camera
RESET
Buon
Bell Buon
Microphone
PIR Sensor
Indicator
USB Charging
Port
Micro SD
Memory
Card Slot
T/AML2C/080
28th November 2019
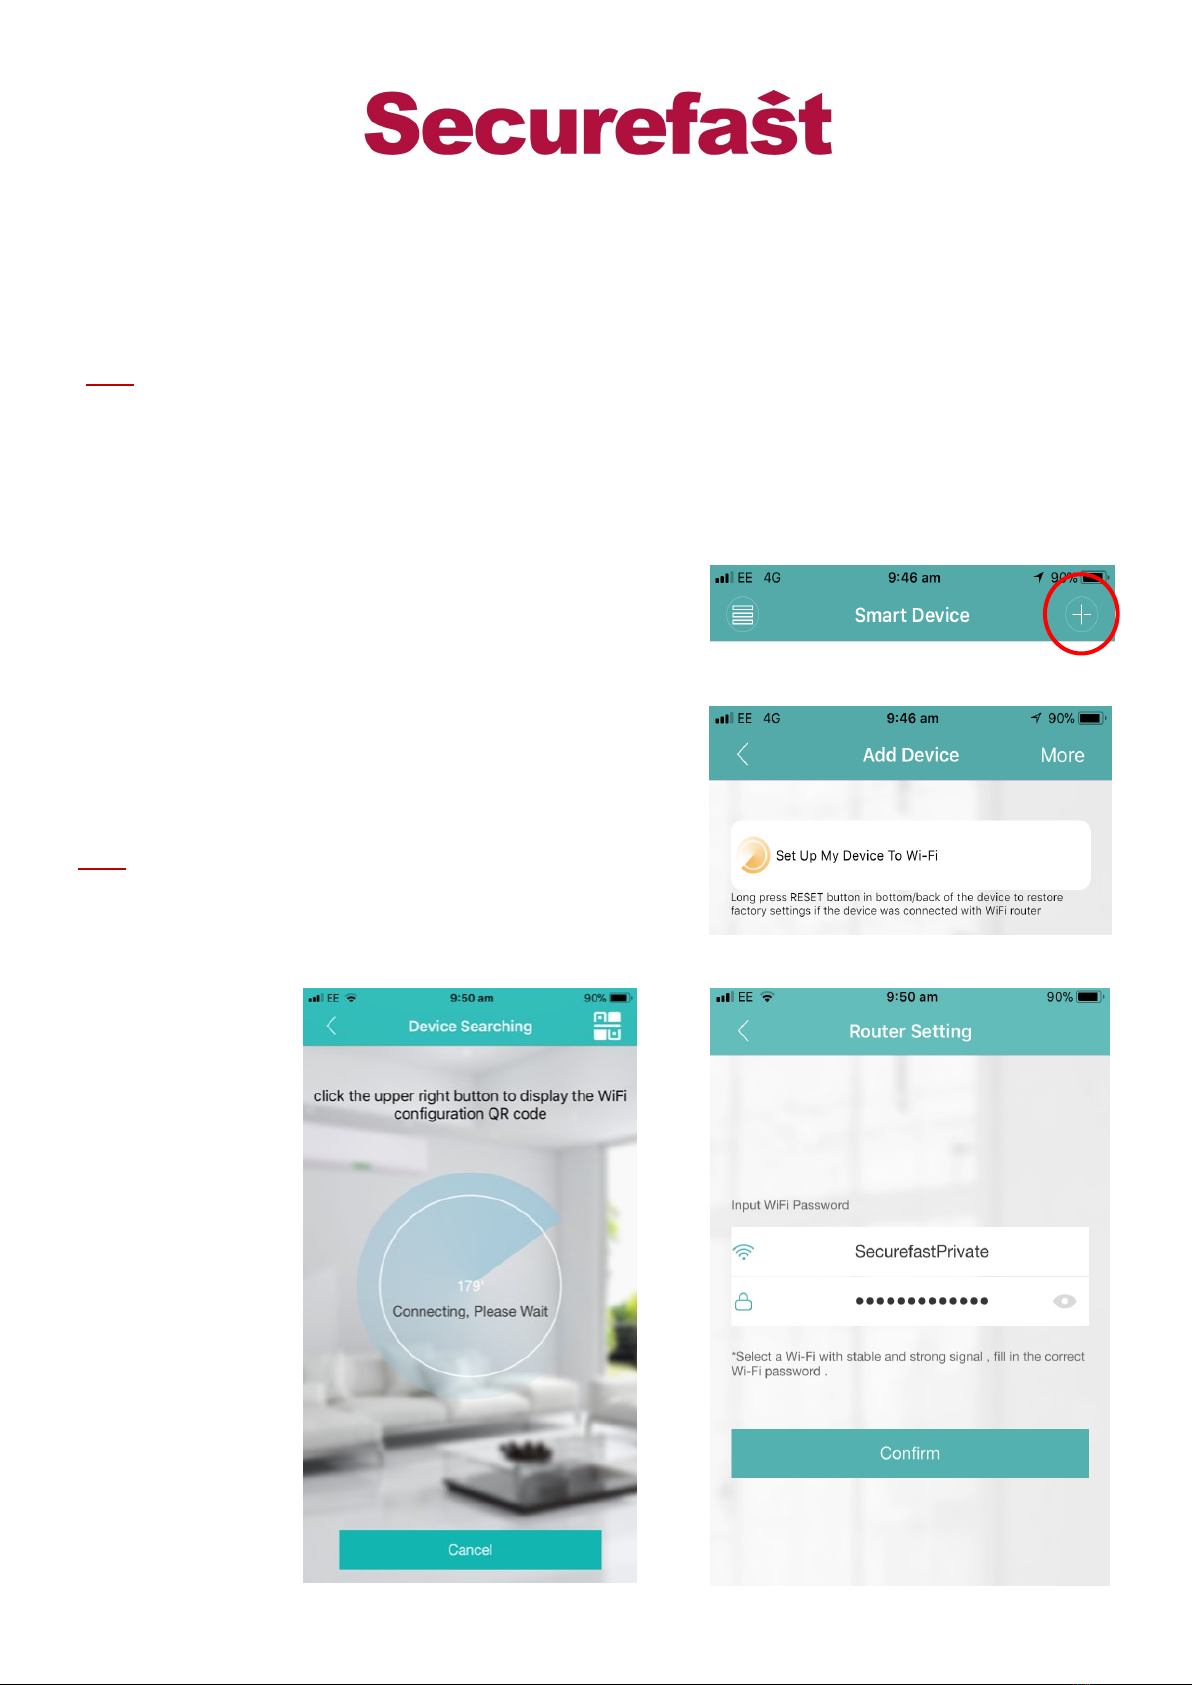
2) Add a device
Aer charging the device for 8 hours press the Bell Buon to wake-up the Doorbell. The voice
Prompt “Wait to be congured” should be heard before proceeding to adding the device as
below.
N.B: If the above voice prompt is not heard wake-up the Doorbell, using the Bell Buon, then press
and hold the RESET buon. Release the reset buon when the voice prompt “Restore factory
sengs please don’t power o” begins.
Once the device is reset to its default conguraon the voice prompt “Wait to be congured”
should be heard when waking the device.
a) Open iCSee and register for an account if you
haven't already.
a) Tap the add symbol on the top right of the screen
b) Select “Set Up My Device To Wi Fi”
c) Input the name and password for the Wi Fi network
you are connected to, this is the one that the device
will connect to.
d) You will then be directed to the search screen
N.B: On the search screen a QR code can be displayed if you
tap the icon in the top right corner. Displaying this QR Code
to the Doorbell’s Camera can speed up the
Conguraon process.

T/AML2C/080
28th November 2019
e) When the device has successfully connected it will prompt you by saying “ Connected to
router successfully” you will then be asked to set a password for the device.
f) When the password is set you will be asked to give the device a name, this is what it will
appear as in the app.
g) You will be directed to the devices screen where you can view the device state and select
to view its feed.
Further Informaon
The device has an esmated baery life of 6 months based on
10 minutes of operaon a day. The unit will enter a “sleep”
state to conserve baery; to “wake” the device, remotely,
simply tap the feed of the device you want to wake.
If a device goes “oine” pull the screen down on the device
page to refresh the feeds
To enable the camera to record events a Micro SD Memory
Card must be inserted into the device, the card may require
formang. This can be done by going on to the Device’s
Sengs and then “Storage Management” and then tap
“Format SD Card”
N.B: When the memory card is full new recordings/images will over-
write the oldest recordings/images.
front door
T/AML2C/080
28th November 2019
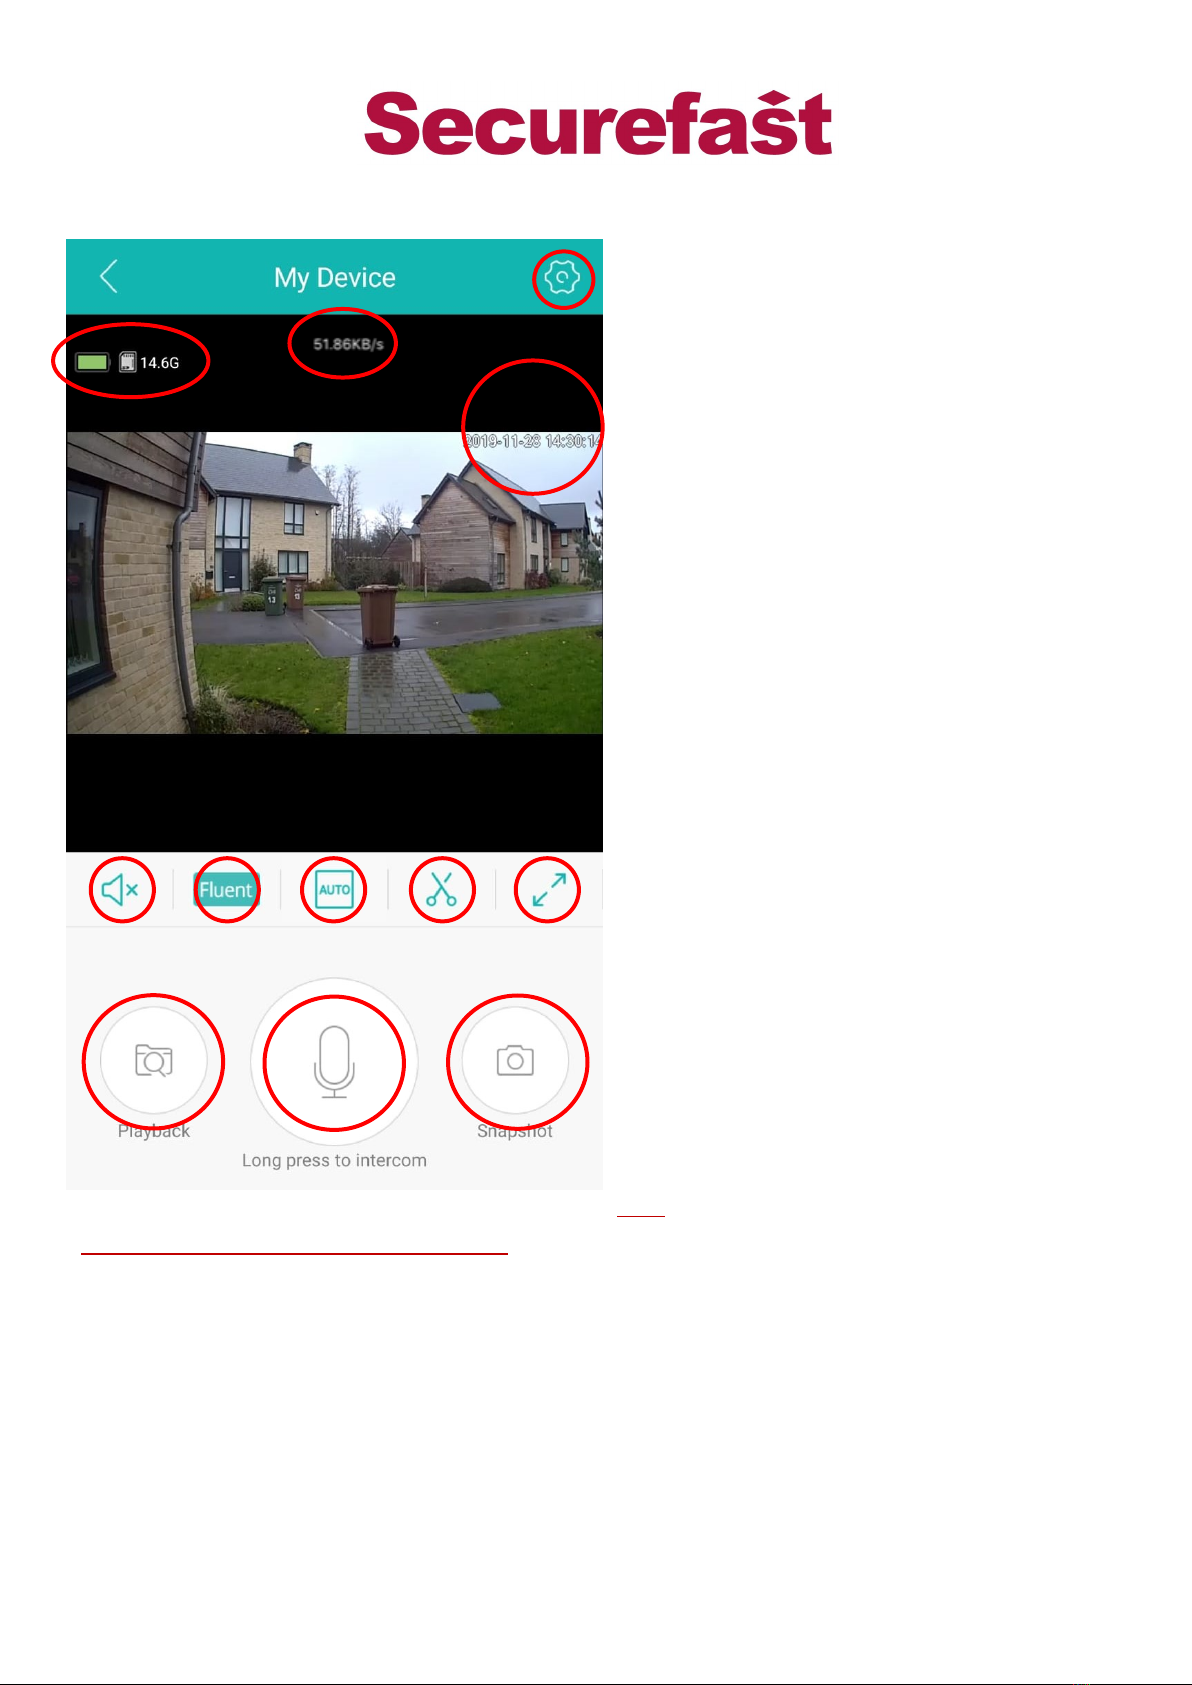
3) Features of the app
1) Data connecon speed
2) Signal strength and date/me
3) Baery/SD card status
4) Mute/unmute buon, allows you to hear
sound from the doorbell
5) Video quality FHD/SD, allows you to change
between high and standard denion video
6) Screen resoluon
7) Record video (4 seconds minimum) you can
then share the recording to others via the
pop up on the feed stang “Interesng Vid-
eo, click here to share”
8) Fullscreen
9) Playback feature. This allows you to play
back recorded videos and photos from local
storage or the cloud service. *For local stor-
age a Micro SD card (not included) needs to
be inserted into the camera
10) Intercom- Press and hold this icon to speak
through the doorbell via the app
11) Screenshot an image of feed you can then
share the recording to others via the pop up
on the feed stang “Nice Picture, click here
to share”
12) Sengs buon to access and congure
various features of the device.
N.B: Changes must be saved to be eecve
Avoiding excessive moon detecon alerts
If the alerts/nocaons from the PIR moon detecon are causing an issue do not turn o the “Alerts”
under “Alert and Message” or the Doorbell will not call your phone when the Bell Buon is pressed.
You can turn o the PIR moon detecon funcon by turning “Human Detecon” o and saving the
seng. This will enable you to receive calls but not get the constant alarms.
You can also set Time Periods that the PIR moon Detecon will be acve i.e if your device sends false
alerts when the sun shines directly on it between 3-4pm then you could set Time Periods of “Start 16.00”
and “End 15:00”so the PIR Moon detecon is not operang between 3 and 4 pm. (Days of the week this
is applicable can also be congured)
Alternavely, you can also increase the “Hover Detecon Time” and “Message Push Interval” in
“Advanced Sengs”. This will not only prolong baery life but will also rene the events that can cause
unnecessary alerts/nocaons from passing/irrelevant triggers.
1
548
2
67
910
3
11
12

T/AML2C/080
28th November 2019
5) Sharing or Adding Addional Devices
a) To add an addional device simply repeat the procedure aer
tapping the “+” icon
b) To add a shared device you must select the “Add Shared De-
vice” and input the Serial Number or Scan the QR Code of the
device being shared. Both can be found under the Device’s
Sengs and “About”.
c) To send a share invite via whatsap, text or email, click the share
icon under the device feed and select the relevant opon and
individual’s contact details. This will send the individual a link
with the serial number informaon that can be copied and
pasted in to the eld on the add shared device screen below .
N.B: You will also need the password the device was inially set up
with to successfully install a shared device and access the
device feed.
4) Installing the Device
Important: The Doorbell should be posioned to prevent excessive exposure to direct sunlight as this
could negavely aect the performance of the PIR moon detecon sensor.
a) Decide on device posioning considering the above; the unit is supplied with wood screws, wall
plugs and 3M double sided backing to suit a variety of installaons; therefore, select the most ap-
propriate method to x the Backplate of the Doorbell in the desired locaon.
b) Once the Backplate is mounted place the Doorbell on to it and secure the two together via the
hole in the base of the doorbell using the supplied machine screw and a Philips head screwdriver.

T/AML2C/080
28th November 2019
6) Further Informaon and Frequently Asked Quesons
The Doorbell will emit a sound when the Bell
Buon is pressed to inform the person ringing the
Doorbell that the Device has registered the buon
being pressed. To turn this feature o, you will need
to turn on “Device Hints” under “Alert and Mes-
sage”.
To alter the order your devices appear on your
device feed tap the buon in the top le corner
to alter the view and list your devices. If you then
tap the icon with an upward arrow next to the “+”
for add new device. You can now move and
rearrange the order of the devices using the 3
lines next to each device feed.
What GB Memory Card can this device support?
The product is compable with a Micro SD card up to 32 GB.
Why is my device oine/wont wake up?
Have you refreshed the device page by pulling the screen down and releasing?
The Device may have low baery and need charging.
Check other products on your Wi to determine whether your Wi is working.
Does the Wi have adequate signal strength where the Device is located? Try moving the
product closer to the Wi router to check this.
Reset the Device and recongure to Wi if all opons have been exhausted.
How do I congure the Doorbell to a dierent Wi Network?
The Device must be woken up using the Bell Buon and then RESET by holding the Reset buon on
the reverse unl the voice prompt “Restore factory sengs please don’t power o” begins.
Why does the Doorbell not respond when the Reset buon is pressed?
Have you woken the Doorbell using the Bell Buon rst? Are you holding the Reset Buon for at
least 5 seconds? If yes, remove baeries and let the unit power down, reinsert baeries let the unit
power up and congure to Wi and then try again.
T/AML2C/080
28th November 2019
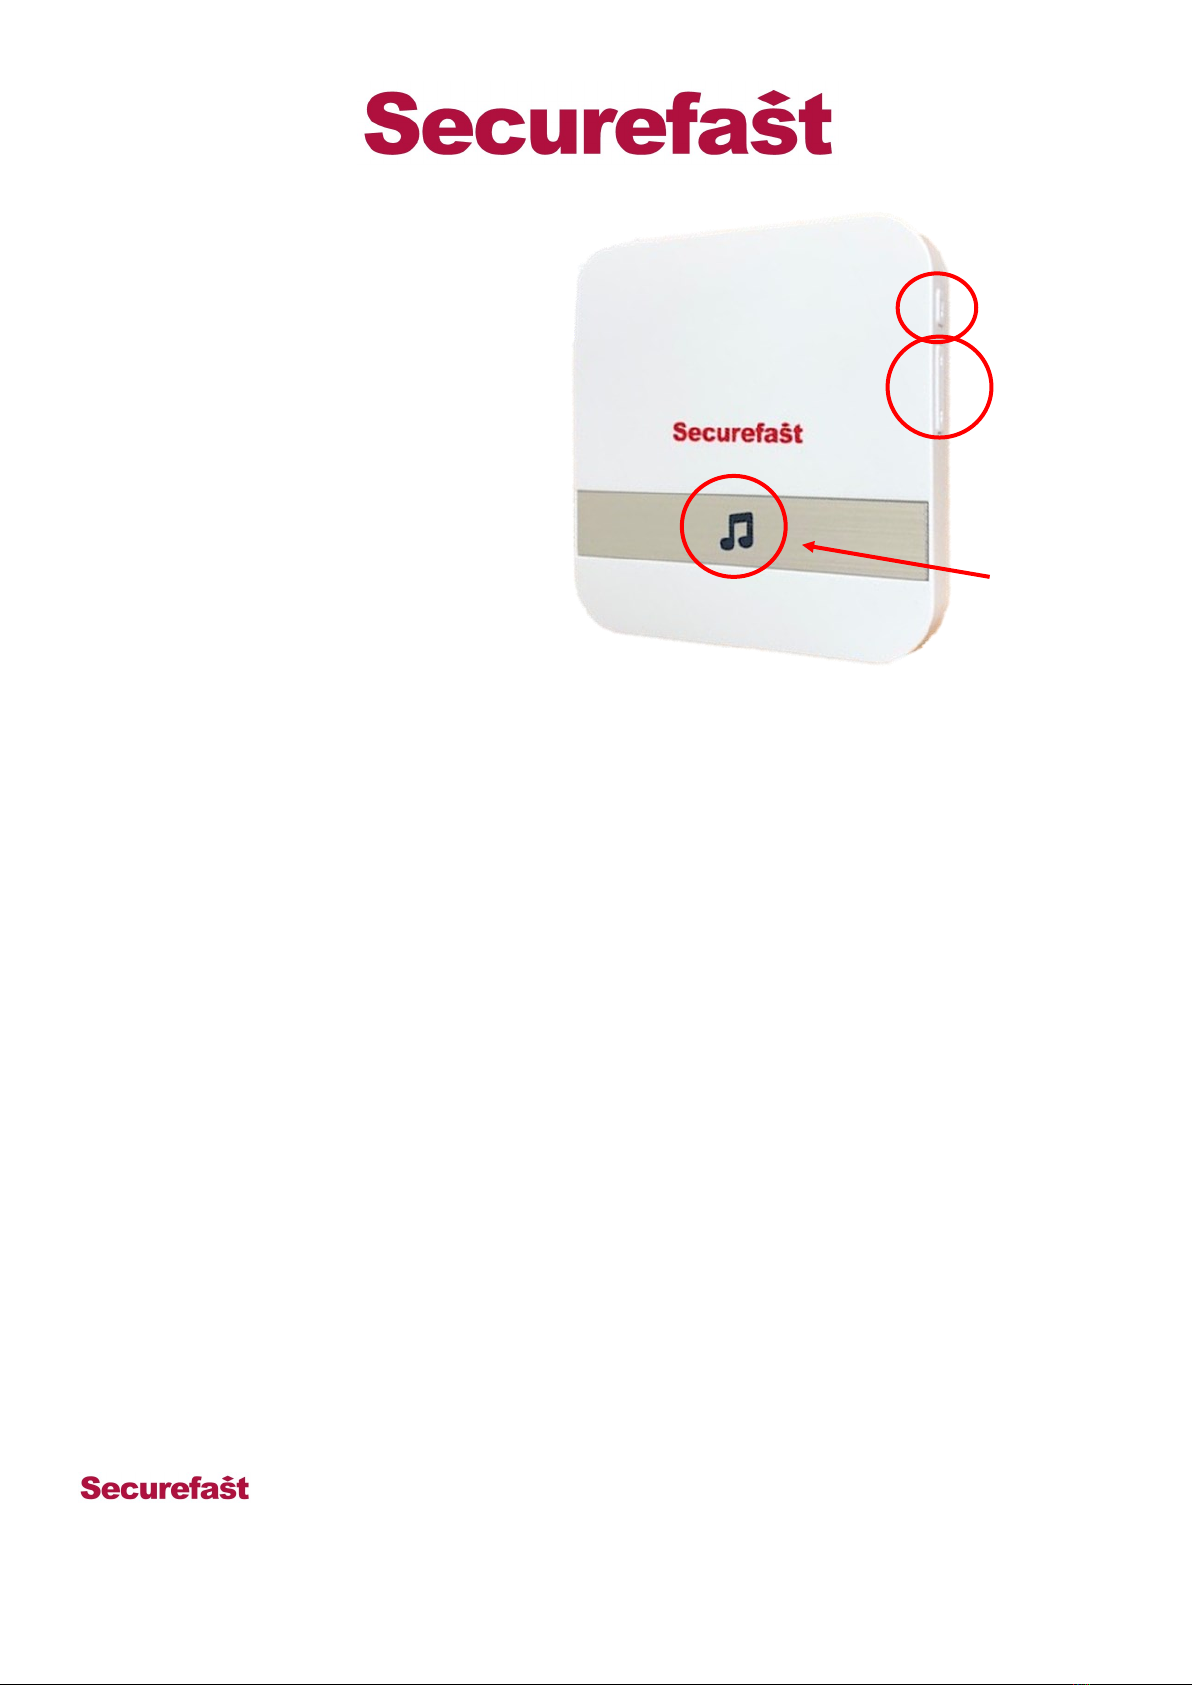
8) Features of the Chime
Sound Selecon
The Chime has a library of 52 dierent sounds, to select a sound simply press the selecon buon to
cycle forwards and backwards through the library unl you nd the one you like.
If you decide you want to change your Chime you must repeat the process of Seng up the Chime
Volume
Press the volume buon to cycle through four levels of volume, the lowest being silent.
Connecng Mulple Doorbells
To connect mulple Doorbells simply repeat the connecon process for each doorbell required
Connecng Mulple Chimes (Max 5)
Repeat the above process on each chime to be paired with the doorbell
Dierent Sounds For Dierent Doorbells
Simply choose a sound and connect a Doorbell, then choose a dierent sound and pair the next Doorbell
Clearing The Chime’s Memory
To clear the chime’s memory un-plug it, then hold the volume buon whilst plugging it back in and
connue to hold it unl the light blinks (approximately 10 seconds).
Unit 6, Cedars Business Centre, Avon Road,
Cannock, Staffordshire, England
WS11 1QJ
Tel: +44 (0)1543 501 600 Sales: +44 (0)1704 502 810 Email:[email protected] Web:www.securefast.co.uk
Volume buon
Indicator
Select buon
7) Seng up a Chime
a) To set the chime up plug it into a mains
socket
b) Use the select buons to cycle through
the Chime library and stop when you
have found a Chime you like.
c) Hold down the volume buon unl the
indicator is a solid blue
d) Press the buon on the doorbell and the
chime will begin playing the sound
indicang a successful connecon.
a) Press the doorbell buon again and it
will play the selected sound
Table of contents
Popular Accessories manuals by other brands

Thermo Scientific
Thermo Scientific 8000DH Series manual

Action Sports
Action Sports S001264DC-2 Assembly, Installation, Care, Maintenance, and Use Instructions

HBM
HBM WTX120 operating manual

Focusrite
Focusrite Scarlett Solo user guide

OnRobot
OnRobot HEX-E v1 user manual

Skov
Skov DOL 68 Technical user guide


