Security Boss MaxSeal User manual

INSTALLATION INSTRUCTIONS
Congratulations on your purchase of a
MaxSeal Door by Security Boss®.
The following is a step by step guide for
installing your Security Boss® product.
A SAFETY REMINDER!
Always wear eye protection and gloves
when appropriate.
The package you received should contain:
Security Boss MaxSeal Pet Door®
(Inner frame and outer frame)
(Wall Mount models include an attached tunnel)
Insulated Security Panel with Replacement Rivets
1/2" #6 Phillips Head Screws
1/2" #6 Security Screws for tamper proof installations
7/64” Drill Bit
Allen Wrench
Indoor Outdoor Carpet (Wall Mount models only)
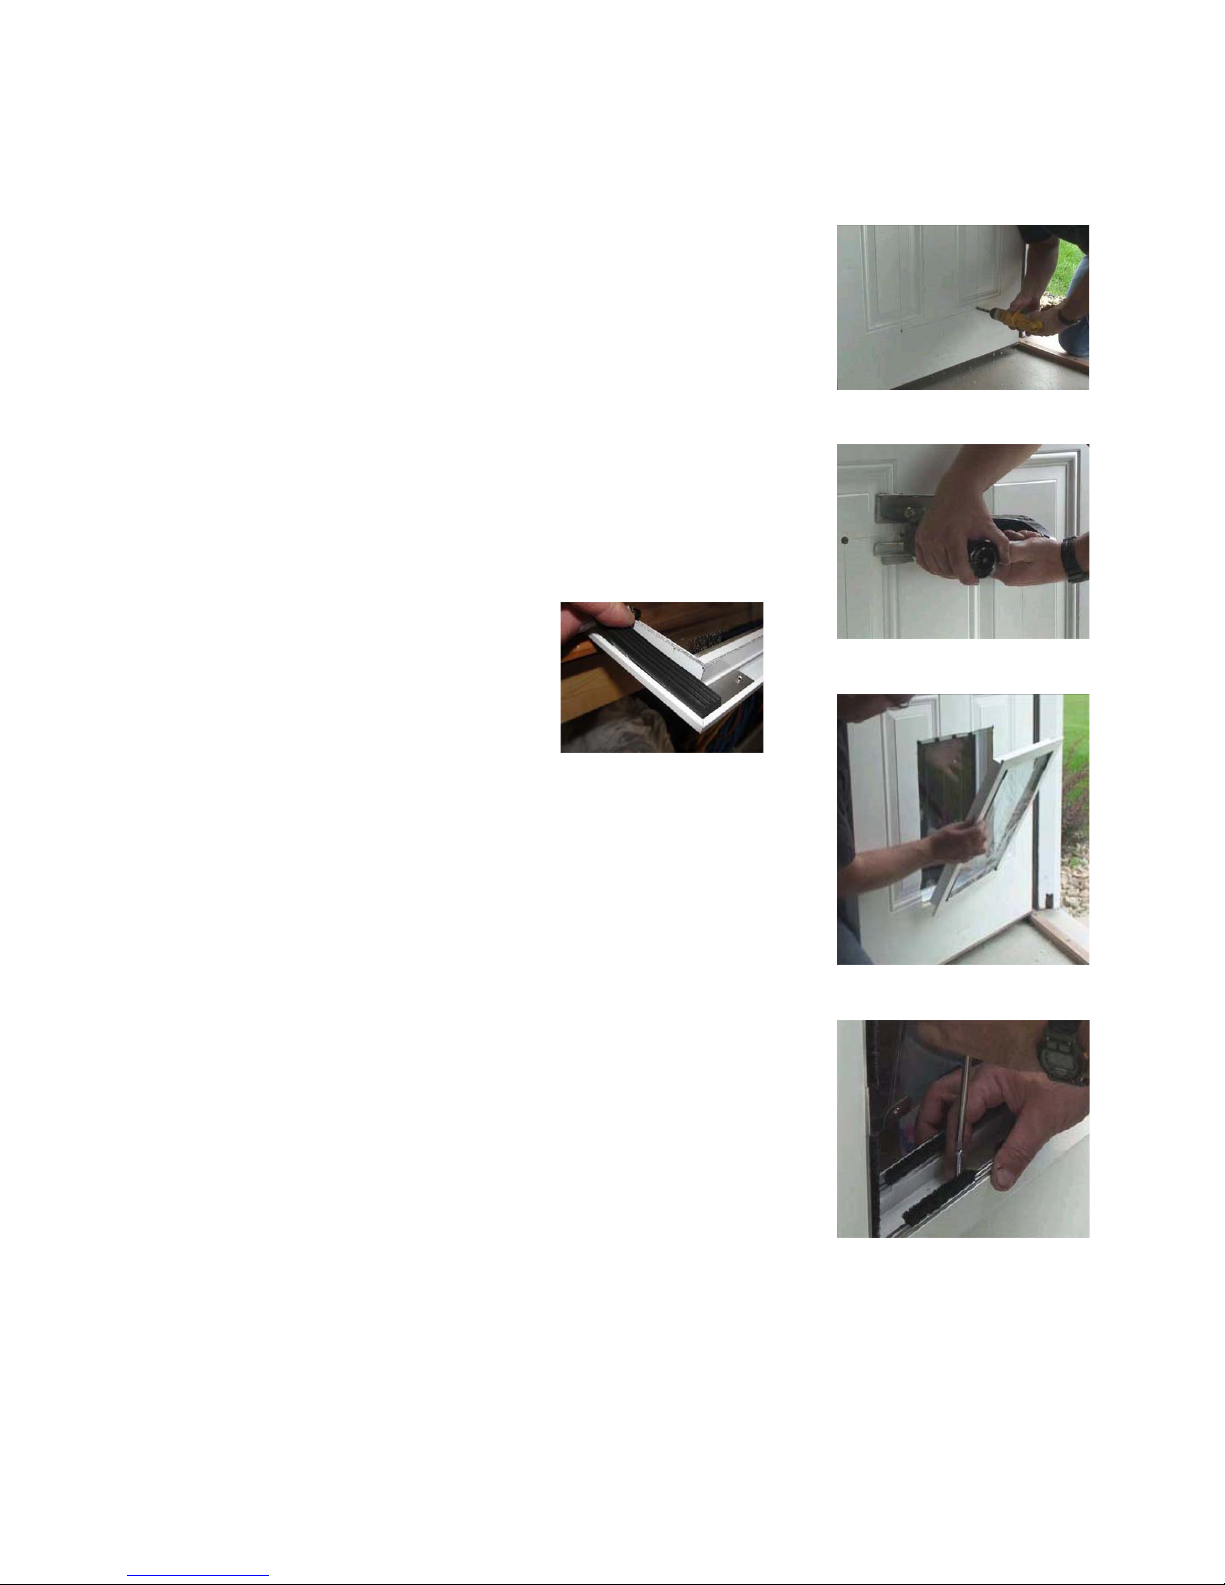
Foam Tape (Storm Door model only)
Tools you may need:
(Will vary depending on your particular type of installation)
Saw (Reciprocating or Jigsaw)
Pencil
Electric Drill
(Drill Bit large enough to create
a “start” hole for the saw)
Level
Caulk or Silicone Sealant
Phillips Head Screw driver
Standard head screw driver (for Security Screws)
Drywall saw
Utility knife
Scissors or snips
Circular saw with wood or masonry blade
5/16” masonry bit (if installing in concrete)
Masking tape
Tin snips
Stud finder
Tape measure
Section A: Pet Opening Installation (For French Door Models skip to Section C)
Step 1: Be sure that you have ordered the correct size door for your pet. For long term use it is
best to install the pet door so that the top of the door is about 1.5 -2 inches taller than your
pet’s shoulders. The resulting bottom of the opening should be a comfortable step over
height.
Step 2: Check the package you received to make sure that it contains all the necessary parts.
Step 3:Find a suitable area for your pet door. Make sure there is adequate room for removal of the
Insulated security panel that lifts out vertically (side loaded panel MaxSeal models are available).
(On some storm doors the door closer may need to be repositioned)
When installing a Door model, try to position the location of the rough opening such that it is no
closer to the edge of the door than 3" to maintain structural strength within the door. The MaxSeal
frame fits doors 1-1/4" to 2" thick. (Storm Door models have a range between 7/8" and 1-1/4".)
For Wall models check both sides of the wall to make sure the area you cut is free of wiring,
plumbing, or any other obstructions. To install in a framed wall mark the stud locations and
position the pet door between the studs.
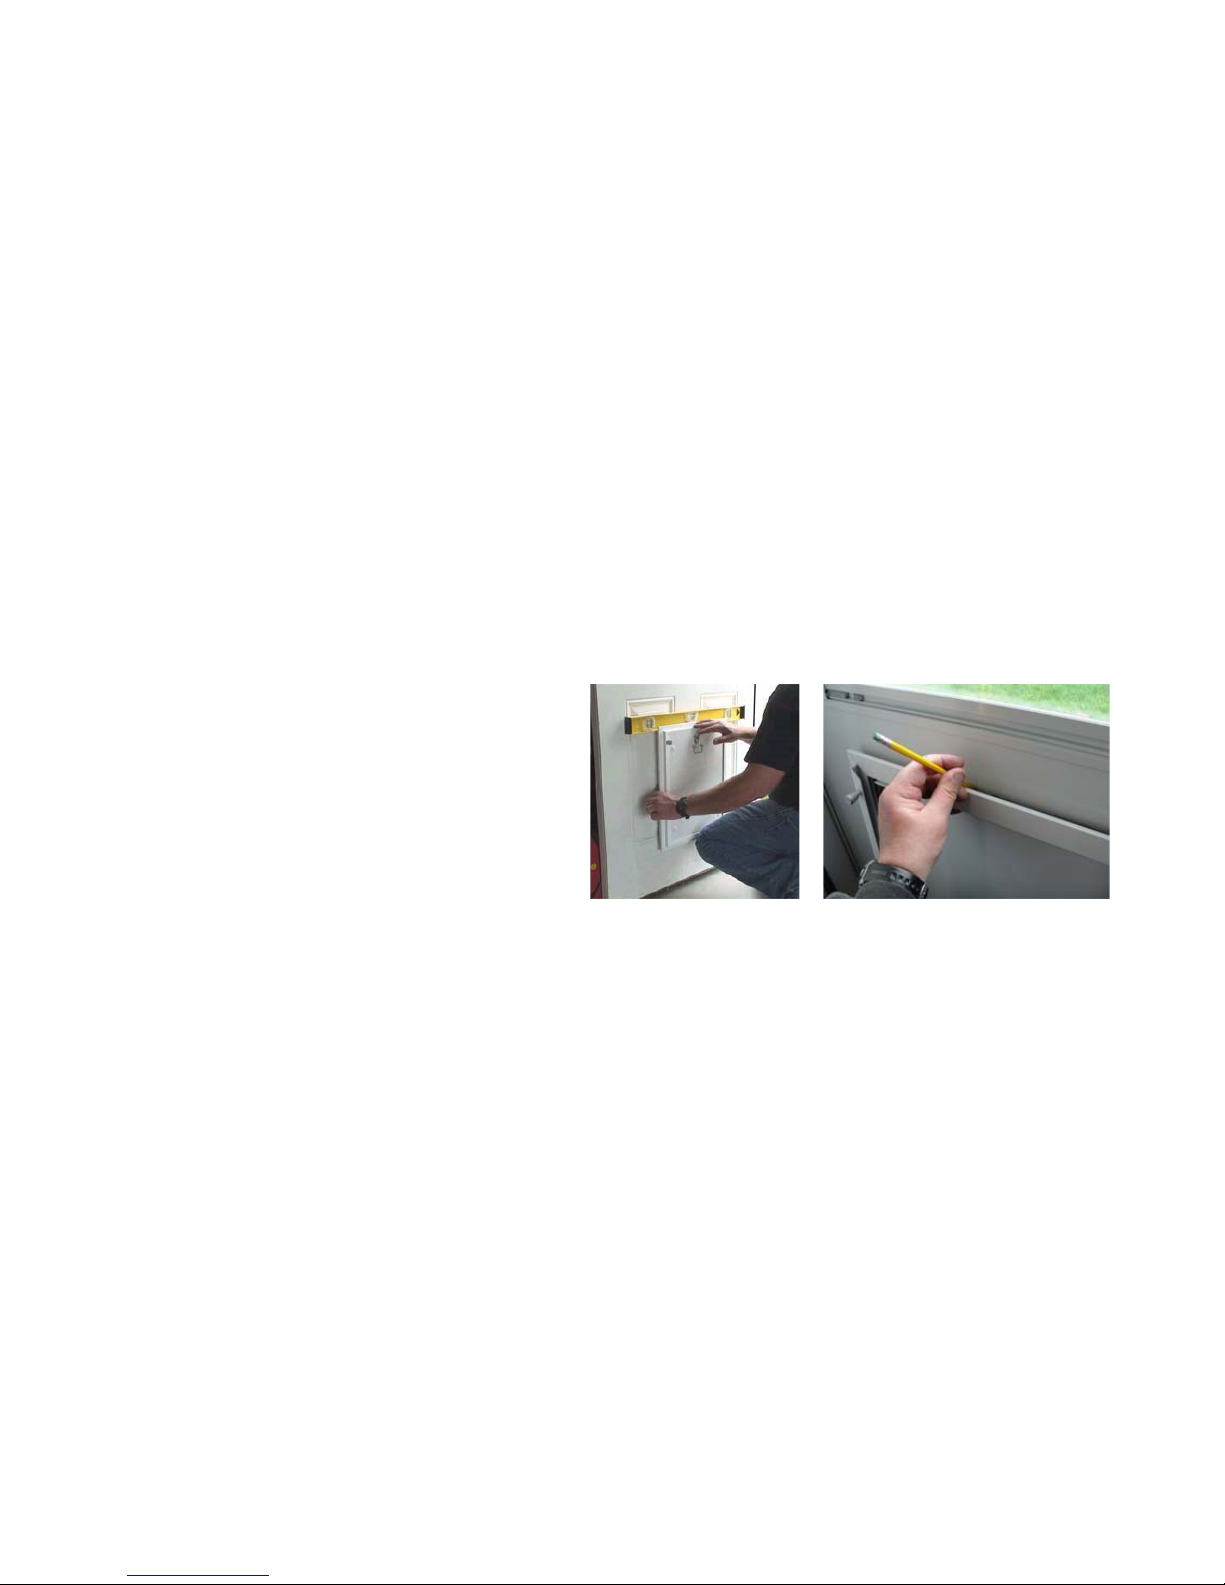
Step 4: Trace the mounting flange of the
pet door using a pencil. Use the dimension
of the flange perimeter to determine the
dimension of the rough opening. For a wall
mount model position the MaxSeal tunnel
against the interior wall. Trace the
perimeter of the tunnel upon the wall.
Check the dimension of the wall marking
against the measurements of the tunnel.
You may also make a template with the
rough-cut information for your size pet
door, and then trace from the template on
the door or wall.
Make sure your opening is square and
level.
These measurements are exact
dimensions, you may add slightly
depending on the accuracy of your cut.
For wall models we recommend that you
use the rough-cut information as
sometimes the outer perimeter of the
tunnel can vary. You may have to add
1/8” to these measurements.
Rough-Cut dimensions based on door sizes
Pet Opening Size (wxh)
Rough Cut Required (wxh)
Small (6" x 7 1/2")
Small/Medium (7" x 9")
Medium (9" x 12")
Large (11" x 16")
Tall (11" x 20")
Tall grand (11" x 25")
XL Grand (12" x 24")
Wide Tall (15" x 20")
Mammoth (15" x 24")
Behemoth (15 3/4" x 32")
8" x 9 3/16"
9" x 10 11/16"
11" x 13 11/16"
13" x 17 11/16"
13" x 21 11/16"
13" x 26 11/16"
14" x 25 11/16"
17" x 21 11/16"
17" x 25 11/16"
17 3/4" x 33 11/16"
For Wall Mount Models skip to Section B
Step 5: WOOD DOORS: For wood doors, drill out two corners
diagonal from each other using a 7/8” paddle bit or a 5/16” regular
bit. If you use a regular bit, drill three holes close together then
elongate the holes until you have connected the three holes. This will
allow insertion of the reciprocating saw blade. Cut out the rough
opening along the traced lines.
METAL DOORS: For metal doors, follow the above directions for
wood doors, using an appropriate blade made for cutting metal.
Step 6: Separate the Interior and exterior door frames. Remove the
Insulated Security Panel from the inside frame.
Storm Door model only
Optional: Attach the included
foam tape to the surface of the
exterior frame that touches the
painted storm door surface. If
your storm door that is thinner
than 7/8”, this foam tape creates
a tighter fit and will support sealants.
Step 7: Put the inner frame (the one with the insulated security panel)
into the rough opening in the people door. Snap the outside frame
into MaxSeal door and sleeve the pet door frame together.
Step 8: Using the pre-drilled pilot holes and supplied drill bit, drill
and insert one screw. Make sure the door is level. When level, tighten
the inserted screw. Affix remaining screws into place using the pilot
holes as guides. (Security Boss Manufacturing has included One-Way
Security Screws as well as Philips head screws to give customers a
Tamper-proof option in their door installation.)
Step 9: Once the pet door is installed you can fill any gaps or seal the
edges with caulking if desired.
Step 10: The Insulated Security Panel will slide into place and fasten
with the dead bolt pin lock.
Section B: Wall Mount Installation (continued)
Step 5: Cut a small hole near the center of the traced outline in step 4. Look for obstructions within the
wall. The smaller the opening the easier the repair should obstructions be found. Use your hand to feel
for any obstructions that may not have been seen.
Step 6: If there are no obstructions then cut the inside wall on the lines traced in step 4. Use a drywall
saw or utility knife. Once the interior lines have been completely cut, remove the drywall and
insulation from the opening.
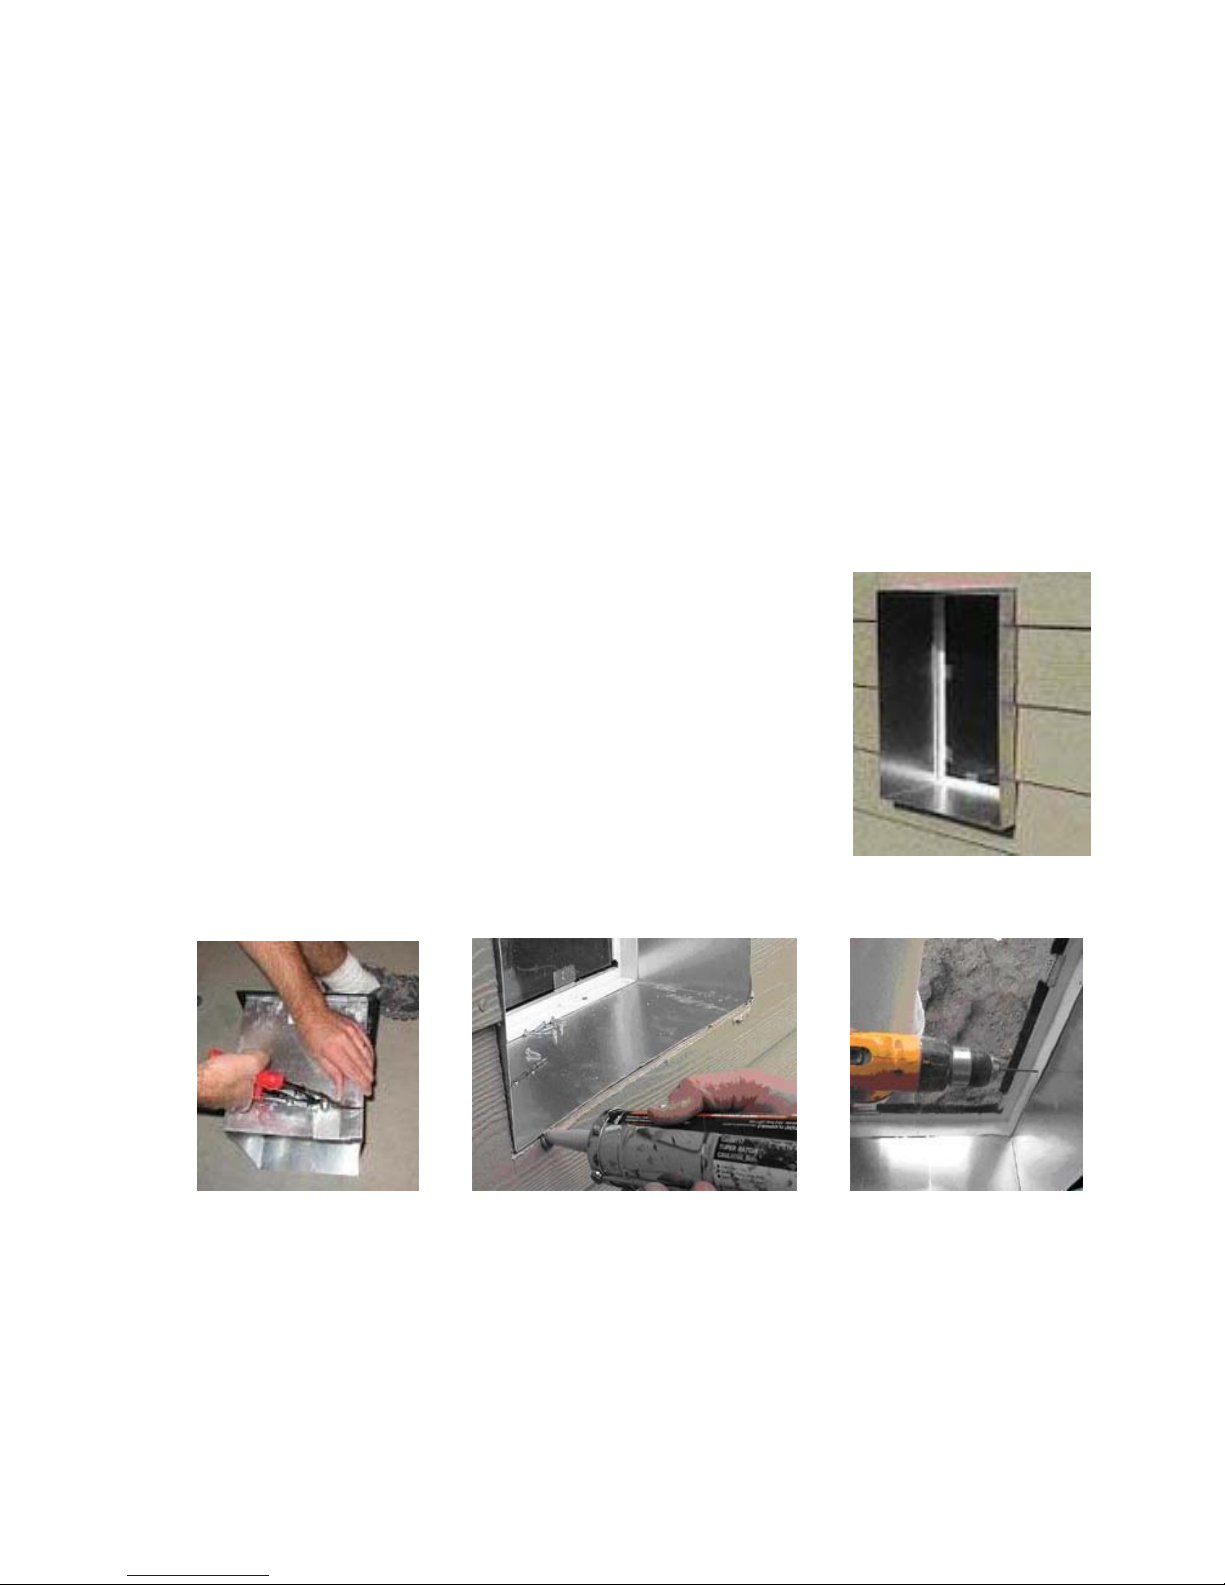
Step 7: At each corner of the cutout, use a long drill bit to drill through the exterior fascia. Use a
Masonry bit for stucco or stone exterior construction.
Step 8: On the exterior wall, find the corner holes you drilled in Step 7 and draw your tunnel outline
on the wall. Make sure your opening is square and level.
Step 9: Drill two additional holes at each corner that are on the tunnel outline.
Elongate these holes so you can insert a reciprocating saw blade.
Step 10: Use a reciprocating saw to complete the exterior cutout
of the opening.
Step 11: Place the inside frame with attached tunnel through the wall
cutout. From the outside, hold the inside frame tight against the wall
by reaching through the door opening. Mark the tunnel with a marker
along the outside wall.
Step 12: Remove the interior door frame and tunnel from the hole.
Cut the tunnel along the marked lines in step 11 with tin snips to make
the tunnel fit your wall thickness.
Step 13: Insert the inside frame and tunnel back into the opening. Caulk around trimmed tunnel. Then
from the exterior, Sleeve the outside frame into the tunnel. Use the supplied drill bit to drill through
the pre-drilled holes into the tunnel. Insert supplied screws into the drilled holes. The number of side
screws varies with the size of pet door. (Security Boss Manufacturing has included One-Way Security
Screws as well as Philips head screws to give customers a Tamper-proof option in their door
installation.)

Step 14: Caulk between the outside frame and the outside wall at the top and both sides. DO NOT
CAULK AT THE BOTTOM OF THE OUTSIDE FRAME. This will restrict the drainage of moisture
from inside the door.
Step 15: Measure the width of the tunnel between the door frames and cut the included carpet to the
correct width and length to cover the distance between the door frames. Use silicone adhesive to keep
the carpet in place. Press the carpet into the bottom of the tunnel first, and then attach it to the sides of
the tunnel.
Section C: French Door Installation
Step 1: Be sure that you have ordered the correct size door for your pet. For long term use it is best
to size the pet door so that the top of the door is about 2 inches taller than your pet’s shoulders.
The resulting bottom of the opening should be a comfortable step over height.
Step 2: Check the package you received to make sure that it contains all the necessary parts.
Step 3: Select the pane of glass in the French door you plan to mount your MaxSeal® pet door. Make
sure there is adequate room for removal of the Insulated security panel that lifts out vertically (side
loaded panel models are available).
Step 4: Remove the molding around the selected pane of glass where you want to install the pet door.
If you are removing more than one panel of glass, remove molding around this area.
Step 5: Remove the pane of glass and re-attach the molding in same location as removed in Step 4.
Step 6: Now you are ready to install the pet door into the glass opening. Separate the interior and
exterior MaxSeal door frames. Remove the Insulated Security Panel from the inside frame.
Step 7: Put the inner frame (the one with the insulated security panel) into the glass opening in the
French door. Put the outside frame into the inner frame from the other side of the opening and sleeve
the two frames together until seated against the French door molding surface.
Step 8: Using the pre-drilled pilot holes and supplied drill bit, drill and insert one screw. Make sure
the door is level. When level, tighten the inserted screw. Affix remaining screws into place using the
pilot holes as guides. (Security Boss Manufacturing® has included One-Way Security Screws as well
as Philips head screws to give customers a tamper-proof option in their door installation.)
Step 9: Once the pet door is installed you can fill any gaps or seal the edges with caulking if desired.
General Use Information:
The Insulated Security Panel will slide into place and fasten with the dead bolt lock. When removing
the Security Panel from the unit, apply a slight inward pull to the panel handle while lifting. Since the
panel is tight fitting in the channel, this pulling pressure will ensure that the panel rivets do not catch
on the frame of the unit. Use vinegar or window cleaner and a soft towel to clean the flaps.
The dead bolt is retracted by pulling on the handle and turning the handle clockwise, or right,
approximately a quarter of a turn. To lock the deadbolt, continue to turn the handle of the deadbolt

another quarter turn and the lock will extend into the locked position under spring tension. DO NOT
TURN THE HANDLE OF THE LOCK COUNTER CLOCK WISE OR LEFT, AS THE LOCK WILL
LOOSEN AND NOT WORK.
Maintenance:
Replacement rivets have been included with your hardware kit should the ones on the MaxSeal
Insulated Security panel work loose. Install by pressing the two pieces together from opposite sides of
the panel in the pre-drilled holes. The Thumbscrews that attach the flaps are factory tightened.
Through use, the thumbscrews occasionally loosen and therefore should be checked regularly for
tightness. Retighten the thumbscrews using the included Allen wrench.
The magnets on all MaxSeal doors are adjustable. This allows a precise seal no matter the weather or
size of the flap throughout the years. The magnets are positioned in the frame with a pressure fit. The
Magnet is held by an aluminum carrier that can slide in and out of the painted frame rail. The best
way to lift the magnet is by using pliers to lift the magnet out of the frame rail. BE SURE TO
COVER THE MAGNET AND CARRIER WITH A TOWEL TO PREVENT SCRATCHING OF
THE FRAME AND CARRIER. Only lift the magnet the minimum required to make the magnet
touch the strike plate on the flap. If the Magnet Carrier becomes loose within the frame after
adjustment, completely remove the aluminum carrier and gently pry the two legs at the opposing end
apart slightly with a screwdriver to achieve a tighter fit. Be careful not to over extend the legs, this
may cause the magnet to come loose from its carrier. The magnets are adjusted correctly when
there is 0” to 1/16” of airspace between the magnet and the strike plate.
DISCLAIMER:
Child Safety:
Security Boss Manufacturing, LLC, recommends that households with small children need to exercise
proper judgment with leaving their children unattended in any area with a pet door. Pet Doors come
with locking panels and locking devices, using these devices minimizes any risk, but does not replace
proper parental supervision.
Installation:
We recommend that any consumer that installs their own pet door wear eye protection and be familiar
with the construction procedures and tools of installing a pet door.
Magnets:
Virtually all doors use magnets for the activation of the pet door as well as in the sealing of the flaps.
Customers with certain medical devices, for example; Pace Maker patients, should consult their
physician.
If you have any questions or are unclear about these safety statements please call our Distributor:
Moore Pet Supplies™, at 1-800-829-7876.
Table of contents
Other Security Boss Pet Care Product manuals


