SecurityMan PalmWatch II User manual

SecurityMan®
PalmWatch II
2.4GHz Wireless Color Baby Monitor System
with Night Vision, Audio Detection,
& Camera Rechargeable Battery

2
Copyright Notice
This manual is furnished under license and may be used or copied only in accordance with the
terms of such license. Except as permitted by such license, no part of this publication may be
reproduced, stored in a retrieval system, or transmitted, in any form or any means, electronic,
mechanical, recording, or otherwise, including translation to another language or format, without
the prior written permission of SecurityMan.
The content of this manual is furnished for informational use only, is subject to change without
notice, and should not be construed as a commitment by SecurityMan. SecurityMan assumes no
responsibility or liability for any errors or inaccuracies that may appear in this book.
All other product names, trademarks and registered trademarks in this document are the proper-
ties of their respective holders.
FCC Information
Notes on FCC’s “Consistent Statement of Information” This product meet the requirements speci-
fied in Part 15 of FCC Regulation. Operation rests with the following two conditions:
(1) The equipment should not cause any harmful interference.
(2) The equipment must receive and process any interference, including any possible interference
caused by operation mistakes.
After testing the product, we confirm that the camera complies with the provision for class C digital
equipment in the 15th part in FCC regulations; and the receiver complies with the limitations for
class B digital equipment in Part 15 of FCC regulation. The product generates, applies and emits
radio waves. It might cause harmful interferences to wireless communication if not be installed and
used following the description of the manual.
The product may cause interference in residential area, and the customer should take remedies to
eliminate the interference on their own costs.
If the product causes any harmful interference to wireless equipment or disturbs the receiving of
TV signals (it can be identified by turning on and off the product), you can solve the trouble by fol-
lowing methods:
- Readjust the product or put it in another place.
- Extend the distance between the equipment interfered and the product.
- Refer to dealers or experienced radio electrician for help.

3
Warranty
SecurityMan warrants that this product will be free from defects in materials and workmanship for
period of time specified on the product packaging. This limited warranty shall commence from the
date of purchase. SecurityMan Products warranty is not transferable and is limited to the original
purchaser. If the product is found to be defective then, as your sole remedy and as the manufac-
turer's only obligation, SecurityMan will repair or replace the product . This warranty shall not apply
to products that have been subjected to abuse, misuse, abnormal electrical or environmental con-
ditions, normal wear and tear or any condition other than what can be considered normal use.
Limitation of Liability
The liability of SecurityMan arising from this warranty and sale shall be limited to a refund of the
purchase price. In no event shall SecurityMan be liable for costs of procurement of substitute prod-
ucts or services, or for any lost profits, or for any consequential, incidental, direct or indirect dam-
ages, however caused and on any theory of liability, arising from this warranty and sale. These
limitations shall apply not with standing any failure of essential purpose of any limited remedy.
SecurityMan
15861 Tapia Street, Irwindale, CA 91706, USA
Tel: 888-977-3777 or 626-338-2028
Fax: 626-338-3585
Email: [email protected]
Website: http://www.securitymaninc.com
Copyright 2006 by SecurityMan v3.1
For Customer Service: 888-977-3777

4
Notice:
2.4Ghz wireless camera works at ISM band. It may cause interferences with
other wireless equipment that operates at the same band. Please turn off one
of the equipment to eliminate the interference.
Product Assurance
2.4Ghz wireless camera will emit electromagnetic wave, just like other wire-
less products. But the output power of the products is lesser than other wire-
less products such as mobile phones. The 2.4Ghz wireless camera meets
wireless frequency security standards and recommend indexes while work-
ing. These standards and indexes are certificated by academic organization
and represent the cogitative research of the scientific workers who continu-
ously explore and annotate the involved fields. So we believe that our prod-
ucts are safe for customers.
Operating Restrictions
DO NOT use this product to violate one's privacy. Monitoring one's activities
without consent is illegal and this product is not designed and manufactured
for these purposes.
DO NOT put this product near any medical equipment. Radio waves might
potentially cause breakdown of electrical medical equipment. This product
should be placed at least 1 feet away from any heart pacemaker. Radio
waves might potentially influence heart pacemaker and lead to respiratory
disturbance.
DO NOT use this product for any illegal activities. SecurityMan shall not be
responsible for any consequences of illegal conducts by users.

5
Conditions
Please read the following messages to make sure whether your working envi-
ronment is suitable.
• Ensure there is enough space around the receiver for ventilation.
• The temperature should be kept between –10˚C and 40˚C (14F – 104˚F).
The relative humidity should remain from 20% to 80%.
• Avoid putting the product in places where change might occur rapidly in
temperature or humidity
• Keep it dry, dustless and avoid exposure in it directly in sunlight
• Keep product away from heat sources such as electric heater
• Do not use the camera near aggressive chemicals
• Do not place product near any magnetic objects
Maintenance
It might influence the normal operation of the product if used at the fringe
range of normal temperature. Please turn off the power when not in use
Do not disassemble the product.
Do not shake or stricken the product.
Do not use this camera near water - for example, near a bath tub, wash bowl,
kitchen sink or laundry tub, in a wet basement or near a swimming pool, and
the like.
Please obey the local government’s environment protection policy

Contents
Introduction . . . . . . . . . . . . . . . . . . . . . . . . . . . . . . . . . . . . .7
Features . . . . . . . . . . . . . . . . . . . . . . . . . . . . . . . . . . . . . . . . . . .7
Package contents . . . . . . . . . . . . . . . . . . . . . . . . . . . . . . . . . . . .7
Things to consider before installation . . . . . . . . . . . . . . . . . . . . . .7
Installation . . . . . . . . . . . . . . . . . . . . . . . . . . . . . . . . . . . . . .8
Setting up the camera (Transmitter) . . . . . . . . . . . . . . . . . . . . . . .8
Setting up the monitor (Receiver) . . . . . . . . . . . . . . . . . . . . . . . .10
Optimizing the PalmWatch II . . . . . . . . . . . . . . . . . . . . . . . . . . . .10
Multi-Camera Operation . . . . . . . . . . . . . . . . . . . . . . . . . . . . . . .11
Rechargeable Battery Pack . . . . . . . . . . . . . . . . . . . . . . . . . . . . .14
Installing the Rechargeable Battery Pack to camera . . . . . . . . . .15
Connect to power supply . . . . . . . . . . . . . . . . . . . . . . . . . . . . . . .15
Troubleshooting . . . . . . . . . . . . . . . . . . . . . . . . . . . . . . . . . .16
Specification . . . . . . . . . . . . . . . . . . . . . . . . . . . . . . . . . . . . .17
Drilling Template for Wall Mounting Camera(s) . . . . . . . . . .18
6

Introduction
Thank you for purchasing the PalmWatch II. The PalmWatch II consists of a
wireless palm LCD monitor and a wireless color day & night BabyCam.
PalmWatch II is an ideal product for monitoring a baby, an elder or a patient.
Features:
•2.4GHz wireless technology
•Supports up to 3 cameras
•LCD display can work with 3 modes: Scan, Auto & Manual
•Adjustable dwell time between cameras in auto mode
•Tilt LCD screen panel for better view angle
•The Brightness, Color, Contrast, Alarm volume & Audio volume can be
adjusted
•Output port connecting to TV/VCR/DVR
•Plug & play installation
•Both Palm LCD monitor & BabyCam can be wall or table mounted
•Up to 300ft video transmission
(up to 100ft for indoor and up to 300ft for clear line of sight.)
Package contents:
• 1 x Wireless Color Camera (SM-200T)
• 1 x 1.5" wireless color LCD Monitor (SM-150LCD)
•1x Rechargeable Battery Pack (BP200) (for Camera)
•1x 9V AC Adapter (for Camera)
•1x 6V AC Adapter (for Monitor)
•1x Mounting Bracket (for Monitor)
•Mounting Hardware
Things to consider before installation
For best performance, follow these simple guidelines:
•The camera should be aimed accordingly to optimize viewing area.
•For best transmission, avoid installations where there are thick walls
or major obstructions between the camera and receiver. 7

Installation
Setting up the camera (Transmitter)
1. Unpack the camera
2. Decide on wall or desk mounting the camera. (For wall mounting
instruction, please refer to “Drilling Template for Wall Mounting
Camera(s)” section)
Note: The Rechargeable Battery Pack should not be used if you decide to wall mount
the camera.
Desk/Table top Wall Mounted
3) Rotate the camera to ideal or required position.
4) If using the 9V camera AC adapter, connect power jack and make sure the
camera is positioned no more than 5.5 feet from the AC power outlet.
8

5) To get the best performance from the camera, please follow the guidelines
below:
i) For best performance, mount the camera between 12ft and 16ft above
the detected area.
ii) Built-in IR sources (8 LEDs) provide night vision, for day use please
turn off the LEDs by sliding the NIGHT VISION SWITCH (on the right
side of camera head) to the OFF position.
iii) To avoid problems with false sound trigger, adjust sound trigger level by
tuning the TRIGGER LEVEL TUNER (on the right side of camera head)
accordingly.
6) Select the channel on the SLIDE SWITCH (on back of the camera head)
by sliding switch to position 1, 2 or 3. Camera is preset to channel 1 (default).
7) The camera (transmitter) installation is now completed. 9

Setting up the LCD Monitor (Receiver)
1) Plug the palm monitor AC adapter into the 6V DC power jack on the back
of the receiver. You can also use 4 AA batteries to operate the monitor for
temporary use.
2) Turn on the monitor by pressing the power button.
3) If connecting to TV/VCR/DVR, connect one end of the enclosed A/V
cable to the back of the palm monitor, the other end to your TV/VCR/DVR’s
A/V inputs, the yellow plug to the VIDEO IN jack and the white plug to the
AUDIO IN jack.
4) If wall mounting, install the bracket onto the wall, and mount the palm
monitor to the bracket.
5) The monitor (receiver) setting is now completed.
Optimizing the Palmwatch II
The 2.4GHz video signals pass easily through your home’s interior walls, but
the signal may be reflected by power wire or plumbing inside the wall. The
most common source of interference are microwave ovens. Try to avoid
mounting the palm monitor near a microwave oven or other source of RF
interference such as cordless phones, and wireless routers in the 2.4Ghz fre-
quency band. 10
Power Jack A/V Output
DIP Switch

Multi-Camera Operation
The PalmWatch II is designed to support up to 3 cameras. Additional cam-
eras are sold separately. Please check for product availability.
Important:
When using more than one camera, make sure each camera is assigned to
specific channel by adjusting the corresponding SLIDE SWITCH to position 1,
2, or 3.
Back view of the camera
The DIP SWITCH located on the back of the palm monitor should be adjust-
ed to correspond to the channel in use.
Back view of the palm monitor
Camera
1
in use
123
Camera
1 & 2
in use
123
Camera
1, 2, & 3
in use
Switch
OFF OFF OFF
123
Camera set to
channel 1
123
Camera set to
channel 2
123
Camera set to
channel 3
123
Switch
11
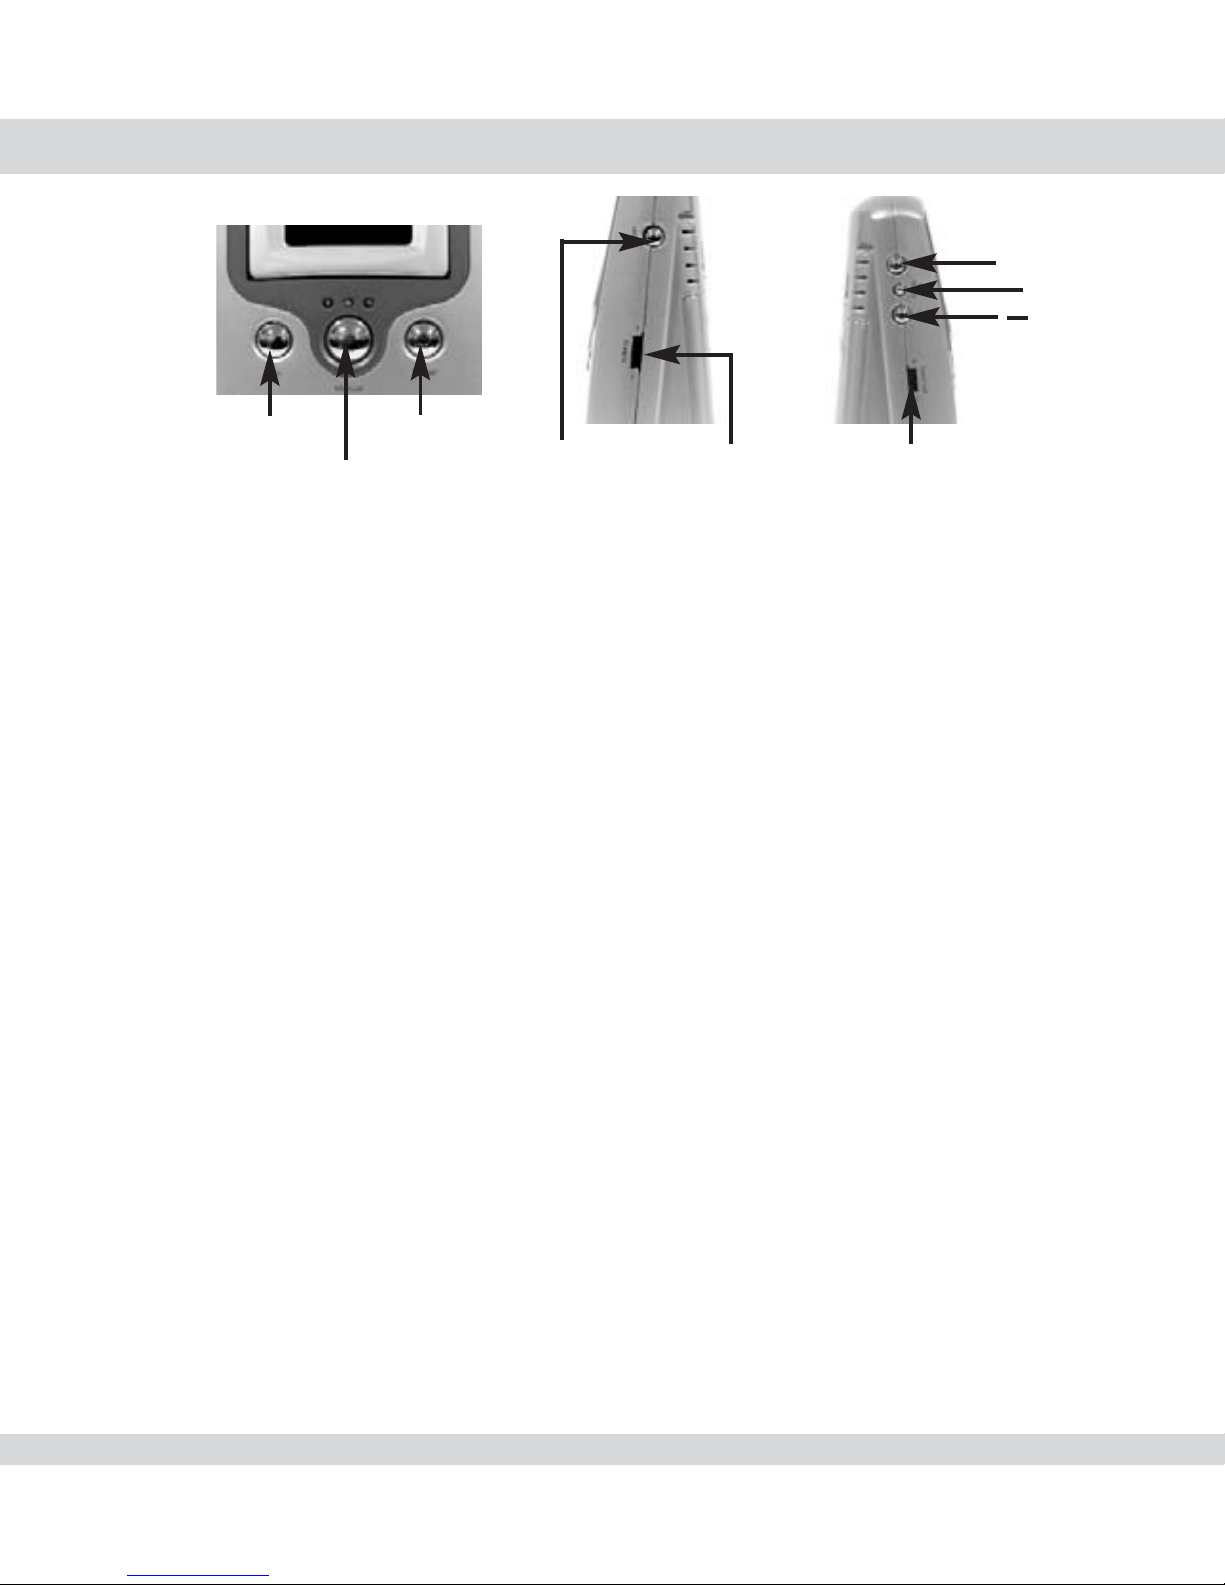
POWER
•Press to turn the palm monitor ON/OFF.
•When using the battery source on the palm monitor, the built-in LED of the
POWER button will flash to indicate low battery status between 2.5 to 3.5
hours after initial use.
AUTO
Pressing the AUTO button places the system in auto mode. In this mode, the
system automatically rotates through all active cameras. When sound is
above the pre-set sound trigger level of the baby camera, the palm monitor
will display the picture from the camera for a few seconds, and the beeper
alarm will sound. To avoid searching for channels that do not have cameras
assigned, set the DIP SWITCH (located on the back panel of the palm moni-
tor) for those corresponding channels up to the OFF position.
The dwell time (time taken to switch between cameras) is preset to 2 sec-
onds and can be adjusted between 2~30 seconds. To adjust the dwell time,
press and hold both the AUTO & MANUAL buttons simultaneously. Each
flash of the LED increases the dwell time by one second.
12
Auto Power
Manual Scan Volume
+Menu
Alarm
Volume

MANUAL
To select a specific camera on the palm monitor, press the MANUAL button.
The palm monitor will switch to a different camera each time the MANUAL
button is pressed. To avoid searching for channels that do not have cameras
assigned, set the DIP SWITCH (located on the back panel of the palm moni-
tor for those corresponding channels up to the OFF position.
SCAN
Pressing the SCAN button places the system in scan mode. The palm moni-
tor screen blanks into standby mode. The system then continuously scans for
active cameras. If sound is detected above the pre-set sound trigger level of
the baby camera, the palm monitor displays the camera picture and the
beeper alarm will sound. Two minutes after the last detection, the screen
returns to standby/scan mode and the palm monitor resumes scanning.
Pressing the MANUAL or AUTO button will cancel this mode.
VOLUME
The audio volume of the palm monitor can be adjusted by tuning the VOL-
UME tuner on the right side of the palm monitor.
ALARM VOLUME
The alarm volume of the palm monitor can be adjusted by tuning the ALARM
VOLUME tuner on the left side of the palm monitor.
MENU
Press the MENU button on the left side of the palm monitor and observe the
LED status:
-LED on, adjust BRIGHTNESS +/-
-LED flashing, adjust COLOR +/-
-LED off, adjust CONTRAST +/- 13

Rechargeable Battery Pack for camera (BP200)
Note: The battery pack BP200 must be fully charged for 12 hours before
independent use.
Plug the PalmWatch II camera AC adapter (9V 400mA) connector into the DC
jack at the end of the Battery Pack (9V 400mA). Plug the adapter itself into
an electrical outlet. Move the Slide Switch on, a red LED on the base of the
camera indicates that the camera is on.
LED indicator on Battery Pack
Apink LED will appear on the Battery Pack to indicate charging. A fully
charged Battery Pack will produce a green LED.
After the initial charge, it is not necessary to leave the camera AC adapter
(9V 400mA) plugged in the Battery Pack. You may unplug the adapter from
the DC jack and reconnect it when necessary.
14
Power Jack for cam-
era AC Adapter
(9V 400mA)
LED indicator
Slide Switch

Installing the Rechargeable Battery Pack to camera
Connect to Power Supply
You can operate the camera with the rechargeable Battery Pack connected
to it.
You can also operate the camera without the Battery Pack.
15
Power Jack
for camera AC
adapter (9V
400mA) on
camera
Power Jack for
camera AC
adapter
(9V 400mA) on
rechargeable
Battery Pack

Troubleshooting
If you are having trouble operating this product, please follow the guide below:
Issues Solution
No Camera Picture 1) Check all connectors. Make sure camera(s)
and palm monitor are switched ON.
2) Ensure camera(s) & palm monitor are set to
correct channel(s).
3) Make sure camera is within range of palm
monitor.
Blank Monitor 1) Make sure the palm monitor is switched ON.
2) If using AC adapter, make sure it is plugged into
wall outlet
3) Make sure all batteries are inserted with correct
polarity.
Interference on 1) Make sure each camera (transmitter) is within the
Camera Picture range, and that no large obstructions are blocking
the signal.
2) Try repositioning both the camera and the palm
monitor to improve the reception quality.
3) Reposition other nearby equipment transmitting
on 2.4GHz frequency, ie. wireless router,
wireless phone, etc..
Audio problems 1) Ensure the volume is turned up to sufficient level
on the palm monitor.
2) Make sure the sound is within the camera
microphone range.
3) If the unit emits a loud wailing sound (feed back)
try moving the camera away from the palm
monitor, or place the palm monitor in a different
location. 16

Specification
Camera (SM-200T)
TV System NTSC (color) standard
Integrated Lens 5.6mm, fixed focus
Resolution 360 horizontal TV lines
Signal/Noise Ratio 48dB
Image Sensor 1/3” CMOS
Min. illumination 0.5 lux
Current Consumption 120mA~300mA
Frequency Range 2,414, 2,432 & 2,468MHz
Dimension (WxHxD) 3.75” x 4.25” x 2.45”
Monitor (Receiver) (SM-150LCD)
Frequency Range 2,414, 2,432 & 2,468MHz
Signal Source 2.4GHz wireless A/V, sound trigger
Current Consumption 320mA
Dimension (WxHxD) 2.92” x 4.67” x 1.84”
Rechargeable Battery Pack (BP200)
Voltage 6V DC
Charge Capacity 650mAh
Use camera (transmitter) AC adapter to charge
Camera Adapter Output 9V DC 400mA
Caution: Not intended for use in a wet location. Exhausted batteries should
be disposed of properly.
17

Drilling Template for Wall Mounting Camera(s)
To wall mount camera(s), drill two holes using a 1/4” drill bit and the template
below. (Please keep a copy of this template for future reference)
Insert supplied wall anchors into holes and secure camera to wall with sup-
plied screws.
DRILL HOLES IN
THESE POSITIONS
18


www.securitymaninc.com
Table of contents
Other SecurityMan Baby Monitor manuals


