Seenergy SVD-200 User manual

SVD-200 Quick Installation Guide
Version 1.0.1
Q101/EN/10222010/001

2| Table of Contents
Table of Contents
Purpose 3
Package Contents 3
Product Description 4
Installation Diagram 5
System Overview 6
Setting Up The Device 7
Network Setup 7
NVR Setup 11
Add NVR with Auto Search 13
Add NVR with Manual Search 18
Camera Setup 20
Live View and Basic Operations 25
Detail Congurations 30
System Setup 30
The Keylock Function 30
Setup Auto Keylock 32
Date/Time Setup 33
Advance Setup 36
Playback 37
Backup 42
Alert 45
Dwell Time 49
System Log 50
NVR Status 50
Version 51
Reset to Factory Default 51
Audio Input Select 52
Conguration Backup 54

3
SVD-216 QUICK GUIDE
Package Contents
• SVD-200 Network Media Decoder
• Power adapter/cord
• Printed Quick Installation Guide
• Printed Warranty Card
• Product CD
Purpose
This document provides information for installing SEEnergy SVD-200 Net-
work Media Decoder on your network. The information included in this docu-
ment should be sufcient for users to quickly setup the device and start the
live video monitoring. Users should also be able to perform basic trouble-
shooting with information provided in this document. For all other aspects of
using this product, please consult the user’s manual available on the CD or it
can be downloaded at our corporation website.

4
SVD-216 QUICK GUIDE
Product Description
Full HD Local Display for Single NVR
Up 9 Live Video Display
HD Resolution Decode and Display
Easy Firmware Upgrade Through USB
Support Backup to USB Disks
Export Playback Videos to AVI
Easy Operation with Remote Control
Two-way Audio
Support H.264
SEEnergy Smart NVR Search
Feature Highlights
The SEEnergy SVD-200 is designed for use with SEEnergy’s embedded NVR that
provides full HD local display capability. The high quality network media player
acts as a network video decoder which is equipped with a DVI-D interface that
can outputs 4 real-time videos from the NVRs up to D1 resolution or 1 real-time
video in full HD (1920 x 1080) resolution. The media player provides maximum
of 9 live video view and 1 channel video playback. The built-in USB ports can be
used to connect a USB hard disk for backup purpose. Simply connect the device
to an external monitor and all operations can be done with an IR remote control
on a friendly user interface. The device is built with high performance decoding
processor and provide superior reliability with an embedded OS.

5
SVD-216 QUICK GUIDE
Installation Diagram

6
SVD-216 QUICK GUIDE
System Overview
Front
Rear
USB 2.0
interface
Alarm
Status LED
Network
Status LED
System
Status LED
Power
Status LED
Reset
Button
Buzzer Stop
Button
Power
Button
Power
Connector
DVI-D
Connector
Microphone
Jack
Line in (Audio
in) jack
Line out (au-
dio out) jack
Ethernet
(RJ-45)

7
SVD-216 QUICK GUIDE
Setting up the device
Network Setup
The device can be congured to use a static IP
address or a dynamic IP address that is assigned
by a DHCP server.
To congure its IP address, follow the steps illus-
trated below:
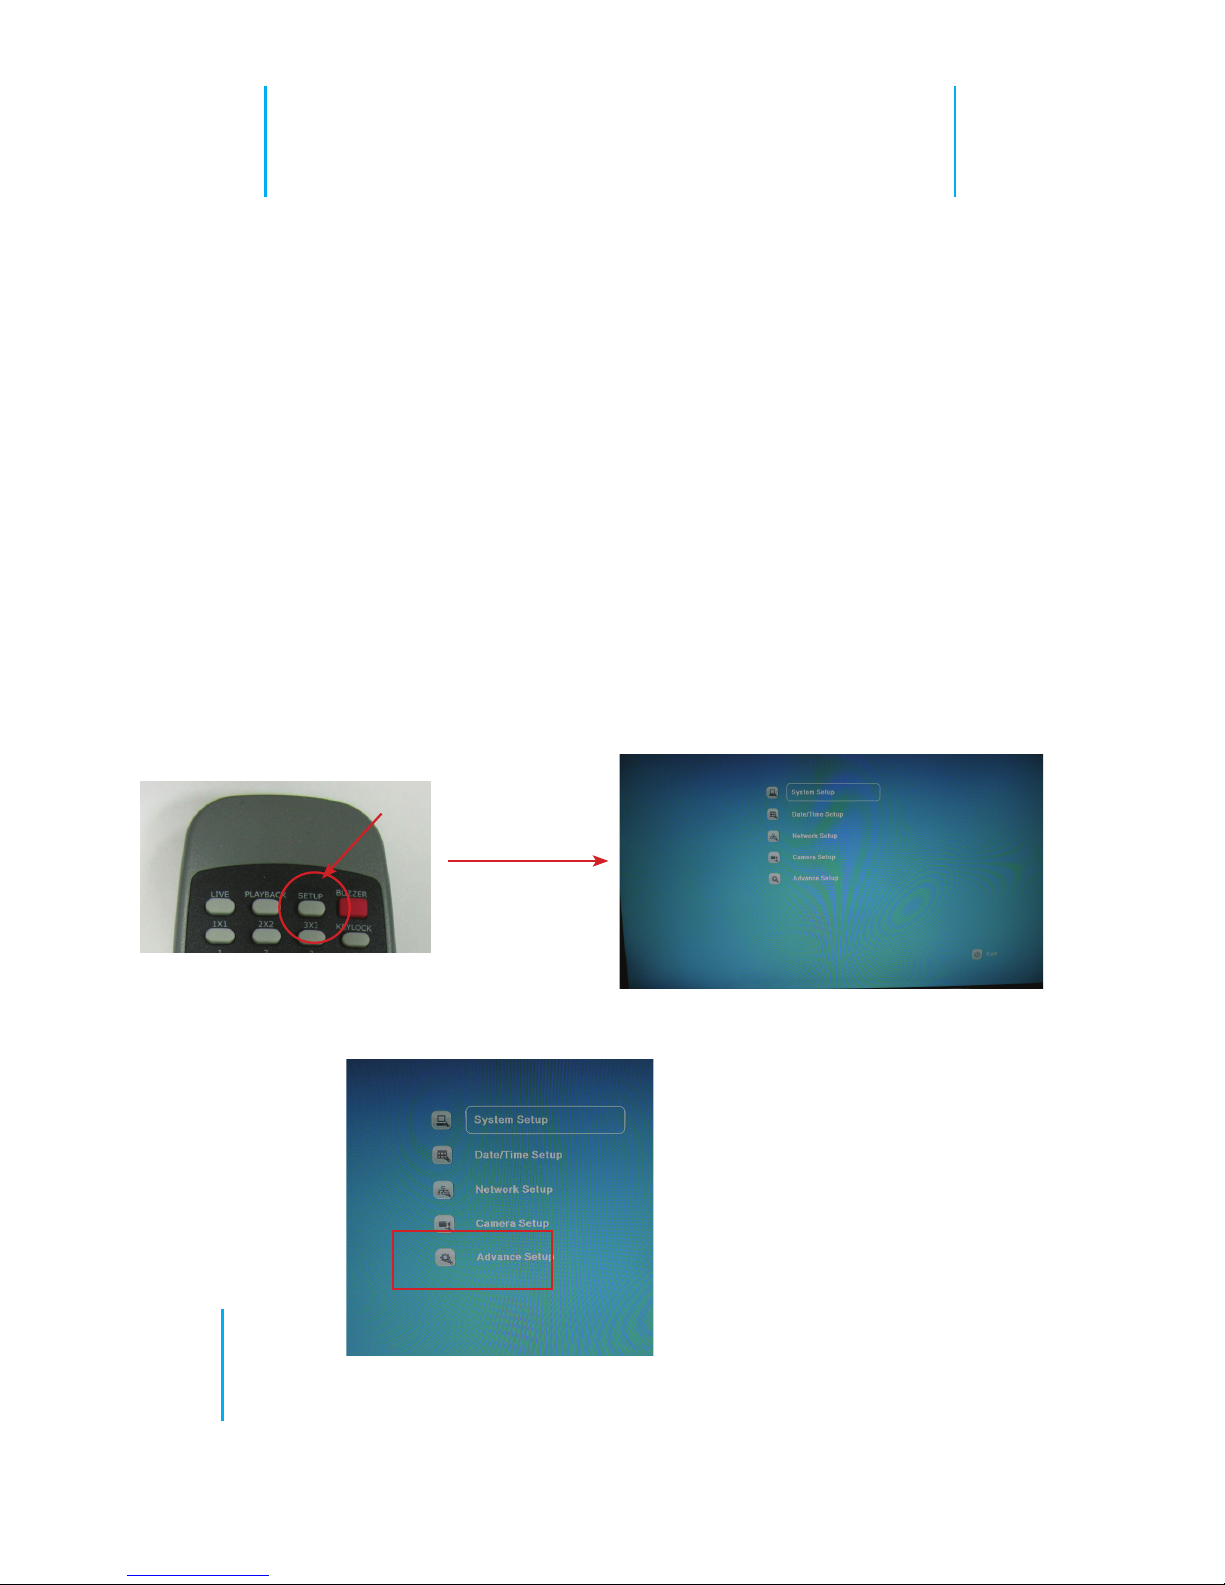
1. Click the “Setup” button on the remote to enter
the conguration screen:
2. Use the directional buttons to move up and
down on the screen and make selections between
different menu options. Select “Network Setup”
and press the “Enter” button on the remote con-
trol:
“Enter” button
8
SVD-216 QUICK GUIDE
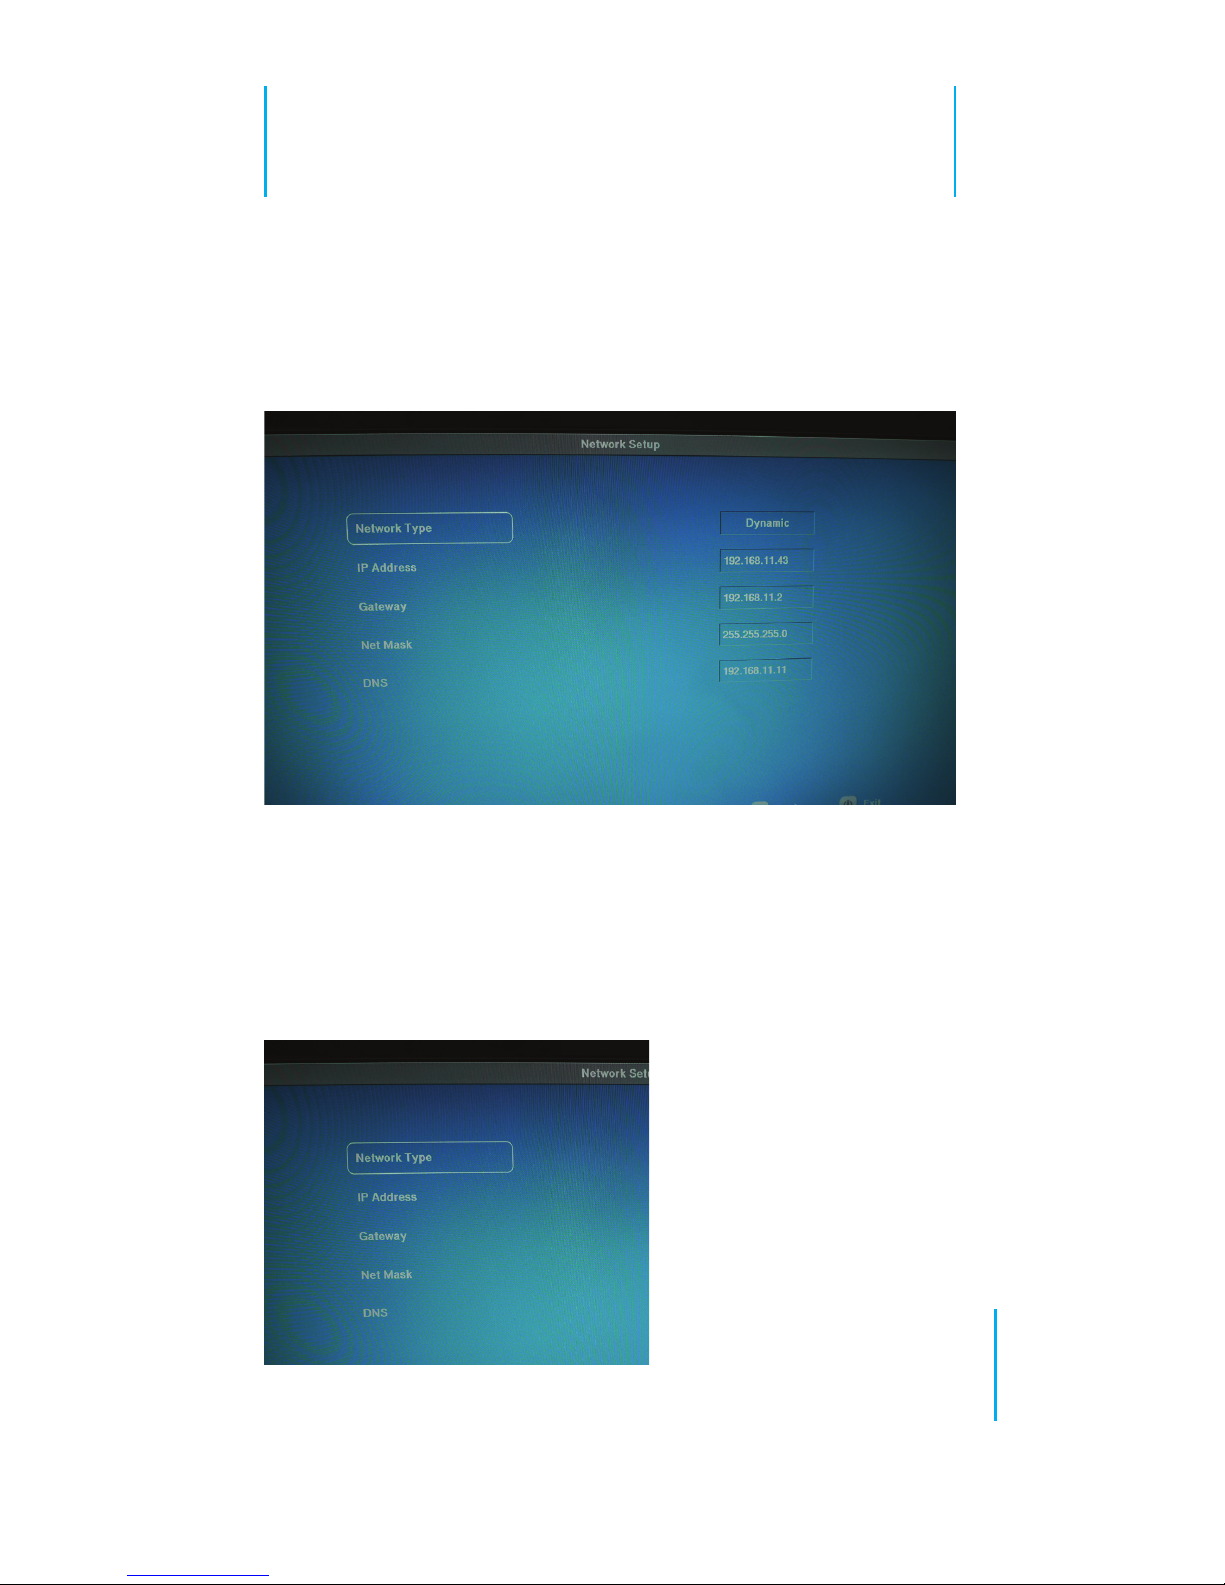
3. By default, the device is set to use dynamic
IP, which if a DHCP server does exist in the local
network, the device’s IP information should be
displayed like what is shown below:
4. Press the “up” and “down” keys on the remote
to move between the options on the left. To con-
gure the device to use static IP, make sure the
“Network Type” option is highlighted (selected)
and press the “enter” button to enter the edit
mode:
9
SVD-216 QUICK GUIDE
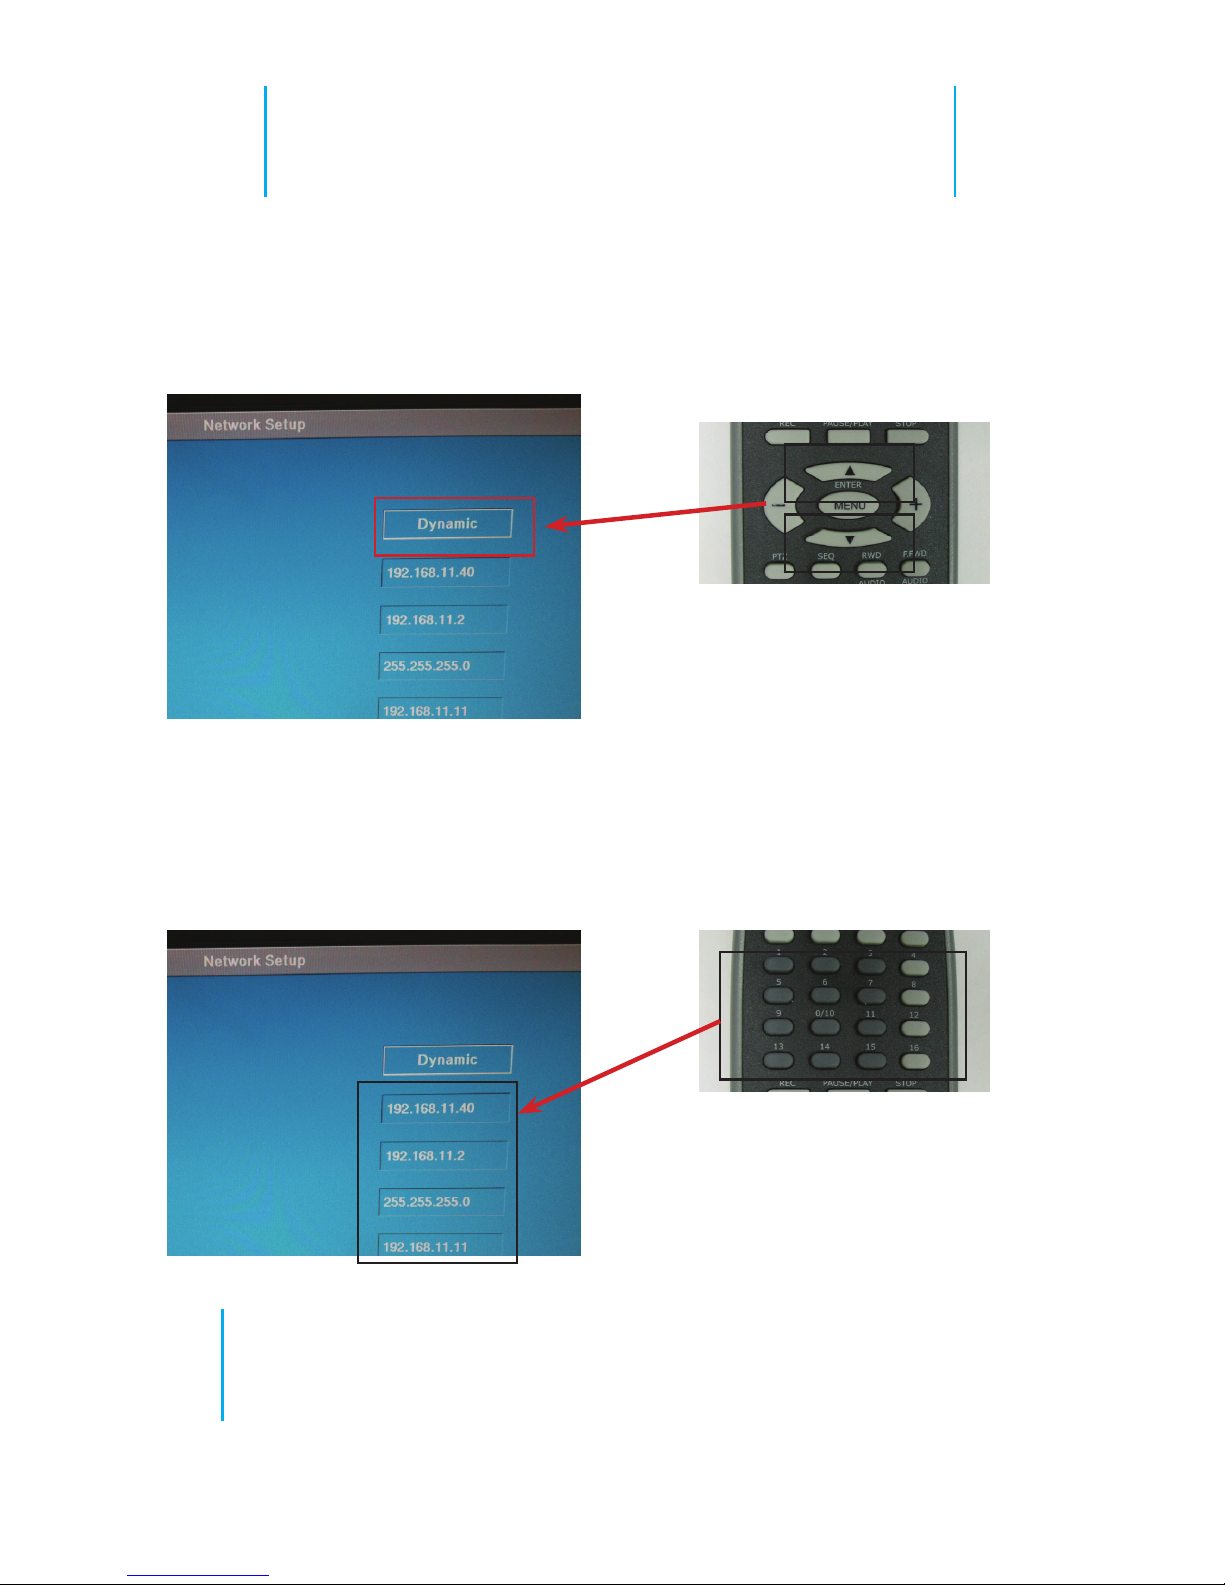
5. Press the “up” and “down” keys to select be-
tween “Static” or “Dynamic”. Once nished, press
the “Enter” key to conrm the new conguration
and leave the edit mode.
6. Follow the step described in point 4 to move
to other elds for conguration. Use the number
keys to enter digits for IP address.
* For entering a number in
any octect that is less than 3
digits, press the “Enter” key to
place the “.” and move to the
next octect.
10
SVD-216 QUICK GUIDE
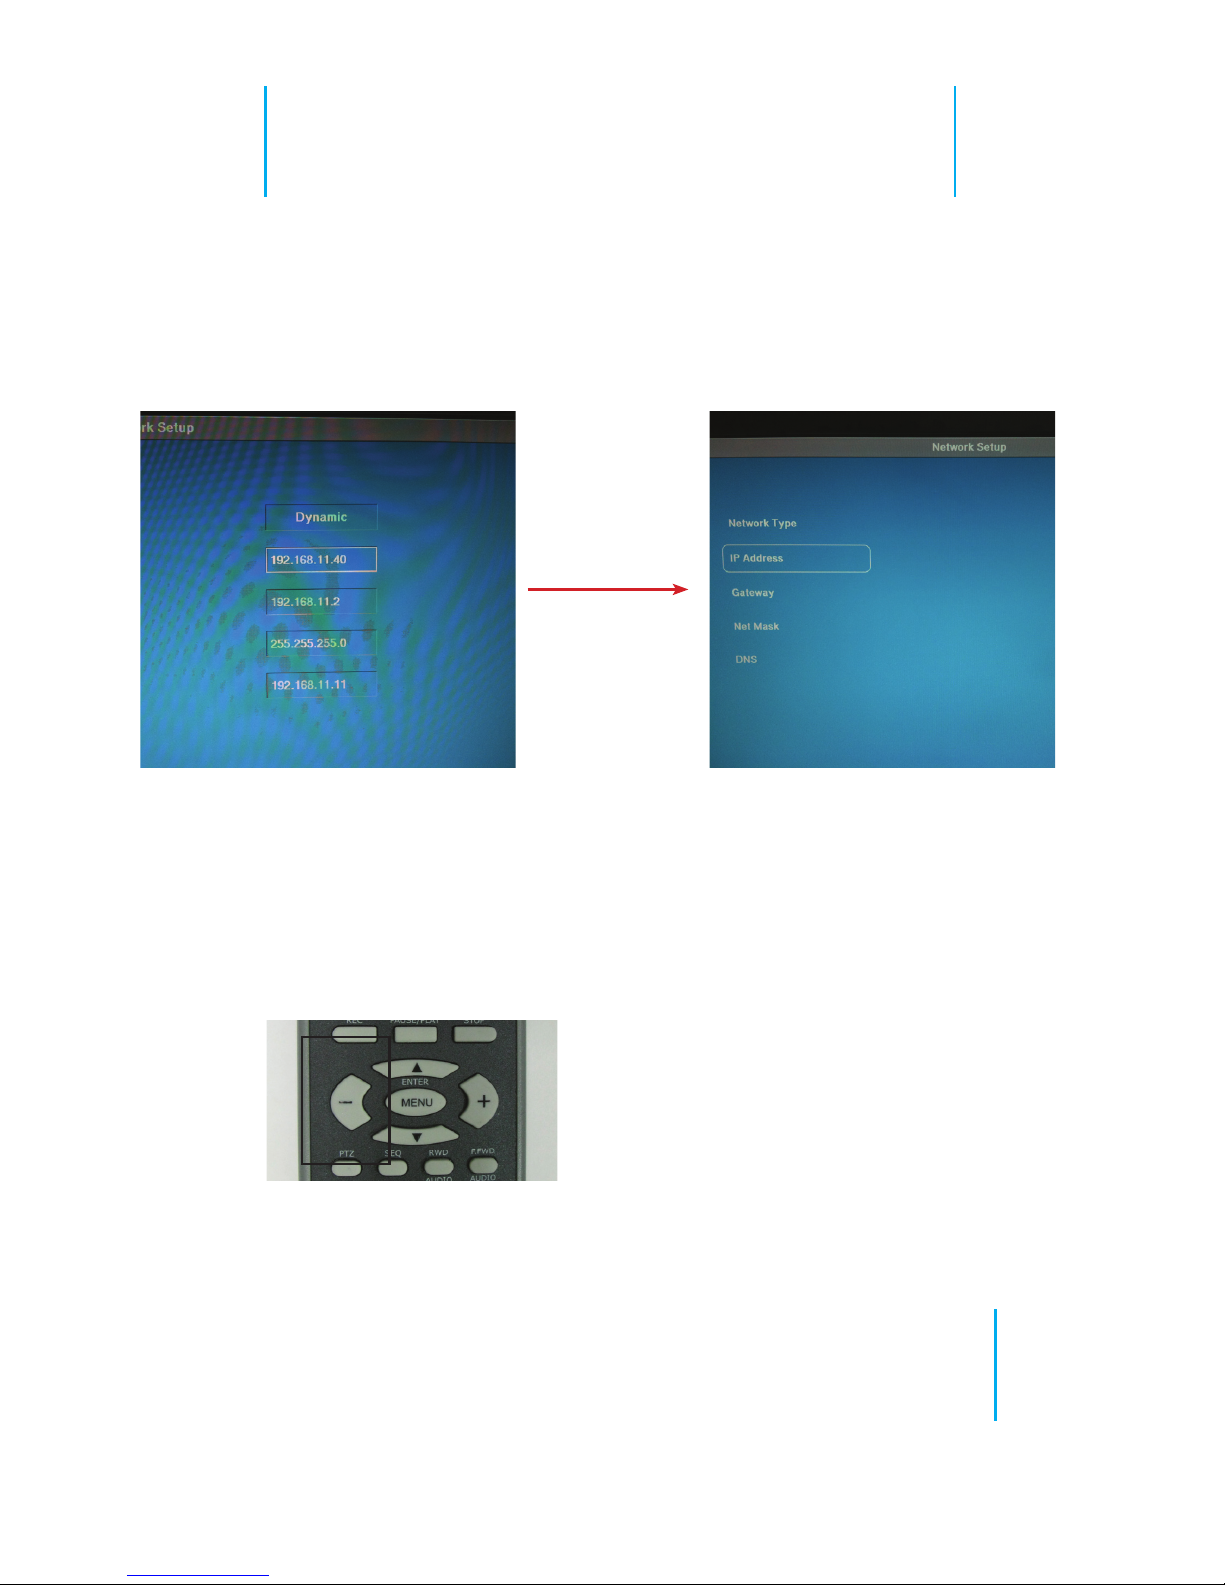
7. Once a proper IP address has been entered,
click the “Enter” key to conrm the setting and
leave the edit mode
press the “Enter”
key on the re-
mote control
* To make correction on the IP address while you are
still in edit mode, click the “left” key to delete one digit
at a time.
One you leave the edit mode, you’d need to key in the
complete IP address again in order to make a correc-
tion
11
SVD-216 QUICK GUIDE
NVR Setup
1. Press the “Setup” button on the remote control
to enter the setup menu:
2. Select “Camera Setup” from the main menu:
The device is capable of receiving 16 channels of
live video streaming from the NVR. The process of
adding channels would be to nd available NVRs
on the network rst and choose the desired chan-
nels from a partcticular NVR, then add them to
the device for management.
To add channels to the device, following the steps
illustrated below:
12
SVD-216 QUICK GUIDE
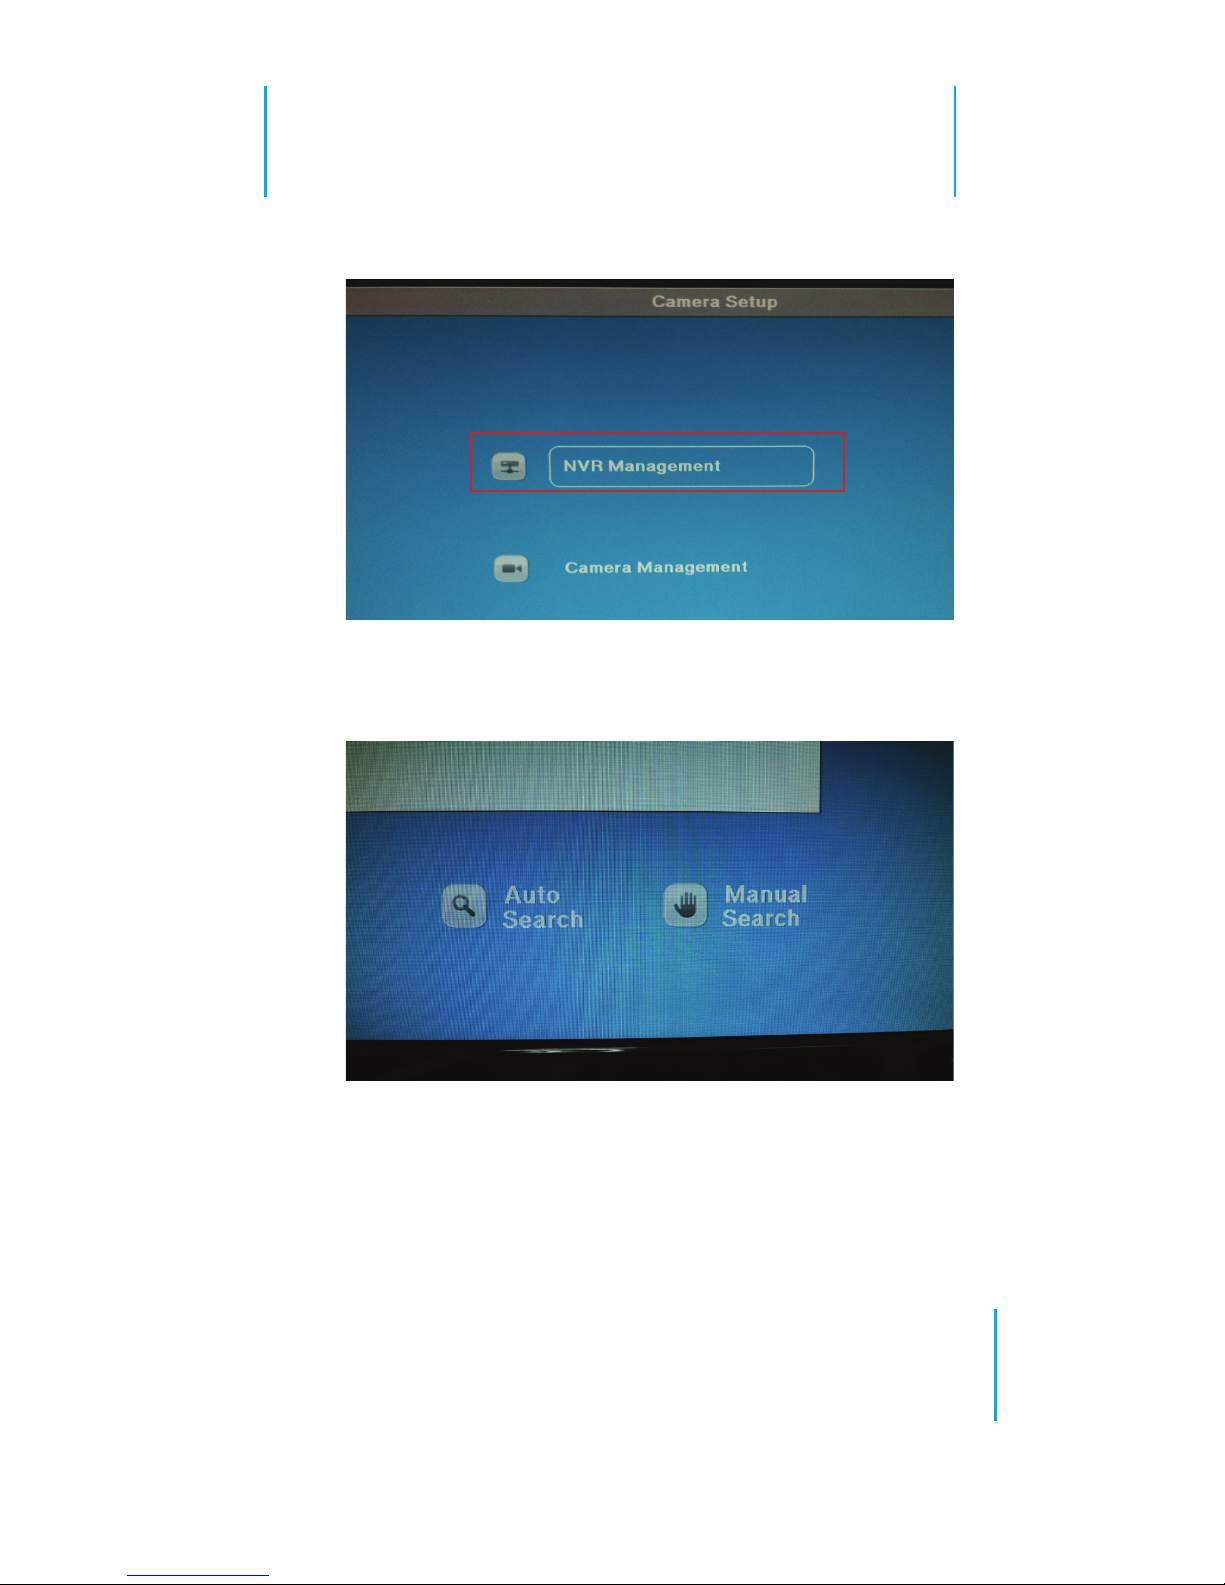
3. Select “NVR Management”:
4. There are two ways of adding NVRs to the de-
vice, auto search and add manually:
* Auto search only works when the device and
the NVR are located in the same subnet

13
SVD-216 QUICK GUIDE
Add NVRs with Auto Search
1. To add a NVR with auto search, press the key
shown below twice to select “Auto Search”:
2. Press “Enter” to start the searching process:

14
SVD-216 QUICK GUIDE
3. Once the device nds NVRs on the network,
they will be listed in the “Auto Search List”. Sim-
ply press the up and down keys to select among
listed NVRs and press the “Enter” key to add one:
4. Click “Yes” to go to the next setup screen which
you should be prompted to enter the NVR’s user-
name and password:

15
SVD-216 QUICK GUIDE
5. Press the down key on the remote control to
select the username eld and press “Enter” to
enter the edit mode. Once you are in edit mode, a
virtual keyboard should be displayed:
6. Use the directional keypad on the remote con-
trol to move between the virtual keyboard buttons
and press the “Enter” button to make a selection:
7. Select the “Enter” button on the virtual key-
board to nish entering.
16
SVD-216 QUICK GUIDE
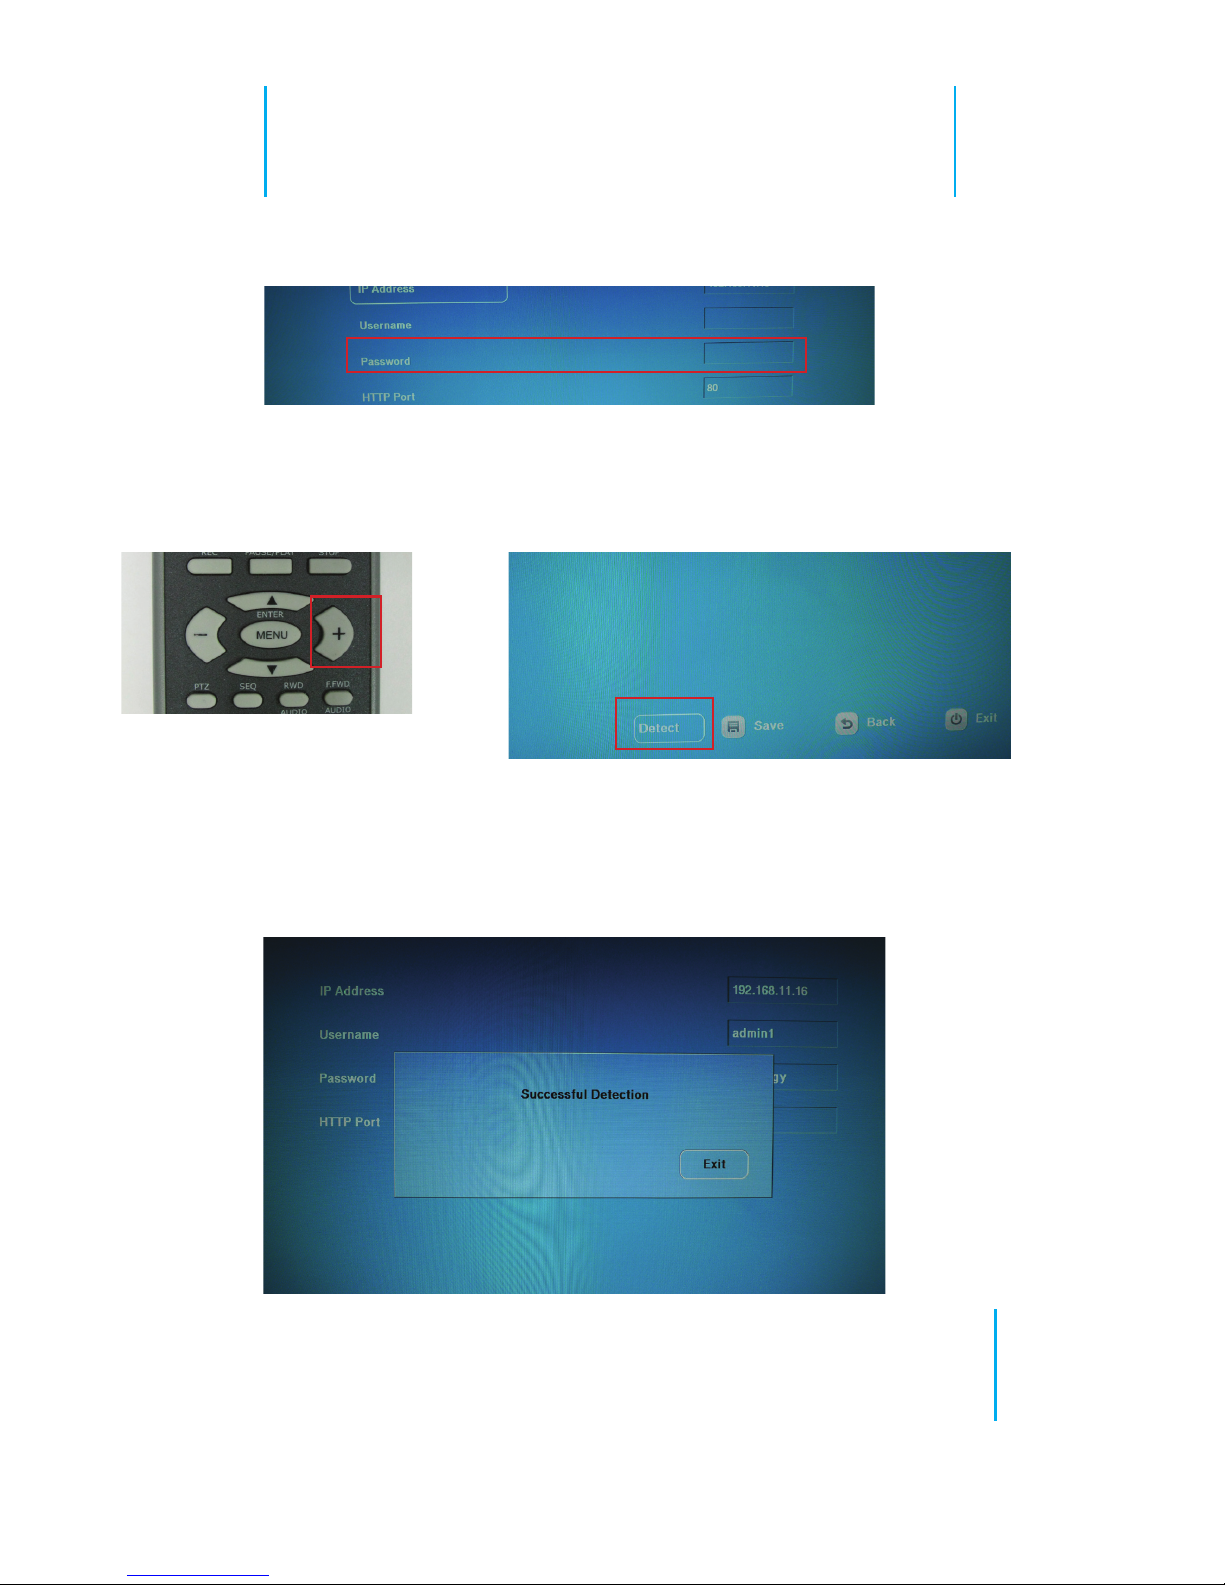
8. Follow the same steps to enter the password.
9. When done, click the button highlighted below
once to select the “Detect” option and press the
“Enter” key to start the detection:
10. Upon successful detection, the following mes-
sage should be displayed. Simply press the “En-
ter” key on the remote to conrm and exit out the
message window:

17
SVD-216 QUICK GUIDE
11. Finally, press the button shown below on the
remote control to select the “Save” option on the
screen to save the conguration:
12. The “Success” message should then be dis-
played to conrm the conguration has been
saved. The NVR that’s being added should be
listed in the “NVR List” on the right.
18
SVD-216 QUICK GUIDE
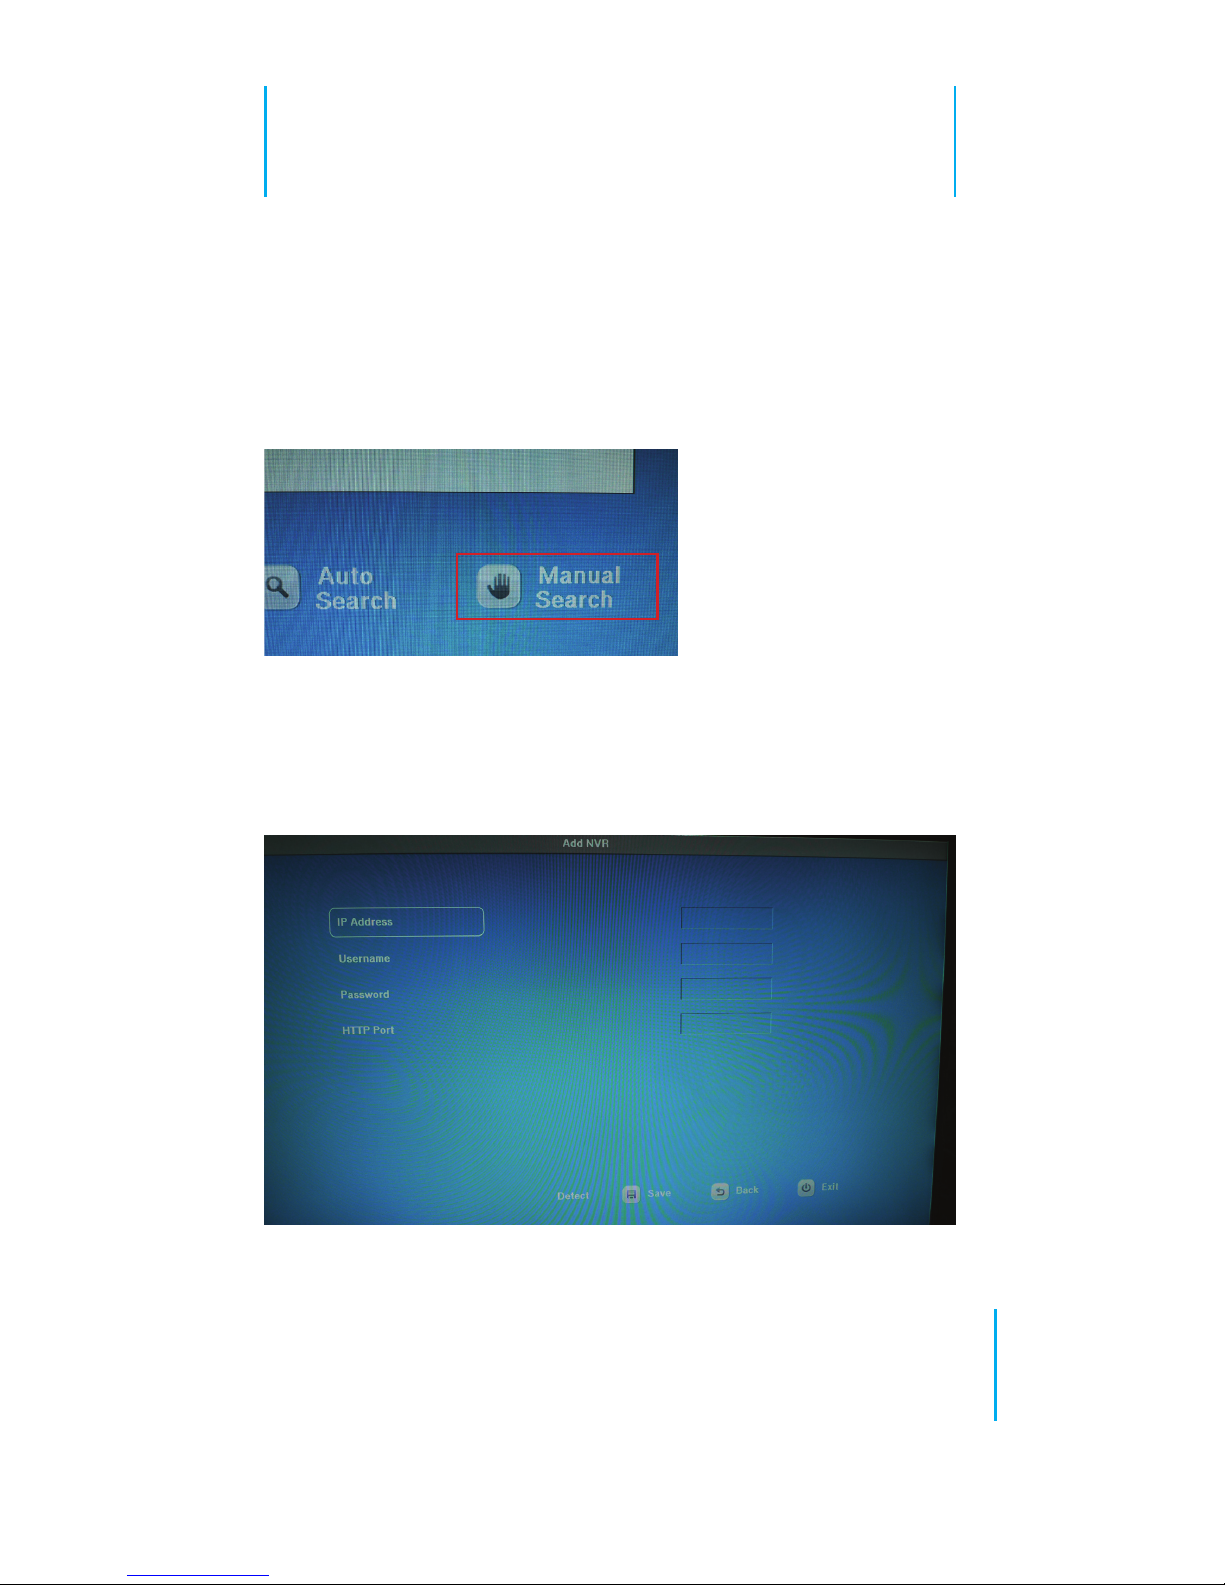
Add NVRs with Manual Search
1. To manually add NVRs to the device, follow the
steps described in page 13, but instead of choos-
ing “Auto Search”, choose “Manual Search” to
begin the process
2. You should be directed to the setup page simi-
lar to the Auto Search setup page, but all elds in
this page require users to enter manually.

19
SVD-216 QUICK GUIDE
3. Follow the steps described from page 15 to 17
and use the virtual keyboard to enter all elds in
this page.

20
SVD-216 QUICK GUIDE
Camera Setup
After NVRs have been added to the device, the
next step would be to add cameras for live view-
ing. To add cameras, follow the steps described
below.
1. Go to “Camera Management” under the “Cam-
era Setup” menu:
2. The following setup page should display:
List of NVRs
that were
previously
added
Cameras available from
the NVR selected in the
list on the left
Cameras that
are added to the
device
Table of contents
Popular Media Converter manuals by other brands


H&B
H&B TX-100 Installation and instruction manual

Bolin Technology
Bolin Technology D Series user manual

IFM Electronic
IFM Electronic Efector 400 RN30 Series Device manual

GRASS VALLEY
GRASS VALLEY KUDOSPRO ULC2000 user manual

Linear Technology
Linear Technology DC1523A Demo Manual

Lika
Lika ROTAPULS I28 Series quick start guide

Weidmuller
Weidmuller IE-MC-VL Series Hardware installation guide

Optical Systems Design
Optical Systems Design OSD2139 Series Operator's manual

Tema Telecomunicazioni
Tema Telecomunicazioni AD615/S product manual

KTI Networks
KTI Networks KGC-352 Series installation guide

Gira
Gira 0588 Series operating instructions

Lika
Lika SFA-5000-FD user guide