Sefa CLAM PRO V3 Series User manual
User guide
Manuel utilisateur
Guía del usuario
Benutzerhandbuch
ENGLISH
FRANÇAIS
ESPAÑOL
DEUTSCH
CLAM PRO V3
SERIES
HEAT TRANSFER TECHNOLOGIES


www.sefa.fr 3
EnglishFrançaisEspañolDeutsch
INDEX
INDEX
INDEX������������������������������������������������������������������������������������������������������������������������������������������������������������������� 3
WARRANTY TERMS ������������������������������������������������������������������������������������������������������������������������������������4
TECHNICAL DATA����������������������������������������������������������������������������������������������������������������������������������������� 5
OVERVIEW��������������������������������������������������������������������������������������������������������������������������������������������������������6
SAFETY ����������������������������������������������������������������������������������������������������������������������������������������������������������������7
OPERATION������������������������������������������������������������������������������������������������������������������������������������������������������8
SMART TOUCH ® CONTROL SCREEN ����������������������������������������������������������������������������������������� 11
SERVICING�������������������������������������������������������������������������������������������������������������������������������������������������������15
TROUBLESHOOTING TIPS ������������������������������������������������������������������������������������������������������������������� 16
CONDITIONS DE GARANTIE���������������������������������������������������������������������������������������������������������������18
CARACTERISTIQUES �������������������������������������������������������������������������������������������������������������������������������� 19
GENERALITES����������������������������������������������������������������������������������������������������������������������������������������������20
SECURIT����������������������������������������������������������������������������������������������������������������������������������������������������������21
UTILISATION ��������������������������������������������������������������������������������������������������������������������������������������������������22
ÉCRAN DE CONTROLE SMART TOUCH ®���������������������������������������������������������������������������������25
MAINTENANCE������������������������������������������������������������������������������������������������������������������������������������������� 29
CONSEILS D’INTERVENTION RAPIDES�������������������������������������������������������������������������������������� 30
CONDICIONES DE GARANTÍA�����������������������������������������������������������������������������������������������������������32
CARACTERÍSTICAS ������������������������������������������������������������������������������������������������������������������������������������33
ASPECTOS GENERALES �����������������������������������������������������������������������������������������������������������������������34
SEGURIDAD���������������������������������������������������������������������������������������������������������������������������������������������������35
UTILIZACIÓN������������������������������������������������������������������������������������������������������������������������������������������������� 36
PANTALLA DE CONTROL SMART TOUCH ®��������������������������������������������������������������������������� 39
MANTENIMIENTO�������������������������������������������������������������������������������������������������������������������������������������43
CONSEJOS DE INTERVENCIÓN RÁPIDA ����������������������������������������������������������������������������������44
GARANTIEBESTIMMUNGEN��������������������������������������������������������������������������������������������������������������46
TECHNISCHE DATEN������������������������������������������������������������������������������������������������������������������������������ 47
ALLGEMEINES���������������������������������������������������������������������������������������������������������������������������������������������48
SICHERHEIT ��������������������������������������������������������������������������������������������������������������������������������������������������49
VERWENDUNG ������������������������������������������������������������������������������������������������������������������������������������������50
SMART TOUCH ® BEDIENDISPLAY�����������������������������������������������������������������������������������������������53
WARTUNG�������������������������������������������������������������������������������������������������������������������������������������������������������57
RATSCHLÄGE FÜR SCHNELLE EINGRIFFE������������������������������������������������������������������������������58
SPARE PARTS�����������������������������������������������������������������������������������������������������������������������������������������������60
WIRING DIAGRAM������������������������������������������������������������������������������������������������������������������������������������� 61
MAINTENANCE LOG ������������������������������������������������������������������������������������������������������������������������������� 62

2021-03-25
4 www.sefa.fr
English
WARRANTY TERMS
The warranty period shall come into effect on the day on which the equipment is
brought into service at the user’s premises, as attested on the returned warranty certif-
icate and the delivery note, and shall run for two years, based on a standard equipment
operating schedule of 8 hours per day, i.e. 3,000 hours.
The warranty is strictly limited to our equipment, and covers faulty materials and work-
manship,
which the purchaser shall be required to substantiate.
Our liability shall be limited to making good or replacing free of charge parts that are
acknowledged by us to be defective, and no claims for damages for any reason may be
made against us.
Parts replaced under warranty shall:
- Remain our property
- Be invoiced on consignment
A credit note will be issued upon return of the faulty parts.
Returns must be made NO LATER THAN ONE MONTH after the work is performed un-
der warranty.
THIS WARRANTY DOES NOT COVER :
Commercially sourced consumables such as:
- Fuses, LEDs, seals, hoses, nozzles, filters, etc.
- Material and equipment not manufactured wholly by us, which are covered by the
warranty of the manufacturer thereof.
THIS WARRANTY DOES NOT EXTEND TO :
Replacements or repairs arising from fair wear and tear of the appliances or machines,
damage or accidents arising from negligence, lack of supervision or maintenance, im-
proper use or alterations made without our written consent.
Defects arising from material provided by the purchaser or mandatory design require-
ments issued by the purchaser.
Repairs made necessary by damage or accidents arising during carriage.
Normal maintenance and adjustment procedures required during use of the machine,
as set out in the maintenance instructions, such as:
- adjustment of intermediate components
- tightening of pipes, hoses, etc.
Any traces of detergent oil in the air system of pneumatic machines
shall invalidate the aforementioned warranty terms.
Quote the machine reference and serial number when making technical enquiries
or ordering spare parts.

User guide - SEFA CLAM PRO V3 Series
www.sefa.fr 5
English
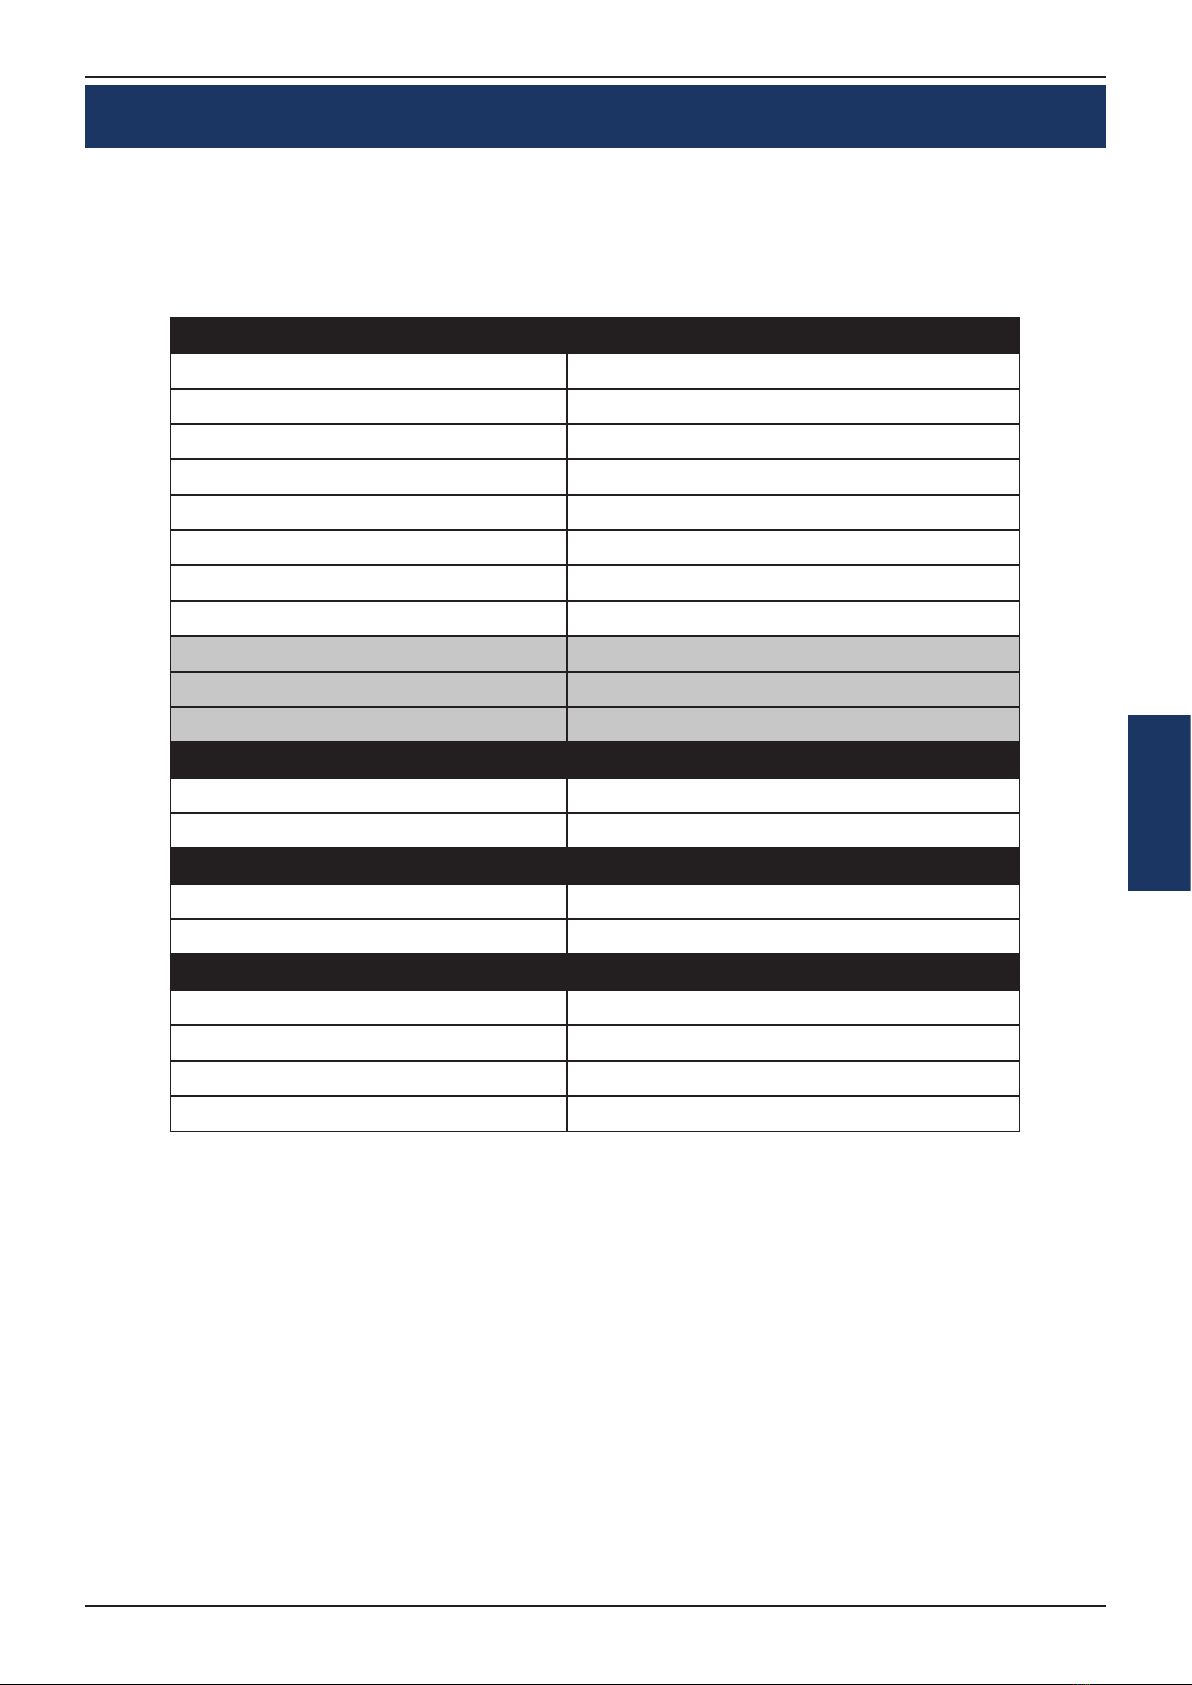
TECHNICAL DATA
Technical data
Weight in working order 57 kg
Height 969 mm
Depth 830 mm
Width 439 mm
Platen size 400 x 500 mm
Power supply 220/240 V single phase + ground 50/60 Hz
Power consumption GPX : 3200 W / Standard : 2500 W
Amp rating GPX : 14 A / Standard : 11 A
Power supply (US version) 110/120 V single phase + ground 50/60 Hz
Power consumption (US version) 1750 W
Amp rating (US version) 16 A
Electronic temperature controller
Accuracy +/- 1%
Setting range 0 °C - 220 °C
Electronic timer
Accuracy +/- 1%
Setting range 0 s - 59 min 59 sec
Operating conditions
Noise level < 70 dB (A)
Ambient operating temperature 10 °C - 35 °C
Humidity < 90%
Maximum pressing force 450 g/cm
Non-contractual document : we reserve the right to alter our product specifications in
line with advances in technology.

2021-03-25
6 www.sefa.fr
English
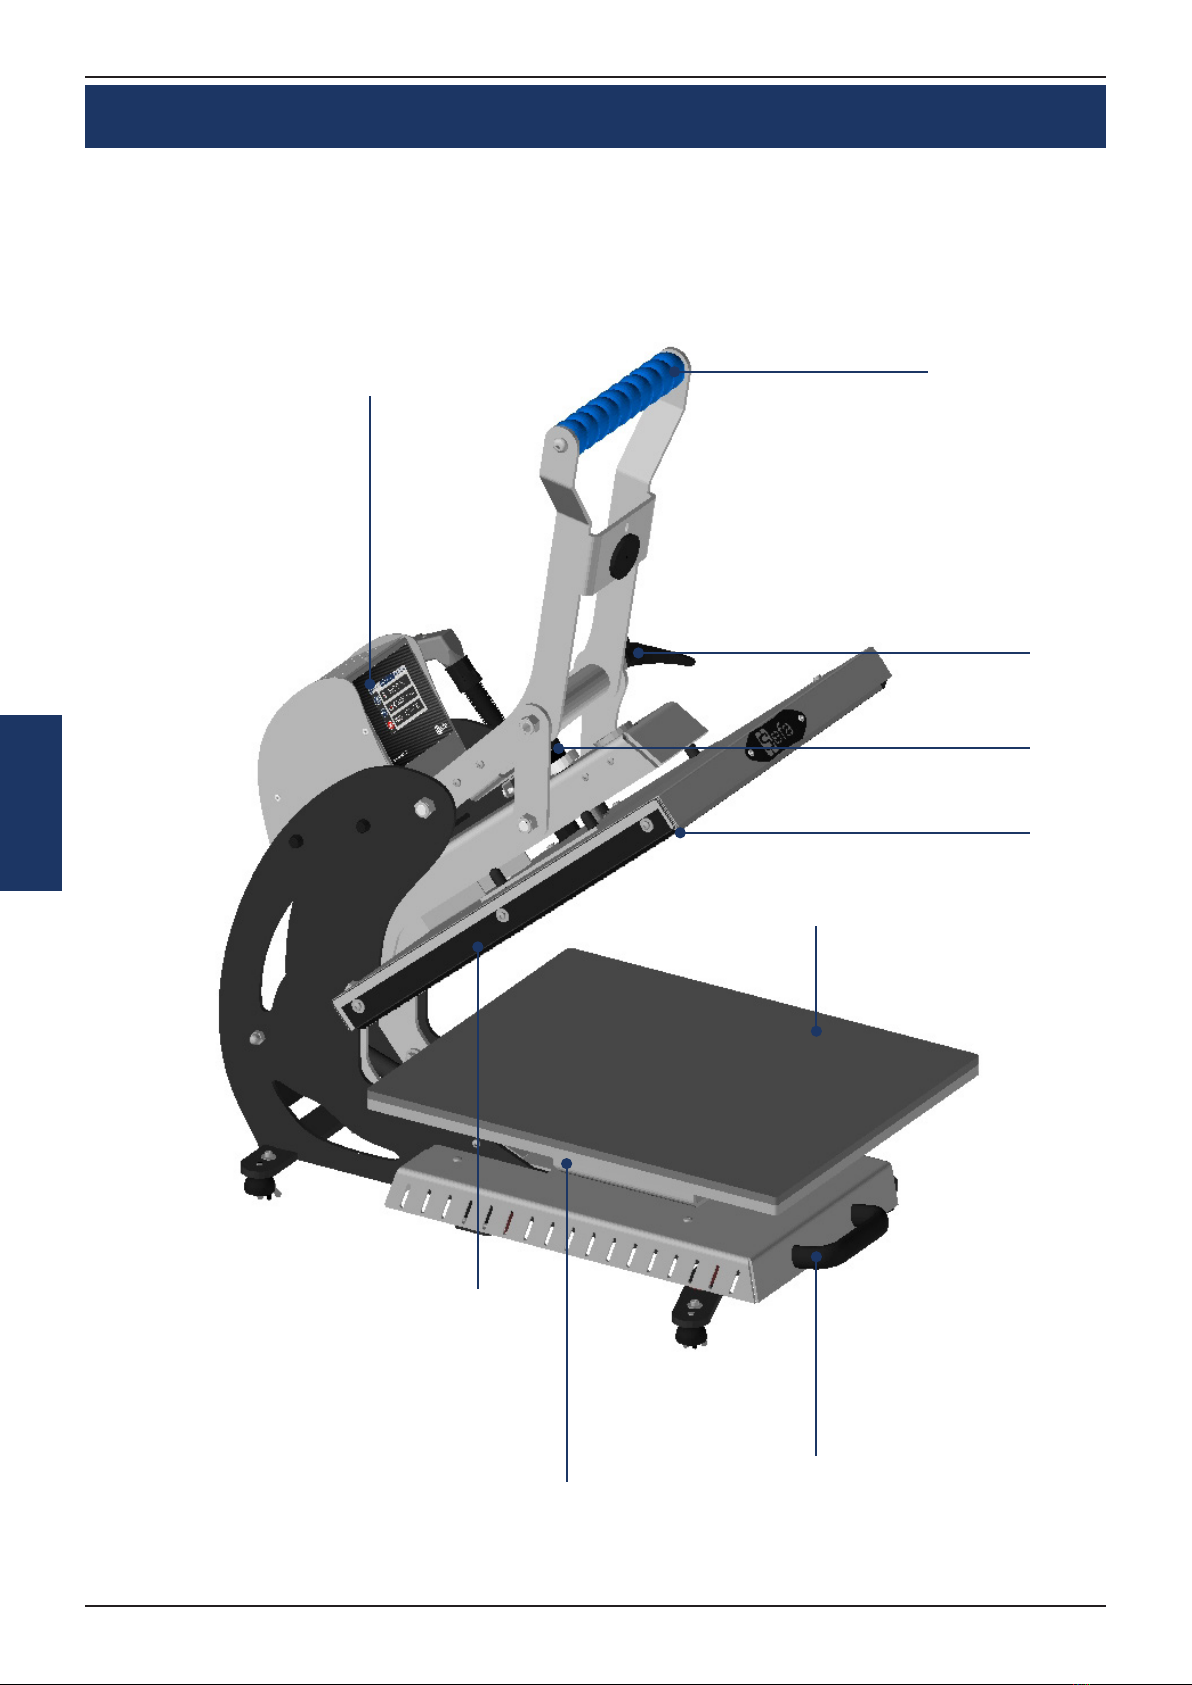
OVERVIEW
This heat press has been designed to operate at high output without risk to operator
safety in accordance with article L 233-5 of the French labour code. It has been de-
signed for use by a single operator positioned in front of the machine.
Teflon sheet
Slide drawer handle
180° rotatable lower
platen mount
Silicone foam
Touch screen
controller
Operating handle
Pressure
adjustment wheel
Heat platen
Quick position
(optional)

User guide - SEFA CLAM PRO V3 Series
www.sefa.fr 7
English
SAFETY
Please read the Operating Manual carefully before operating the press.
The press should be operated by a qualified person who is aware of the potential dan-
gers arising from improper use of the equipment. The factory-installed pneumatic,
electrical and mechanical settings programmed by our technicians and the safety fea-
tures must not be altered under any circumstances. SEFA accepts no liability for pro-
blems that may be caused by the machine if such alterations are made.
Personal Protective Equipment (PPE) must be worn (e.g. gloves and
safety glasses).
Do not touch hot parts of the machine during use. Do not place hands
between the platens when the machine is switched on. Make sure the
operator is not exposed to risks of burns, electrocution or other ha-
zards when handling the machine.
Check the machine each day before use. Make sure there is nobody in
the vicinity of the machine before starting work. If the machine mal-
functions, cut the power supply and look for the cause of the problem
(see the Servicing section of this manual).
No changes must be made to the safety covers and safety systems.
They must be refitted if they are removed for servicing work.
They must be kept in place and in good condition during normal use.
Technical parts documents are supplied with the machine. Please read them before
starting to use your SEFA machine.
a� International symbols
b� Important safety precautions
c� Safety features
THIS MACHINE IS DESIGNED FOR USE BY A SINGLE QUALIFIED OPERATOR
OFF
HOT SURFACE
ON
DANGER, WARNING ELECTROCUTION
HAZARD

2021-03-25
8 www.sefa.fr
English
DO NOT CARRY THE MACHINE BY THE PLATES
TO BE PERFORMED BY QUALIFIED PERSONNEL
OPERATION
Cut the packing straps and undo the cover and dome retai-
ning screws.
Remove the cover and then the dome from the case.
Remove the plastic bag from the machine.
Remove the anchor bolts securing the machine to the pallet.
With the packaging removed, take off the safety screw using
the 4 mm Allen key provided.
Use the carry bars to carry the machine and attach it to a
stable, level table.
Fit and secure the lower platens in place if they are not already
installed.
Plug in the machine using the power lead provided.
Press the switch at the back of the arm to «1».
The control panel page will be displayed on the touch screen.
This machine must be used by qualified personnel.
Switching on the machine turns on the temperature control,
electronic board and electrical power supplies.
a� Setting up the machine
b� Switching on
safety screw
User guide - SEFA CLAM PRO V3 Series
www.sefa.fr 9
English
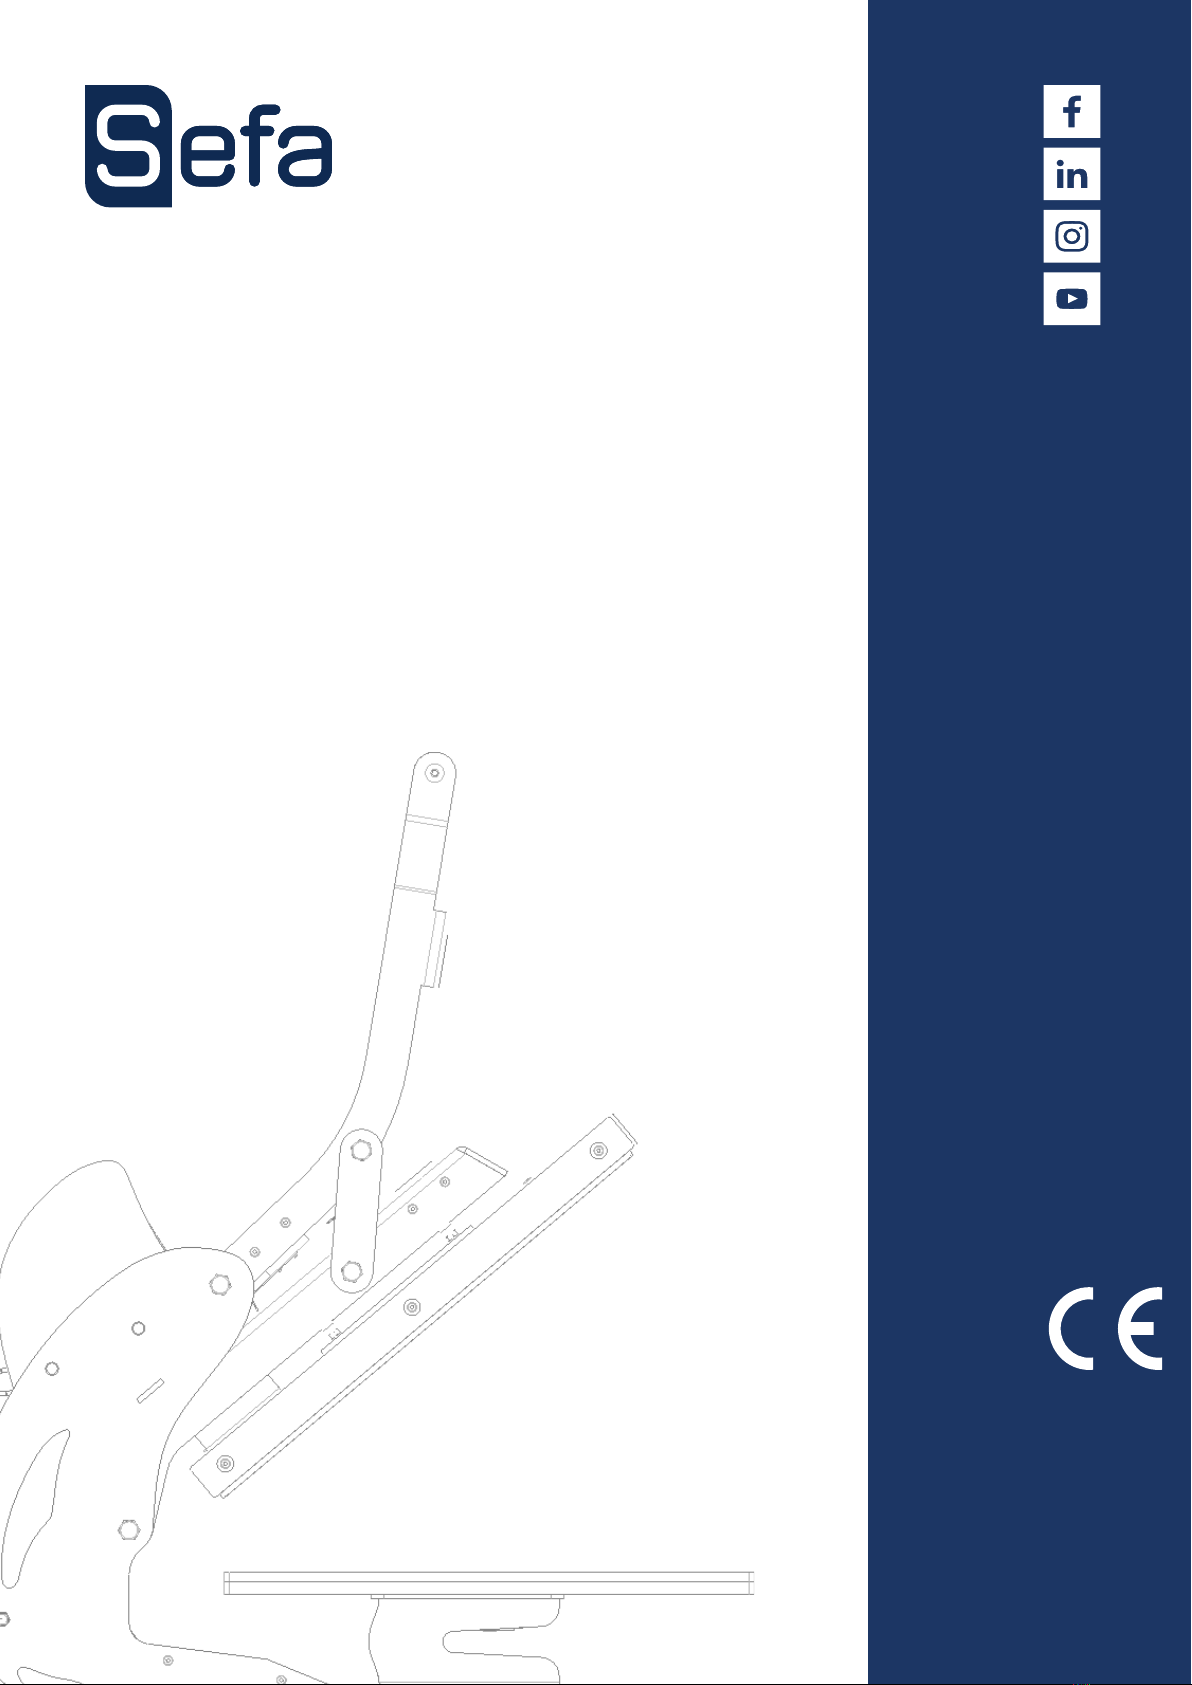
This press is fitted as standard with a lower platen mount that pivots through 180° so
that you can thread the workpieces on from the front or back.
To fit the mount the other way:
- Undo the 2 thumbscrews between the mount and the lower platen.
- Turn the mount around 180°.
- Tighten the 2 thumbscrews underneath the lower platen
There are two placement guides on the underside of the lower platen to place your
hands on and make the platen easier to lift off for changing.
The pressure applied by the heat platen can be altered to suit operator requirements.
The cold platen can also be fully lowered to leave a gap between the two platens (maxi-
mum distance in the working position: 15mm).
1. Undo the attachment screw.
2. Turn the pressure adjustment wheel clockwise to lower the heat platen
(and increase the pressing force).
3. Turn the other way to reduce the pressure.
4. Tighten the attachment screw to apply the setting.
c� Selecting a working direction
d� Setting the height of the heat platen
e� Changing the work platen
Thumbscrews
Attachment screw
Pressure
adjustment wheel
Lockpin Placement guides
180 ° Rotation
2021-03-25
10 www.sefa.fr
English
1. Press the main switch at the back of the machine to turn the power on.
2. Set the temperature.
3. Set the pressing time.
4. Set the pressure.
5. Place the T-shirt on the lower platen.
6. Position the transfer sheet correctly.
7. When the heat platen is at the correct temperature, use the handle to
lower it into position.
8. The timer will start when the platen is lowered.
9. The press will open automatically when the countdown has finished.
10. The cycle can be stopped early by pressing the cycle stop button on the
touch screen. The press will open automatically within 2 seconds.
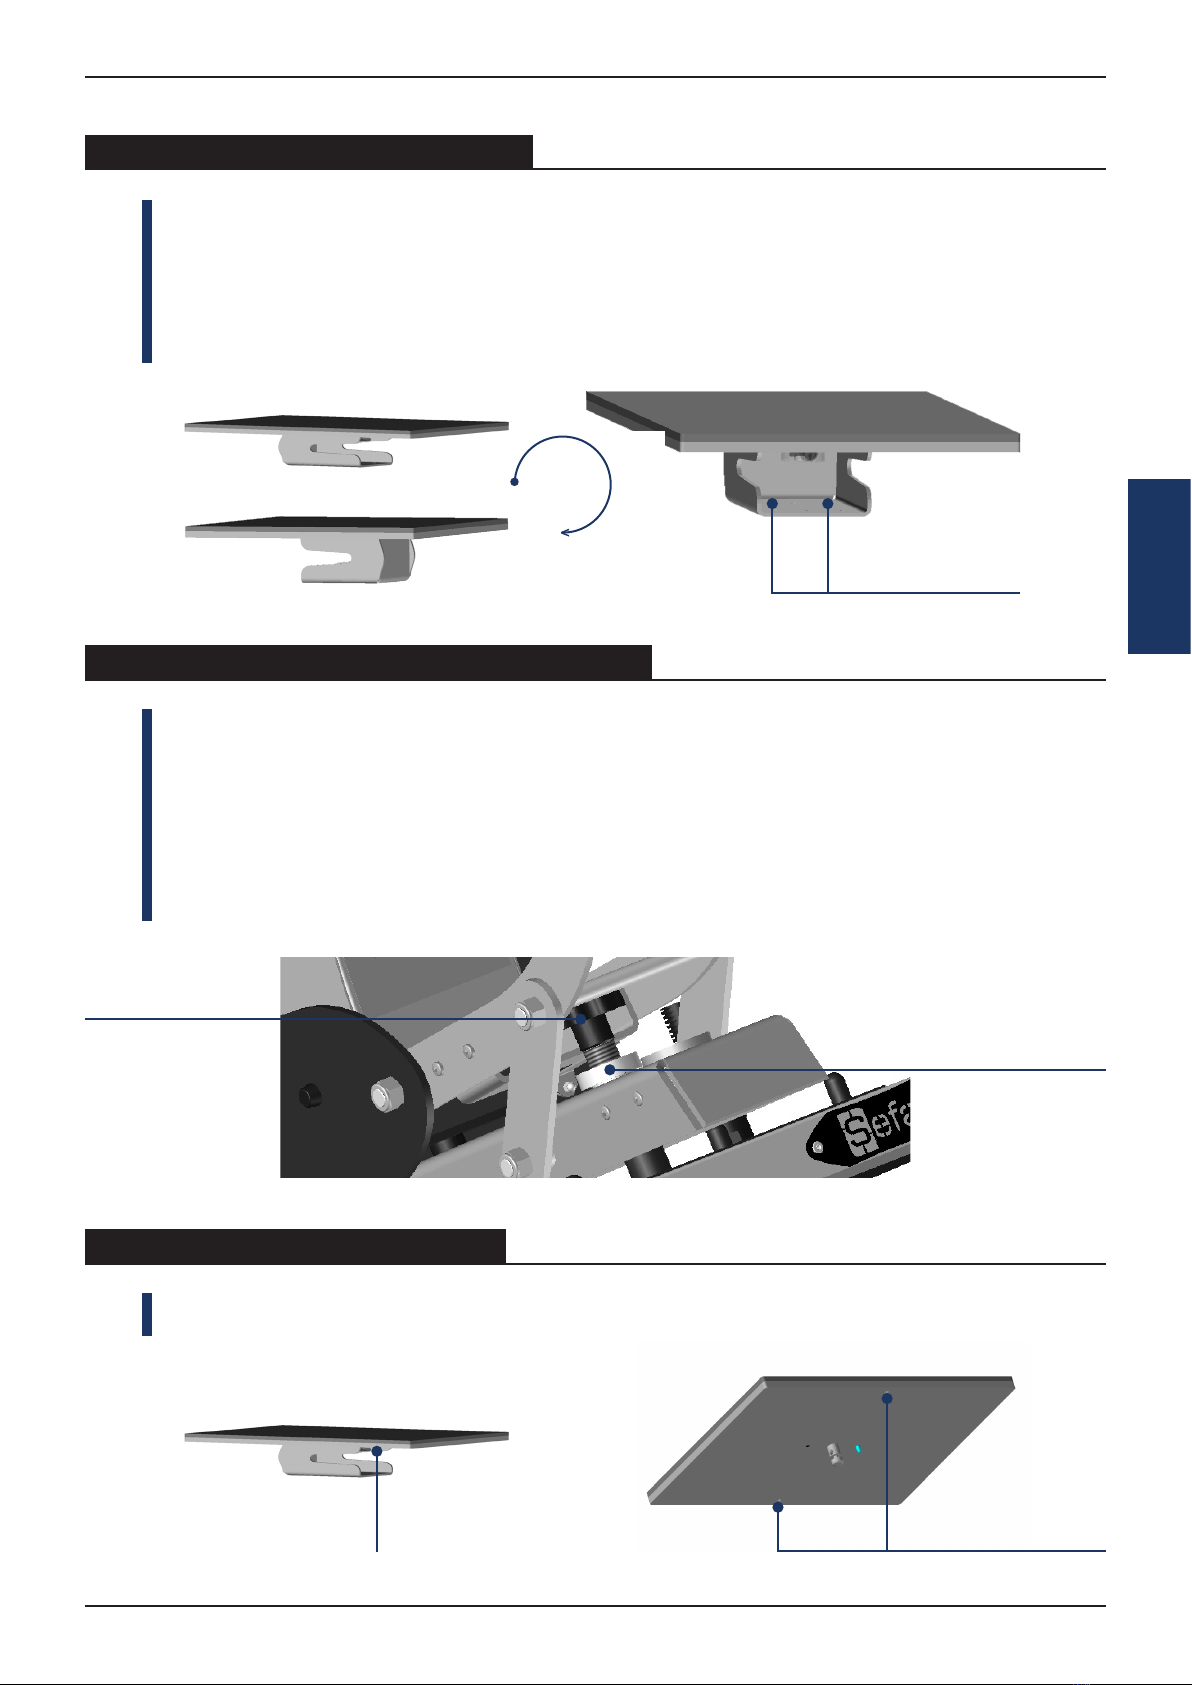
11. The lower platen has a handle to slide it in and out.
g� Operating cycle
There are two placement guides on the underside of the lower platen to place your
hands on and make the platen easier to lift off for changing.
f� Using the “double pressure” option
Quick position lever
Lockpin
User guide - SEFA CLAM PRO V3 Series
www.sefa.fr 11
English
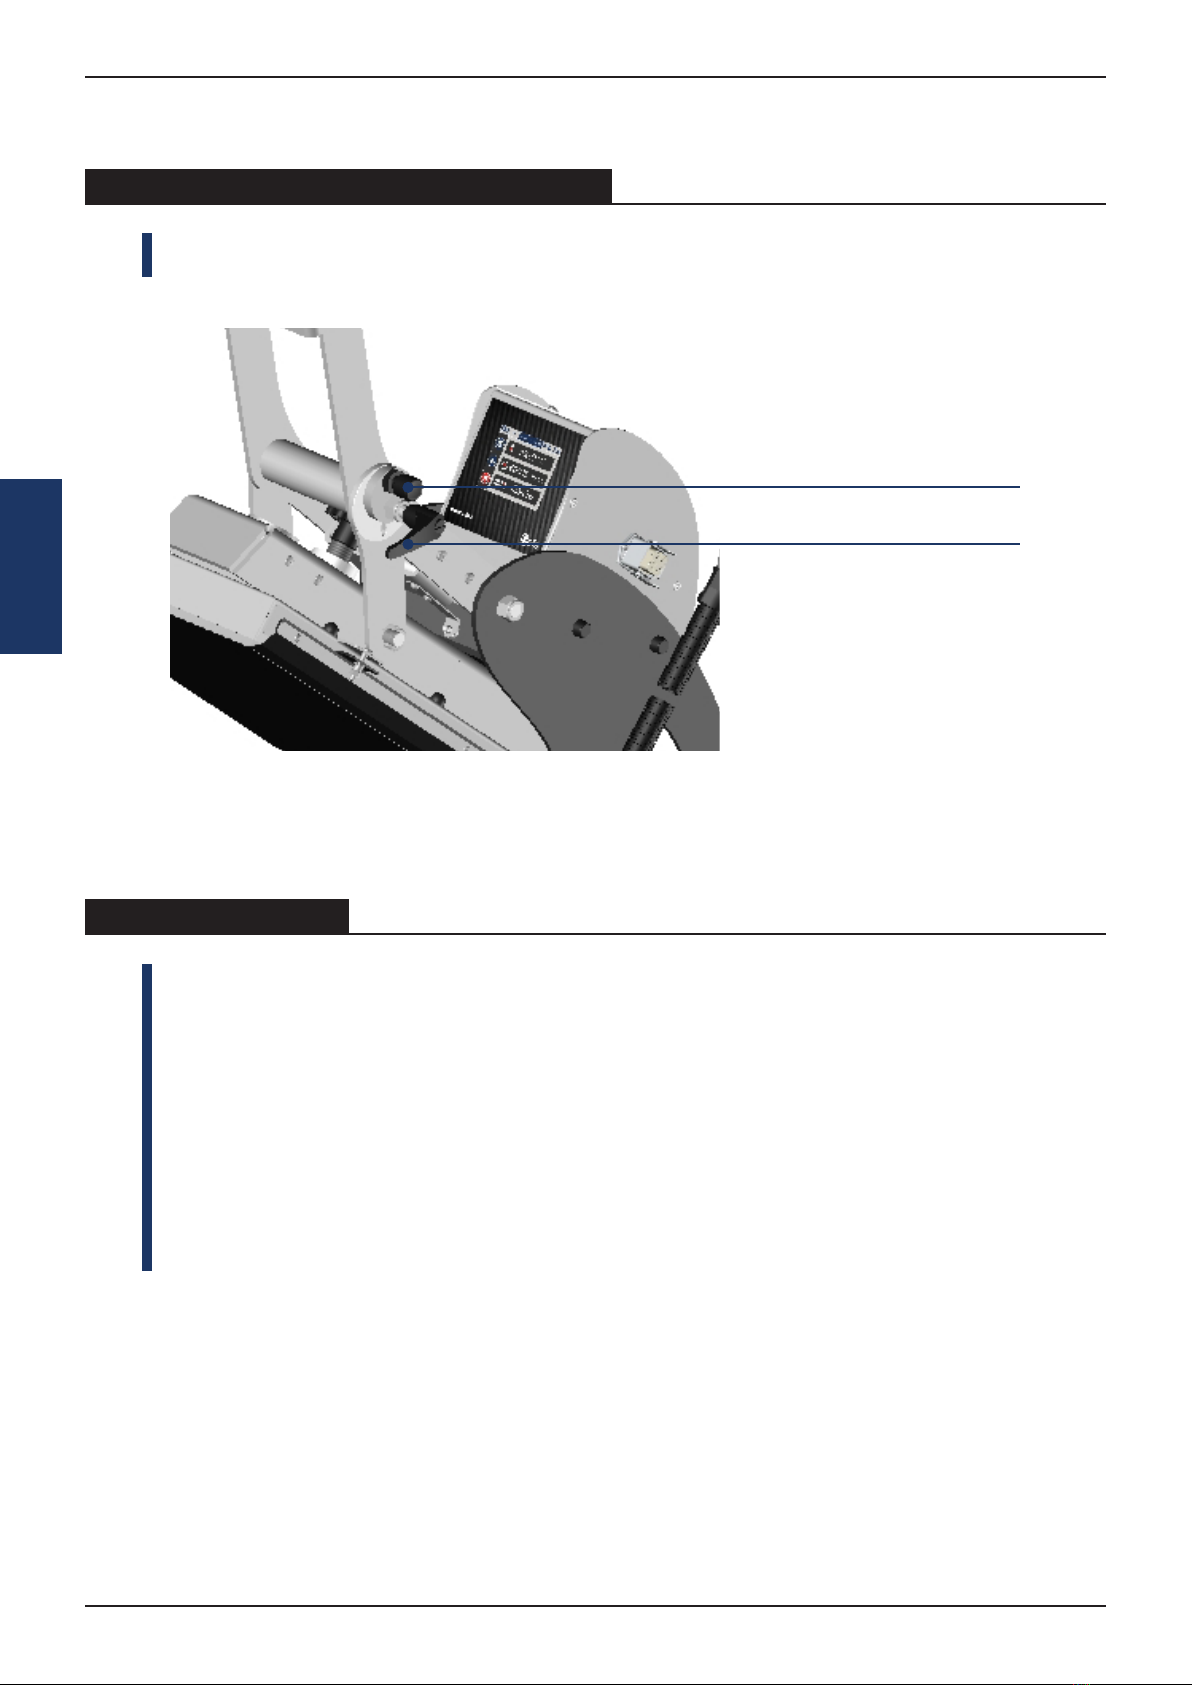
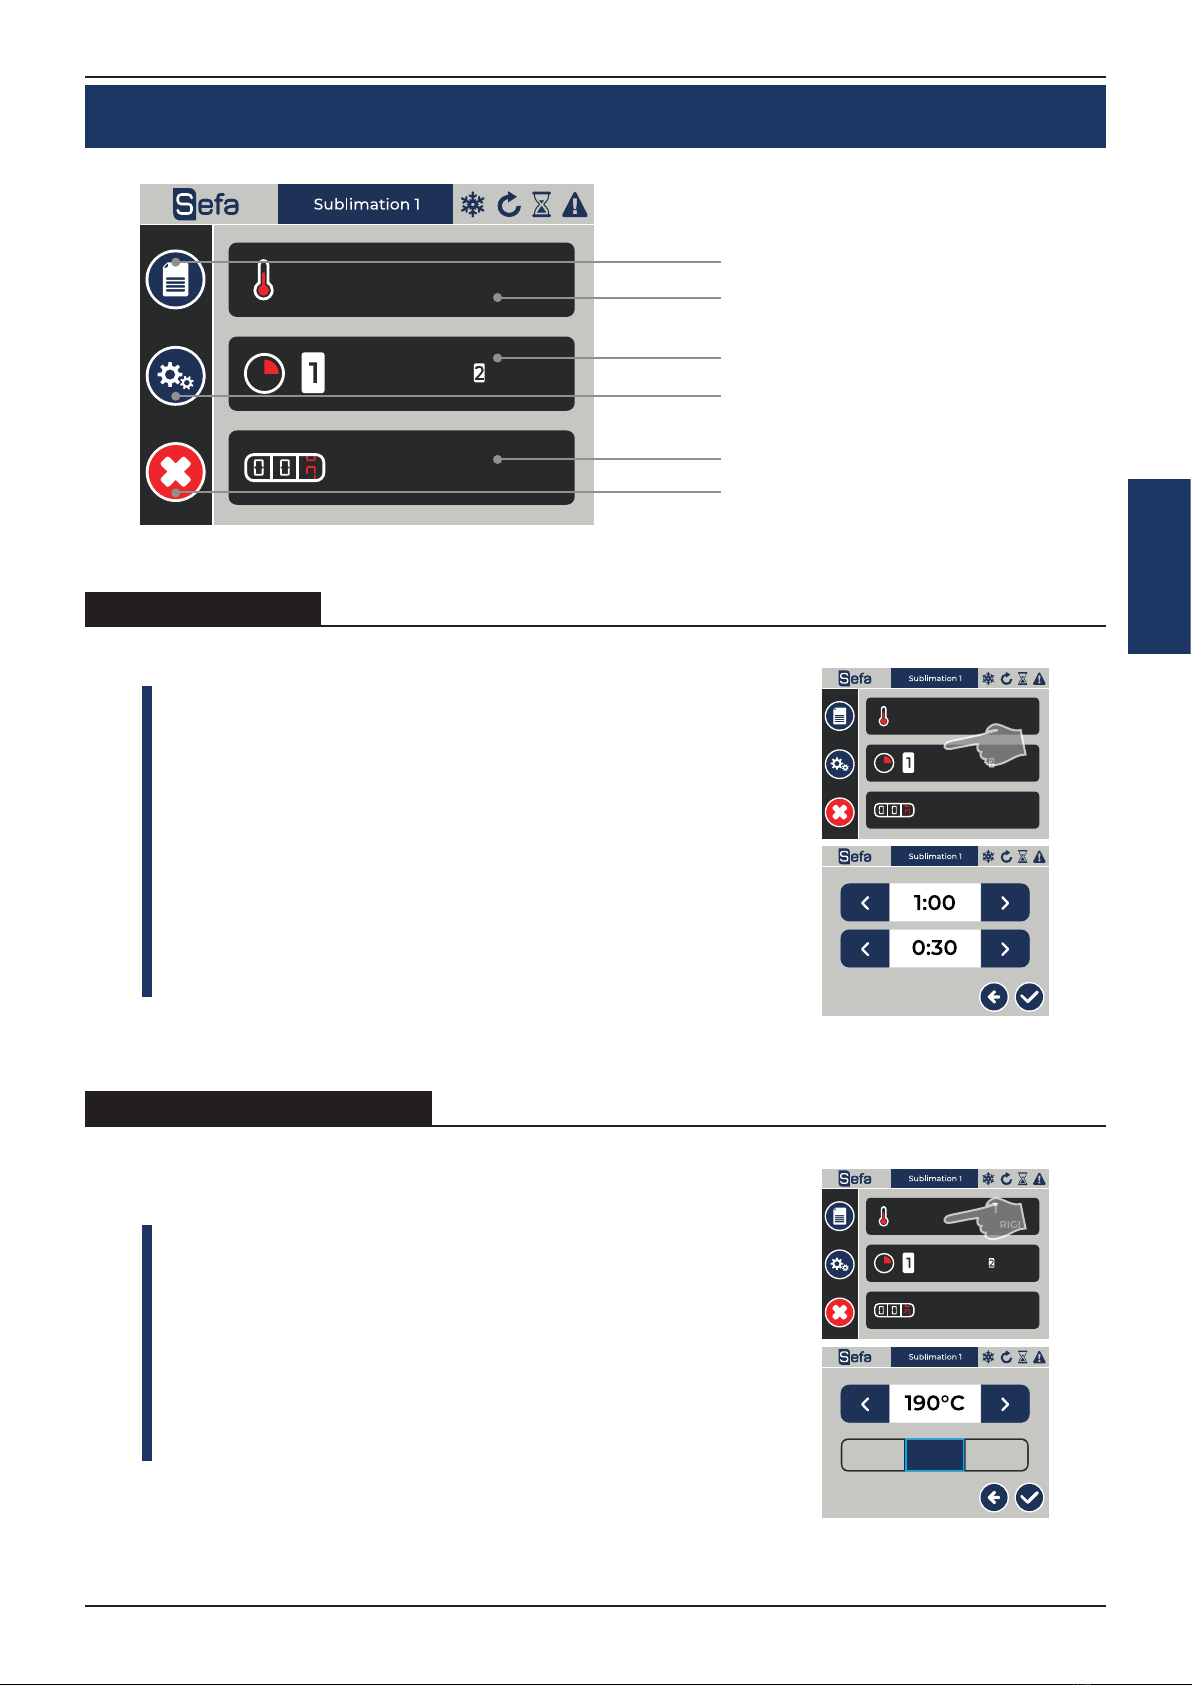
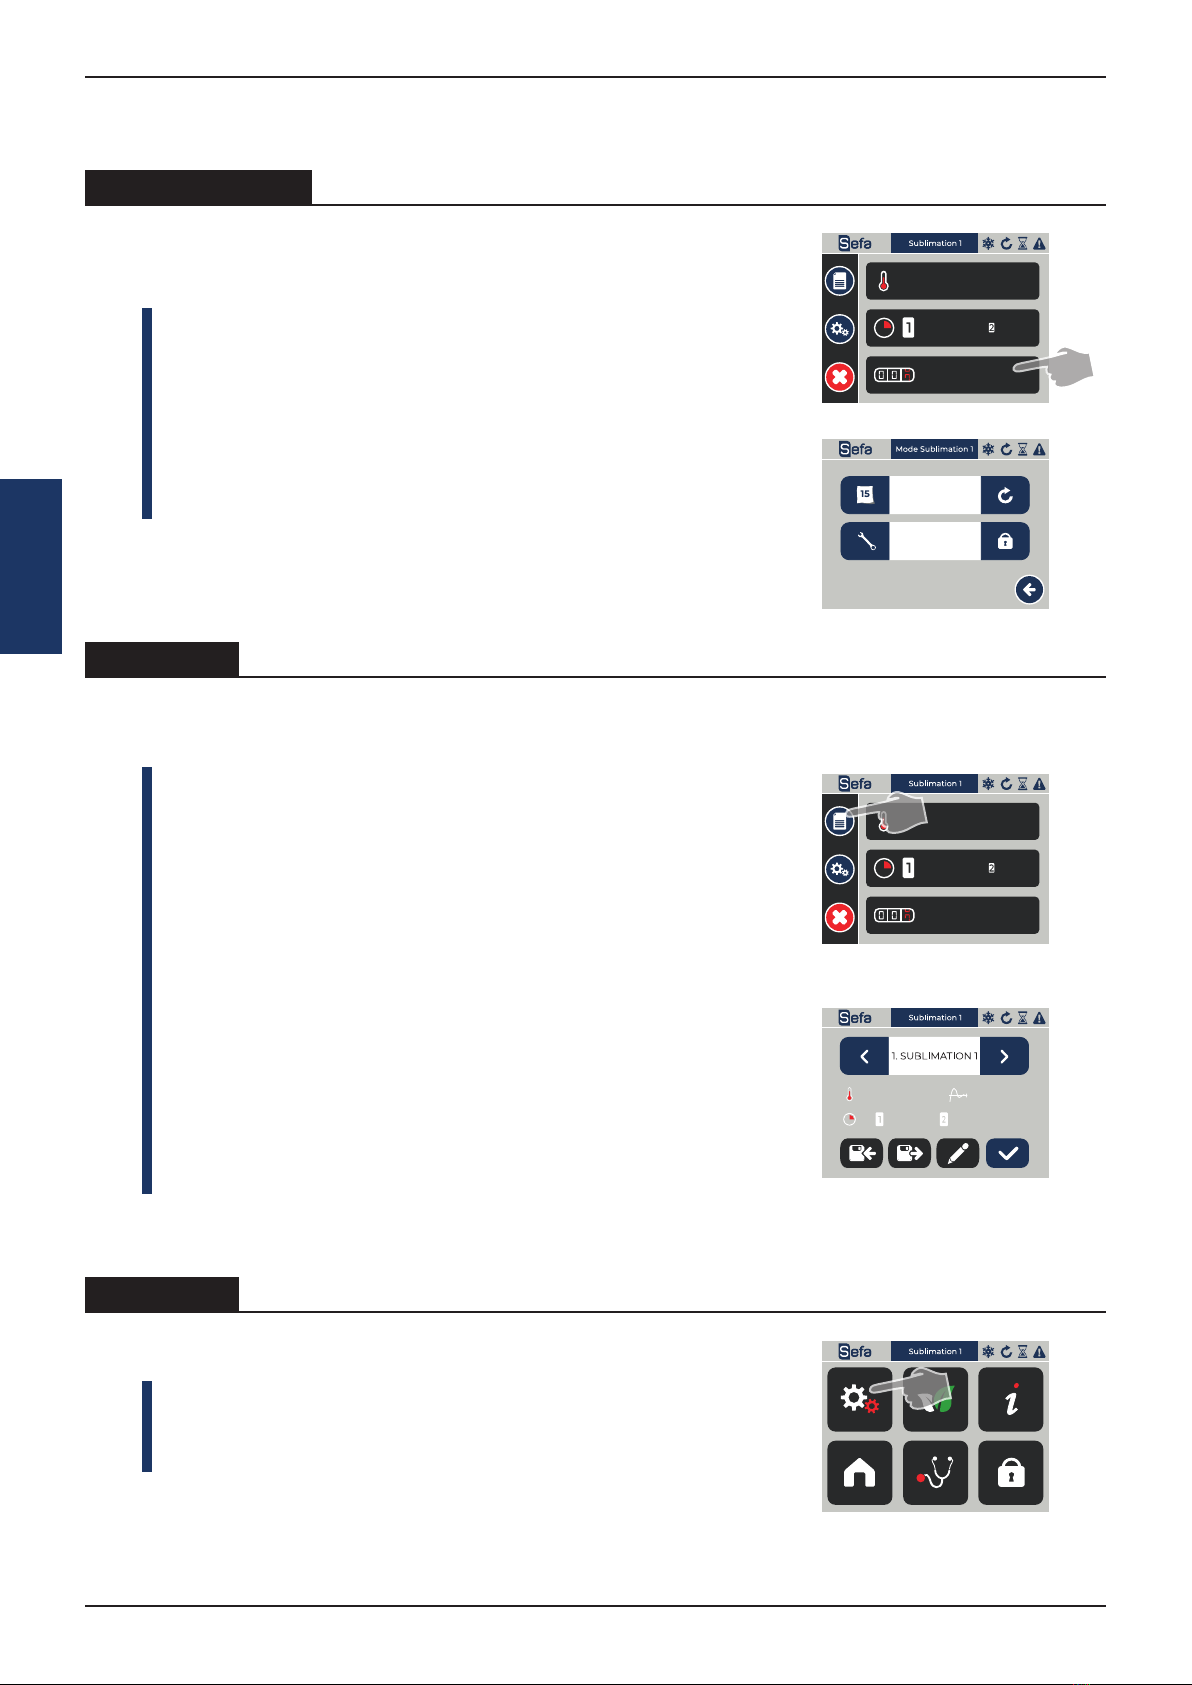
SMART TOUCH ® CONTROL SCREEN
25°C
1:00
001502
0:30
190°C
RIGID
Recipes (d)
Temperature - current & setpoint (b)
Pressing time (a)
Settings (e)
Counter (c)
Stop cycle
25°C
1:00
001502
0:30
190°C
RIGID
25°C
1:00
001502
0:30
190°C
RIGID
Press here to set the machine’s pressing time.
Use the left and right arrow keys to increase and decrease the
setting.
You can also have 4 consecutive pressing times (cf. “settings
(e)”) on single-platen presses and up to 4 times for dual-
platen presses.
You can also change this setting by pressing the time display
and entering the required time from the touch pad (4 cha-
racters must be entered).
Once you have entered the required time, press the “confirm”
key in the bottom right corner of the screen.
Press the temperature menu. You can select the temperature
you require in the same way as for the pressing time, using
the arrow keys on the left and right of the temperature dis-
play. You can also click on the reading and manually select
a temperature. When entering a temperature below 100°C,
place a 0 before the desired value (e.g. 090° C).
Select the material profile you wish to press from the 3 op-
tions provided (TEXTILE, RIGID and DTG) and press the
confirm icon.
TEXTILE RIGID DTG
a� Pressing time
b� Temperature settings
2021-03-25
12 www.sefa.fr
English
c� Item counter
d� Recipes
e� Settings
25°C
1:00
001502
0:30
190°C
RIGID
25°C
1:00
001502
0:30
190°C
RIGID
This menu shows how many items the machine has printed.
When you click on this icon, two counters are displayed.
The first counter shows the partial count. It can be reset to
zero by pressing the arrow to its right.
The second counter shows the total number of items printed
since the machine was installed. This count is permanent and
cannot be reset.
Pressing the Recipes icon brings up the menu shown oppo-
site.
Use the left and right arrows to select one of the 5 pre-confi-
gured recipes. To use a recipe, press the floppy disk icon with
the arrow pointing to the right. Once selected, press the home
icon in the bottom right corner to return to the main menu.
To create or alter a recipe, you must first set the time and
temperature from the main screen and then select a memo-
ry slot (1 to 5) from the recipe screen.
To rename a recipe, press the pencil icon. Give your recipe
a name and press the arrow in the bottom right corner to
confirm.
To finish, press the floppy disk icon with the arrow pointing to
the left to save your choice/setting.
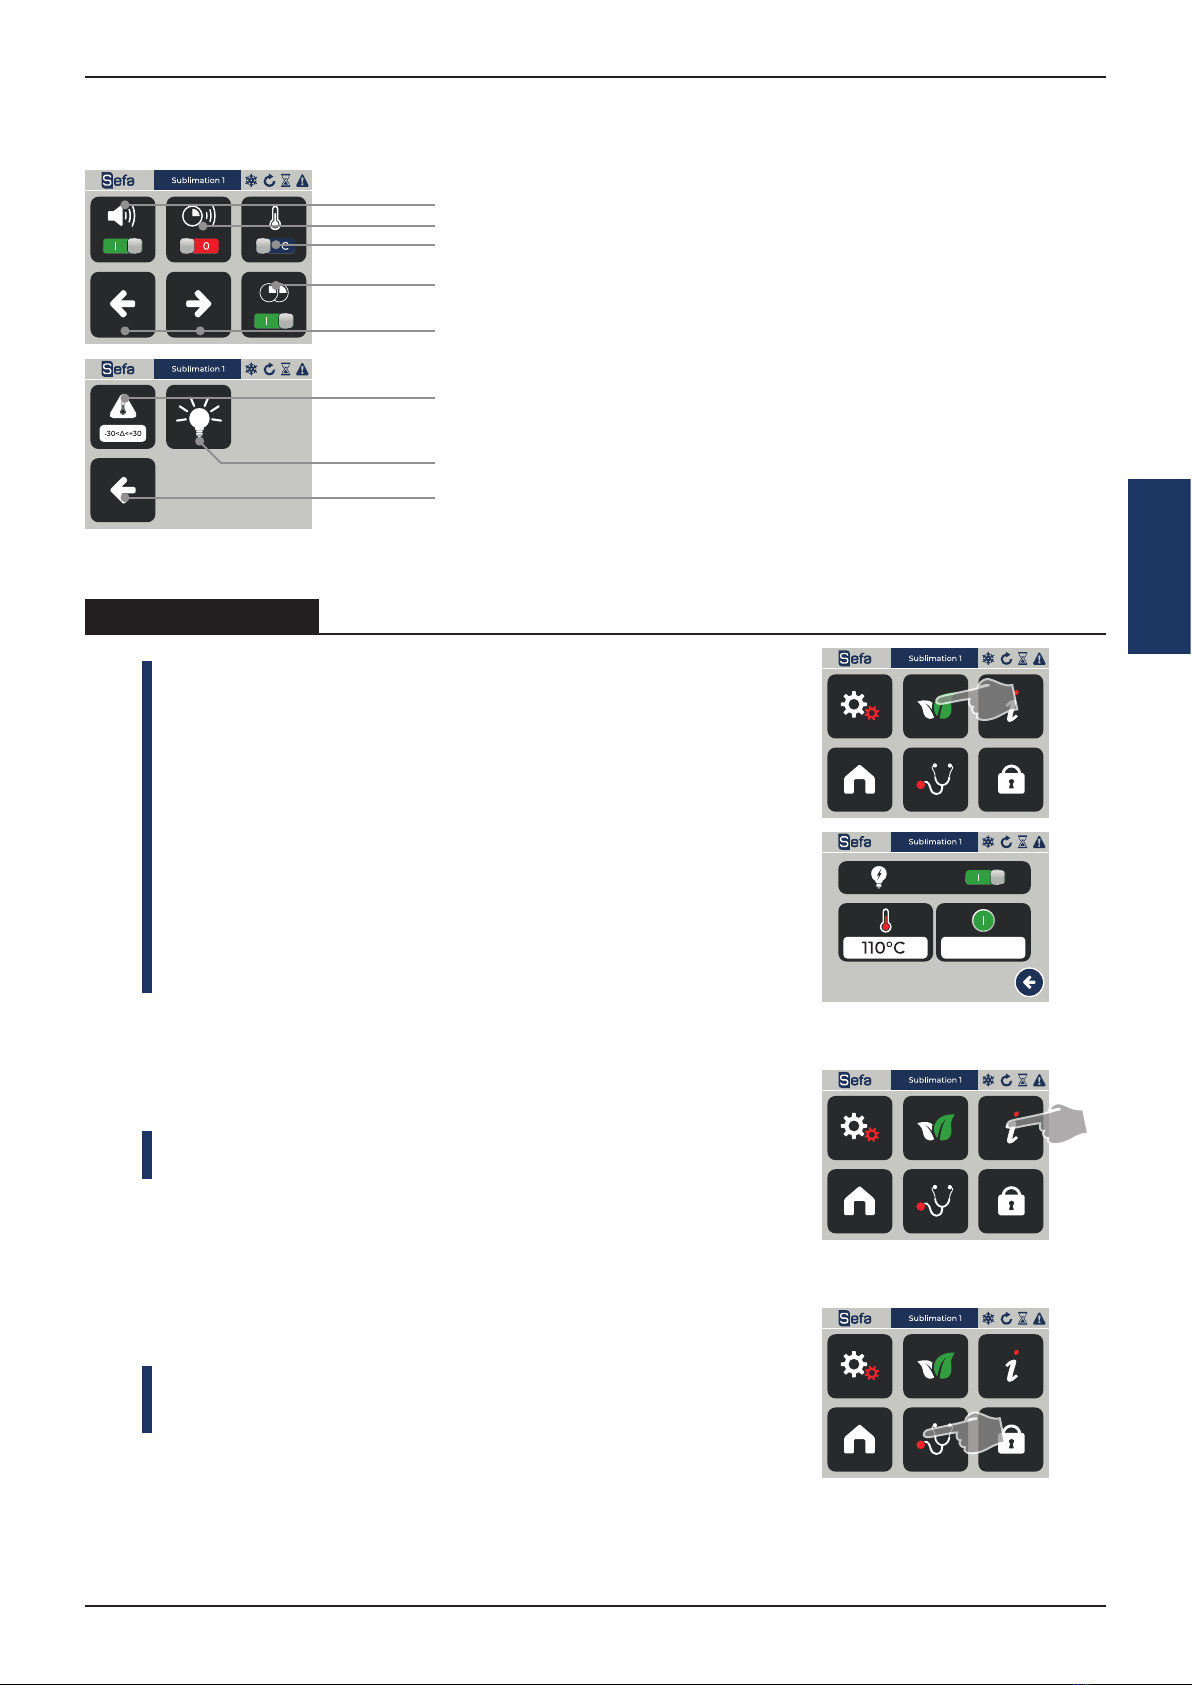
Press icon (e) in the main menu to go to the machine set-
tings. There are 6 available options.
The gear wheel button lets you change the machine’s tech-
nical aspects.
150282
150282
195°C
02:00 02:00
RIGID
User guide - SEFA CLAM PRO V3 Series
www.sefa.fr 13
English
f� Other settings
The green leaf icon is used to set energy-saving mode.
The operator can use two energy-saving modes :
- Hibernate
Hibernate start time
Heating restart time
- Sleep
Sleep temperature (40°C (104°F) to 140°C
(284°F))
Idle time before sleep mode
The board will only switch to eco mode if it is on the home
screen. If the user leaves the press on another screen, the
screen is presumed to be in the process of being altered. Sim-
ply touch the screen or start a cycle to exit energy-saving mo-
des that are currently running.
The “i” at the top right provides key information about the sof-
tware version and SEFA contact details.
The last icon is home, which takes you back to the machine’s main menu.
The diagnostic button brings up the machine status so you
can see if there are currently any malfunctions. If there are,
contact your distributor support department.
Lets you choose whether the machine emits a sound each time the touch screen is used.
The setting in the top left corner shows that the machine is pressing within the set tempera-
ture range. This range can be set by pressing the icon and entering the 2 required tempera-
tures. A non-locking warning will be displayed. It will be ignored during the 2nd pressing and
allows the work continue even if the setpoint is not reached.
Lets you enable another timer for the pressing time. With this option enabled, you
can alter 2 times in the pressing time menu.
Lets you enable or disable an alarm when the pressing time is complete.
The setting at the top right lets you adjust the screen brightness.
The left arrow takes you back to the previous menu. The right arrow takes you to
other settings.
Lets you choose the unit of temperature : Celsius or Fahrenheit.
The left arrow takes you back to the previous menu.
2 min
2021-03-25
14 www.sefa.fr
English
g� List of alarms / events
Press the red/orange area to clear the fault.
Alarm 01: Probe PT100 Probe signal lost (sensor or cable). The
heating control is instantly disabled.
Alarm 02: Overheating Tem-
perature above 220°C
Temperature reading above 230°C. The
heating control is instantly disabled.
Alarm 06: Platen lift
The top travel limit is not read during the
lift phase before the platen lift time-out
ends.
Alarm 10: Communication
error
Communication lost between power
board and screen board.
Contact your stockist.
Alarm 13: Temperature not
reached.
Blocks first cycle start request. Permits
cycle start at second request (forced start
despite setpoint not being reached).
User guide - SEFA CLAM PRO V3 Series
www.sefa.fr 15
English
SERVICING
TO BE PERFORMED BY QUALIFIED PERSONNEL
THE MACHINE MUST BE SWITCHED OFF AND LOCKED AND TAGGED PRIOR TO
SERVICING (ELECTRIC AND PNEUMATIC POWER SOURCES DISCONNECTED)
The following tools should be available at hand:
- Phillips and flat-blade screwdrivers
- Set of open-ended spanners and box spanners
- Set of Allen keys
- Multimeter
- Silicone foam pads
Check that the platen is cold.
Make sure the surface of the platen is clean.
The surface can be cleaned using soapy water. Suitable personal protective
equipment must be worn.
Use RTV-1 glue to stick the foam pad to the aluminium platen (NB: read the
instructions for use on the packet).
The pad and the platen must be clean and dry before they are stuck together.
Apply a thin layer of glue evenly over the platen and then stick the pad
immediately into place, making sure there are no air bubbles trapped between
the platen and the pad (e.g. a notched tile adhesive comb).
Leave to set overnight at room temperature with a slight pressure applied and
the platen cold.
- For other parts, contact your stockist to determine whether they need to be renewed
or repaired.
SEFA heat presses are practically maintenance-free. Follow the preventive mainte-
nance instructions below to ensure trouble-free operation:
Do not heat items that could perish or score the silicone pad or damage the heat
platen’s teflon coating.
Clean the machine at regular intervals, with the platen cold, using a clean cloth and
soapy water and wearing suitable personal protective equipment.
Keep the heat platen in the raised position when it is hot but not in use.
DAILY CARE:
Clean the foam pad and the heat platen’s coating (when cold) with a dry cloth
or a cloth with grease remover.
Inspect the air inlet filter on the left side of the swing arm; drain the filter if it is
heavily condensated.
MONTHLY CARE:
Check that the hinged joints are lubricated.
According to use:
Replace the foam pad every 6 months.
a� Replacing worn parts
b� Maintenance

2021-03-25
16 www.sefa.fr
English
TROUBLESHOOTING TIPS
The machine must be switched off and locked and tagged prior to any ser-
vice repair work (electric and pneumatic power switched off).
The heat platen can cause burns. Check that the platen temperature rea-
ding on the display panel is below 25° C before handling.
Problem Possible causes Solution
The platen does not heat
up
The fuse is not working
Faulty board
The thermocouple is not working (da-
maged probe)
If none of the press lights come on,
check and if necessary replace the
fuse.
MAIN FUSE housed in a compart-
ment next to the power cord plug
(16A). To gain access, unplug the
power lead and use the tip of a pen
or a screwdriver to lift up the fuse
compartment. The square tube
contains a spare fuse to replace the
one in the clip.
Check and if necessary replace the
board.
Replace the temperature probe
The platen overheats The electronic board is damaged Replace the electronic board
The timer does not count
down
The limit switch is not activated Check whether the limit switch is
opposite the magnet.
The buzzer sounds non-
stop even though the
press is open
The limit switch magnet is incorrectly
adjusted.
Check the position of the magnet.
Change the limit switch
The platen does not stay
down
The limit switch is faulty.
There is no power to the electro-
magnet or it is faulty
Change the limit switch
Check the connections
The drawer does not stay
in place
Check the slides
Check the magnets
Lubricate or change the slides
Replace or move the magnets
higher

Manuel utilisateur - SEFA CLAM PRO V3 Series
www.sefa.fr 17
Français

2021-03-25
18 www.sefa.fr
Français
CONDITIONS DE GARANTIE
La période de garantie débute le jour de la mise en service du matériel chez l’utilisateur,
matérialisée par le retour du bon de garantie et le bon de livraison, pour une durée de
deux ans pour une utilisation courante de 8 heures par jour, soit 3000 heures.
La garantie est strictement limitée à nos matériels, contre les défauts de matière et
d’exécution.
A charge pour l’acheteur de prouver les dits défauts.
Notre responsabilité est limitée à l’obligation de rectifier ou de remplacer gratuitement
les pièces reconnues défectueuses par nous, sans qu’il ne puisse nous être réclamé au-
cune indemnité pour quelque cause que ce soit.
Les pièces remplacées au titre de la garantie :
- Restent notre propriété,
- Font l’objet d’une facturation de dépôt
Un avoir d’annulation est déclenché dès le retour des pièces défectueuses.
Le retour devra survenir UN MOIS MAXIMUM après l’intervention.
LA GARANTIE NE COUVRE PAS :
Les fournitures consommables du commerce telles que :
- Fusibles, LED, joint, flexibles, buses, filtres...
- Les fournitures n’étant pas notre fabrication pure, subissent la garantie de leur fabri-
cant.
LA GARANTIE NE S’APPLIQUE PAS :
Aux remplacements, ni aux réparations qui résulteraient de l’usure normale des appa-
reils et machines, des détériorations ou accidents provenant de négligences, défaut de
surveillance ou d’entretien, d’utilisation défectueuse ou de modifications sans notre
accord écrit.
En cas de vice provenant de matière fournie par l’acheteur, ni d’une conception im-
posée par celui-ci.
Aux réparations qui résulteraient des détériorations ou accidents survenues lors du
transport.
Aux opérations d’entretien et de réglages inhérentes à l’utilisation de la machine, et
indiquées dans la notice d’entretien, telles que :
- réglages d’intermédiaires
- resserrage de tuyauterie, etc. …
Pour les machines pneumatiques, toutes traces d’huile détergen-
te dans le circuit pneumatique inhibent les conditions de garanties
précédemment citées.
Pour tout renseignement technique ou commande de pièces détachées,
donner la référence de la machine ainsi que son numéro de série.
Manuel utilisateur - SEFA CLAM PRO V3 Series
www.sefa.fr 19
Français
CARACTERISTIQUES
Document non contractuel : en fonction des progrès techniques, nous nous réservons
le droit de modifier les caractéristiques de nos produits.
Caractéristiques
Poids en ordre de marche 57 kg
Hauteur 969 mm
Profondeur 830 mm
Largeur 439 mm
Dimensions du plateau 400 x 500 mm
Alimentation électrique 220/240 V single phase + ground 50/60 Hz
Puissance GPX : 3200 W / Standard : 2500 W
Ampérage GPX : 14 A / Standard : 11 A
Alimentation électrique (version US) 110/120 V single phase + ground 50/60 Hz
Puissance (version US) 1750 W
Ampérage (version US) 16 A
Régulateur électronique température
Précis à +/- 1%
Réglable de 0 °C - 220 °C
Minuterie électronique
Précis à +/- 1%
Réglable de 0 s - 59 min 59 sec
Conditions d’utilisation
Bruit < 70 dB (A)
Température ambiante d’utilisation 10 °C - 35 °C
Hygrométrie < 90%
Effort de pressage max 450 g/cm
2021-03-25
20 www.sefa.fr
Français
GENERALITES
Cette presse à thermo coller a été conçue pour effectuer une production intensive
tout en respectant l’article L 233-5 du code du travail, pour assurer la sécurité de l’utili-
sateur. Cette presse a été conçue pour un opérateur travaillant face à la machine.
Plateau chauffant
Poignée du tiroir
coulissant
Support plateau inférieur
pivotant à 180°
Mousse en silicone
Écran tactile
Poignée de serrage
Volant de
réglage pression
Quick position
(optionnel)
Toile Teflon
This manual suits for next models
1
Table of contents
Languages:
Other Sefa Printer manuals


