Sefa iSPRAY PRO User manual
User guide
Manuel utilisateur
ENGLISH
FRANÇAIS
iSPRAY PRO
HEAT TRANSFER TECHNOLOGIES


www.sefa.fr 3
EnglishFrançais
INDEX
INDEX
INDEX������������������������������������������������������������������������������������������������������������������������������������������������������������������� 3
WARRANTY TERMS ������������������������������������������������������������������������������������������������������������������������������������4
TECHNICAL DATA����������������������������������������������������������������������������������������������������������������������������������������� 5
SAFETY ����������������������������������������������������������������������������������������������������������������������������������������������������������������6
INSTALLATION������������������������������������������������������������������������������������������������������������������������������������������������7
FIRST START���������������������������������������������������������������������������������������������������������������������������������������������������10
BASIC FUNCTIONS�������������������������������������������������������������������������������������������������������������������������������������12
GARMENT LOADING��������������������������������������������������������������������������������������������������������������������������������14
PRODUCTION MODE�������������������������������������������������������������������������������������������������������������������������������15
TANK PROCEDURE����������������������������������������������������������������������������������������������������������������������������������� 16
SERVICING������������������������������������������������������������������������������������������������������������������������������������������������������ 17
TROUBLESHOOTING TIPS ��������������������������������������������������������������������������������������������������������������������21
CONDITIONS DE GARANTIE���������������������������������������������������������������������������������������������������������������23
CARACTERISTIQUES ������������������������������������������������������������������������������������������������������������������������������� 24
SECURIT���������������������������������������������������������������������������������������������������������������������������������������������������������25
INSTALLATION��������������������������������������������������������������������������������������������������������������������������������������������� 26
PREMIER DÉMARRAGE������������������������������������������������������������������������������������������������������������������������ 29
FONCTIONS DE BASE������������������������������������������������������������������������������������������������������������������������������31
CHARGEMENT DES VÊTEMENTS����������������������������������������������������������������������������������������������������33
MODE DE PRODUCTION���������������������������������������������������������������������������������������������������������������������34
PROCÉDURE DU RÉSERVOIR�����������������������������������������������������������������������������������������������������������35
MAINTENANCE������������������������������������������������������������������������������������������������������������������������������������������� 36
CONSEILS DE DÉPANNAGE ��������������������������������������������������������������������������������������������������������������40
MAINTENANCE LOG �������������������������������������������������������������������������������������������������������������������������������42

2021-03-25
4 www.sefa.fr
English
WARRANTY TERMS
The warranty period shall come into effect on the day on which the equipment is
brought into service at the user’s premises, as attested on the returned warranty certif-
icate and the delivery note, and shall run for two years, based on a standard equipment
operating schedule of 8 hours per day, i.e. 3,000 hours.
The warranty is strictly limited to our equipment, and covers faulty materials and work-
manship,
which the purchaser shall be required to substantiate.
Our liability shall be limited to making good or replacing free of charge parts that are
acknowledged by us to be defective, and no claims for damages for any reason may be
made against us.
Parts replaced under warranty shall:
- Remain our property
- Be invoiced on consignment
A credit note will be issued upon return of the faulty parts.
Returns must be made NO LATER THAN ONE MONTH after the work is performed un-
der warranty.
THIS WARRANTY DOES NOT COVER :
Commercially sourced consumables such as:
- Fuses, LEDs, seals, hoses, nozzles, filters, etc.
- Material and equipment not manufactured wholly by us, which are covered by the
warranty of the manufacturer thereof.
THIS WARRANTY DOES NOT EXTEND TO :
Replacements or repairs arising from fair wear and tear of the appliances or machines,
damage or accidents arising from negligence, lack of supervision or maintenance, im-
proper use or alterations made without our written consent.
Defects arising from material provided by the purchaser or mandatory design require-
ments issued by the purchaser.
Repairs made necessary by damage or accidents arising during carriage.
Normal maintenance and adjustment procedures required during use of the machine,
as set out in the maintenance instructions, such as:
- adjustment of intermediate components
- tightening of pipes, hoses, etc.
Any traces of detergent oil in the air system of pneumatic machines
shall invalidate the aforementioned warranty terms.
Quote the machine reference and serial number when making technical enquiries
or ordering spare parts.
User guide - SEFA iSPRAY PRO
www.sefa.fr 5
English
TECHNICAL DATA
Technical data
Weight in working order 104 kg
Height 660 mm
Depth 1040 mm
Width 850 mm
Platen size 410 x 600 mm
Power supply 220/240 V single phase + ground 50/60 Hz
Power consumption 250 W
Amp rating 1 A
Power supply (US version) 110/120 V single phase + ground 50/60 Hz
Power consumption (US version) 250 W
Amp rating (US version) 2 A
Features
Spraying Method Y Axis movement precision spraying
Motor Stepper motor
Pumps 4x
Direction of Spraying Uni-directional
Nozzles 4x
Nozzle Pressure 6.8 bars max.
Tanks 4x (5L/unit)
Non-contractual document : we reserve the right to alter our product specifications in
line with advances in technology.

2021-03-25
6 www.sefa.fr
English
SAFETY
Please read the Operating Manual carefully before operating the machine.
The machine should be operated by a qualified person who is aware of the potential
dangers arising from improper use of the equipment. The factory-installed pneuma-
tic, electrical and mechanical settings programmed by our technicians and the safety
features must not be altered under any circumstances. SEFA accepts no liability for
problems that may be caused by the machine if such alterations are made.
Personal Protective Equipment (PPE) must be worn (e.g. gloves and
safety glasses).
Do not touch hot parts of the machine during use. Do not place hands
inside when the machine is switched on. Make sure the operator is
not exposed to risks of electrocution or other hazards when handling
the machine.
Check the machine each day before use. Make sure there is nobody in
the vicinity of the machine before starting work. If the machine mal-
functions, cut the power supply and look for the cause of the problem
(see the Servicing section of this manual).
No changes must be made to the safety covers and safety systems.
They must be refitted if they are removed for servicing work.
They must be kept in place and in good condition during normal use.
Technical parts documents are supplied with the machine. Please read them before
starting to use your SEFA machine.
a� International symbols
b� Important safety precautions
c� Safety features
THIS MACHINE IS DESIGNED FOR USE BY A SINGLE QUALIFIED OPERATOR
OFF ELECTROCUTION
HAZARD
ON
DANGER, WARNING

User guide - SEFA iSPRAY PRO
www.sefa.fr 7
English
Keep the machine away from direct sunlight and heat sources
TO BE PERFORMED BY QUALIFIED PERSONNEL
INSTALLATION
First remove the top cover from the carton box.
Then remove the protective styrofoam sheets.
Continue with removing the side carton cover.
The product is 104Kg and requires at least 4 people to lift it. Always carry the device
from the bottom. Never lift it utilizing the drawer handle, nor the Nozzle Access Cover.
Place this product on a flat, stable surface. The surface should be at least 670 x 790 mm
and capable of supporting more than 130kg. This product will not operate properly if it
is tilted or in an angle. The machine must only be used indoors. Do not install or store
the iSPRAY Pro, where it will be exposed to weather conditions. Avoid places subject to
shocks and vibrations. Before moving the machine to another position, ensure that the
tank caps are sealed and liquid cannot spill out. Do not tilt the pretreatment machine,
while the liquid tanks are full or inside the machine.
Remove the blue security tapes from the iSPRAY Pro covers.
Open the Nozzle Access Cover.
Remove the yellow safety bar from the Nozzle Carriage.
Open the drawer and check that the table is properly placed on it.
The height of the machine on the front side must be 660mm and on the backside
643mm. If not, adjust the feet accordingly.
a� Unboxing
b� Preparation

2021-03-25
8 www.sefa.fr
English
Open the Tank Access Cover to gain access to the Tank Storage Compartment.
There are 4 empty tanks in the slots L1, L2, CL, and MT. You can fill the empty tanks or
directly use a new pretreatment tank in its place.
Fill/Replace Tank L1 or/and L2 with the pretreatment liquid you are going to use.
In case of using 2 pretreatment liquids, fill/replace both Tanks L1 and L2 with the accor-
ding pretreatment liquid.
Fill the Tank CL with distilled water.
Tanks that you need to refill/replace in blue below.
Option 1:
Using 1 Pretreatment Liquid (L1 or L2) and
Distilled water in the (CL) Tank.
Option 2:
Using 2 of the same type Pretreatment Li-
quids (L1 +L2) to double your capacity and
Distilled water in the (CL) Tank.
Option 3:
Using 2 different Pretreatment Liquids (L1 /
L2) and Distilled water in the (CL) Tank.
c� Liquid installation
L1
L1
L1
L1
L2
L2
L2
L2
CL
CL
CL
CL
MT
MT
MT
MT
Shake the new tanks/bottles with the pretreatment well, before using them inside the
machine.

User guide - SEFA iSPRAY PRO
www.sefa.fr 9
English
Take the Tank out of the slot.
Open the cap of the Tank.
You can use the Tank Access Cover as extra workspace.
Take the tubes out of the Tank.
Shake the pretreatment bottles well, before filling the tanks.
Fill the tank with the pretreatment liquid. Ensure that it’s with the same pretreatment
liquid type.
Put the tubes inside the tank and close the cap. Ensure they are in place and properly
sealed.
Put the tank back into the slot.
Close the Tank Access Cover.
Take the Tank out of the slot.
Open the cap of the Tank.
You can use the Tank Access Cover for extra workspace.
Take the tubes out of the Tank.
Shake the pretreatment bottles well, before replacing the tanks.
Put the tubes inside the new tank and close the cap. Ensure they are in place and pro-
perly sealed.
Put the new tank inside the slot.
Close the Tank Access Cover.
d� Tank Filling Procedure
e� Tank Replacement
Before closing the Tank Access Cover, ensure that all the tubes are inside the tanks and
that the caps are in place and properly sealed.
Before closing the Tank Access Cover, ensure that all the tubes are inside the tanks and
that the caps are in place and properly sealed.
2021-03-25
10 www.sefa.fr
English
FIRST START
a� Preparation
b� Nozzle assembly steps
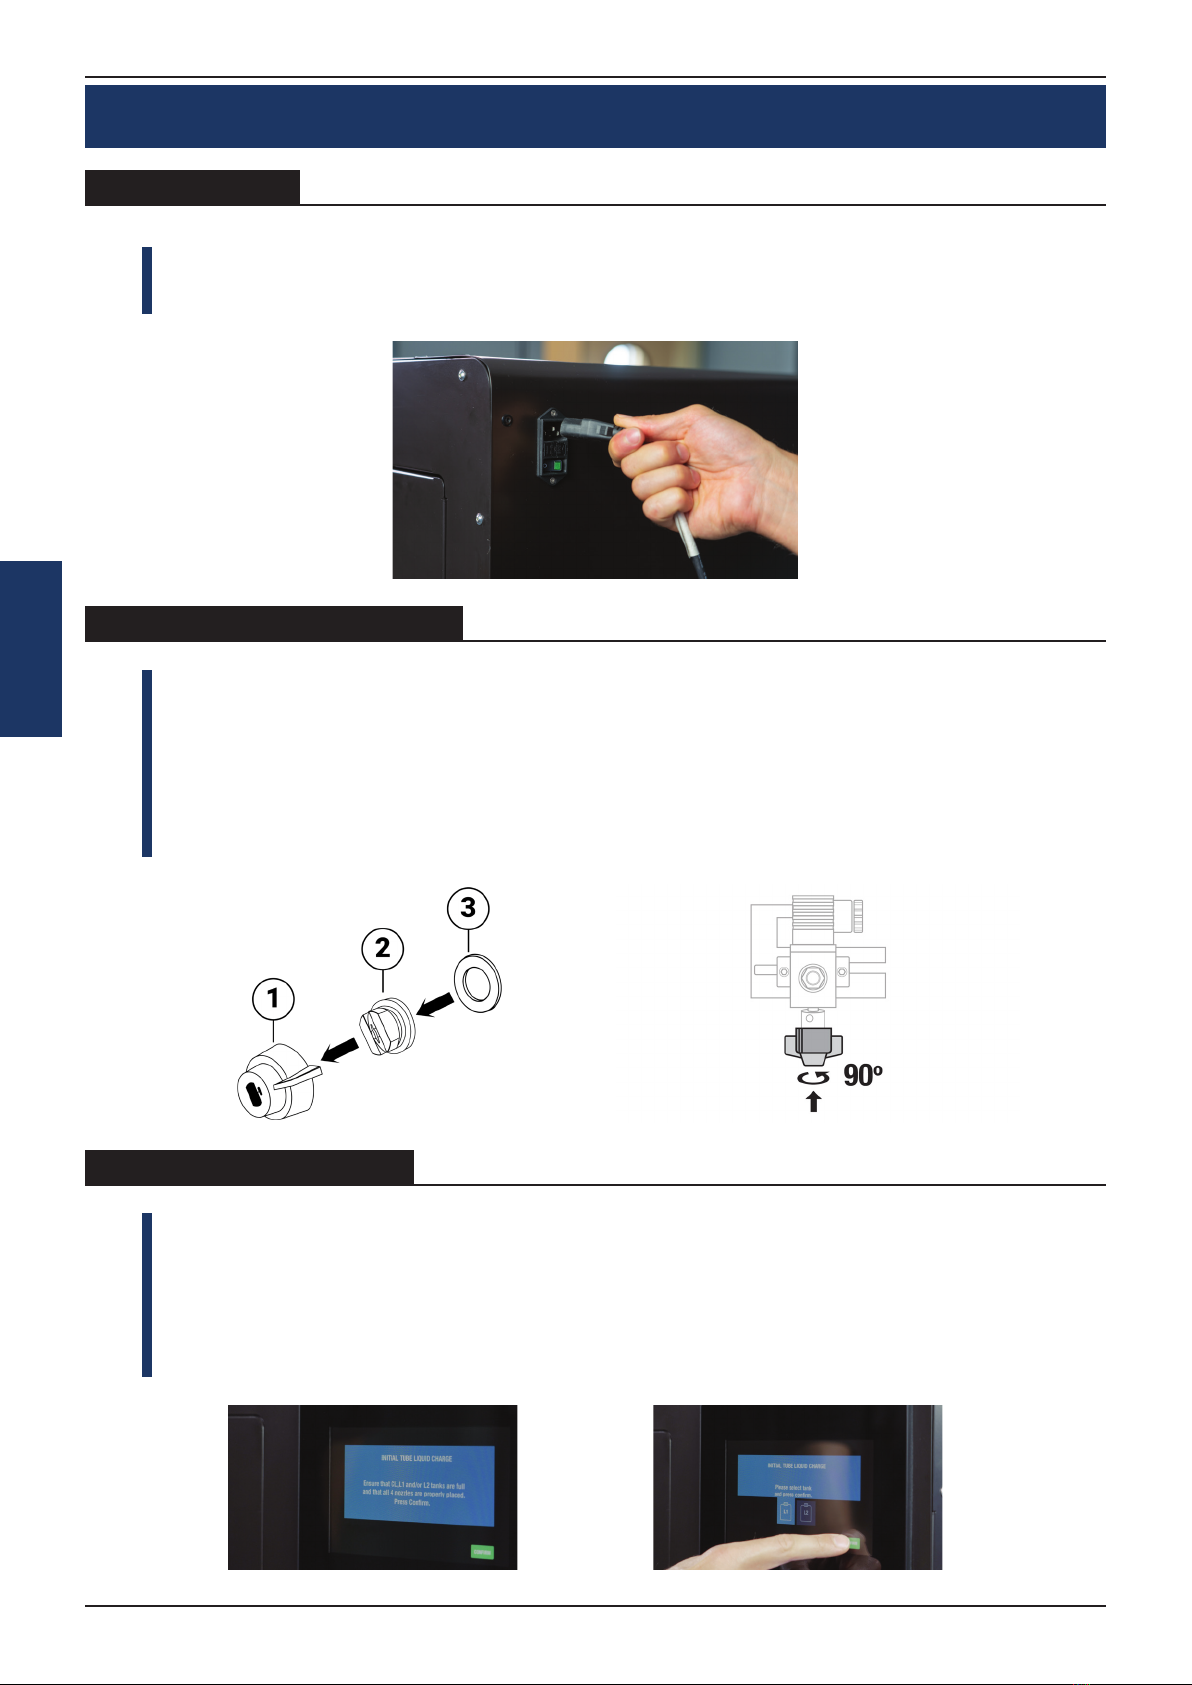
Plug in the power cord. Make certain that the source voltage is the same as the rated
voltage, listed on the serial number/rating plate. Power On the machine from the Main
switch, that is placed at the backside of iSPRAY Pro.
To initiate the machine, tap the screen.
Check that the CL, L1 and/or L2 Tanks are full and that all four (4) nozzles are properly
placed into position.
Press Confirm to continue with the liquid charge.
In case you installed pretreatment liquid in L1 or L2 Tank, select the one you filled.
In case you installed pretreatment liquid in both L1, L2 Tanks, select the one you wish to
use first and press Confirm.
Place inside the Nozzle Carriage Chamber the nozzle assemblies, following the steps
below :
1. Open the Nozzle Access Cover
2. Insert the nozzle inside the blue nozzle holder.
3. Position the black gasket inside the blue nozzle holder and push it, in place, to tighten.
Finally, Attach the nozzle assembly to the carriage and turn it 90 degrees counterclo-
ckwise to lock it in position.
c� Initial Liquid Charge

User guide - SEFA iSPRAY PRO
www.sefa.fr 11
English
d� Nozzle Check
You should perform a nozzle check to see if all four nozzles are firing correctly.
To perform the nozzle check, start from the Home screen.
Press the Nozzle button.
You can, also, open the Nozzle Access Cover to have a better view.
Enable all the nozzles, one-by-one, (or only the nozzles you want to check).
Press the Spray button. Each nozzle should be firing in an 80O angle.
Exit the Nozzle Check screen, by pressing the back arrow, to return to the Home screen.
After a couple of seconds, the initial liquid charge will finish.
The machine is now filled with liquid and ready for operation.
If there is no liquid flowing, then check that all the tubes are inside the tanks and that
the caps are in place and properly sealed.
If you get any error messages, for further information, check the topic: Troubleshooting>
General Problems in the Operational Manual.
If the nozzles are not firing correctly, for further information, check the topic:
Troubleshooting> Spraying problems.

2021-03-25
12 www.sefa.fr
English
BASIC FUNCTIONS
a� Spraying modes
b� Grid edit
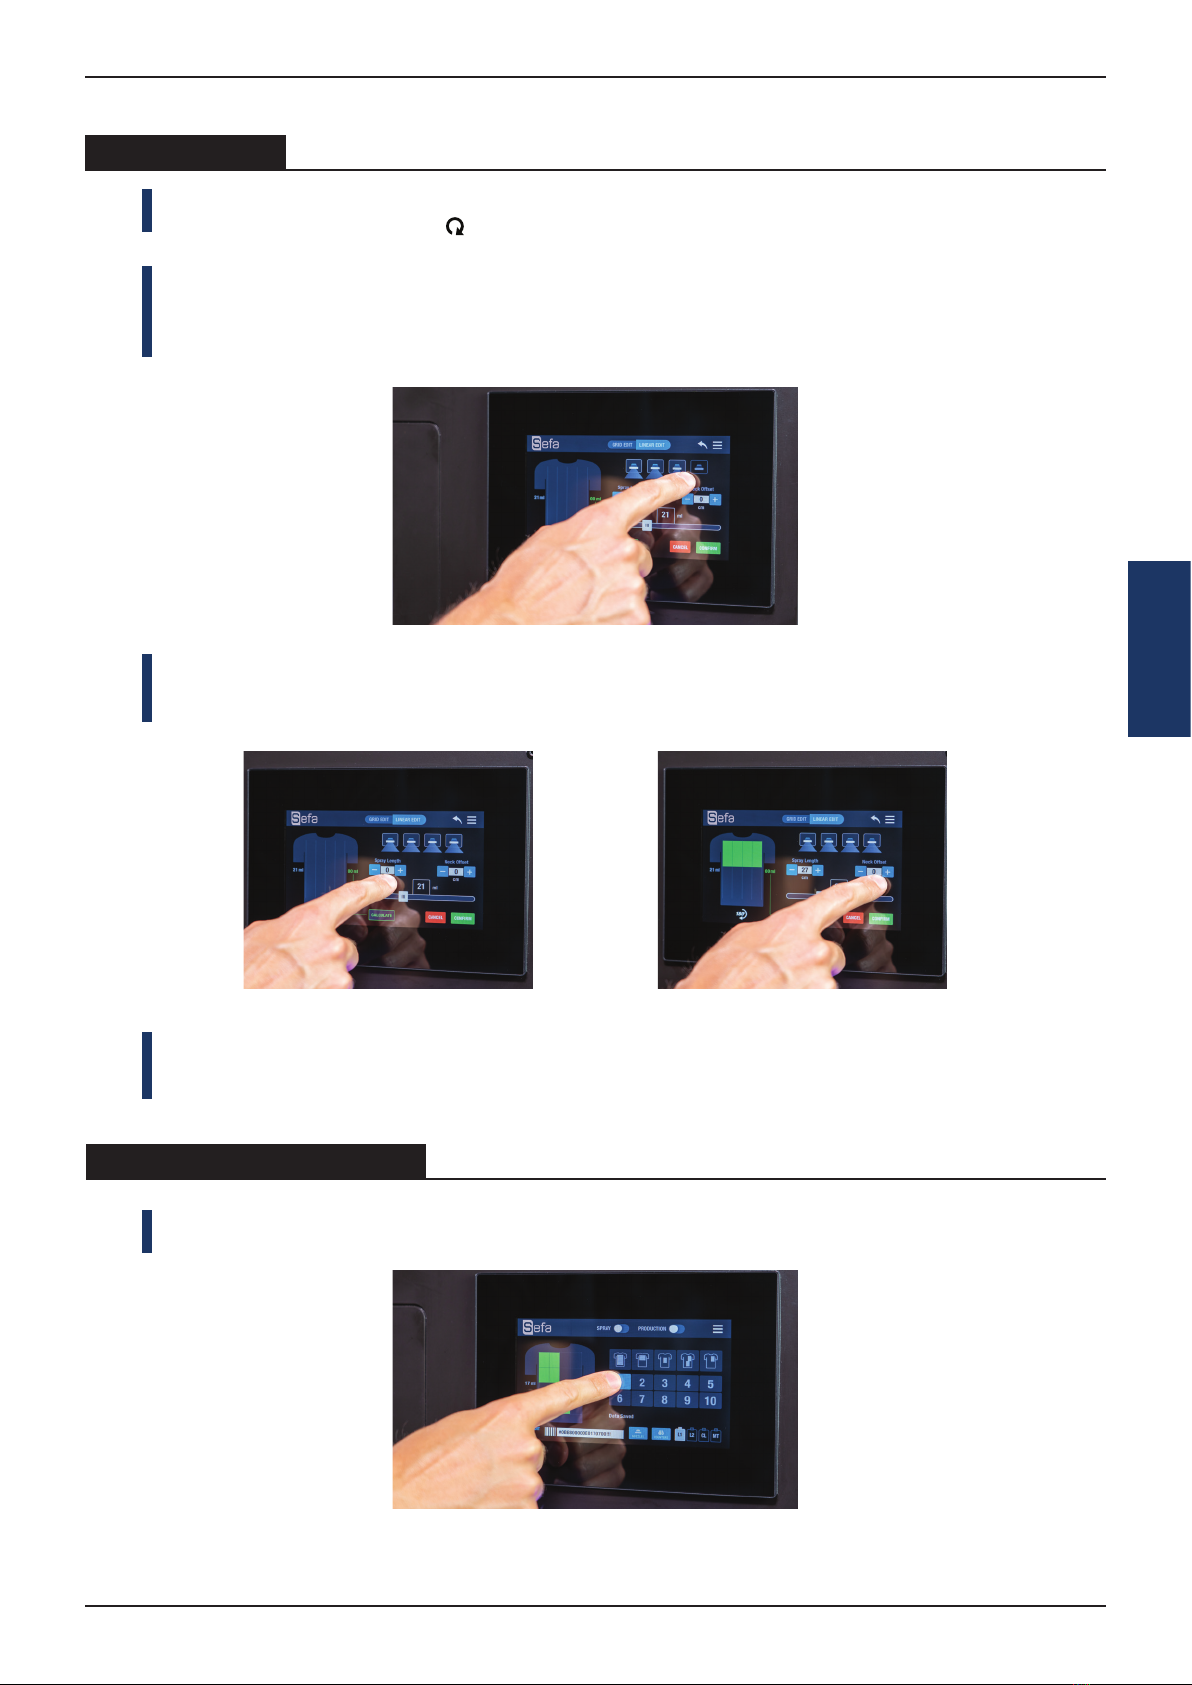
On the Home screen, tap on Edit.
Edit the spray area. There are two spraying selection modes. You can use your preferred
method, by switching between Grid Edit and Linear Edit.
Select the direction you want the garment to have, on the drawer plate. You can rotate
it 180°, by pressing the icon.
The entire spray area (41x60cm / 16x23.6in) has been divided into 4 columns and 4 rows
(4x4=16 boxes). Specifically, select the boxes in the Grid Box selection area that you want
to enable.
Select the liquid spraying amount per ml, for the max spray area (41x60cm / 16x23.6in),
from the slide bar. Tap on the Calculate button, to check the actual liquid amount
sprayed on the selected area. When finished, tap on the Confirm button.
User guide - SEFA iSPRAY PRO
www.sefa.fr 13
English
c� Linear Edit
Select the direction you want the garment to have, on the drawer plate. You can rotate
it 180°, by pressing the icon.
Select the nozzles you want to enable. You are able to choose from 1 up to all 4 nozzles.
The nozzles spray, exactly as shown on the screen, in the Nozzle Carriage Chamber.
e.g. If you select the second nozzle from the left on the screen, the same nozzle will
spray in the Nozzle Carriage Chamber.
Select the Spray Length by changing the value with the +/ - buttons.
Select the distance from the top, by changing the Neck Offset value with the +/ -
buttons.
Select the liquid spraying amount per ml, for the max spray area (41x60cm / 16x23.6in),
from the slide bar. Tap on the Calculate button, to check the actual liquid amount
sprayed on the selected area. When finished, tap on the Confirm button.
On the Home screen, you can save your job preference, by holding for 3 seconds on any
of the ten custom job preset buttons.
d� Save custom presets
2021-03-25
14 www.sefa.fr
English
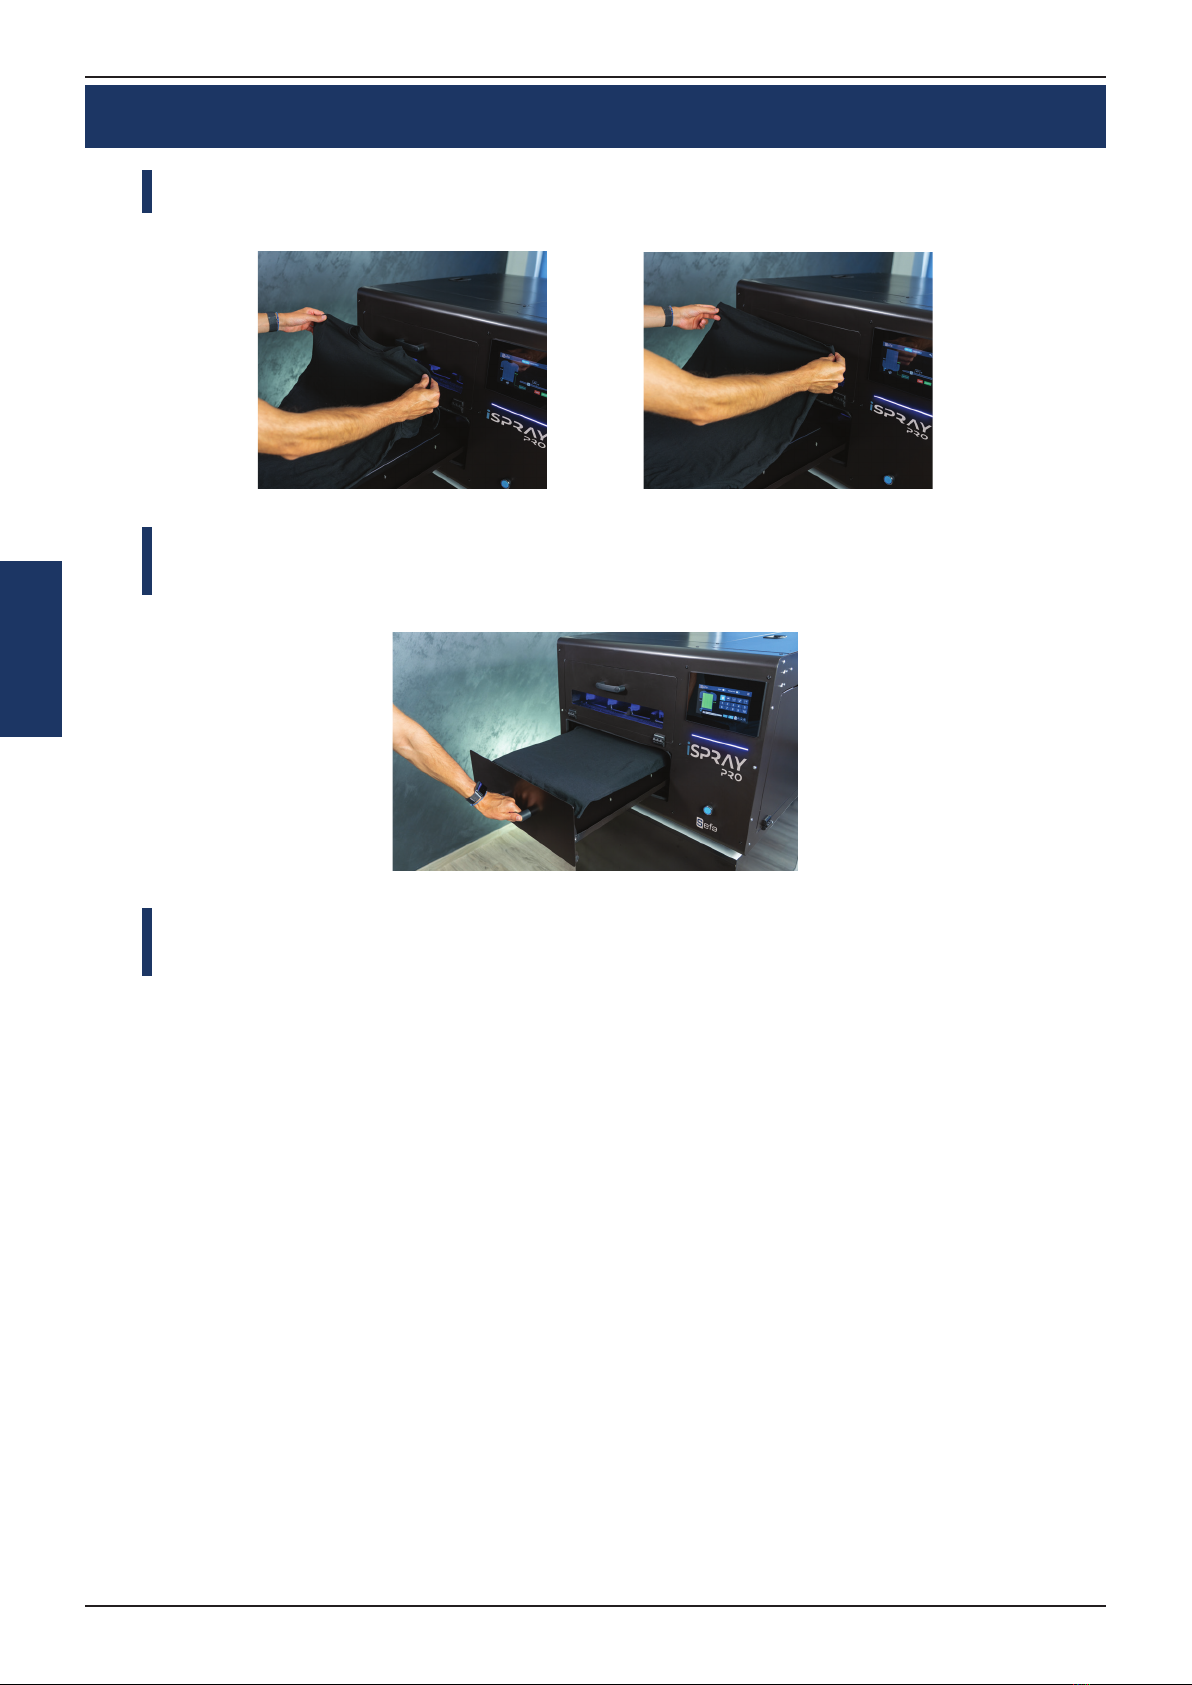
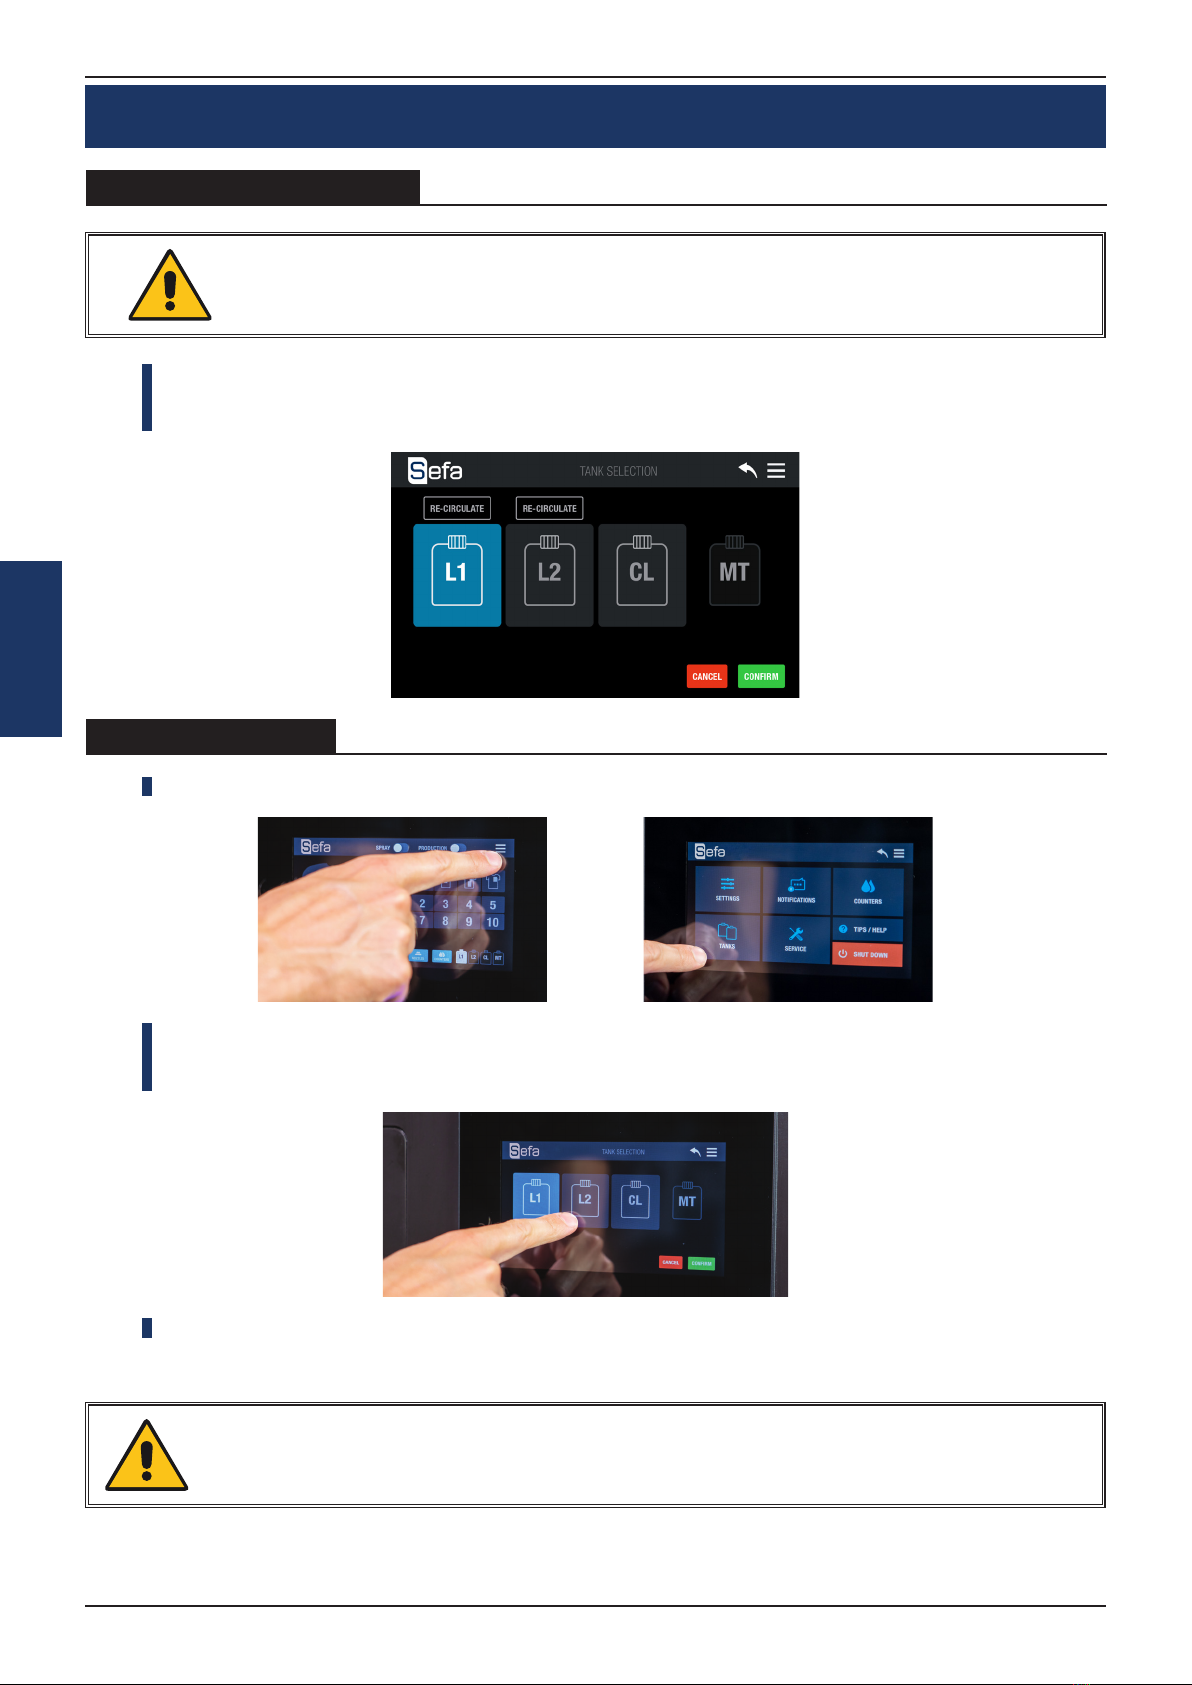
GARMENT LOADING
Open the drawer and place the garment on the plate, in the direction of the preselec-
ted position.
Place the garment on the platen. Make sure that the garment is flat.
Carefully tuck in/ position, any excess textile, below the platen.
Close the drawer.
In humid environment, it is often beneficial to pre-press the shirt (using the protection
paper as a barrier from the press) for 5 to 10 seconds prior to applying the pretreatment.
This removes some of the water that is naturally trapped in the fibers.

User guide - SEFA iSPRAY PRO
www.sefa.fr 15
English
PRODUCTION MODE
To spray the garment, either press the Blue button on the front side of the iSpray Pro,
or activate the Spray option on the Home screen.
Production Mode allows you to start the spraying procedure, as soon as, the drawer is
closed, without pressing a button.
Activate the Production Mode on the Home screen to start the automatic spraying
function, once the drawer is closed.
If drawer is closed, when enabling the Production Mode, open and close the drawer to
start spraying procedure.
When spraying finishes, open the drawer and take out the garment.
Once you have finished spraying your last garment, before closing the drawer, deacti-
vate the Production Mode on the Home screen.
a� Single
b� Production
2021-03-25
16 www.sefa.fr
English
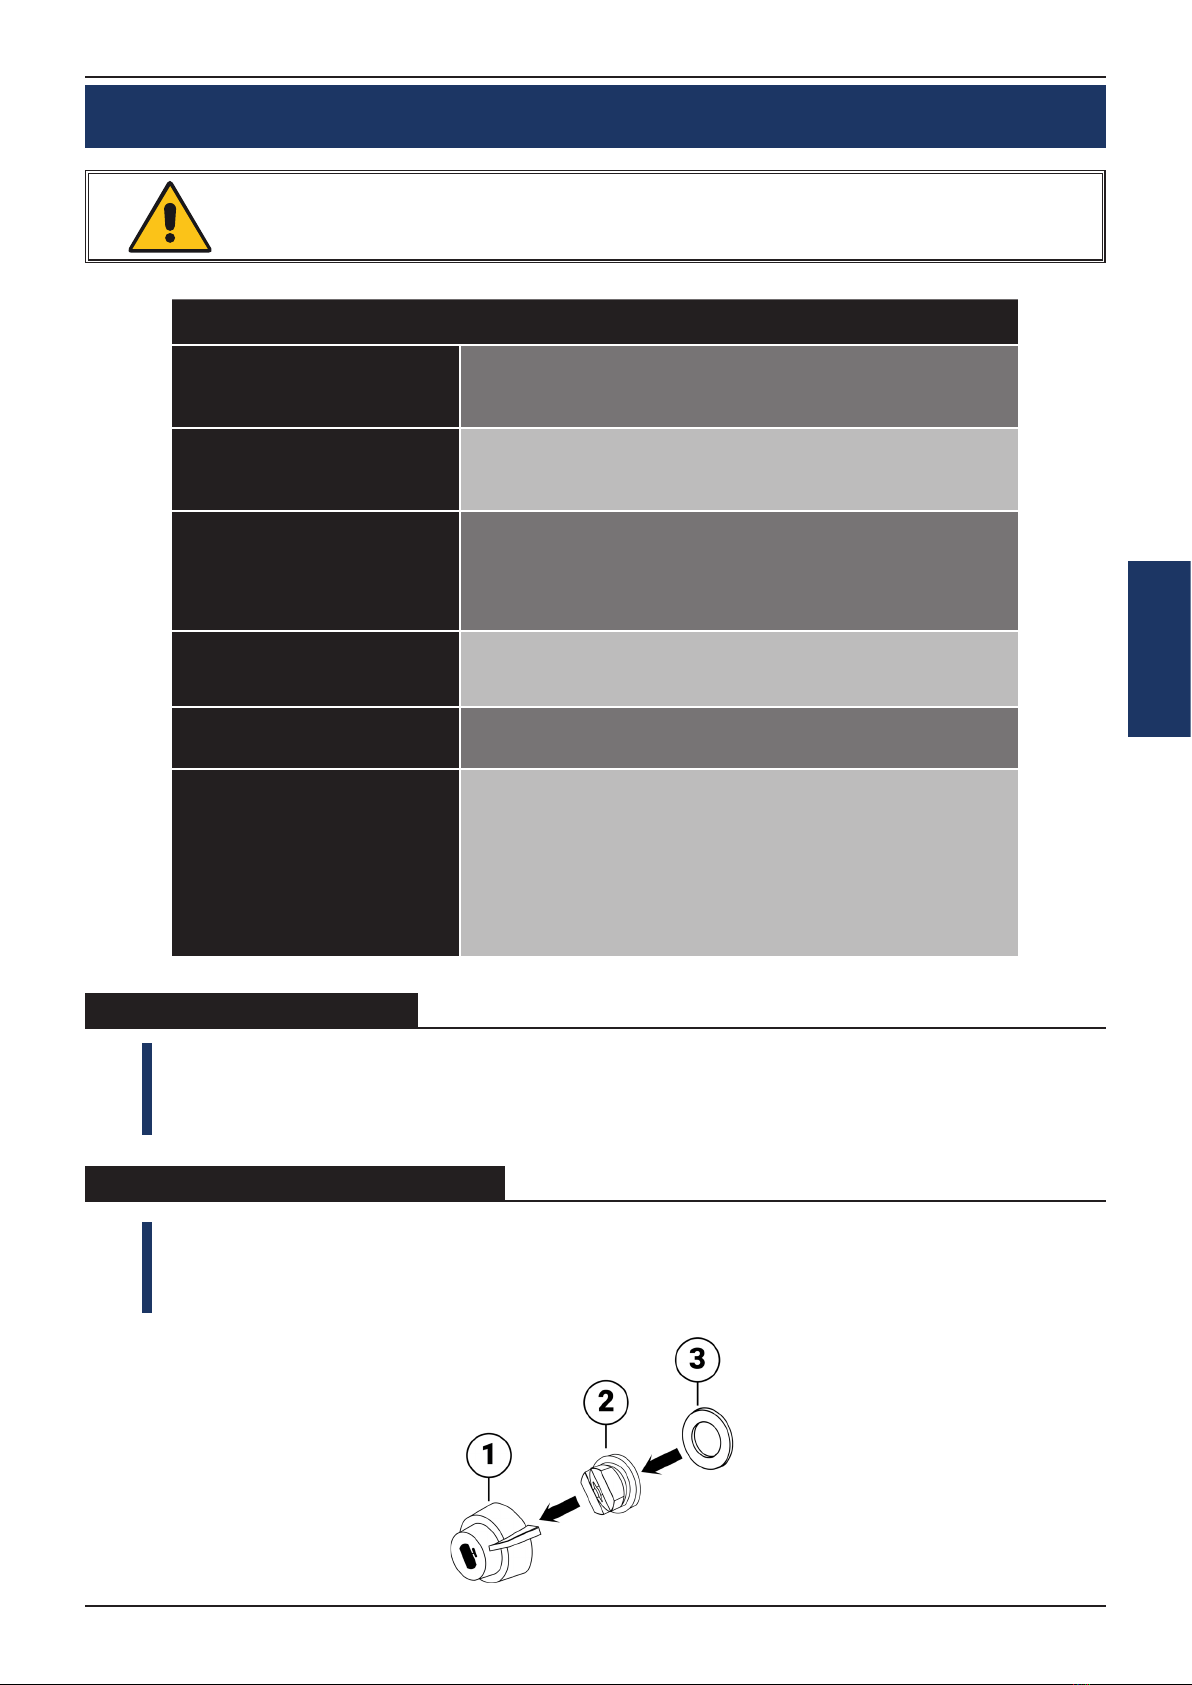
TANK PROCEDURE
a� Filling / Replacment
b� Tank selection
On the Home screen tap on the Menu button and select Tanks. Tap the Re-Circulate
button (of the tank you refilled previously) for three seconds to initiate the liquid re-cir-
culation process that will remove any air bubbles from the tank tubes.
In this Tank Selection screen, you can check, which tank you have, currently, selected.
If you wish to select a different tank to spray, tap on that tank you want, and press
Confirm. iSpray Pro will automatically switch to your preferred tank.
You can, also, tap on the CL Tank, to manually perform the shutdown maintenance.
On the Home screen tap on the Menu button. Select Tanks.
CHECK «LIQUID INSTALLATION» IN THE INSTALLATION MENU.
Choosing CL will clean, only the basic line to the nozzles, and will not bring the machine
into a shipping state. For further instructions, check the topic: Transporting iSPRAY Pro.
User guide - SEFA iSPRAY PRO
www.sefa.fr 17
English
1. Open the Tank Storage Compartment Cover.
2. Check the liquid level in the L1, L2, CL tanks and if needed, follow the instructions to
refill / replace them.
3. Empty the Maintenance tank.
1. Open the Nozzle Access Cover.
2. Take the 4 nozzles out of the ultrasonic device and insert the nozzles inside the blue
nozzle holder.
3. Position the black gasket inside the blue nozzle holder and push it in place to tighten.
SERVICING
TO BE PERFORMED BY QUALIFIED PERSONNEL
Maintenance Schedule
Daily Liquid Check
• Check the Tanks for enough
Pretreatment liquid and Water
• Empty the Maintanance Tank
Daily Wake Up
• Place the 4 nozzles on the Nozzle Carriage
• Initiate iSpray Pro
• Liquid Charge
Daily Shutdown
• Flush the main tube with
distilled water
• Remove the 4 nozzles from the Nozzle Carriage
• Place the 4 nozzles in the
ultrasonic device
Monthly Maintenance
• Check and clean the L1, L2
tank filters
• Clean the Liquid Collecting Mat
Two Month Maintenance • Check and clean the Nozzle Filter
• Clean the Waste Collector
Long Inactivity-
Storage Condition
• Flush all the tubes with
distilled water
• Shutdown iSpray Pro
• Remove the 4 nozzles from the Nozzle Carriage
• Place the 4 nozzles in the
ultrasonic device
• Clean the Waste Collector
• Empty all the Tanks
a� Daily Liquid Check
b� Daily Wake Up Procedure

2021-03-25
18 www.sefa.fr
English
Attach the nozzle assembly to the Nozzle Carriage and turn it 90 degrees counterclo-
ckwise, to lock it in position.
To initiate the machine, tap the screen.
Select the tank you want to use. Follow the instructions of Tank Selection.
Tap on the Menu button.
Tap the Shutdown button.
To flush the main tube with distilled water, select YES on the screen that appears.
Remove the 4 nozzles from the Nozzle Carriage and disassemble them. Place the 4
nozzles into the ultrasonic device and start the cleaning process for 1 min.
c� Daily Shutdown Procedure

User guide - SEFA iSPRAY PRO
www.sefa.fr 19
English
Check and clean the L1, L2 tank filters :
1. The two filters are located in the Tank Compartment.
2. Unscrew the filter cap to remove them.
3. Clean them with water.
4. Reposition them. Make sure they are, in their initial place.
There is no need to empty the tubes from liquid to do this procedure.
Check and clean the Nozzle Filter :
The 3rd filter (nozzle filter) is located in the Nozzle Carriage Chamber. To clean it, you
need to, firstly, discharge the liquid from the main tube. To do that, you have to bring
the machine to service condition. For further instructions, check the topic: Service
Condition in the Operational Manual.
When iSpray Pro is in service condition, you can safely remove the filter cap and take it
out to be cleaned.
Clean the Waste Collector :
1. Power Off the machine, from the Main Power switch before cleaning the Waste
Collector.
2. Open the Nozzle Carriage Cover and pull it outwards.
3. Remove the screws holding the left metal cover and pull it out.
4. Remove the top plastic cover of the Isolation Chamber.
5. Clean the Waste Collector with paper or a towel.
6. Place back, into initial position, the top plastic cover of the Isolation Chamber.
7. Place the screws back on the left metal cover and tighten it into place.
8. Move the Nozzle Carriage back to Home position and close the Nozzle Carriage Cover.
Clean the Liquid Collecting Mat :
1. Open the Nozzle Access Cover.
2. Remove the Liquid Collecting Mat.
3. Clean it with water.
4. Reposition it. Make sure it is, in its initial place.
d� Monthly Maintenance
e� Two Month Maintenance

2021-03-25
20 www.sefa.fr
English
Storage Condition :
1. Empty the L1, L2 Tanks from the pretreatment liquid.
2. Fill the L1, L2 Tanks with distilled water.
3. Check that the CL Tank is full of / contains distilled water.
4. In one step: On the Home screen, tap on the Menu Button and then, select
Tanks.
5. Perform a Liquid Charge, by selecting L1, L2, CL, one-by-one, in any order. This
will flush all the lines with distilled water.
6. Go back and in the main Menu screen, tap on Service.
7. Set the Initial Charge Flag to ON.
8. Tap on the back icon and select the Shutdown button.
9. Click Yes to flush with distilled water the main line and nozzles.
10. When finished, iSpray Pro will Shutdown. Close the main switch at the back of
the machine and remove the power cable.
11. Remove the 4 nozzles from the Nozzle Carriage.
12. Place the 4 nozzles in the ultrasonic device.
13. Clean the Waste Collector, as described on page 23.
14. Empty all Tanks from liquids and place them back, empty. Place the tubes back
into the Tanks and seal the caps.
Perform the Maintenance Long Inactivity Storage Condition.
For further information check the topic: Maintenance>Long Inactivity> Storage Condi-
tion.
1. Lock the Nozzle Carriage in position with a tire up.
2. Ensure that the Tanks are empty.
3. Place tape to all covers to keep them properly secured into place.
f� Long Inactivity Maintenance
g� Transporting iSpray Pro
When the machine has been maintained for Long Inactivity Storage Condition,
there is no need to follow up with the maintenance schedule.
Before moving the machine to another location/position, ensure that the tank caps
are in place and sealed, so liquid cannot spill out. Do not tilt iSpray Pro while the
liquid tanks are full or inside the machine and the waste collector is not properly
cleaned.
To restore iSPRAY Pro after the Long Inactivity- Storage Condition state, follow the
instructions in the Installation Guide.
Table of contents
Languages:
Other Sefa Printer manuals


