Segon Outdoor Wall Mount Speaker Series User manual

JS-EST10T
Outdoor Wall Mount Speaker Series
3”
MINI Satellite Loudspeaker
USER MANUAL

INTRODUCTION
Thank You For Purchasing the SEGON® Product
Segon® Speakers features an outstanding combination of performance and value in
each of our products. To ensure you get the most out of your new loudspeakers
please take a moment to read this manual before you get started.
A Few Words About Your New Outdoor Wall Mount Speaker
Segon® Outdoor loudspeakers are designed to accurately reproduce high fidelity
music in an outdoor environment. Ideally designed for background music and
business place integration.
High freuency response as required for outdoor scenerios with great bass response
Segon® Outdoor Loudspeakers are IP64 waterproofed and are built to withstand the
most rigorous weather and climate conditions.
Every exposed bolt is made of stainless steel is ensure endurance and fuconality.
The cabinet is made of a high-impact ABS poly-mer painted with UV protecon
industrial quality paint.
The primary components include a paper cones made of various materials and
around the rubber surround. Makes the JS-EST10 mini&light, high sensitivity and
better sound.
Mini Satellite Loudspeaker JS-EST10T

Stainless Steel Bolts
3” Paper cone
Correct Speaker Wiring
Figure 1.
Be careful not to cross wires when installing your speakers. Wiring should always be negative to negative
and positive to positive.
(Figure 2. shows speaker c. incorrectly wired)
Incorrect Speaker Wiring
Figure 2.
SPEAKER OUT PUT
COM 70V 100V
4Ω 8Ω 16Ω
+-
+
-
+
-
a. b. c.
SPEAKER OUT PUT
COM 70V 100V
4Ω 8Ω 16Ω
+-
+
-
+
-
a. b. c.
PRODUCT DETAIL
AUDIO CONNECTIONS
Mini Satellite Loudspeaker JS-EST10T
MOUNTING THE SPEAKERS
!
Although Segon® Speaker are waterproof and can be placed directly in the
elements, mounting the speakers in such away that they will not absorb rain or
sun directly will improve the speaker's longevity. Placing the speaker in a corner
will also help improve bass performance.
Always mount the speakers so that they are aimed slightly downward in order to not
collect rain water. Also, make sure to follow the "drip loop" instrucons/example
diagram.
Segon® Speaker can be mounted vertically or horizontally and then aimed as
needed to deliver the best sound performance for your area. In most cases, you
will achieve the best stereo sound and imaging if you mount both speakers along
the same wall between 3-6 meters apart.
Installation of your Segon® Speaker is designed to be simple and
intuati e, it is largely advised to consult a professional installer.
Make sure the materials on which you plan to mount the speakers
can support the weight of the speakers.
Hardware is provided for attaching the brackets directly to a solid wood beam
and also to sturdy drywall that is atleast 5/8" thick.
Never a ach the speakers to a wall that might contain electrical wiring or plumbing.
IF YOU ARE UNSURE ABOUT ANY OF THESE INSTRUCTIONS,
PLEASE CONTACT A PROFESSIONAL CUSTOM AUDIO INSTALLER.
Mini Satellite Loudspeaker JS-EST10T
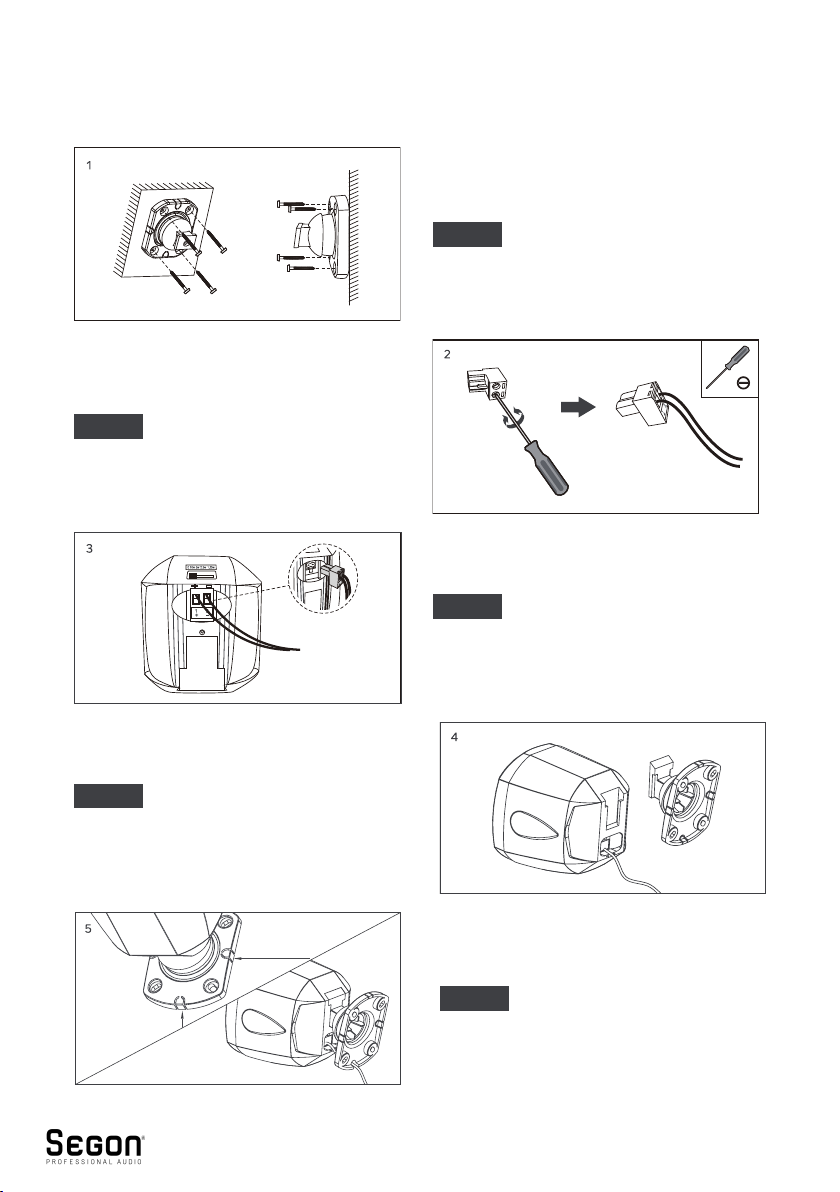
INSTALLATION
STEP 1 Fix the bracket to the wall.
STEP 2 Connect the speaker wire.
connector
to the speaker.
STEP 3 Attach phoenix
STEP 4 Attach the speaker to
the bracket.
STEP 5 ① The speaker cable can
be removable and fixed
through the hole.
②Done.
Through-Hole
Mini Satellite Loudspeaker JS-EST10T
This manual suits for next models
1
Table of contents
Languages:
Other Segon Speakers manuals


