SEI Industries SACKSAFOAM II User manual

SACKSAFOAM II
SACKSAFOAM II
MODEL 8044
MODEL 8044
MANUAL
E
nvironmental Bambi BucketEmergency Response

Sacksafoam II Model 8044 Operations Manual (Version C)
SACKSAFOAM II (MODEL 8044) MANUAL - Version C
Issue Date: October 2008
PLEASE READ BEFORE USING.
SEI INDUSTRIES LTD.
7400 Wilson Avenue
Delta, B.C. Canada
V4G 1E5
Phone: (604) 946-3131
Fax: (604) 940-9566
E-Mail: [email protected]
Website: www.sei-ind.com
COPYRIGHT © 2006 SEI INDUSTRIES LTD. ALL RIGHTS RESERVED
PRINTED IN CANADA

Sacksafoam II Model 8044 Operations Manual (Version C)
Table of Contents
Section 1: Sacksafoam II Overview 1
Introduction to Model 8044 ...........................................................................................1
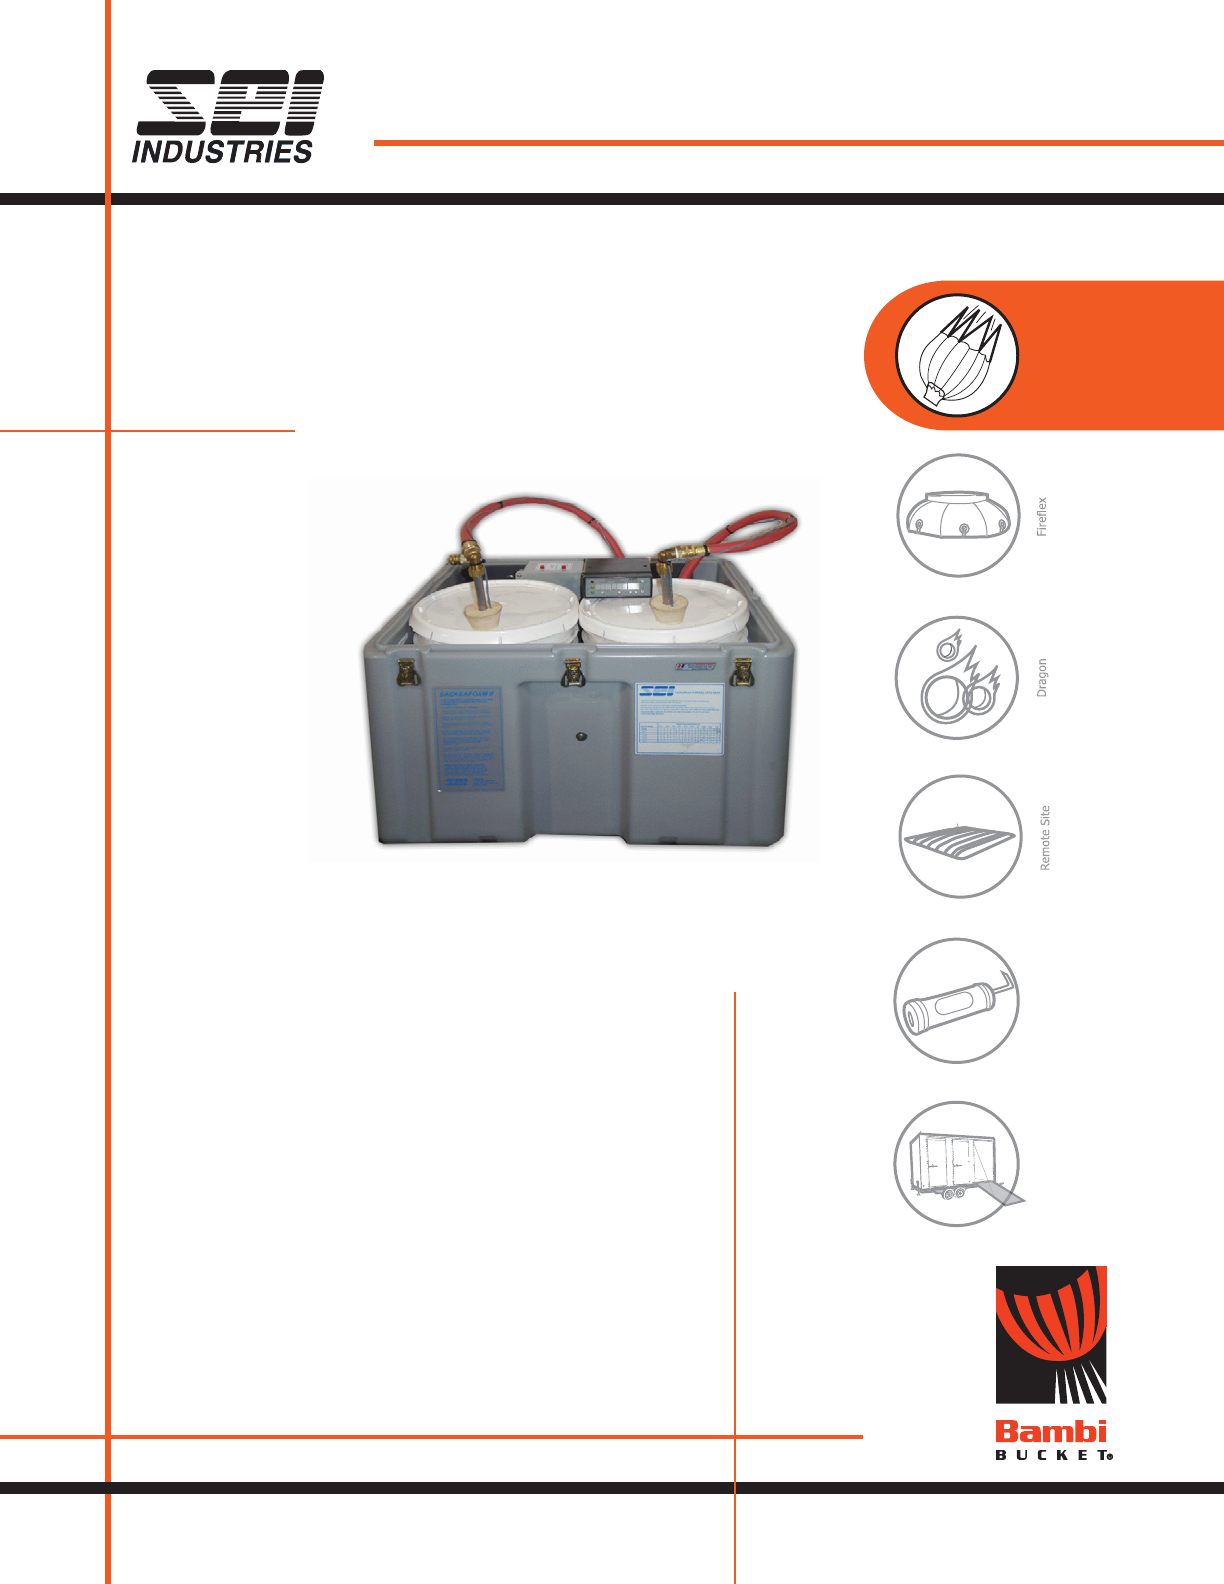
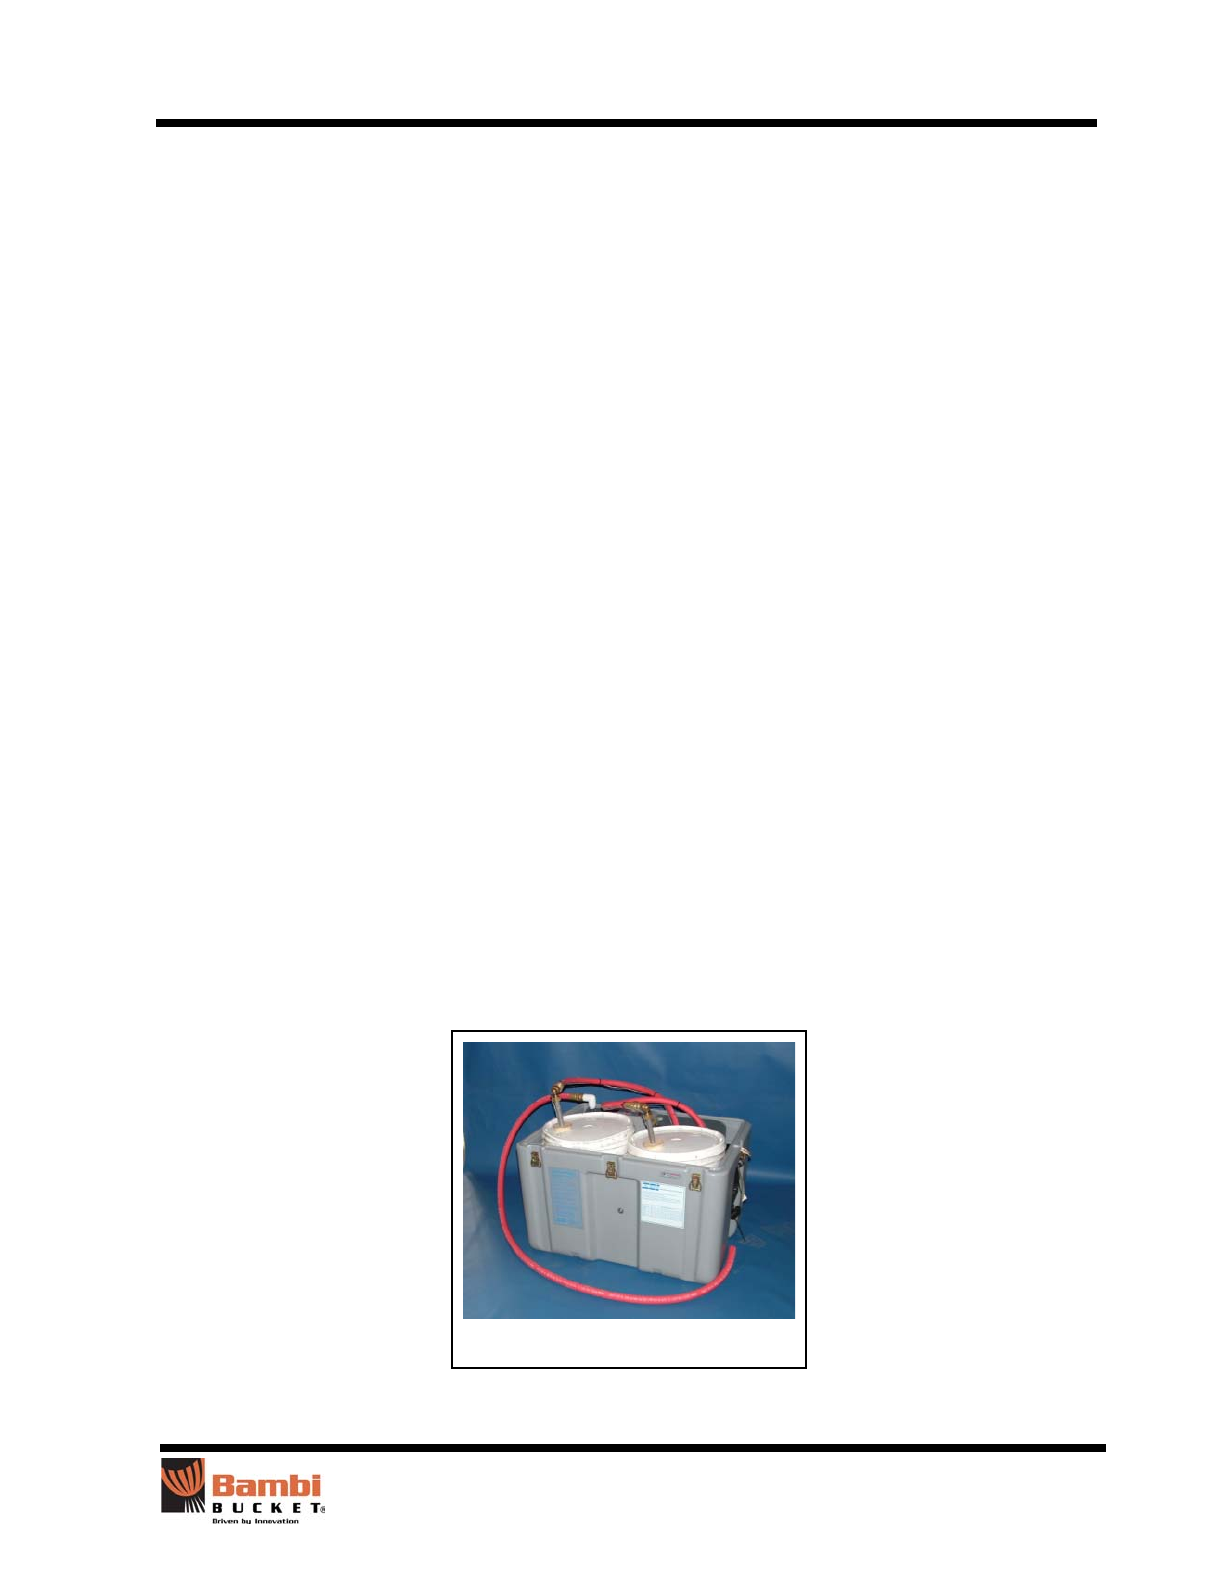
System Description .......................................................................................................2
Unpacking .......................................................................................................2
Section 2: Installation 3
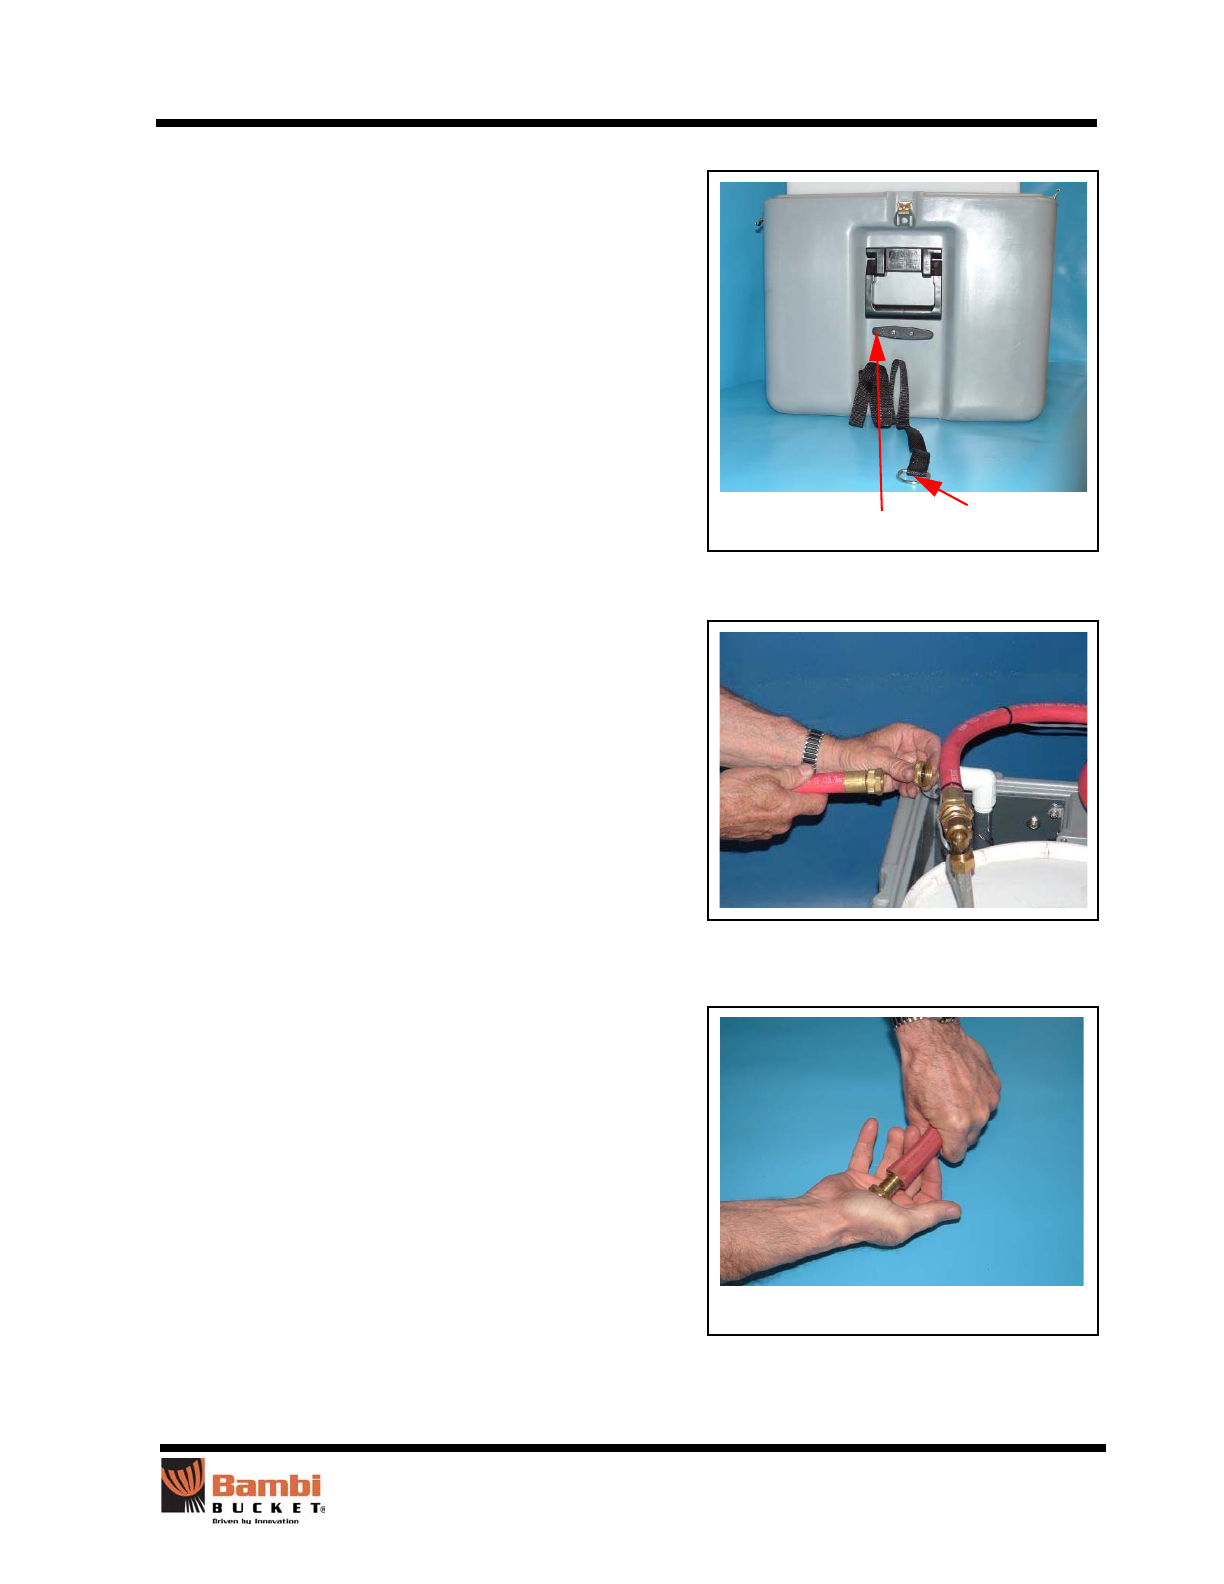
Installation Procedures .................................................................................................3
Section 3: Testing 7
Testing the Sacksafoam ...............................................................................................7
Dry Test ..........................................................................................................7
Wet Test .........................................................................................................8
Section 4: Safety 9
Preflight Safety Check ..................................................................................................9
Section 5: Controller Box 10
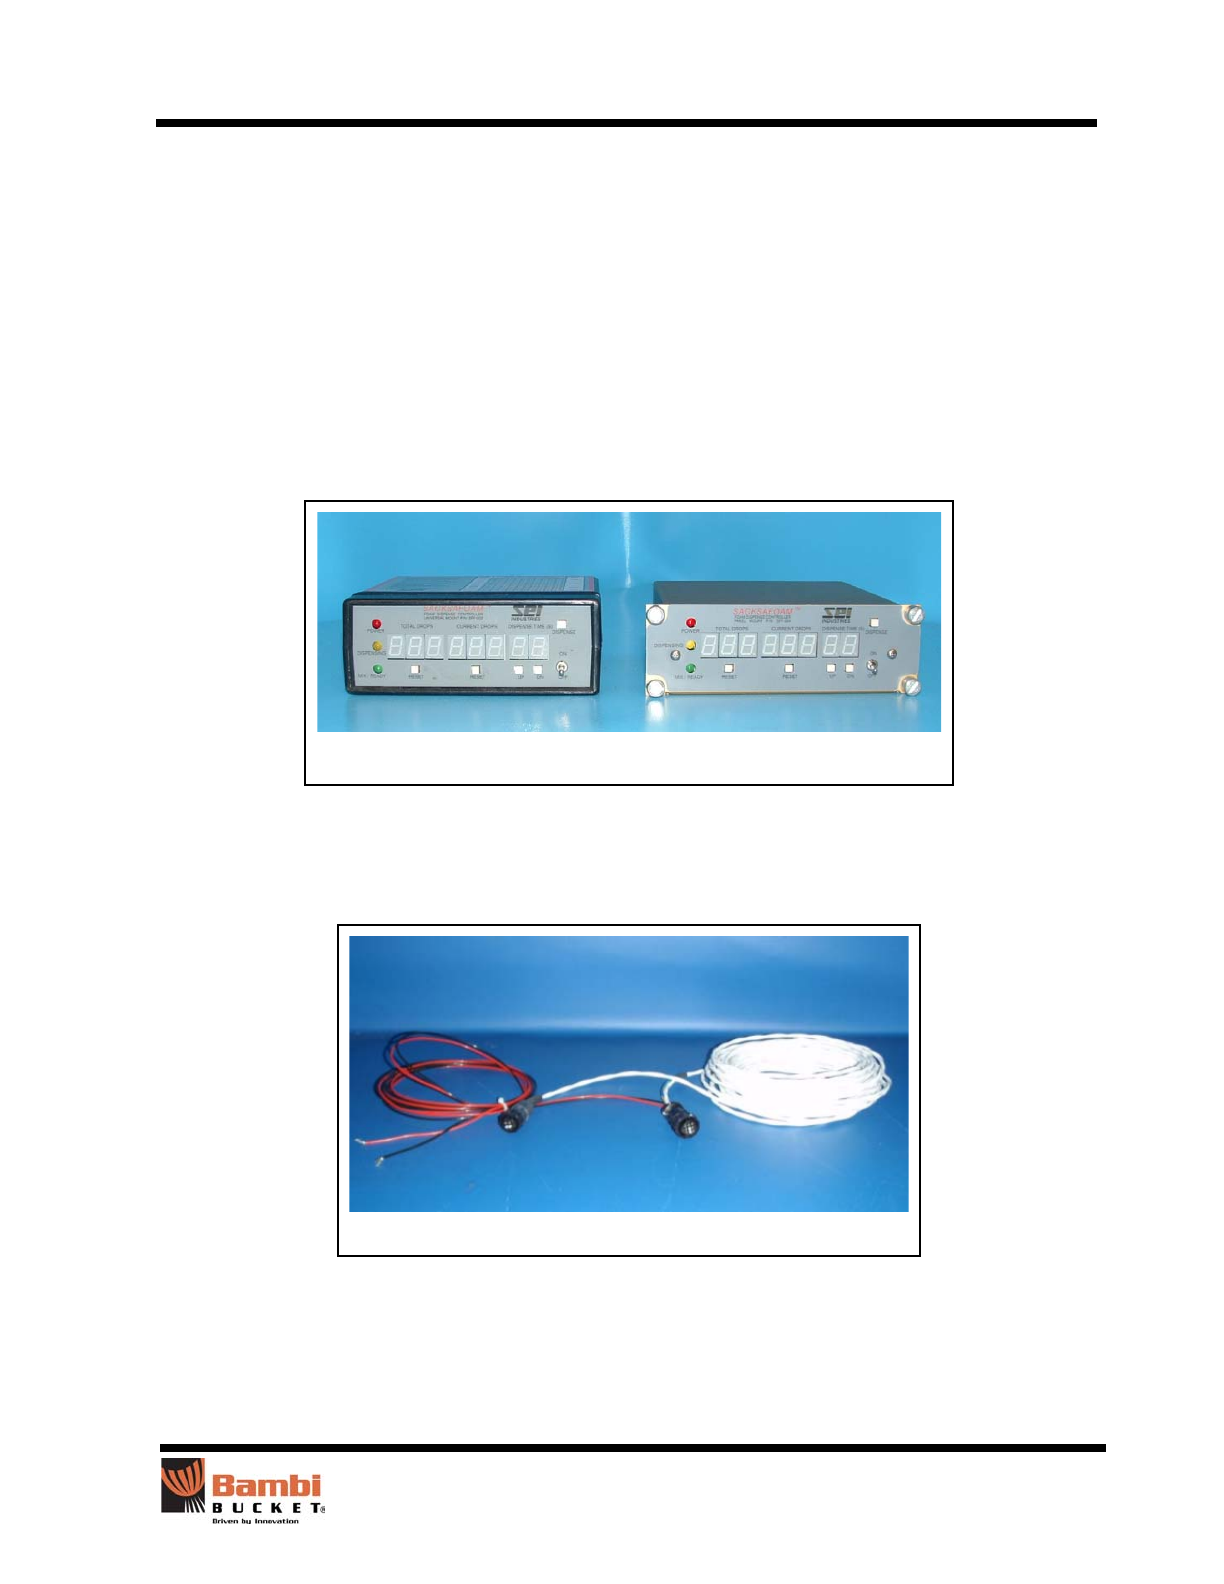
Control Box Description ..............................................................................................10
Controller Box Functions ............................................................................................11
Controller Connector Pin Descriptions .......................................................................12
Section 6: Operations 13
Operating the System .................................................................................................13
Container Size ..............................................................................................14
Model SF2-8044 Run Times .........................................................................14
Section 7: Maintenance 15
Maintenance and Servicing ........................................................................................15
Flushing Procedure ......................................................................................15
Servicing .......................................................................................................16
Section 8: Parts 17
Parts and Diagrams ....................................................................................................17
Control Panel ................................................................................................17
Control Panel (Continued) ............................................................................18
Control Panel (Continued) ............................................................................19
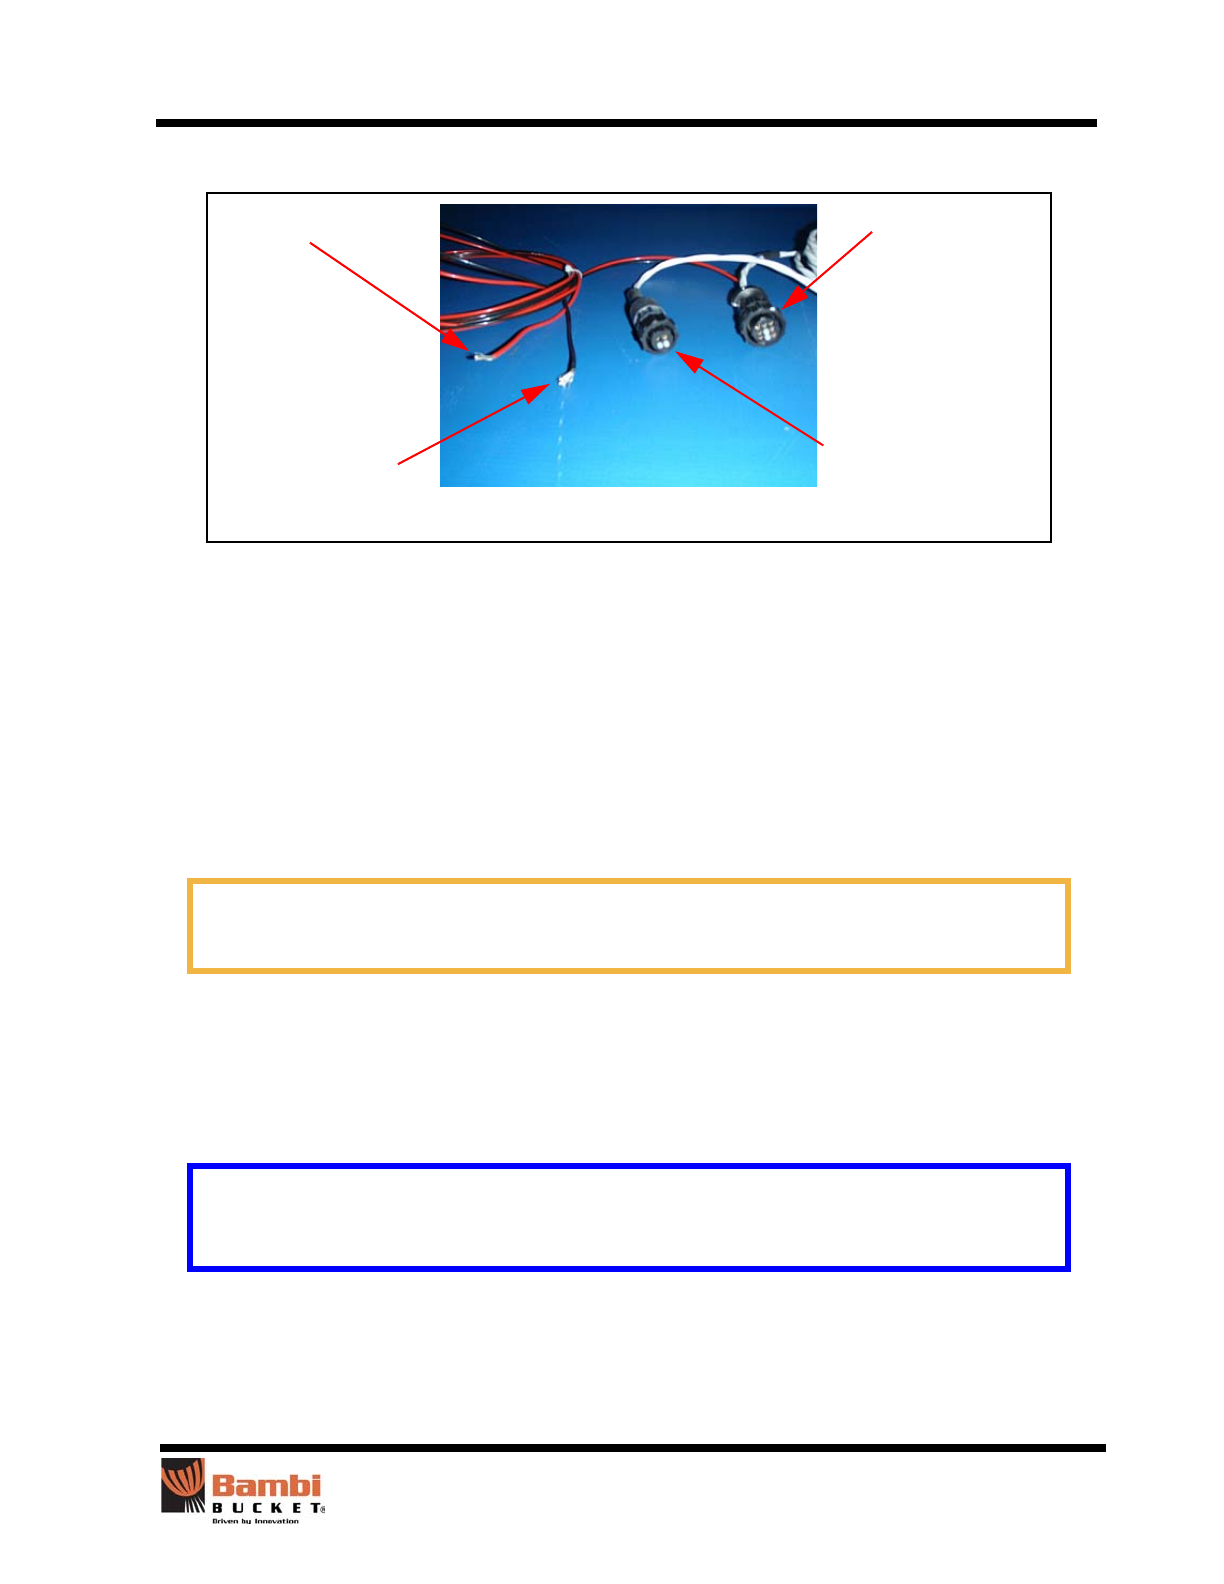
Wiring Harness (Bambi) ...............................................................................20
Section 9: Warranty 21

Section 1: Sacksafoam II Overview Introduction to Model 8044
Sacksafoam II Model 8044 Operations Manual (Version C) 1
Section 1: Sacksafoam II Overview
Introduction to Model 8044
This manual provides helicopter operators with important information on the operation and maintenance of
the Sacksafoam dispensing system for use with the Bambi bucket.
The Sacksafoam II has advanced features to enhance the efficiency of helicopter fire fighting.
The control box has a quartz digital timer to control the delivery of an accurate percentage of foam concen-
trate. The timer circuit has crowbar over-voltage protection and its own circuit breaker.
The operation of the Sacksafoam II can be quickly mastered by users with no prior experience. Several
dumps with foam will provide familiarity with the use of the system.
Please read this manual prior to flying the bucket, particularly the sections on installation, filling and dis-
pensing. If problems are experienced, please refer to the manual.
For your own protection and for longer system life, always heed the instructions and warnings. Ignoring
them could result in damage to the Sacksafoam II, the Bambi bucket and aircraft or in personal injury.
SEI offers complete parts supply and repair facilities for the Sacksafoam II. For maintenance and repair pur-
poses, parts diagrams and descriptions are provided in this manual.
When ordering parts, please provide the model and serial number of the unit which is printed on the back of
the controller and on the inside of the container lid that is normally removed during operation. The side of
the grey container also shows the Sacksafoam model number.
Additional copies of this manual are available from SEI Industries Ltd.
Sacksafoam 8044

Section 1: Sacksafoam II Overview System Description
Sacksafoam II Model 8044 Operations Manual (Version C) 2
System Description
The Sacksafoam II Model SF2-8044 is used inside smaller helicopters to supply foam to the Bambi
bucket (models 8096 to 1821).
Sacksafoam II model SF2-8044 will hold up to 10 USG (38 litres) of foam concentrate. The foam is held
in two standard 5 USG (19 litre) containers within a large plastic case. The unit is self-contained and de-
signed to prevent foam from contacting the helicopter.
The Sacksafoam pump is operated by a controller box with a long wiring harness. A timer on the controller
box determines the amount of foam concentrate that is pumped into the Bambi bucket. This controller box
comes in two models; an in-dash mount and a remote mounted model.
Ground crew members should replace the foam containers as required. In areas, where a second member is
allowed on board, replacement of the container can be accomplished in flight. This same procedure applies
to foam dispensing. Either the pilot or a crew member can activate the foam dispenser.
Unpacking
Whether receiving the Sacksafoam II for the first time or unpacking it at the start of the season, ensure that
you have the following:
1. Sacksafoam II unit
2. Controller box with cable
3. 6 ft. (1.8 m.) breakaway hose
4. 1 male/1 female garden hose fitting
5. Webbing tie-down straps (two), attached to the grey container.
The following operator-supplied equipment is also required:
1. Dump hose to supply foam to the Bambi bucket (5/8" hose with a 5/8" female garden hose fitting
on one end).
Important Note
Cable and hose lengths must be determined by the operator. They will depend on the helicopter
model, Bambi bucket model and length of the cargo line/longline in use. Please refer to the Bambi
bucket operations manual.

Section 2: Installation Installation Procedures
Sacksafoam II Model 8044 Operations Manual (Version C) 3
Section 2: Installation
Installation Procedures
Installation of Wiring Harness
Standard Control Box (SFF003) Console Mount (SFF004)
Wiring Harness (SF515)

Section 2: Installation Installation Procedures
Sacksafoam II Model 8044 Operations Manual (Version C) 4
The control box has a 3-amp breaker that protects its electronic components. Be sure to observe the correct
polarity. The control box will not operate if hooked up with reverse polarity.
The injection pump is protected by the helicopter circuit breaker. The injection pump will work, but at a
greatly reduced volume, if hooked up with reverse polarity.
1. Connect power input wires (red is positive, black is negative) to a 28-volt direct current power
supply, protected by a 10-amp breaker (20-amp breaker for HL series Sacksafoam only). In this
case, 28-volts is the nominal charging voltage on a 24-volt system.
2. Depending on the model, mount the control box in the appropriate location (the standard model
can be mounted in a convenient location, the console model must be mounted on the console).
3. Connect the nine-pin plug to the socket on the back of the control box (pin 1 is positive, pin 2 is
negative).
4. Place the Sacksafoam unit inside the helicopter and remove the lid. Ensure that the lid is stored
securely or removed completely from the helicopter.
Positive In
Negative or Ground
To Controller
Power to Sacksafoam II
Wiring Harness
Important Note
Make sure the circuit can carry a load of 11-amps at 24VDC.
Caution
Excessive force or twisting on the wiring connector can damage the contacts.

Section 2: Installation Installation Procedures
Sacksafoam II Model 8044 Operations Manual (Version C) 5
5. Secure the "D" rings to the cargo tie-downs on the
floor of the helicopter. Tie the supplied webbing
straps onto the Sacksafoam cleats.
6. Attach power to the unit.
7. Uncoil the stored breakaway hose and connect the
breakaway hose to the foam outlet fitting.
8. Push the garden hose fitting into the free end of the
breakaway hose.
Secure using cleats and "D" rings.
Pushing in fittings.

Section 2: Installation Installation Procedures
Sacksafoam II Model 8044 Operations Manual (Version C) 6
9. Secure the breakaway hose to the helicopter. Run the 5/8" (16 mm) ID female garden hose from
the end of the breakaway hose down to the Bambi bucket. Attach the hose to the suspension lines
using tie wraps. Take care not to pinch or kink the hose as this will restrict the flow of foam.
Warning
Do not secure the garden hose fitting to the breakaway hose with a clamp. The breakaway hose is
intended for safe jettisoning of the Bambi bucket.
Important Note
If the bucket has to be jettisoned, the hose will pull apart at the unclamped fitting. Since the break-
away hose is secured, there will be no tendency for the garden hose to pull the Sacksafoam from
the helicopter. In this event, any foam in the hose will drip safely outside the helicopter.

Section 3: Testing Testing the Sacksafoam
Sacksafoam II Model 8044 Operations Manual (Version C) 7
Section 3: Testing
Testing the Sacksafoam
Dry Test
Important Note
The testing procedure should be performed before every use to check the operation of the Sasksa-
foam unit.
Important Note
A dry test can be done to determine if all power hook-ups are correct. Set the controller to 10 sec-
onds, take one dip tube out and lift the float on the end of the dip tube. If the pump starts, the hook-
up is correct.
Power On
Dispensing
Ready
Reset Reset On/Off
Switch
Total
Drops Current
Drops Dispense
Standard
Controller
Console
Mount
Dispense Timer

Section 3: Testing Testing the Sacksafoam
Sacksafoam II Model 8044 Operations Manual (Version C) 8
Wet Test
1. For the wet test, foam or water can be used for test purposes.
2. Place a full 5 USG container of fire-retardant foam in the space provided within the Sacksafoam
case.
3. Insert the dip tube into the foam container and press
the rubber stopper down to seal the filler neck.
Push the dip tube down to contact the bottom of the
container.
4. If you are using foam for the test, place a break away hose into the empty container.
5. Turn the controller on and set the dispense time to 10.
6. Activate the dispense switch.
7. The pump should now start. There may be a short delay until the pump primes itself. To complete
the test, activate the dispense switch a second time. Foam or water should flow for 10 seconds.
8. Once the test is finished, store the dip tube as shown
in the photo.
Important Note
Please see Section 8: Parts for the parts list to aid in identifying components.

Section 4: Safety Preflight Safety Check
Sacksafoam II Model 8044 Operations Manual (Version C) 9
Section 4: Safety
Preflight Safety Check
The Bambi bucket and Sacksafoam II system should receive a preflight inspection in the same manner as a
pilot preflights the aircraft before use. To preflight the system, start at the bottom and work up.
1. Is the unit plugged into the helicopter’s power source?
2. Is the controller secured inside the cockpit and plugged into the electrical box in the unit?
3. Are all wires in the helicopter secured to avoid tripping and tangling?
4. Is the Sacksafoam case secured with the tie down strap?
5. Is the breakaway hose secured to the Bambi bucket?
6. Is the pail of foam inside the Sacksafoam container?
Please refer to the Bambi bucket manual for the preflight check on the Bambi bucket itself.

Section 5: Controller Box Control Box Description
Sacksafoam II Model 8044 Operations Manual (Version C) 10
Section 5: Controller Box
Control Box Description
The Sacksafoam controller box is the brains of the system and contains an accurate quartz digital timer to
control delivery of foam concentrate to the Bambi bucket.
Since the Sacksafoam unit pumps foam at a fixed rate, the dispense time set on the controller relates directly
to the foam concentration in the Bambi bucket. Circuit protection for the controller consists of a crowbar
over-voltage protector and a 3-amp circuit breaker.
Standard Control Box (SFF003) Console Mount (SFF004)
The unit should look like this when ready to operate.

Section 5: Controller Box Controller Box Functions
Sacksafoam II Model 8044 Operations Manual (Version C) 11
Controller Box Functions
Item Function
On/off switch Toggle up to turn ON.
Toggle down to turn off and reset.
Dispense
switch Press/push button to begin dispensing foam.
Dispense
time switch Push buttons to set run time of foam injection pump.
Current
drops
counter
Both counters increment every time dispense switch is pressed up (on). Current
drops counter should be reset when Sacksafoam is refilled. Zero counter by
pressing reset button.
Total drops
counter Both counters increment every time dispense switch is pressed up (on). Total
drops counter can be used to count the total number of drops per day or shift.
Zero counter by pressing reset button.
Red power
light Red light is on when power is on.
Orange
dispense
light
Orange light is on when unit is dispensing foam.
Green mix
ready light Green light is on when unit is ready for next dispense cycle or mixer (if installed)
is running. The green light (and mixer; if installed) will go off when the Bambi
bucket is dumped if green wire is hooked up to Bambi dump circuit.
Important Note
If the power supply polarity is reversed, the controller box will not operate. However, the Sack-
safoam dispense pump will operate at a greatly reduced flow rate. If reverse polarity occurs, cor-
rect it immediately.

Section 5: Controller Box Controller Connector Pin Descriptions
Sacksafoam II Model 8044 Operations Manual (Version C) 12
Controller Connector Pin Descriptions
3
6
9
5
8
1
4
7
Pin
Description Wire Color
1 + 24 VDC supply red
2 - 24 VDC supply black
3 + 24 VDC to remote dispense switch (option) blue
4 +24 VDC to foam dispense pump white
5 plugged
6 - 24 VDC to foam dispense pump white with blue tracer
7 + 24 VDC 0.5 AMPS to mixer solenoid (option) yellow
8 plugged
9 + 24 VDC from Bambi dump button green

Section 6: Operations Operating the System
Sacksafoam II Model 8044 Operations Manual (Version C) 13
Section 6: Operations
Operating the System
Please perform the installation, testing and preflight inspection as previously described before operating the
Sacksafoam II. This section should be read in conjunction with the Bambi bucket operations manual.
1. Place a full container of foam into one or both spaces of the Sacksafoam case.
2. Insert the dip tubes into the containers. Press in the rubber stoppers.
3. Refer to the chart on the side of the Sacksafoam case to set the controller box with the correct
foam dispense time. The dispense time will vary with the size of the Bambi bucket you are using
and the desired foam concentration.
4. After the Bambi bucket has been filled with water, operate the controller box dispense switch to
pump foam down to the bucket.
5. There are two red lights on the Sacksafoam control box, which,
when lit, indicate that a foam container is empty. Replace the
corresponding foam container with a full one. If you are unsure
which container is empty, this can be determined by pulling the
dip tube towards the top of the pail. If the other light does not
come on, you have the right container.
6. While changing the foam containers, the dip tube can be stored
in the black storage tube.
Important Note
If you have an existing controller box with a black plastic case, disregard the dispense time chart
on the top. It applies only to original Sacksafoam I units.
Dip tube placed inside the
black storage tube.

Section 6: Operations Operating the System
Sacksafoam II Model 8044 Operations Manual (Version C) 14
Container Size
The Sacksafoam container is 27" x 20" x 21 1/4" or 590 mm x 510 mm x 540 mm.
Model SF2-8044 Specifications
Model SF2-8044 Run Times
Use the following chart to set the run time on the Sacksafoam containerfor the foam concentration required.
First, select your bucket size and concentration. The intersection of the row and column gives the run time
in seconds. Set this time using the small push buttons on the front of the controller box.
Foam Concentrate Capacity Empty and Full WeightsSF II Bambi Bucket Model USG Imp. Gal L Lbs Kgs Lbs Kgs
SF2 - 8044
6072 - 1821 10 8 38 59 27 67 30
Caution
Do not use the chart on the top of the controller box. Use the chart on the outside of the grey con-
tainer or use the table below to determine run times.

Section 7: Maintenance Maintenance and Servicing
Sacksafoam II Model 8044 Operations Manual (Version C) 15
Section 7: Maintenance
Maintenance and Servicing
The Sacksafoam II unit requires no maintenance other than cleaning. The unit should be flushed out with
clean water daily, after use, and prior to storage.
Flushing Procedure
1. Insert one dip tube into a container of clean water.
2. Place the breakaway hose into a bucket and operate the Sacksafoam controller until the water runs
clean.
3. Repeat step #2 for the other dip tube. Drain any remaining water from the piping and pump by
alternately holding the dip tubes upside down and operating the Sacksafoam controller.
4. Foam or water in the Sacksafoam case can be drained by removing the drain cap and tipping the
unit. Wipe out the case with a damp cloth.
5. Remove the drip tube to drain any residual foam.
Important Note
Proper cleaning of the equipment prior to storage will increase the life span of the unit.
Caution
Residual foam will form a waxy substance that can prevent proper operation of the Sacksafoam.

Section 7: Maintenance Maintenance and Servicing
Sacksafoam II Model 8044 Operations Manual (Version C) 16
Servicing
The gray plastic mounting panel carrying the pump, valves and electrical control box can be removed for
servicing.
To remove the mounting panel:
1. Remove the three bolts holding the
pail. Separate the interior frame.
2. Remove the three bolts holding the
mounting panel.
3. Lift the assembly straight up with the
wires attached. Lay the panel on top of
the container.
The pump impeller can be serviced without removing the pump from the mounting panel. Remove the four
brass screws on the bottom of the pump to access the impeller. A spare impeller and seal are supplied with
each Sacksafoam II unit.
If a solenoid valve does not operate properly, remove the blue coil by pulling off the securing clips (do not
lose the wave washer installed under the coil).
Undo the four boltsand gently remove the top of the valve from the diaphragm. Clean the inside of the valve
and the diaphragm using mild soap and water (do not lose the small spring that fits inside the metal stem
attached to the diaphragm).
Test the unit after any servicing.
Bambi panel shown in photo.

Section 8: Parts Parts and Diagrams
Sacksafoam II Model 8044 Operations Manual (Version C) 17
Section 8: Parts
Parts and Diagrams
Control Panel
1
2
3
4
4
5
67 8 9 8 8 9 8 7 10 6
11
10
4
13
14
This manual suits for next models
1
Table of contents
Other SEI Industries Industrial Equipment manuals
Popular Industrial Equipment manuals by other brands

Magnetrol
Magnetrol Tuffy T3 series Installation and operating manual

Greenlee
Greenlee H4905A instruction manual

PISCO
PISCO VTA instruction manual

CAMION
CAMION BRINE MASTER 1600 owner's manual

Columbus McKinnon
Columbus McKinnon DORNER 2200 Series Installation, maintenance & parts manual

KICE
KICE VJOT Series Operator's manual