SEIKEL 1214 0000 User manual

Volkswagen Transporter T6
Winch
Nummer: 1214 0000 Stand: 03.2020
Revision: 03 Sprache: EN
________________________________________________________________________________________
Installation guide
1214 0000
Volkswagen Transporter T6
Winch
REV: 03
As on: 03.2020 Page 1 of 15 SEIKEL GmbH
Installation Guide 1214 0000
This installation guide applies to part n°/descriptions:
1214 0000 T6 – Winch attachment kit incl. Winch
1214 0002 T6 – Winch attachment kit

Volkswagen Transporter T6
Winch
Nummer: 1214 0000 Stand: 03.2020
Revision: 03 Sprache: EN
________________________________________________________________________________________
Installation guide
1214 0000
Volkswagen Transporter T6
Winch
REV: 03
As on: 03.2020 Page 2 of 15 SEIKEL GmbH
Important
To ensure proper function and optimal quality of our parts, their installation must be done in accordance
with this installation guide and according to Volkswagen manufacture’s specifications in a professional
workshop. SEIKEL GmbH and its employees shall not be responsible for damage and its consequences of
any nature, which are caused due to non-observance or ignorance of these guidelines. Warranties shall
be void for incorrectly performed installations.
Installation guide
Please refer to the Volkswagen instructions for the exact working steps as well as the tightening torques. In
case of deviation, our specifications shall be applicable.
NOTE!
All the drill holes and breakthroughs must be deburred from both the sides. Metal swarfs are to be
removed / vacuumed up immediately, and it has to be ensured that no swarfs fall into the hollow space
in the body!
Apply paint (as per current valid VW repair manual "Paint", refer to ELSA):
1. Apply wash primer and allow it to dry in accordance with the item description. A hot-air dryer can be
used, if necessary. We recommend: 1k Wash primer LLS MAX 106 M2.
2. Apply filler and allow it to dry in accordance with the item description. A hot-air dryer can be used, if
necessary. We recommend 2K-HS filler LLS MAX 202 M2.
3. Apply base coat on visible areas based on the vehicle-specific varnish and allow base coat to dry in
accordance with the item description. A hot-air dryer can be used, if necessary.
4. Protect all cutting edges, hollow spaces or drill holes additionally with anti-corrosion wax, if required
using a small brush. We recommend transparent preservative wax AKR 321 M 15 4.
Volkswagen Transporter T6
Winch
Nummer: 1214 0000 Stand: 03.2020
Revision: 03 Sprache: EN
________________________________________________________________________________________
Installation guide
1214 0000
Volkswagen Transporter T6
Winch
REV: 03
As on: 03.2020 Page 3 of 15 SEIKEL GmbH
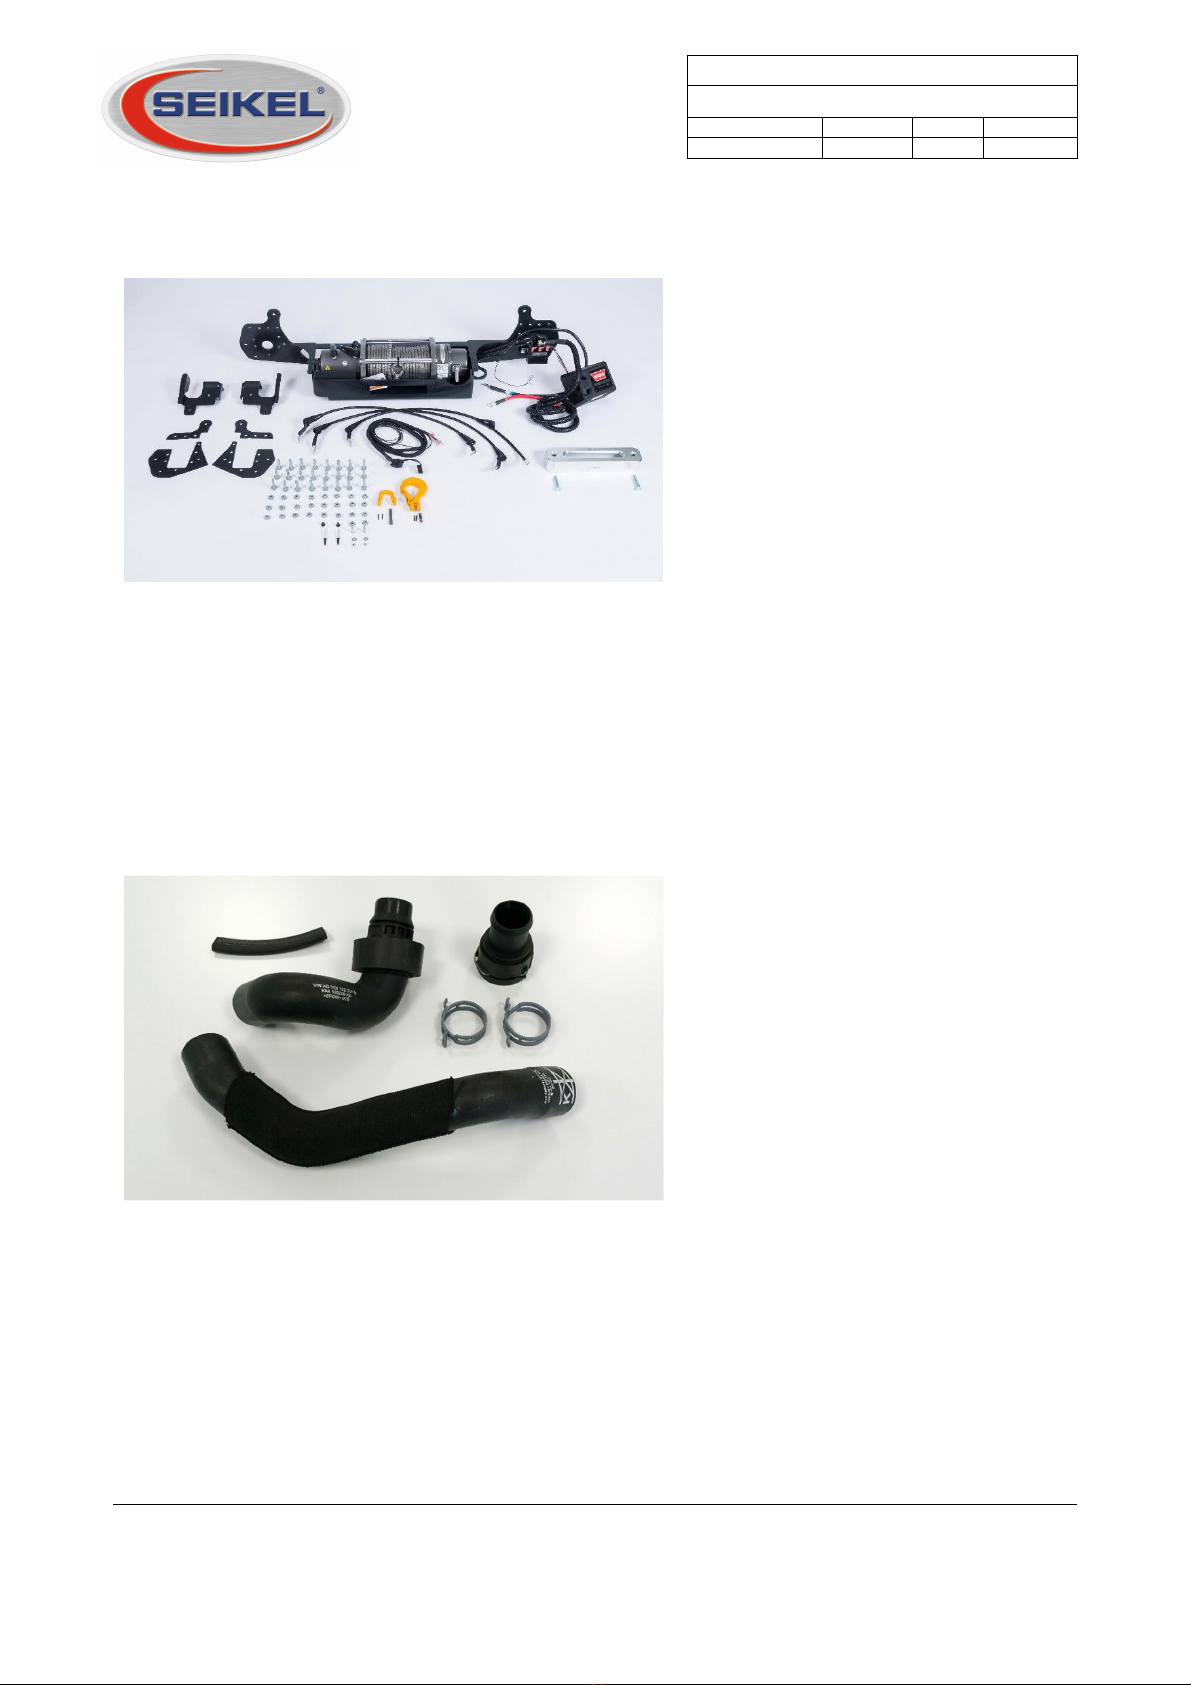
Parts list 1214 0000
- 1x winch
- 1x plastic cable
- 1x safety hook
- 1x cable fairlead
- 1x winch installation kit
- 1x stencil for winch fairlead
section
- 1x winch holder
- 2x reinforcement plate below
- 2x reinforcement plate top
- 1x holder for radiator right
- 1x holder for radiator left
- 1x holder for ECU
- 1x angle plate for cable routing
- 2x M10x40 countersunk head screw
- 26x M8x35 hexagon head screw
- 26x M8 hexagon locking nut
- 2x M6x10 torx screw
- 1x coolant hose 7E0 121 101 E
- 1x coolant hose 7E0 122 051 E
- 1x quick coupling 3B0 122 291 C
- 2x spring band clamp 40x12
- 1x edge guard
Volkswagen Transporter T6
Winch
Nummer: 1214 0000 Stand: 03.2020
Revision: 03 Sprache: EN
________________________________________________________________________________________
Installation guide
1214 0000
Volkswagen Transporter T6
Winch
REV: 03
As on: 03.2020 Page 4 of 15 SEIKEL GmbH
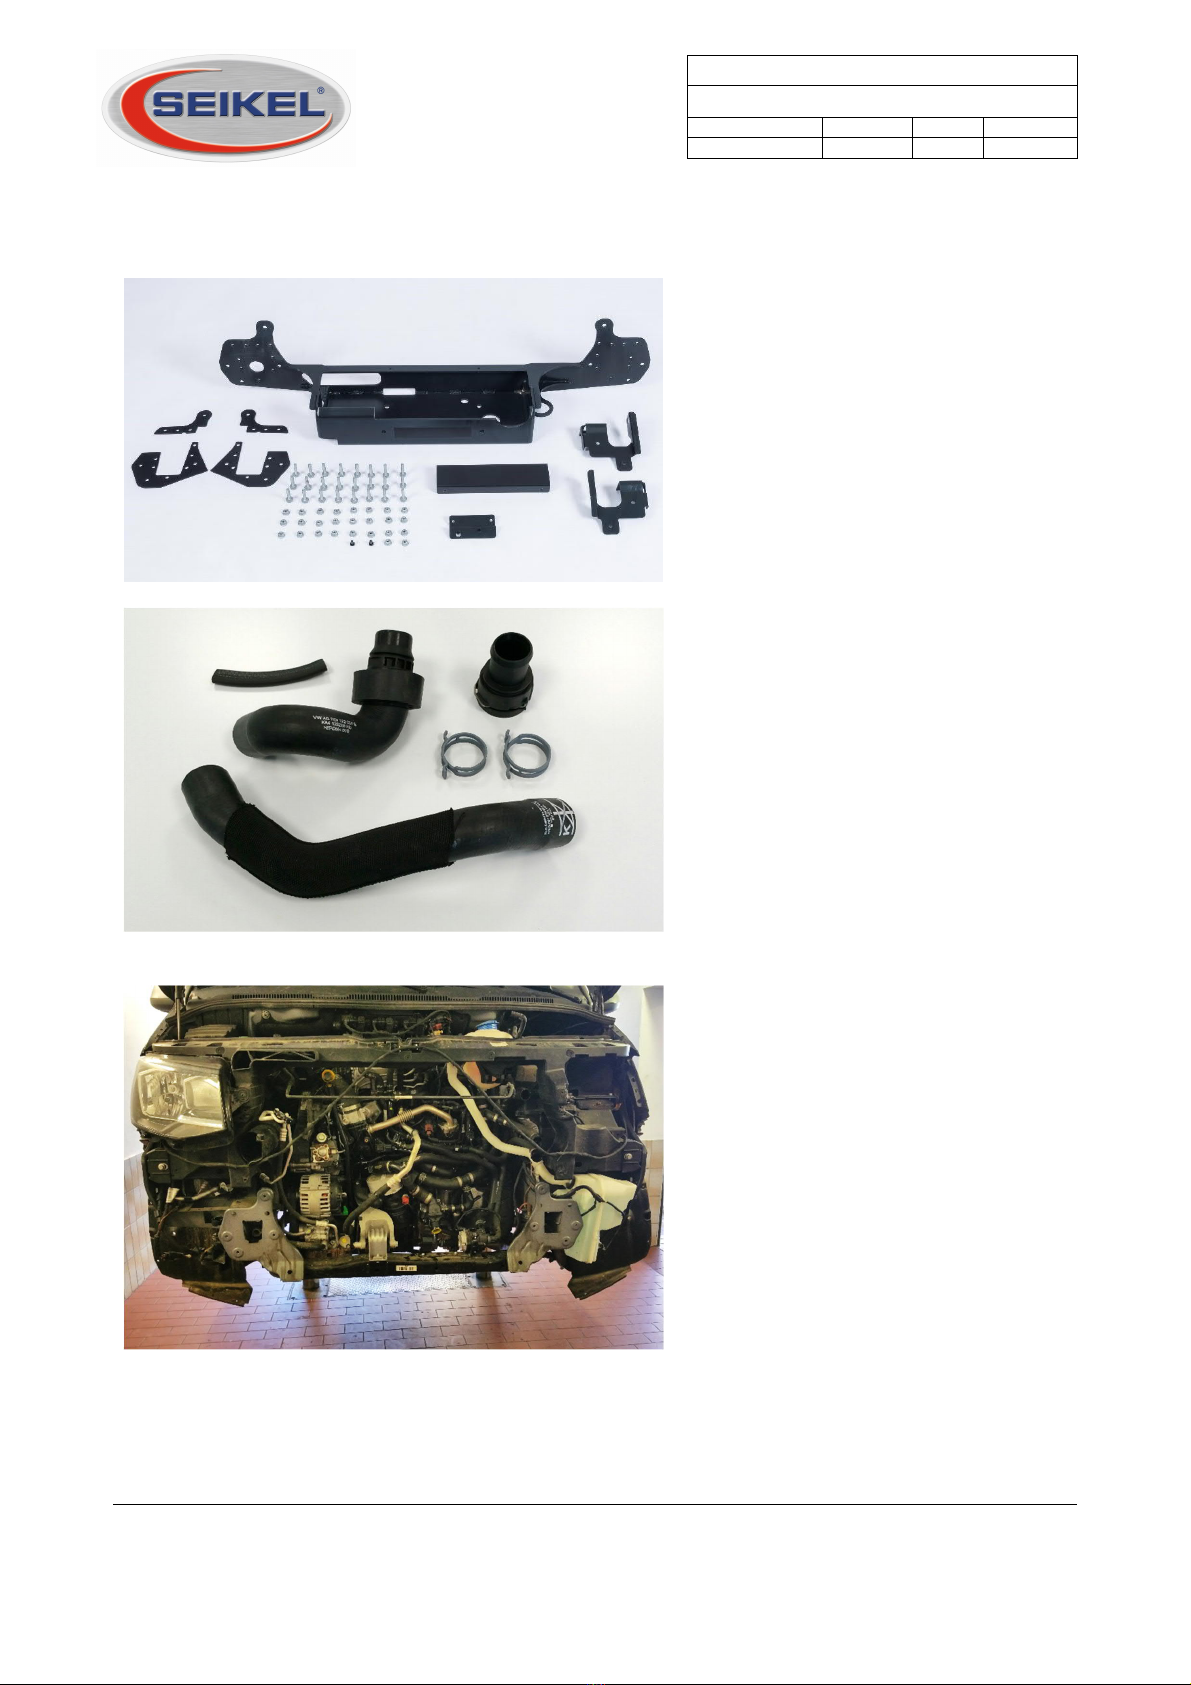
Parts list 1214 0002
- 1x stencil for winch window
section
- 1x winch support
- 2x reinforcement plate below
- 2x reinforcement plate top
- 1x holder for radiator right
- 1x holder for radiator left
- 1x holder for ECU
- 1x angle plate for cable routing
- 2x M10x40 countersunk head screw
- 26x M8x35 hexagon head screw
- 26x M8 hexagon locking nut
- 2x M6x10 hexagon head screw
- 1x coolant hose 7E0 121 101 E
- 1x coolant hose 7E0 122 051 E
- 1x quick coupling 3B0 122 291 C
- 2x spring band clamp 40x12
- 1x edge guard
Instruction
Dismount vehicle front as shown in the
adjacent image (absolutely follow
manufacturer specifications (ELSA) and
safety guidelines).

Volkswagen Transporter T6
Winch
Nummer: 1214 0000 Stand: 03.2020
Revision: 03 Sprache: EN
________________________________________________________________________________________
Installation guide
1214 0000
Volkswagen Transporter T6
Winch
REV: 03
As on: 03.2020 Page 5 of 15 SEIKEL GmbH
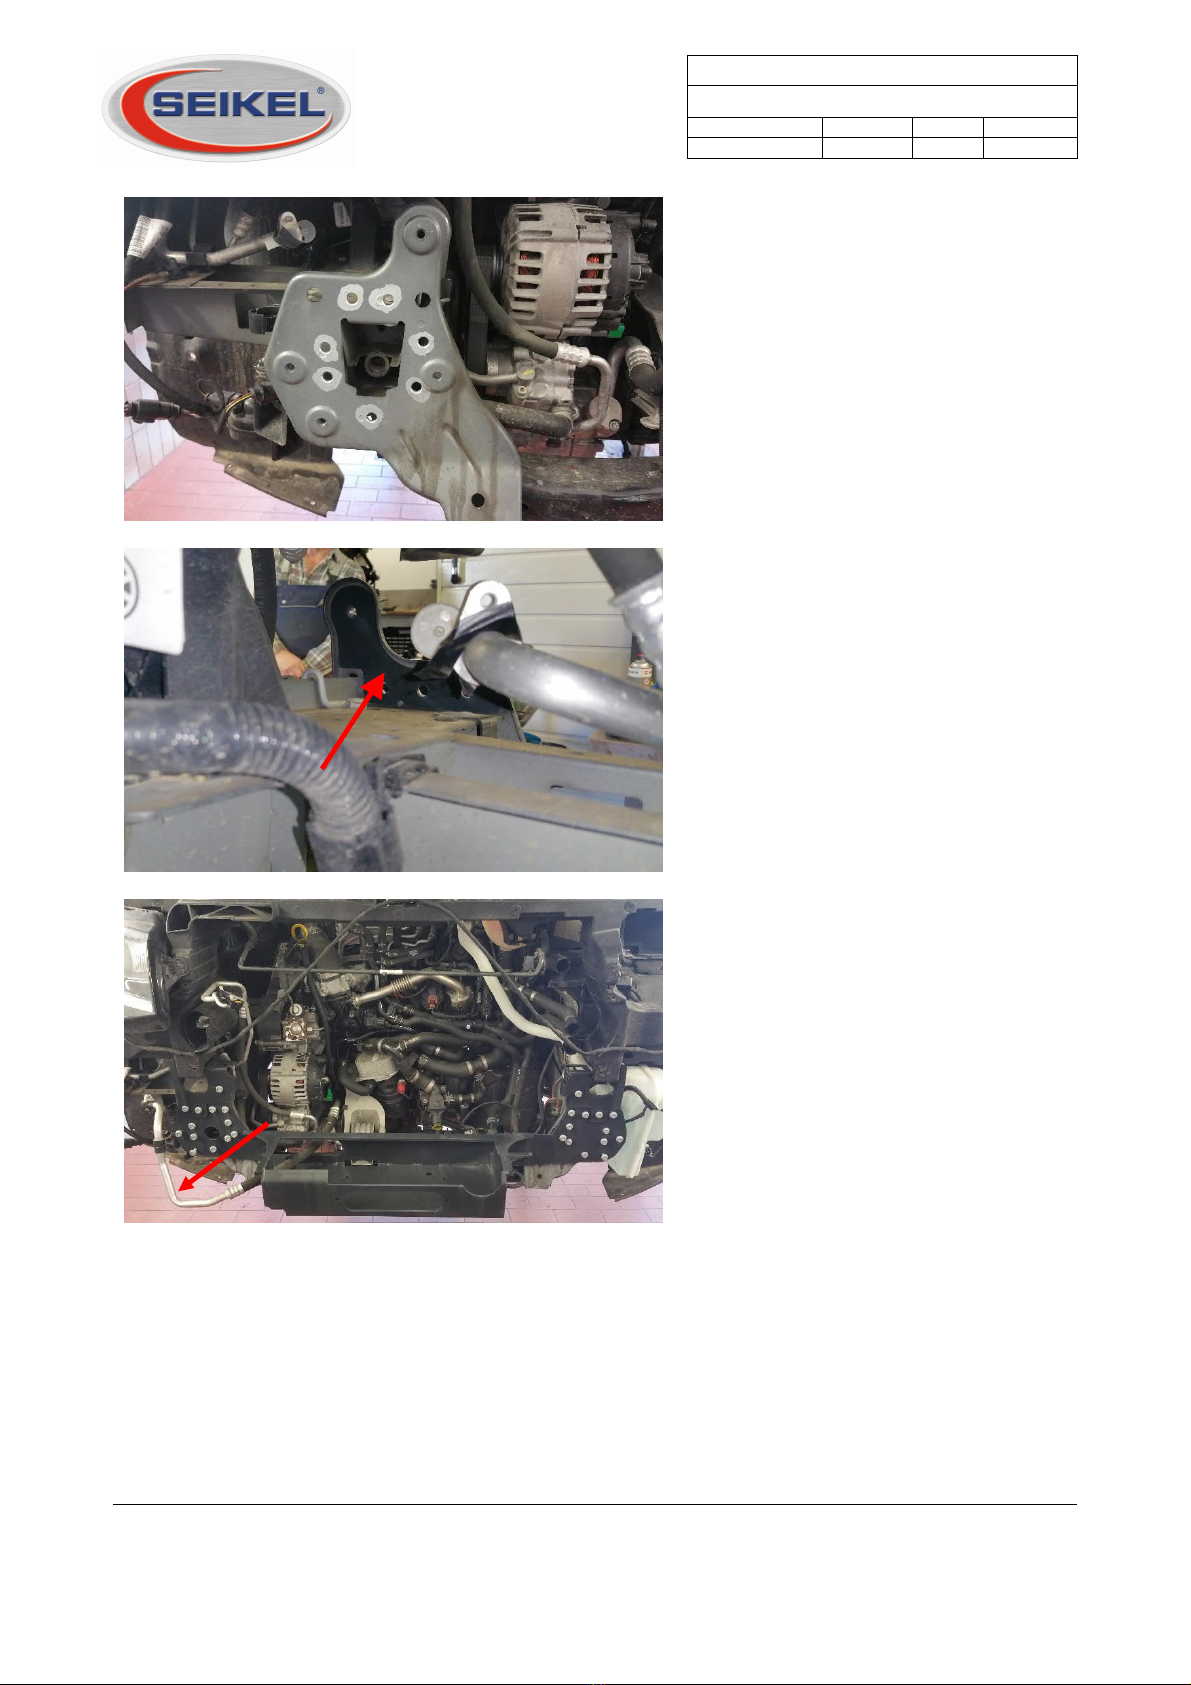
Pre-assemble the winch holder on the
frame heads and mark the holes that are
yet to be done.
Dismount the winch holder again.
Pre-drill the marked spots and drill 10
mm.
Volkswagen Transporter T6
Winch
Nummer: 1214 0000 Stand: 03.2020
Revision: 03 Sprache: EN
________________________________________________________________________________________
Installation guide
1214 0000
Volkswagen Transporter T6
Winch
REV: 03
As on: 03.2020 Page 6 of 15 SEIKEL GmbH
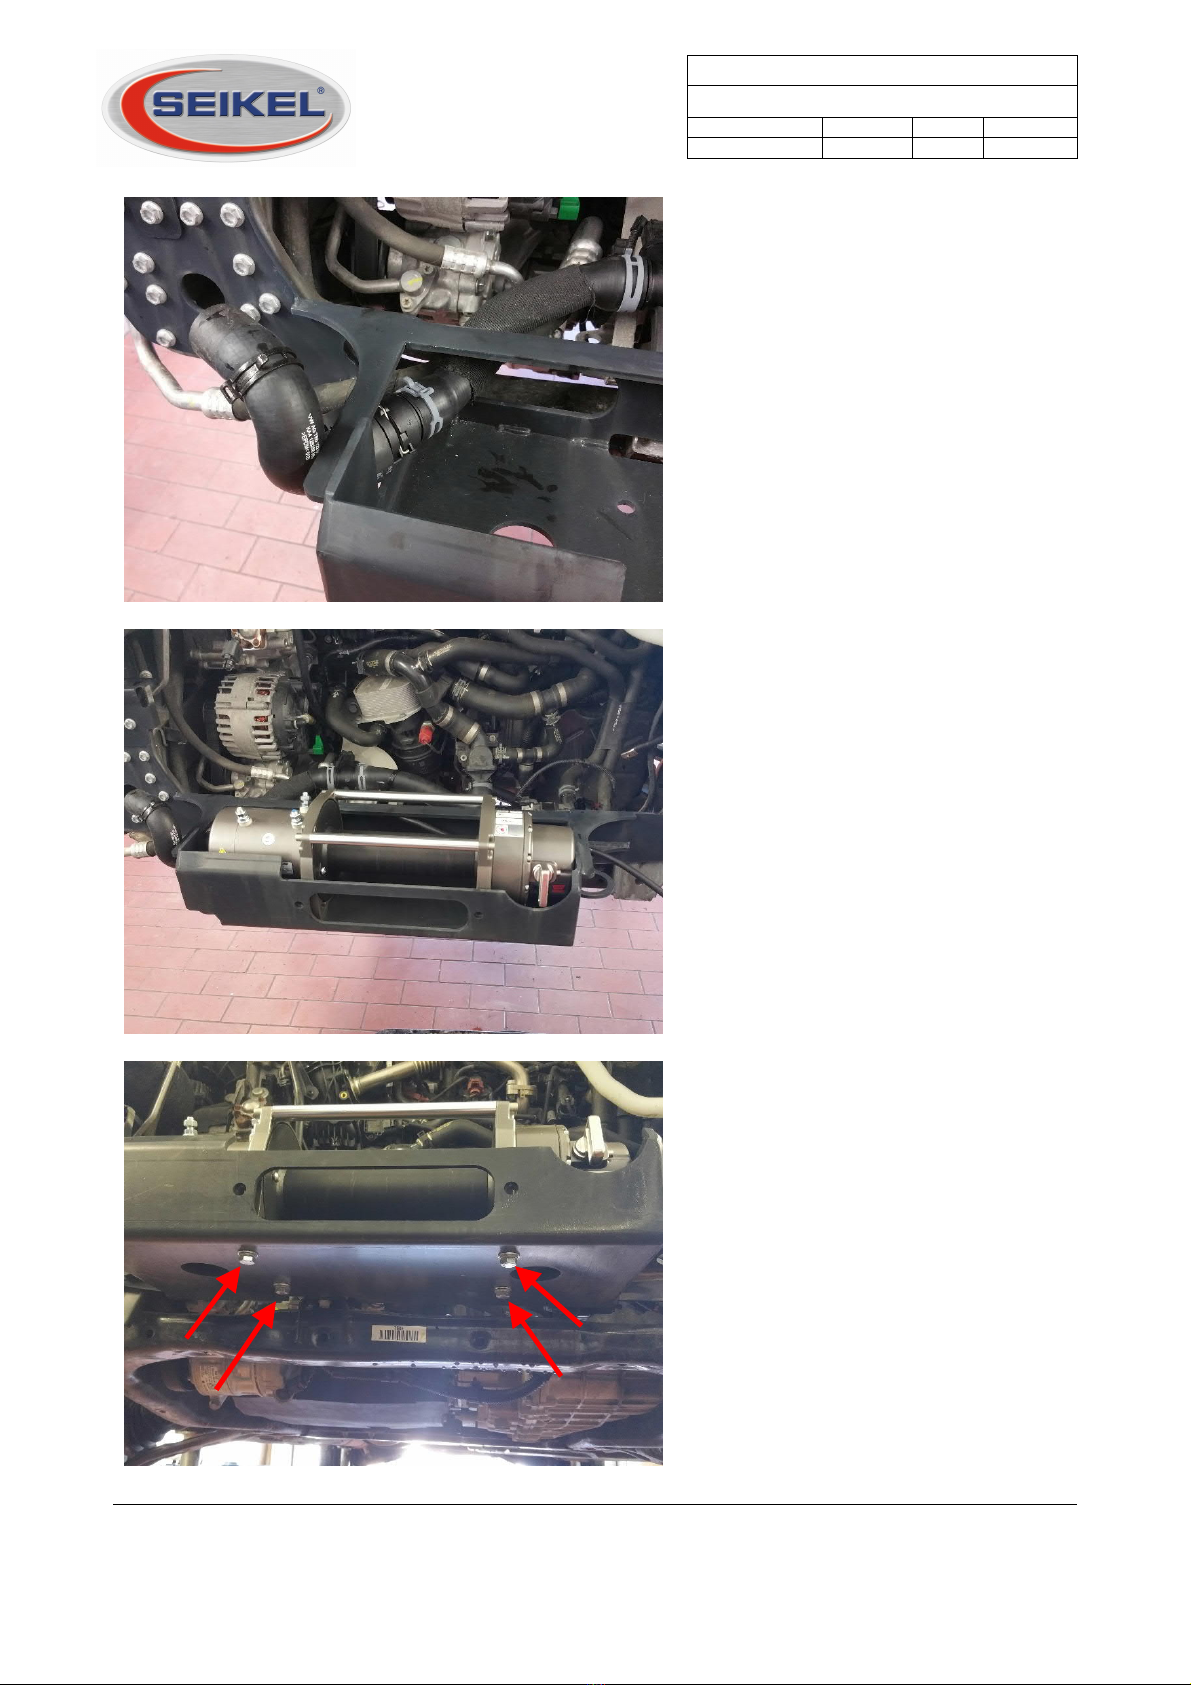
Deburr all the drilled holes and protect
against corrosion as shown on page 2.
Insert the 4 reinforcement plates supplied
in the delivery from rear in both the
frame heads.
Fix the winch holder along with the left
and right holder for the cooling pack on
the frame heads. Use the 26 M8x35
hexagon screws and the M8 hexagon
locking nuts supplied in the delivery for
fixing.
Pay attention that at the beginning of
installation, the AC lines are run in
through the winch holder and connected
to the vehicle.
Volkswagen Transporter T6
Winch
Nummer: 1214 0000 Stand: 03.2020
Revision: 03 Sprache: EN
________________________________________________________________________________________
Installation guide
1214 0000
Volkswagen Transporter T6
Winch
REV: 03
As on: 03.2020 Page 7 of 15 SEIKEL GmbH
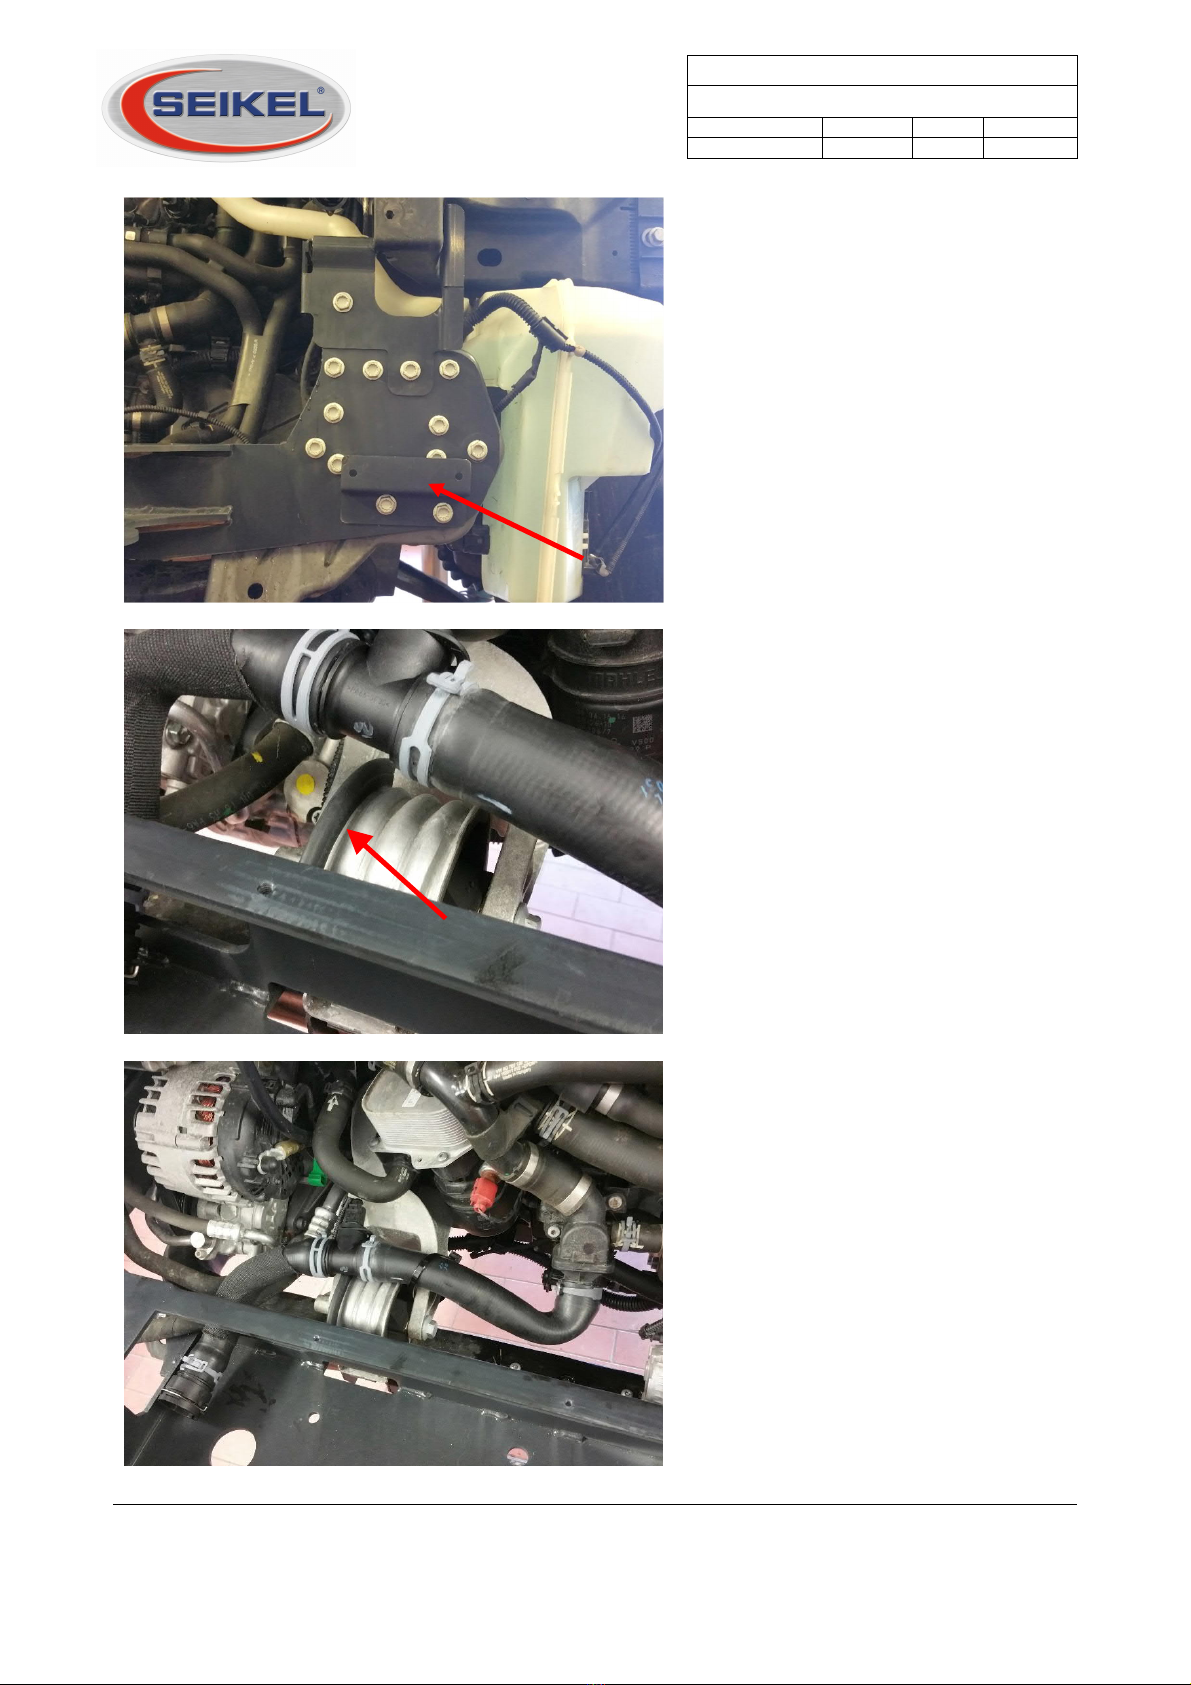
As seen in the image, install the holder for
ECU supplied in the delivery on the left
bottom of the winch holder.
Finally, tighten all the fixed M8 screw
connections with 25 Nm.
Fix the edge guard supplied in the delivery
on the right plate edge of the front engine
support.
Separate the supplied and preassembled
coolant hose on the coupling and replace
the longer piece, as shown in the image,
with the hose installed in the vehicle.
Volkswagen Transporter T6
Winch
Nummer: 1214 0000 Stand: 03.2020
Revision: 03 Sprache: EN
________________________________________________________________________________________
Installation guide
1214 0000
Volkswagen Transporter T6
Winch
REV: 03
As on: 03.2020 Page 8 of 15 SEIKEL GmbH
Connect the short hose bend, which was
separated earlier, back to the long hose
piece, as shown in the image.
Insert the winch incl. earth cable supplied
in kit 1214 0000 in the winch holder and
fix. Guide the earth cable on the left side
out of the winch holder.
Tighten the 4 fixing screws of the winch
with 55 Nm.

Volkswagen Transporter T6
Winch
Nummer: 1214 0000 Stand: 03.2020
Revision: 03 Sprache: EN
________________________________________________________________________________________
Installation guide
1214 0000
Volkswagen Transporter T6
Winch
REV: 03
As on: 03.2020 Page 9 of 15 SEIKEL GmbH
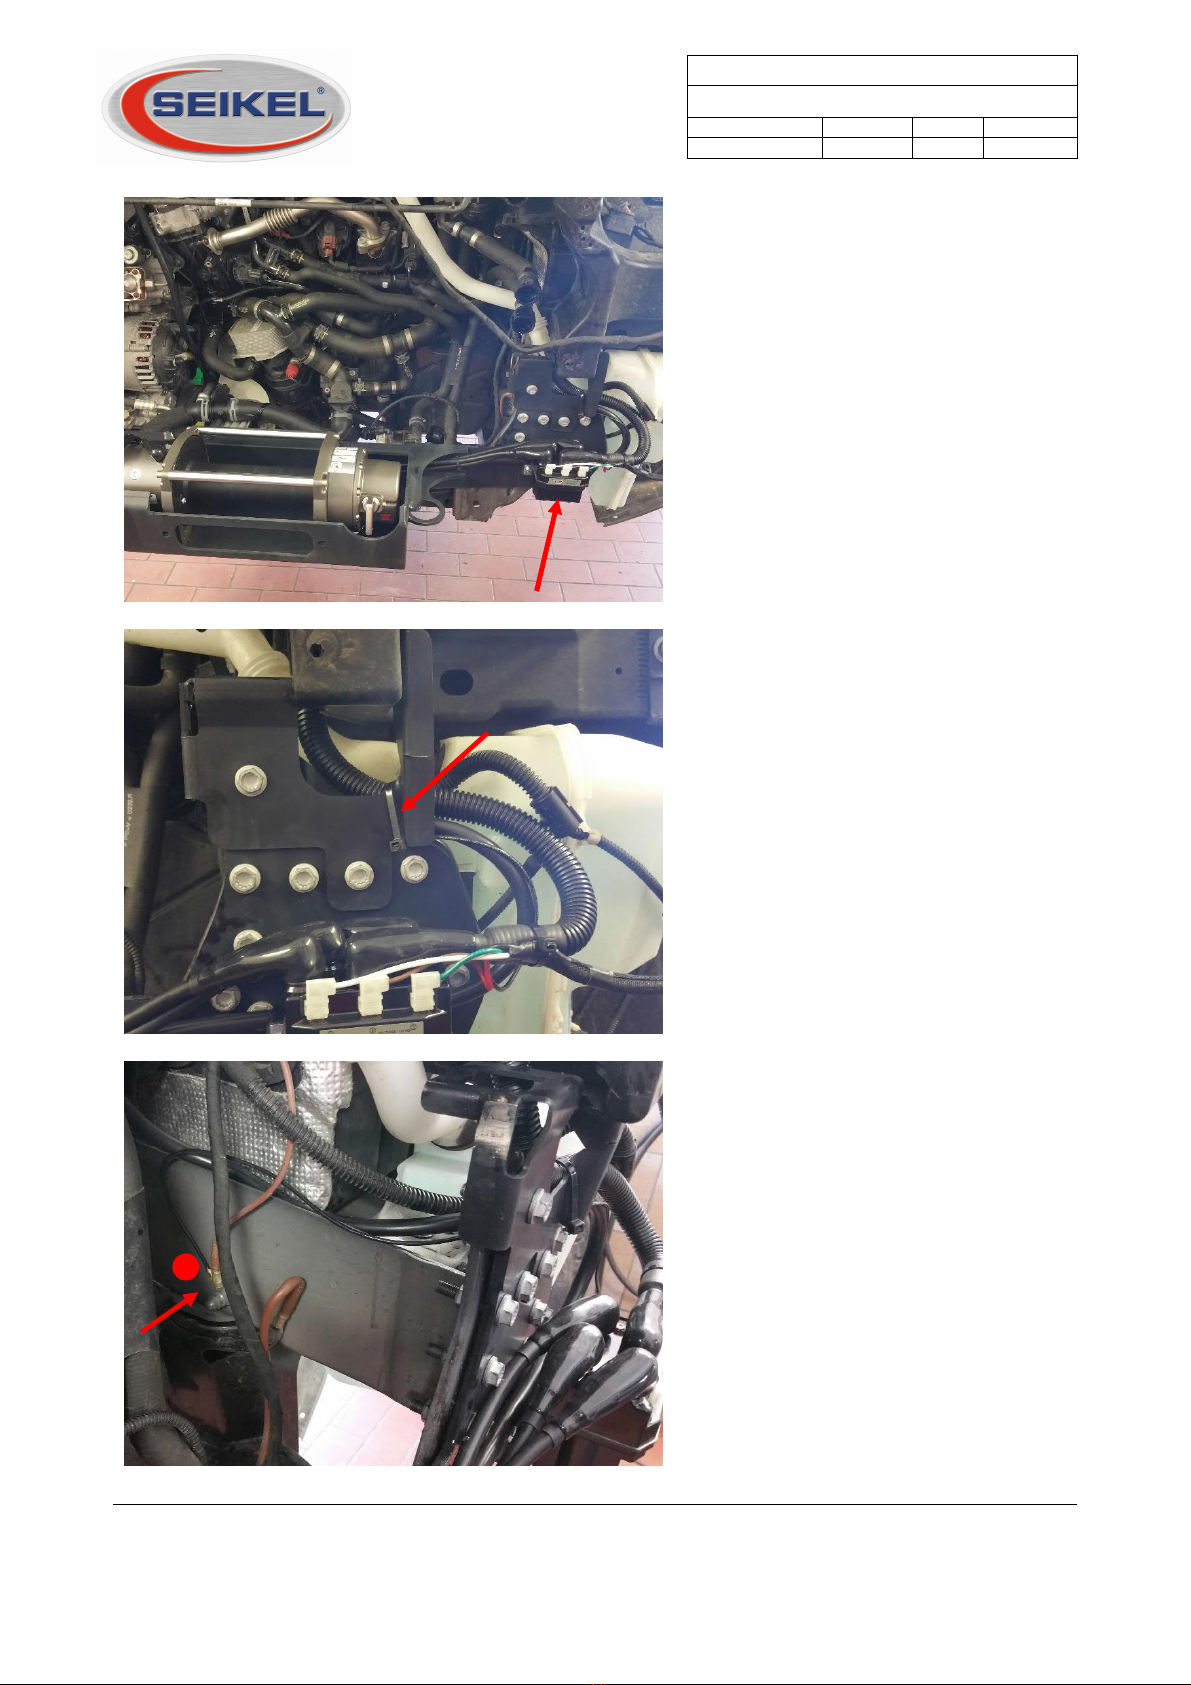
Fix the angle plate for cable routing
supplied in the delivery behind the winch
on the winch support with both the torx
screws M6x10 supplied in the delivery.
Tighten both the screws with 10 Nm.
Guide all the cables that are connected to
the winch between the angle plate and
the winch holder past the winch on the
left side.
Lay the earth cable on the left vehicle side
along the frame.
Fasten the earth cable at the earthing
point (–), which is above the left vehicle
frame as seen in the image.
+
-
Volkswagen Transporter T6
Winch
Nummer: 1214 0000 Stand: 03.2020
Revision: 03 Sprache: EN
________________________________________________________________________________________
Installation guide
1214 0000
Volkswagen Transporter T6
Winch
REV: 03
As on: 03.2020 Page 10 of 15 SEIKEL GmbH
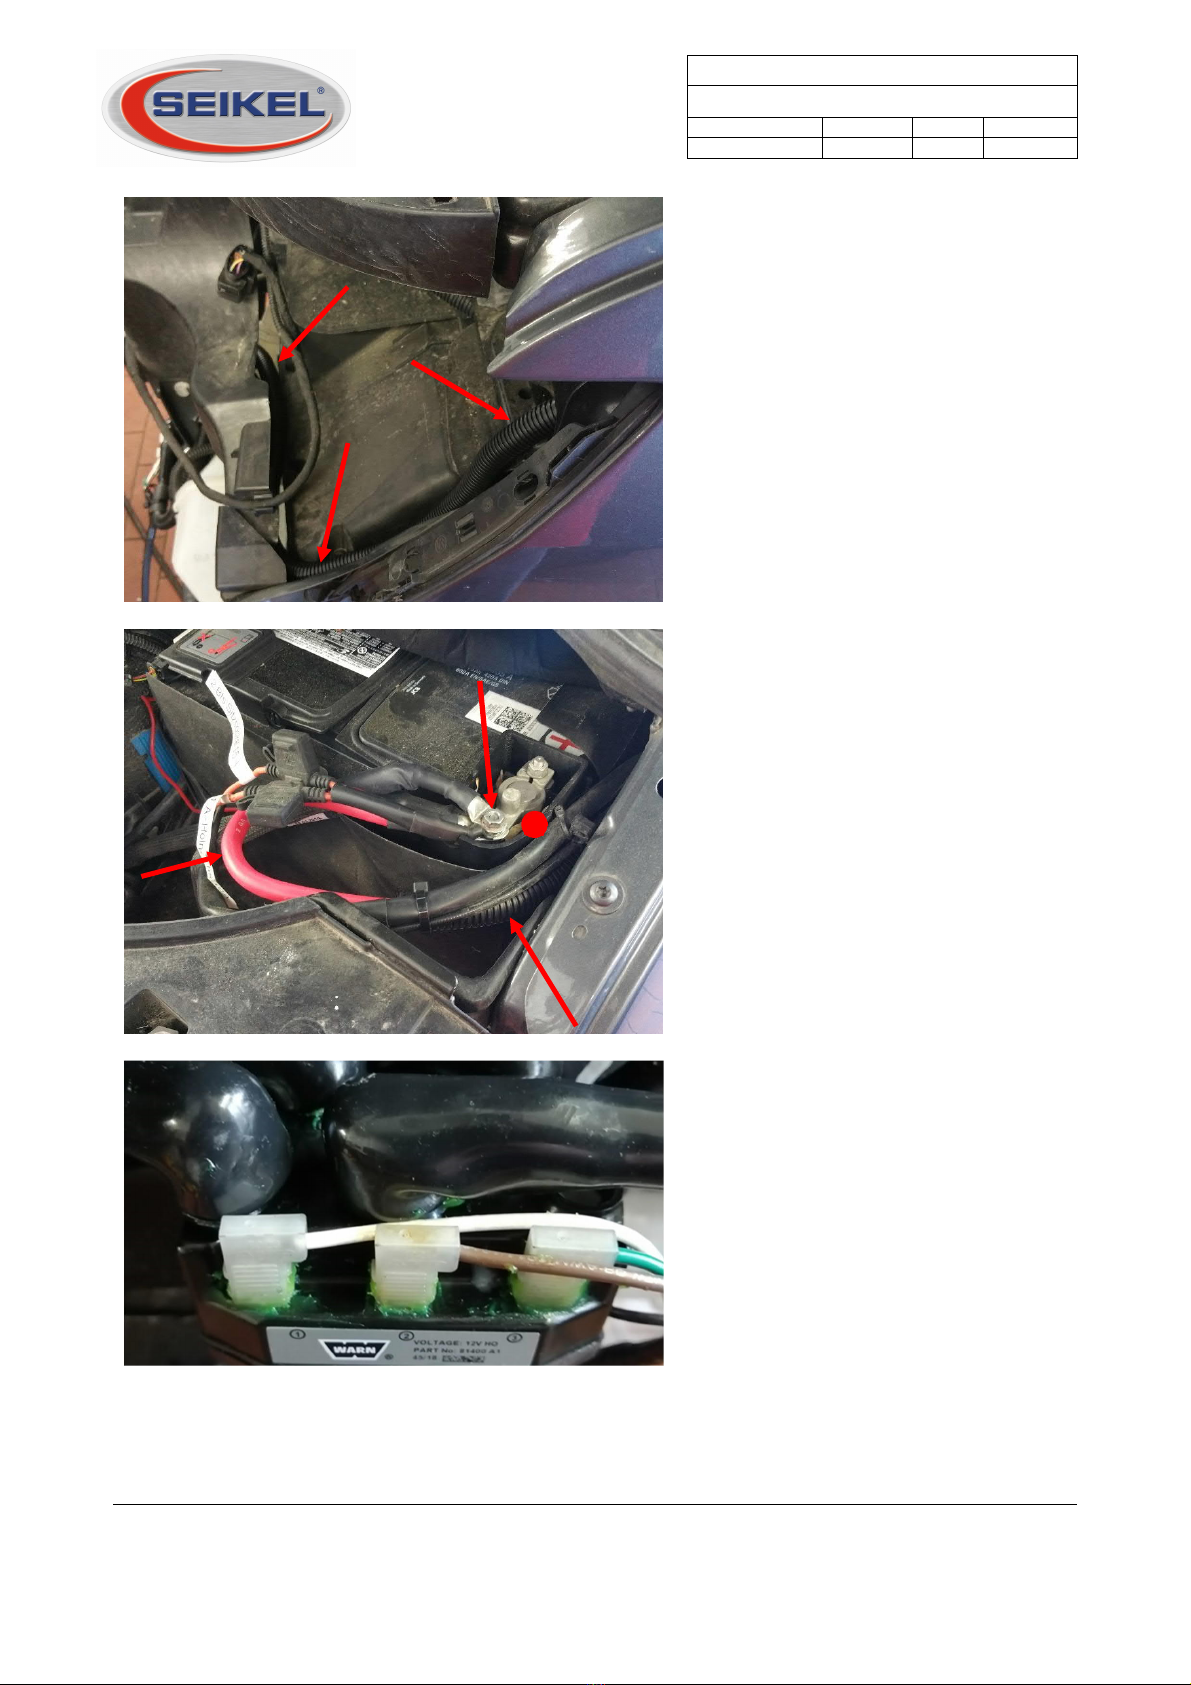
Fix the ECU for the winch pre-assembled
with all the cables on the earlier iinstalled
holder and connect the three thick cables
to the cable winch, as described in the
installation instructions of the cable
winch.
Fasten all the cables that lead from ECU
to the vehicle at the radiator holder using
a cable tie.
Fasten the earth cable of the ECU at the
earthing point (–) on the vehicle frame.
+
-
Volkswagen Transporter T6
Winch
Nummer: 1214 0000 Stand: 03.2020
Revision: 03 Sprache: EN
________________________________________________________________________________________
Installation guide
1214 0000
Volkswagen Transporter T6
Winch
REV: 03
As on: 03.2020 Page 11 of 15 SEIKEL GmbH
Lay the plus cable in the corrugated pipe
below the headlight position towards left
of fender and along the fender upwards
to vehicle battery.
Connect the plus cable on positive
terminal (+) of the vehicle battery.
Important:
During maintenance work, we
recommend protecting the plug
connections and cable connections of the
cable winch and the control unit with
grease and, if necessary, protective wax
against penetrating dirt and moisture.
+
+

Volkswagen Transporter T6
Winch
Nummer: 1214 0000 Stand: 03.2020
Revision: 03 Sprache: EN
________________________________________________________________________________________
Installation guide
1214 0000
Volkswagen Transporter T6
Winch
REV: 03
As on: 03.2020 Page 12 of 15 SEIKEL GmbH
Fix the cable fairlead supplied in the
delivery on the winch holder using the
two countersunk head screws M10x40
and tighten with 35 Nm.
Finally guide the towing rope through the
winch fairlead and fix on the winch drum.
Now, coil the towing rope using the winch
remote control on the drum.
Re-mount the left headlight and all the
radiators and connect all the hose
connections.
If the radiator is very tight on the winch,
attach an abrasion protector, e.g. made of
felt, to the winch to protect the radiator
net.

Volkswagen Transporter T6
Winch
Nummer: 1214 0000 Stand: 03.2020
Revision: 03 Sprache: EN
________________________________________________________________________________________
Installation guide
1214 0000
Volkswagen Transporter T6
Winch
REV: 03
As on: 03.2020 Page 13 of 15 SEIKEL GmbH
Mask the bumper in the area of marked
surface with an adhesive tape and mark
out the section for the cable fairlead onto
the bumper using the stencil supplied in
the delivery.
Cut the marked section from the bumper
using workshop tools.
Finally, mount the bumper on the vehicle.
For connecting the remote control, mask
the bumper as shown in the image.

Volkswagen Transporter T6
Winch
Nummer: 1214 0000 Stand: 03.2020
Revision: 03 Sprache: EN
________________________________________________________________________________________
Installation guide
1214 0000
Volkswagen Transporter T6
Winch
REV: 03
As on: 03.2020 Page 14 of 15 SEIKEL GmbH
The drill hole is marked 35 mm on the left
next to the radiator opening in the centre
of the impression.
Drill the marked hole on the diameter of
the bushing using step drill.
Insert the bushing from outside through
the hole and align the lugs with the fixing
holes.
Then, transfer the fixing holes onto the
bumper through drilling.
35 mm

Volkswagen Transporter T6
Winch
Nummer: 1214 0000 Stand: 03.2020
Revision: 03 Sprache: EN
________________________________________________________________________________________
Installation guide
1214 0000
Volkswagen Transporter T6
Winch
REV: 03
As on: 03.2020 Page 15 of 15 SEIKEL GmbH
Fit the bushing from inside on the bumper
and draw the outline of the connector
from outside on the bumper.
Cut the outline of the connector from the
bumper and fit the bushing back on the
bumper from inside.
The completely mounted cable winch.
This manual suits for next models
1
Popular Automobile Accessories manuals by other brands

Menabo
Menabo YELO MY3 Fitting instructions

Cruz
Cruz N Plus Series Assembly instructions

EV-Vision
EV-Vision EXP120K1-HT User& installer's manual

LG
LG HFB500 - - Bluetooth hands-free Car user manual

HAMEL
HAMEL S-200 operating manual

Soundoff Signal
Soundoff Signal UNIVERSAL UNDERCOVER ELUCTS010 Quick installation guide


