Selden S30 User manual

597-285-E
2019-01-23
Manual
2-speed self-tailing winches
S30, S40, S48, S54

2
Contents
1 Introduction………………………………………………………………………….................. 3
2 Self-tailing winch……………………………………………………………............................ 5
2.1 Included parts………………………………………………………………………....... 6
2.2 Optional parts …………………………………………………………………….......... 6
2.3 Technicalspecication……………………………………………………………....... 7
3 Installation…………………………………………………………………………………......... 9
3.1 Installation preparation…………………………………………………………….......10
3.2 Deck installation……………………………………………………………………....... 12
3.3 Final adjustments………………………………………………………………….........15
4 Operation……………………………………………………………………………….…......... 16
5 Service and maintenance……………………………………………………………….........19
5.1 Frequent maintenance……………………………………………………………....... 19
5.2 Normal maintenance…………………………………………………………….......... 19
5.3 Extended Maintenance……………………………………………………………...... 21
6 Spare parts…………………………………………………………………………………...... 25
7 Warranty……………………………………………………………………………………....... 26
3
1. Introduction
Congratulations on the purchase of your new Seldén S-Winch.
This manual covers installation and operating instructions for S-winch model S30, S40, S48, S54.
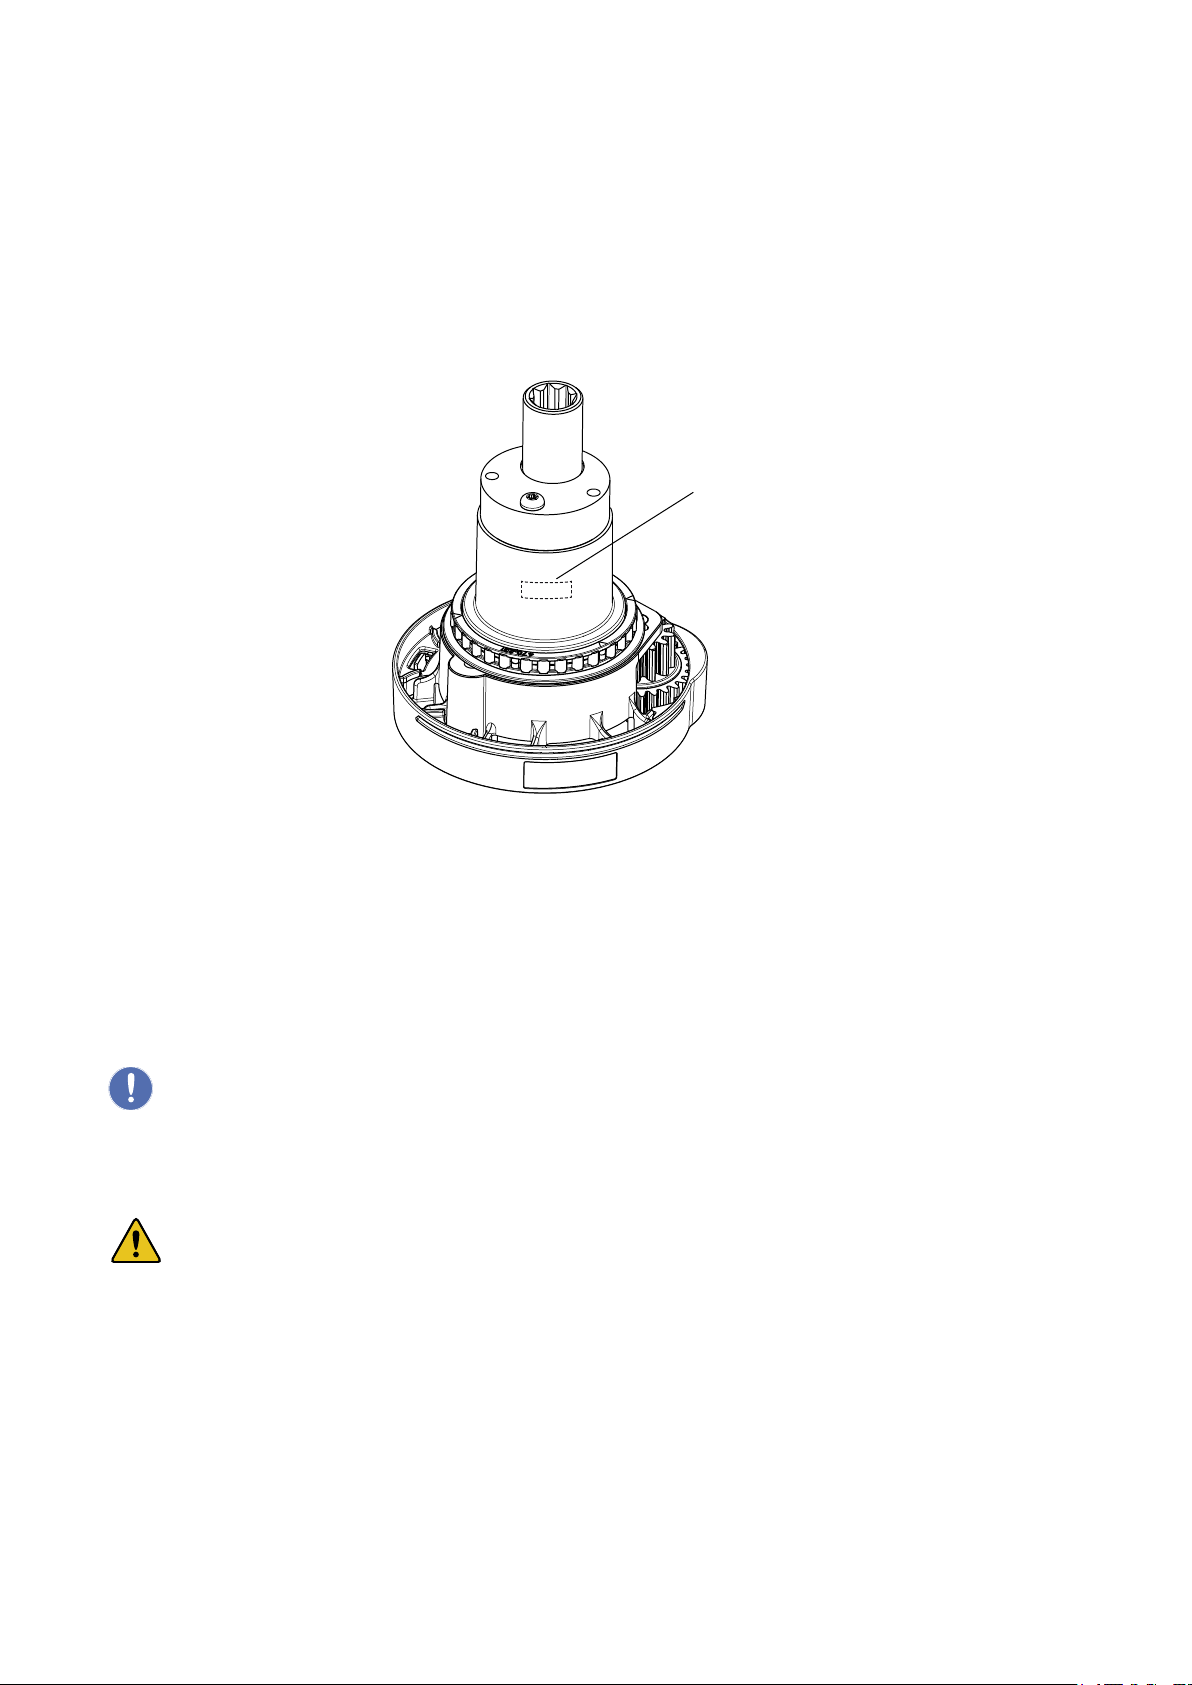
The model designation is found on the top of the winch. The serial number is found on the winch base,
as shown below, and on the delivery box.
Please read the entire manual before installation and use of the product. The manual shall be kept for
future reference.
Safety Precautions
Follow and pay careful attention to instructions with the following symbols:
ATTENTION
This symbol indicates a critical moment in the assembly or technical advice.
WARNING
This symbol indicates a potentially hazardous situation. If not avoided, this could result in serious personal
injury or damage to property.
Serial number
placed here.

4
Choosing the correct version of S-winch for your boat:
The key to a safe and properly working installation is correct dimensioning in relation to the boat size the
productsshallbeusedon.Seldénprovidesdimensioningguidelinesincatalogues,leaetsandonthe
website. If there are any questions about selecting the right product, please consult an authorized Seldén
dealer. All dealers are listed at www.seldenmast.com and divided in categories describing their competence.
The Seldén winch is designed for line handling on sailboats only!
Exceeding the stated maximum working load may lead to winch failure and serious injuries.
Keephands,ngers,hairandclothingawayfrommovingpartswhilewinchisinuse.Itis
recommended to let only one person work with the winch at any one time.

5
2 Self-tailing winch
The Seldén winches are manually operated and of self-tailing type with two available speeds. The ribs of the
drum provide an extraordinary grip. As a result, fewer coils of the line are required, reducing the risk of an
override and allowing the line to be released quickly. An optimized choice of materials makes for low weight
and high performance. The unique design of the self-tailer enables the trimmer to pull the slack out of the
sheet with the line sitting in the self-tailer and with the winch handle mounted.
Pull the slack with
the sheet in the
self-tailing jaws
Two-speed operation
Ribbed Drum
Light weight

6
2.1 Included parts
2.2 Optional parts
S30 S40 S48 S54
472-630-02
S30 winch
472-640-02
S40 winch
472-648-02
S48 winch
472-654-02
S54 winch
164-088-01
Plastic
RBSwasher
(5pc)
Stainless
steel RBSwasher
(5pc)
164-088-01
Plastic
RBSwasher
(5pc)
Stainless
steel RBSwasher
(5pc)
164-089-01
Plastic
RBSwasher
(5pc)
Stainless
steel RBSwasher
(5pc)
164-089-01
Plastic
RBSwasher
(5pc)
Stainless
steel RBSwasher
(5pc)
597-226-E
Drilling
template
597-226-E
Drilling
template
597-227-E
Drilling
template
597-227-E
Drilling
template
597-285 -E
Manual
597-285 -E
Manual
597-285 -E
Manual
597-285 -E
Manual
597-28 5-E
2019-01-16
Manual
2-speed self-tailing winches
S30, S40, S48, S54
597-227-E
2016-03-14
Drilling template Winch S48/S54
For mounting with through bolt:
Drilling diameter = Ø9 mm
Rope entry position on Drum
for optimal performance
Ø189 mm
104 mm
Part
312-501
Seldén lubrication grease
533-927-20
Winch handle
7
2.3 Technical specification
Parts and nomenclature
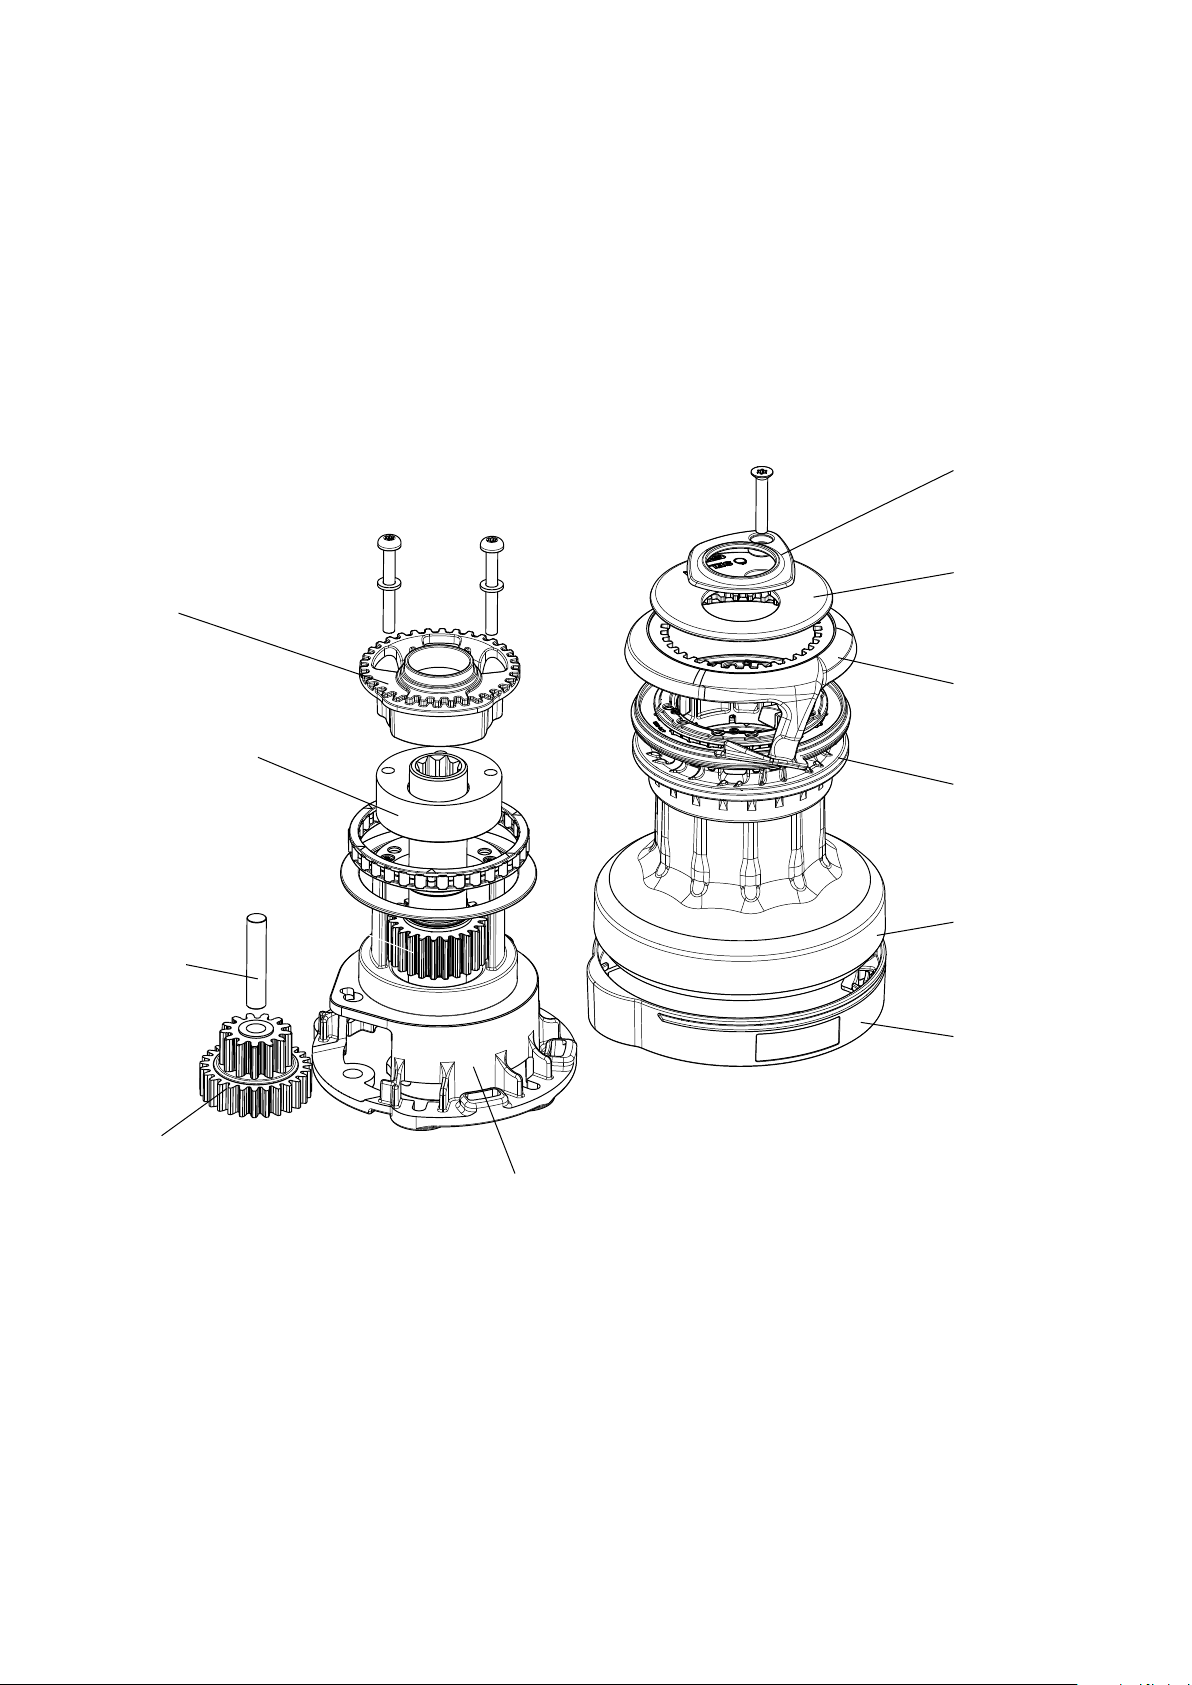
In the schematic below, the names of parts referred to in this manual can be viewed.
Top cover wear
protection
Top Cover
Self-tailing
arm
Self-tailing
jaws
Drum
Base cover
Locator
bracket
Bearing cylinder
Drive shaft
Twin gear
axle
Twin gear
ratchet
Winch
base
8
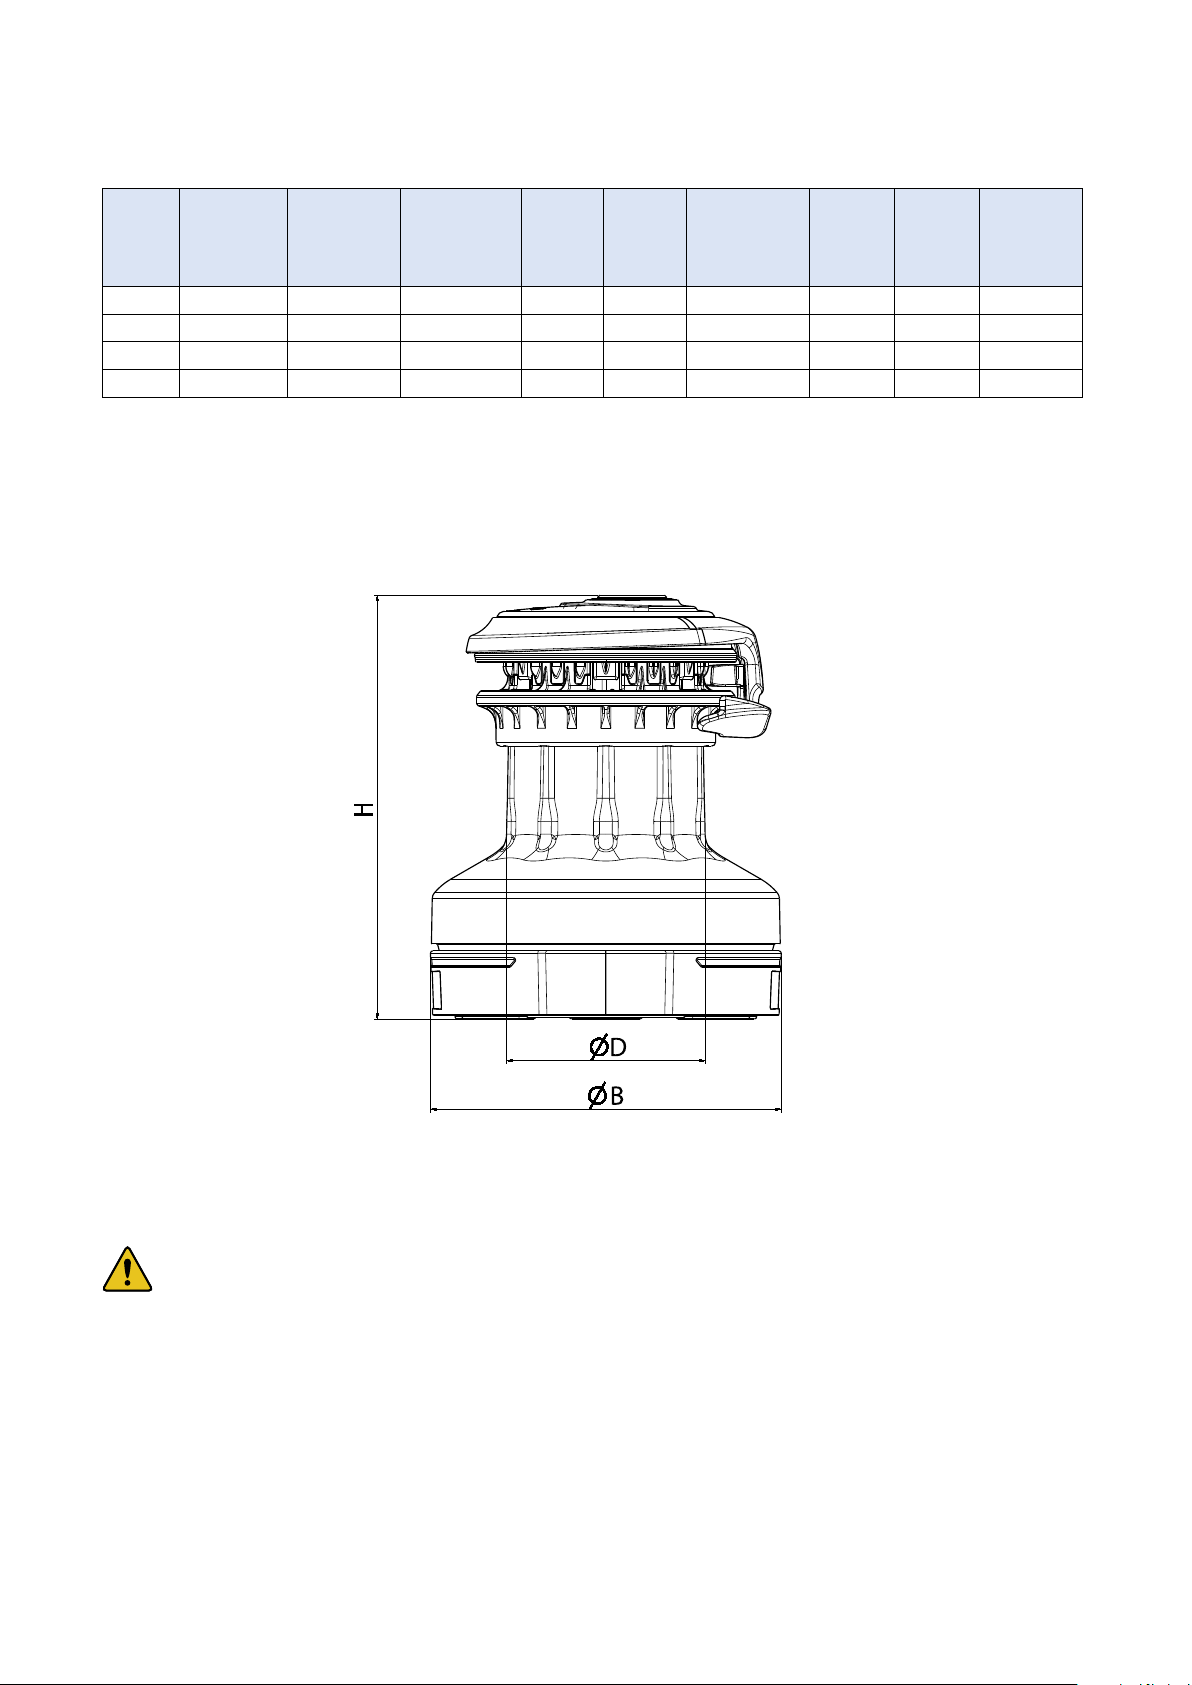
Model Item. No. Base
diameter
(ØB)
[mm]
Drum
diameter
(ØD)
[mm]
Height
(H)
[mm]
Weight
[kg]
Suitable
Line
dimensions
[mm]
Gear
ratio
HIGH
GEAR
Gear
ratio
LOW
GEAR
Safe
Working
Load
(SWL) [kN]
S30 472- 630-10 150 85 183,5 3,5 8-12 10:1 30:1 8,4
S40 472- 640-10 150 85 183,5 3,5 8-12 10:1 40:1 11,2
S48 472- 648-10 188 108 218 5,6 10-14 10:1 48:1 13,4
S54 472-654-10 188 108 218 5,6 10-14 10:1 54:1 15,1
Dimensions and technical data
Exceeding the stated safe working load may lead to winch failure and/or fatal injuries.

9
3 Installation
Installation of a Seldén Winch must be carried out by a competent installer who has read and
understood this installation manual, the purpose and function of the winch and has checked the
loads, winch sizing and mounting requirements prior to installation.
Winch orientation, position relative to associated components and location regarding deck reinforcement
and suitability must be checked and any reinforcement work carried out prior to installation. The installer
takes full responsibility to ensure these checks have been undertaken. This may require the assistance of
aboatyardorcertiedmarineengineers.
Seldén Mast does not provide fasteners. The installer is responsible for the sourcing and specifying load
capacity of the fasteners, ensuring they are rated for the expected loads from the winch. Any fastener
should be made from marine grade stainless steel.
SeldénMastABdoesnottakeresponsibilityfortheincorrectinstallationofawinch,theinsucientrein-
forcementofthedeckatthelocationofthewinch,wateringressduetoinsucientsealingoranydamage
to interior as a result of water ingress.

10
3.1 Installation preparation
Priortoinstallation,ndasuitablemountingpointforthewinch.Whenchoosingamountingpoint,
consider previous and following requirements.
Orienting the winch
For optimum performance during use, the winch must be oriented correctly for the intended application.
If the winch is to be used for handling of multiple lines, e.g. placed on the coach roof for use as a halyard
winch in combination with running spinnaker or gennaker sheets, the winch shall be oriented and optimized
for the highest load.
The line shall enter the drum tangential to the base cover protrusion. This is shown in the
gurebelow.
Failingtoalignthewinchinaccordancewiththegureabovemayleadtowinchfailure
which may lead to fatal injuries or damages to the boat or equipment.
Cover
protrusion
Cover
protrusion
To sail clew
To sail clew

11
Preventing override
To prevent override, the line must be guided onto the winch at an angle of approximately 5-10° to the
horizontalplane,asshowninthegurebelow:
To achieve the correct angle, installing a block or sheet lead to divert the sheet or halyard to the winch may
be necessary. Please visit www.seldenmast.com to browse our selection of suitable deck hardware.
Failingtoleadtheropeontothewinchatrecommendedangleasseeningureabovemay
lead to winch failure which may lead to fatal injuries or damages to the boat or equipment.
5-10°
12
3.2 Deck installation
Thewinchescaneitherbeinstalledwithscrewssecuredwithnutsbelowdeckorwithscrewstteddirectly
in the deck, provided that the hull is prepared with appropriate reinforcement plates.
Follow procedure A or B depending on your installation method:
A: Installation with screws and nuts below deck
B: Installation directly in the deck
Equipment
Material and equipment needed for installation:
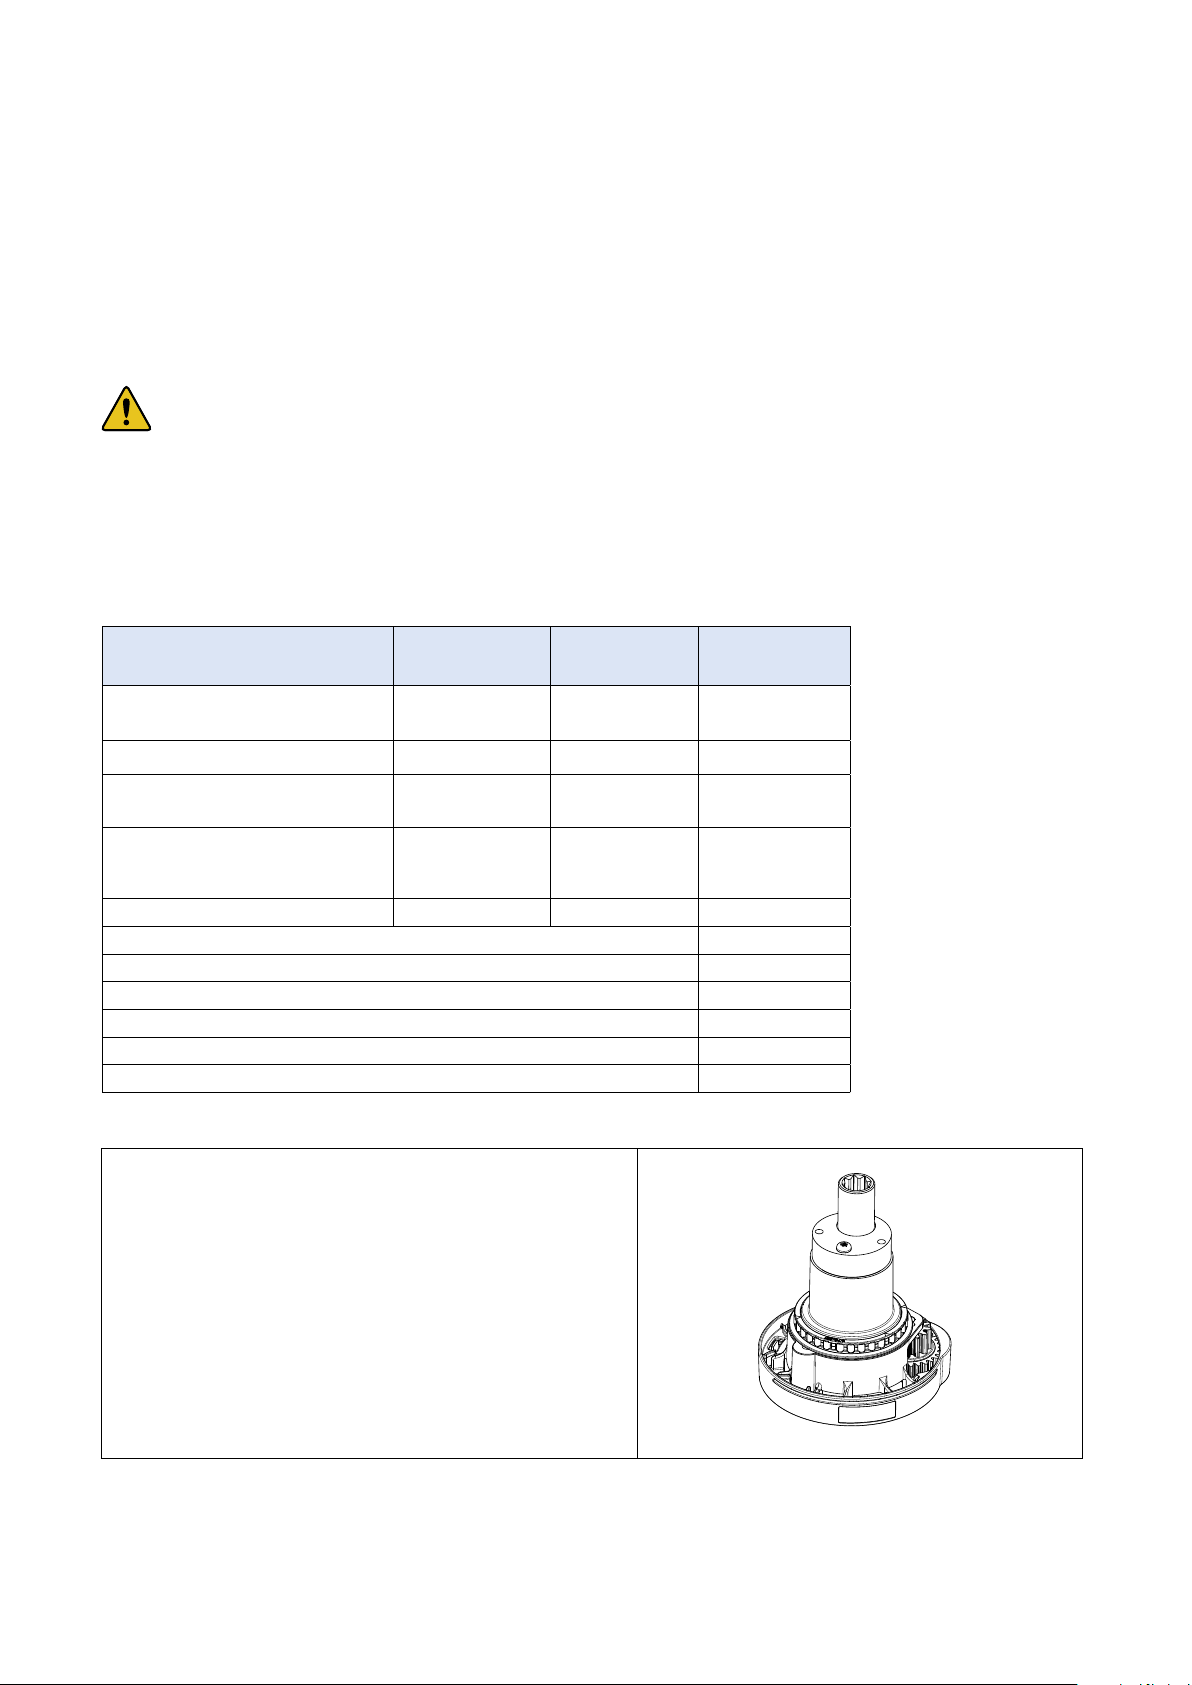
1.
A/B:
Dismantle the winch according to chapter 5.2,
steps 1 and 2.
Installing winches directly into the deck is only possible on yachts equipped with aluminium- or
stainless-steel deck-inserts intended for mounting winches. If at any point there is uncertainty if
the yacht is equipped in this way, please abort the installation and seek assistance at the yard or
builder.
Material and equipment S30/40 S48/54 Quantity
Stainless steel and plastic
RBS-washers
164-088-01 164-089-01 1 pc
Installation and drilling template 597-226-E 597-227-E 1 pc
Fasteners of suitable length
and size
M6 M8 5pc
(not included)
Drill and drill bit Ø4mm
A: Ø7mm
B: Ø5mm
Ø4mm
A: Ø9mm
B: Ø6,8mm
(not included)
Thread tapping tool B: M6x1 B: M8x1,25 (not included)
Masking tape (not included)
Awl or center punch (not included)
Countersink (not included)
Marine sealing compound (not included)
Methylated spirits, cloth (not included)
B: Locking adhesive (not included)
13
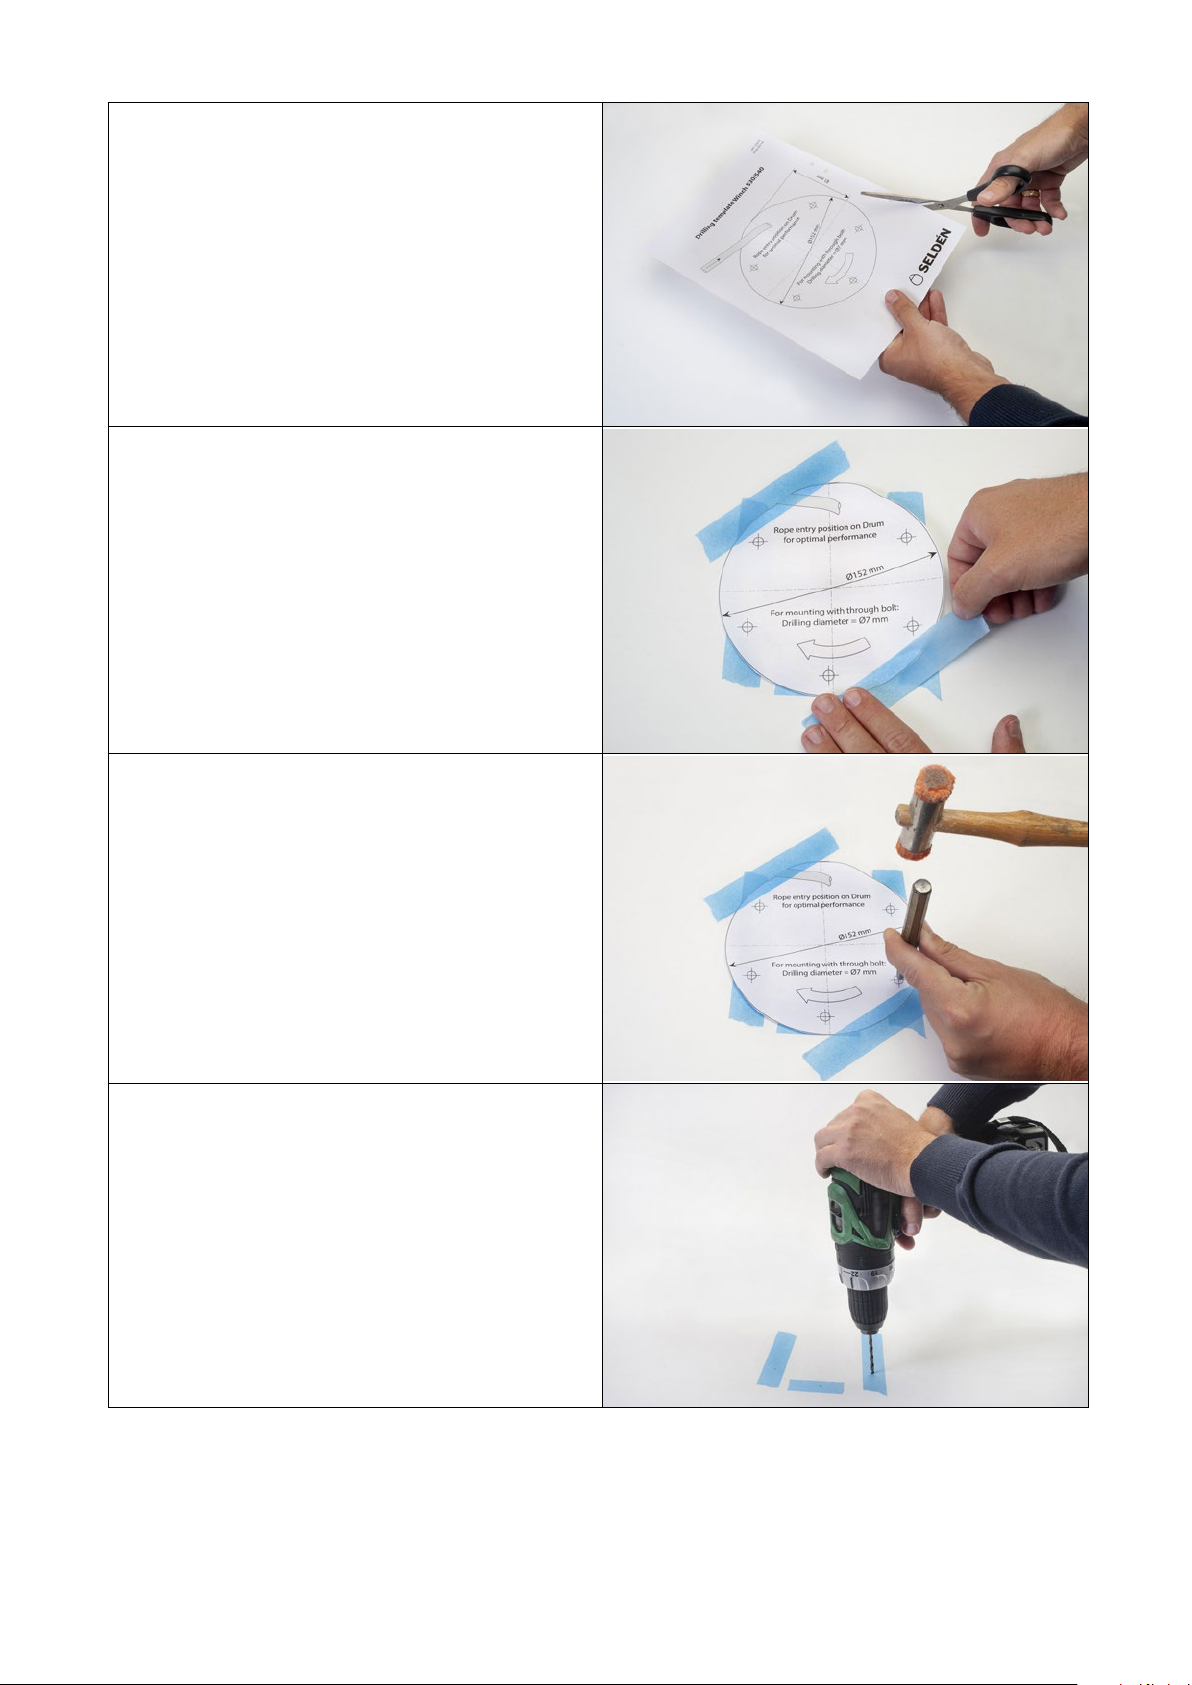
2.
A/B:
Cut out the drilling template provided in the
delivery box.
3.
A/B:
Test-tandalignthedrillingtemplatein
accordance with chapter 3.1 Orienting the
winch and attach it to the deck using
masking tape.
4.
A/B:
Mark all hole positions using an awl or
center-punch.
5.
A/B:
Remove the template and pre-drill a pilot
hole at each position using the 4mm drill bit.

14
6.
A:
Continuedrillingtheholestonalsize,
using the larger drill-bit.
Drill sizes:
S30/40: Ø7mm
S48/54: Ø9 mm
B:
Continue to drill the holes for the
recommended internal thread diameter.
Clean the hole followed by tapping to correct
thread size.
Drill and tap sizes:
S30/40: Ø5mm drill, M6X1 tap
S48/54: Ø6,8mm drill, M8X1,25 tap
7.
A/B:
Countersink each hole approximately 3 mm
to allow enough marine sealing compound
to be applied to stop water ingress.
8.
A/B:
Remove any masking tape and debris and
proceed to wipe the area down using
acetone or methylated spirits to remove
any grease.
9.
A/B:
Fill the countersunk hole with marine
sealing compound and mount the winch,
ensuring the winch is correctly aligned.

15
10.
A:
Fit screws, placing the included steel and
plastic RBS-washers between the winch
base and the screw head, with the plastic
washers closest to the winch base.
Tighten the winch down to the deck in a
crosswise pattern.
Recommended tightening torques
for screws are as follows:
M6 =7 Nm
M8=12 Nm
B:
Apply thread locking adhesive to screws
intended for mounting the winch.
Fit the screws, placing the included steel
and plastic washer between the winch base
and the screw head, with the plastic
washer closest to the winch base.
Tighten the winch down to the deck in a
crosswise pattern.
Recommended tightening torques
for screws are as follows:
M6=7 Nm
M8=12 Nm
Avoid mixing locking adhesive and
marine sealant as this may cause
either to fail.
3.3 Final adjustments
Whennishedwiththeinstallation,theself-tailing-arm(ST-arm)needstobeadjustedtoguidetheropeinthe
preferred direction. To adjust the position of the ST-arm, dismantle the winch according to step 1 in chapter
5 Maintenance and Service.TheST-armcanthenbettedfollowedby
reassembly of the winch.
It is recommended to guide the line into the cockpit.

16
1.
Apply 2-3 turns clockwise around the
winch. The number of turns suitable for
optimal performance is determined by
the wind conditions and the line type.
2.
Lead the line over the self-tailing arm and
into the self-tailing jaws for ¾ of a turn.
The line can remain in the self-tailing jaws
during the winching operation.
3.
Pull the slack of the line until tensioned.
4 Operation
Seldén S-winches are manually operated and are of self-tailing type with two available speeds.
Winching

17
4.
Insert the winch-handle into the socket by
twisting the lever on the handle to enable
insertion into the handle-socket.
When inserted, release the lever to secure
the handle in the socket.
5.
Operate the winch by turning the winch
handle in either clockwise of anticlockwise
direction.
High gear: Turn the winch handle
clockwise.
Low gear: Turn the winch handle
anticlockwise.
1.
While keeping tension in the pulling end of
the line, undo the line from the self-tailing
jaws. If needed, reduce the number of turns
on the drum to 2-3 turns.
Reducing the number of turns under
high loads may cause the line to slip
in an un-controlled manner, with the
potential risk of personal injury.
Release the line
Clockwise:
High gear
Anticlockwise:
Low gear

18
2.
Gently ease the tension in the pulling end to
induce slipping over the winch drum,
releasing the tension in the sheet.
Do this until the desired tension is obtained.
Lock the line by putting it into the self-tailing
jaws.
Keep body parts and clothing away
from the winch when releasing the line.
The Seldén winch is designed for line handling on sailboats only!
Keep body parts and clothing away from moving parts while the winch is in use.
It is recommended to let only one person work with the winch at any one time.
If a Seldén winch is used for going aloft, double halyards must be used, to be hauled in and
easedoatthesametime.(Seldénriggingmanual“Hints&Advice”,595-540-E,“Workingaloft”).

19
5.1 Frequent maintenance
To aid longevity and performance of the winch it is recommended to rinse the winch with fresh water
after sailing. This removes any build-up of salt and will ensure that the winch runs smoothly between
services.
5.2 Normal maintenance
For heavy sailing or racing, a normal service is recommended before any major regatta or event. For the
regular sailor, a normal service can be performed once a year adding to the annual extended service.
5 Service and maintenance
Material and equipment
(not included) S30/40 S48/54 Quantity
Torx-key T30 T30, T45 1 pc
Seldén pawl oil 312-709-01 312-709-01 1 pc
Seldén lubricating grease 512-501 512-501 1 pc
Brush - - 1 pc
Cloth - - 1 pc

20
1.
Unscrewthetopscrew(1)usingtheTorx-key,
T30.Removethewearprotection(2),thetop
cover(3)andtheself-tailingarm(4).Besureto
keep track of any parts removed
2.
Continue to dismantle the winch by
unscrewing the two Torx-screws with the
Torx-key, T30 or T45.
Removethescrewsandwashers(5).
Follow this by removing the locator bracket
(6)andnallythedrumassembly(7).
3.
With the winch disassembled, apply Seldén
lubrication grease to all visible gears.
4.
Reassemble the winch in reverse order.
7
6
5
1
2
3
4
Dismantling
Recommended tightening torques for screws are as follows:
M6=7 Nm,
M8=12 Nm
Other manuals for S30
3
This manual suits for next models
7
Table of contents
Other Selden Winch manuals


Popular Winch manuals by other brands


Comeup
Comeup CWG-30075 quick start guide

Ingersoll-Rand
Ingersoll-Rand force5 GULF MAN-RIDER FA2A-GMR Parts, operation and maintenance manual

TRAVELLER
TRAVELLER 12000 user manual

Paccar Winch
Paccar Winch Braden BA2A Installation maintenance and service manual

Harken
Harken Powered Performa Installation and maintenance manual

Warrior Winches
Warrior Winches S9500HS Assembly & operating instructions


