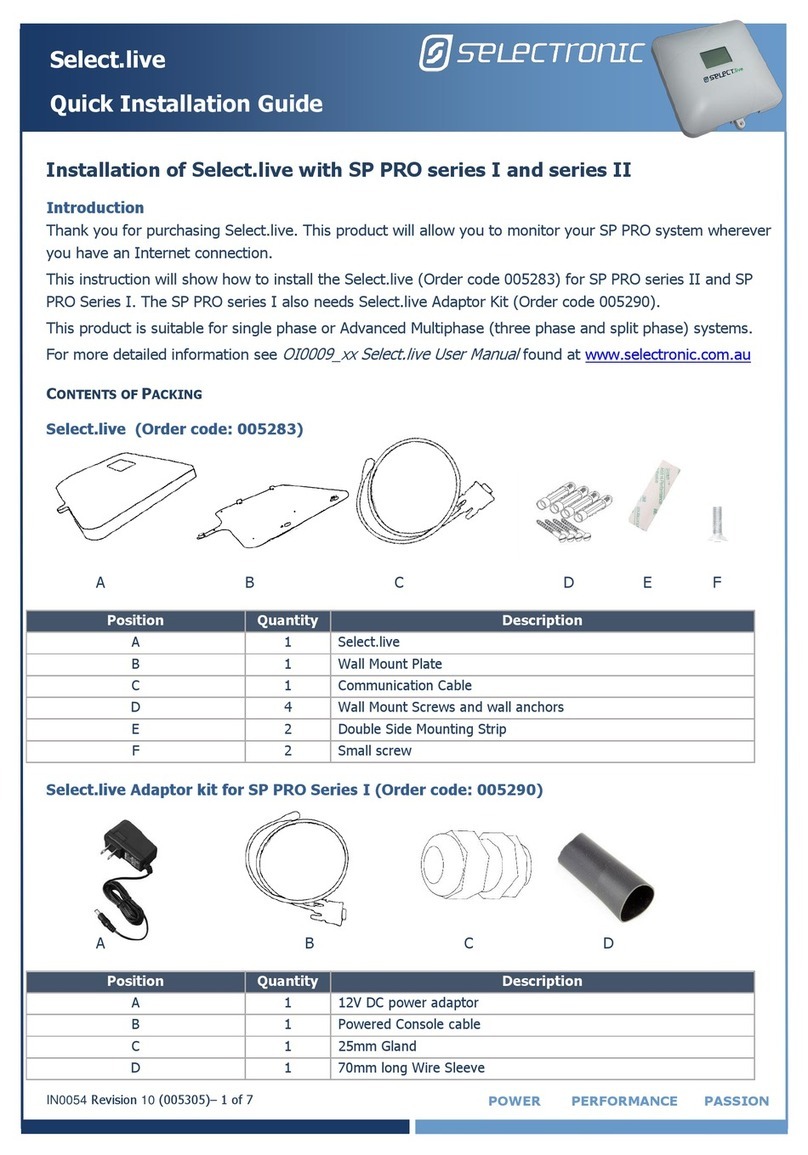
Selectronic Select.live User manual

Selectronic Australia
Select.live User Manual OI0009 Version: 01
Select.
live
SP PRO Remote Monitoring
User Manual
EN -English

Selectronic Australia Legal and Safety Information
2 OI0009 Revision 01 Select.live User Manual
Legal and Safety Information
Thank you for purchasing Selectronic Select.live remote monitoring device for the SP PRO
series I and II inverters.
This document, copyright of Selectronic Australia is intended to be used for the installation
and operation of Select.live. Select.live comes with a warranty. Neither Selectronic Australia
nor its distributors or dealers shall be liable for a warranty claim for any indirect, incidental
or consequential damages under any circumstances.
Selectronic Australia reserve the right to make changes to this document. This document
can be downloaded from www.selectronic.com.au. While every attempt has been made to
ensure this document is self-explanatory, clear as possible and up-to-date, the
specifications are subject to change without notice.
Selectronic Australia Pty Ltd.
Suite 5, 20 Fletcher Road,
Chirnside Park, VIC
3116 Australia
Copyright © 2018 Selectronic Australia Pty Ltd. All rights reserved.

Table of Contents Selectronic Australia
OI0009 Revision 01 Select.live User Manual 3
Table of Contents
Legal and Safety Information....................................................................... 2
Table of Contents.......................................................................................... 3
1Introduction......................................................................................... 5
Information ........................................................................................................ 5
1.1.1 Validation ...................................................................................................................................... 5
1.1.2 Glossary of Terms........................................................................................................................... 5
1.1.3 Formatting..................................................................................................................................... 6
Select.live........................................................................................................... 6
2Package Contents ................................................................................ 7
Select.live Package.............................................................................................. 7
Select.live Adaptor Kit Package............................................................................. 7
3Select.live Overview ............................................................................ 8
Select.live........................................................................................................... 8
Device Label ....................................................................................................... 9
Connection and LED indicators ............................................................................10
4Installation and Commissioning ........................................................ 11
Mounting...........................................................................................................12
Connection to the SP PRO...................................................................................13
4.2.1 Connection to the SP PRO Series II ................................................................................................ 13
4.2.2 Connection to the SP PRO Series I ................................................................................................. 14
Login to Select.live .............................................................................................15
Setup Wizard of Select.live..................................................................................15
4.4.1 Configuring Select.live for the SP PRO ............................................................................................ 16
4.4.2 Configuring Select.live for the Internet via Wi-Fi.............................................................................. 17
4.4.3 Configuring Select.live to the Internet via Ethernet .......................................................................... 18
4.4.4 Connection to the Ethernet cable ................................................................................................... 19
4.4.5 Completing the Setup Wizard......................................................................................................... 20
Registration to Select.live Portal ..........................................................................21
Link Select.live to the Portal ................................................................................22
Monitoring of the system ....................................................................................24
5Select.live Display Operation............................................................. 25
Before Setup Wizard...........................................................................................25
After the Setup Wizard .......................................................................................25
After Adding the device to the Portal....................................................................27
During Events ....................................................................................................28

Selectronic Australia Table of Contents
4 OI0009 Revision 01 Select.live User Manual
6Login to Select.live............................................................................. 29
Login via Wi-Fi normal mode or Ethernet..............................................................29
7Select.live Operation.......................................................................... 30
User Interface....................................................................................................30
Viewing Setup Wizard Page.................................................................................31
Viewing Advanced Settings page .........................................................................32
Viewing SP PRO detail ........................................................................................34
Deleting the connected SP PRO ...........................................................................34
Adding new SP PRO ...........................................................................................35
Editing Wi-Fi Connection.....................................................................................36
Editing Ethernet Connection ................................................................................38
Updating new Firmware......................................................................................40
Factory Reset of the device .................................................................................41
Login to the Portal..............................................................................................42
Reset the login password ....................................................................................43
8Select.live Portal Operation ............................................................... 44
Viewing Systems page ........................................................................................44
8.1.1 Status icon representation ............................................................................................................. 45
User Interface....................................................................................................45
Viewing Dashboard Page ....................................................................................46
8.3.1 Power Flow .................................................................................................................................. 47
8.3.2 Load Powered By.......................................................................................................................... 50
8.3.3 INFO ........................................................................................................................................... 50
8.3.4 Connection Status ........................................................................................................................ 51
8.3.5 ECO ............................................................................................................................................ 51
8.3.6 Energy Chart................................................................................................................................ 52
Viewing Events Page ..........................................................................................54
Changing System Settings...................................................................................55
8.5.1 Delete the system from Portal ....................................................................................................... 56
Changing my Profile ...........................................................................................56
8.6.1 Changing My Details ..................................................................................................................... 57
8.6.2 Changing Password ...................................................................................................................... 57
9Maintenance and Service................................................................... 58
10 Troubleshooting................................................................................. 59
11 Specifications..................................................................................... 61
Select.live..........................................................................................................61
12 Contact............................................................................................... 62

Introduction Selectronic Australia
OI0009 Revision 01 Select.live User Manual 5
1Introduction
Information
This document will explain the installation, operation and troubleshooting of Select.live
(Order code 005283) for SP PRO series II and for the SP PRO Series I. When installing
Select.live with SP PRO series I, the Adaptor Kit (Order code 005290) is also required.
This document doesn’t provide any detailed information about the SP PRO. For detailed
information on the SP PRO, download relevant documents from www.selectronic.com.au.
1.1.1 Validation
This document is only valid for a Select.live with hardware version 2.0 and firmware version
3.6.3 and greater. Select.live supports the SP PRO Series I in a single-phase configuration
only, or SP PRO Series II in either a single phase or Advanced Multiphase (three phase or
split phase) configuration. Select.live supports both On-grid and Off-grid systems, including
On-grid with Generator backup.
1.1.2 Glossary of Terms
Terms
Description
Select.live
Remote monitoring device connected to SP PRO System. This
is also referred as “the device”in this document
Select.live Portal
Remote monitoring Web site for SP PRO system. This is also
referred as “the portal”and “the web app”in this document
Device Web Interface
Select.live local web interface for configuration
SP PRO System
Battery inverters from Selectronic Australia with battery, Grid,
Generator (optional) and solar PV (optional)
Off-grid
SP PRO System with no Grid; with battery, generator and solar
PV (optional)
On-grid
SP PRO System with Battery, Grid and solar PV (optional).
On-grid with
Generator backup
SP PRO System with Battery, Grid solar PV (optional) and
Generator (optional –requires additional Grid Fail, Generator
backup kit).
Solar PV
A Solar PV array with a solar inverter
W
Watt; The unit of Power
kWh
KiloWatt hours; the unit of Energy
SoC
State of Charge in the battery (amount of charge in the
battery) expressed as a % of the battery capacity

Selectronic Australia Introduction
6 OI0009 Revision 01 Select.live User Manual
1.1.3 Formatting
This document uses special formatting for the representation of buttons, links etc. which
are follows
Formatting
Description
<Input Text>
Input field of the form
[Save]
Buttons or link
‘Menu1’
Menu item
‘Menu1’→[button]
Menu followed by button path in order of the right arrow
Example
Example in italics
Select.live
Select.live is a remote communication system for the SP PRO that enables users to view
data remotely using internet connected PC, laptop and mobile devices. Select.live consists
of two modules, Select.live and Select.live portal
Select.live communicates with the SP PRO system via its communication port and sends the
data to the remote server (Select.live Portal) via the internet. Select.live Portal stores all this
data ready to display to the user via web charts and animated flow tools.
SP PRO Series II
SP PRO Series I
Select.live
Device Web Interface
Internet
Select.live Portal
OR

Package Contents Selectronic Australia
OI0009 Revision 01 Select.live User Manual 7
2Package Contents
Check the delivery for completeness and for any external damage. Contact your dealer if
the delivery is incomplete or damaged.
Select.live Package
This package contains Select.live and accessories for the connection to SP PRO Series II
inverters only.
Order Code: 005283
A B C D E F
Position
Quantity
Description
A
1
Select.live
B
1
Wall Mount Plate
C
1
Communication Cable
D
4
Wall Mount Screws with wall anchors
E
2
Double Side Mounting Strip
F
1
Small Screw
Select.live Adaptor Kit Package
This extra package is required when connecting Select.live to the SP PRO Series I inverter.
Order Code: 005290
A B C D
Position
Quantity
Description
A
1
12V DC power adaptor
B
1
Power Console cable
C
1
25mm Gland
D
1
70mm long Wire Sleeve

Selectronic Australia Select.live Overview
8 OI0009 Revision 01 Select.live User Manual
3Select.live Overview
Select.live
Position
Description
A
Wi-Fi antenna area of Select.live
B
LCD display of Select.live
C
Position for the small screw to secure Select.live to the wall mount
plate
A
B
C

Select.live Overview Selectronic Australia
OI0009 Revision 01 Select.live User Manual 9
Device Label
The device label is found on the back of Select.live. The label has following details
Position
Label
Description
A
WLAN MAC
MAC address of the Wi-Fi.
B
ETH MAC
MAC address of the Ethernet.
C
S/N
Serial Number.
D
Stock Code
Stoke code and hardware version.
E
Rated
The power rating.
A
B
C
D
E

Selectronic Australia Select.live Overview
10 OI0009 Revision 01 Select.live User Manual
Connection and LED indicators
The connection area is on the back of Select.live facing downwards. The label for the
connectors is on the back.
Position
Name
Status
Description
A
Power LED
Solid Red
Select.live has a power supply
Off
Select.live has no power supply
B
Ethernet LED
Blinking green
Ethernet is transferring data
Off
Ethernet is not transferring data
C
Wi-Fi LED
Blinking green
Wi-Fi is transferring data
Off
Wi-Fi is not transferring data
D
Reset Button
Push button to reboot and factory reset
E
Ethernet Port
Ethernet connection
F
USB A Port
USB A connection host (no function)
G
Serial Port
The Serial connection to the SP PRO
H
DC Power Port
2.5 DC jack for power supply (Only used with
Series I SP PRO)
A B C D E F G H

Installation and Commissioning Selectronic Australia
OI0009 Revision 01 Select.live User Manual 11
4Installation and Commissioning
Based on the network selection, there are two options for the commissioning of Select.live.
Choose the method of connection that is most convenient for the installation.
•Commission of Select.live via Wi-Fi connection
•Commission of Select.live via Ethernet connection
Commission of Select.live via Wi-Fi connection
•Mount Select.live’s wall mount plate on the wall (see page 12).
•For SP PRO Series II, connect Select.live to the SP PRO via communication cable
(see page 13).
For SP PRO Series I, connect Select.live to the SP PRO via the communication
cable and power console cable (see page 14). Fix Select.live on wall mount
plate.
•Configure Select.live to connect to the SP PRO (see page 16).
•Configure Select.live to connect to the internet via Wi-Fi (see page 17).
•Complete the Setup Wizard (see page 19).
•Register to Select.live Portal (see page 21).
•Add Select.live to the Portal (see page 22).
•The commission is complete. Monitor your system (see page24).
Commission of Select.live via Ethernet connection
•Mount Select.live’s wall mount plate on the wall (see page 12).
•For SP PRO Series II, connect Select.live to the SP PRO via communication
Cable (see page 13).
For SP PRO Series I, connect Select.live to the SP PRO via the communication
cable and power console cable (see Page 14). Fix Select.live on wall mount plate
•Configure Select.live to connect to the SP PRO (see page 16).
•Configure Select.live to connect to the internet via Ethernet (see page 18).
•Connect the ethernet cable to Select.live and the router. (See page 12)
•Complete the Setup Wizard (see page 19).
•Register to Select.live Portal (see page 21).
•Add Select.live to the Portal (see page 22).
•The commission is complete. Monitor your system (see page 24).

Selectronic Australia Installation and Commissioning
12 OI0009 Revision 01 Select.live User Manual
Mounting
Mount Select.live on the wall in an upright position as per the following requirements:
•Select.live is recommended for indoors wall mount.
•The ambient conditions at the mounting location must be -10oC to 70oC
•Use the supplied communication cable.
•If using Ethernet to connect Select.live to the internet, the maximum length of the
Ethernet cable is 100m.
•If using Wi-Fi to connect Select.live to the internet, Select.live must be mounted in a
location with access to your Wi-Fi network.
•Protect Select.live from dust, wet conditions, corrosive substances and vapours.
The procedure to mount Select.live is as follows:
•Detach the wall mount plate from Select.live by sliding them apart.
•Drill four holes in the wall as per the dimensions below and mount the wall mount
plate on the wall using mounting screws and wall anchors. The gap on all sides of
Select.live must be at least 50 mm as shown. The gap between Select.live and
SP PRO must be at least 150mm.
•Select.live is ready to connect to SP PRO and power cables.

Installation and Commissioning Selectronic Australia
OI0009 Revision 01 Select.live User Manual 13
Connection to the SP PRO
4.2.1 Connection to the SP PRO Series II
•Connect Select.live to the SP PRO Series II using the Communication Cable supplied,
as shown.
•Select.live is powered from the SP PRO. The power adaptor is not required.
•Place Select.live on the wall mount plate, securing it with the small screw.
•Turn on the SP PRO and Select.live will power up, ready to login.

Selectronic Australia Installation and Commissioning
14 OI0009 Revision 01 Select.live User Manual
4.2.2 Connection to the SP PRO Series I
•Connect Select.live to the SP PRO Series I using the Communication Cable and the
Powered Console cable supplied, as shown.
•The Powered Console Cable threads though the gland and sleeve provided through
the base of the SP PRO. It is connected to Serial Port 1 inside the SP PRO.
•Connect the power adapter to Select.live.
•Use the Gland and Sleeve to fasten the Powered
Console cable to the gland plate located at the
bottom of the SP PRO as shown.
•Place Select.live on the wall mount plate and use
secure I with the small screw.
•Turn on the SP PRO and the power adapter. Select.live is ready to login.

Installation and Commissioning Selectronic Australia
OI0009 Revision 01 Select.live User Manual 15
Login to Select.live
•Check that the power LED and LCD display are lit after the connecting power to the
SP PRO (and power adaptor for SP PRO series I). After a minute, the following
message will be displayed on the LCD display of Select.live:
•Connect to Select.live using Wi-Fi SSID: “selectronic”with no password.
•Open a web browser and enter http://192.168.1.1. The browser will then direct you
to Select.live web interface.
•Select.live is ready for Setup Wizard.
Setup Wizard of Select.live
To enter into the Setup Wizard, click on the large green button [Setup Wizard] from the
home page of Select.live web interface as shown:
------ SETUP -------
Connect to Wi-Fi
SSID: selectronic
Browse to:
http://192.168.1.1
to setup

Selectronic Australia Installation and Commissioning
16 OI0009 Revision 01 Select.live User Manual
4.4.1 Configuring Select.live for the SP PRO
•Select.live autodetects the SP PRO. The SP PRO details are shown in the dialog box
as shown. Click [Next] to proceed to the next step of the Setup Wizard- Selection of
the network.
•If the device couldn’t autodetect the SP PRO, a form will appear in the dialog box as
shown:
•Enter the correct <SP PRO Login Password> and click [Autodetect].
<SP PRO Login Password> defaults to “Selectronic SP PRO”. For more detail on
<SP PRO Login Password>, refer to the SP PRO user manual.
•On successful autodetect and correct <SP PRO Login Password>, the SP PRO serial
number will appear in the <Serial>. Click [Next] to continue.

Installation and Commissioning Selectronic Australia
OI0009 Revision 01 Select.live User Manual 17
4.4.2 Configuring Select.live for the Internet via Wi-Fi
•Select the <Connection Type> as “Wi-Fi”and click [Next] to continue as shown.
•A form for the Wi-Fi connection appears as shown.
•Click [Refresh] to update the list of Wi-Fi networks available in the <Available Access
Points>. This takes about 5 seconds.
•Select your Wi-Fi network from the <Available Access Points> to update the
<SSID> and <Encryption>.
•Enter <Password> of the Wi-Fi network.
•Click [Finish] to proceed to final setup of the Setup Wizard.

Selectronic Australia Installation and Commissioning
18 OI0009 Revision 01 Select.live User Manual
4.4.3 Configuring Select.live to the Internet via Ethernet
•Select the <Connection Type> as “Ethernet” and click [Next] to continue.
•A form for the Ethernet connection appears as shown.
•With <DHCP Enabled> as “On”, enter the <Hostname> (can be any name or
empty) only. It is recommended to have <DHCP Enabled> as “On”.
•With <DHCP Enabled> as “Off”, enter the <Hostname> (can be any name or
empty), <Static IP Address>, <Static IP Netmask>, <Static IP Gateway> and
<Static IP DNS server>.
•For more information on the input field, Click [More Information].
•Click [Finish] to proceed to final setup of the Setup Wizard.

Installation and Commissioning Selectronic Australia
OI0009 Revision 01 Select.live User Manual 19
4.4.4 Connection to the Ethernet cable
If you are connecting Select.live to the internet via Ethernet then connect the Ethernet
cable between Select.live and the router now. The maximum length of the ethernet cable is
100m of CAT5e or better.

Selectronic Australia Installation and Commissioning
20 OI0009 Revision 01 Select.live User Manual
4.4.5 Completing the Setup Wizard
•Select.live is ready to link in the Portal with “Device ID” and “Serial”.
•Within 30 seconds, “Device ID” and “Serial” are also shown in LCD display of
Select.live as shown:
Note: The Wi-Fi (hotspot) “selectronic" is now disabled. To get it back, factory
reset the device (See page 41) then rerun the Setup Wizard.
--- REGISTRATION ----
Cloud:OK
IP :XXX.XXX.XXX.XXX
D.Ver:XX.XX.XX
Please Enter:
Device ID: XXXXXXXX
Serial: XXXXXX
in Select.live portal
Other manuals for Select.live
1
Table of contents
Other Selectronic Measuring Instrument manuals
Popular Measuring Instrument manuals by other brands

Virtec Instruments
Virtec Instruments pFLOW E5 Series instruction manual
Millimar
Millimar C 1208 operating instructions

Tektronix
Tektronix Type 130 instruction manual
TESTO
TESTO 314 Application Information
VWR
VWR LCO304 operating manual

S+S Regeltechnik
S+S Regeltechnik HYGRASREG KH-30 operating instructions
mru
mru MGAprime user manual

PCB Piezotronics
PCB Piezotronics 320C03 Installation and operating manual

Polymer Technology Systems
Polymer Technology Systems CardioChek user guide
BTU
BTU DF-68A user manual

Leupold
Leupold RX-1200i Complete Operation Manual
Xylem
Xylem Sensus PulseRF HRI-A3 installation manual
