SEMC J1230 User manual
J1230 User Manual
Simons Electron Microscopy
Center (SEMC) at the New York
Structural Biology Center
(NYSBC)

Last updated on 9/20/19
2
J1230 Information Sheet
●Cs = 2.0 mm
●Apertures
○Condenser = 300, 200, 100 um
○Objective = 80, 50, 20 um
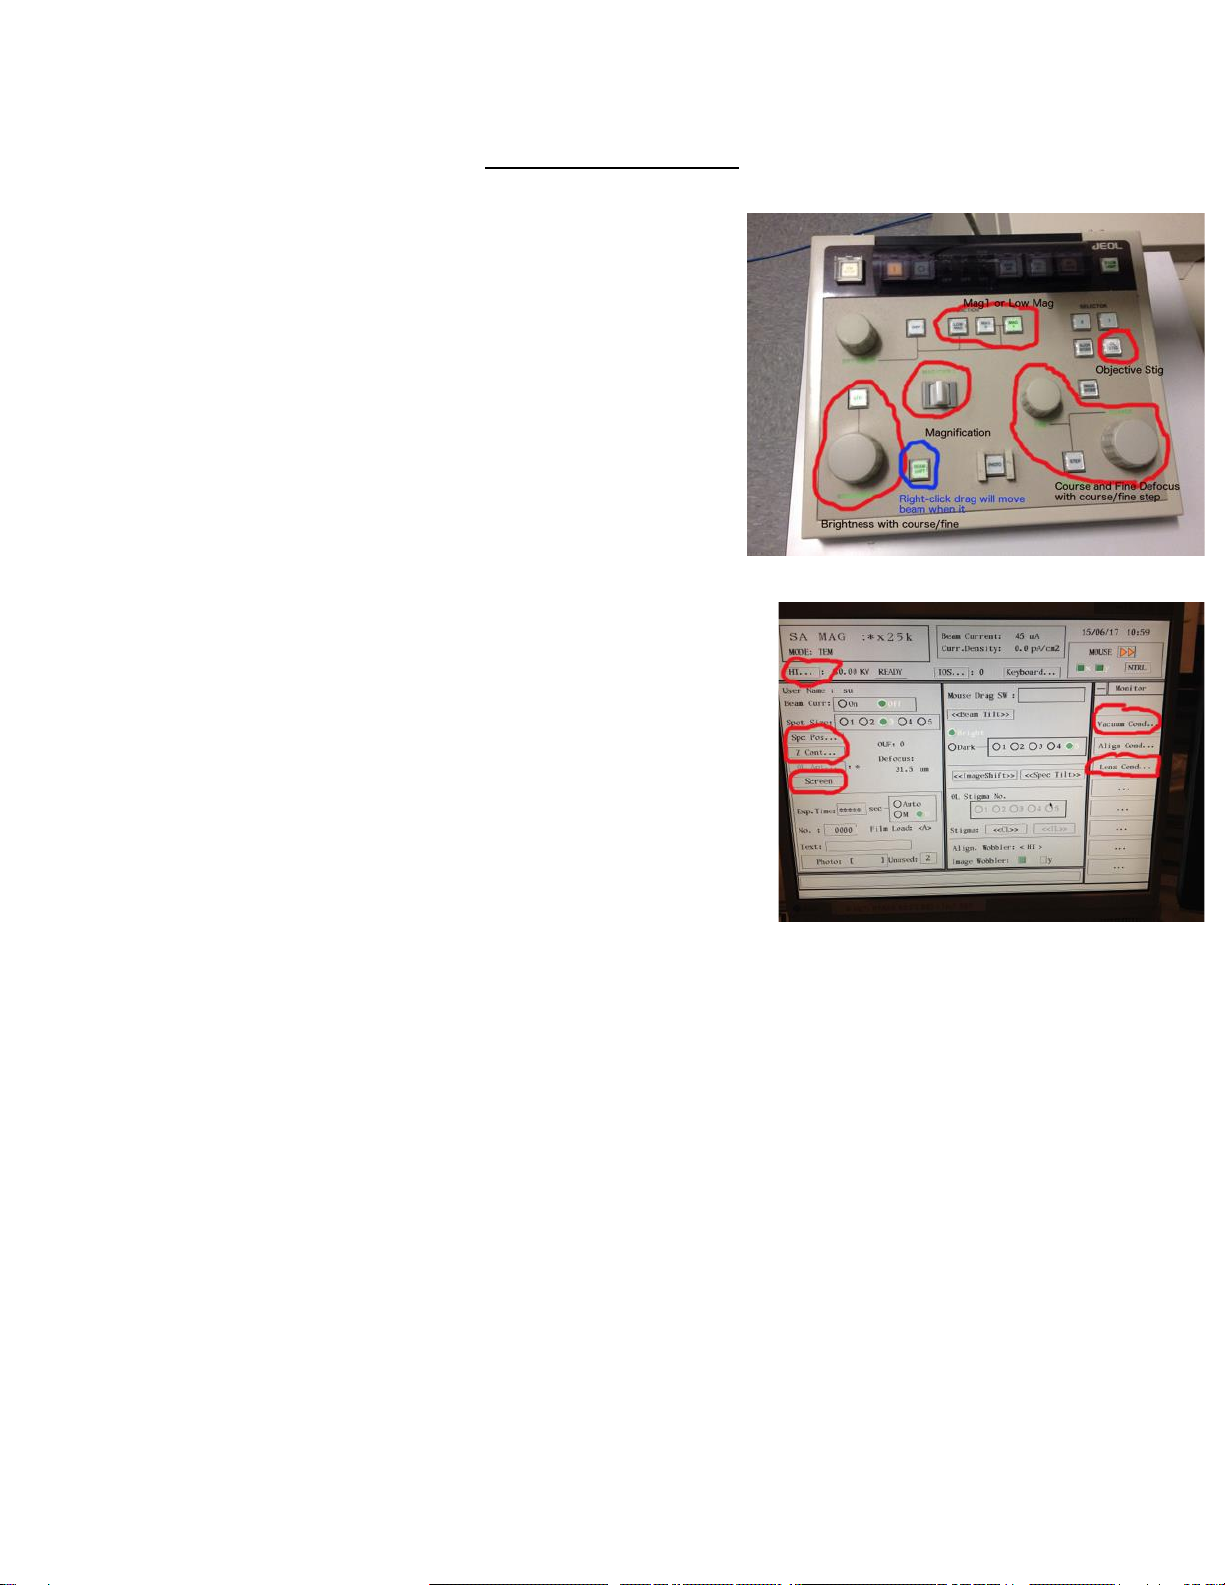
●Important buttons:
○Use LOW MAG or MAG1 mode (not MAG2)
○When OL STIG lig, right-click drag will adjust
○When BEAM SHIFT lift, right-click drag to
move beam
○When STEP is lit, adjustments are coarse
(BRIGHTNESS, Obj Focus)
●Important software controls:
○General controls needed for operation are
circled
○DO NOT adjust other alignments without
consulting staff first
○You can leave the Monitor panel open (far right)
●Change mag using MAG/CAM L toggle switch
○Left = down mag
○Right = up mag

Last updated on 9/20/19
3
J1230 User Guide
1. Beginning of session:
a. HT = 80 kV and “READY”
b. Beam = OFF
c. Microscope should have been left in SA mag range
d. Objective aperture OUT
e. Screen DOWN
f. Camera at -25℃
g. Recenter stage
i. Spc Pos… → Position → click center of stage map (make sure Point option
is ON)
ii. Tilt/Rot selected → click center of stage map
2. Retract holder
a. Objective aperture OUT, flu screen DOWN, stage recentered, filament OFF
b. Open vacuum window
i. Monitor → Vacuum Cond…
ii. should see “Vac. Ready” in 5 chambers (COL, GUN, CAM, RT & SPC)
c. Switch from PUMP to AIR on goniometer
d. Pull holder straight out until you can’t any further
e. Turn counterclockwise until you can’t any further
f. Pull slightly out until you can’t any further
g. Turn counterclockwise until you can’t any further
h. Wait for vacuum
i. Watch V37 and V34 (turns from white/closed to black/open, and then
finally back to white/closed during retraction)
i. Wait for SPC to change from “Vac ready” to “Air” (will go to the ~200 range)
j. Pull holder straight out; you should feel no resistance
3. Transfer negative stain grid to holder tip
4. Insert holder
a. Objective aperture OUT, flu screen DOWN, stage recentered, filament OFF
b. Open vacuum window
i. Monitor → Vacuum Cond… (should see “Vac. Ready” in 4 chambers
[COL, GUN, CAM, RT] and SPC = “Air”)
c. Switch from AIR to PUMP
d. Insert holder with pin lined up at 9 o’clock position and insert holder straight in;
you should hear the pump start; light near toggle (on goniometer) turns yellow
e. Wait until SPC switches from “Air” to “Evac.” to “Vac. Ready” (vacuum should
drop from ~200 to ~40 range)
i. If pump times out, toggle from PUMP to AIR and then back to PUMP
f. Insert holder turning clockwise for two turns
g. Close vacuum window when done

Last updated on 9/20/19
4
5. Turn beam on
a. In top left panel select Beam Curr: ON
b. Should see “Beam Current” (at top of window) go from 45 uA to 58 - 59 uA; this
takes a few seconds, be patient
6. Before starting Leginon
a. Make sure DM (Digital Micrograph) is open on J1230cam1 computer
b. If Leginon client is already open on camera computer, close and re-open.
Otherwise, open Leginon client from Python shortcut on desktop.
7. Start Leginon
a. Log on to Leginon workstation
b. Right click to open a terminal and type betaleginon
c. Follow prompts to create a new session
d. Choose “j1230 robot holder” as holder and enter a session description
e. When prompted, connect client to j1230-cam1
i. Select camera client, click “+” button and okay
f. C2 (condenser aperture) = 200 um (should be)
i. as of 4/15/19 it is the 300 um aperture
g. Run application = J1230MSI-Raster Screen2 (3.2)
i. Main = j1230leginon
ii. Scope and camera = 1230-cam1
8. Import presets
a. J1Presets_Manager → Import presets from another session (*)
i. TEM = Jeol1230
ii. Digital Camera = Gatan
iii. Find
iv. Load most recent users presets and select all
v. Import → Done
*NOTE: We DO NOT recommend taking a grid atlas*
b. Leginon works best in a semi-manual mode
c. If you must take an atlas, do so at gr = 120x mag, radius = 0.009 = 43 targets
d. After atlas, beam needs to be re-centered at SA mag
i. To center, make sure BEAM SHIFT button is lit
➢need x & y control on for “mouse”
ii. Right-click drag EM mouse to move beam
9. Find a good square
a. Make sure objective aperture is out
b. Send gr preset to scope
c. Move stage using trackball on right to find an area with carbon / good stain
d. Send sq preset to scope
e. Insert objective aperture now
f. Using fluorescent screen, center over a good square
g. Send hl preset to scope and make sure you are still centered over your square

Last updated on 9/20/19
5
10. Adjust preset intensity - this should be checked for every square used for imaging as
stain thickness varies
a. Send sq preset to scope
b. With the flu screen down, adjust current density (on monitor) to be between 20
and 25 pA/cm2 using the brightness knob on the control panel
*note: if you cannot see beam, lower mag and adjust beam shift first
c. In Leginon, click “edit selected preset parameters”, and click the icon “import
from scope” for intensity and save
d. Repeat for hl, fa, fc, and en (any high mag changes can be adjusted using one
preset and )
11. Adjust high mag beam shift
a. Send en preset to scope
b. With beam shift selected on the control panel, right click and drag the mouse to
center beam
c. Through leginon, click “edit selected preset parameters”, and click the icon
“import from scope” for beam shift and save
i. You can also import the beam shift for fa and fc presets
ii. Note: you may need to adjust beam intensity after shifting the beam.
d. Lift screen (close the furthest left panel on the scope monitor; click “screen” to
lift/lower flu screen)
12. Simulate square target
a. In the J1Square node…
b. Click simulate target (+++)
13. Submit subsquare targets
a. In the J1Subsquare_Targeting node…
b. Use the acquisition mouse pointer to select subsquare area of interest
c. Use the focus mouse to select eucentric height target
d. Click “Submit Targets”
e. Click “Submit Queued Targets”
f. At this point, you should see action happening in the J1Z_Focus node and
J1Subsquare node
14. Submit exposure targets
a. In the J1Exposure_Targeting node...
b. Use the acquisition mouse pointer to select exposure targets
c. Use the focus mouse to select eucentric focus target
d. Click “Submit Targets”
e. You should see action in the Drift_Manager, J1Focus and J1Exposure nodes
15. Repeat steps 7 - 10 until you are done collecting data
16. End of session:
a. Beam off
b. Send scope to en preset (SA MAG x60k)
c. Fluorescent screen down
d. Objective aperture out
e. Recenter stage

Last updated on 9/20/19
6
i. Spc Pos… → Position → click center of stage map (make sure Point option
is ON)
ii. Tilt/Rot selected → click center of stage map
f. Retract holder
g. Remove grid and store holder inside column

Last updated on 9/20/19
7
Troubleshooting
●EN/FA/FC beam should be at least as large as flu screen, otherwise images will
sensitive to beam movements
●EN preset
○Brightness 20-25 pA/cm2
○500 ms at 2048 x 2048, bin2
○If quadrants show up in images, then the beam is too dim or too bright
○Should be ~8000 counts
●FA/FC presets
○Brightness 20-30 pA/cm2
○200 ms exposure at 1024x1024, bin4
○If beam is too condensed, focus will fail because the image will move too much
●If focus is off
○Pause in J1Exposure node
○In J1Focus node, simulate target; verify that focus is good
○If focus is still off, adjust using manual focus (MF) under J1Focus node
■It is often easier to use the OBJ FOCUS knob on the microscope hand
panel to find true focus and reset using MF display in Leginon
○Resume collection in J1Exposure node (play button)
●Exposure and Focus node should use “Image Beam Shift” to move to target
●Grid, Square and Subsquare node should use “Stage position” to move to target
●YOU MUST USE THE J1230 Raster app!
STAFF USE ONLY
Alignments
Frequently you will need to adjust gun tilt and possibly gun shift after a vacuum crash. You
should not have to do any other alignments regularly. If you have not done alignments before,
please consult EMG staff for supervision before attempting.
Gun tilt:
You will find this under the HT panel. Click <<Tilt>> and use right mouse click and drag
to maximize brightness.
Gun shift:
You will find this under the HT panel. Click <<Shift>> and go to spot size 1. Center
beam. Unclick <<Shift>>. Click BEAM SHIFT button on hand panel and go to spot size
3. Center beam. Iterate between gun shift (ss1) and beam shift (ss3) until stable.

Last updated on 9/20/19
8
Microscope Recovery
If the J1230 has experienced a vacuum crash upon insertion or retraction please complete the
steps under MICROSCOPE RESTART.
If the J1230 computer has frozen please complete the steps under COMPUTER RESTART.
For any other microscope issues please consult with EMG staff before proceeding.
MICROSCOPE RESTART
1) On microscope hand panel lift protective plastic covers and press the green O button.
This will turn the entire microscope off over several minutes.
2) After ~3 minutes press and hold the orange | button for 15 seconds. This will restart the
microscope over several minutes.
3) After the computer has rebooted you will be prompted to log in. Click “Login” button on
the far right panel on screen. Immediately after typing in User Name you must hit enter
before moving on to the Code No. field. Enter Code No. and hit enter again. Click
“Apply” button. You should see the username su appear on top left panel below HT. If
not, clear all fields of login window and repeat above.
User Name: su
Code No.: 1230
4) Go to the vacuum panel and wait. The RT (reserve tank) will evacuate upon reaching the
trip level (around 120) and then the gun and column will actively be pumped.
5) When COL and GUN are in the 20s, you can safely turn on the high tension by clicking
the HT button on the top left corner of the screen. Set HT to on. This triggers the
pumping of the camera chamber.
6) When emission is around 46uA the microscope is ready for use.
7) Frequently you will have to adjust the gun tilt after a full restart. Please refer to
Troubleshooting section above.
COMPUTER RESTART
1) Below the microscope computer monitor table on the top right panel is a small button set
back into the panel. You will need to push this in with a pen, stick, etc. Hold this in until
computer monitor freezes up. Hint: try moving the mouse around. Computer will restart
in a couple minutes.
2) After the computer has rebooted you will be prompted to log in. Click “Login” button on
the far right panel on screen. Immediately after typing in User Name you must hit enter
before moving on to the Code No. field. Enter Code No. and hit enter again. Click
“Apply” button. You should see the username su appear on top right panel below HT. If
not, clear all fields of login window and repeat above.
User Name: su
Code No.: 1230

Last updated on 9/20/19
9
Table of contents
Other SEMC Laboratory Equipment manuals

Popular Laboratory Equipment manuals by other brands


Brookfield
Brookfield R/S Rheometer M/02-212 operating instructions

Sterlitech
Sterlitech 1812 Assembly & operation manual

Amplyus
Amplyus miniPCR mini16 user guide

Biotage
Biotage V-10 Touch Installation and safety

Socket
Socket D720 Programming guide

Beckman Coulter
Beckman Coulter Microfuge 20 Series Instructions for use

Omicron
Omicron NG LEED Technical reference manual

Beckman Coulter
Beckman Coulter Optima LE-80K instruction manual

Codonics
Codonics Horizon XL manual

Agilent Technologies
Agilent Technologies 4150 TapeStation system System manual

Codonics
Codonics Horizon GS manual

Caframo
Caframo Petite Digital Stirrer BDC250 user manual