SEMROC BlueJay KC-03 User manual
BlueJay
About the Blue Jay™
The Semroc Blue Jay was designed by Jay Berry and Randy
Boadway. Randy has built delta wing gliders for years and
flown them in competition too. Randy had a number of
complaints about the typical design that was available on
the market so he put Jay Berry to work creating a delta
wing model without the disadvantages of similar models.
Jay is a member of NAR section 703, Wright Stuff Rocket-
eers in the Dayton, Ohio area. He designed this glider to be
nearly fool proof. It is almost impossible to put a part in the
wrong place. The keel is extra heavy duty and the hook
system designed by Eric Specht forces the glider off at apo-
gee. After naming the rocket after Jay we had to add a
Bluejay head to the kit. We promise this rocket will never
raid the nests of other songbirds and steal their eggs. We
hope you enjoy building and flying it!
Copyright © 2017 Semroc
www.semroc.com
January 2017
Made in the U.S.A by Semroc - Dayton, Ohio
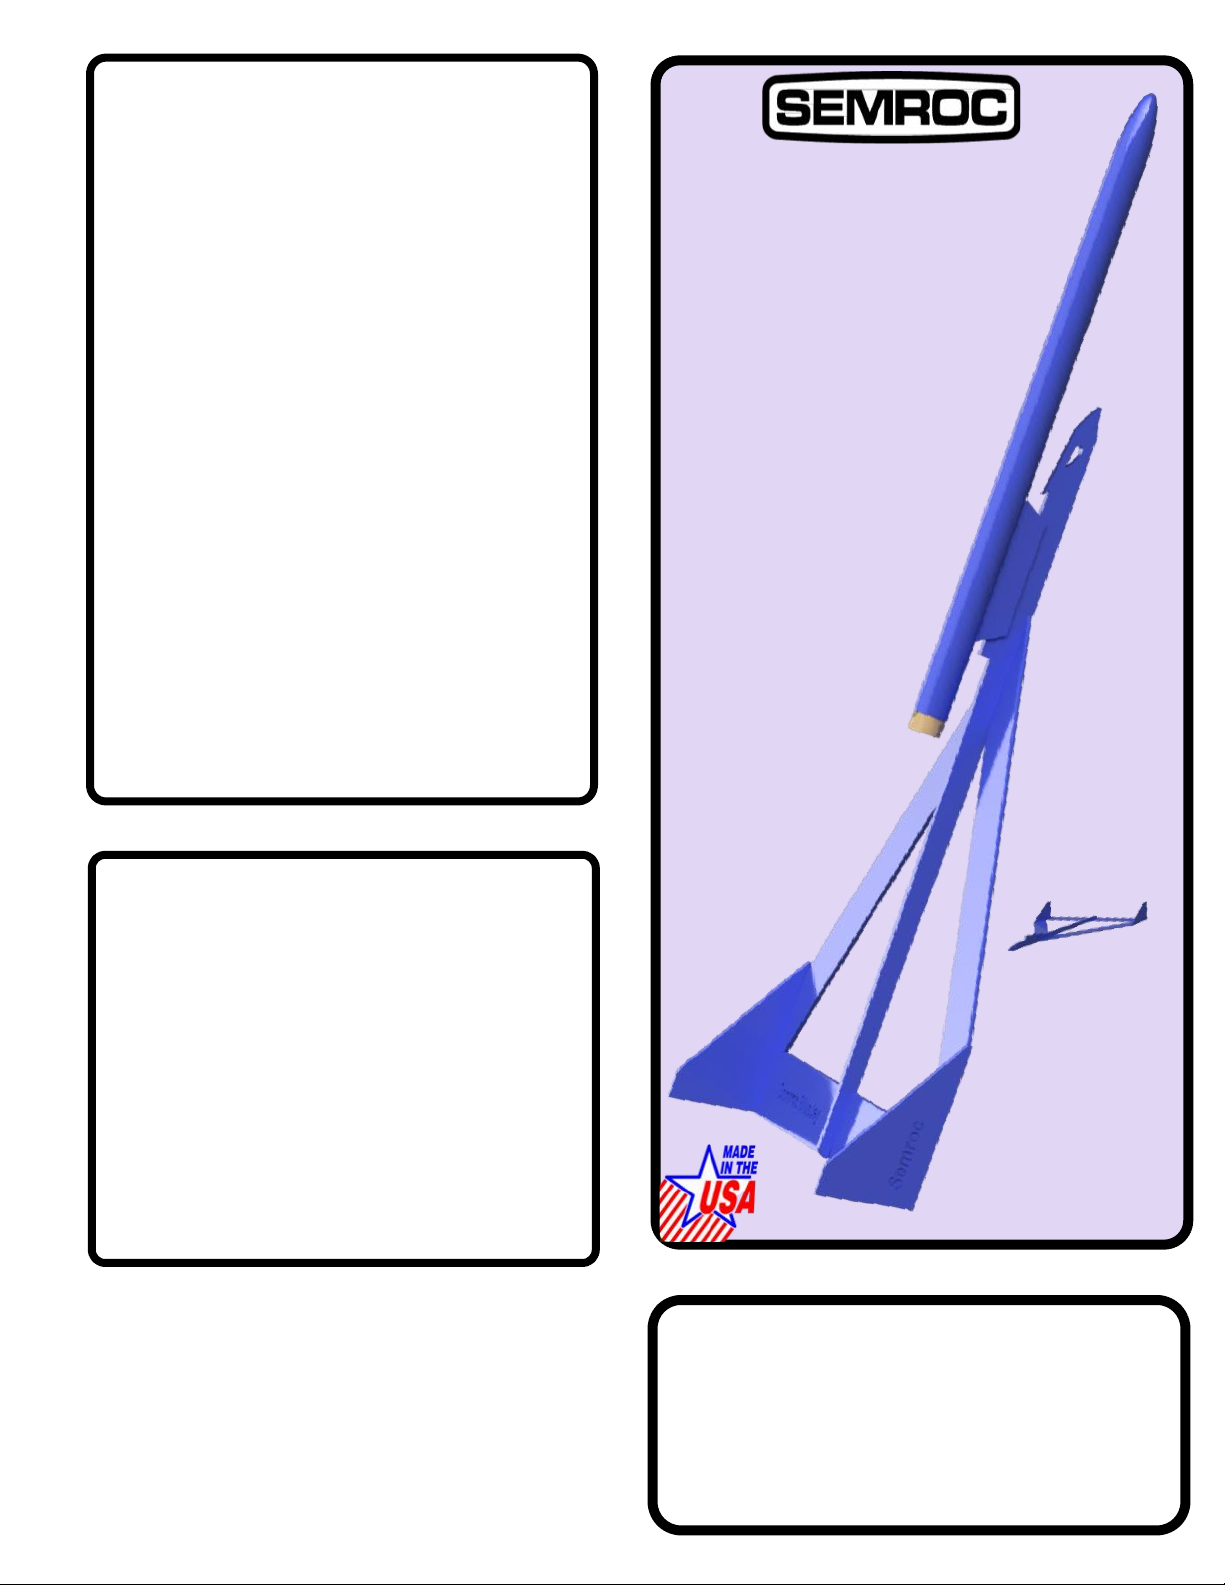
Blue Jay™
Kit No. KC-03
Specifications
Glider Wingspan 13.5”
Length 16”
Tube Diameter 0.73”
Length 13.75”
Motor Approx. Altitude
B6-2 175’
C6-3 400’
Skill Level 2
About Semroc
Astronautics Corporation
Semroc Astronautics Corporation was started by Carl
McLawhorn in his college dorm at North Carolina State Uni-
versity in November, 1967. Convincing a small group of
investors in his home town of Ayden, North Carolina to
invest in a small corporation, the company was re-
incorporated as Semroc Astronautics Corporation on De-
cember 31, 1969.
Semroc produced a full line of model rocket kits and mo-
tors. At its peak, Semroc had twenty-five full time employ-
ees working at two facilities. One was for research and de-
velopment, printing, shipping, and administration. The oth-
er was outside town and handled all production and model
rocket motor manufacturing. For several years, Semroc
successfully sold model rocket kits, supplies, and motors by
mail-order and in hobby shops. In early 1971, Semroc be-
came insolvent and had to close its doors.
After 31 years of dreams and preparations, Semroc Astro-
nautics Corporation was reincorporated on April 2, 2002
with a strong commitment to helping put the fun back into
model rocketry. Many years of excellent service to the rock-
etry community passed by until sadly, on August 11 2013,
Carl passed away and left a great void in the hearts of many
rocketeers. He is forever in our hearts and minds.
In February of 2015, Semroc was sold to a group of inves-
tors and Randy Boadway of eRockets and moved to Dayton,
Ohio where it resides today. It is our goal to continue the
level of service and dedication to the hobby that Carl and
his family were so well known for. We strive to serve you,
our customers, to the best of our abilities as we carry the
vision of Carl McLawhorn boldly into the future.
TM
FLYINGMODEL
ROCKET KIT
Designed by:
Jay Berry
Delta Wing
Boost Glider
Precision Turned
Balsa Nosecone
Sturdy Fuselage
Laser Cut Balsa
Parts
Unique Motor
Pod Hook
Glider and
Streamer
Recovery
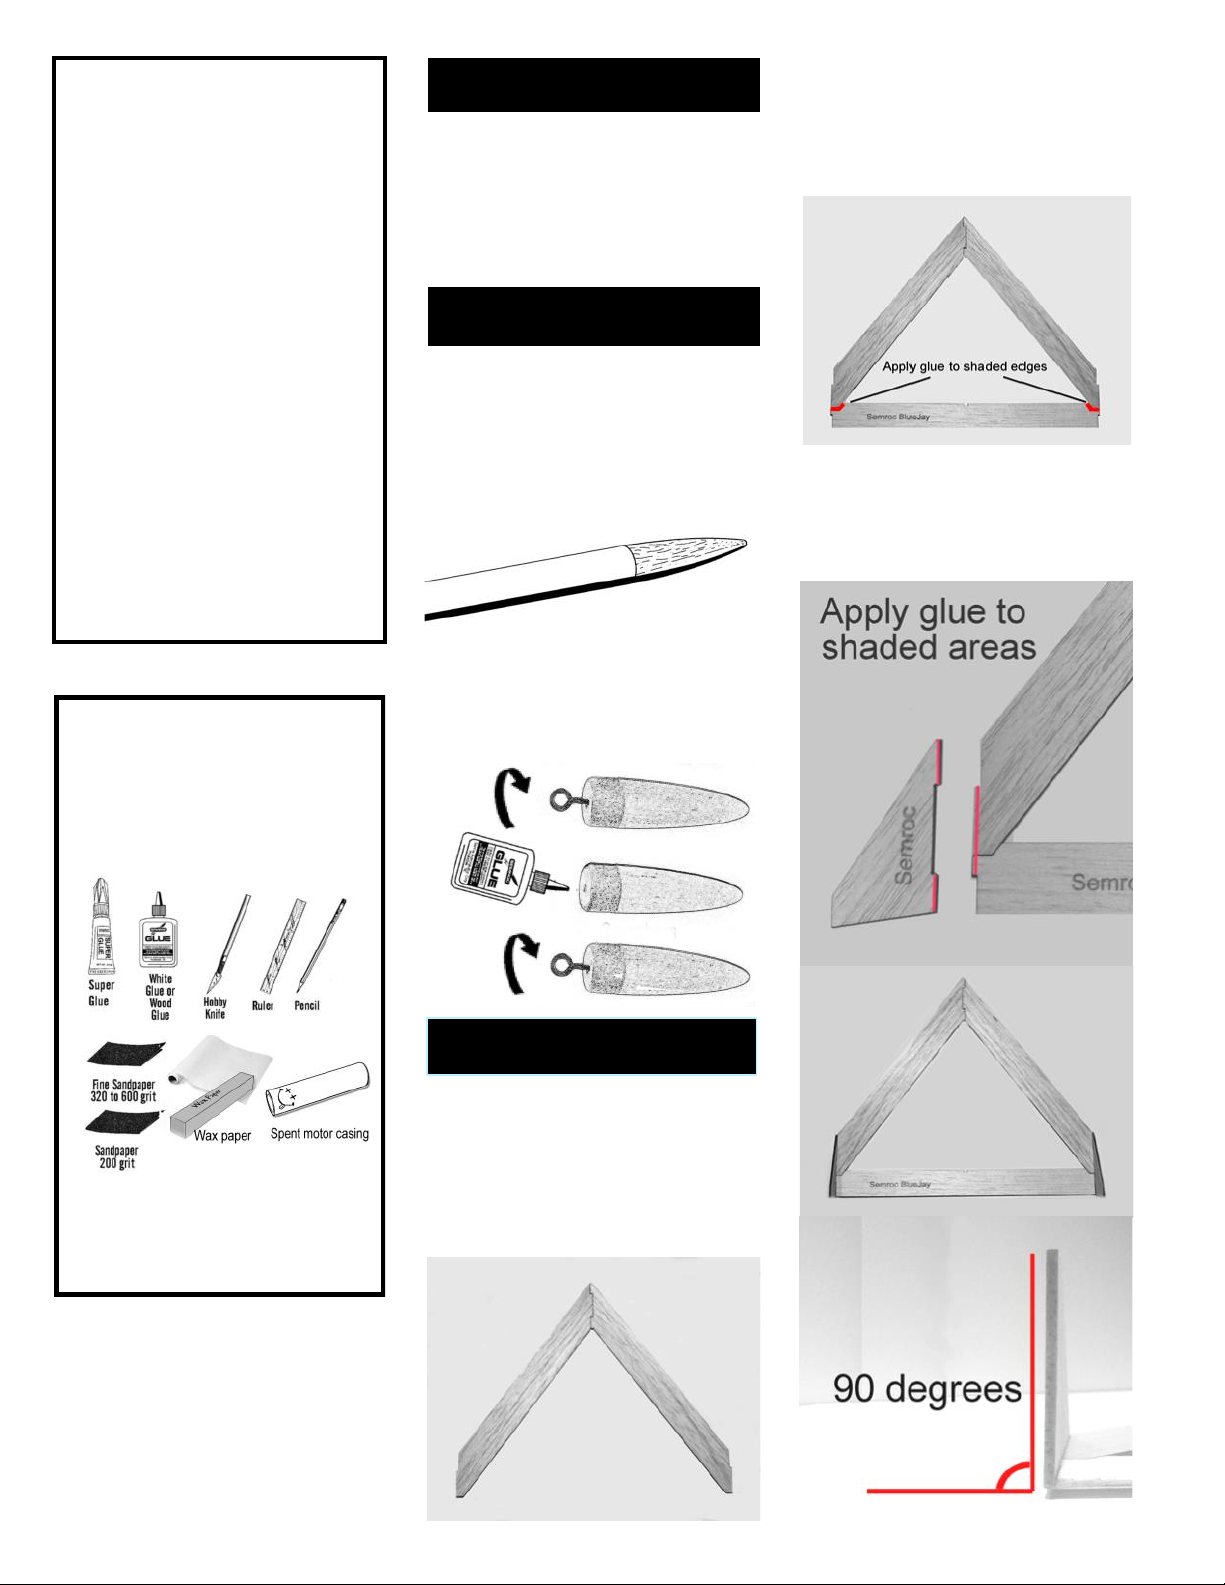
TOOLS
In addition to the parts supplied,
you will need the following tools to
assemble and finish this kit.
BEFORE YOU
START!
Make sure you have all the parts
included in this kit that are listed in
the Parts List in these instructions.
In addition to the parts included in
this kit, you will also need the tools
and materials listed below. Read
the entire instructions before begin-
ning to assemble your rocket. When
you are thoroughly familiar with
these instructions, begin construc-
tion. Read each step and study the
accompanying drawings. Check off
each step as it is completed. In each
step, test-fit the parts together be-
fore applying any glue. It is some-
times necessary to sand lightly or
build-up some parts to obtain a
precision fit. It is important to al-
ways make sure you have adequate
glue joints.
❑1. These instructions are presented
in a logical order to help you put
your Blue Jay™ together quickly and
efficiently. Check off each step as you
complete it. We hope you enjoy
putting this kit together.
ASSEMBLY
❑3. Twist the screw eye into the
center of the base of the nose cone.
Unscrew it and squirt glue into the
hole. Reinstall the screw eye and
wipe off any excess glue.
NOSECONE
❑2. Insert the nose cone into the
body tube and check for proper fit -
snug enough to stay in place but not
so tight it’s hard to remove. If it is too
loose, add masking tape. If it is too
tight, sand the shoulder slightly.
❑5. Apply glue to the tabs and at-
tach the tail section of the glider.
Make sure the entire assembly re-
mains flat on the table and weighted
down.
❑6. The uprights are attached next.
Glue the uprights in place as shown.
You may wish to use a triangle to
ensure they are attached at a 90 de-
gree angle.
WING
❑4. Take the two wings and lay
them on a flat surface covered in wax
paper. Apply glue to the tabs where
the wings join and then glue them
together. Hold in place with weights
or a copy of Rockets of the World
until dry.

Blue Jay
FUSELAGE
❑10. Locate the 3 pieces of the
motor pod hook.
Viewed from the end, the motor pod
hook should look like this when con-
tour sanding is finished.
❑13. Sand a contour into the motor
pod hook so it fits snugly onto the
motor tube. Take an empty motor
casing and insert it into the motor
pod tube. Leave about 1/4 inch hang-
ing out so you can grab it to pull it
out later. Wrap a piece of sandpaper
around the tube and hold it in place.
❑11. Glue the hook to the cheek
while making sure the bottom edges
are aligned.
❑14. Take the motor pod hook in
hand and sand it gently back and
forth, making sure to keep it aligned
with the tube. Do your best to apply
light, even pressure while sanding. If
you don’t sand it straight, you’ll end
up with divergent thrust and your
rocket won’t fly straight.
❑15. Test fit the motor pod hook
and the fuselage hook. If the fit is too
tight, the motor pod won’t separate
when the motor fires the ejection
charge. Lightly sand the fuselage
hook with fine sandpaper until the
motor pod hook slides off smoothly.
❑7. Attach the hook to the fuselage
as shown. Make sure the hook is
flush with both sides of the fuselage
before gluing in place.
❑8. After the glue on the hook has
cured, attach the fuselage to the
wing. The notch in the underside of
the fuselage aligns with the leading
edge of the wing while the other end
aligns with the notch in the rear
wing. Only glue the leading edge of
the wing to the underside of the fu-
selage at this time. Just like the up-
rights, make sure the fuselage is at a
90 degree angle to the wing.
❑9. After the glue has dried from
step 8, the tail of the glider is glued
to the fuselage to form the elevator.
Clamp in place with hobby clamps or
a clothespin while the glue dries.
MOTOR POD
❑12. Glue on the other cheek and
you’ll have an assembly that looks
like this. Note contour
Blue Jay
❑22. Insert the motor block as shown
and push into place with the empty
casing until the 1/4 inch mark is even
with the end of the tube. Quickly re-
move the motor casing with a twisting
motion.
❑17. Make a mark on the motor
pod tube 1 3/4 inches from one end.
Using a straightedge, draw a straight
line through the 1 3/4 inch mark and
another 3 1/2 inches up the tube.
❑20. Tie the length of Kevlar
around the motor block. Use the old
motor casing as a spacer to tie it in a
loop. Set the knot with a drop of
glue and cut off the loose end.
❑21. Mark the motor casing 1/4 inch
from one end. Spread a layer of glue
around 2 1/4 inches inside the end of
the tube with the hook.
❑23. When the glue has dried, feed
the Kevlar cord through the motor tube
and tie it to the nosecone. Unroll the
streamer material and lay the loose
end under the Kevlar as shown. Apply
the tape to hold the streamer in place.
❑18. Place the motor pod hook on
the line. The end of the pod with the
mark you made in step 16 should be
even with the 1 3/4 inch mark. Make
sure the motor pod hook is in align-
ment and glue into place.
❑16. After you’re satisfied with the
fit of the motor pod hook and fuse-
lage hook, make a mark at the rear
edge of the motor pod hook.
❑19. Glue the launch lug into place
between the motor pod tube and the
pod hook.
❑24. This concludes the con-
struction of your Semroc Blue Jay
boost glider! We hope you enjoy
flying this high quality kit.
❑ 25.Locate a clear grassy area
free of objects that will damage
your glider. Face the wind and
gently toss the glider with the nose
slightly elevated. If the glider
stalls, add some weight in the
“eye” of the glider body and try
again. If it dives, remove some of
the nose weight until level flight is
achieved.
Glider Trimming
❑ 26.Once you have obtained a
straight and level glide path, add
some weight to the left or right
wing to make the glider turn. If the
glider doesn’t turn, you’re in for a
long walk!

Blue Jay
FLIGHT PREPPING
❑ 3. . Wrap tape around the nozzle
end of the motor until it fits snugly
into the tube. Insert the motor until it
stops against the motor block. Grab
it with your fingers and try to pull it
out—it should not come out easily.
❑ 5. Install the igniter so the leads
are opposite the pod hook and attach
the pod to the glider.
❑ 4. Apply a few sheets of recov-
ery wadding in the top of the body
tube. Roll the streamer and pack it
and the shock cord on top of the re-
covery wadding. Slide the nose cone
into place, making sure it does not
pinch the shock cord or streamer.
❑ 7. After each flight, promptly
remove the spent motor casing and
dispose of properly.
❑ 2. Take a 2 inch long piece of
masking tape and make a tab on the
launch rod 12 inches from the blast
deflector plate. This will hold the tail
of the glider off of the blast deflector
plate and prevent it from separating
before launch.
❑ 1. Carefully check all parts of
your boost glider before each flight
as a part of your pre-flight checklist.
Launch the Blue Jay™from a 1/8”
diameter by 36” long launch rod.
❑ 6. Drive a wooden dowel into
the ground at an angle away from
the pad. Tape the leads down to this
makeshift umbilical tower while mak-
ing sure you can still get the clips
onto the igniter. This helps prevent
the leads from getting caught by the
tail section as the rocket launches
and seriously fouling the flight.

Parts List
A 1Balsa Nose Cone BNC-20B
B1Body Tube BT-20L
C13/16” Balsa Keel FC-03
D13/32” Balsa Parts FC-03
E13/13 Basswood Hook FC-03
F13/16” Balsa Hook FC-03
G1Screw Eye SE-10
H1Kevlar 200# SCK-236
I1Launch Lug 2.25” LL-122
J1Motor Block CR-5-20
-1/8”
K1Streamer Pack SP-236
L1Clay Weight WC-2
Table of contents
Popular Aircraft manuals by other brands

Sky Country
Sky Country Discovery-5 manual

Diamond Aircraft
Diamond Aircraft DA 40 D Flight manual

Zodiac Aerospace
Zodiac Aerospace ATOM Legend S T1,5 Use and maitain manual

Flow Paragliders
Flow Paragliders Cosmos user manual

Piper
Piper CHEROKEE WARRIOR II Information manual

Alexander Schleicher
Alexander Schleicher ASK 21 Mi Flight manual


