Sencor SCT 9412DBMR User manual

SCT 9412DBMR
EN User Manual DAB+ CAR RADIO WITH AMULTIMEDIA
PLAYER AND RDS RADIO WITH BLUETOOTH


EN 1
EN
2021 08/2021
IF YOU WANT TO USE THIS PRODUCT CORRECTLY, CAREFULLY READ THIS
USER'SMANUAL AND STORE IT FOR FUTURE REFERENCE. IF YOU GIVE
(SELL) THE APPLIANCE TO SOMEBODY, PLEASE ALSO INCLUDE ALL THE
DOCUMENTATION TOGETHER WITH THIS APPLIANCE, INCLUDING THIS
INSTRUCTION MANUAL.
Table of Contents
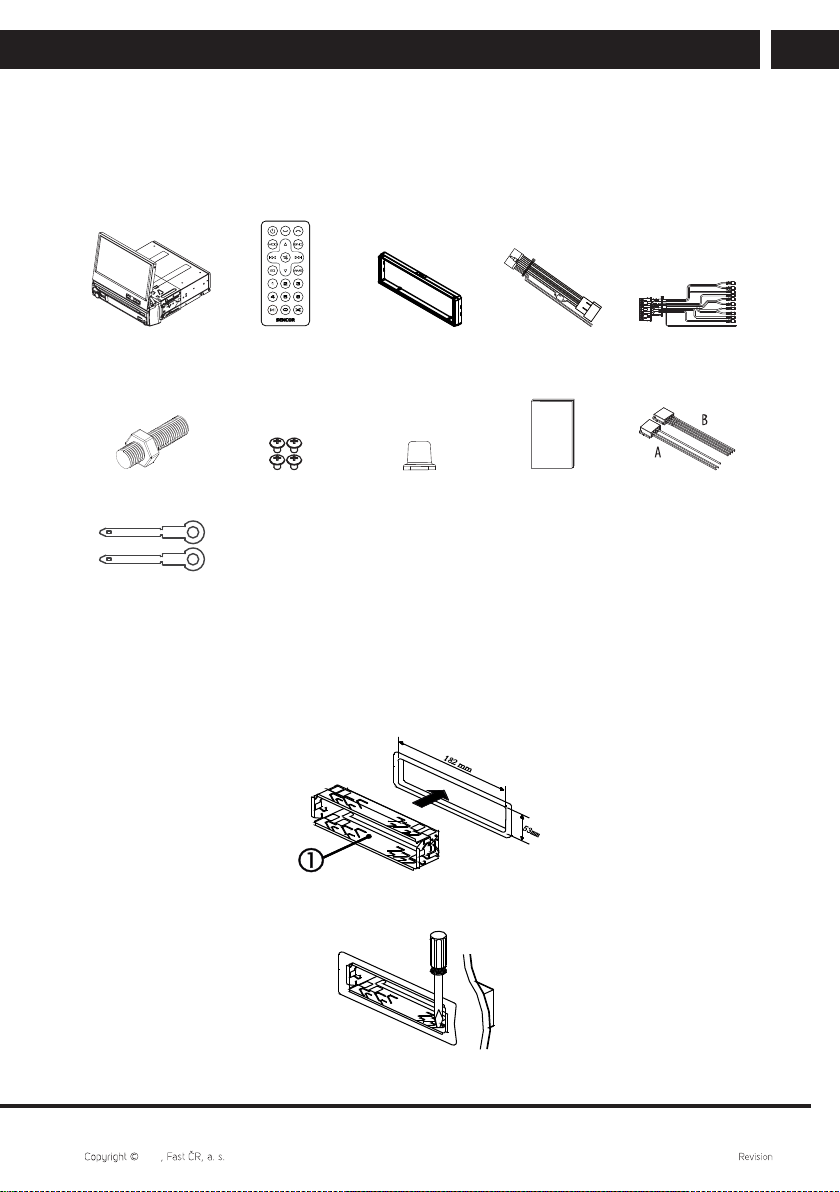
1. Installation instructions .................................................................................................................2
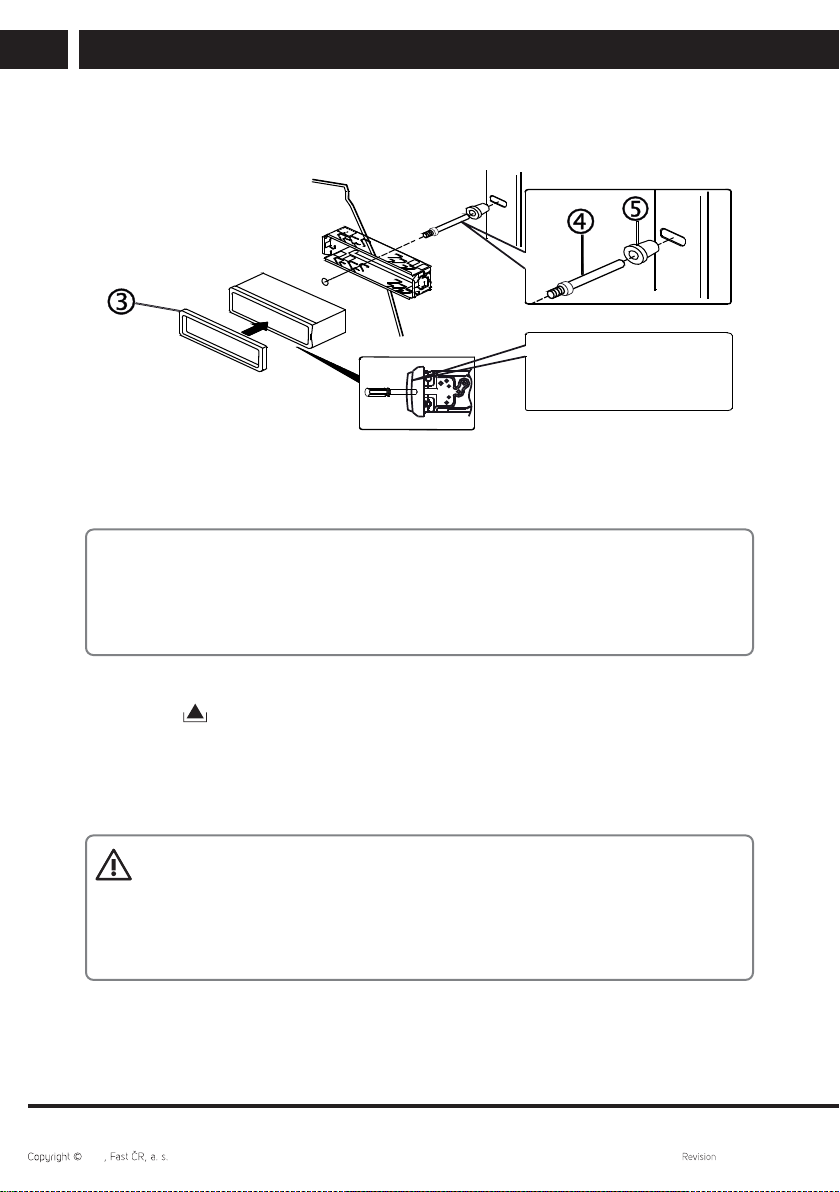
2. Installation.........................................................................................................................................3
2.1. Assembly procedure ...........................................................................................................3
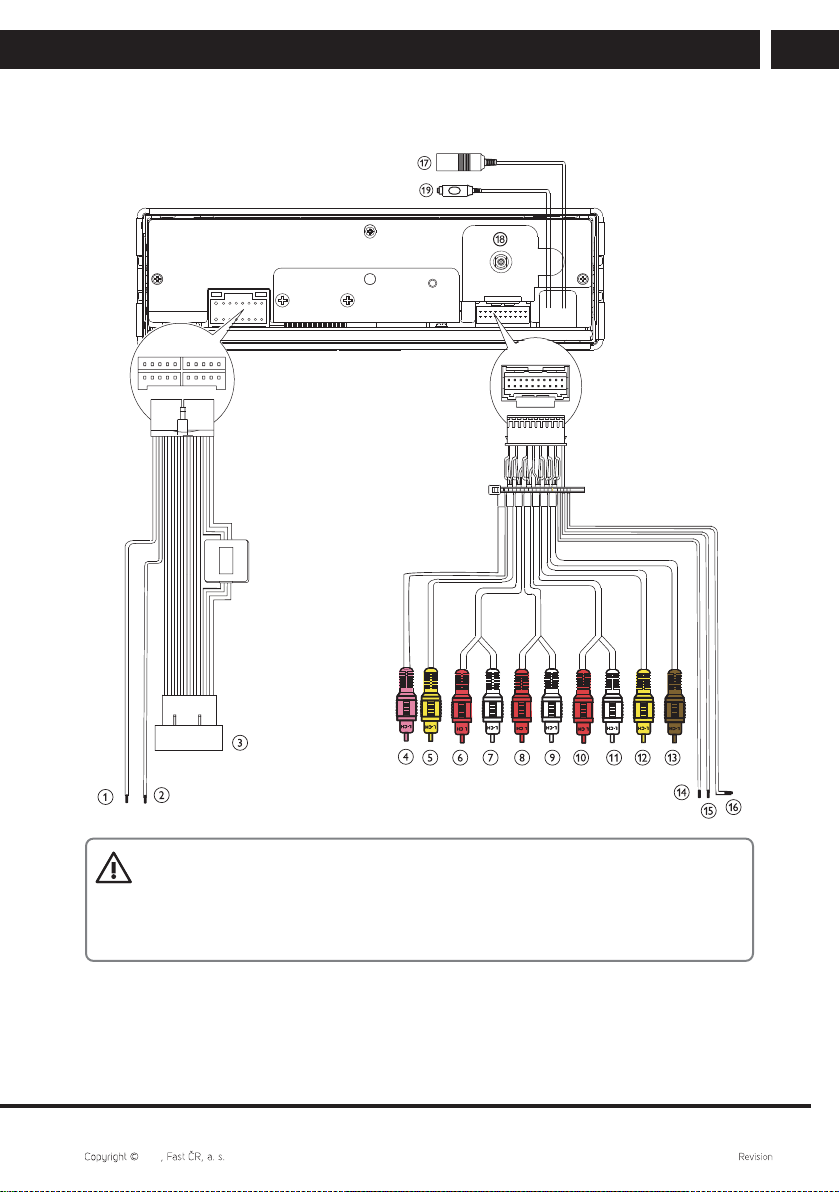
2.2. Electronic connection...........................................................................................................5
2.3. Connecting leads .................................................................................................................. 6
3. Control panel and the remote control.......................................................................................8
3.1. Description of the remote control.................................................................................... 9
3.2. Remote control and batteries ..........................................................................................10
4. Control and operation ................................................................................................................... 11
4.1. General controls.................................................................................................................... 11
4.2. Basic operation ..................................................................................................................... 11
4.3. Equaliser ................................................................................................................................. 11
4.4. Radio ....................................................................................................................................... 12
4.5. Controlling the RDS............................................................................................................ 13
4.6. USB / SD ............................................................................................................................... 15
4.7. Bluetooth controls............................................................................................................... 17
4.8. DAB reception ......................................................................................................................18
4.9. External input mode (AUX-IN)/AV input (AV-IN)........................................................19
4.10. Settings ................................................................................................................................20
5. Troubleshooting .............................................................................................................................21
6. Technical specifications..............................................................................................................22

2 EN
EN Installation instructions
2021 08/2021
1. Installation instructions
The device is designed to be powered by 12 Vdirect current. Before installing the
unit, check that your vehicle has a12 Vpower supply with the negative pole going to
ground.
The negative pole of the battery must be disconnected before the device is
connected. This reduces the probability of damaging the device by an accidental
shorting of the circuit.
Check that the unit is correctly connected according to the coloured leads based on
the wiring diagram. An incorrect wiring connection could cause the malfunction of the
unit or damage to the vehicle'selectrical system.
Do not forget to connect the loudspeaker lead marked (-) to the (-) terminal. Never
connect the left and right loudspeaker leads together or to the car body.
Do not cover the ventilation openings on the unit. Blocking them will increase the
temperatures inside the unit, which may damage it or cause afire.
This device can playback MP3 and WMA digital sound file formats.
Do not attempt to repair the unit, modifications to the unit may cause amalfunction
or damage the device.
Stop the vehicle before performing anything that could interfere with driving.
Do not turn on the device in extremely high or low temperatures. The normal
operating temperature is between -10 and +50 °C.
ATTENTION
Ensure correct connection, particularly the power supply (larger draw) and
backup memory (smaller draw). This will keep the current draw in the turned off
state to aminimum and maintain your set preferences in the car radio memory.

EN 3
EN
Installation
2021 08/2021
2. Installation
The following accessories are included with the device
12345
Main unit and front
panel (with case)
Remote control Reduction frame ISO connectors Audio and video
cable
67890
Hex bolt Screw x 4pcs Rubber washer User’smanual ISO male
qa
Disassembly
tool (2PCS)
2.1. Assembly procedure
1. Insert the installation case into the dashboard.
2. For safe installation bend the flaps inside into the dashboard.

4 EN
EN Installation
2021 08/2021
3. If necessary, use ametal strip to secure the rear side of the unit. The strip can be
bent to the necessary angle by hand.
Dashboard Fireproof partition
Release the dashboard
Attach the rear bracket screws and
the rear cable bundle and safely
secure the device in place.
4. To release the unit insert the keys on both sides and pull the unit out of the
dashboard.
Note:
- Store small items in alocation that is not accessible to children.
- Use only the supplied bolts for the installation.
- The installation method is modified depending on the car model and the supplied
parts. You should have the unit installed by aqualified technician.
Detaching the front panel
Press button to release the control panel from the main unit. The panel will be
disconnected and can be removed. Likewise, after disconnecting the panel, you may
insert an SD card into the slot to playback multimedia files.
To attach the front panel, first attach the left side in the tilted out position, lightly push to
the left and attach the right side.
ATTENTION:
Do not touch the connector on the front panel of the main unit as this could
result in apoor electrical contact. Only wipe the connectors using aclean and
dry wiping cloth. After detaching the front panel from the main unit, store it in
aprotective case (if available).

EN 5
EN
Installation
2021 08/2021
2.2. Electronic connection
ATTENTION:
We recommend that the connections are made by aprofessional. This will
prevent your unit from malfunction, protect your unit and other objects from
damaging and ensure safe and trouble-free operation!

6 EN
EN Installation
2021 08/2021
2.3. Connecting leads
Use the adaptor bundle connected to the device’smulticonnector and the relevant inputs
and outputs on the other side. Ensure that the connections are properly made and the
insulation of both connected adisconnected leads is good!
Connector/Object Connect to
1 Pink lead Parking brake (-)
2 Violet lead Rear-view camera (B+)
3 ISO connector See previous description
4 Yellow cable Video output
5 Red cable Rear line output (R - right)
6 White cable Rear line output (L - left)
7 Red cable Front line output (R - right)
8 White cable Front line output (L - left)
9 Red cable Audio input (R - right)
10 White cable Audio input (L - left)
11 Yellow cable Video input
12 Brown cable Video camera
13 Blue cable Subwoofer
14 White lead OE SWC AD Line 1
15 Green lead OE SWC AD Line 2
16 Black lead OE SWC AD Line Ground (earth)
17 Black cable Radio antenna
18 DAB connector Antenna connector
19 Black cable External microphone
CONTROL LEAD
Parking brake: Connect this lead to the vehicle'shand brake system
Rear-view camera: Connect to the reverse indicator light. Voltage should be supplied to
this lead when reverse is put into gear.
ATTENTION:
To prevent accidents, it is forbidden to watch video while driving. This unit is
ready for this feature the installation is made correctly. To watch video, park in
asafe place and set the parking brake.

EN 7
EN
Installation
2021 08/2021
Note:
- Watching the video without the parking brake being set is locked, showing
ascreen message.
- Video blocking applies to the main screen only, rear screen RCA output is not
locked.
CONNECTOR A
4. MEMORY +12 V BAT
5. VEHICLE ANTENNA OUTPUT
7. +12 V ACC (TO IGNITION)
8. GROUNDING
Note: (connector Ano.7) must be connected by
means of akey to the vehicle'signition so that the
vehicle'sbattery is not discharged in the event that the
vehicle is not used for an extended period of time.
CONNECTOR B
1. RIGHT REAR SPEAKER (+)
2. RIGHT REAR SPEAKER (-)
3. RIGHT FRONT SPEAKER (+)
4. RIGHT FRONT SPEAKER (-)
5. LEFT FRONT SPEAKER (+)
6. LEFT FRONT SPEAKER (-)
7. LEFT REAR SPEAKER (+)
8. LEFT REAR SPEAKER (-)
B
1 3 5 7
2 4 6 8
5 7
4 8
A

8 EN
EN Control panel and the remote control
2021 08/2021
3. Control panel and the remote control
The following pictures show the control panel and the remote control. The display and
symbols shown on the picture above may differ from the actual control panel and of the
remote control. Follow the exact functions found on the device.
no
a
d
ei
j
k
a
c
f
g
h
j
k
l
m
b
1. OPEN
• Press to eject TFT and set the TFT
screen tilt.
• Press and hold to retract the TFT
screen.
2. /
• Press to skip to previous/next track.
• Press and hold to search for tracks
or fast forward/rewind.
3. SELECTION (SEL)
• Selecting the shortcuts or settings
4. (MOD)
• Hangs up the ongoing call
• Source selection (Radio, BT, AV,
DAB)
5. BND
• Answers the call.
• Transfers the call to your mobile
during acall.
• Select the FM bands(FM1/FM2/
FM3) or AM1(MW1)/AM2(MW2)
6. HOME
• Main screen
7.
• Press to turn the system on.
• Press and hold to turn the
system off.
• Press briefly to mute or unmute
the sound.
• Rotate to set the volume.

EN 9
EN
Control panel and the remote control
2021 08/2021
3.1. Description of the remote control
Power button
Mode switch
Tuning/Track
selection
EQ button
(Equaliser)
Memory preset
buttons
Play/Pause
Reject / hang up a call
Band switch
Volume control knob
Automatic memory search
Press for repeat playback of
one track; press again for repeat
playback of afolder
Press to start random
playback; press again for
random playback of afolder
Receive / make calls
Mute/resume volume
8. AMS
• Automatic scanning and storing
available stations (long press) or
browsing through previously stored
stations (short press).
9. AV INPUT (AV IN)
• To connect an external signal
source by astereo cable.
10. USB
• To connect aUSB memory stick.
• To connect acompatible iPod/
iPhone device.
11. DISP
• To switch clock/device status
display (radio frequency etc.)
12.
• To release the front pane lock to
detach.
13. NUMERICAL BUTTONS
14.
• To insert aSD/SDHC memory card.
15. RESET
• Hidden button to reset the system
in case of malfunction.

10 EN
EN Control panel and the remote control
2021 08/2021
3. 1.1. Changing the batteries
If the range of the remote control is reduced or the device does not respond to any
functions during operation, replace the battery with anew one. Ensure that you maintain
the correct polarity when inserting the battery into the remote control. Please see the
provided procedure below for replacing the battery.
3.2. Remote control and batteries
Do not expose the remote control or the batteries to direct sunlight or sources of heat,
such as heaters, heat exchangers, stoves or other appliances (including amplifiers)
that produce heat. Do not use or leave the device in the vicinity of an open fire.
Neither the remote control nor the batteries may be exposed to dripping or running
water and objects filled with water must not be placed on them, e.g. vases. Protect
against exposure to rain, spraying or pouring of any kind of liquid. Do not use
outdoors. Failure to observe these instructions may lead to arisk of damage to the
remote control or the batteries.
Do not use this device near water.
It is necessary pay attention to the environmental impact aspects of battery disposal.
The incorrect use of batteries may cause the leakage of the electrolyte and corrosion.
To ensure that the remote control works correctly, proceed according to the
instructions below:
–
Make sure when inserting batteries to correctly align the polarities.
–
Do not recharge, heat, open or short circuit the batteries.
–
Do not throw batteries into afire.
–
Do not leave discharged batteries in the remote control.
– Do not combine various types of batteries or new and old batteries.
– If you will not be using the remote control for along period of time, remove the
batteries to prevent potential damage caused by asubsequent battery leakage.
– If the remote control is not working correctly or its operational range is reduced,
change all batteries for new ones.
– If electrolyte leaks out from the batteries, have the remote control cleaned by an
authorised service centre.

EN 11
EN
Control and operation
2021 08/2021
4. Control and operation
4.1. General controls
Turn the device on / off, mute volume
Press the vol knob to turn the power on.
Press and hold the vol knob to turn the power off.
In any mode, press the vol knob to activate or deactivate mute.
Selecting asource
Press the MOD button to select the source or
press to switch to the home page and
select the source you wish to use. Further items
will appear when the source dial is rotated just
like when dialling on an old phone (JOG DIAL).
Audio settings
Press SEL in any mode to set Speaker Volume/EQ mode/DSP/Display parameters, rotate
the volume knob to change the value, then press SEL to skip to the next option.
4.2. Basic operation
Main unit = MU
Remote control = RC
4.3. Equaliser
Press SEL button and select EQ, rotate the volume knob repeatedly to select the equaliser
(Standard Classic, Rock, Pop, Jazz, Electric, Custom.)

12 EN
EN Control and operation
2021 08/2021
4.4. Radio
Selecting amode
During operation, repeatedly press the MOD button
and select the radio mode.
Selecting abroadcast band width
Press the BND button repeatedly to select frequency
band. Up to 6 stations can be stored in each
frequency band and selected with the shortcut buttons.
Automatic scanning and saving of stations
In the radio mode,with functions TA, AF & PTY turned off, long press TFT screen to
start scanning frequencies and check signal streng until tuning is complete.
Short press TFT screen again, you can browse each stored station about five seconds.
During this process, click TFT screen again to end this function.
Manual scanning and storing stations
To activate the manual scan, click TFT screen .
During the manual scanning process, repeatedly click TFT upward Radio date
sustem or process, repeatedly downward Radio date sustem to the desired frequency.
Memory presets
Each band (FM1-3, AM1-2), selected using the BND button has 6 preset positions.
In the radio mode, press one of the numbers 1–6 to select astation that was stored in
memory.
Automatic scanning up / down
In the radio mode and when the TA, AF & PTY functions are off, press the
buttons to scan frequencies up / down for the next strong signal.

EN 13
EN
Control and operation
2021 08/2021
4.5. Controlling the RDS
4.5.1. Overview of RDS functions
The Radio Data System (RDS) is aservice, which makes it possible for FM stations to
broadcast other digital information together with the standard program signal. Some
of them are listed below. It depends on the specific station, which data is used for
transmission and when. The device monitors the received data and reacts to it based on
its settings.
Important note
The RDS function only works in countries or areas that have RDS broadcasting. Not
all countries or areas have broadcasting with full RDS functionality. RDS may not work
correctly if the signal is weak or in the event that the tuned station are not broadcasting
RDS data. The reception of RDS will be significantly affected by geographical conditions.
AF (Alternative Frequencies)
Alist of alternative frequencies providing information about various transmitters
broadcasting the same program in the same or neighbouring area.
TA (Traffic Announcement)
Information about whether traffic information is being broadcast.
PI (Program Identification)
This is acode that identifies the RDS station.
PS (Program Service Name)
The name of the current broadcasting station is shown on the display. Sometimes it is
used for other messages of the broadcaster.
TP (Traffic Program)
Information that agiven station is using atraffic announcement / news system.
PTY (Program Type Codes)
This code is used to designate the current program material. This function is used to
search for stations corresponding to your selected program category, such as news, easy
music, sport, etc. There is arelatively large number of program types and the inclusion of
abroadcast program in acertain category also depends on the focus of the given station.
4.5.2. Setting up the RDS mode
In the Radio mode screen, touch to select AF (Alternative frequencies) and TA (Traffic
announcement) on/off and select PTY (Program type); confirm the selection using the
“Confirm” symbol and make the settings.

14 EN
EN Control and operation
2021 08/2021
4.5.3. Setting up the RDS mode
Set the device as required so that when receiving the given specific RDS information
(described above) it reacts appropriately.
Alternative frequencies AF
When AF is turned on (AF ON), the device will monitor reception quality. If it declines, it
will search for abetter quality reception of the same station based on the broadcast data,
and when it finds it, it will automatically switch to the strongest signal of the given station.
Traffic announcements
When the TA function is activated, the device scans for astation broadcasting traffic
announcements ("TA SEEK"). When it finds such astation, it stays tuned to it and the TP
indicator is lit. If reception quality declines, again start ascan for the reception of other
stations with sufficient quality.
If the TA mode is activated and atraffic announcement is being broadcast:
–
"TRAFFIC" will appear on the display.
–
when the device is in adifferent operating mode than FM radio, it will temporarily
switch to radio
When the TA function is activated:
–
And you use the buttons to scan for stations, it will always find stations
that provide TA broadcasts.
–
And astation with TP information is tuned, TP is shown on the display.
PTY program – selection
After selecting the PTY mode, the radio will start to scan for corresponding PTY
information and will stop if it detects corresponding PTY information. If the corresponding
PTY information does not exist, the PTY mode will switch back to normal mode.

EN 15
EN
Control and operation
2021 08/2021
4.6. USB / SD
USB / SD mode selection
During operation, repeatedly press the MOD button and select either aUSB or SD input.
USB port
MU: Insert aUSB device into the USB port to playback MP3/WMA audio files. After
inserting adevice into the USB slot playback will commence automatically.
SD slot
MU: Press the button for releasing the front panel. Insert an SD card into the SD slot
to playback MP3/WMA audio files.
Note:
Ensure that you insert the USB device / SD card in the correct direction. Do not use
force to insert the USB device / SD card into the device. Otherwise you could damage
the USB device / SD card and the device.
PLAY/PAUSE
Press the PLAY/PAUSE (1) button to pause playback and to resume normal playback.
FAST FORWARD / FAST REWIND
Press and hold the buttons to fast forward / rewind. When the button is
released the device will resume normal playback.
Play track intros
Press the INT (2) button to start or cancel playback of track intros.
Repeat playback
Press the RPT (3) button to select the repeat playback mode.
Playback in random order
Press the RDM (4) button to start or cancel playback in random order.
Skip forward/backward (+10/-10)
You can skip 10 tracks forward (6) or backward (5) to facilitate moving through large
directories
EN

16 EN
EN Control and operation
2021 08/2021
Audio
During playback, press
to open
the file list. By pressing the symbol at the
bottom of the list, you can select by file
type (music/photo/video) .
Video
:selection shortcut (touch the
message window to switch)
:File and folder list
/:skip to previous/next
title, chapter, track, file
(according to the file type)
:start or pause playback
:stopping the playback (Stop)
:repeat mode
:random playback
:picture zoom in/out
:stereo settings
:available subtitles on/off
:selecting afile by the list number
:turn off the screen.

EN 17
EN
Control and operation
2021 08/2021
4.7. Bluetooth controls
Bluetooth controls are used for
connecting to amobile phone and
making calls and for reception of played
music. It is limited only to receiving
incoming calls, ending incoming calls,
rejecting incoming calls, dialling and
playback of audio.
First connect the telephone via Bluetooth
and pair if necessary. When amobile
phone is connected, acall interrupts
playback from other sources and when
the call is finished it automatically resumes playback.
Selecting amode
Press the MOD button repeatedly to select BLUETOOTH mode.
Note:
In the BLUETOOTH mode the microphone on the main unit is active.
Pairing
When the mobile phone is connected for the first time, it is necessary to pair
the devices. Proceed as follows:
1. Activate the Bluetooth feature in your mobile telephone.
2. On your telephone, start ascan for new devices for pairing
3. After the scan is complete select "SCT 9412DBMR" from the list and confirm the
pairing.
4. The entry code, which you may be asked for is "0000" and confirm.
5. The display will show "CONNECTED" for amoment when the pairing is successfully
completed.
Note:
The steps described are only areference. The specific pairing procedure may differ
depending on the type of mobile telephone. For this reason, follow the instructions in
the user'smanual for your telephone.
Connecting / disconnecting the telephone
All the radio functions are limited in the BLUETOOTH mode if you are receiving acall or
dialling anumber. As soon as the dialling stops or the call is ended, all the functions of
the car radio will automatically be renewed.

18 EN
EN Control and operation
2021 08/2021
Receiving acall
The phone number of the caller will appear on the display when acall is being received
(depending on the type of mobile telephone). Press the BND button on the main unit or
the "ANSWER" button on the remote control.
Dialling in Bluetooth mode
Enter the number on the mobile phone as usual, once the number starts being dialled,
"CALLING" will appear on the display.
Redialling
To redial the last called number, press and hold down the BND button ("ANSWER").
Hanging up / rejecting an incoming call
Press the MOD button (HANG UP) on the main unit or on the remote control to hang up
or reject an incoming call. The unit will switch to the initial mode.
Playing music
The Bluetooth mode also makes it possible to playback music files stored on your mobile
telephone. According to your mobile phone'smanual, use the appropriate software for
this purpose. If your mobile phone and applications support it, the main functions can be
controlled from the main unit – PAUSE/PLAYBACK, NEXT, PREVIOUS. The way that your
application in your phone performs the commands depends on your telephone and the
application.
4.8. DAB reception
Digital Audio Broadcasting (DAB) is a way of transmitting several stations digitally
encoded on one existing frequency. It offers better sound quality and more background
information than FM broadcasts.
Searching for available stations
Press MOD or use the screen selection to switch to the DAB mode. Touch the magnifier
icon to launch station search. The receiver scans all the receivable frequencies and the
available stations on each of them, which it stores in the list. As the list may be very
extensive, press the arrow down on the screen to show the next list page.
DAB reception
The reception station displays its name along with an indication of the signal strength (1-5
dashes). Furthermore, the carrier frequency (MHz) and the sound quality (KBPS) is shown
here. If a station broadcasts program type information (PTY) and accompanying text, it will
also be displayed. The way the national alphabets of the text are displayed depends on
the correctness of the transmission and the selected OSD language of the receiver.
Note: If the signal strength is low or fluctuating (0-1 dashes), the sound may be muted.
However, accompanying information that has less data flow requirements can still be
displayed and active. For good listening, only receive stations with sufficient signal
strength.
Table of contents
Other Sencor Car Receiver manuals

Sencor
Sencor SCD-7605BMR User manual

Sencor
Sencor SCD-5045MR User manual

Sencor
Sencor SCT 3015MR User manual

Sencor
Sencor SCT M750BWT User manual

Sencor
Sencor SCT 5016BMR User manual

Sencor
Sencor SCT 9411BMR User manual

Sencor
Sencor SCD 9404DR User manual

Sencor
Sencor SCT 5051BMR User manual

Sencor
Sencor SCD 9405DR User manual
Popular Car Receiver manuals by other brands

Metra Electronics
Metra Electronics 95-7882B installation instructions

Sony
Sony HCD-H3800 Service manual

Clarion
Clarion DXZ666MP owner's manual

Rosen
Rosen RE9269D instructions

Jensen
Jensen VM8113R Installation and operation manual

Dual Electronics Corporation
Dual Electronics Corporation XD5125 Installation