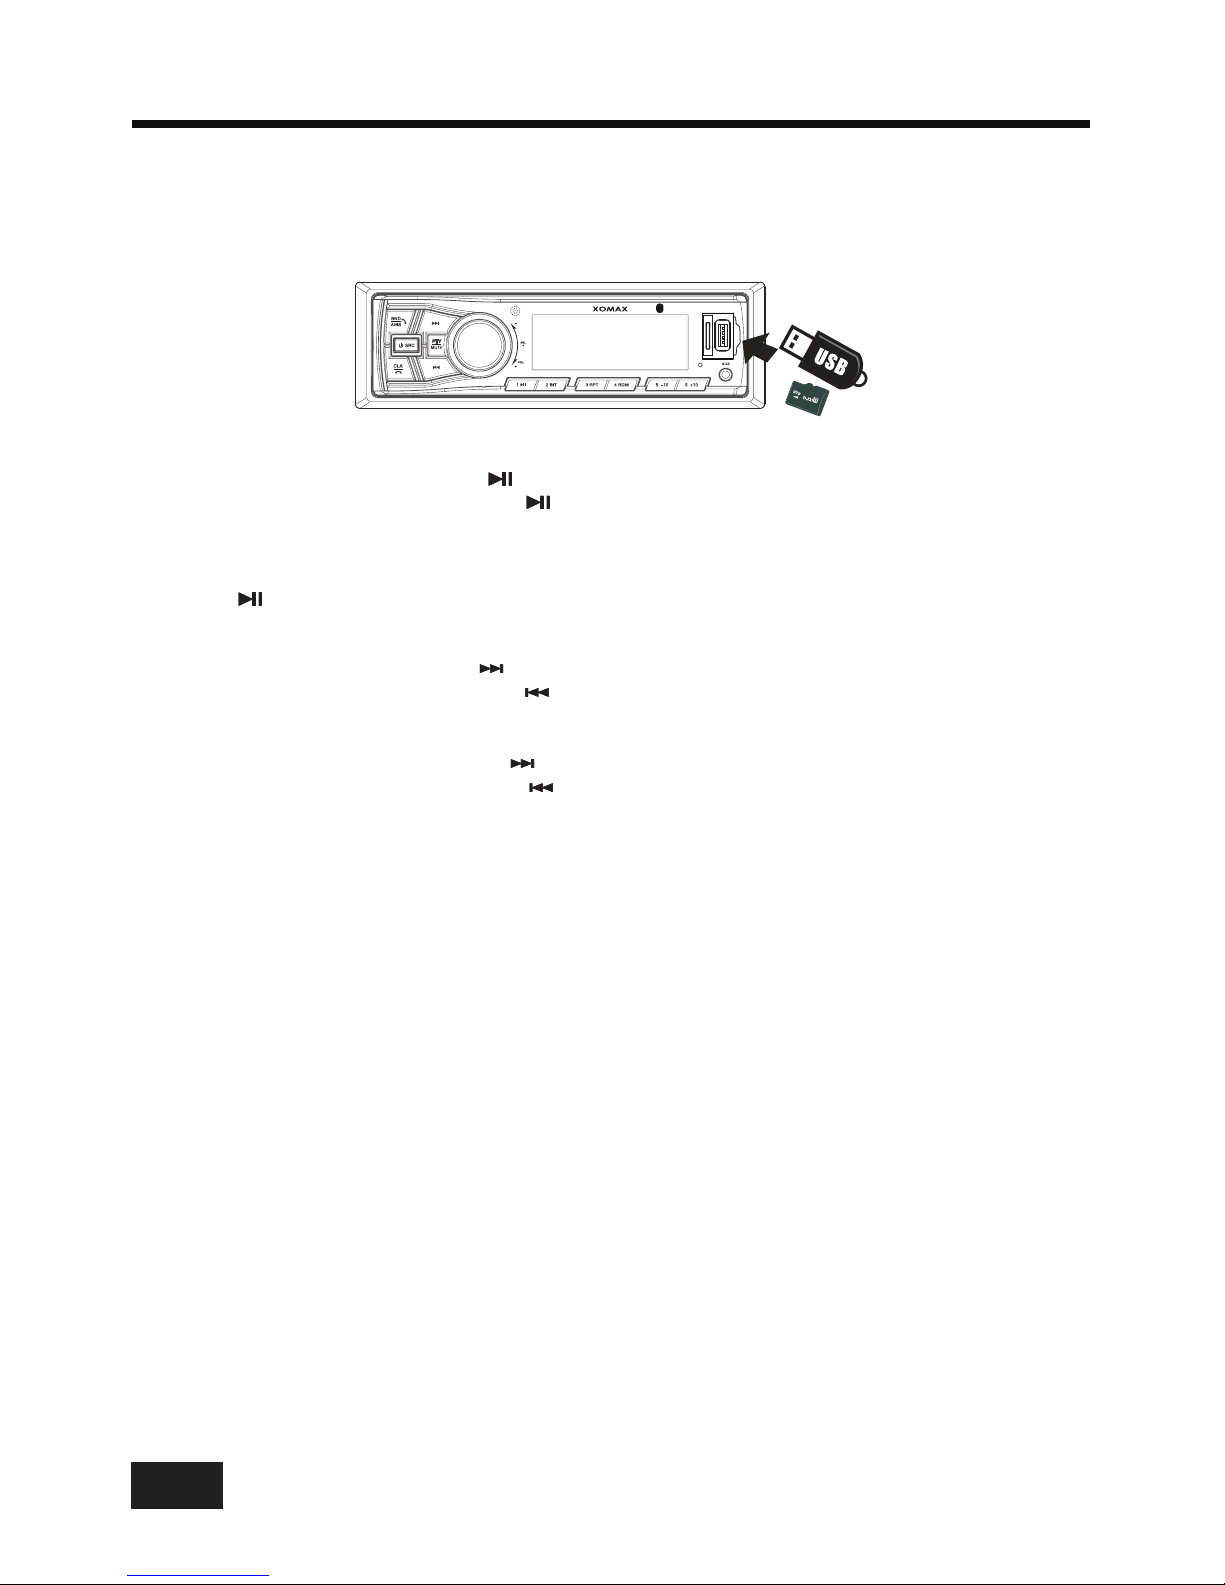
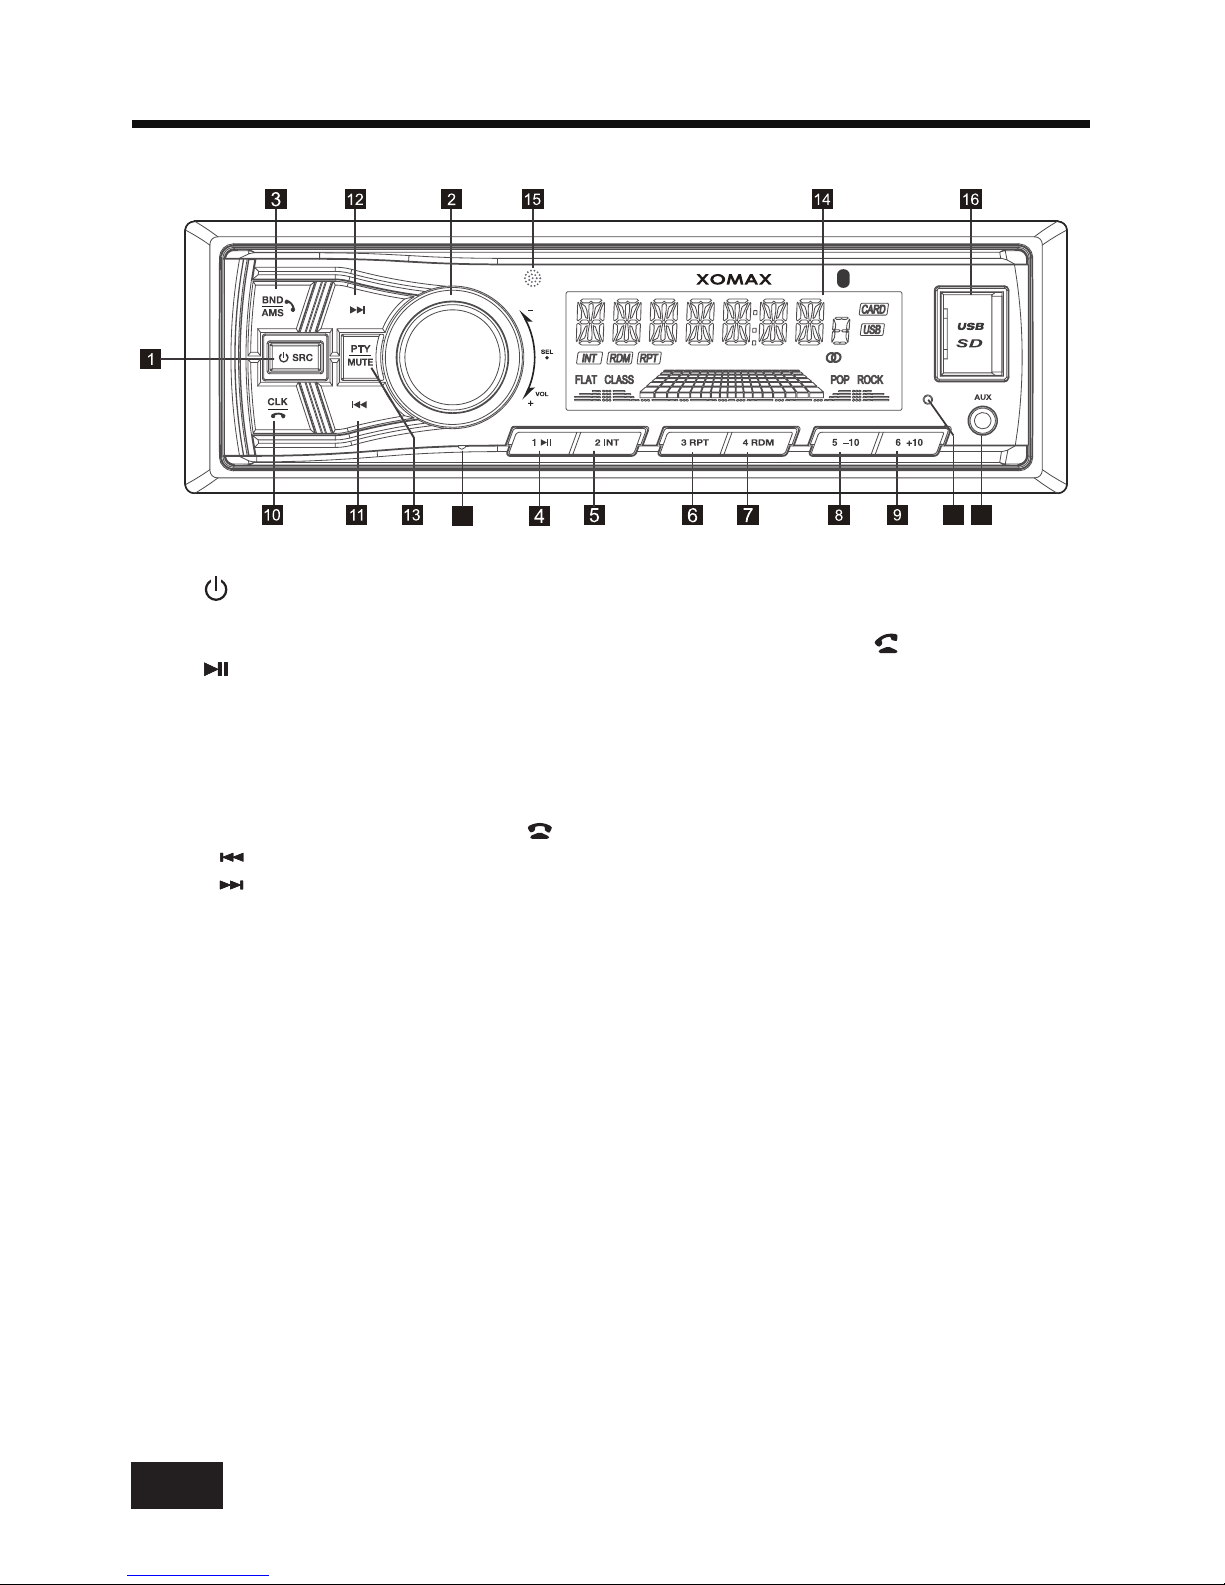
Xomax XM-RSU254BT User manual

In-Dash Car RDS/FM Radio, MP3 Player
With USB/SD Card Inputs
USER’S MANUAL
Car Single-DINMech-less Series
Model No.:XM-RSU254BT

Precautions..................................................................................................................1
Precautions & Warnings..............................................................................................1
Lithium Battery Cell Warnings.....................................................................................1
Drivers and Connections.............................................................................................1
Other Warnings..........................................................................................................1
Installation....................................................................................................................2
Installation Precedures...............................................................................................2
Installation Opening...................................................................................................2
To Install theCart Radio............................................................................................2-3
Wiring Connections....................................................................................................3
Removal of the Main Unit ............................................................................................3
Control Panel Button Locations.......................................................................................4
General Operation.........................................................................................................5
Turn Unit On/Off.........................................................................................................5
Adjust Volume (VOL)..................................................................................................5
Adjust Menu Options (SEL).........................................................................................5
Set the Clock (CLK)....................................................................................................6
Change the Source (SRC)...........................................................................................6
Mute on/off................................................................................................................6
Charging with USB port..............................................................................................6
Aux input connector...................................................................................................6
Built-in Microphone...................................................................................................6
Reset System (RESET)..............................................................................................6
Radio Operation............................................................................................................7
Change Bands (BAND)................................................................................................7
Manual Tuning ( / ).............................................................................................7
Auto Seek Tuning ( / ).........................................................................................7
To Store/Recall Preset Stations (1 - 6)...........................................................................7
USB/Micro SD Card Operation........................................................................................8
To Insert USB/ Micro SD Card.......................................................................................8
Eject USB/Micro SD Card.............................................................................................8
Play/Pause.................................................................................................................8
Next/Previous Track....................................................................................................8
Fast Forward/Backward...............................................................................................8
Introduction Scan........................................................................................................8
Repeating the same track...........................................................................................8
Playing All Tracks in Random.......................................................................................8
Track/Folder Navigation..............................................................................................8
Bluetooth Operation.....................................................................................................10
Troubleshooting...........................................................................................13
Automatic Store Preset Station (AMS)..........................................................................7
Using the PTY search function......................................................................................7
Specifications.............................................................................................................12
Track Search..............................................................................................................8
Auxiliary Input Operation................................................................................................9
Remote Control...........................................................................................................11
CONTENTS

Precautions & Warnings
Lithium Battery Cell Warnings
Drives and connections
Others Warnings
• To reduce the riskof fire, electric shock, and interfer-ence, do not attempt to repair this
unit yourself. Refer all service to a qualified technician.
• Some MP3/WMA files may not be playable.
• Keep the volume at a reasonable level to avoid distracted driving. High volume levels
may make it difficult to concentrate on traffic and road conditions while driving.
• If the car has been in direct sunlight for an extended period, you may need to reduce the
temperature inside the car before turning on and using the unit.
If the battery is disconnected, discharged, or changed, the preset memory of the unit will
be lost and require reprogramming.
The unit is designed to be installed in a level,horizontal position.
For optimal performance, avoid installing the unit at an angle.
• Cell leakage may cause damage to the remote control
• Do not throw cells into as this may cause an explosion.
• Keep battery cells out of reach of children.
Never place any foreign objects into the openings of the car radio (disc compartment, USB
jack, card slot, AUX IN connection). Otherwise you might damage the slots and connections.
Do not switch on the car radio for long periods of time when the motor is switched off.
This could cause the car battery to discharge and the vehicle can no longer be started.
•
•
• Never use excessive force when removing or attaching the faceplate.
Do not tightly grip the display and buttons to avoid damage.
• Always lower the volume before turning off the unit or switching the ignition off.
PRECAUTIONS
1

INSTALLATION
Installation Procedures
First complete the electrical connections and then check for correctness.
This unit can be installed in any dashboard Having
an opening as shown the right figure.
Installation Opening
To Install the Car Radio
Be sure you test all connections first, and then follow these steps to install this unit.
1. Make sure the ignition is turned off, and then disconnect the cable from the vehicle battery’s
negative (-) terminal.
2. Disconnect the wire harness and the antenna.
3. Press the button on the front panel to flip down the front panel and remove it.
4. Lift the left or right top corner of the plastic outer trim ring then pull it out to remove it.
5. Insert the two bracket keys into the left and right side of the chassis, as shown the below
to separate the chassis from the housing.
6.
7. Insert car radio into the mounting sleeve.
figure
Insert mounting sleeve into the dashboard and bend the mounting tabs out with a screw-
driver. Make sure that the lock lever is flush with the mounting sleeve and is not projecting
beyond.
2
182 mm
53 mm
Bracket key
Bracket key
Plastic outer trim ring

INSTALLATION(CONT.)
- Only use speakers with 4 ohms impedance.
- Do not attach the control panel to the chassis before wiring is complete.
- The maximum current of the auto antenna is 200mA.
WIRING
DIAGRAM
CAUTION
+12V DC
NEGATIVE
GROUND
3
Removal of the Main Unit
1. Remove the plastic trim out from the main unit.
2. Insert a bracket key into the left and right side of the main unit and draw the unit out of
the mounting sleeve.
Wiring Connections
8. Make wiring connections, as illustrated in the “Wiring Diagram.”
9. Install the plastic outer trim ring.

CONTROL PANELBUTTON LOCATIONS
4
1. (power)/SRC (source) button
2. SEL(select/menu) button and VOL(volume) knob
3. BND(band) button,
4. (pause/play), Preset station1 button
5. INT(intro) 2 button
6. RPT(repeat) 3 button
7. RDM (random) 4 button
8. -10(previous 10 tracks) 5 button
9. +10(next 10 tracks) 6 button
10. CLK (clock setting) button, button
11. (tune down, seek down,track down, fast reverse) button
12. (tune up, seek up, track up, fast forward)button
13. MUTE button, PTY(Program Type) button
14.
AMS (automatic music search) button, button
, Preset station
, Preset station
, Preset station
, Preset station
, Preset station
LCD Display
16. USB port & Micro SD Card Slot
17. MIC hole(built-in Microphone)
18. RESETbutton
19.AUX IN (auxiliary input) jack
15. IR remote control sensor
PTY
17 18
XM-RSU254BT
19
Bluetooth
B

GENERAL OPERATION
Turn Unit On/Off
Adjust Volume (VOL)
Adjust Menu Options (SEL)
Press and hold the to turn off the unit.
•
to cycle through the following adjustable audio functions:
BASS, TREBLE, BALANCE, FADER, BEEP ON/OFF, EQ ON/OFF, VOL LAS/
ADJ, CLK 24/12, DX/LOC, STEREO/MONO, LED AUTO/ COLOR 1(Red) / COLOR 2 (Green)
/ COLOR 3 (Blue) and VOLUME.
• Press the power ( ) /SRC button on the front panel to turn on the unit.
• power ( ) / SRC button
LOUD ON/OFF,
•
to adjust the selected item.
- BASS/TREBLE:-7,-6, ~, -1,00,+1,~, +6,+7
- BALANCE:L7,L6,~, L1, 00, R1,~,R6,R7
- FADER:R7,R6~,R1,00,F1,~,F6,F7
- BEEP ON/OFF:Enables or disables the “BEEP” signal to confirm use.
- Loudness: LOUD ON/OFF
- EQ(Equalizer) Setting:OFF, FLAT, POP, CLASS, ROCK
- VOL LAS/ADJ: This option allows you to preset a volume level as the power-on
memory volume level.
- VOL LAST: In this mode,the unit switches on at the actual volume it had when
it was last switched off.
- VOL ADJ: In this mode, the unit switches on at the actual volume that you
preseted a constant switch-on volume level.
Press the button to enter the constant switch-on volume adjusting mode
and the “A-VOL XX” will be shown on the LCD display. Then you can adjust a
constant switch-on volume level by rotating the knob.
-:
This unit is equipped with two types of clock display formats, 24 hours and 12
hours. Rotate the volume knob to choose 24 hours format or 12 hours format.
- DX/LOCAL:
- Stereo/Mono: Switches between MONO and STEREO reception mode for radio
frequencies.
- LED AUTO / COLOR 1(Red) / COLOR 2 (Green) / COLOR 3 (Blue):
This unit is equipped Red, Green and Blue 3 colors illumination.
You can preset color 1 (Red), color 2 (Green), color 3 (Blue) or LED auto
illumination. When you select the LED AUTO, the red, green and blue color
illumination will be automatically switched in sequence every 3 seconds.
- Volume level:0,1,~,43
•
to cycle through the following RDS functions:
AF ON/OFF, TA ON/OFF, TA VOL, REG ON/OFF, EON ON/OFF.
- AF ON/OFF: Enables or disables the alternative frequency search mode (AF).
This function is used for maintaining a program being listened to during a trip if its
frequency changes.
- TA ON/OFF: Enables or disables the TA function (traffic information). When this
function is enabled, the tuner will periodically scan received frequencies and play
any traffic information message that may be broadcast.
SEL
VOL
Rotate the knob on the front panel or press the / button on the remote
control to increase or decrease the volume level.
Press
repeatedly
Rotate the knob on the front panel or press the / button on the remote
control
VOL VOL+ VOL-
VOL VOL+ VOL-
the button on the front panel or press the button on the remote controlSEL SEL
CLOCK 24/12
.
button ( knob) and hold for more than 2 seconds to access the system
setup menu mode, then p
SEL VOL
Enables or disables the local broadcast mode (LOCAL).
Press the
ress the VOL knob
5

GENERAL OPERATION (CONT.)
6
-
Enables or disables
Enables or disables
•
to adjust the selected item.
1. To display clock time, press the button.
2. To set clock time, press and hold the button and the hour will flash.
3. Press the or button on the front panel or on the remote control to adjust the hour.
4. Press the button and the minutes will flash.
5. Press the or button on the front panel or on the remote control to adjust the minute.
Press the button on the front panel or press the MODE button on the remote control to
switch between RADIO, BT(Bluetooth), USB(with USB inserted), CARD(with Micro SD card
inserted) and AUX-IN (auxiliary input) modes.
The muted state
will be also released when the volume knob is used.
The charging current consumption is 1 ampere.
The 3.5mm auxiliary input stereo connection is designed for deiveces with 3.5mm line-out or
headphone output.
The RESET button is used to reset all parameters to factory default settings.
This function may be used when the LCD does not display normally or sound is distorted, or
when any of the controls are disabled. To reset your system, use a thin object with a pointed
end to depress the button.
Set the Clock (CLK)
CLK
CLK
CLK
Change the Source (SRC)
SRC
Aux input connector
Reset System (RESET)
RESET
TA VOL (traffic announcement volume): This function allows you to define the
minimum volume for the traffic announcements. The adjustable range is 0~43.
The defaulted value is 26. Rotate the knob to adjust the volume of the traffic
announcements.
- REG ON/OFF:
- EON ON/OFF:
VOL
the region mode.
Some broadcasting stations change their program from normal broadcasting to
regional broadcasting for a certain time period. When region is on, the current
listening program remains unchanged. When region is off, it allows the reception
moved to the regional station.
the EON (Enhanced other network).
In power on mode, briefly press the button to toggle mute on or off.
Mute on/off
MUTE
Rotate the knob on the front panel or press the / button on the remote
control
To receive your voice when you calling by using this bluetooth handsfree system.
VOL VOL+ VOL-
Built-in Microphone
The USB port of this car radio is designed for media playback from flash memory devices and
charging for iPhone / andriod mobile phone.
Charging with USB port

RADIO OPERATION
Change Bands (BAND)
BAND
Manual Tuning ( / )
Auto Seek Tuning ( / )
Press the button to switch between the FM1, FM2, FM3 bands.
Each band stores up to six preset stations.
Press and hold the or button on the front panel or on the remote control to enter manual
tuning mode. In manual tuning mode, press the or button to move the radio frequency
number up or down one step.
In standby mode or while not in manual tuning mode, quickly press the or button to
move to the next/previous available station automatically.
or .
tuner
To Store / Recall Preset Stations
To memorize a station:
- To recall a preset station:
Automatic Store Preset Station (AMS)
AMS
Using the PTY seach function
PTY/MUTE
The radio can be stored 6 preset stations for each band (FM1, FM2, FM3) for a total of 18
preset stations.
- Turn the radio on and select the desired band and station.
- Select a station by button
- Press and hold the desired preset button (numbered 1-6 on the face of the radio) for more
than 2 seconds to save the station to that preset number.
- Select the desired band.
- Briefly press a preset button (numbered 1-6) to recall the corresponding preset station.
Press and hold the button for more than 2 seconds to select six strong stations and store
them in the current band. The radio will automatically scan the current frequency and enter
the six strongest stations into the preset memory positions for that band.
Press and hold the button on panel can switch between PTY speech group
and PTY music group. “NEWS”(speech) or
When PTY group is on, pressing one of 6 numbered (1~6) buttons can select one of typed
program.
The PTY function allows you to search for a particular program type.
The program types are divided into two groups: the speech PTY group and the music PTY
group.
“POP M” (music) will appear on the LCD display.
When you select the SPEECH/ MUSIC PTY GROUP, the numbered (1~6) buttons are shared
as follows RDS station programs:
When you select a program type, the will search for a station broadcasting this type of
program. The tuner will stop searching if it finds the relevant program type. If the radio does
not find a station broadcasting the type of program selected, the text “NO PTY ” be shown on
the LCD displaty and return back to the previous station.
7
Music PTY Group
POP M, ROCK M
EASY M, LIGHT M
CLASSICS, OTHER M
JAZZ, COUNTRY
NATION(national), OLDIES
FOLK M
Numeric key Speech PTY Group
1NEWS, AFFAIRS, INFO
2SPORT, EDUCATE, DRAMA
3CULTURE, SCIENCE, VARIED
4WEATHER, FINANCE, CHILDREN
5SOCIAL, RELIGION, PHONE IN
6TRAVEL,LEISURE, DOCUMENT

8
USB / CARD OPERATION
To insert USB / Micro SD CARD
• To play files on a USB device or an micro SD card, open the USB port cover and insert the
USB storage device into the USB port or insert an micro SD card into micro SD cardslot.
Playback will begin automatically.
Eject USB/Micro SD
Play/Pause
Next/Previous Track
Fast Forward/Backward
Introduction Scan
INT
Repeating the same track
RPT
Playing all tracks in random
RDM
Track/Folder Navigation
5/-10
6/+10
5/-10
6/+10
• To eject a USB device, press the button to stop playback, then remove the USB device.
• To eject an micro SD card, press the button to stop playback, and push the micro SD card
to eject and remove it from the micro SD card slot.
Press the (play/pause) button to pause or resume playback.
• To play the next track, pressthe button.
• To play the previous track, press the button.
• To fast forward, press and hold the button.
• To fast backward, press and hold the button.
Press thebutton to play the first 10 seconds of each track, press again to stop the
introduction scan, and play the current track.
Press thebutton to repeat the current track, press again to stop repeat plaback and
resume normal playback.
Press thebutton to play all tracks in random order, press again to cancel this function.
•During USB or SD card mode, press thebutton to go backward 10 tracks.
Press thebutton to jump forward 10 tracks.
•DuringUSB or SD card mode, press and hold thebutton to go back the
previous folder. Press and hold thebutton to go to the next folder.
You can repeat this function depending on the number and level of folders.
•These buttons have no this function if the USB device or SD card has no folders.
will appear on the LCD display in
b)
Track Search
AMS
VOL
a) In playback of files with MP3 format, press and hold thebutton to enter track search
mode which allow you to quickly find a specific MP3 track or file by its serial number, and the
.ecneuqes”---T“dna”HCSKRT“
Rotate theknob to select the serial number of your favorite song with high speed.
PTY
XM-RSU254BT
Bluetooth
B

c) After selecting the desired serial number of your favorite song, press thebutton to
confirm and search.
You want to listen to the 123th song.
- Rotate theknob to select the“1” on the ones place, 2 seconds later, the“1" will skip to
tens place.
-Then rotate theknob to select the“2” on the ones place, 2 seonds later, the“1" on the
tens place will skip to hundreds place, and the“2” on the ones place will skip to tens place.
- Rotate theknob to select the“3” on the ones place.
- Finally press thebutton to search and play the 123th song.
This car radio has an external auxiliary input jack, it is compatible withaudio output from an
MP3 music player.
So you can listen to sounds and music from external devices, if you have plugged such a
player into theAUX IN jack with a audio cable. Press thebutton to switch to theAUX
input mode on or off.
SEL
eg.:
VOL
VOL
VOL
SEL
MODE
The track will be played immediately when the number is matched.
USB / CARD OPERATION (CONT.)
AUXILIARY INPUT OPERATION
9
PTY
XM-RSU254BT
Bluetooth
B

10
BLUETOOTH OPERATION
Pair and Connect
Make a Call
DEL
Redial Last Dialed Number
Answer a Call
Reject a Call
End a Call
Switch Audio Between Car and Phone
VOL
Adjust Talk Volume
VOL
MUTE
Audio Streaming (A2DP)
SRC
Prior to using the Bluetooth device as a handsfree system for a Bluetooth-enabled mobile
phone for the first time, you must pair and connect the two devices as follows:
1. In any mode, prior to pairing and connecting, the BT logo in the LCD indicating that no
device is connected. To begin pairing, enable BT mode on your mobile phone.
2. When the phone the car audio system,the XOMAX XM-RSU254BT name will be displayed.
3. Choose the XOMAX XM-RSU254BT from the device list to pair and connect with the car
audio system. Upon confirming, the BT logo will stop flashing.
4. When pairing is complete, the mobile phone audio will automatically transfer to the car
audio system whenever a call is made or received, or when the mobile phone plays music.
• To make a call, dial the call directly from the paired mobile phone.
• To make a call with this bluetooth handsfree system:
a) When linking up the Bluetooth-enabled mobile phone to this bluetooth handsfree system,
press the button to access the dial telephone number mode, then press the “0~9”, *
and # button on remote control to input the telephone number, and the entered number
will be shown on the LCD.
b) If a number has been incorrectly inputted, press the button or button to delete it.
c) Press the button to make outgoing call.
Press and hold the button on the control panel to redial the last dialed phone number.
• When the mobile phone is called, the incoming telephone number displays in the LCD.
• To receive the call, press the button on the control panel.
To reject the call, press the button on the control panel.
To end an active call, press the button.
During a call, press the knob/button to switch the audio source from the car audio system
back to your mobile phone.
• During a call, use knob or button to adjust the volume level.
• Use the button to mute sound.
1. Press the / button to enter BT mode and display media in the LCD.
2. When a mobile device is paired, music played through that device will automatically be
heard through the car audio system.
3. Press the or button to play the next or previous on the mobile phone.
4. Press the button to pause or resume music playback.
VOL+ VOL-/

REMOTE CONTROL
Remove Insulating Sheet
Replace Lithium Battery Cell
Remote Control Operation
The remote control comes with an insulating sheet
attached to the underside of the remote control, as
illustrated on the right. The remote control will not
work until the insulating sheet is removed.
1. When the lithium cell battery becomes weak,
replace it as illustrated on the right.
2. Press and hold the movable block in the direction
indicated by arrow 1. At the same time, pull the cell
holder out of the remote control in the direction
indicated by arrow 2.
3. Replace the old cell with a new one, making sure the
(+) polarity is facing upward.
4. Re-insert the cell holder into the remote control.
- Cell leakage may cause damage to the remote control.
- Do not throw cells into as this may cause an explosion.
- Keep battery cells out of reach of children.
Position the emitting window of the remote control toward the sensor window of the unit.
• The operation angle for front panel remote control reception is about 30 degrees.
• The distance between the emitting window of the remote control and the sensor window
of the unit should remain less 5 meters.
Button Names and Locations
1. (Power on/off) button
2.
3.
4.
5.
8.
9.
10.
11.
16.
17.
18.
19.
20
VOL+/VOL-(volume increase/decrease) button
Band button, button
Tune down, seek down; Track down, fast reverse
SEL(selection) button
6. button:tune up, seek up; Track up, fast forward
7. Mute button, DEL(Delete) button
CLK(clock setting) button, button
INT(intro) 2 button,keypad 2
RPT(repeat) 3 button, keypad 3
12. RDM (random) 4 button, keypad 4
13. -10(previous 10 tracks) 5 button, keypad 5
14. +10(next 10 tracks) 6 button, keypad 6
15. ST (stereo) button, keypad 7
MODE button, keypad 8
AMS (automatic music search) button, keypad 9
AF(list of alternative frequency) button, keypad
PTY(program type) button, keypad 0
. TA (traffic announcement) button, keypad #
Note: When using the remote control for the first time, you
must pull out the portective plastic tab from the battery compartment
found on the back of the remote control.
button, preset station 1 button, keypad 1
button, preset station
, preset station
, preset station
, preset station
11
2
10
4
12
15
9
18
19
20
13
8
14
6
7
5
17
16
11
13

SPECIFICATIONS
General
Radio
Chassis Dimensions...............................................................178(W) x 108(D) x 50(H) mm
Power Supply Requirement ..................................................................................DC 12V
Current Consumption ................................................................................................10A
Maximum Power Output ...........................................................................W x 4CH
Frequency Range.............................................................87.5 - 108.0 MHz (100KHz/Step)
Usable Sensitivity ................................................................................................30 dBu
I.F. Frequency ..................................................................................................10.7 MHz
Usable Audio Formats ......................................................................................MP3/WMA
Pre-amp Output .........................................................................................Front and Rear
Frequency Response .................................................................................20 Hz - 20 KHz
S/N Ratio ................................................................................................................60dB
FM
USB/Card
BT
BT Profile supports ......................................................................A2DP, AVRCP,HSP, HFP
Range of frequency ...............................................................................2.4GHz spectrum
12

TROUBLESHOOTING
13
lfyou
suspect
something
is
wrong
immediately
switch
power
off.Do
not
use
the
unitinabnormal
condition,for
example
without
sound,
orwith
smoke
orfoul
smell,can
cause
fire
or
electric
shock
lmmediately
stop
using
it
and
call
the
store
where
you
purchased
it.Never
try
to
repairthe
unit
yourself
because
it
is
dangeraus
to
do
so.
• General
Nopoweror
no
so
und
•Radio
A Iot
of
static in
broadcast
Preset
station
is
raset
•
USB/SD
USB
or
SO
card
ls
connecting
but
No Sound
Car's
engine
switch
is
not
on.
Turn
your
car's
key
to
ACC
or
ON.
Gableis
not
correctly
connected.
Check
connection.
Fuse
is
burnt.Replace
fuse.
Check
volume
or
mute
on/off.
Station
or
signal
is
too
weak.
Select
other
stations
of
strenger
signal
Ievei.
Battery
cable
is
not
correctly
connected.
Connectthe battery cable
to
theterminal that
is
always live.
USB
or
SD card connection
is
not
good.
Take
it
out
and Insertagain.
USB
or
SD card is damaged
or
no musicfile Inside.
Change
to
another
USB
or
SO
card,
or
record
music
inside
it.
-
Table of contents
Other Xomax Car Receiver manuals

Xomax
Xomax XM-2DA702 User manual

Xomax
Xomax XM-2RSU418BT User manual

Xomax
Xomax XM-VRSU4309BT v2 User manual

Xomax
Xomax XM-RSU220 B/W User manual

Xomax
Xomax XM-RSU261BT User manual

Xomax
Xomax XM-2VRSUA744 User manual

Xomax
Xomax XM-CDB617 User manual

Xomax
Xomax XM-RSU247BT User manual

Xomax
Xomax XM-R278 User manual

Xomax
Xomax XM-DTSB931 User manual

Xomax
Xomax XM-CDB624 User manual

Xomax
Xomax XM-V746 User manual

Xomax
Xomax XM-DVBT2-01 Manual

Xomax
Xomax XM-RSU221BT User manual

Xomax
Xomax XM-DA755 User manual

Xomax
Xomax XM-RD263 User manual

Xomax
Xomax XM-CDB619 User manual

Xomax
Xomax XM-CDB618 User manual

Xomax
Xomax XM-RSU256BT User manual

Xomax
Xomax XM-RSU227BT User manual