Sencor SENCOR SVR-630 User manual

1
WORTH
knowing Precautions
Please keep the video's guarantee sheet and receipt for your video in a safe
place.
◆Read this booklet carefully.
◆Make sure the rating of your household electricity supply matches
that shown on the back of the video recorder.
◆Read this page and the chapter and the "Setting up your video" to
help you set up and adjust your video recorder.
◆Do not put the video recorder in a hot or humid place (to avoid the
risk of fire and electric shock).
◆Do not open the video recorder. Get a qualified technician to carry
out any repairs.
◆Do not connect the video recorder to the power supply if you have
just moved it from a cold environment to a warm room. This can
lead to condensation inside the video which can seriously damage
the video and cassettes. Wait around two hours to allow it to reach
room temperature.
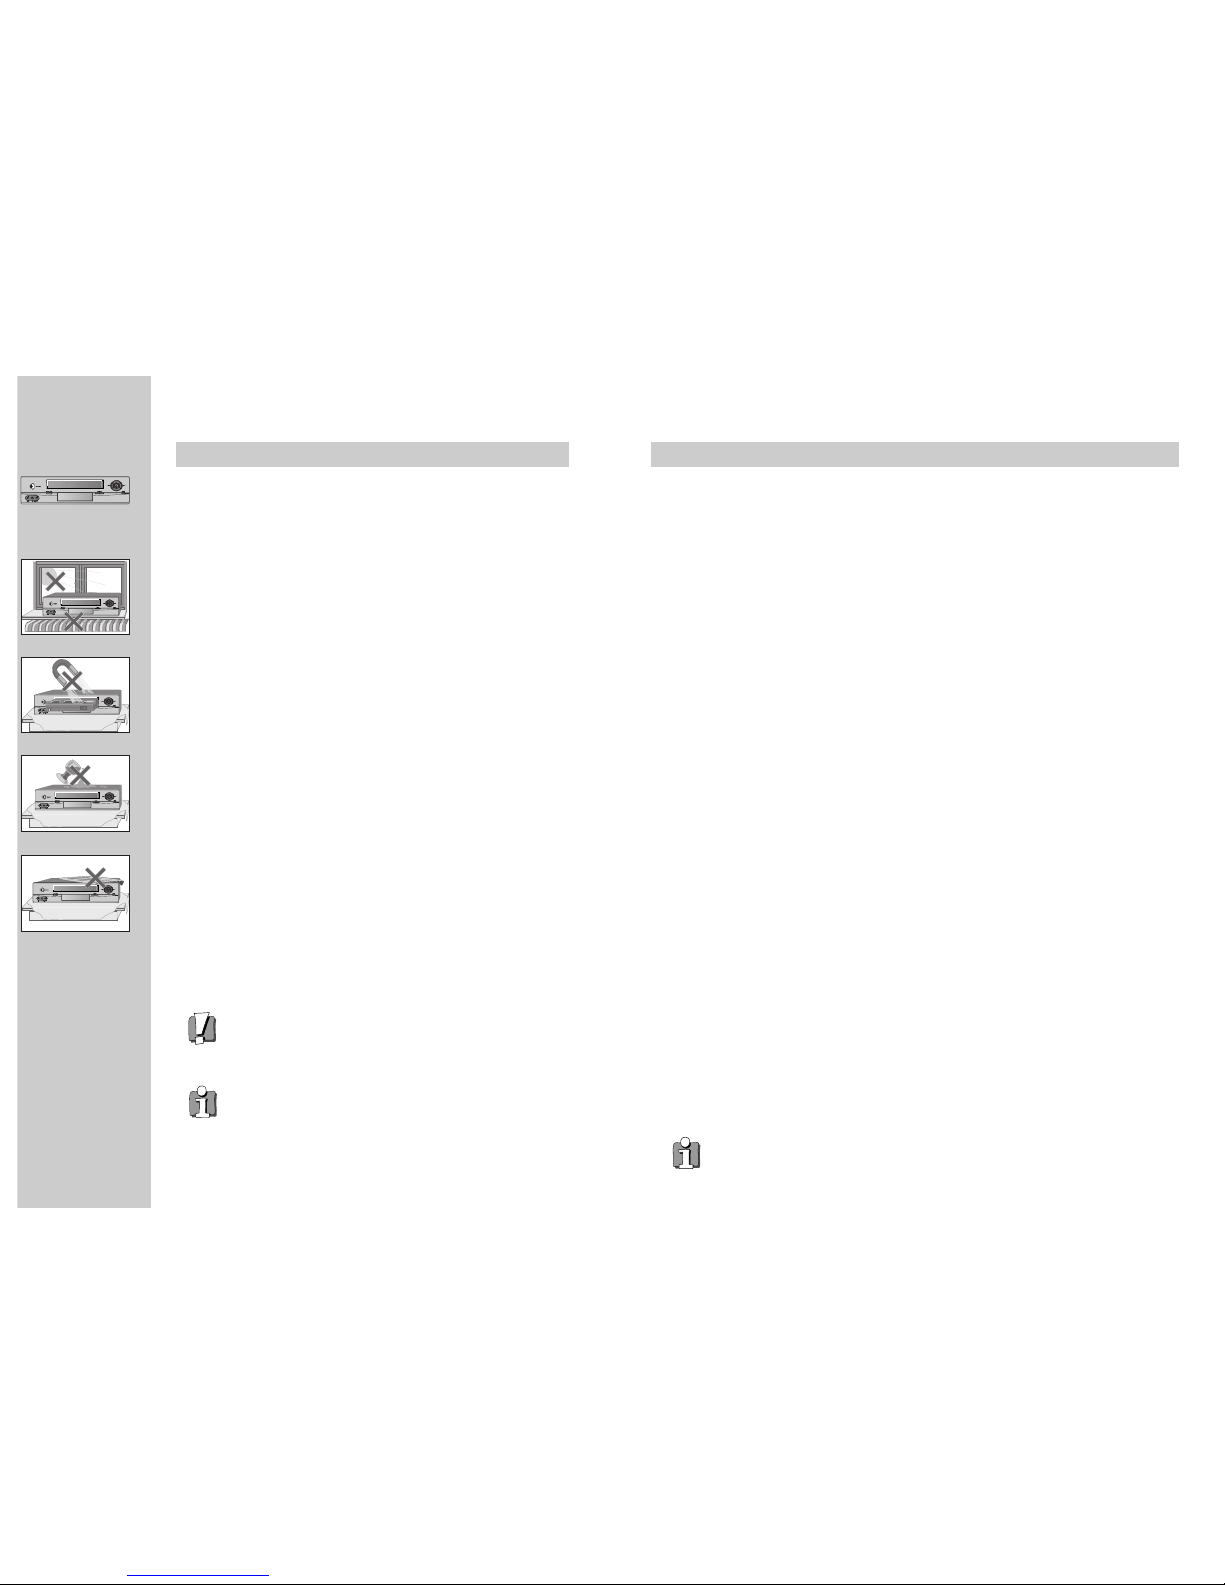
◆Make sure the video is placed at least 10cm apart from other home
appliances or obstacles to get sufficient ventilation.
◆This apparatus shall not be exposed to dripping or splashing and no
objects filled with liquids, such as vases, shall be placed on top of
the video.
◆Put the video on a steady, flat surface.
◆Only clean the video with a soft, lint-free cloth. Do not use harsh or
alcohol-based cleaning agents.
AUTO SET
CH.
OP EJECT
For your own safety!
◆There are no components in this video recorder you can
service or repair yourself.
◆Do not open the case of the video recorder. Only allow a
qualified engineer to repair or service your video.
◆
This video recorder is designed to work continuously.
Switching it off (onto stand-by) does not disconnect it from
the mains. To disconnect it from the mains, you have to
unplug it.
Contents
Before you do anything with the video, please read the chapter "Setting up the video".
◆On the following pages, the pictures show the buttons you need to press on the remote
control and what you should see on the television screen or video display.
Setting up the video
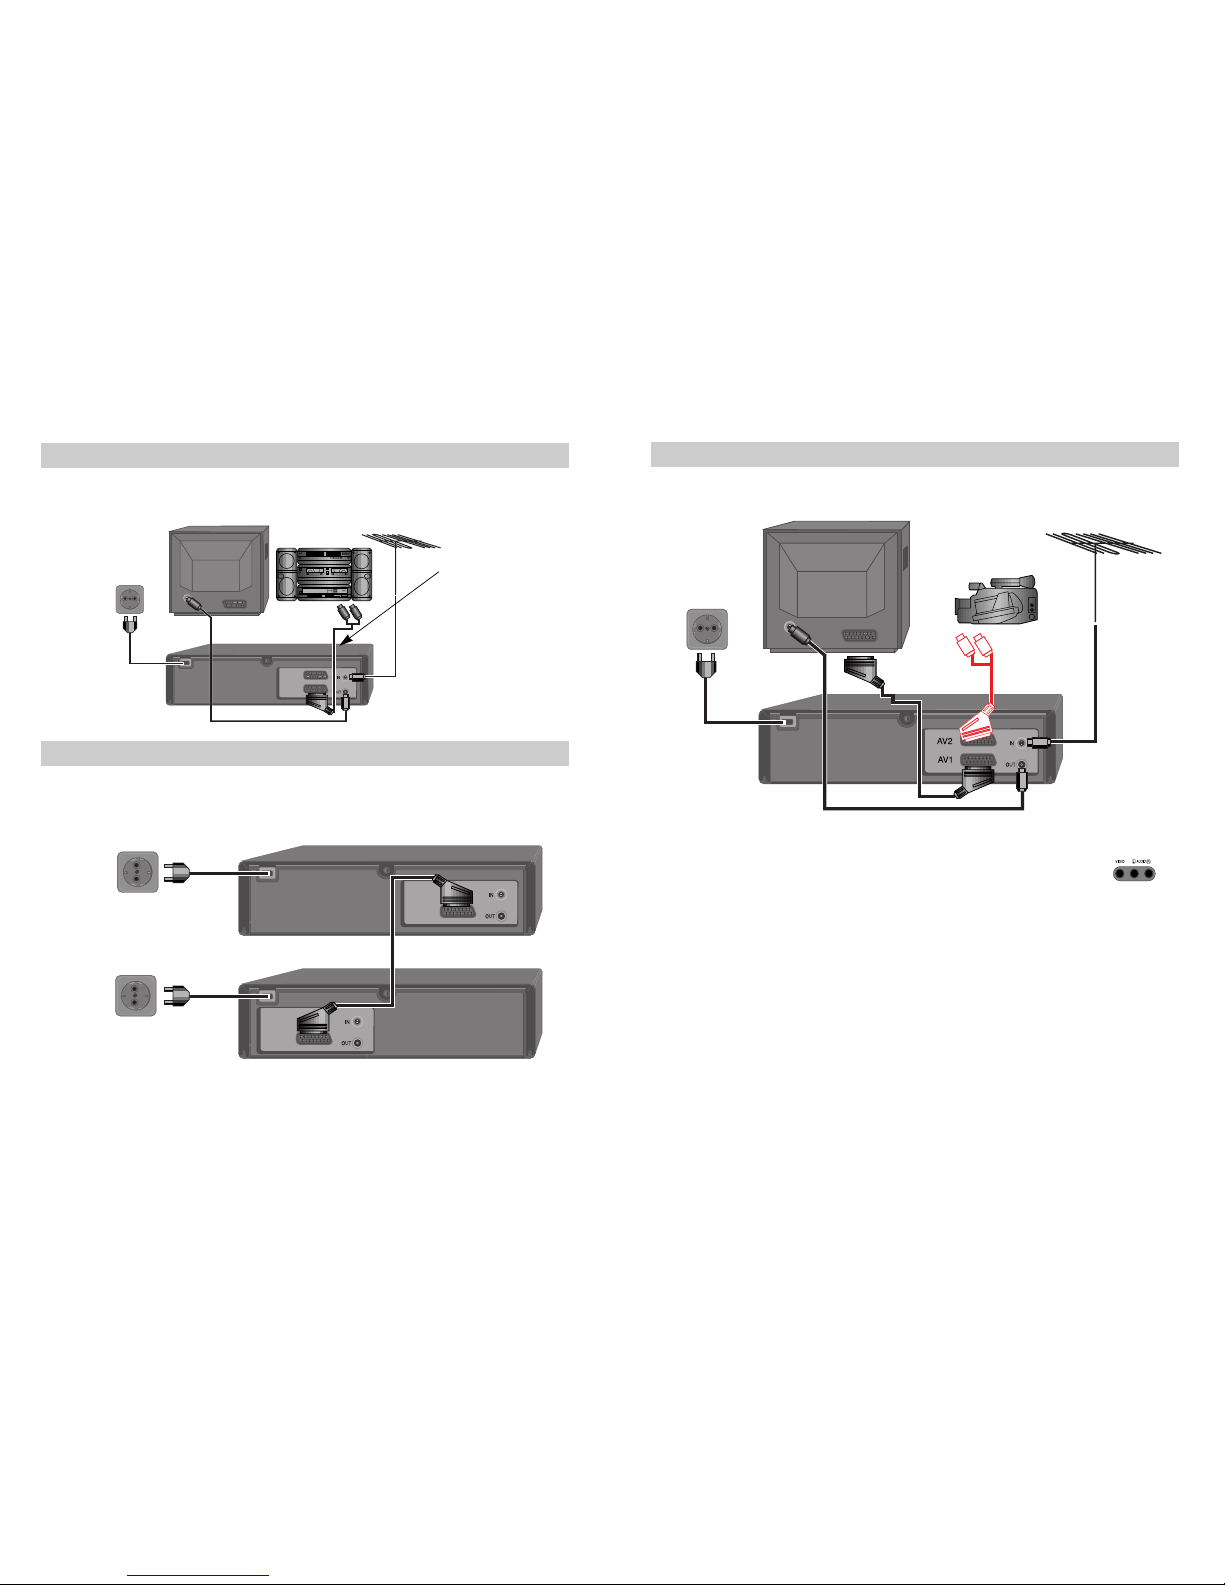
Connecting your video through RF lead, Connecting your video through a scart lead ..............................................2
Connecting your video to the satellite system, Connecting your video to the hi-fi system (Option 1) ..................... 3
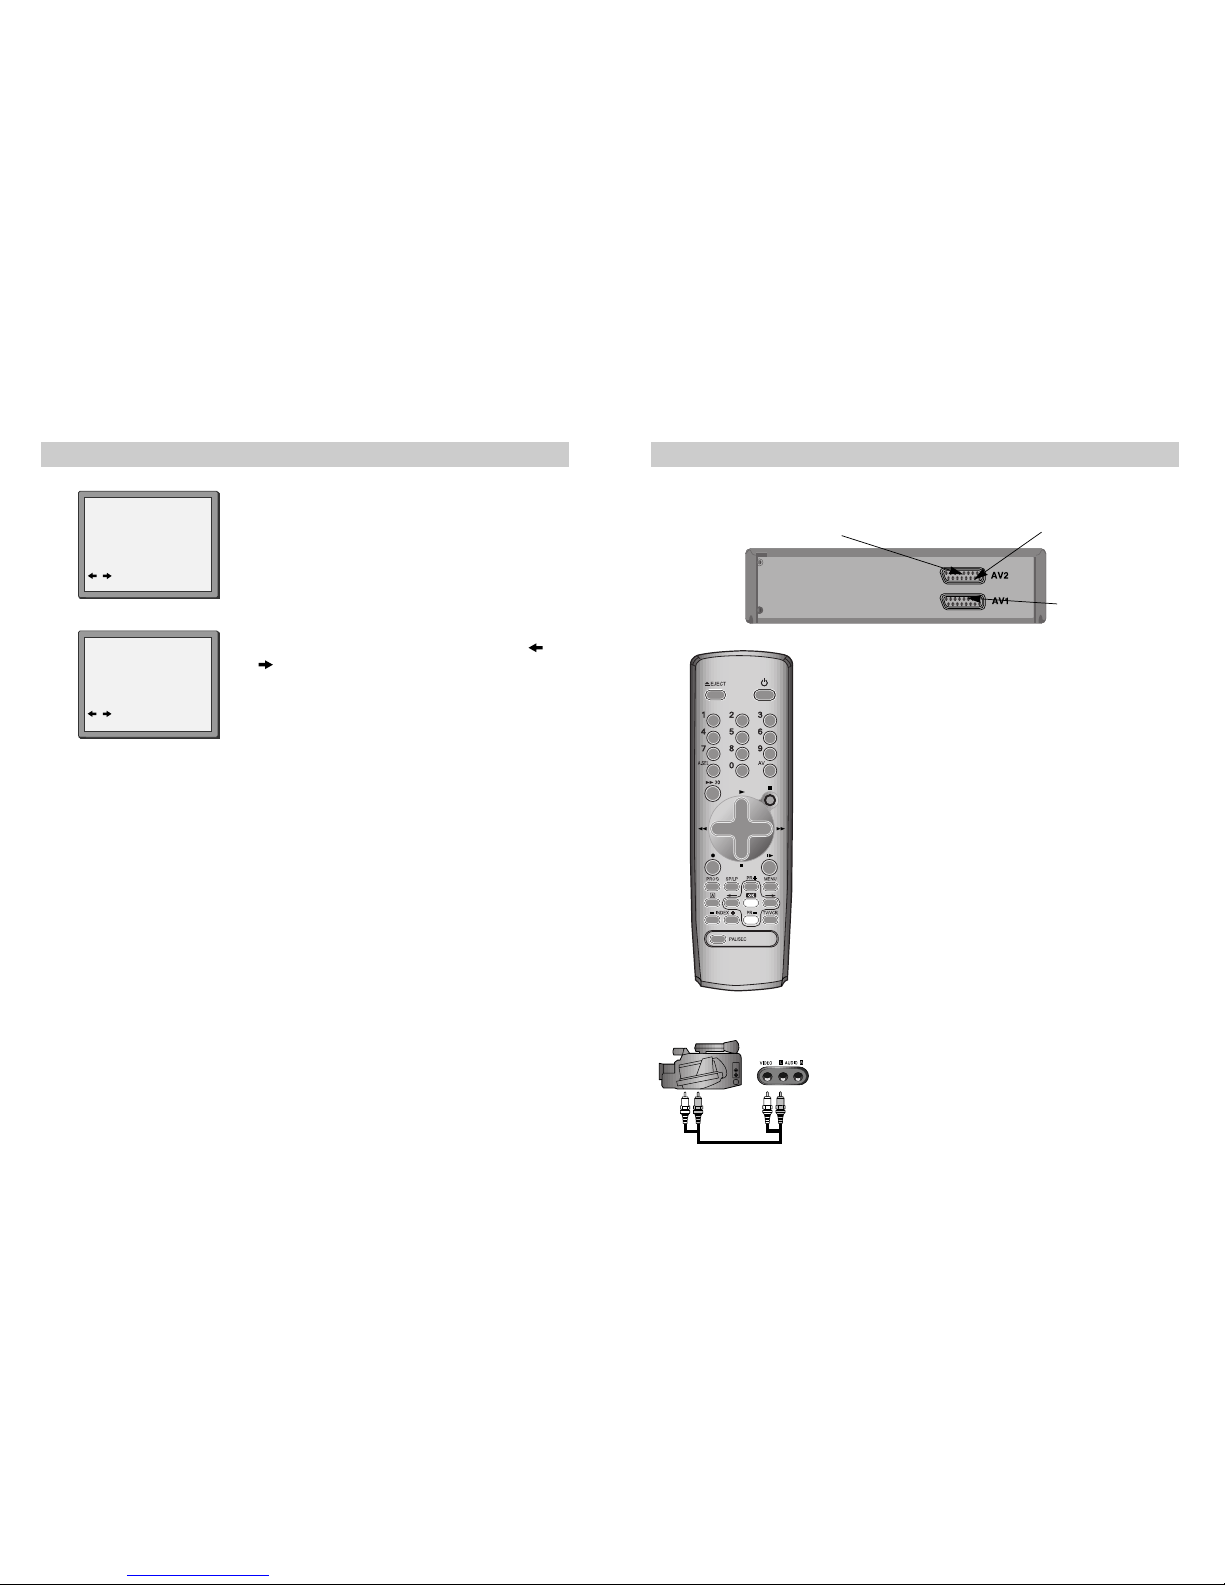
Connecting your video to the hi-fi system (Option 2), How to connect your video to another video ........................ 4
How to connect your video to a camcorder ................................................................................................................5
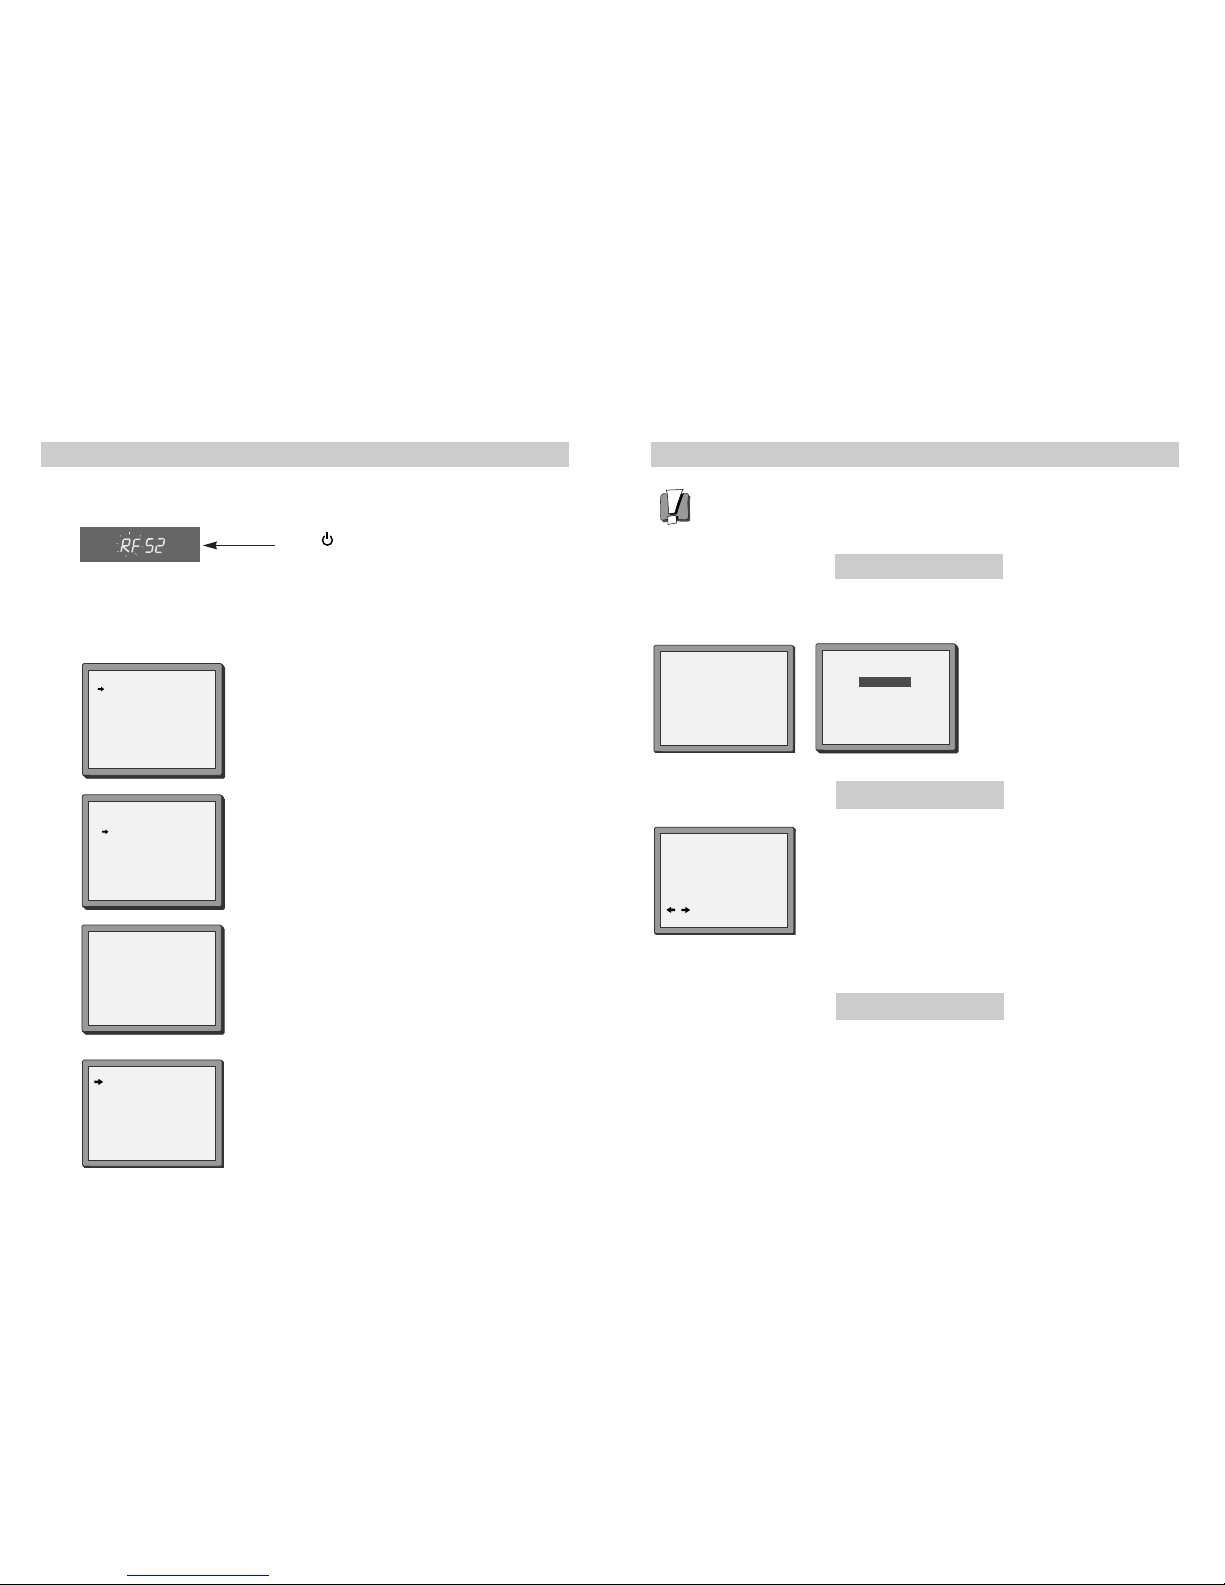
Tuning to the TV ..........................................................................................................................................................6
What to do if you get picture interference when using RF lead ............................................................................... 7
Setting time and date ................................................................................................................................................ 8
2nd scart socket .......................................................................................................................................................... 9
Tuning in new stations
Manual tuning............................................................................................................................................................10
Station names ............................................................................................................................................................11
Sorting programme locations, Clearing programme locations................................................................................. 12
Front panel controls .................................................................................................................................................. 13
Playing cassettes
Play ............................................................................................................................................................................14
Still, Variable picture search, Variable slow motion,
Finding new recordings (index scan) ........................................................................................................................ 15
16:9 Wide Screen format...........................................................................................................................................16
CM skip (commercial skip), Auto Repeat, Child lock ................................................................................................ 17
OSD (On Screen Display) On/Off............................................................................................................................... 18
Recording cassettes
Recording cassettes, Simple recording, One touch recording-OTR ......................................................................... 19
Timer recording using ShowView ............................................................................................................................ 20
Normal timer recording ............................................................................................................................................ 21
Timer review – changing and erasing record settings ............................................................................................. 23
More functions
Clock and counter display, Remaining time and cassette length,
Finding the counter zero position...............................................................................................................................24
Resetting the counter to zero, Cassettes, Power-saving features, Language select ............................................ 25
The hi-fi system..........................................................................................................................................................26
Appendix
Index, Technical information......................................................................................................................................27
Problem-solving guide .............................................................................................................................................. 28
Quick-start guide ..........................................................................................................................................back cover

32
Setting up your video (Option 1) - Connecting your video through RF lead
Before you start, unplug all the equipment from the mains supply.
Television
Aerial
The type of aerial you
should use, depends on
local interference and
how far you are from the
transmitter. You should
contact a local retailer if
you have any questions
about your aerial.
Back view of your VCR
This lead is supplied in your accessory kit.
200V-240V~,
50/60Hz
Put the batteries into the remote control. Make sure the (+) and (-) signs on the batteries agree with
the (+) and (-) signs in the battery compartment.
If you have connected your video as shown in option 1, turn to page 6.
1
Setting up your video (Option 2) - Connecting your video through a scart lead
Television Aerial
Scart lead (not supplied)
With this connection, if your video is receiving CH ARD and your TV is displaying CH3, when you press the
TV/VCR button on the remote control, your TV will automatically display the CH ARD. “VCR” will be displayed.
In this mode, to change the viewing channels the PR- and PR+ buttons on the video remote need to
be used. To switch off this mode press TV/VCR on the remote control, TV remote can now be used
as normal. You will get better pictures and sound quality if you connect your video with a scart
lead.
200V-240V~,
50/60Hz
2Before you start, unplug all the equipment from the mains supply.
If you have connected your video as shown in option 2, turn to page 6.
Connecting your video through extra equipment
Connecting your video to the satellite system
Before you start, unplug all the equipment from the mains supply.
Television
You can use this connection
if your video has two scart
sockets. This will improve
sound and picture quality
when you are recording from
satellite.
To use this function, see
page 9.
Video
200V-240V~,
50/60Hz
3
Satellite
Aerial
Connecting your video to the hi-fi system - Option 1
Before you start, unplug all the equipment from the mains supply.
Television Plug a phono cable into
the ‘Audio L/R’ sockets on
the back panel and into
the audio sockets on any
audio amplifier, if needed.
If your video does not
have this connection, see
page 4 (Option 2).
Video
200V-240V~,
50/60Hz
You can also use a scart lead to improve picture and sound quality from your video.
4Hi-Fi
Aerial

54
Connecting your video to the hi-fi system - Option 2
Before you start, unplug all the equipment from the mains supply.
Television
Plug a scart to phono
cable into the ‘AV1’
socket on the back
panel and into the
audio socket on any
audio amplifier, if
needed.
Video
200V-240V~,
50/60Hz
5Hi-Fi
Aerial
How to connect your video to another video
Before you start, unplug all the equipment from the mains supply.
First video
Second video
200V-240V~,
50/60Hz
1)
Insert the tape you wish to record on into the first video and press AV until ‘AV1’ appears on the front display.
2) Insert the tape you wish to copy from into the second video. Press the play button on the second video.
3) Press the record button on the first video
The video will start recording.
If your video has two scart sockets, you can use the other socket ‘AV2’ to connect other equipment.
To use this function, see page 9.
6
200V-240V~,
50/60Hz
How to connect your video to a camcorder
Before you start, unplug all the equipment from the mains supply.
Camcorder
Aerial
200V-240V~,
50/60Hz
If you have connected your camcorder in this way, you can also connect a scart lead from ‘AV1’ on the back
panel of the video to the television. To use this function, see page 9.
You can also connect the camcorder by using a phono cable if your video has front input sockets.
Check the front of your video for this connection, see page 9.
7Television
Video
to
camcorder
Scart
Plug to
TV

76
Tuning to the TV
Once you have carried out the steps in ‘Setting up your video’ (diagram 1 on page 2), switch on
your TV.
Press on the remote control and RF52 will be
displayed on the front of your video.
1
2
LANGUAGE SET
ENGLISH
POLISH
CZECH
HUNGARIAN
PYCCKNZ
DEUTSCH
SLOVAK
PR+/-:SELECT
OK:CONFIRM MENU:END
COUNTRY SET
CZ
H
PL
RU
SK
OTHERS
PR+/-:SELECT
OK:CONFIRM MENU:END
Select the wanted language and country with PR+ or
PR- button. Press OK to confirm.
For selecting the country, refer to the followings.
CZ: Czechoslovakia
H: Hungary
PL: Poland
RU: Russia
SK: Slovakia
What to do if you get picture interference when using RF lead
Option 1
If other stations are positioned on or near the current RF OUTPUT CH, the following guide message
appears automatically.
The RF output can be adjusted from 21 to 69, this video is defaulted to RF52. If other
broadcasts are close to RF 52 they may cause picture interference, you can change the
RF output until your television has a noise-free channel for your video.
Change the RF output from 52 using the remote control.
Press MENU. Select ‘VCR Set Up’ by pressing PR- twice then OK.
Select ‘RF Output Set Up’ by pressing PR- twice then OK.
Change the channel number using buttons 0-9.
Press OK to confirm. Press MENU to end.
Option 3
Buy a scart lead from your local electrical shop. Connect the scart lead as shown on page 2,
diagram 2.
If you want to change the RF output in the future due to new broadcasting stations or equipment and so on,
press and hold the OK button on the remote control until RF 52 is displayed on the front of the video. Then go
to option 2 above.
PLEASE CHANGE THE TV
CH TO 54.
IMPORTANT! Press OK to confirm.
Press MENU to end.
Option 2
RF OUTPUT SET
0-9:SET UP (21-69)
/ : SELECT (BG/DK)
OK:CONFIRM MENU:END
CH 52
SYSTEM BG DK
If there is still picture interference repeat option2.
RF OUTPUT SET
OK:CONFIRM MENU:END
CURRENT CH 52
RECOMMENDED CH 54
If you have connected your video through the scart connection (diagram 2 on page 2), go to step 2.
If you have connected it through RF cable (as shown in diagram 1 on page 2)
Select a free channel on your TV and manual tune the channel until the blue screen as shown in
step 2 appears. Refer to the TV manual for more details.
MENU:END
PLEASE WAIT...
CH 25
Press OK to confirm.
Unless you are living in an area with poor reception, ‘Auto Set’ or
‘ Auto Search’ tunes in all the stations you can receive in your
country and sorts them in a common order, for example, ARD on
programme 1, ZDF on programme 2 and so on.
See page 11 and page 12 if you need to change any of the
automatic settings. You should finish the auto set before you go
to page 11 or page 12.
The clock is also set automatically. If the clock has not
been set, the clock setting screen will appear.
Please see “ Setting time and date” on page 8.
If you want to change the station names, see page 11.
If you want to change the programme locations see page
12. You need to change programme locations if the
stations are not in order, for example, ARD on programme
1, ZDF on programme 2 and so on.
Press MENU to end.
MANUAL SET
PR01 P-01 PR08 P-08
PR02 P-02 PR09 P-09
PR03 P-03 PR10 P-10
PR04 P-04 PR11 P-11
PR05 P-05 PR12 P-12
PR06 P-06 PR13 P-13
PR07 P-07 PR14 ----
PR+/-:SELECT
OK:CONFIRM MENU:END

98
2nd scart socket
If your video has the AV2 output, shown in the diagram below, you can connect other
equipment as seen on pages 3 and 4.
2nd scart INPUT ONLY
INPUT+OUTPUT
If the ‘CLOCK SET’ display is not already on the screen
press MENU.
Choose ‘VCR SET UP’ by pressing PR- twice, then OK.
Choose ‘CLOCK SET’ then press OK.
CLOCK SET
0-9:SETUP (HOUR)
/ :CORRECT
OK:CONFIRM MENU:END
CLOCK SET
0-9:SETUP (HOUR)
/ :CORRECT
OK:CONFIRM MENU:END
TIME - - : - -
DATE - -/- -/- - - -
TIME 11:41
DATE 11/04/2005(MON)
Setting time and date
1
2
Once the ‘CLOCK SET’ display is on the screen, move
to the position you want to change by pressing or
.
Use the number buttons 0 to 9 on the remote control
to enter the correct time and date.
Press OK to confirm the settings, and press MENU to
end.
When connecting other equipment please refer to their
manuals for further information. This video manual
recommends the set up as shown on page 3 diagram 3. When
connected by this method if the equipment is turned off the
video behaves as normal, but if the equipment is turned on the
video will automatically switch over to AV2 mode and displays
the channel of the other equipment, channel selection can only
be performed by the other equipment, the video PR+/PR-
buttons have no effect.
To return to normal video use the other equipment must be
turned off.
Recording from other Equipment.
Simple recording can be performed (refer to page 19), ensure
the equipment is turned on and is displaying the correct
channel.
Timer recording (refer to page 21), set the video to perform a
timed recording ensuring AV1 is selected as the channel to be
recorded. Some equipment may have a timer which allows it to
be powered on to the correct channel, if this feature is not
available the other equipment should be left powered on.
Front AV
If the video has front input sockets, it is possible to connect
devices such as a camcorder to the video. To watch a
camcorder tape the video must be in AVF mode. Recordings of
this input are the same as described on page 5.

1110
Station names
If your video is showing no station name or is showing a station name incorrectly, you can change this.
1Press MENU.
Choose ‘PR Preset’ by pressing PR- then OK.
Choose ‘Manual Set’ by pressing PR- then OK.
Select the channel to be renamed by pressing PR- then
OK.
Select NAME position.
EITHER
Press the 0 button to change the given name.
By pressing the button this will select preset station
names.
Or press the 1 button to create the station name.
Change the letters with the PR +/– buttons, move to
the next letter with the /
buttons.
Press OK to confirm and
MENU to end.
2
3
4MANUAL SET
PR01 ARD PR08 P-08
PR02 ZDF PR09 P-09
PR03 P-03 PR10 P-10
PR04 P-04 PR11 P-11
PR05 MTV PR12 ----
PR06 P-06 PR13 ----
PR07 P-07 PR14 ----
PR+/-:SELECT
OK:CONFIRM MENU:END
MANUAL SET
PR+/-: UP/DOWN
0/1: CHANGE/CREATE
OK:CONFIRM MENU:END
PR 01
STANDARD BG
RECEPTION AERIAL
AUTOSEARCH CH
_ _
FINE TUNING
DECODER ON
NAME
_ _ _ _
MANUAL SET
PR+/-: SELECT CHARACTER
/ : SELECT POSITION
OK:CONFIRM MENU:END
PR 01
STANDARD BG
RECEPTION AERIAL
AUTOSEARCH CH
_ _
FINE TUNING
DECODER ON
NAME
_ _ _ _
Manual tuning
Manual tuning allows you to tune in new stations or equipment such as a satellite receiver and so on.
1Press MENU.
Choose ‘PR Preset’ by pressing
PR- then OK.
Choose ‘Manual Set’ by pressing
PR- then OK.
Press PR+ or PR- to select any
programme number that is not
being used, for example ‘----’ or
‘P-xx’.
Press OK to confirm.
Set the station you want:
◆
the programme location number,
◆the proper broadcast system for
your location (BG/DK),
◆the broadcast system you want
(Aerial(CH) or Cable(CC)),
◆You can directly enter the real
channel number with the 0 to 9
buttons, or search by pressing
/
,
◆The fine tuning you can adjust, by
pressing /
,
◆When the program is encoded (and
you have a decoder connected to
socket EURO AV2), press the or
to select ON or OFF,
◆Change or create the station name.
Refer to page 11.
PR PRESET
AUTO SET
MANUAL SET
PR ERASE
PR ALIGN
PR+/-:SELECT
OK:CONFIRM MENU:END
MANUAL SET
PR01 ARD PR08 P-08
PR02 ZDF PR09 P-09
PR03 P-03 PR10 P-10
PR04 P-04 PR11 P-11
PR05 MTV PR12 ----
PR06 P-06 PR13 ----
PR07 P-07 PR14 ----
PR+/-:SELECT
OK:CONFIRM MENU:END
2
3
4
5
These buttons are used
on the following two
pages.
MANUAL SET
PR+/-: UP/DOWN
/ : SELECT
OK:CONFIRM MENU:END
PR 04
STANDARD BG
RECEPTION AERIAL
AUTOSEARCH CH
_ _
FINE TUNING
DECODER ON
NAME
_ _ _ _
MANUAL SET
PR+/-: UP/DOWN
/ : SELECT
OK:CONFIRM MENU:END
PR 04
STANDARD BG
RECEPTION AERIAL
AUTOSEARCH CH
_ _
FINE TUNING
DECODER ON
NAME
_ _ _ _
MANUAL SET
PR+/-: UP/DOWN
0/1: CHANGE/CREATE
OK:CONFIRM MENU:END
PR 03
STANDARD BG
RECEPTION AERIAL
AUTOSEARCH CH
_ _
FINE TUNING
DECODER ON
NAME
_ _ _ _
Press OK to store the picture you
want.
Tune in other stations (by
following step 3 onwards) or press
MENU to leave the tuning mode.
Your video has 99 available channel slots. It will only store programmes that are available
in your area. You can tune in other stations in any channel slot that is not already being
used.
MANUAL SET
PR01 ARD PR08 P-08
PR02 ZDF PR09 P-09
PR03 P-03 PR10 P-10
PR04 P-04 PR11 P-11
PR05 MTV PR12 ----
PR06 P-06 PR13 ----
PR07 P-07 PR14 ----
PR+/-:SELECT
OK:CONFIRM MENU:END
If DECODER mode does not
appear on the screen, it is
not available on your video

1312
Front panel controls
The following buttons are on the front of your video.
Play
stand-by/ power on
Stop and eject
front input sockets for connecting a stereo camcorder (left and
right channels)
This is only available on some models. Check the front of your video to
see if this connection is available.
Change the station
Recording or one-touch record
Every time you press the button the recording time is increased by 30
minutes.
Rewind or fast forward a cassette from stop, or picture search
backwards or forwards if the video is playing a cassette.
Sorting programme locations
Sorting programme locations allows you to put the video programme in the same order as your TV.
1Press MENU.
Choose ‘PR Preset’ by pressing PR- then OK.
Choose ‘PR Align’ by pressing PR+ then OK.
Press PR+ or PR- to select the
programme you want to swap.
Confirm by pressing the OK
button.
Press PR+ or PR- to move the
station to the program number
you want to store it on.
Confirm with the OK button.
Press MENU to end.
2
3
PR ALIGN
PR+/-:ALIGN
:PR VIEW
OK:CONFIRM MENU:END
PR01 ARD PR08 P-08
PR02 ZDF PR09 P-09
PR03 P-03 PR10 P-10
PR04 P-04 PR11 P-11
PR05 MTV PR12 ----
PR06 P-06 PR13 ----
PR07 P-07 PR14 ----
Clearing programme locations
Clearing programme locations allows you to erase any stored programmes you
no longer want.
1Press MENU.
Choose ‘PR Preset’ by pressing PR- then OK.
Choose ‘PR Erase’ by pressing PR+ twice and then OK.
Press PR+ or PR- to select the
station you want to clear.
Press and hold to watch
the picture.
2
PR ERASE
PR+/-:SELECT
:PR VIEW
OK:ERASE MENU:END
PR01 ARD PR08 P-08
PR02 ZDF PR09 P-09
PR03 P-03 PR10 P-10
PR04 P-04 PR11 P-11
PR05 MTV PR12 ----
PR06 P-06 PR13 ----
PR07 P-07 PR14 ----
These buttons are used
on the following two
pages.
3If you want to erase the
station, press OK.
Press MENU to end.
If you don’t want to erase the
station, press MENU.

1514
Still
There must be a cassette in the video.
VCR
Still picture from playback.
Each press of the button moves the picture on one frame.
Press the play button to switch back to normal playback.
Variable picture search
VCR
VCR -
Keep pressing to vary the forward search speed.
Keep pressing to vary the rewind search speed.
Pressing the above buttons will vary the search speed in
two speeds.
Press to switch back to normal playback.
Variable slow motion
VCR
Starting from playback you can keep pressing to
control slow motion speed in six steps.
Press to switch back to normal playback.
After approximately five minutes on still, the cassette will automatically switch to normal playback.
If the still picture is jumping, you can steady it by using the PR+ and PR- button.
Finding new recordings (index scan)
The video index search system allows you to find the beginning of any recording you have
made on your video. Your video automatically records index marks on the tape whenever a
recording is started.
Press INDEX + or INDEX – to search forwards or
backwards.
The video will now wind to the beginning of a recording,
play it for about 6 seconds, then wind on to the next one.
When you see the recording you want to watch,
press PLAY.
FF SP
INDEX 01
0:11:09
PLAYING cassettes
Play
Push the cassette smoothly and squarely into the cassette bay, with its windows pointing up.
PLAY SP Hi-Fi
L+R
VCR
VCR
VCR
VCR
VCR Start playback.
If you hear an unclear or
mixed sound output in
different languages, select
one of the sound options, see
page 26.
A.Sel is only available on some models. If this screen does not appear
when you press the button, A.Sel is not available on your video.
The screen will only appear if you use a hi-fi tape or play a hi-fi or NICAM recording.
Stop playback.
Fast forward or rewind the
cassette from stop.
Eject the cassette.
These buttons are used
on the following two
pages.
• When you load a protected cassette such as pre-recorded film (see page 25) playback will
start automatically.
• When you are playing tapes of poor quality or tapes which have been recorded on another
machine, you can use the PR+ or PR- buttons while the cassette is playing to reduce horizontal
interferences stripes.
• Playing NTSC tapes on PAL TV: If you play cassettes which have been recorded on the NTSC
colour system (as used in the USA), you can watch the pictures on most PAL TVs.
On older TVs, some black lines may appear at the top and bottom of the screen. The picture may
also roll up or down. To prevent these problems adjust the V-HOLD knob on your television.
NTSC : National Television Systems Committee.
• This video can also play MESECAM (middle east secam not secam) cassettes.

1716
CM Skip
If you press [CM Skip] button on the remote control during playback mode,
tape advances for 30 seconds segment.
Auto Repeat
If you press the PLAY button for 5secs during playback mode, REP should
appear on your display, the video goes into Auto repeat mode. This video
repeatedly plays the tape from beginning to end .
To release this mode, press any mode operation button such as PLAY, FF,
REW or STOP.
Child lock
Press the button for about 5 seconds.
No buttons of front panel can be operated now and
LOCK INDICATOR (“SAFE”) will be displayed
momentarily on LED display. Keep your remote control
in a safe place.
To release child lock, press any button of the remote
control.
You can only set the child lock with your remote control.
16:9 Wide-screen format
16:9 Wide-screen format is only available through wide-screen broadcasts. Your TV must have 16:9
function. You must connect your TV to the video using an A/V scart lead and the video must be in
VCR mode. (See page 2, diagram 2.)
1Choose ‘16:9 set’ by pressing MENU. Press PR- twice to ‘VCR Set Up’ then OK.
Press PR+ three times then OK.
-ON : The video will play or record all broadcasts in 16:9
format. 4:3 broadcasts will be converted to 16:9
format.
-OFF : The video will play or record all broadcasts in 4:3
format only.
2
3
VCR SETUP
CLOCK SET
LANGUAGE SET
RF OUTPUT SET
16:9 SET
OSD ON/OFF
PR+/-:SELECT
OK:CONFIRM MENU:END
16:9 SET
AUTO
OFF
ON
PR+/-:SELECT
OK:CONFIRM MENU:END
Press PR- to choose the setting you want, for example,
-AUTO, -ON or -OFF. Confirm the setting with OK.
•
16:9 Set
-Auto : This video automatically detects the program
format (16:9 or 4:3) and records or plays this
program in the same format.
For the above formats to work your TV must be able to automatically detect a 16:9
broadcast. In the case of turning 16:9 format off, your TV may override this decision and
display the picture in 16:9 format.

1918
Simple recording
Load a cassette with its safety tab in
place (see page 25).
Press to start your recording.
Press if you want to stop the
recording for a short while.
Press to continue recording.
Press to stop your recording.
Press PR+ or PR- to choose the
station you want to record.
Press SP/LP if you wish to double
the length of the cassette’s recording
time.
For example, on an E-240 cassette you can
record for up to four hours when SP is
displayed, or up to eight hours when LP is
displayed.
STOP SP PR01 ARD
STEREO ON
VCR
VCR
VCR
These buttons are used
on the following two
pages.
One-touch recording-OTR
VCR Press PR+ or PR- to choose the
station you want to record.
Every time you press , the recording time will increase by 30
minutes. It is possible to record for up to 10 hours if there is
enough room on the cassette.
• To cancel OTR press and hold the STOP button for about five seconds until the video
stops recording.
• If you want to record from other equipment that is connected to your video, see pages 3,
4, 5 and 9.
Recording cassettes
◆If you want to use the video’s timer to record a programme, the clock, date and stations must be set correctly.
◆ Load a cassette with its safety tab in place (see page 25) and with enough free tape for the recording.
VCR SETUP
CLOCK SET
LANGUAGE SET
RF OUTPUT SET
16:9 SET
OSD ON/OFF
PR+/-:SELECT
OK:CONFIRM MENU:END
OSD ON/OFF
ON
OFF
PR+/-:SELECT
OK:CONFIRM MENU:END
OSD(On Screen Display) ON & OFF
This VCR is set to “OSD (On Screen Display) ON” mode at the factory, but you can change
it to OFF mode. When a function is changed at the front display or remote control the
change will be displayed on the screen.
Press MENU.
Choose “VCR SETUP”
And press OK.
Choose “OSD ON/OFF”.
If you want OSD OFF mode, press PR- and press
OK.
OSD characters will not be displayed in the normal
picture at the start of each mode change.
1
2
3
MAIN MENU
TIMER PROGRAM
PR PRESET
VCR SETUP
TAPE CONTROL
PR+/-:SELECT
OK:CONFIRM MENU:END

2120
Normal timer recording
◆For timer recordings, clock, date, and stations must be set correctly.
◆ Load a cassette with its safety tab in place (see page 25) and with enough free tape for the recording.
1
Press MENU.
Choose "Timer Program" by
pressing OK.
There are positions for eight timer
programs.
Press PR+ or PR- to select an
unused program, for example ‘- - - -’
then press OK to confirm.
Press PR+ or PR- to select how
often you want to make the
recording, for example, once, weekly
and so on. Press OK to confirm.
2
3
PR+/-:SELECT (AV1/AV2)
0-9 :SETUP(PR)
/ :CORRECT MENU:END
PR --
START TIME --:--
END TIME --:--
START DATE --/--
TAPE SPEED SP
VPS/PDC OFF
TIMER PROGRAM (ONCE)
◆PR : Use PR+ if you want to choose
the AV channel (see page 9) or 0to 9
for other channels.
◆Start time : Use buttons 0to 9to
enter the start time.
◆End time : Use buttons 0to 9to enter
the end time.
◆Start date : Use buttons 0to 9to
enter the date.
◆Tape Speed : Use PR+ if you want to
choose LP (see page 19).
◆VPS/PDC : Use PR+ if you want to
switch VPS/PDC on (see page 20).
If VPS/PDC does not appear on the
screen, it is not available on your
video.
If you want to change any of the
details. Move to the details you
want to change using the and
buttons.
Change the setting using the PR+ or
PR- or number buttons 0to 9.
These buttons are used
on the following two
pages.
HOW OFTEN DO YOU WANT
TO RECORD THIS PROGRAM?
PR+/-:SELECT
OK:CONFIRM MENU:END
ONCE
WEEKLY(ONCE A WEEK)
DAILY(MON-FRI)
DAILY(MON-SAT)
DAILY(MON-SUN)
TIMER PROGRAM (ONCE)
PR 01
START TIME 18:10
END TIME 20:30
START DATE 15/04(FRI)
TAPE SPEED LP
VPS/PDC ON
PR+/-:SELECT (AV1/AV2)
0-9 : SETUP (PR)
/ :CORRECT
OK:CONFIRM MENU:END
Timer recording using ShowView
ShowView is an automatic system which makes it easier to set the timer.
Press PROG. to select the ShowView screen.
(If ShowView mode does not appear on the screen, it is
not available on your video. Go to page 21).
ShowView numbers are shown in TV guides.
From your current TV guide, type in the number next to
the programme you want to record using the number
buttons 0-9. Press OK to confirm.
1
0-9:SHOWVIEW NUMBER
:CORRECT
OK:CONFIRM MENU:END
SHOWVIEW
83077----
2Press PR+ or PR- to select how often you want to make
the recording, for example, once, weekly and so on.
Press OK to confirm.
If you wish to change any details:
Move to the details you want to change using the /
buttons.
Change the setting using the PR+ or PR- or number
buttons 0-9.
If all the settings are correct, press OK. The on screen
display will remind you to enter a cassette and turn the
video off.
3
4Press to switch your video off. Your video will not
record unless you do this.
You can switch the video on again if you want to set the timer to
record another programme. Remember to switch the video off when
you have finished setting the timer.
If VPS/PDC does not appear on the screen, it is not available on your video. VPS=Video Programming System PDC=
Programme Delivery Control.
•VPS/PDC sets your video to adjust the start times of your timed recording. This happens even if a programme
starts earlier or later than advertised.
VPS/PDC works when the broadcaster sends a signal, but the signal is not always sent.
If you are not sure the signal will be sent, it is best to switch VPS/PDC off.
•
If there is no programme number displayed under ‘PR’ in the change menu, the video doesn’t yet
know the number for the programme you want. Type it in and this will be stored for later recordings.
•
If you wish to record from a satellite receiver, select under ‘PR’ the satellite programme or AV
(depending whether the video is connected with the antenna cable or the scart-cable). Leave the
satellite tuner switched on and set the programme you want to record.
•The video will warn you if you have set the timer to start recording a second programme before the
first recording has finished.
•To stop the recording after it has already started, press and hold the STOP button for about five
seconds until the video stops recording.
•ShowView and ShowView code are trademarks of Gemstar Development Corporation.
ShowView system is manufactured under license from Gemstar Development Corporation.
HOW OFTEN DO YOU WANT
TO RECORD THIS PROGRAM?
PR+/-:SELECT
OK:CONFIRM MENU:END
ONCE
WEEKLY(ONCE A WEEK)
DAILY(MON-FRI)
DAILY(MON-SAT)
DAILY(MON-SUN)
TIMER PROGRAM (ONCE)
PR 03
START TIME 21:20
END TIME 22:20
START DATE 16/04(SAT)
TAPE SPEED SP
VPS/PDC ON
PR+/-:SELECT (AV)
0-9 : SETUP (PR)
/ :CORRECT
OK:CONFIRM MENU:END

2322
Timer review - changing and erasing record settings
Press MENU.
Choose "Timer Program" then press OK.
1
2Select the program you want to change or erase by
pressing PR+ or PR-.
Press OK to confirm.
Changing a setting
Select the details you want to change by pressing or .
Use the number buttons 0to 9to change the settings. Use
PR+ to select the AV channel, to change the tape speed and
to switch VPS/PDC on and off.
When you have made all the changes, press or
until you see ‘OK : confirm’ on the bottom line of the screen.
Press OK.
Remember to load a cassette and switch the video off by
pressing .
TIMER PROGRAM
PR START END DATE
01 18:10 20:30 15/04
03 21:20 22:20 16/04
PR+/-:SELECT
OK:CONFIRM MENU:END
TIMER PROGRAM (ONCE)
PR 03
START TIME 21:20
END TIME 22:20
START DATE 16/04(SAT)
TAPE SPEED SP
VPS/PDC ON
0 :ERASE
/ :CORRECT MENU:END
TIMER PROGRAM
PR START END DATE
01 18:10 20:30 15/04
03 21:20 22:20 16/04
PR+/-:SELECT
OK:CONFIRM MENU:END
3a
Erasing a setting
Press the number 0.
Press OK to confirm.
Press MENU twice to end.
3b
4
5
If all the settings are correct, press OK to confirm.
The on screen display will remind you to enter a cassette and turn
the video off.
Switch your video off by pressing the
button.
You can switch your video on again if you want to set the timer to record another programme. Remember to
switch the video off when you have finished.
•The video will warn you if you have set the timer to start recording a second programme before the
first programme has finished. If you don’t adjust the times, the video will record the first
programme completely, then start to record the second one.
•If there is not enough free space for the recording on the cassette the video will automatically
switch to ‘LP’ to double the recording time left on the cassette.
•The recorder will eject cassettes which have the safety tab removed (page 25)
•To stop a recording which has already started, press and hold the STOP button for about five
seconds until the video stops recording.
TIMER PROGRAM (ONCE)
PR 01
START TIME 18:10
END TIME 20:30
START DATE 15/04(FRI)
TAPE SPEED LP
VPS/PDC ON
PR+/-:SELECT (AV1/AV2)
0-9 : SETUP (PR)
/ :CORRECT
OK:CONFIRM MENU:END

2524
Resetting the counter to zero
Press MENU and choose ‘Tape Control’ by pressing PR+ and then
OK.
Choose ‘Counter Reset’ by pressing PR- twice and then OK.
The video will reset the counter to zero.
COUNTER RESET
0:00:00
This display will only appear when there is a cassette in the video.
Cassettes
Use only good-quality cassettes with the VHS logo.
• Keep cassettes away from moisture or dust, magnetic and electrical fields (for
example, loudspeakers and computer monitors).
• Always rewind cassettes to the beginning when you have finished using them.
Stand cassettes up with the full spool at the bottom. Always keep cassettes in
their cases.
PAL
Clock and counter display
◆The counter counts in real time from when you load the cassette. This does not have to be at the beginning
of the cassette. The counter does not count unrecorded parts of the cassette.
◆If you rewind the cassette, the counter will count backwards, if you rewind beyond the zero position, the
counter counts in negative values for example, – 0:01:15.
This display will only appear when there is a cassette in the video.
STOP SP PR01 ARD
14:00 11/04
STEREO ON Press once to display the time and date.
Press twice to display the counter time and how long is
left to the end of the cassette.
Press three times to clear the screen.
A
A
A
Remaining time and cassette length
Choose ‘Tape Remain’ by pressing OK.
Press PR+ or PR- to select the length of your current cassette.
Press OK to confirm. The display will show how long is left to the end of
the cassette.
This will be displayed for several seconds only.
Finding the counter zero position
Press MENU and choose ‘Tape Control’
by pressing PR+ and then OK.
Choose ‘Go to Zero’ by pressing PR- and
then OK.
The video will wind to the position 0:00:00
and stop.
REW SP
GO TO ZERO
0:02:13
TAPE CONTROL TAPE REMAIN
E-240 01:27
TAPE REMAIN
GO TO ZERO
COUNTER RESET
E-180
E-240
E-300
PR+/-:SELECT
OK:CONFIRM MENU:END
PR+/-:SELECT
OK:CONFIRM MENU:END
This display will only appear when there is a cassette in the video.
Press MENU and choose ‘Tape Control’ by pressing PR+ and then
OK
This display will only appear when there is a cassette in the video.
V
These buttons are used
on the following three
pages.
You can protect your precious recordings from being recorded over by breaking off the safety tab on
the side of the cassette (some cassettes have a slide). When you have removed the tab your video
will eject the cassette if ever you try to record onto it.
If you want to record onto the cassette after removing the tab, cover the hole with sticky tape.
We advise you to use a head - cleaning cassette every six months to keep your video in perfect
working order.
Power - saving features
Dimmer
Your video recorder’s display will go dim when the video is on stand-by.
Auto power off
If your video is connected through RF, it will switch to stand-by when no station is
received for more than five minutes.
Language Select
Press MENU.
Select „VCR SETUP“ by pressing PR- twice, then press OK. Choose
„LANGUAGE SET“ by pressing PR-, then press OK. Use PR+ or
PR- to select the wanted language and press OK.
Press MENU to confirm
LANGUAGE SET
ENGLISH
POLISH
CZECH
HUNGARIAN
PYCCKNZ
DEUTSCH
SLOVAK
PR+/-:SELECT
OK:CONFIRM MENU:END

2726
The hi-fi system
First press: the on-screen display of sound output appears and the main language (original
sound track) is selected.
Second press: the video selects the sub-language.
Third press: the video selects both main language and the sub-language.
Fourth press: the video returns to the original soundtrack.
For mono sound performance there is no choice available.
While a bilingual performance is being broadcast
STOP SP PR10 P-10
BIL
BIL I
II
BIL
I+II
BIL
OFF
As well as the normal mono sound track of VHS video recorders, your video has a high-
quality hi-fi sound system.
This means you can enjoy the following.
•Films with excellent stereo sound
•Films of full-length concerts in high quality stereo
•Films with impressive surround sound using extra surround-sound equipment
•VHS cassettes with hi-fi stereo sound and also VHS cassette with normal sound.
If this screen does not appear when you press the A.SEL button, this function is not available on your video.
PLAY SP Hi-Fi
L+R
HI-Fi
LEFT
Hi-Fi
RIGHT
Hi-Fi
OFF
Technical information
Dimensions
Width x height x depth
360 x 91 x 280 mm
Weight 3.3 kg
Power supply
Voltage 200V-240 V ~,
50/60Hz
Power consumption Mono 14 Watts
Hi-Fi 16 Watts
System
Video PAL -B/G, D/K
Channel range VHF 2 - 12,
UHF 21 - 69,
CATV S1 - S41, x, y, z
(Hyperband)
Channel locations 99 + AUX
RF Out UHF CH 21 - 69 (52)
Video
System VHS
Speeds
Short play and long
play
Hi-Fi
(Available on some models. See page 27)
Frequency response 20 Hz to 20 KHz
Dynamic range > 80dB
Signal-to-Noise-Ratio > 60dB
General
Temperature range 5° C to 35° C
Humidity range < 80 %
Timer 8 events,
1 month
These technical details may change.
Index
Aerial ......................................................... 2, 6
Bilingual..................................................14, 26
Cassette length ........................................... 24
Channel ........................................... 6-7, 10-12
Child lock ..................................................... 17
CM Skip ....................................................... 17
Condensation ............................... Precautions
Counter ........................................................ 24
Euro AV ......................................................... 9
.
Location number .................................. 6-7, 12
LP (long play) .......................................... 19-21
Mains ................................................... 2-5, 27
Mesecam ..................................................... 14
NTSC ........................................................... 14
OSD ON/OFF ................................................ 18
OTR (One Touch Recording) ......................... 19
PDC (Programme Delivery Control) ............. 20
Protected cassette ...................................... 25
Remaining time ........................................... 24
RF out ......................................................... 6-7
Satellite ..................................................... 3, 9
Scart socket ........................................... 2-5, 9
ShowView ................................................... 20
SP (standard play) .................................. 19-21
Stand-by ....................................... Precautions
Station ...................................................6-7, 12
Still-frame adjustment ................................ 15
TV/VCR button .............................................. 2
Tracking ....................................................... 14
VPS .............................................................. 20
16:9 Set .........................................................16
1-4X

29
Problem-solving guide
The video has the time or - -.- - on the display
If while you are setting up the video, the timer or - -.- - is in the display, the video is switched off or has
already gone through the autoset procedure (OK has already been pressed). In this case, please turn to page 6
and carry out step 2 until you see the manual tuning screen.
A blue screen is displayed when you switch the video on
If a blue screen appears when you switch the video on, the AV button has been pressed. Press AV on the
remote control until P-_ _ appears on the display of the video, or until a TV picture is displayed.
The timer light stays on the display, even though the recording has finished
If the timer light stays on even though the recording has finished, this is because VPS/PDC takes into account
a delay in recording for up to 24 hours.
The TV/VCR button on the video remote control will not work
This button will only work if the TV has the appropriate internal switch and a scart lead is connecting the TV
and video.
The television will not change channel when the video is turned on
If the television will not change channel while the video is on, check whether a scart lead has been connected.
(See page 2 option 2)
If a scart lead has been connected, you need to press the TV/VCR button on the video remote control. When
the small VCR symbol appears on the display, you can only change channel by using the video remote control.
If the TV/VCR button on the video remote control does not work, read the instruction book for the TV to find out
about an audio video button.
The video has a number other than 52 when RF appears
A number other than 52 might be displayed on the video when RF is flashing in the display. This means that
the number has been adjusted in the past.
The TV needs to be tuned in to get the blue auto set or auto search screen. (Refer
to page 6)
28
QUICK START GUIDE FOR SORTING CHANNELS ON THE VCR
Once the ‘Auto Set’ function has been completed the On Screen Display will show a list
of the channels which it has found, displayed in the order it found them.
It is unlikely, that they will be in the correct oder ie. ARD as PR01, ZDF as PR02, ITV as
PR03, Channel4 as PR04 and Channel 5 as PR05.
Therefore, it will be necessary to Sort the channels displayed, into the correct order.
Please follow the following procedure.
1
Press the [MENU] button.
2
Select the ‘PR PRESET’ using [PR+] or [PR-] button and
press the [OK] button.
3
Select the ‘PR ALIGN’ using [PR+] or [PR-] button and
press the [OK] button.
4
Select the channel that needs to be moved and press the
[OK] button.
5
Press the [OK] button in order to select the ‘PR’ number
which you want to place the current selected channel
using [PR+] or [PR-] buttons. ie. PR01 ARD. And press the
[OK] button to confirm.
Repeat above 4-5 steps to align the other channels.
MAIN MENU
TIMER PROGRAM
PR PRESET
VCR SETUP
TAPE CONTROL
PR+/-:SELECT
OK:CONFIRM MENU:END
PR PRESET
AUTO SET
MANUAL SET
PR ERASE
PR ALIGN
PR+/-:SELECT
OK:CONFIRM MENU:END
PR ALIGN
PR+/-:ALIGN
:PR VIEW
OK:CONFIRM MENU:END
PR01 P-01 PR08 P-08
PR02 ZDF PR09 P-09
PR03 ITV PR10 P-10
PR04 P-04 PR11 P-11
PR05 ARD PR12 ----
PR06 P-06 PR13 ----
PR07 P-07 PR14 ----
PR ALIGN
PR+/-:ALIGN
:PR VIEW
OK:CONFIRM MENU:END
PR01 ARD PR08 P-08
PR02 P-01 PR09 P-09
PR03 ZDF PR10 P-10
PR04 ITV PR11 P-11
PR05 P-04 PR12 ----
PR06 P-06 PR13 ----
PR07 P-07 PR14 ----

Quick-start guide
Please follow the guide from the beginning to the end. Before you connect the video
equipment make sure all equipment is switched off at the plug.
Stage 1. Connecting the video to your TV
A
Fit the batteries into the remote control. Make sure that
the (+) and (-) marks on the batteries agree with the (+) and
(-) marks inside the battery compartment.
B Plug your aerial into the ANT IN socket of the video.
C Connect the black aerial lead provided from the ANT
OUT socket of the video to your TV aerial socket.
D Plug the video into the mains and turn it on by pressing
the POWER button. RF 52 will now be displayed on the
front of your video.
200V-240V~,
50/60Hz
Back view of your video
There are more details, including how to connect extra equipment, on pages 2 to 5.
Stage 2. Tuning in your TV
A
Tune a spare channel of your TV until you see the blue ‘Language
Set’ screen.
Select the wanted language and country with PR+ or PR-
button. Press OK to confirm.
Store this setting on your TV.
B
If there is any distortion (lines, flickering and so on), the video
usually recommends a new ‘RF’ number during the next stage (auto
set or auto search). Press OK to confirm the new number. Should the
video not recommend a new number, see option 2 or 3 on page 7.
LANGUAGE SET
ENGLISH
POLISH
CZECH
HUNGARIAN
PYCCKNZ
DEUTSCH
SLOVAK
PR+/-:SELECT
OK:CONFIRM MENU:END
COUNTRY SET
CZ
H
PL
RU
SK
OTHERS
PR+/-:SELECT
OK:CONFIRM MENU:END
*For selecting the country, refer to the followings.
CZ: Czechoslovakia
H: Hungary
PL: Poland
RU: Russia
SK: Slovakia
Stage 3. If you already set the language and country set, you can see the followings.
MENU:END
PLEASE WAIT...
CH 25
A Point the remote control at the video and press OK.
B
The video is now tuning all the television stations available in your area.
C
If ‘Clock Set’ appears on the TV screen, please enter the time and date.
Use the number buttons 0to 9on the remote control. Press OK to confirm.
D
When ‘Manual Set’ appears on the TV screen, press MENU to end.
F Your video is now set up. If you want to change station names or
the programmes they are stored on see pages 11 and 12.
MANUAL SET
PR01 P-01 PR08 P-08
PR02 P-02 PR09 P-09
PR03 P-03 PR10 P-10
PR04 P-04 PR11 P-11
PR05 P-05 PR12 P-12
PR06 P-06 PR13 P-13
PR07 P-07 PR14 ----
PR+/-:SELECT
OK:CONFIRM MENU:END
Important : If you switch your video off at the mains overnight you
do not have to retune the settings. You will lose the time and date,
these will have to be reset (see page 8). If you have had any
problems setting up your video , please read the problem-solving
guide on page 28.

GB
English
SVR-637/SVR-630
INSTRUCTION MANUAL
Video recorder
P/N:97P95600D0-6B
This manual suits for next models
1
Table of contents