- 7 - 09/2022
Copyright © 2022, Fast ČR, a.s.
EN Fully Automatic Rice Cooker
User'smanual
■ Prior to using this appliance, please read the user’smanual thoroughly, even in cases, when one has already familiarised themselves with previous use of similar types of
appliances. Only use the appliance in the manner described in this user’smanual. Keep this user’smanual in asafe place where it can be easily retrieved for future use.
■ We recommend saving the original cardboard box, packaging material, purchase receipt and responsibility statement of the vendor or warranty card for at least the duration of
the legal liability for unsatisfactory performance or quality. In the event of transportation, we recommend that you pack the appliance in the original box from the manufacturer.
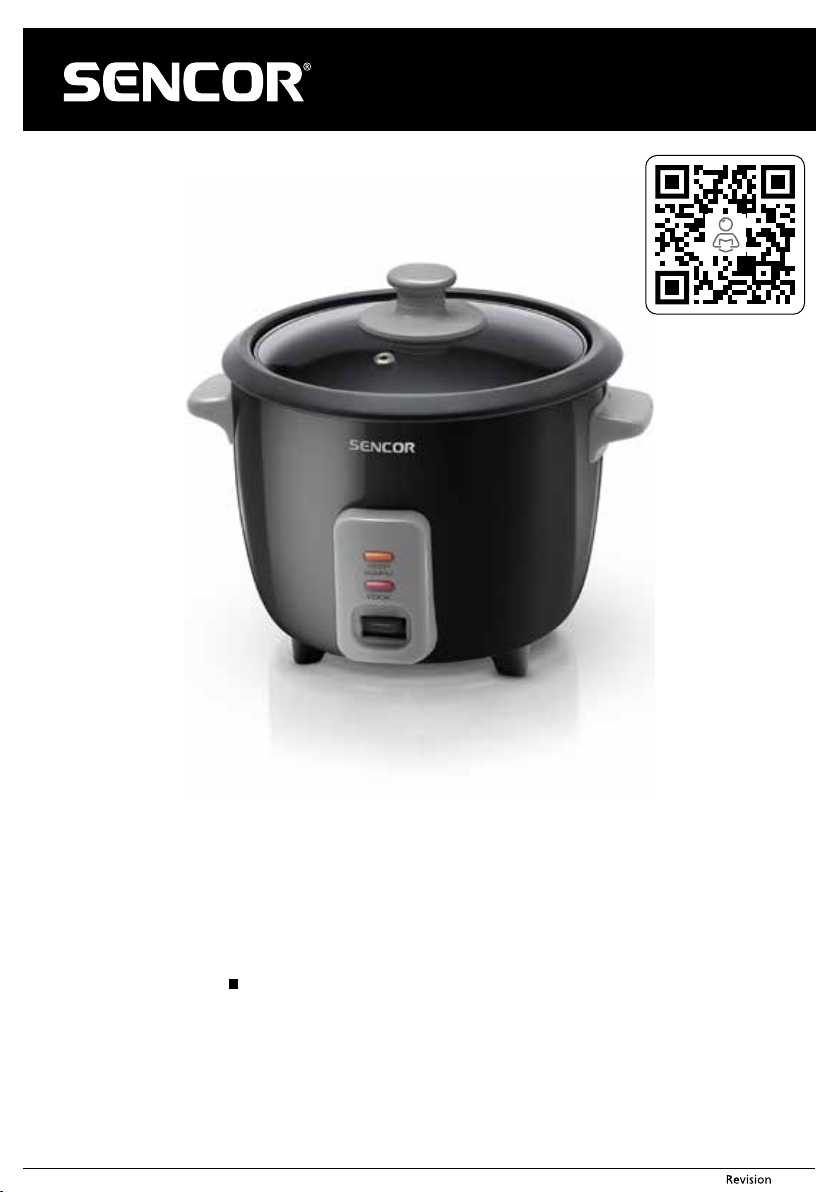
DESCRIPTION OF THE RICE COOKER
A1 Glass lid with ahandle and an excess steam release hole
A2 Inner removable bowl with anon-stick finish
A3 Handle
A4 Outer pot
A5 KEEP WARM indicator light
indicates the keep warm mode
A6 COOK indicator light
indicates the rice cooking mode
A7 Switch for changing between the KEEP WARM andCOOK modes
A8 Powercord (not shown)
A9 Powerswitch (not shown)
DESCRIPTION OF SUPPLIED ACCESSORIES
B1 Rice and water measuring cup B2 Stirring spoon
BEFORE FIRST USE
1) Take the rice cooker and its accessories out of the packaging materials.
2) Wash the removable bowl A2, the lid A1, the measuring cup B1 and the spoon B2 in warm water with dishwashing detergent. Then rinse all these parts under clean running
water and dry them thoroughly.
USING THE RICE COOKER
1) Place the removable bowl A2 on the kitchen bench or another even and stable surface. Using the supplied measuring cup B1 measure the required amount of rice.
Attention:
In asingle batch it is possible to cook amaximum of 3 level measuring cups of rice.
■ Transfer the rice to astrainer and rinse through using running water.Transfer the rinsed rice into the removable bowl A2 and evenly spread it out from the centre towards the wall
of the bowl. Add the appropriate amount of cold water. You will find the recommended rice and water dosage ratio in the table below.
Number of level measuring cups of uncooked rice Amount of water
1 measuring cup Add water up to the 1–1½ CUP mark on the removable inner bowl A2.
2 measuring cups Add water up to the 2–2½ CUP mark on the removable inner bowl A2.
3 measuring cups Add water up to the 3 CUP mark on the removable inner bowl A2.
Note:
Two measuring scales are marked on the measuring cup B1. One measuring scale is used for measuring rice (¼, ½, ¾ cup or one level measuring cup) and the second
scale is used for measuring water (40 to 160 ml).
Asingle level measuring cup is equal to 140 g of uncooked rice.
Attention:
The rice to water ratio can be modified as necessary. However, make sure that the water level does not exceed the 0.6 L water level mark on the inside wall
of the removable bowl A2. Otherwise boiling water could spray out during the cooking process.
2) Insert the bowl A2 into the outer pot A4 and cover it with the lid A1. Make sure that bowl A2 is correctly seated in the outer pot A4.
3) Insert the power plug into an electrical power socket. Move the power switch A9 to position I(on).
4) After inserting the power cord into the power socket the KEEP WARM mode will automatically be activated. This is indicated by the KEEP WARM indicator light A5. To start the
COOK mode slide the switch A7 downwards. The COOK indicator light A6 will be lit. Do not move switch A7 back to the upper position while the rice is cooking.
5) The rice will be cooked in approximately 30 minutes. Afterwards, the rice cooker will automatically switch to the KEEP WARM mode. The KEEP WARM mode can keep the rice
warm for up to 6 hours. After this, the rice cooker will turn off.
Tip:
The rice will taste better if you allow it to finish cooking in the KEEP WARM mode for 10 to 20minutes.
Note:
To maintain flavour, we recommend that you do not keep the rice warm for longer than 3 hours. Otherwise it may dry out.