Sendai CD889 User manual

CSENDAI
CD889
CD/MP3/SD/MMC/USB
PLAYER
WITH
FM/AM
TUNER
OPERATING
INSTRUCTIONS

Safety
Information
Thank
you
for
purchasing
this
product.
Please
read
this
manual
carefully
before
operating
and
reserve
it
for
future
reference.
PRECAUTIONS
*
Use
only
in
a
12-volt
DC
negative-ground
electrical
system.
+
When
replacing
the
fuse,
be
sure
to
use
one
with
an
identical
amperage
rating.
Using
a
fuse
with
a
higher
amperage
rating
may
cause
serious
damage
to
the
unit.
DO
NOT
attempt
to
disassemble
the
unit.
Laser
beams
from
the
optical
pickup
are
dangerous
to
the
eyes.
¢
Make
sure
that
pins
or
other
foreign
objects
do
not
get
inside
the
unit,
they
may
cause
malfunctions,
or
create
safety
hazards
such
as
electrical
shock
or
laser
beam
exposure.
*
If
you
have
parked
the
car
for
a
long
time
in
hot
or
cold
weather,
wait
until
the
temperature
in
the
car
becomes
normal
before
operating
the
unit.
*
Keep
the
volume
at
a
level
at
which
you
can
hear
outside
warning
sound
(horns
sirens,
etc.).
CD
Notes
+
Playing
a
defective
or
dusty
CD
can
cause
dropouts
in
sound.
*
Hold
CDs
as
illustrated.
*
Do
not
touch
the
unlabeled
side.
*
Do
not
attach
any
seal,
label
or
©
data
protection
sheet
to
either
side
S
of
a
disc.
*
Do
not
expose
a
CD
to
direct
sunlight
or
excessive
heat.
«
Wipe
a
dirty
CD
from
the
center
outward
with
a
cleaning
cloth.
Never
use
solvents
such
as
benzene
or
alcohol.
¢
This
unit
cannot
play
3-inch
(
8cm
)
CDs.
NEVER
insert
a
3-inch
CD
contained
in
the
adapter
or
an
irregularly
shaped
CD.
The
unit
may
not
be
able
to
eject
it,
resulting
in
malfunction.
Before
Operation
*
Do
not
raise
the
volume
level
too
much,
as
this
will
block
outside
sounds,
making
driving
dangerous.
*
Stop
the
car
before
performing
any
complicated
operation.
CAUTION
*
DO
NOT
open
covers
and
do
not
repair
yourself.
Consult
the
dealer
or
an
experienced
technician
for
help.
Safety
Information
Panel
Controls
Other
Instructions
Remote
Controls
.........ccccccscsssessssesesseeees
3-4
Button
Tips
USB/SD/MMC
MP3
Playback
MP3
Playback
.........::ceceeeeeee
MP3
OVGIVIEW..
siniiccesscccesacveecosnncctecicssecnecsedseis
RDS(Radio
Data
System)
Menu
Function
...........
Electrical
Connections...
Installation
Guide
...
Anti-Theft
System...
Troubleshooting...
Specifications
*
In
addition
to
ordinary
CDs,
this
unit
can
playback
CD-R
or
CD-RW,
MP3.

Panel
Controls
p=
one
©®@OO
©
O88
OH
@
SRC
BAND
>
ams
\\
\
4
SO
S
Qa
ar
S
pry
a
>uTOP
INT
RPT
RDM
MUTE
Z1c2/
32
4/7
5
=
6)
Jose)
AUX
IN
OQ]
-
Power
on/off
-
Rotate
the
knob
to
adjust
volume
level.
-
Press
to
select
VOL/BAS/TRE/BAL/FAD,
rotate
the
knob
to
adjust
level.
-
Hold
it
to
system
menu.
-
Radio
-
Disc
play
(when
disc
inserted)
-
USB-drive
(when
USB
inserted)
-
Card
(when
SD/MMC
inserted)
-
AUX-in
-
Band
switch:
FM1-FM2-FM3-MW1-MW2
-
AMS:
Radio
preset
scan
Radio
auto
preset
-
SEARCH:
MP3
track/file/characte
search.
-
Radio
tune
7.
8.
9.
10
11.
12.
13
14
15
16.
8/88
©
OB/O
-
Track
skip/seek
-
Traffic
announcements
identification
-
Alternative
frequency
-
REG
on/off
-
Program
type
.
-
Panel
release
-
USB
connector
-
Mute
.
-
Press
briefly
for
Play/Pause
function.
-
Press
more
than
2
seconds
if
you
want
to
start
playback
from
the
beginning
of
the
first
track
of
your
disc.
.
-
Intro
play
(10
sec)
.
-
Track
repeat
play
-
Track
random
play
17.
-
Previous
folder
-
Hold
it
to
MP3
track
-10
down.
18.
-
Next
folder
-
Hold
it
to
MP3
track
+10
up.
19.
-
Button
1~6
radio
preset
Press
to
listen
to
a
preset
station.
Hold
for
more
than
2
seconds
to
store
station.
20.
-
Display
switch
21.
-
AUX-in
jack

Other
Instructions
Remote
Control
Press
the
“«
button
to
open
the
panel.
Remote
control
operating
range
The
remote
control
sensor
is
located
to
the
left
of
the
VOL
knob.
@ @ @
—
©
Point
the
remote
control
unit
to
the
remote
sensor
when
you
operate
the
unit
with
it.
The
remote
control
can
operate
within
a
distance
of
3~5m.
=
.
Disc
eject
2.
Reset
hole
Note:
Pressing
the
RESET
hole
will
erase
the
clock
setting
and
stored
stations.
3.
Panel
status
indicator
Lights
up
when
you
flip
the
panel
down;
Flashes
when
you
remove
the
panel.
4.
Disc
slot,
insert
the
disc.
5.
SD/MMC
card
slot

Remote
Control
Power
On
:
Press
any
button
on
the
remote
control
to
turn
on
the
unit.
.
-
Power
on/off
-
Mute
.
-
Volume
-
Press
to
select
VOLUME/BASS/TREBLE/
BALANCE/FADER,
use
volume
button
to
adjust
level.
-
Press
for
more
than
2
seconds
to
menu
function.
.
-
Traffic
announcements
identification
.
-
Alternative
frequency
-
REG
on/off
.
-
CD
playback
Button1:
Press
briefly
for
Play/Pause
function.
Press
for
more
than
2
seconds
if
you
want
to
start
playback
from
the
beginning
of
the
first
track
of
your
disc.
Button2:
Intro
play(10sec)
Button3:
Track
repeat
play
Button4:
Track
random
play
Button5:
Previous
folder
Button6:
Next
folder
-
1-6
Button:
Radio
preset
Press
to
listen
to
a
preset
station,
Hold
for
more
than
2
seconds
to
store
station.
8.
-
Radio
-
AUX-in
-
Disc
play
(when
disc
inserted)
-
USB-drive
(when
USB
inserted)
-
Card
(when
SD/MMC
inserted)
9.
-
Radio
tune
RON
oun
“N
-
To
fast
search
within
a
track/skip
to
next
or
previous
track
10.-
AMS
Radio
auto
preset/Radio
preset
scan
-
MP3
track/file/character
search
11.-
Band
switch:
FM1->FM2->FM3->MW1->MW2
12.-
Program
type
13.-
Display
switch
Replacing
the
lithium
battery
of
remote
control
unit.
When
the
operation
range
of
the
card
remote
control
becomes
poor,
replace
the
lithium
battery
with
a
new
one.
Make
sure
the
battery
polarity
replacement
is
correct.
.
Pull
out
the
battery
holder
while
pressing
the
stopper.
.
Insert
the
button-type
lithium
battery
with
the(+)
mark
facing
upward.
Insert
the
battery
holder
into
the
remote
control.
(CR
2025)
1
=a
2
<>
WARNING:
Store
the
battery
where
children
cannot
reach.
If
a
child
accidentally
swallows
the
battery,
consult
a
doctor
immediately.
Do
not
recharge,
short,
disassemble
or
heat
the
battery
or
dispose
it
in
a
fire.
Otherwise,
the
battery
may
start
to
give
off
heat,
crack
or
catch
fire.
Do
not
leave
the
battery
with
other
metallic
materials.
Otherwise,
the
battery
may
start
to
give
off
heat,
crack
or
catch
fire.
When
throwing
away
or
saving
the
battery,
wrap
it
in
tape
and
insulate.
Otherwise,
the
battery
may
start
to
give
off
heat,
crack
or
catch
fire.

Button
Tips
Radio
To
fine
tune
the
radio,
press
I<
or
Pi
briefly.
To
search
the
station
automatically,
press
<<
or
>>
for
more
than
0.5
second.
Disc
Playback
Track
skip:
Press
I<
or
>>
briefly
to
go
to
the
next
or
previous
track.
Track
seek:
Press
<<
or>>t
for
more
than
0.5
second
to
seek
the
forward
or
previous
track.
AMS
:
Auto
Memory
Store
Press
AMS
briefly
to
scan
the
preset
station
1-6
for
5
seconds
each.
Hold
for
more
than
2
seconds,
the
6
strongest
available
station
will
be
automatically
saved
in
the
memory
of
preset
buttons
1-6.
Viewing
Clock
Time
During
Radio/Disc
Playback
Press
DISP
(once
for
Radio
mode
or
twice
for
other
modes),
display
shows
the
clock
time
for
5
seconds.
Setting
The
Clock
Time
Press
DISP,
time
displays.
Press
again
for
more
than
2
seconds,
time
display
blinks.
Rotate
the
knob
clockwise
to
set
the
hours,
rotate
the
knob
counterclockwise
to
set
the
minutes,
press
DISP
again
to
exit
the
clock
setting.
USB/SD/MMC
MP3
Playback
1.
Loading
SD/MMC
Card
Open
the
panel,
insert
the
SD/MMC
card
into
the
slot,
with
the
front
side
at
left.
The
unit
will
play
the
music
automatically.
2.
Take
out
SD/MMC
Card
Press
SRC
button
and
switch
to
non
CARD
mode,
open
the
panel,
slight
press
SD/MMC
card,
take
out
the
card
when
it
was
popped
out.
3.
Loading
USB
equipment
Open
the
cap,
insert
the
USB
into
the
connector
and
the
unit
will
play
the
music
in
the
USB
stick
automatically.
4.
Take
out
USB
equipment
Press
the
SRC
button
and
switch
to
non
USB-
DRIV
mode,
then
take
off
the
USB
stick,
close
the
cap.
USB/SD/MMC
Notes
USB
functions
(flash
memory
type)
MP3
music
play
1.
SD/MMC
card
support.
2.
USB
flash
memory
2
in
1
(SD/MMC)
support.
3.
FAT
12/
FAT
16
/
FAT
32
is
possible.
4.
File
name:
32
byte
/
dir
name:
32
byte
/
tag
name:
32
byte.
.
Tag
(ID3
tag
ver
2.0)
-
title
/
artist
/
album:
32
byte
support.
.
Multi
card
reader
not
support.
.
USB
1.1
support.
USB
2.0
support
(It
can
not
support
USB
2.0
speed.
Just,
get
the
same
speed
with
USB1.1).
Not
all
USB
devices
are
compatible
with
the
unit.
a
NO

MP3
Playback
While
playing
MP3
disc/USB/SD/MMC-MP3
MUSIC,
the
folder/file
name
and
ID3
TAG
(Song
title,
Album
and
Artist)
can
scroll
entirely
across
the
LCD.
Press
the
button
BAND
to
show
ID3
information:
Elapsed
playing
time
&
Track
number
->
Folder
name
&
number
->
File
name
&
number
->
Song
title
->
Album
title
->
Artist
name
MP3
Character
Search
-
Press
AMS
button
three
times
to
select
“CHAR
SCH"
mode.
-
Press
the
knob
and
"A"
displayed.
-
If
you
want
to
select
a
track
name
beginning
with
a different
letter,
rotate
the
knob
to
select
a
letter,
then
press
the
knob
to
confirm.
Then
"A"
flashes
at
the
next
place,
select
2nd
and
other
character
of
the
desired
track
name
as
steps
above.
MP3
File
Search
-
Press
AMS
twice
to
select
"FILE
SCH"
mode.
-
Press
the
knob
to
enter,
rotate
the
knob
to
select
folder.
MP3
Track
Search
-
Press
AMS
to
select
"TRK
SCH"
mode.
-
Press
SEL/MENU
knob
and
LCD
display
will
show
"TRK
0001".
-
If
the
desired
track
number
is
less
than
100,
-
To
play
songs
of
the
current
folder,
press
the
rotate
the
knob
to
select
the
first
digit
and
knob
for
more
than
0.5
second
to
play
the
first
press
the
knob
once
again
and
rotate
the
track.
Knob
to
set
the
tenth
digit
of
the
track
number.
-
To
play
a
desired
track,
press
the
knob
and
Press
the
knob
again
more
than
0.5
second
to
rotate
the
knob
to
select
a
track,
press
the
play
the
track.
Knob
again
to
play
the
track.
-
If
the
desired
track
number
is
more
than
100,
rotate
the
knob
to
select
the
first
digit
and
press
the
knob
to
confirm,
rotate
the
knob
to
select
the
tenth
digit
and
press
the
knob
to
confirm,
rotate
the
knob
to
select
the
hundredth
digit
and
press
the
knob
to
confirm,
press
the
knob
button
again
to
play
the
track.
-
Press
the
knob
more
than
0.5
second
to
play
your
desired
track.
For
example:
To
search
character
"ECHO".
MP3
Overview
Note
on
MP3
"MP3"
technology
(mpeg
audio
layer3)
reduces
the
digital
data
of
an
audio
CD
significantly
while
maintaining
CD-like
sound
quality.
*
MP3
is
a
music
compression
technology,
MP3
(mpeg
audio
layer
3)
reduces
the
digital
data
of
an
audio
CD
significantly
while
maintaining
CD-like
sound
quality.
*
This
product
allows
playback
of
MP3
files
on
CD-ROM,
CD-R
or
CD-RW
discs.
The
unit
can
read
MP3
files
written
in
the
format
compliant
with
ISO
9660.
However
it
does
not
support
the
MP3
data
written
by
packet
writing.
*
The
unit
can
not
read
an
MP3
file
that
has
a
file
extension
other
than
".mp3".
*
If
you
play
a
non-MP3
file
that
has
the
"
.mp3
"
extension,
you
may
hear
some
noise.
*
In
this
manual,
we
refer
to
what
are
called
"MP3
file"
and
"folder"
in
PC
terminology
as
"track"
and "album"
respectively.
*
Maximum
number
of
directory
is
128,
maximum
number
of
directory
level
is
8,
including
the
root
directory.
Maximum
number
of
MP3
files
per
disc
is
1000.
The
unit
may
not
play
tracks
in
the
order
of
track
numbers.
*
The
unit
support
multi-session
disc
with
MIXED
&
EXTRA
format,
but
plays
the
MP3
tracks
is
priority.
MIXED
format:
disc
structure
first
is
MP3
data,
second
is
audio
data.
EXTRA
format:
disc
structure
first
is
audio
data,
second
is
MP3
data.
¢
The
unit
support
all
MPEG
bit
rate
including
free
format
for
MPEG
1
audio
layer
3,
support
all
MPEG
bit
rate
except
8kbps
and
free
format
for
MPEG
2
audio
layer
3.
*
The
unit
support
32/44.1/48kHz
sampling
rate
for
MPEG
1
audio
layer
3,
32/44.1/48kHz
and
16/22.05/24kHz
sampling
rate
for
MPEG
2
audio
layer
3,
and
44.1kHz
sampling
rate
for
VBR
(Variable
Bit
Rate)
.
How
to
get
music
files
*
Either
download
legal
music
files
from
the
internet
to
your
computer
hard
disc
or
create
them
from
your
own
audio
CDs.
For
this,
insert
an
audio
CD
into
your
computer
CD-RW
drive
and
convert
the
music
using
an
appropriate
encoding
software.
Note
on
creating
your
own
CD-Rs
or
CD-RWs
containing
MP3
files
*
To
enjoy
high
quality
music,
we
recommend
converting
MP3
files
with
a
sampling
frequency
of
44.1
kHz
and
a
fixed
bit
rate
of
128
kbps.
*
Do
not
store
more
than
1000
MP3
files
per
disc.
For
ISO
9660-compliant
format,
the
maximum
allowable
depth
of
nested
folders
is
8,
including
the
root
directory
(folder).
When
CD-R
disc
is
used,
playback
is
possible
only
for
discs
which
have
been
finalized.
Make
sure
that
when
MP3,
CD-R
or
CD-
RW
is
burned
that
it
is
formatted
as
a
data
disc
and
NOT
as
an
audio
disc.
It
is
not
recommended
to
write
non-MP3
files
or
un-related
folders
along
with
MP3
files
on
the
disc,
otherwise
it
may
take
longer
time
to
start
playing
the
MP3
music.
With
some
CD-R
or
CD-RW
media,
data
may
not
be
properly
written
depending
on
their
manufacturing
quality.
In
this
case,
data
may
not
be
reproduced
correctly.
High
quality
CD-R
or
CD-RW
disc
is
recommended.
Support
ID3
tag
Version
1.XX
and
2.XX,
up
to
16
characters
can
be
displayed
for
the
title
of
the
song,
album
and
the
artist.
Note
that
the
unit
may
not
play
tracks
as
ripped
and
recorded.

RDS
(Radio
Data
System)
It
constantly
updates
the
AF
list
of
preset
stations,
including
the
one
that
currently
tuned
into.
If
you
preset
a
station
around
the
area
at
RDS
service
availability
varies
with
areas.
Please
understand
if
RDS
service
is
not
available
in
your
area,
the
following
service
is
Traffic
Announcements
Some
RDS
FM
stations
periodically
provide
traffic
information.
not
available.
TP
(Traffic
Program
Identification)
your
home,
you
will
later
be
able
to
receive
Broadcasting
of
traffic
information
the
same
station
at
an
alternative
frequency,
RDS
Basics
TA
(Traffic
Announcements
Identification)
or
any
other
station
serving
the
same
AF
(Alternative
Frequency)
When
the
radio
signal
strength
is
poor,
enabling
the
AF
function
will
allow
the
unit
to
automatically
search
another
station
with
the
same
PI
(program
identification)
as
the
current
station
but
with
stronger
signal
strength.
PS
(Program
Service
name)
The
name
of
station
will
be
display
instead
of
frequency.
AF
Mode:
Press
AF
button
to
switch
AF
mode
on
and
off.
AF
on:
AF
function
is
activated.
AF
off:
AF
function
is
disabled.
Remark:
AF
indicator
on
LCD
will
flash
until
RDS
information
is
received.
If
RDS
service
is
not
available
in
your
area,
turn
off
the
AF
mode.
REG
Mode:
Press
AF
button
for
more
than
2
seconds
to
switch
REG
mode
on
and
off.
REG
on:
AF
function
will
implement
the
regional
code
(of
the
PI)
and
only
stations
in
the
current
region
can
be
tuned
automatically.
REG
off:
AF
function
will
ignore
the
regional
code
(of
the
Pl)
and
stations
in
the
other
regions
can
also
be
tuned
automatically.
Radio
announcements
on
traffic
conditions
TA
Mode:
Press
TA
to
turn
on/off
the
TA
function.
When
TA
mode
is
turned
on,
the
TA
indicator
will
blink.
When
traffic
announcement
is
received,
the
TA
indicator
will
display.
The
unit
will
temporarily
switch
to
the
tuner
mode
(regardless
of
the
current
mode)
and
begin
broadcasting
the
announcement
at
TA
volume
level.
After
the
traffic
announcement
is
over,
it
will
return
to
the
previous
mode
and
volume
level.
When
TA
is
turned
on,
SEEK,
SCAN,
AMS
function
can
only
be
received
or
saved
when
traffic
program
identification
(TP)
code
is
received.
EON
(Enhanced
Other
Networks)
When
EON
data
is
received,
the
EON
indicator
lights
and
the
TA
and
AF
functions
are
enhanced.
TA:
Traffic
information
can
be
received
from
the
current
station
or
stations
in
other
network.
AF:
The
frequency
list
of
preset
RDS
stations
is
updated
by
EON
data.
EON
enables
the
radio
to
make
fuller
use
of
RDS
information.
program,
EON
also
keeps
track
of
locally
available
TP
stations
for
quick
reception.

RDS
(Radio
Data
System)
PTY
Reception
(Program
Type)
RDS
FM
stations
provide
a
program
type
identification
signal.
Example:
news,
rock,
info,
sport,
etc.
PTY
Mode:
Press
PTY
to
turn
on
the
program
type
reception,
the
previous
PTY
type
is
shown.
Press
PTY
once
again
to
enter
the
MUSIC
type
or
press
twice
to
enter
the
SPEECH
type,
then
use
buttons
1
-
6
to
select
the
desired
program
type.
The
selected
PTY
type
is
shown
and
searching
starts
if
no
other
function
is
selected
for
2
seconds.
If
there
is
no
corresponding
program
type,
NO
PTY
is
shown
and
the
unit
will
return
to
normal
mode.
PTY
Type
Preset:
Press
PTY
once
to
enter
the
MUSIC
type
or
press
PTY
twice
to
enter
the
SPEECH
type.
Then
use
function
1
-
6
to
select
the
desired
program
type.
PRESET
NO.
MUSIC
TYPE
SPEECH
TYPE
POP
M
NEWS
1
AFFAIRS
ROCK
M
INFO
EASY
M
SPORT
2
EDUCATE
LIGHT
M
DRAMA
CLASSICS
CULTURE
3
SCIENCE
OTHER
M
VARIED
JAZZ
M
WEATHER
4
FINANCE
COUNTRY
CHILDREN
NATIONAL
M
SOCIAL
5
RELIGION
OLDIES
M
PHONE
IN
TRAVEL
6
FOLK
M
LEISURE
DOCUMENT

TA
mode
Rotate
the
knob
to
choose
TA
ALARM
or
TA
SEEK
mode.
If
the
TA
(traffic
announcements)
is
turned
on
and
there
is
no
traffic
program
identification
code
received
in
the
specified
time,
no
TA/TP
will
display
and
either
TAALARM
or
TA
SEEK
will
be
activated.
TA
ALARM
mode
:
Alarm
is
turned
on.
TA
SEEK
mode:
TA
SEEK
is
automatically
activated.
MASK
mode
Rotate
the
knob
to
choose
MASK
DPI
or
MASK
ALL
mode.
In
some
cases,
the
AF
function
may
be
influenced
by
some
interference,
examples
are
signals
with
strong
field
but
without
the
RDS
data.
For
this
reason,
the
unit
has
two
options
to
avoid
the
above
interference.
MASK
DPI
mode
:
Only
AF
which
has
different
program
identification
is
masked.
MASK
ALL
mode
:
The
AF
which
has
different
program
identification
and
NO
RDS
signal
with
high
field
strength
is
masked.
TA
VOL
mode
Rotate
the
knob
to
adjust
TA
volume
level.
RETUNE
mode
Rotate
the
knob
to
choose
RETUNE-S
or
RETUNE-L.
RETUNE-S
or
RETUNE-LL
is
time
length
selection
of
TA
SEEK
retune
interval.
RETUNE-S:
Short,
TA
SEEK
retune
interval
is
45
seconds.
RETUNE-L:
Long,
TA
SEEK
retune
interval
is
180
seconds.
Remark:
RETUNE
mode
functions
for
TA
during
TA
SEEK
mode
only.
DSP
mode
Rotate
the
knob
to
choose
DSP
sound
effect:
POP
->
FLAT
->
CLASSIC
->
ROCK
->
OFF
EPS
mode
ESP
12s:
Selected
as
CD-ESP
time
12
seconds,
MP3-ESP
time
>100
seconds.
ESP
45s:
Selected
as
CD-ESP
time
45
seconds,
MP3-ESP
time
>100
seconds.
MULT
mode
MULT
OFF:
Mixed
CD,
one
session
CD.
MULT
ON:
Mixed,
extra,
multi
session
CD.
LOUD
ON/OFF
mode
Rotate
the
knob
to
choose
loudness
on
or
off.
WOOF
ON/OFF
mode
Rotate
the
knob
to
choose
sub-
woofer
on
or
off.
BEEP
ON/OFF
mode
Rotate
the
knob
to
choose
button
beep
sound
on
or
off.
Press
SEL/MENU
knob
more
than
2
seconds
to
enter
menu
mode,
then
each
press
changes
the
mode
as
follows:
TA
mode
->
MASK
mode
->
TA
VOL
mode
->
RETUNE
mode
->
DSP
mode
->
ESP
mode
->
MULT
mode
->
LOUD
ON/OFF
mode
->
WOOF
ON/OFF
mode
->
BEEP
ON/OFF
->
SEEK1/2
mode(only
in
tuner
mode)
->
ST/MO
mode(only
in
tuner
mode)
->
LOCAL/DX
mode(only
in
tuner
mode)
->
VOL
mode
SEEK
1/2
mode
Rotate
the
knob
to
choose
radio
seek
mode
1
or
2.
SEEK
1:
Searching
station
will
stop
when
the
next
station
is
received.
SEEK
2:
Searching
station
will
stop
when
I<
or
>>
button
is
released
and
next
station
is
received.
STEREO/MONO
mode
Rotate
the
knob
to
choose
FM
stereo
or
mono.
LOCAL/DX
mode
Rotate
the
knob
to
choose
tuner
sensitivity
local
or
distant.
VOL
mode
Rotate
the
knob
to
choose volume
last/adjust
mode.
VOL
LAST:
The
turn-on
volume
level
is
the
volume
of
latest
power
off.
VOL
ADJUST:
Press
the
knob
to
enter
A-VOL
mode,
rotate
to
set
the
turn-on
volume
level.

Electrical
Connections
Wiring
Diagram
Antenna
afta
da
all
all
ef
a
Tal
AT
al
al
ol
Sub-woofer
out
(mi
[
_
(Green)
Fuse
15A
Connector
Rear
Line-out
(Gray)
=
R(Red)
HC
[|
—_/
L(White)
ISO
connector
Front
Line-out
(Brown)
=
R(Red)
mm
b
L(White)
Location
Function
Connector
A
Connector
B
1
Rear
Right
(+)
-
Purple
2
Rear
Right
(-)
-
Purple
/
Black
Stripe
3
Front
Right
(+)
-
Gray
4
Battery
12V(+)/yellow
Front
Right
(-)
-
Gray
/
Black
Stripe
5
Auto
Antenna/blue
Front
Left(+)
-
White
6
Front
Left(-)
-
White
/
Black
Stripe
7
ACC+/red
Rear
Left
(+)
-
Green
8
Ground/black
Rear
Left
(-)
-
Green
/
Black
Stripe
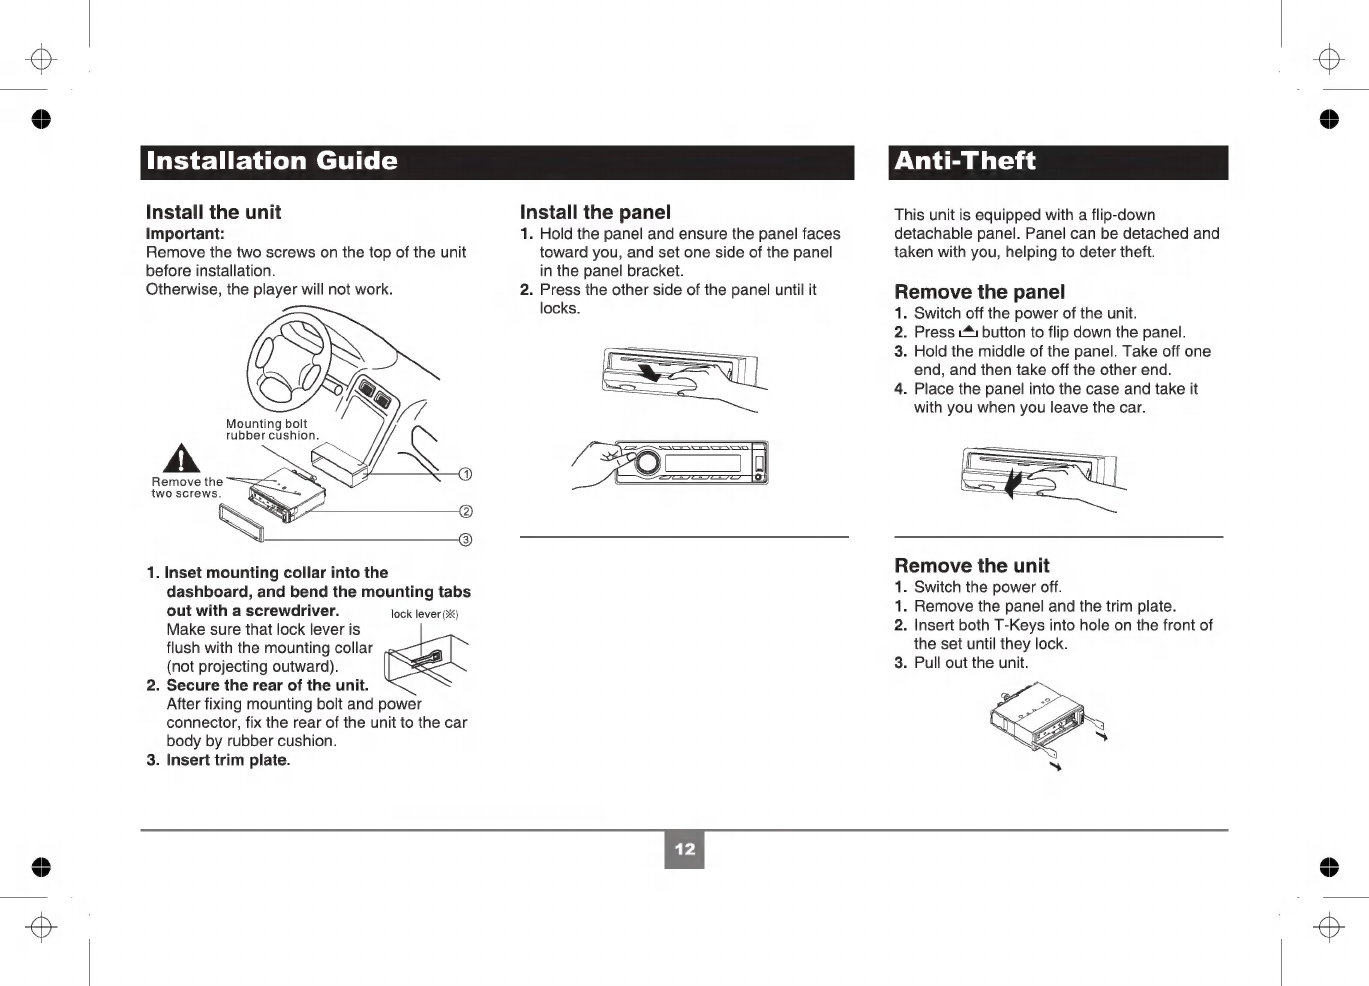
Installation
Guide
Installation
Procedures
First
complete
the
electrical
connections,
and
check
for
correctness.
Reset
When
the
installation
and
connections
are
completed,
be
sure
to
press
the
RESET
witha
ball-point
pen,
etc.
Note:
Press
the
RESET
button
will
erase
the
clock
and
stored
stations.
Reset
Installation
Opening
This
unit
can
be
installed
in
any
dashboard
having
an
opening
as
shown
below.
The
dashboard
should
be
4.75mm
-
5.56mm
thick
in
order
to
be
able
to
support
the
unit.
=
~53mm
>}
ms
182mm
Installation
Guide
Install
the
unit
Install
the
panel
Important:
1.
Hold
the
panel
and
ensure
the
panel
faces
Remove
the
two
screws
on
the
top
of
the
unit
toward
you,
and
set
one
side
of
the
panel
before
installation.
in
the
panel
bracket.
Otherwise,
the
player
will
not
work.
2.
Press
the
other
side
of
the
panel
until
it
locks.
¢
S
S
Mounting
bolt
rubber
cushion.
A
1.
Inset
mounting
collar
into
the
dashboard,
and
bend
the
mounting
tabs
out
with
a
screwdriver.
lock
lever
(>)
Make
sure
that
lock
lever
is
flush
with
the
mounting
collar
(not
projecting
outward).
2.
Secure
the
rear
of
the
unit.
After
fixing
mounting
bolt
and
power
connector,
fix
the
rear
of
the
unit
to
the
car
body
by
rubber
cushion.
3.
Insert
trim
plate.
Anti-Theft
This
unit
is
equipped
with
a
flip-down
detachable
panel.
Panel
can
be
detached
and
taken
with
you,
helping
to
deter
theft.
Remove
the
panel
1.
Switch
off
the
power
of
the
unit.
2.
Press
“1
button
to
flip
down
the
panel.
3.
Hold
the
middle
of
the
panel.
Take
off
one
end,
and
then
take
off
the
other
end.
4.
Place
the
panel
into
the
case
and
take
it
with
you
when
you
leave
the
car.
Remove
the
unit
1.
Switch
the
power
off.
1.
Remove
the
panel
and
the
trim
plate.
2.
Insert
both
T-Keys
into
hole
on
the
front
of
the
set
until
they
lock.
3.
Pull
out
the
unit.
Troubleshooting
If
you
suspect
something
is
wrong,
immediately
switch
power
off.
Do
not
use
the
unit
in
abnormal
condition,
for
example
without
sound,
or
with
smoke
or
foul
smell,
can
cause
fire
or
electric
shock.
Immediately
stop
using
it
and
call
the
store
where
you
purchased
it.
Never
try
to
repair
the
unit
yourself
because
it
is
dangerous
to
do
so.
General
No
power
or
no
sound.
Car's
engine
switch
is
not
on.
Turn
your
car's
key
to
ACC
or
ON.
Cable
is
not
correctly
connected.
Check
connection.
Fuse
is
burnt.
Replace
fuse.
Check
volume
or
mute
on
/
off.
If
the
above
solutions
cannot
help.
Press
the
RESET
button.
Radio
Much
noise
in
broadcast.
Station
is
too
far,
or
signals
are
too
weak.
Select
other
stations
of
higher
signal
level.
Preset
station
lost.
Battery
cable
is
not
correctly
connected.
Connect
the
battery
cable
to
the
terminal
that
is
always
live.
Disc
Disc
is
inside
but
no
sound.
Disc
is
upside
down.
Place
disc
in
the
correct
direction,
and
the
label
side
up.
Disc
is
dirty
or
damaged.
Clean
disc
or
change
another
disc.
Disc
sound
skips,
tone
quality
is
low.
Disc
is
dirty
or
damaged.
Clean
CD
or
change
another
CD.
Sound
skips
due
to
vibration.
Mounting
angle
is
over
30°.
Adjust
mounting
angle
to
less
than
30°.
Unstable
mounting.
Mount
the
unit
securely
with
the
mounting
parts.
Error
Display
Messages
Display
shows
NO
FILE:
Disc
is
not
CD
or
contains
no
MP3
files.
Display
shows
ERR-4:
Disc
upside
down.
Display
shows
ERR-10:
Recovery
error,
check
the
disc.
Display
shows
ERR-11:
MP3
error,
check
the
disc.
Display
shows
ERR-12:
USB/SD/MMC
MP3
data
error.
Display
shows
ERR-3
or
ERR-7:
Disc
mechanism
error:
Press
&
to
eject
the
disc.
In
case
that
the
disc
cannot
be
ejected
by
pressing
&
,
press
the
RESET
switch
and
press
the
&
again.
If
you
are
still
unable
to
eject,
consult
your
dealer.

Specifications
General
Power
supply
Maximum
power
output
Suitable
speaker
impedance
Suitable
speaker
power
Pre-Amp
output
voltage
Fuse
Dimensions(WxHxD)
Weight
Aux-in
level
Sub-woofer
out
Disc
Player
System
Frequency
response
Signal/noise
ratio
Total
harmonic
distortion
Channel
separation
FM
Stereo
Radio
Frequency
range
Usable
sensitivity
Frequency
response
Stereo
separation
Image
response
ratio
IF
response
ratio
Signal/noise
ratio
12V
DC(11V-16V)
Test
voltage
14.4V,
negative
ground
45Wx4
channels
4-80hm
80-100Wx4
channels
2.0V
(CD
play
mode:
1KHz,
OdB,
10KQ
load)
15A
178x50x166mm
1.64kg
2300mV
2.0V
Disc
digital
audio
system
20Hz
-
20KHz
>80dB
Less
than
0.20%
(1KHz)
>60dB
87.5-108.0MHz
(Europe)
87.5-107.9MHz
(USA)
10dBu
30Hz-15KHz
30dB
(1KHz)
50dB
70dB
55dB
AM(MW)
Radio
Frequency
range
Usable
sensitivity(S/N=20dB)
Components
Mounting
collar
Machine
screws
M5x6
mm
M4x6
mm
Mounting
bolt
(60mm)
Wire
connector
Removable
face
plate
case
Trim
plate
T-key
Operating
Instructions
Rubber
cushion
Remote
control
unit
Note:
Specifications
and
the
design
are
subject
to
change
without
notice
due
to
improvements.
522-1620KHz
(Europe)
530-1710KHz
(USA)
30dBu
kek
Rak
ek
Sa
Se

PN:
127075001835
Table of contents


