Senior Bad W20 User manual

Assembly Instructions Whirlpool Bath
W20 (11v20) eng
Attention: The pool should always be
be done by two people!
VOL- VOL+
ON
OFF TUN
TUN
DB -3 0 +3 +6
Senior
Bad
GmbH

2
Foreword
Dear customer, we are pleased that you have chosen this product. Please observe all
instructions before assembly and use and strictly follow the procedure below!
Please check the product for completeness rst. If there is any damage, please send us a
message with a short description and photos of the aected area. A responsible employee
will contact you as soon as possible and nd a solution together with you.
You have a 2-year legal warranty on all products.
Important information
Please note: The product is designed exclusively for private use. Our products are sub-
ject to constant further development. This may result in changes to the design and the
use of other components. We try to keep the following pages up to date. If you have any
questions regarding the design, please contact us at +49 35795 - 179 600 or by e-mail at
kundenservice@seniorbad.de. We are very grateful for any suggestions for improvement.
Please read the operating instructions carefully rst!
If you still have questions about the assembly, we will be happy to help you personally.
Complaints resulting from incorrect installation or use are excluded from the warranty!
Seals, hand showers, shower hoses and castors are wearing parts, therefore a warranty
period of 6 months applies here. The costs for replacement are not covered. Illuminants are
completely excluded from the warranty.
• Installation and assembly work should only be carried out by a skilled worker.
• Make sure that the bathtub is properly earthed. We recommend that any electrical
connections be made by trained professionals.
• The permissible water pressure should be approx. between 4 and 6 bar.
• From a hardness level of 10° (German hardness) we recommend the installation of a
softening device.
• Complaints based on limescale deposits are excluded from the warranty!

3
Sealing areas under/behind the bathtub
Sealing is compulsory - silicone is not enough!
The areas behind and under the bathtub must be tiled. Sealant joints - like silicone joints
- are not waterproong, but only maintenance and beauty joints! Only the use of bathtub
sealing tapes or e.g. sheet sealants comply with this DIN.
Waterproong according to DIN 18534
„This standard is therefore not only addressed to the waterproong specialist, but also to
those who are responsible for the overall planning and execution of the building and its
components, because the eect and durability of the waterproong depend on the coordi-
nated planning of all those involved.“
You as the installer are responsible for reliable waterproong alongside the planner and
tiler. „The waterproong must full its function for the intended service life with sucient
reliability.“
Waterproong must be planned so that it functions for the entire duration of use. In a
domestic bathroom, this can be an average of 20 to 25 years. In practice, this means laying
tiles or a membrane waterproong under the bath is mandatory. Note that the sealing area
at the transition from the oor to the wall must be at least 10 cm high.
Please note:
• The pool must not be permanently installed. It must be ensured that it can be moved
away from the wall for maintenance work.
• The pool should be connected by an approved tradesman.
• The pool should be installed by a professional in accordance with these installa-
tion instructions. The electrical connection for the pool must be made by a certied
electrician. This person must also ensure sucient earthing to prevent accidents and
malfunctions.
• Please have an electrician check the function of the residual current circuit breaker
regularly.
• The statics of the oor must ensure that it can withstand the total weight of the pool,
including water and one person.
• The feet of the pool must stand on a rm, stable surface. The oor must be level.
• Any damage found during unpacking must be reported to the dealer immediately; it is
best to take photos and send them to the dealer

4
Technical data
Outside dimensions of the pool 141 cm Length
141 cm Wide
55 cm Hight
Inner dimensions of the pool at the bottom 105 cm x 45 cm
top 150 cm x 63 cm
Hot and cold water connection ½ Inch max. 4 Bar
Waist water HT 40mm
Power connection 220-240 V
50 Hz
max. 4 A
Heating 1500 W
Massage pump air 300 W
Massage pump water 750 W
Max. water ll level 32 cm
Tools for the construction
Tools are not included in the package.
Spirit level Measuring
tape
Phillips / slotted
screwdriver
Open-end spanner
5
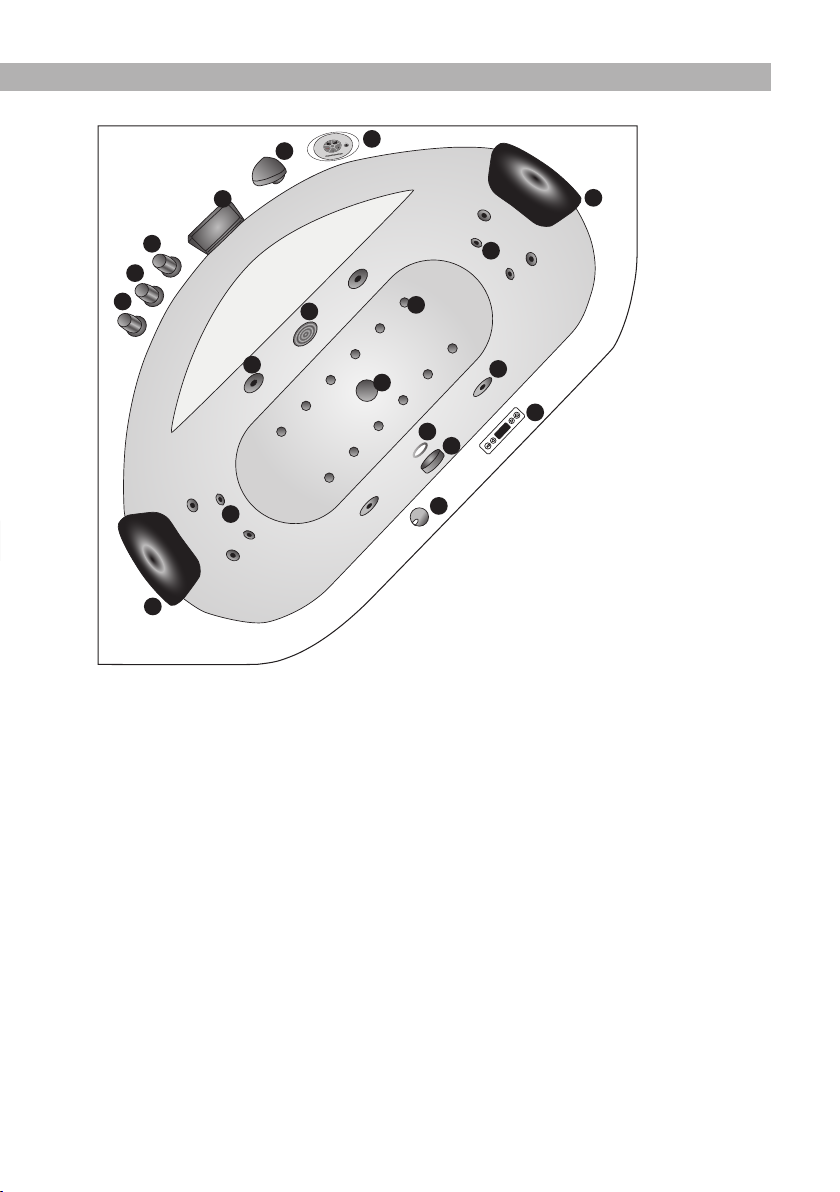
Bezeichnungen
1 Hand shower
2Waterfall
3 Hand shower/waterfall switch
4Cold water
5 Hot water
6Water aspirator
7 Massage jets large
8 Massage jets small
9 Air jets (per version)
10 Drain
11 Colour light
12 Drain opener
13 Massage setting
14 Control panel (per version)
15 Pillow
VOL- VOL+
ON
OFF TUN
TUN
DB -3 0 +3 +6
1
1
2
2
3
3
4
4
5
5
7
7
7
8
8
8
9
9
10
10
11
11
12
12
13
13
14
14
14
15
15
15
6
6
Handbrause
Wasserfall
Umschalter Handbrause/Wasserfall
Kaltwasser
Warmwasser
Wasseransauger
Massagedüsen groß
Massagedüsen klein
Luftdüsen (je Ausführung)
Abuss
Farblicht
Abussöner
Massageeinstellung
Bedienteil (je Ausführung)
Kopfkissen

6
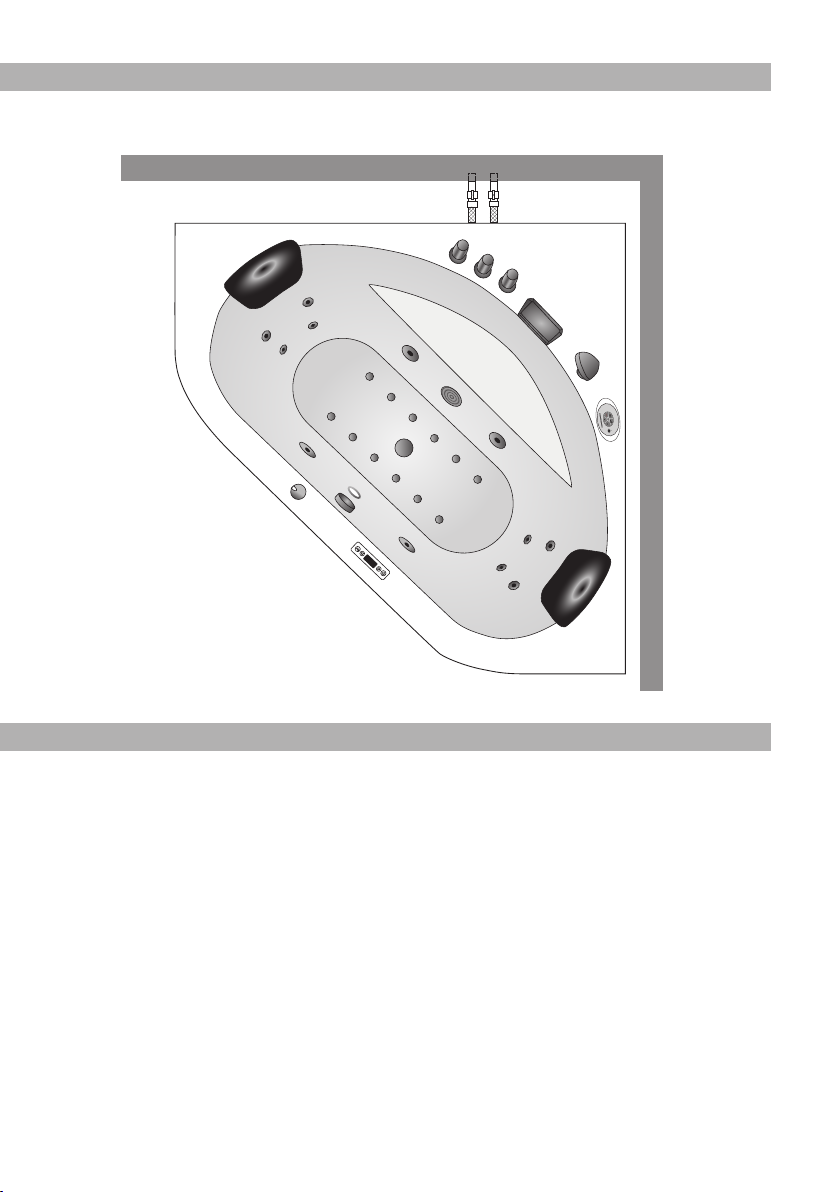
Vorbereitung der Anschlüsse
1 Socket 230V 16A (or xed
socket)
1a R-variant
2 Hot water 1/2 inch
2a possible with hose extension
3 Cold water 1/2 inch
3a possible with hose extension
4 ATTENTION: leave the 15 cm
Ø around the white siphon (dark
grey area) under the drain free.
5 Grey area = possible area for
the drain pipes, in the wall area
the drain can be up to a max.
height of 6 cm from the centre of
the hole.
Waste water via a exible con-
nection HT 40 supplied.
Connection possible without
dismantling the skirt/panel.
120 cm
4
1
23
40 cm 40 cm
70 cm
70 cm
5
80 cm
90 cm
3a
2a
1a
7
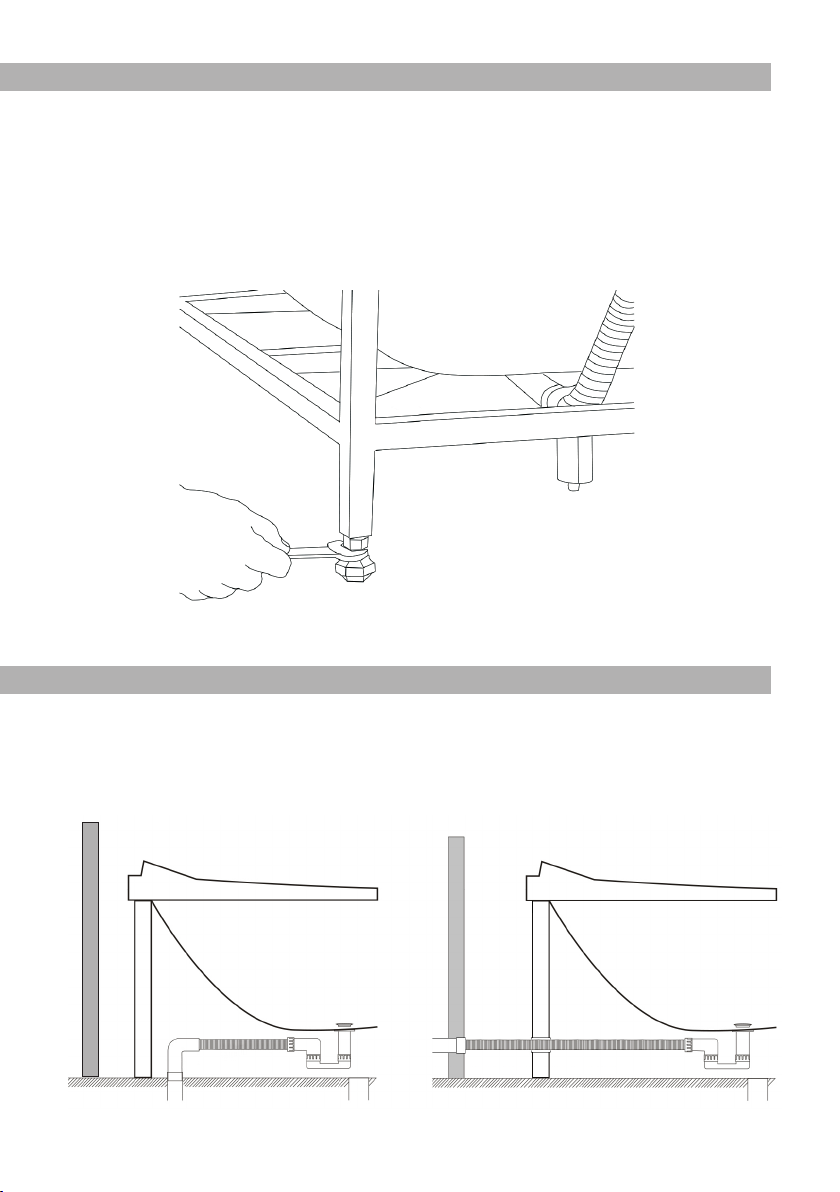
Alignment
In order for the pool to stand straight, it is necessary to align the pool exactly with the help of
a spirit level. Each foot is individually adjustable, so you can compensate for small irregular-
ities in the oor. Please make sure that all feet are touching the ground and that the weight
is evenly distributed on the ground. TO ADJUST THE FEET, THE APRON OF THE TUB
MUST NOT BE REMOVED. The front feet can be easily adjusted by tilting the tub slightly.
All other feet can be easily reached from the side.
Install drain pipes
The drain is in the oor, but the exible drain hose can also be attached to a drain in the
wall, but not higher than 6 cm so that the drain is still allowed. The exible connection HT 40
used for this purpose is included in the delivery. It is not necessary to remove the apron for
installation.
Tub
Ground
Wall
Tub
Ground
Wall
8
Connecting the cold and hot water
After the drain has been installed, the water is now connected. The cold water connection is
on the right and the hot water connection is on the left.
Commissioning/leak test
For the leak test, please now connect the water and waste water with the hose connections.
It is important that the tub continues to stand away from the wall so that you can still operate
behind it. Before you put the pipe under water pressure, please note that it has only been
pre-assembled by the factory to make it easier for you to set it up. It is absolutely necessary
that you check all screw connections and tighten them if necessary. This applies to the
nozzles and the clamps. Only when all this has been checked may you open the water inlet.
Now test all the functions that have to do with water, one after the other. Check the hand
shower and the function of the tap.
It is best to test this in pairs. One stands in front of or next to the bath, the other stands
behind the bath and looks at the hose connection and the function that is currently being
tested. If a screw connection is not properly tight, check whether the seal in the screw
connection is properly seated and whether it is screwed tight enough. After the leak test,
the electrical functions can now be tested. If the plug is plugged in, you can test the radio,
whirlpool function, etc.
VOL- VOL+
ON
OFF TUN
TUN
DB -3 0 +3 +6
Wand
Wand
Kaltwasser
Warmwasser
Wall
Hot water Cold water
Wall
9
Sealing
You can now draw a silicone joint between the tub and the wall to seal it.
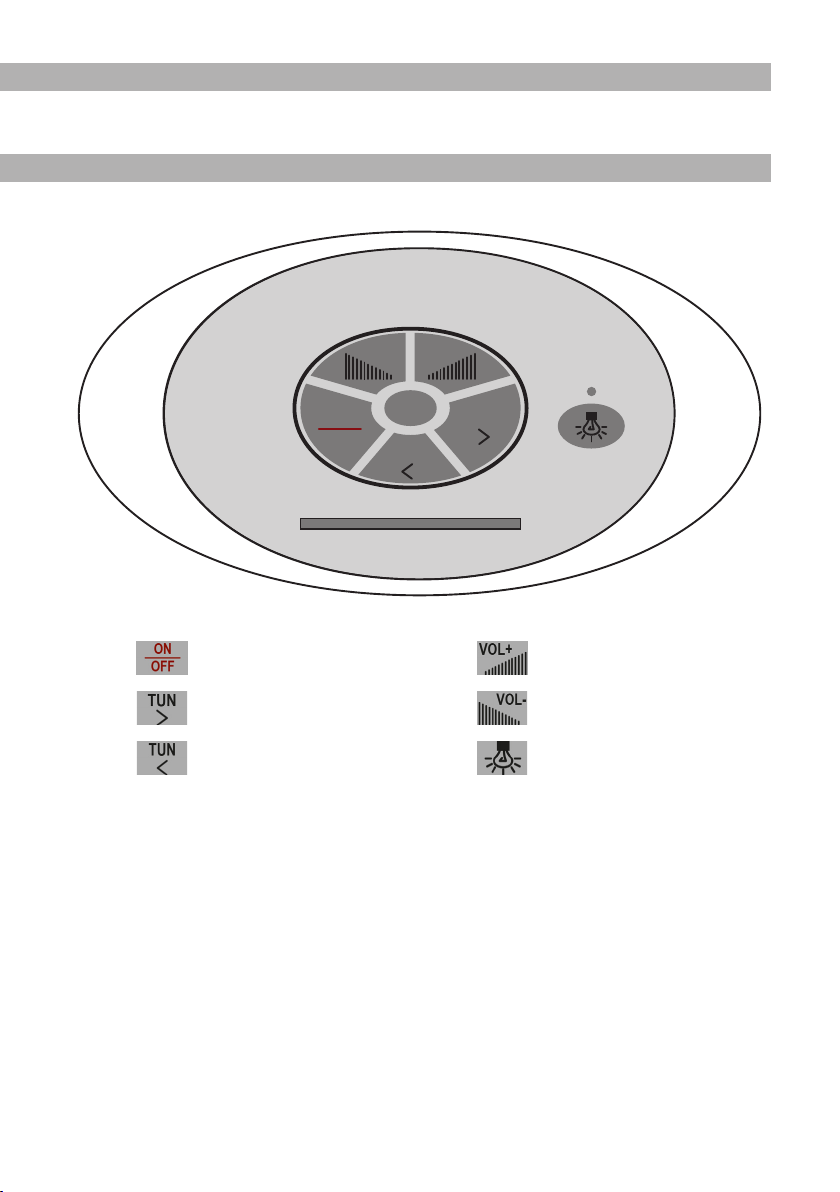
Pool control panel - A1420 R
On/o switch
Station search +
Station search -
Volume +
Volume -
Underwater lamp
VOL- VOL+
ON
OFF TUN
TUN
DB -3 0 +3 +6

10
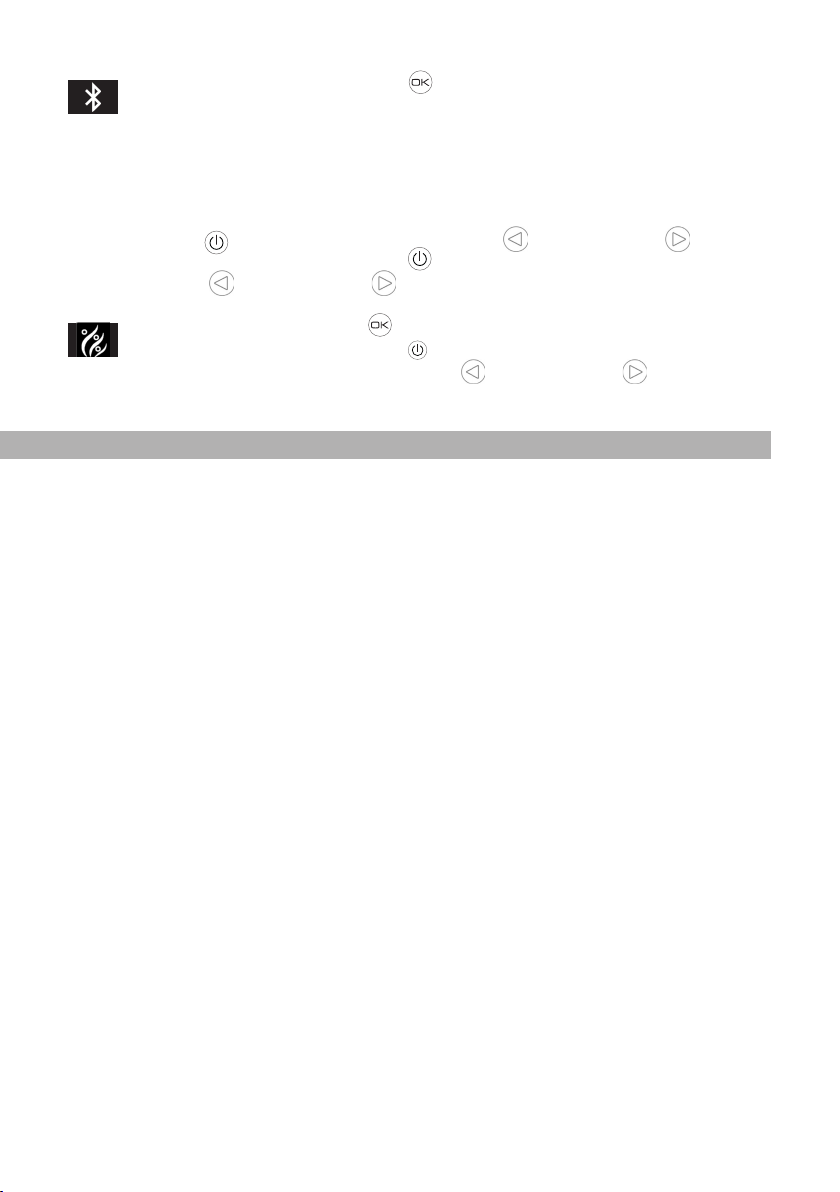
Pool Bedienteil - A1420 H
On/o switch Conrmation switch
left right
Press for 2 seconds to start the control unit, press again to switch the control unit o
again.
Press the left and right buttons to select the respective function and conrm
with .
Light Bluetooth Air jets
Ozone Heating Water jets
Press the key again to end the selected function.
If the control unit is not operated for more than 3 minutes, all keys are locked and „LOCK“
appears in the display. To unlock, press any key for 3 seconds, a sound indicates that the
keys are unlocked again and the „LOCK“ disappears from the display.
Select light conrm with and nish with .
Select ozone conrm with and press to end (the ozone switches o
automatically after 10 minutes). No Bluetooth music playback with ozone.
Select air massage conrm with and nish with .
Select water massage conrm with and press to end (the water pump
only switches on when the set water level is reached).
11
Conrm Bluetooth selection with (2s) The display shows „PAIR“. Switch
on the Bluetooth function on your mobile phone. The pool appears on your
display under the name JOYONWAY. The password is 2288. Now connect both
devices.
Now you can play music stored on your mobile phone or content from streaming
services (extra charge, not included in the scope of delivery) via the speakers of
the pool.
Press appears in the display. Use the left and right buttons to skip to
the next or previous track. Press to access the volume control „VOL“. Use
the left and right buttons to set the desired volume.
Select heating conrm with the temperature is set to 37° C by default.
To adjust the temperature, press until °C ashes on the display. Now you can
set the desired temperature with the left and right buttons .
The temperature setting range is between 35° and 45° C.
Maintenance and cleaning of the pool
1. Clean the pool with a mild liquid detergent and a soft cloth. Caution: Never use ace-
tone, cleaning agents containing ammonia or coarse-grained scouring agents!
2. Clear the pool drain regularly of hair and the like to prevent clogging.
3. Use an acrylic care product for the tub and the panel to protect the surface from
scratches.
4. Small scratches can be polished with toothpaste and a soft cloth, for example.
5. Before using the whirlpool system for the rst time, it should be rinsed through with
disinfectant. Afterwards, it is sucient to repeat the disinfection after approx. 5 baths.
Disinfection should also be carried out if the whirlpool system is not used for a longer
period of time.

12
Warranty and service
You receive a 2-year warranty for our products. A warranty period of 6 months applies to
wearing parts such as seals, hand showers and shower hoses. The costs for replacement
are not covered. Spare parts can be ordered from our customer service.
E-mail: kundenservice@seniorbad.de
Online shop: www.seniorbad.de
Telephone: +49 35795 - 179 600
Fax: +49 35795 - 179 699
Defects that can be traced back to calciferous or iron-rich water are excluded from the
warranty. Please describe the spare part exactly and state the exact pool type (e.g. W20).
We are always open to your comments and suggestions.
Note
Each pool is assembled, connected, tested and repacked at the factory for testing purpos-
es. As our products are subjected to several checks during manufacture, small amounts of
residual water may be present in parts of the product.
Recycling
The disposal of the product‘s electronics is governed by the Waste Electrical and Electronic
Equipment Act. The „old device“ must then be taken to an appropriate collection point.
We recommend that you remove the control unit, the lighting unit and the display and take
these parts to the electrical/electronic collection point. The remaining large „residue“ can be
treated as usual (local variant - such as bulky waste collection ...)..
Senior
BadGmbH
Table of contents
Other Senior Bad Bathtub manuals


Popular Bathtub manuals by other brands

Luca Varess
Luca Varess DUO installation guide

Kohler
Kohler Bancroft K-1158-GCR installation guide

Kohler
Kohler Mariposa K-1239-GRF manual

glass 1989
glass 1989 LIS 150 manual

Streamline
Streamline N-120-60FSWH-DM Owner's manual & installation guide

Aquatica Digital
Aquatica Digital AquateX Corelia Installation & Care Manual


