Senior Bad S17D User manual

1
Assembly Instructions Whirlpool Bath
S17D (08v22) eng
Attention: The assembly of this tub
should be done by two people!
Senior
BadGmbH

2
Foreword
Dear customer, we are pleased that you have chosen this product. Please observe all
instructions before assembly and use and strictly follow the procedure below!
Please check the product for completeness rst. If there is any damage, please send us a
message with a short description and photos of the aected area. A responsible employee
will contact you as soon as possible and nd a solution together with you.
You have a 2-year legal warranty on all products.
Important information
Please note: The product is designed exclusively for private use. Our products are sub-
ject to constant further development. This may result in changes to the design and the
use of other components. We try to keep the following pages up to date. If you have any
questions regarding the design, please contact us at +49 35795 - 179 600 or by e-mail at
kundenservice@seniorbad.de. We are very grateful for any suggestions for improvement.
Please read the operating instructions carefully rst!
If you still have questions about the assembly, we will be happy to help you personally.
Complaints resulting from incorrect installation or use are excluded from the warranty!
Seals, hand showers, shower hoses and castors are wearing parts, therefore a warranty
period of 6 months applies here. The costs for replacement are not covered. Illuminants are
completely excluded from the warranty.
• Installation and assembly work should only be carried out by a skilled worker.
• Make sure that the bathtub is properly earthed. We recommend that any electrical
connections be made by trained professionals.
• The permissible water pressure should be approx. between 4 and 6 bar.
• From a hardness level of 10° (German hardness) we recommend the installation of a
softening device.
• Complaints based on limescale deposits are excluded from the warranty!

3
Sealing areas under/behind the bathtub
Sealing is compulsory - silicone is not enough!
The areas behind and under the bathtub must be tiled. Sealant joints - like silicone joints
- are not waterproong, but only maintenance and beauty joints! Only the use of bathtub
sealing tapes or e.g. sheet sealants comply with this DIN.
Waterproong according to DIN 18534
„This standard is therefore not only addressed to the waterproong specialist, but also to
those who are responsible for the overall planning and execution of the building and its
components, because the eect and durability of the waterproong depend on the coordi-
nated planning of all those involved.“
You as the installer are responsible for reliable waterproong alongside the planner and
tiler. „The waterproong must full its function for the intended service life with sucient
reliability.“
Waterproong must be planned so that it functions for the entire duration of use. In a
domestic bathroom, this can be an average of 20 to 25 years. In practice, this means laying
tiles or a membrane waterproong under the bath is mandatory. Note that the sealing area
at the transition from the oor to the wall must be at least 10 cm high.
Please note:
• The pool must not be permanently installed. It must be ensured that it can be moved
away from the wall for maintenance work.
• The pool should be connected by an approved tradesman.
• The pool should be installed by a professional in accordance with these installa-
tion instructions. The electrical connection for the pool must be made by a certied
electrician. This person must also ensure sucient earthing to prevent accidents and
malfunctions.
• Please have an electrician check the function of the residual current circuit breaker
regularly.
• The statics of the oor must ensure that it can withstand the total weight of the pool,
including water and one person.
• The feet of the pool must stand on a rm, stable surface. The oor must be level.
• Any damage found during unpacking must be reported to the dealer immediately; it is
best to take photos and send them to the dealer.

4
Technical data
Outside dimensions of the pool 150 cm Length
75 cm Width
54 cm High
Hot and cold water connection ½ Inch max. 4 Bar
Waste water HT 40mm
Power connection 220-240 V
50 Hz
max. 4 A
Massage pump water 900 W
Max. water ll level 38 cm
Tools for the construction
Tools are not included in the package.
Check completeness!
Please check for completeness. If you do not nd something immediately, please check
again carefully. Small parts in particular are easily overlooked due to the large number of
parts and the mass of the packaging. Please do not dispose of the packaging until you are
sure that it does not contain any small parts.
Spirit level Drill/screwdriver Measuring
tape
Phillips / slotted
screwdriver
Open-end spanner
5
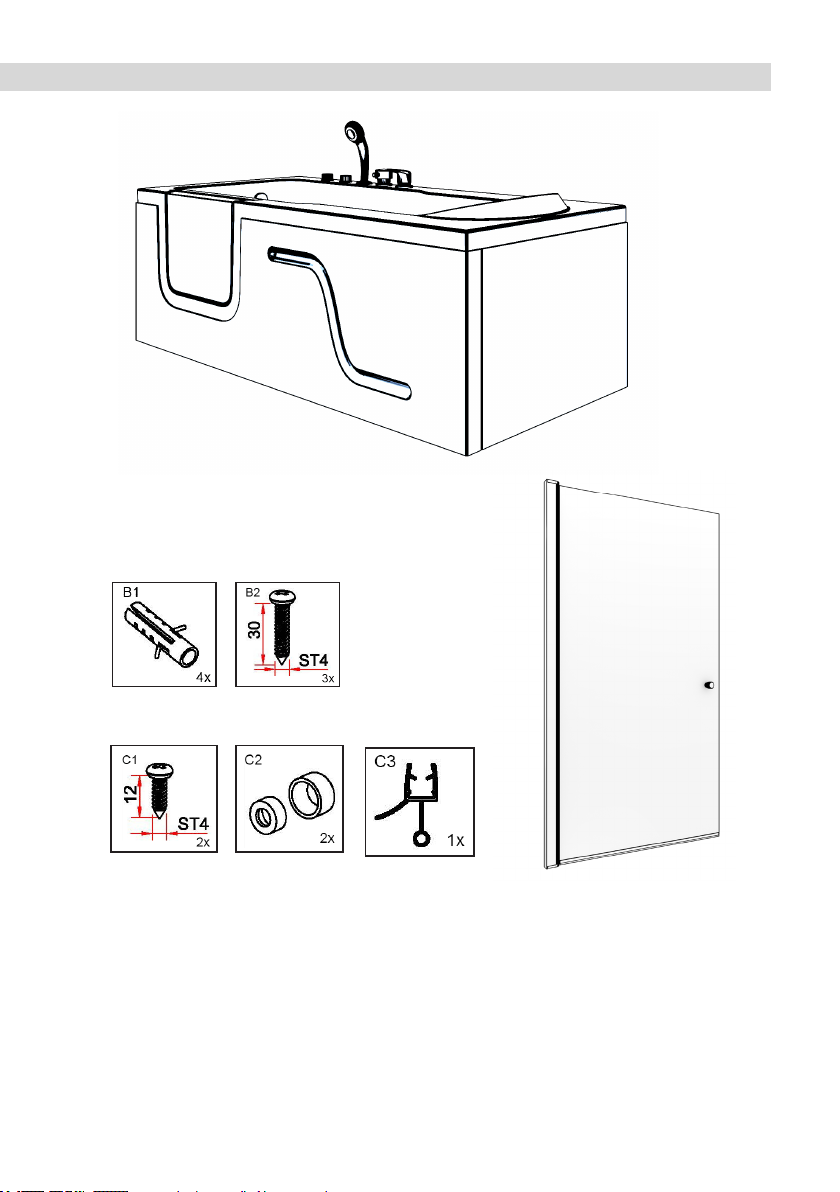
Product components
A
ASanitary acrylic bathtub with door
BWall rail
CShower door
B
C
C
B
Door seal
Wall plug Screws Wall rail
Connecting
screw to the
wall rail
Washers and
Cover caps
Table of contents
Other Senior Bad Bathtub manuals


Popular Bathtub manuals by other brands


Whirlpool
Whirlpool Ariel ARL-702 installation manual

Kohler
Kohler K-1151 Homeowner's guide

American Standard
American Standard 3052OD.X0X Installation instructions and owner's manual

Kohler
Kohler K-1111-H2 Roughing-In Guide

Kohler
Kohler K-1158 Roughing-In Guide

Kohler
Kohler Hourglass K-1209-LA Roughing-In Guide