Senix TL4QL-L1 User manual

15 IN. 46cc CULTIVATOR
Operator’s manual
Model: TL4QL-L1
For customer support, please call 1-800-261-3981 or send email to:
SAVE THIS MANUAL FOR FUTURE REFERENCE.
TM
2www.senixtools.com
• SAFETY & INTERNATIONAL SYMBOLS •
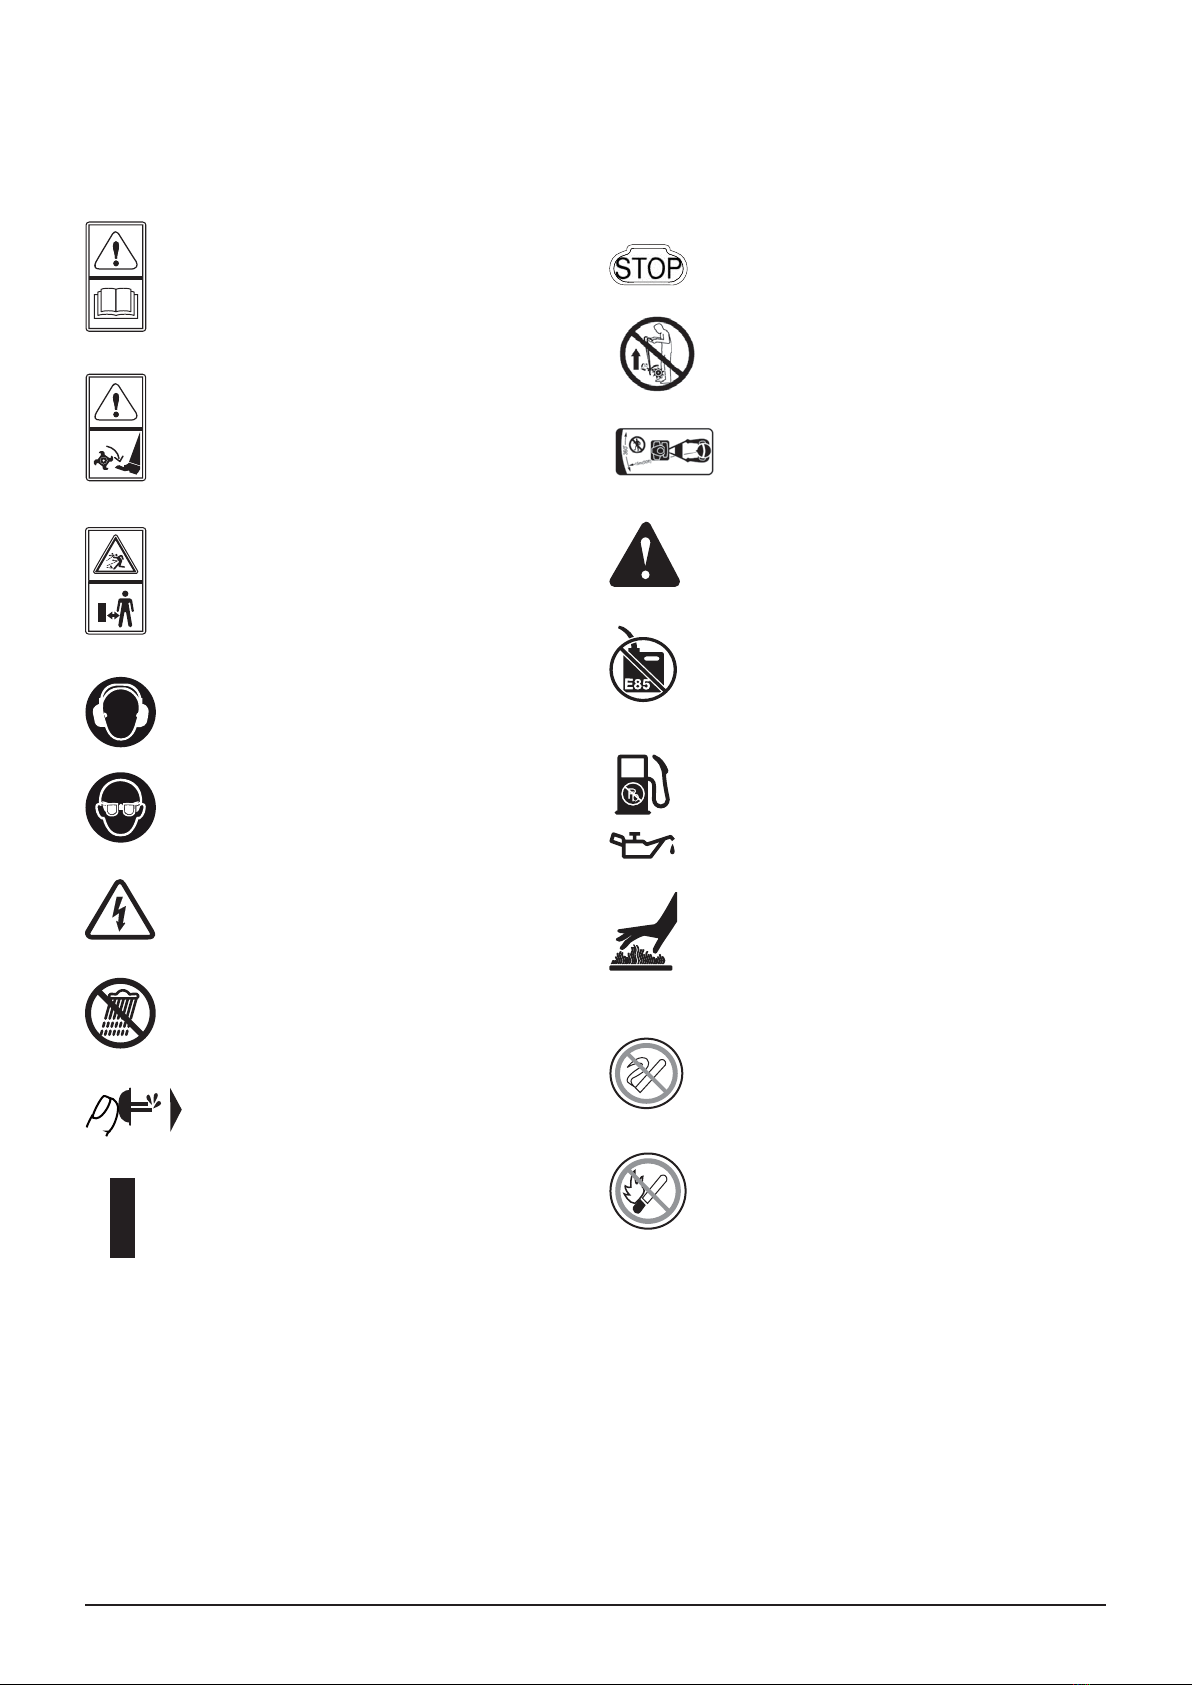
This operator’s manual describes safety and international symbols and pictographs that may appear on this product.
Read the operator’s manual for complete safety, assembly, operating and maintenance and repair information.
DO NOT USE E85 OR E15 FUEL IN THIS
UNIT. It has been proven that fuel contai-
ning greater than 10% ethanol will likely
damage this engine and void the warranty.
Always use clean, fresh unleaded fuel.
Refer to operator’s manual for the proper
type of oil.
Hot surface. Do not touch a hot muffler or
cylinder. You may get burned. These parts
get extremely hot from operation. They
remain hot for a short time after the unit is
turned off.
Do not smoke in the work area, around the
product and in the vicinity of flammable
materials!
No open flames in the work area around
the product.
Indicates danger, warning or caution. Pre-
cautions that involve your safety.
Avoid power lines, use in dry conditions.
Do not expose to rain.
Wear ear protection.
Wear eye protection.
Push primer bulb, fully and slowly, 10
times.
ON / START / RUN
OFF or STOP
Keep hands and feet away from sharp rot-
ating parts – danger of injury! When clea-
ning, repairing, or inspecting, make certain
the working tool and all moving parts have
stopped.
Carry unit with carry handle.
Keep bystanders a minimum of 15m (50ft.)
away while operating unit.
Caution/ Warning.
WARNING-To reduce the risk of injury, user
must read instruction manual.
Risk of flying objects or debris.
Be aware of that there is a risk of flying ob-
jects and/or debris when using the machine
keep bystanders away.

3www.senixtools.com
Table of Contents
WARNING:
Always wear the appropriate Personal
Protective Equipment (PPE) when
operating this machine.
DANGER:
Signals an EXTREME hazard. Failure
to obey a safety DANGER symbol WILL
result in serious injury or death to
yourself or to others.
WARNING:
Crude oil, gasoline, diesel fuel and
other petroleum products can expose
you to chemicals including toluene
and benzene, which are known to the
State of California to cause cancer
and birth defects or other reproductive
harm. These exposures can occur
in and around oil fields, refineries,
chemical plants, transport and storage
operations such as pipelines, marine
terminals, tank trucks and other
facilities and equipment. For more
information go to: www.P65Warnings.
ca.gov/petroleum.
WARNING:
Signals a SERIOUS hazard. Failure to
obey a safety WARNING symbol CAN
result in serious injury to yourself or to
others.
SAFETY INFORMATION
CAUTION:
Signals a MODERATE hazard. Failure
to obey a safety CAUTION symbol MAY
result in property damage or injury to
yourself or to others.
NOTE: Advises you of information or
instructions vital to the operation or
maintenance of the equipment.
WARNING:
This product contains a chemical
known to the state of California to
cause cancer, birth defects or other
reproductive harm.
WARNING:
ENGINE EXHAUST, SOME OF ITS
CONSTITUENTS AND CERTAIN
FINISHED COMPONENTS CONTAIN
OR EMIT CHEMICALS KNOWN TO THE
STATE OF CALIFORNIA TO CAUSE
CANCER AND BIRTH DEFECTS OR
OTHER REPRODUCTIVE HARM. WASH
HANDS AFTER HANDLING.
Read the operator’s manual and follow
all warnings and safety instructions.
Failure to do so can result in
serious injury to the operator and/or
bystanders.
SAFETY INFORMATION...................................................................3
WARRANTY......................................................................................8
KNOW YOUR UNIT...........................................................................9
SPECIFICATIONS*.........................................................................10
ASSEMBLY......................................................................................11
OPERATION....................................................................................13
MAINTENANCE..............................................................................16
TROUBLESHOOTING....................................................................20
PARTS.............................................................................................21
EC DECLARATION OF CONFORMITY...........................................23

4www.senixtools.com
INTENDED USE
This engine gasoline powered cultivator
is intended for loosening and working
up the soil in a garden and for tilling
coarse soil for mixing in fertilizer,
peat and compost in domestic areas.
This product may not be used to till
extremely dry or wet soil.
This product is intended for private
domestic use only, not for any
commercial trade use. It must not be
used for any purposes other than those
described.
GENERAL SAFETY RULES
• Read, understand, and follow all
instructions on the machine and in the
manual(s). Be thoroughly familiar with
the controls and the proper use of the
machine before starting.
• Use this equipment for its intended
purpose only.
• Familiarize yourself with all of the
safety and operating decals on
this equipment and on any of its
attachments or accessories.
• Do not put hands or feet near or under
rotating parts.
• Only allow responsible individuals
who are familiar with the instructions
to operate the machine. Do not allow
children to operate this machine.
Do not allow adults to operate the
machine without proper instruction.
Thoroughly inspect the area where the
machine is to be used and remove all
foreign objects. Your equipment can
propel small objects at high speed
causing injury or property damage.
Stay away from breakable objects,
such as house windows, automobiles,
greenhouses, etc.
• Wear appropriate clothing such as a
long-sleeved shirt or jacket. Also wear
long trousers or slacks. Do not wear
shorts. Never wear sandals, sneakers
or open shoes, and never operate the
machine with bare feet.
• Do not wear loose clothing or jewelry.
They can get caught in moving parts.
Always keep hands, feet, hair and
loose clothing away from any moving
parts on engine and machine.
• Always wear safety goggles or safety
glasses with side shields when
operating the machine to protect your
eyes from foreign objects which can
be thrown from the unit. Always wear
a protective hearing device.
• Always wear work gloves and sturdy
footwear. Wear footwear that will
improve footing on slippery surfaces.
Leather work shoes or short boots
work well for most people. These will
protect the operator’s ankles and
shins from small sticks, splinters, and
other debris.
• It is advisable to wear protective
headgear to prevent the possibility of
being struck by small flying particles,
or being struck by low hanging
branches, twigs, or other objects
which may be unnoticed by the
operator.
• Do not operate the machine without
proper guards or other safety
protective devices in place.
• See manufacturer’s instructions for
proper operation and installation of
accessories. Only use accessories
approved by the manufacturer.
• Operate only in daylight or good
artificial light.
• Do not operate product when fatigued
or under the influence of alcohol,
drugs or other medication which can
cause drowsiness or affect your ability
to operate this machine safely.
• Never operate machine in wet grass.
Always be sure of your footing; keep
a firm hold on the handle and walk;
never run.
• Watch for traffic when operating
cultivator near, or when crossing
roads.
• If the equipment should start to

5www.senixtools.com
vibrate abnormally, stop the engine
(motor) and press and hold the On/
Off switch in the off position till the
engine stops. The switch will return to
the on position automatically.
• Check immediately for cause.
Vibration is generally a warning of
trouble. If the noise or vibrations
of the machine increase, stop
immediately and perform an
inspection.
• Never leave the machine unattended
when the engine is running. Press
and hold the On/Off switch in the off
position till the engine stops. The
switch will return to the on position
automatically. The OFF switch
will come back to the ON position
automatically.
• Regularly inspect the machine. Make
sure parts are not bent, damaged or
loose.
• Temperature of muffler and nearby
areas may exceed 150° F (65° C).
Allow muffler and engine areas to
cool before touching. Never pick up or
carry the machine while the engine is
running.
• Prolonged exposure to noise and
vibration from gasoline engine-
powered equipment should be
avoided. Take intermittent breaks and/
or wear ear protection from engine
noise as well as heavy work gloves to
reduce vibration in the hands.
• Keep all screws, nuts and bolts tight.
• Do not transport the machine from
one place to another with the engine
running.
• When moving the packaged machine,
always do so with a partner.
• Check local regulations for age
restrictions on use of this machine.
PRODUCT-SPECIFIC SAFETY RULES
• Do not cultivate above underground
utilities, including water lines, gas
lines, electric cables, or pipes. Do not
operate the machine on terrain/soil
with large rocks and foreign objects
which can damage the equipment.
• After striking a foreign object, stop
the engine. Press and hold the On/
Off switch in the off position till the
engine stops. The switch will return to
the on position automatically. Inspect
the machine for damage. If damaged,
repair before starting and operating
the machine.
• The tines of the cultivator should not
rotate when the engine is idling. If
it does rotate when engine is idling,
contact us at 1-800-261-3981.
• If an object becomes lodged in
the tines, press and hold the On/
Off switch in the off position till the
engine stops. The switch will return to
the on position automatically. Allow to
cool before attempting to remove the
foreign object.
• The clutch will transfer maximum
power after about two hours of normal
operation. During this break-in period
clutch slippage may occur. The clutch
should be kept free of oil or other
moisture for efficient operation.
ENGINE SAFETY PRECAUTIONS
If your product comes with a separate
engine manual, be sure to read
and follow all safety and warning
precautions outlined there, in addition
to any in this manual.
Preventing Carbon Monoxide Poisoning
• Always start and run engine outdoors.
Do not start or run engine in an
enclosed area, even if doors or
windows are open.
• Never try to ventilate engine exhaust
indoors. Carbon monoxide can reach
dangerous levels very quickly.
• Never run engine outdoors where
exhaust fumes may be pulled into a
building.
• Never run engine outdoors in a poorly
ventilated area where the exhaust

6www.senixtools.com
fumes may be trapped and not easily
taken away. (Examples include: in
a large hole or areas where hills
surround your working area.)
• Never run engine in an enclosed or
partially enclosed area. (Examples
include: buildings that are enclosed
on one or more sides, under tents, car
ports or basements.)
• Always run the engine with the
exhaust and muffler pointed in the
direction away from the operator.
• Never point the exhaust muffler
towards anyone. People should
always be many feet away from
the operation of the engine and its
attachments.
• Do not change the engine governor
settings or over-speed the engine.
Gasoline Fires and Handling Fuel Safely
• Use extra care in handling gasoline
and other fuels. They are flammable
and vapors are explosive.
• When storing extra fuel be sure that
it is in an appropriate container and
away from any fire hazards.
• Prevent fire and explosion caused
by static electric discharge. Use only
nonmetal, portable fuel containers
approved by the Underwriter’s
Laboratory (U.L.) or the American
Society for Testing & Materials
(ASTM).
• Always fill fuel tank outside in a well
ventilated area. Never fill your fuel
tank with fuel indoors. (Examples
include: basement, garage, barn,
shed, house, porch, etc.) Never fill
tank near appliances with pilot lights,
heaters, or other ignition sources.
If the fuel has to be drained, this
should be done outdoors. The drained
fuel should be stored in a container
specifically designed for fuel storage
or it should be disposed of carefully.
• Never remove the fuel cap or add fuel
with the engine running. Stop engine
and allow to cool before filling.
• Never drain fuel from engine in an
enclosed area.
• Always wipe up excess (spilled) fuel
from engine before starting.
• Clean up spilled fuel immediately. If
fuel is spilled, do not start the engine
but move product and fuel container
from area. Clean up spilled fuel and
allow to evaporate and dry after
wiping and before starting.
• Allow fuel fumes/vapors to escape
from the area before starting engine.
• Test the fuel cap for proper installation
before starting and using engine.
• Always run the engine with fuel cap
properly installed on the engine.
• Never smoke while refilling engine fuel
tank.
• Do not store engine with fuel in fuel
tank indoors. Fuel and fuel vapors are
highly explosive.
• Never siphon fuel by mouth to drain
fuel tank.
• Always have an adult fill the fuel tank
and never allow children to fill the fuel
tank.
• Never allow an adult or anyone under
the influence of drugs or alcohol to fill
the fuel tank.
• When storing gasoline or equipment
with fuel in the tank, store away from
furnaces, stoves, water heaters or
other appliances that have a pilot light
or other ignition source because they
can ignite gasoline vapors.
WARNING:
ENGINES GIVE OFF CARBON
MONOXIDE, AN ODORLESS,
COLORLESS, POISONOUS GAS.
CARBON MONOXIDE MAY BE
PRESENT EVEN IF YOU DO NOT
SMELL OR SEE ANY ENGINE EXHAUST.
BREATHING CARBON MONOXIDE
CAN CAUSE NAUSEA, FAINTING OR
DEATH, IN ADDITION TO DROWSINESS,
DIZZINESS AND CONFUSION.IF

7www.senixtools.com
YOU EXPERIENCE ANY OF THESE
SYMPTOMS, SEEK FRESH AIR AND
MEDICAL ATTENTION IMMEDIATELY.
BURNS AND FIRES
The muffler, muffler guard and other
parts of the engine become extremely
hot during the operation of the engine.
These parts remain extremely hot after
the engine has stopped.
Prevention of Burns and Fires
• Never remove the muffler guard from
the engine.
• Never touch the muffler guard
because it is extremely hot and will
cause severe burns.
• Never touch parts of the engine that
become hot after operation.
• Always keep materials and debris
away from muffler guard and other hot
parts of the engine to avoid fires.
CHILDREN AND BYSTANDERS
Tragic accidents can occur if the
operator is not alert to the presence
of children and/or bystanders. Never
assume that others will remain where
you last saw them.
• Keep the area of operation clear of all
persons, especially small children and
pets. Keep children under the watchful
care of a responsible adult.
• Be alert and turn machine off if
children enter the area.
• Before and while moving backwards,
look behind and down for small
children.
• Never allow children to operate the
machine.
• Use extra care when approaching
blind corners, shrubs, trees, or other
objects that may obscure vision.
WARNING:
HOT GASES ARE A NORMAL BY-
PRODUCT OF A FUNCTIONING
INTERNAL COMBUSTION ENGINE.
FOLLOW ALL SAFETY INSTRUCTIONS
TO PREVENT BURNS AND FIRES.
SERVICE
• Always stop the engine whenever you
leave the equipment, before cleaning,
repairing or inspecting the unit.
Engine should be turned off and cool.
Never make adjustments or repairs
with the engine (motor) running.
• Always wear eye protection when you
make adjustments or repairs.
• Keep all nuts and bolts tight and keep
equipment in good condition.
• Never tamper with safety devices.
Check their proper operation regularly.
• When servicing or repairing the
machine, do not tip the machine over
or up unless specifically instructed
to do so in this manual. Service and
repair procedures can be done with
the machine in an upright position.
Some procedures will be easier if the
machine is lifted on a raised platform
or working surface.
• To reduce fire hazard, keep machine
free of grass, leaves or other debris
build-up. Clean up oil or fuel spillage.
Allow machine to cool before storing.
• Stop and inspect the equipment if you
strike an object. Repair, if necessary,
before restarting.
• Clean and replace safety and
instruction decals as necessary.
• Inspect machine before storage. When
not in use, press and hold the On/
Off switch in the off position till the
engine stops. The switch will return
to the on position automatically. And
store indoors in a dry place locked or
otherwise inaccessible to children.
• Use only original equipment parts for
the manufacturer including all nuts
and bolts.
SAVE THESE INSTRUCTIONS

8www.senixtools.com
LIMITED THREE-YEAR WARRANTY
3 year limited warranty on Senix 15 in. 46cc Cultivator.
FOR THREE YEARS from the original date of retail purchase this Cultivator is warranted against defects in
materials and workmanship period. Defective product will receive free repair.*
This warranty does not cover normal wear of parts and components such as, line or blades nor does this warranty
cover product transportation cost for warranty or service.
Warranty is subject to the following conditions
• Warranty applies to the original purchaser at retail and is not transferrable.
7KHWRROKDVQRWEHHQPLVXVHGDEXVHGQHJOHFWHGDOWHUHGPRGL¿HGRUUHSDLUHGE\DQ\RQHRWKHUWKDQDQ
authorized service center.
• Only genuine OEM accessories have been used with or on this product.
• The tool has been subjected to normal wear and tear.
• The tool has not been used for trade or professional purposes.
• The tool has not been used for rental purposes.
• This warranty only covers defects arising under normal usage and does not cover any malfunction, failure or
defect resulting from misuse, abuse (including overloading the product) accidents, neglect or lack of proper
installation and improper maintenance or storage.
To locate your nearest Senix service provider call toll free at 800-261-3981 or email us at [email protected].
Additional Limitations
$Q\LPSOLHGZDUUDQW\JUDQWHGXQGHUVWDWHODZLQFOXGLQJZDUUDQWLHVRIPHUFKDQWDELOLW\RU¿WQHVVIRUDSDUWLFXODU
purpose, are limited to two years from the date of purchase. The manufacturer is not responsible for direct, indirect,
incidental or consequential damages. Some states and provinces do not allow limitations on how long an implied
warranty lasts and/or do not allow the exclusion or limitation of incidental damages, so the above limitations and
H[FOXVLRQVPD\QRWDSSO\WR\RX7KLVZDUUDQW\JLYHV\RXVSHFL¿FOHJDOULJKWVDQG\RXPD\DOVRKDYHRWKHUULJKWV
which vary from state to state or province to province.
YAT USA declines any responsibility in regard to civil liability arising from abusive use or not in conformity with
proper use and maintenance of the machine as described in the operator’s manual.
YAT USA is not responsible for direct, indirect, incidental or consequential damages. After the purchase, the
manufacturer operator’s manual.
YAT USA is not responsible for direct, indirect, incidental or consequential damages. After the purchase, the
manufacturer recommends proper maintenance of the machine and to read the operator’s manual before using the
machine.
*Original purchase receipt may be required for proof of purchase.
For customer service contact us toll free at 1-800-261-3981 or Senixtools.com.
YAT USA, Inc. 6441 Hendry Rd. Suite A Charlotte, NC. 28269
WARRANTY
9www.senixtools.com
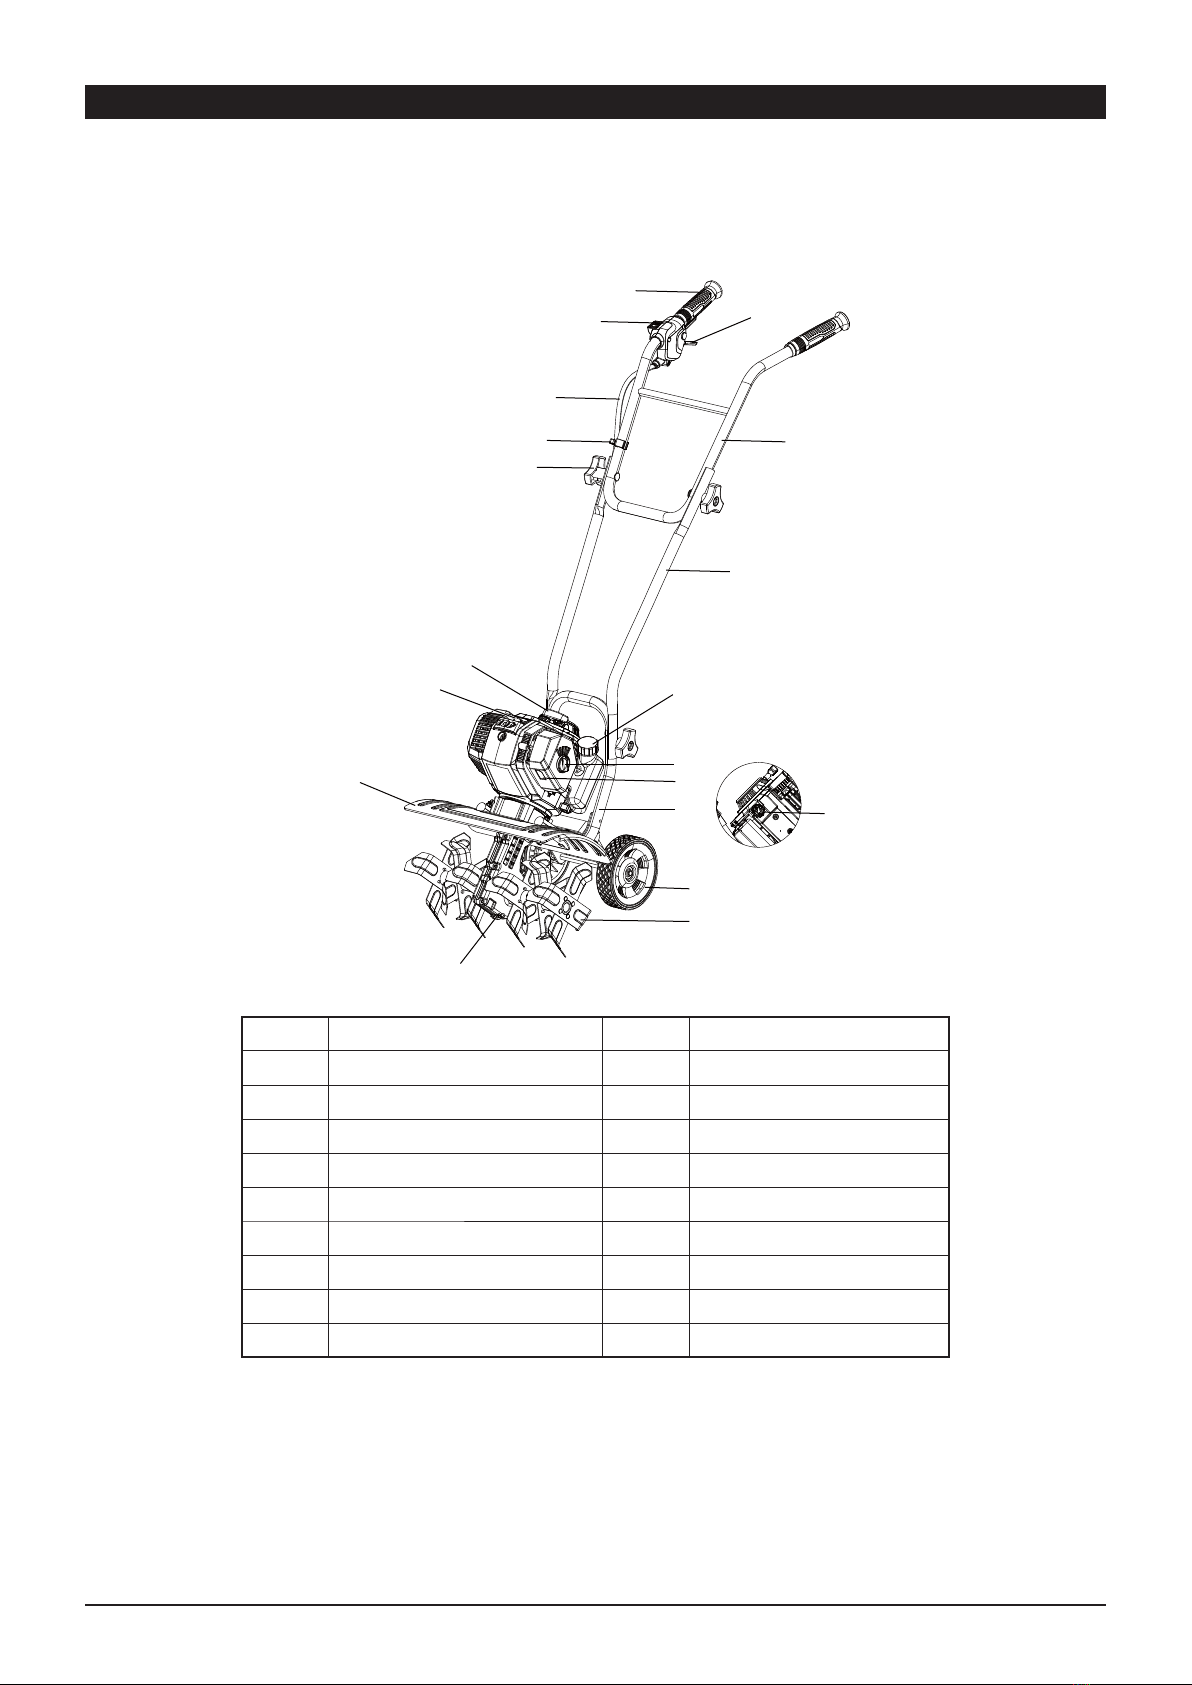
KNOW YOUR UNIT
Model: TL4QL-L1
As a cultivator:
Loosening and working up the soil in a garden and for tilling coarse soil for mixing in fertilizer, peat and compost in
domestic areas.
A Throttle lever K Tines
B Handle grip ( left and right ) L Wheel
C On/off switch M Lower handle bar
D Cable N Choke button
E Cable clip O $LU¿OWHUNQRE
F Knob P Fuel cap
G Starter grip and rope Q Middle handle bar
H Primer bulb R Upper handle bar
I Guard S 2LO¿OOSOXJ
J Gearbox
A
B
C
D
E
F
G
H
I
J
K
L
M
N
O
P
Q
R
S

10 www.senixtools.com
Model TL4QL-L1
Engine displacement 46 cc
Max. engine power 1400 W
Blade speed 250 RPM
Blade cutting width 15.7 in. (400 mm)
Blade cutting depth 7.84 in. (200 mm Max.)
Fuel tank capacity 28.16 oz. (800 ml)
Oil tank capacity 3.37 oz. (100 ml)
Weight approx. 25.4 lbs. (11.5 Kg)
SPECIFICATIONS*
11www.senixtools.com
This product requires assembly. Carefully remove the
product and any accessories from the box. Make sure
that all items listed in the packing list are included. In-
spect the product carefully to make sure no breakage or
damage occurred during shipping.
Do not discard the packing material until you have care-
fully inspected and satisfactorily operated the product.
WARNING:
The equipment and packaging material are not toys.
Do not let children play with plastic bags, foils, or small
parts. These items can be swallowed and pose a suffo-
cation risk!
INSTALLING THE HANDLE BAR
The product must be fully assembled before operation!
Do not use a product that is only partly assembled or
assembled with damaged parts.
Follow the assembly instructions step-by-step and use
the pictures provided as a visual guide to easily assem-
ble the product!
Never start the engine before it is completely assem-
bled!
1. Set up the cultivator on flat and firm ground to ensure
safe and sturdy operating.
2. Align the holes in the middle handle bar (BB) with the
holes in the lower handle bar (M) and secure the con-
nection with the bolts (AA), knobs (DD), and gaskets
(CC) (Fig. 1).
3. Align the holes in the upper handle bar (R) with the
holes in the middle handle bar (BB) and secure the
connection with the bolts (AA), knobs (DD), and gas-
kets (CC) (Fig. 2).
BB
CC
DD
AA
M
Fig. 1
R
BB
DD
CC
AA
Fig. 2
ASSEMBLY
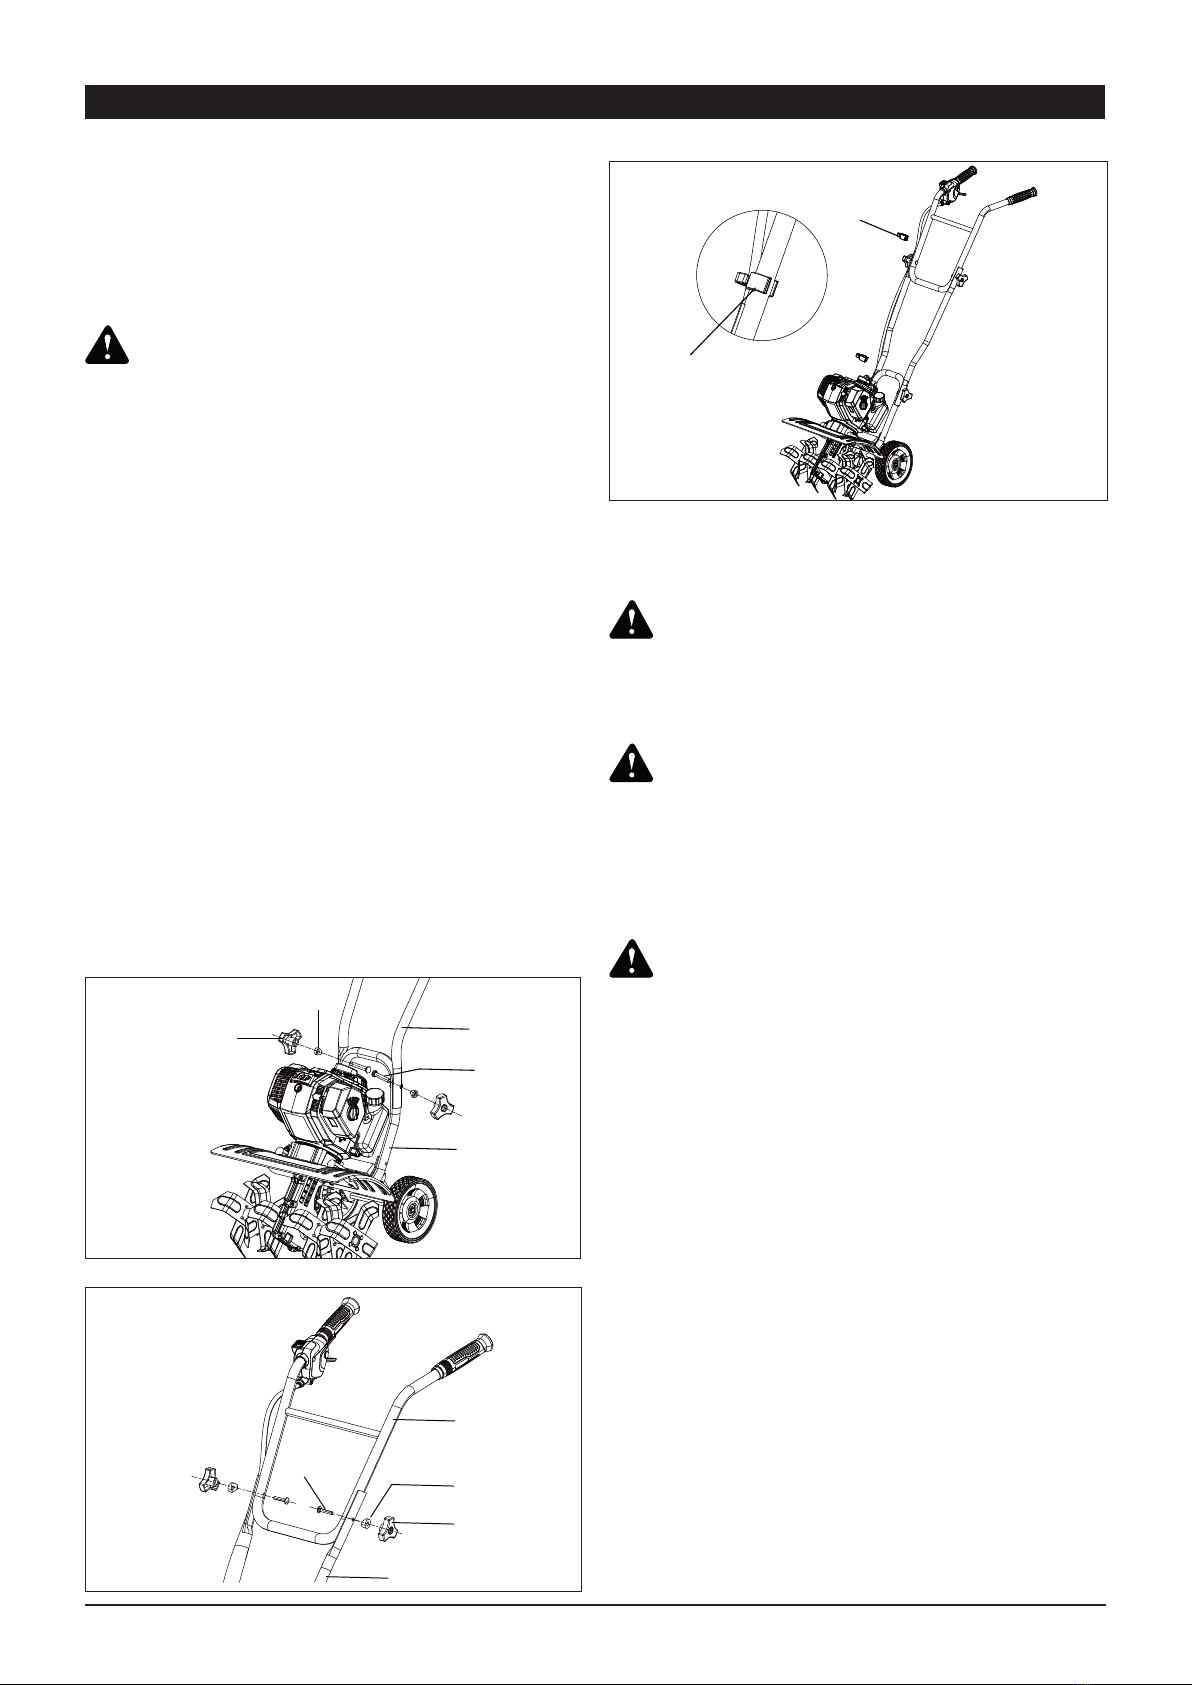
4. Secure the cables with the cable clips (EE) (Fig. 3).
EE
EE
Fig. 3
ADDING OIL: INITIAL USE
CAUTION:
Attempting to start the engine before it has been pro-
perly filled with lubricant will result in equipment failure
not covered by the warranty.
WARNING:
Overfilling the crankcase may cause serious issues.
Check the oil level before each use. The importance
of maintaining the proper oil level cannot be overemp-
hasized. Change the oil according to the Maintenance
Schedule.
CAUTION:
Do not overfill. Overfilling the crankcase may cause ex-
cessive smoke, oil loss, and engine damage.
NOTE: Oil must be added before starting the unit.
NOTE: This unit comes with a 3.37 fluid oz. (100 ml
SAE 10W-30) container of oil.
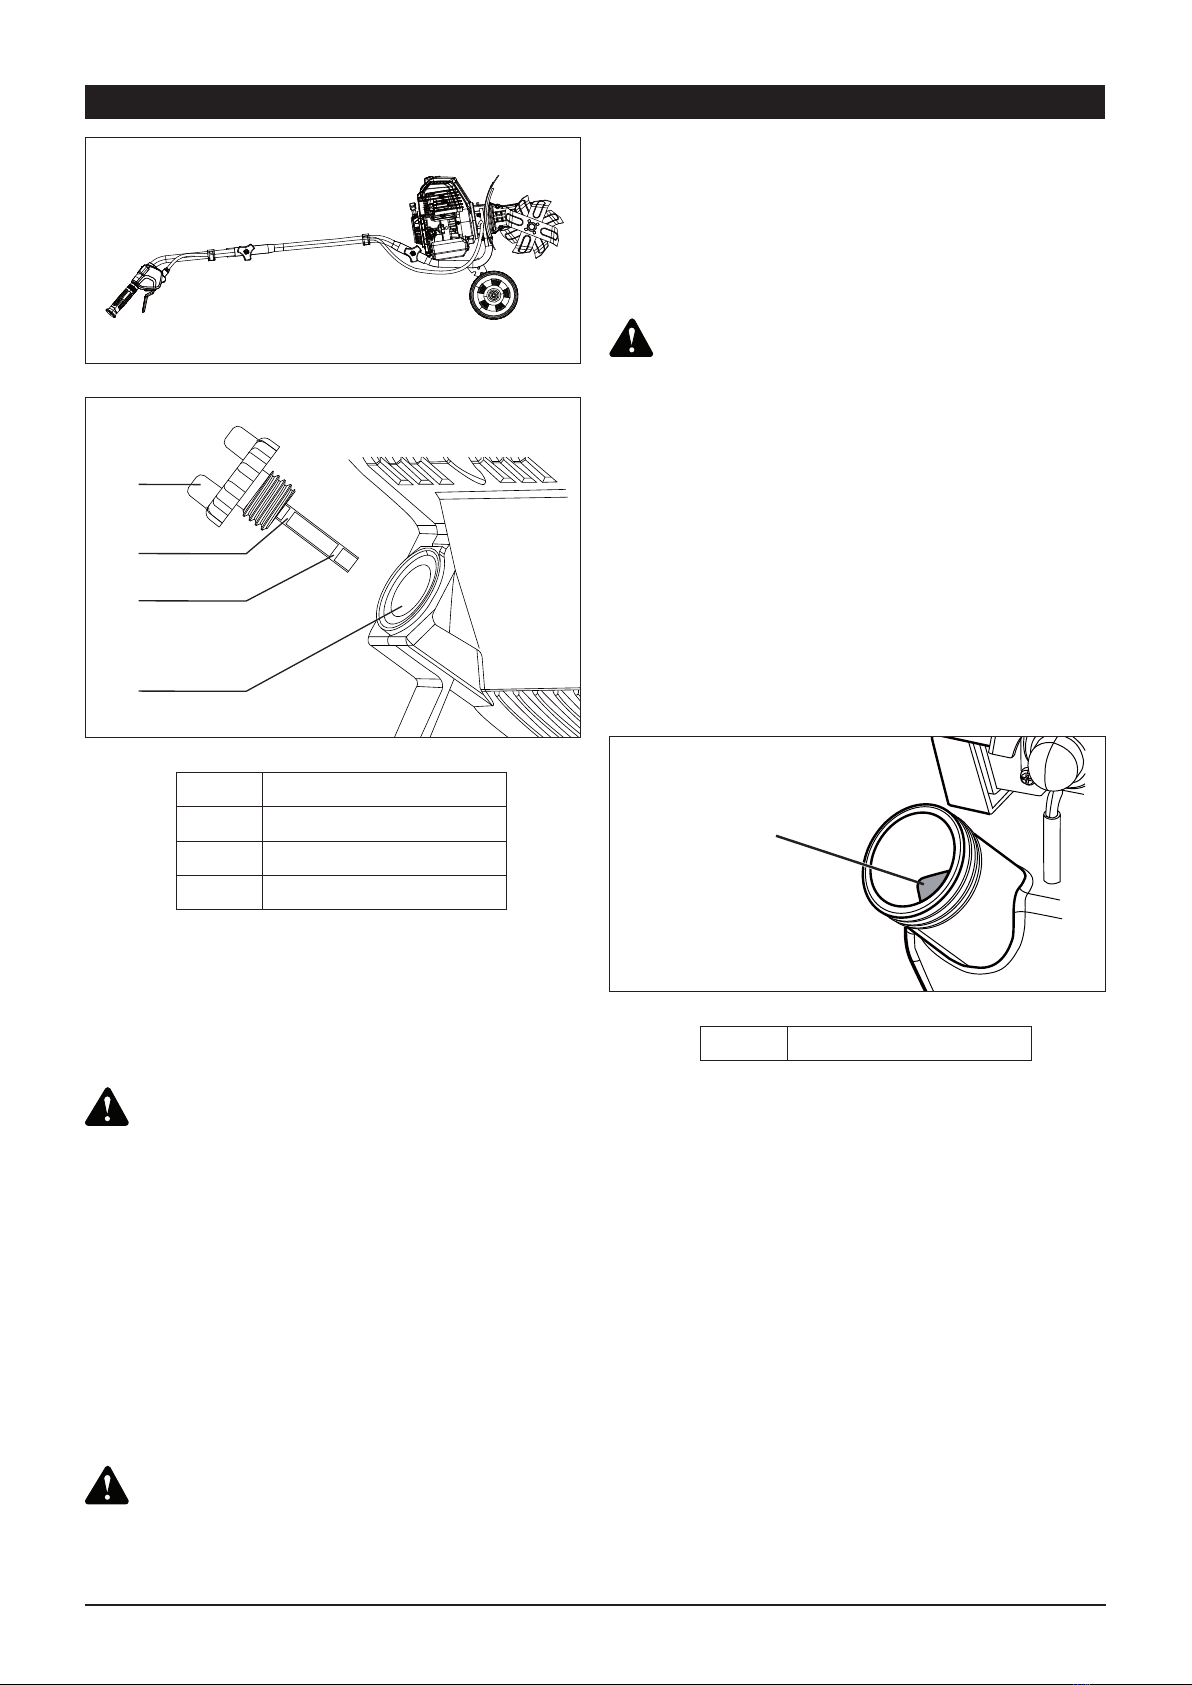
1. Set the unit on a flat, level surface horizontally as
shown below (Fig. 4).
2. Unscrew the oil fill plug (Fig. 5).
3. Pour the 3.37 fluid oz. (100 ml) oil into the oil fill hole.
DO NOT overfill.
4. Insert the dipstick into the fill spout but do NOT screw
in. Remove dipstick and check the oil level.
5. When oil level is full, the oil will be between the up-
per limit and lower limit on the dipstick. If oil level is
below the lower limit, add oil until the fluid level rises
between the upper limit and lower limit on the dipstick
(Fig. 5).
NOTICE: Never add oil to the fuel tank. This unit has a
four-cycle engine. DO NOT mix oil with gasoline.
6. Wipe up any oil that may have spilled.
7. Reinstall the oil fill plug (Fig. 5).
12 www.senixtools.com
ASSEMBLY
Fig. 4
4
1
2
3
Fig. 5
12LO¿OOSOXJ'LSVWLFN
2 Upper limit
3 Lower limit
42LO¿OOKROH
USING THE RIGHT OIL
Use a high-qualitySAE 10W-30 weight oil. DO NOT use
dirty oil. Failure to use clean oil of the correct type can
cause premature engine wear and failure.
FUELING THE UNIT
WARNING:
Gasoline is extremely flammable. Ignited vapors may
explode. Always stop the engine and allow it to cool
before filling the fuel tank. Do not smoke while filling the
tank. Keep sparks and open flames at a distance from
the area.
Remove the fuel cap slowly to avoid injury from fuel
spray. Never operate the unit without the fuel cap secu-
rely in place.
Add fuel in a clean, well-ventilated outdoor area. Wipe
up any spilled fuel immediately. Avoid creating a source
of ignition for spilled fuel. Do not start the engine until
fuel vapors dissipate.
WARNING:
Gasoline and its vapors are highly flammable and ex-
plosive. To prevent serious injury and property damage,
handle it with care. Keep away from ignition sources
and open flames, handle outdoors only.
Pour fuel outdoors where there are no sparks or flames.
Slowly remove the fuel cap after stopping the engine.
Do not smoke while fueling. Wipe spilled fuel from the
unit. Move at least 3 m (10 ft) away from the fueling
source before starting the engine.
WARNING:
Always wear heavy, long pants, boots, gloves, and a
long-sleeve shirt. Do not wear loose clothing, jewelry,
short pants, sandals, or go barefoot. Secure hair so it is
above shoulder level.
1. Position the unit with the fuel cap facing up.
2. Slowly remove the fuel cap.
3. Place the fuel container spout into the fuel tank fill
hole and fill the tank. Stop adding fuel when you see
that the level reaches the base of the tank spout
(Fig. 6).
4. Wipe up any fuel that may have spilled.
5. Reinstall the fuel cap.
6. Move the unit at least 3 m (10 ft) from the fuel contai-
ner and the fueling site before starting the engine.
1
Fig. 6
1 Base of the tank spout

13www.senixtools.com
WARNING:
Do not allow familiarity with this product to make you
careless. Remember that a careless fraction of a se-
cond is sufficient to inflict serious injury.
WARNING:
Always wear eye protection along with hearing protecti-
on. Failure to do so could result in objects being thrown
into your eyes and other possible serious injuries.
WARNING:
Do not use any attachments or accessories not recom-
mended by the manufacturer of this product. The use
of attachments or accessories not recommended can
result in serious injury
WARNING:
Operation of this equipment could create sparks that
can start fires around dry vegetation. A spark arrestor
may be required. The operator should contact local fire
agencies for laws or regulations relating to fire preven-
tion requirements.
USING THE RIGHT FUEL
The use of old fuel is the most common cause of per-
formance problems. Use only fresh, clean unleaded
gasoline less than 30 days old.
NOTICE: This unit has a four-cycle engine. DO NOT
mix oil with gasoline.
Definition of Blended Fuels
Today’s fuels are often a blend of gasoline and oxyge-
nates such as ethanol, methanol or MTBE (ether). Alco-
hol-blended fuel absorbs water. As little as 1% water in
the fuel can make fuel and oil separate, forming acids
when stored. ALWAYS use fresh fuel (less than 30 days
old) with less than 10% ethanol. Dispose of old fuel ac-
cording to federal, state and local regulations.
Using Blended Fuels
If using a blended fuel:
Always use fresh unleaded gasoline.
Use the fuel additive STA-BILL®or an equivalent.
WARNING:
DO NOT USE E85 OR E15 FUEL IN THIS UNIT. It
has been proven that fuel containing greater than 10%
ethanol will likely damage this engine and void the
warranty.
WARNING:
Operate this unit only in a well-ventilated outdoor area.
Carbon monoxide exhaust fumes can be lethal in a con-
fined area
USING THE RIGHT OIL TYPE
Using the proper type and weight of oil in the crankcase
is extremely important.
Check the oil before each use and change the oil regu-
larly. Failure to use the correct oil, or using dirty oil, can
cause premature engine wear and failure.
Use a high-quality SAE 10W-30 weight oil ofAPI (Ame-
rican Petroleum Institute) service class SF, SG, SH.
WARNING:
Avoid accidentally starting the unit. To avoid serious in-
jury, the operator and the unit must be in a stable posi-
tion when pulling the starter rope.
WARNING:
Do not operate the unit inside a closed environment,
such as a room or building; breathing carbon monoxide
from exhaust fumes can kill.
WARNING:
Inspect unit before each use. Replace damaged parts.
Check for fuel leaks. Make sure all fasteners are in pla-
ce and secure. Replace cutting attachment parts that
are cracked, chipped, or damaged in any way. Make
sure the cutting attachment is properly installed and
securely fastened. Make sure the cutting attachment
shield is properly attached and in the position recom-
mended by the manufacturer.
CAUTION:
Clear the area to be tilled before each use. Remove
all objects such as rocks, broken glass, nails, wire, or
string which can be thrown or become entangled in the
cutting attachment. Clear the area of children, bystan-
ders, and pets outside a 50 ft (15 m) radius: there is still
a risk of injury from thrown objects outside the 50 ft (15
m) zone. Bystanders should be encouraged to wear eye
protection.
If you are approached, stop the engine and cutting
attachment. In the case of bladed units, there is the
added risk of injury to bystanders from being struck with
the moving blade.
WARNING:
In some countries regulations define at what time of the
day and on what special days products are allowed to
be used and what restrictions apply! Ask your commu-
nity for detailed information and observe the regulations
in order to preserve a peaceful neighborhood and avoid
committing administrative offences.
WHEEL ADJUSTMENT
WARNING:
Always wear safety glasses, ear protection and work
gloves during operation. Avoid wearing loose clothing
and accessories.
OPERATION

14 www.senixtools.com
The wheels can be adjusted to two positions.
1. Pull on the wheel and move it to required position,
let go of the wheel and make sure it locks in position
(Fig. 7).
WARNING:
The wheels can be adjusted in two different positions.
Always ensure the wheels are securely locked! Do not
attempt to use the product with the wheels in any other
position or unlocked!
1
2
Fig. 7
1 Working
2 Transport
STARTING INSTRUCTIONS
1. When oil level is full, the oil will be between the up-
per limit and lower limit on the dipstick. If oil level is
below the lower limit, add oil until the fluid level rises
between the upper limit and lower limit on the dips-
tick. Reinstall the oil fill plug. (Fig. 5)
2. Fill the fuel tank. Stop adding the fuel when you see
that the level reaches the base of the tank spout.
3. Slowly press and release the primer bulb 10 times
(Fig. 8).
4. Push the choke button in until it clicks (Fig. 9).
NOTE: The choke automatically disengages when the
throttle lever is squeezed.
5. Pull the starter rope with a controlled and steady mo-
tion five times until engine starts or attempts to start
(Fig. 10).
6. Squeeze the throttle lever to release the choke but-
ton (Fig. 11).
IF.. the unit fails to start. Squeeze the throttle control,
and pull the starter rope until the engine starts.
IF THE ENGINE IS HOT... begin the starting procedure
with step 5.
STOPPING INSTRUCTIONS
1. Release the throttle lever and allow the engine to
idle.
2. Press and hold the On/Off switch in the Off (O) posi-
tion until the engine comes to a complete stop
OPERATION
(Fig. 12). Make sure the cutting attachment has stop-
ped before the unit is set down.
NOTE: This OFF switch will come back to the ON posi-
tion automatically.
Fig. 8
Fig. 9
Fig. 10
Fig. 11

15www.senixtools.com
OPERATION
Fig. 12
HOLDING THE UNIT
• Stand in the operating position (hold the machine in
front of your body). Stand up straight. Do not bend
over.
• Keep feet apart and firmly planted.
• Hold the handle with two hands. Keep the arms
straight.
• Do not over-reach; Keep all parts of your body away
from the rotating cutting attachment and hot surfaces.
WARNING:
Do not operate the machine with a damaged or excessi-
vely worn cutting device.
CLEARING JAMS
If the blades get jammed by a wire or other obstruction
and cannot move, follow these important safety rules:
• NEVER reach for, or try to remove, jammed material
while the engine is running.
• ALWAYS switch the unit off and wait for blades to stop
before clearing a jam.
• ALWAYS inspect the blades after clearing a jam to
make sure all jammed material has been cleared, and
to make sure blades are not damaged.
16 www.senixtools.com
MAINTENANCE
When servicing, use only identical replacement parts.
Use of any other parts could create a hazard or cause
product damage.
NOTICE: Users are not allowed to set the carburetor or
ignition. If further assistance is required, take the unit to
a qualified service dealer.
WARNING:
To avoid serious injury, always stop the engine and
allow it to cool before cleaning or maintaining the unit.
Never perform cleaning or maintenance while the unit is
running. Disconnect the spark plug wire to prevent the
unit from starting accidentally.
WARNING:
Wear protective clothing and observe all safety instruc-
tions to prevent serious injury.
CLEANING
Use a small brush to clean the outside of the unit. Do
not use strong detergents. Household cleaners that
contain aromatic oils such as pine and lemon, and sol-
vents such as kerosene, can damage plastic. Wipe off
any moisture with a soft cloth.
Correct and regular cleaning is not only important for
the safe use of this product, but also extends its life
span.
LUBRICATION
For a long lifespan, make sure that the cutting blades
are cleaned and lubricated at regular intervals in order
to ensure the best possible performance. Routinely ap-
ply a thin film of lubricating oil.
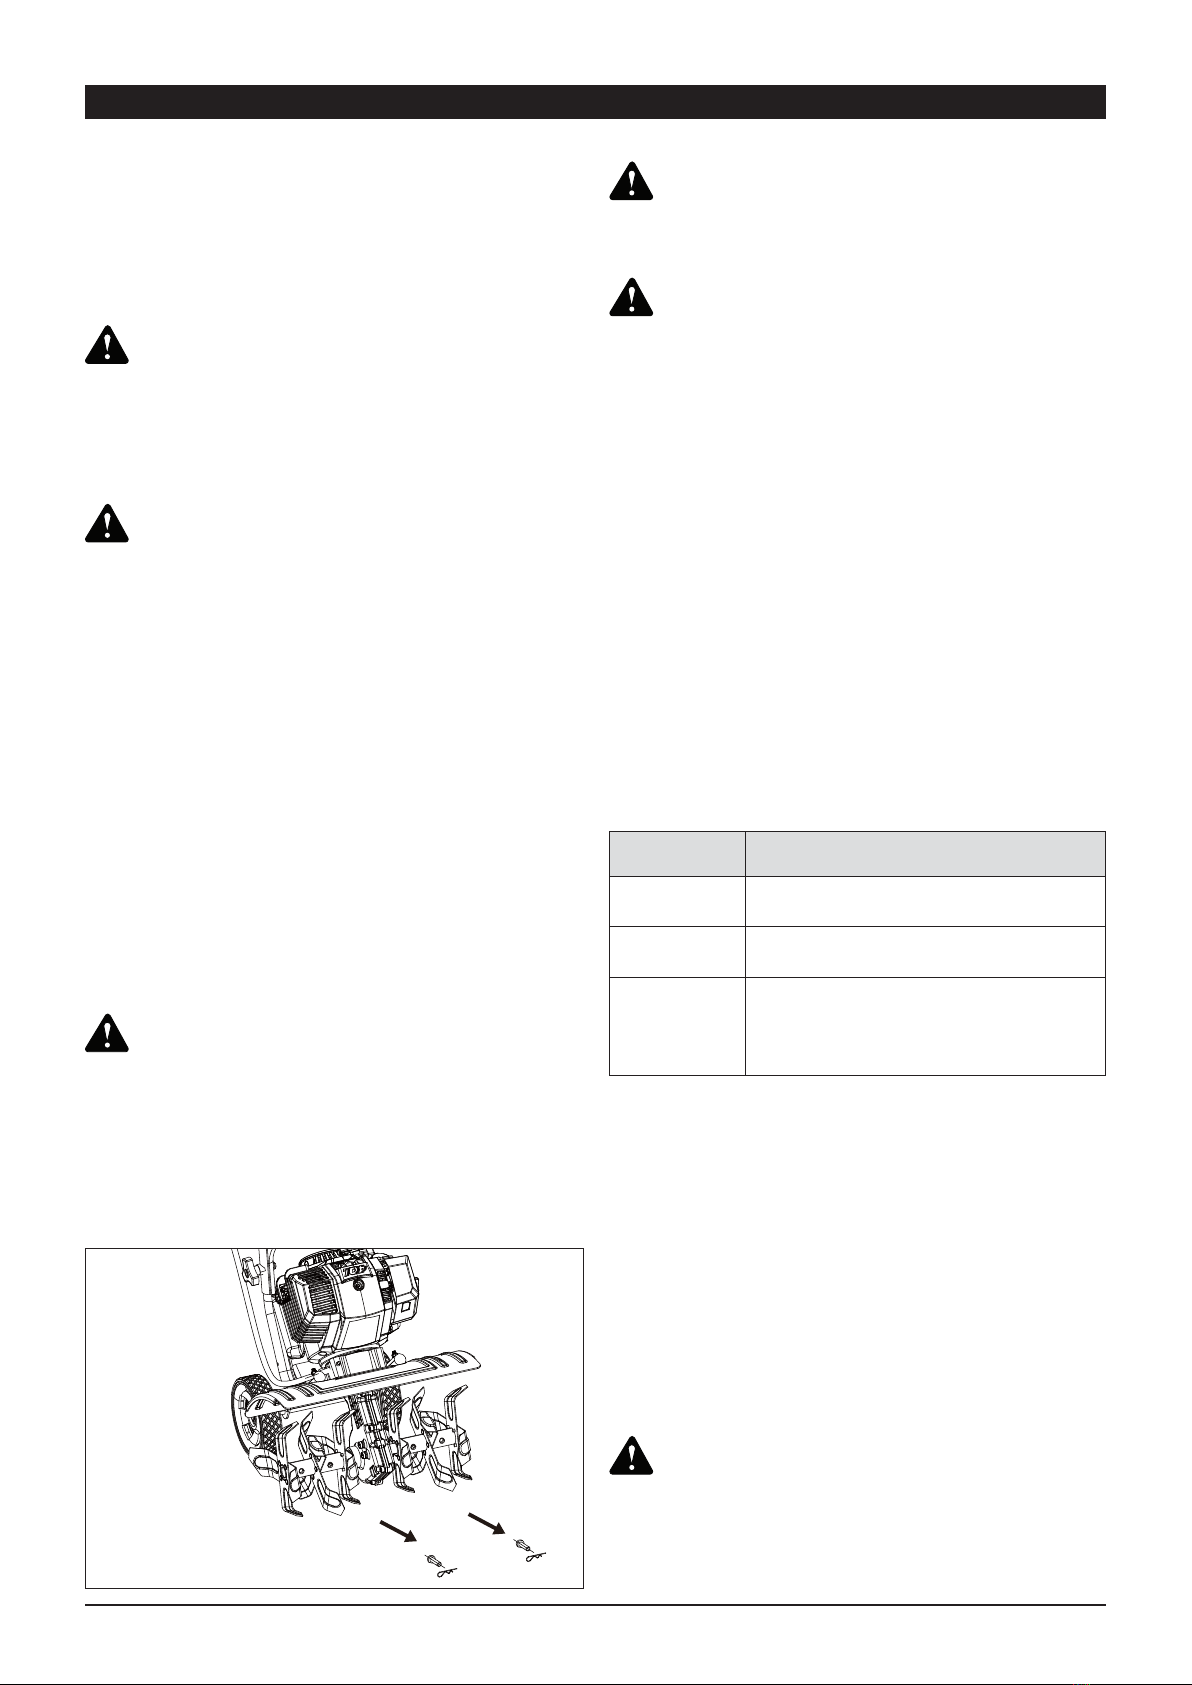
REPLACING THE BLADES
WARNING:
To avoid serious injury, always stop the engine and
allow it to cool before replacing the blades.
To replace the blades, take off the pin.
Take off the broken blades and replace the new blades
according to the original position (Fig. 13).
Re-insert the pin to secure the blades.
Fig. 13
MAINTENANCE SCHEDULE
WARNING:
When the engine idles, user should check the cutting
attachment stops while turning routinely.
WARNING:
To prevent any danger or defects, user should check
and maintain every part of the machine before use and
after dropping or other impacts.
Perform these required maintenance procedures at the
frequency stated in the table. These procedures should
also be a part of any seasonal tune-up.
NOTE: Some maintenance procedures may require
special tools or skills. If you are unsure about these pro-
cedures, take the unit to a qualified service dealer.
NOTE: Maintenance, replacement, or repair of the
emission control devices and system may be performed
by a qualified service dealer.
NOTE: Please read the California/EPA statement that
came with the unit for a complete listing of terms and
coverage for the emissions control devices, such as the
spark arrestor, muffler, carburetor, etc.
FREQUENCY MAINTENANCE REQUIRED
Every 10 hours ЬClean the air filter.
Refer to Maintaining the Air Filter.
Every 20 hours ЬChange the oil. Refer to Changing the Oil.
• Replace the oil after the first 5 hours.
Every 30 hours
ЬHave the rocker arm clearance checked by a
qualified service dealer.
• Check the spark plug condition and gap.
Refer to Maintaining the Spark Plug.
NOTE: If the engine frequently work under dusty or
other severe circumstances, increase the cleaning fre-
quency.
REMARKS
• The maintenance interval is only a recommendation
for machines in ordinary operating condition.
• If there are any abnormal signs from the machine,
please do the proper inspection and maintenance im-
mediately.
• All other repairs or maintenance should be done by a
qualified service center
CHECKING THE OIL LEVEL
WARNING:
Check the oil level before each use. The importance of
maintaining the proper oil level cannot be overempha-
sized.
17www.senixtools.com
MAINTENANCE
Inspecting the Oil Level
1. Stop the engine and allow it to cool.
2. Set the unit on a flat, level surface horizontally.
NOTE: Failure to keep the engine level may result in a
faulty oil level reading.
3. Remove dipstick and check oil level. When oil level is
full, the oil will be between the upper limit and lower
limit on the dipstick (Fig. 14). If the oil level is too
low, add oil. Refer to Adding Oil.
Adding Oil
1. Set the unit on a flat, level surface horizontally.
2. Clean the area around the oil fill plug (Fig. 14) to pre-
vent debris from entering the oil fill hole.
3. Unscrew the oil fill plug.
4. Insert the dipstick into the fill spout but do NOT screw
in. Remove the dipstick and check the oil level. Add
oil until the fluid level rises between the upper limit
and lower limit on the dipstick (Fig. 14).
NOTE: If the oil level is too high, tip the unit and drain
the excess oil into an appropriate container.
5. Wipe up any oil that may have spilled.
6. Reinstall the oil fill plug.
WARNING:
DO NOT overfill the oil level. Overfilling will result in too
much oil in the engine crankcase, and may cause smo-
ke or fumes that can injure the user.
CHANGING THE OIL
WARNING:
Old engine oil is considered special waste and has to
be disposed according to your local environment pro-
tection regulation. Do not pour the oil into a garbage
can, sewer, soil etc.
Change the oil while the engine is still warm. The oil will
flow freely and carry away more impurities.
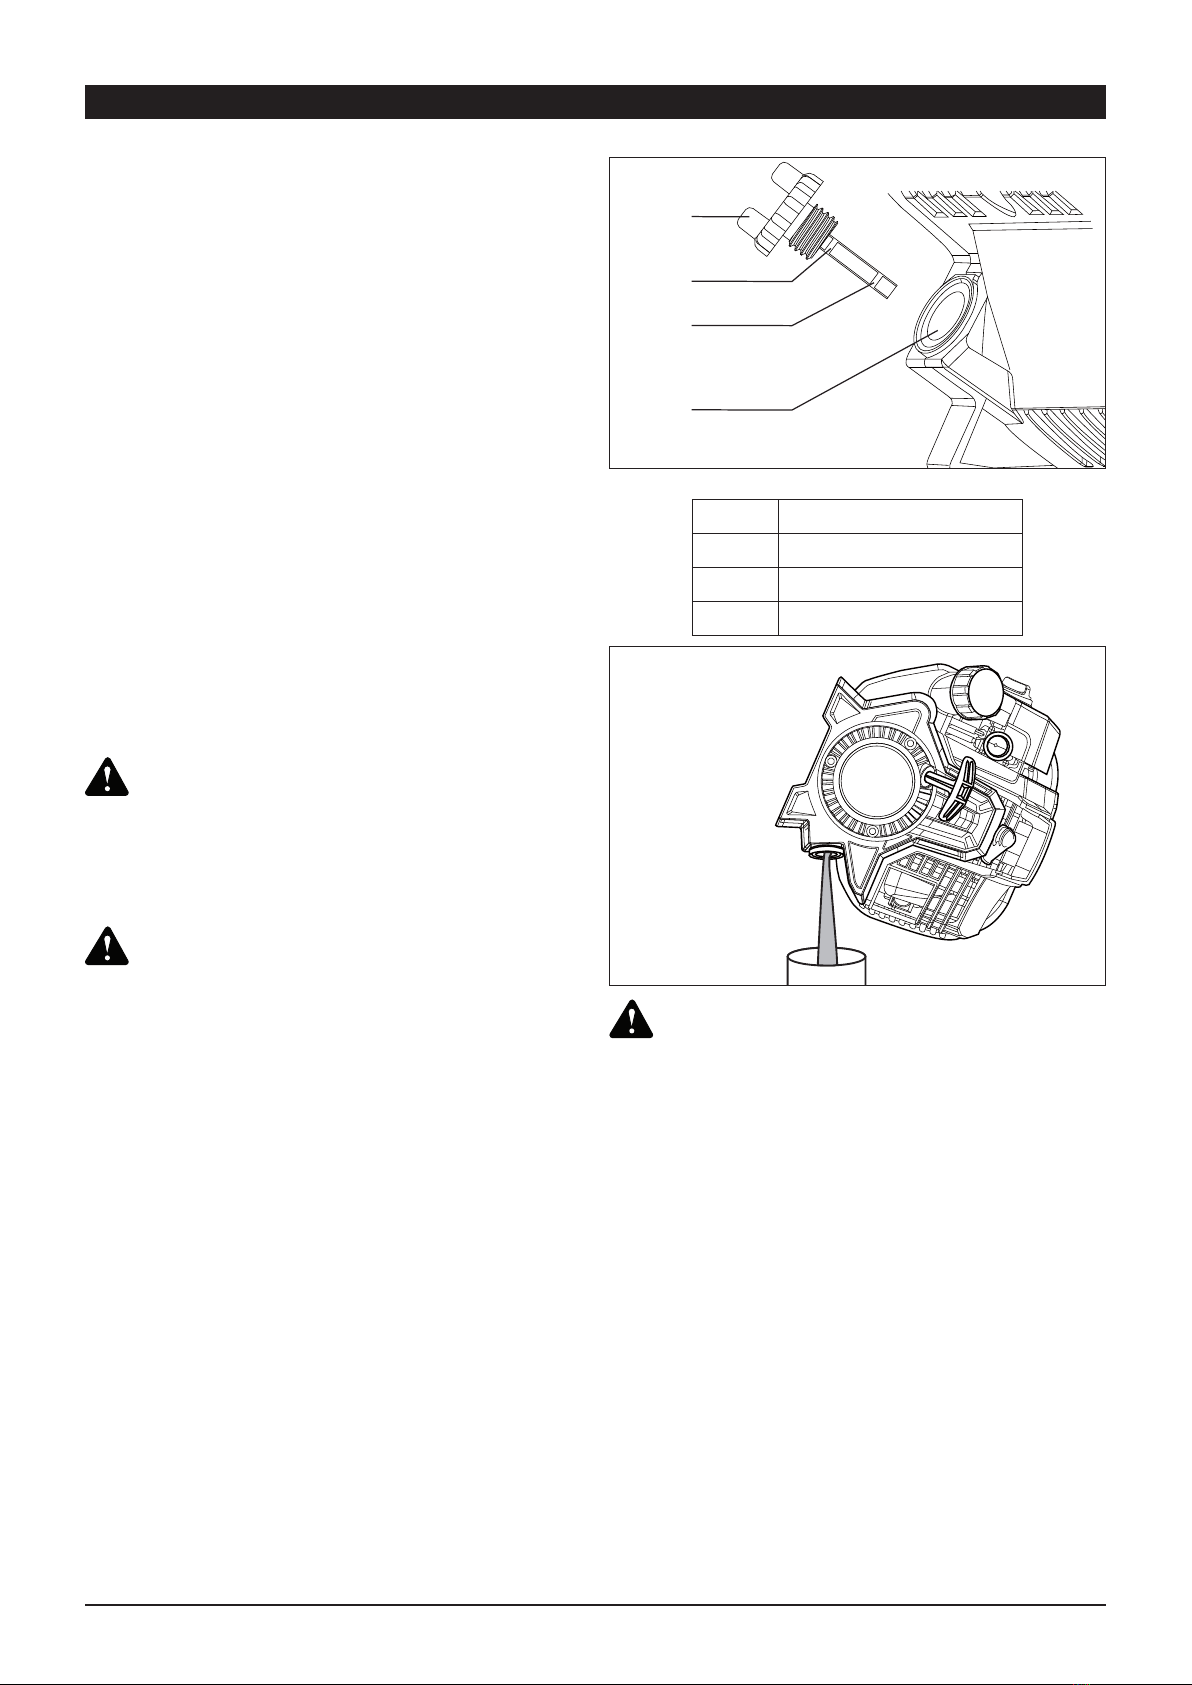
1. Clean the area around the oil fill plug (Fig. 14) to pre-
vent debris from entering the oil fill hole.
2. Unscrew the oil fill plug.
3. Tip the unit vertically to pour the oil out of the oil fill
hole and into a container (Fig. 15). Allow ample time
for complete drainage.
NOTE: Dispose of the old oil according to federal, state
and local regulations.
4. Wipe up any oil that may have spilled.
5. Set the unit on a flat, level surface horizontally.
6. Pour 3.37 oz. (100 ml SAE 10W-30) of SAE 30 oil
into the oil fill hole. When oil level is full, the oil will
be between the upper limit and lower limit on dipstick
(Fig. 14). If the oil level is too low, add oil. Refer to
Adding Oil.
7. Wipe up any oil that may have spilled.
8. Reinstall the oil fill plug.
4
1
2
3
Fig. 14
1 Oil fill plug/Dipstick
2 Upper limit
3 Lower limit
4 Oil fill hole
Fig. 15
WARNING:
DO NOT overfill the oil level. Overfilling will result in too
much oil in the engine crankcase, and may cause smo-
ke or fumes that can injure the user.
MAINTAINING THE AIR FILTER
Failure to maintain the air filter can result in poor perfor-
mance or can cause permanent damage to the engine.
Engine failure due to improper air filter maintenance is
not covered by the product warranty.
Cleaning the Air Filter
1. Unscrew the air filter knob completely. Remove the
air filter cover from the air filter housing (Fig. 16).
2. Remove the air filter from the air filter housing.
3. Wash the air filter in detergent and water. Rinse the
air filter thoroughly and allow it to dry.
4. Reinstall the air filter in the air filter housing (Fig. 16).
NOTICE: Operating the unit without the air filter and air
filter cover will VOID the warranty.
5. Insert the tab on the air filter cover into the hole in the
air filter housing. Push the air filter cover back onto
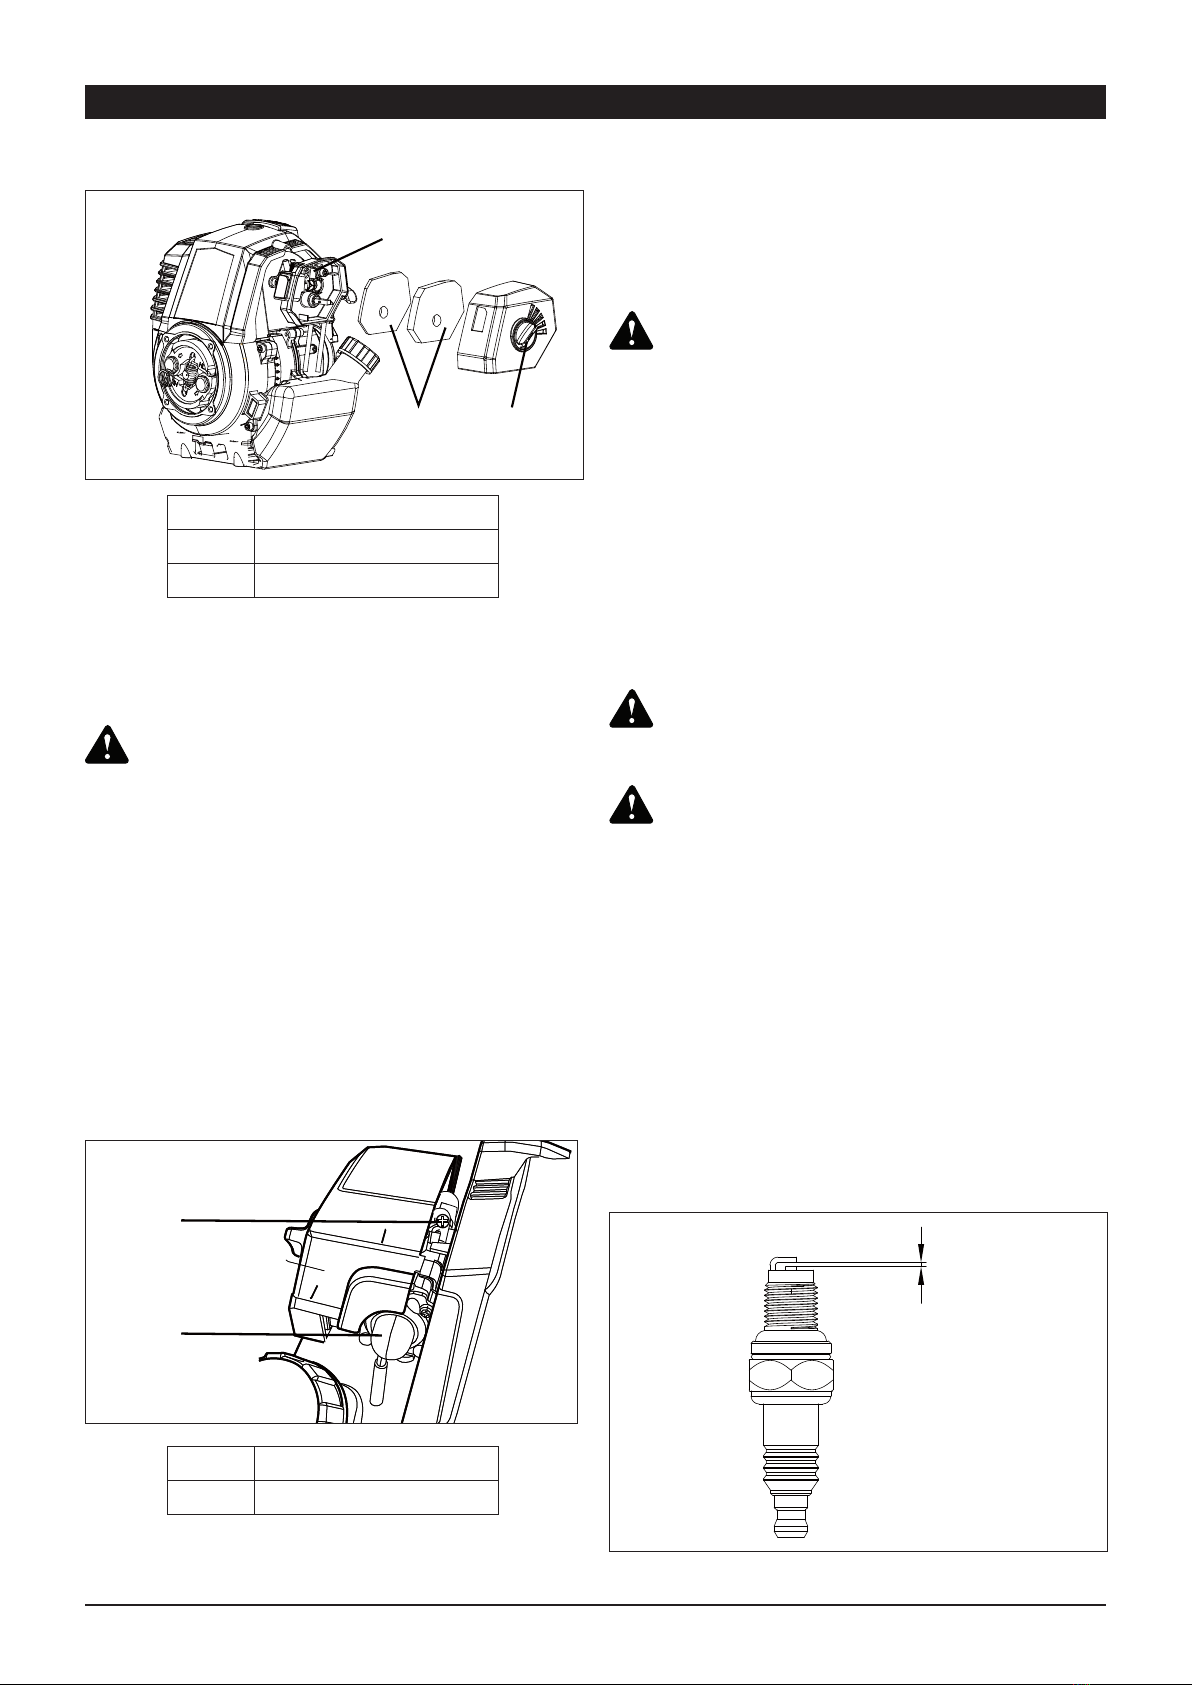
18 www.senixtools.com
the air filter housing. Tighten the air filter knob to se-
cure the air filter cover (Fig. 16)
1
23
Fig. 16
1 Air filter housing
2 Air filter
3 Air filter knob
NOTICE: Do not overtighten as this may strip the air
filter knob.
ADJUSTING THE IDLE SPEED
WARNING:
The cutting blades will move when adjusting the idle
speed. Wear all protective clothing and keep all bys-
tanders, children, and pets at least 50 ft. away. Make
adjustments with the unit supported by hand so that
the cutting blades does not contact the ground or any
object.
Keep all parts of your body away from the cutting bla-
des and muffler. Failure to follow these instructions
could result in serious injury.
If the engine will not idle properly:
1. Start the engine. Refer to STARTING INSTRUC-
TIONS.
2. Release the throttle control and let the engine idle.
1
2
Fig. 17
1 Idle speed screw
2 Primer bulb
• If the engine stops, increase the idle speed. Use a
small screwdriver to turn the idle speed screw clock-
wise, 1/8 of a turn at a time, until the engine idles
smoothly (Fig. 17).
• If the cutting blades spin when the engine idles, redu-
ce the idle speed. Turn the idle speed screw counterc-
lockwise, 1/8 of a turn at a time, until the cutting head
stops moving.
WARNING:
The cutting attachment should never turn at idle. Turn
the idle speed screw counterclockwise to reduce the
idle RPM and stop the cutting attachment, or contact us
at 1-800-261-3981 for adjustment and discontinue use
until the repair is made. Serious injury could result from
the cutting attachment turning at idle.
MAINTAINING THE SPARK PLUG
1. Stop the engine and allow it to cool. Grasp the spark
plug boot firmly and pull it from the spark plug.
2. Clean around the spark plug. Remove the spark plug
from the cylinder head with a 5/8-inch socket, turning
counterclockwise.
CAUTION:
Do not remove the spark plug when the engine is hot.
CAUTION:
Do not sand blast, scrape or clean spark plug electro-
des. Grit in the engine could damage the cylinder.
3. Inspect the spark plug. If the spark plug is cracked,
fouled or dirty, replace it with replacement part refer
to PART or an equivalent spark plug.
4. Use a feeler gauge to set the air gap at
0.6 mm - 0.8 mm (0.025 in. - 0.031 in.) (Fig. 18).
5. Install the spark plug in the cylinder head. Tighten the
spark plug with a 5/8-inch socket, turning it clockwise
until snug.
NOTICE: If using a torque wrench, torque to 12 N•m.
Do not over tighten.
6. Reattach the spark plug boot.
1
Fig. 18
MAINTENANCE

19www.senixtools.com
10.60 mm - 0.80 mm
0.025 in. - 0.031 in.
STORAGE
ЬNever store a fueled unit where fumes may reach an
open flame or spark.
• Allow the engine to cool before storing.
• Lock up the unit to prevent unauthorized use or da-
mage.
• Store the unit in a dry, well-ventilated area.
• Store the unit out of the reach of children.
• Store the unit after cleaning the cutting blade.
Short-term Storage (1-2 weeks)
Store the unit in a horizontal position.
Long-term Storage
1. Remove the fuel cap, tip the unit and drain the fuel
into an approved container. Reinstall the fuel cap.
2. Start the engine and allow it to run until it stalls. This
ensures that all fuel has been drained from the car-
buretor.
3. Allow the engine to cool. Remove the spark plug and
put 5 drops of any high quality motor oil into the cy-
linder. Pull the starter rope slowly to distribute the oil.
Reinstall the spark plug.
4. Thoroughly clean the unit and inspect it for any loose
or damaged parts. Repair or replace damaged parts
and tighten loose screws, nuts or bolts.
5. Store the unit in a horizontal position.
Preparing the Unit for Use after Long-term Storage
1. Remove the spark plug. Tip the unit and drain all of
the oil from the cylinder into an approved container.
Reinstall the spark plug.
2. Change the oil. Refer to Changing the Oil.
NOTICE: Do not use fuel that has been stored for more
than 30 days. Dispose of old fuel and oil according to
federal, state and local regulations.
TRANSPORTATION
CAUTION:
Protect the product from any heavy impact or strong
vibrations which may occur during transportation in ve-
hicles.
Transport the unit in a horizontal position. If not possib-
le, transport the unit vertically with the engine at the top.
Secure the unit to prevent damage during transport.
Secure the unit to prevent it from slipping or falling over.
MAINTENANCE

20 www.senixtools.com
TROUBLESHOOTING
PROBLEM SOLUTION
THE ENGINE WILL NOT START.
The fuel tank is empty. Fill the fuel tank with fresh fuel.
The primer bulb was not pressed enough. Press the primer bulb 10 times.
The fuel is old (over 30 days). Drain the fuel tank and add fresh fuel.
The spark plug is fouled. Replace the spark plug.
THE ENGINE WILL NOT IDLE.
7KHDLU¿OWHULVGLUW\ &OHDQRUUHSODFHWKHDLU¿OWHU
The fuel is old (over 30 days). Drain the fuel tank and add fresh fuel.
Idle speed screw needs adjustment. Turn idle speed screw clockwise to increase idle speed.
THE ENGINE EMITS TOO MUCH SMOKE.
Too much oil in crankcase. 'UDLQHQJLQHRLODQGUH¿OOZLWKFRUUHFWDPRXQWRIHQJLQH
lubricant.
THE ENGINE WILL NOT ACCELERATE.
The fuel is old (over 30 days). Drain the fuel tank and add fresh fuel.
The cutting blades is bound with any objects. Stop the engine and clean the cutting blades.
7KHDLU¿OWHULVGLUW\ &OHDQRUUHSODFHWKHDLU¿OWHU
THE ENGINE LACKS POWER OR STALLS.
The fuel is old (over 30 days). Drain the fuel tank and add fresh fuel.
7KHDLU¿OWHULVGLUW\ &OHDQRUUHSODFHWKHDLU¿OWHU
The spark plug is fouled. Replace the spark plug.
UNSATISFACTORY CUTTING PERFORMANCE.
Cutting blade is dull/damaged. 5HSODFHRUFRQWDFWDTXDOL¿HGVHUYLFHGHDOHU
Cutting material exceeds capacity. Only cut material according to the capacity of the unit.
EXCESSIVE VIBRATION/NOISE OR EXHAUST.
Bolts/Nuts are loose. Tighten.
Gas/oil is incorrect. (PSW\XQXVHGIXHODQGRLO5H¿OOZLWKIUHVKIXHODQGRLO
,IIXUWKHUDVVLVWDQFHLVUHTXLUHGWDNHWKHXQLWWRDTXDOL¿HGVHUYLFHGHDOHU
Table of contents
Languages:


