Toro Soil Cultivator User manual

FormNo.3431-447RevA
SoilCultivator
CompactToolCarrier
ModelNo.23102—SerialNo.319000001andUp
Registeratwww.Toro.com.
OriginalInstructions(EN)*3431-447*A

ThisproductcomplieswithallrelevantEuropean
directives.Fordetails,pleaseseetheDeclarationof
Incorporation(DOI)atthebackofthispublication.
WARNING
CALIFORNIA
Proposition65Warning
Useofthisproductmaycauseexposure
tochemicalsknowntotheStateof
Californiatocausecancer,birthdefects,
orotherreproductiveharm.
Introduction
ThissoilcultivatorisintendedtobeusedonaToro
compacttoolcarrier.Itisdesignedprimarilyfor
buryingstones,soilclods,debris,andgrass,which
createstheperfectgerminationenvironmentforfresh
seedsorsodonresidentialorcommercialproperties.
Usingthisproductforpurposesotherthanitsintended
usecouldprovedangeroustoyouandbystanders.
Readthisinformationcarefullytolearnhowtooperate
andmaintainyourproductproperlyandtoavoid
injuryandproductdamage.Youareresponsiblefor
operatingtheproductproperlyandsafely.
Visitwww.Toro.comforproductsafetyandoperation
trainingmaterials,accessoryinformation,helpnding
adealer,ortoregisteryourproduct.
Wheneveryouneedservice,genuineT oroparts,or
additionalinformation,contactanAuthorizedService
DealerorT oroCustomerServiceandhavethemodel
andserialnumbersofyourproductready.Figure1
identiesthelocationofthemodelandserialnumbers
ontheproduct.Writethenumbersinthespace
provided.
g285760
Figure1
1.Modelandserialnumberlocation
ModelNo.
SerialNo.
Thismanualidentiespotentialhazardsandhas
safetymessagesidentiedbythesafetyalertsymbol
(Figure2),whichsignalsahazardthatmaycause
seriousinjuryordeathifyoudonotfollowthe
recommendedprecautions.
g000502
Figure2
1.Safetyalertsymbol
Thismanualuses2wordstohighlightinformation.
Importantcallsattentiontospecialmechanical
informationandNoteemphasizesgeneralinformation
worthyofspecialattention.
©2098—TheToro®Company
8111LyndaleAvenueSouth
Bloomington,MN554202
Contactusatwww.Toro.com.
PrintedintheUSA
AllRightsReserved

Contents
Safety.......................................................................3
GeneralSafety...................................................3
SlopeSafety.......................................................4
SoilCultivatorSafety..........................................4
MaintenanceandStorageSafety........................4
SafetyandInstructionalDecals..........................5
Setup........................................................................6
InstallingtheRoller.............................................6
ProductOverview.....................................................6
Specications....................................................6
Operation..................................................................7
InstallingandRemovingtheAttachment.............7
RemovingtheRoller...........................................7
SettingtheDiggingDepth...................................8
AdjustingtheGraderBlade.................................8
ChangingtheHorizontalPositionofthe
Roller..............................................................9
OperatingtheCultivator......................................9
TransportPosition..............................................9
OperatingTips.................................................10
Maintenance............................................................11
RecommendedMaintenanceSchedule(s)............11
GreasingtheCultivator......................................11
ChangingtheDrive-ChainOil............................11
AdjustingtheDrive-ChainTension....................12
ReplacingTines................................................13
Storage...................................................................14
Troubleshooting......................................................15
Safety
DANGER
Theremaybeburiedutilitylinesinthework
area.Diggingintothemmaycauseashock
oranexplosion.
Havethepropertyorworkareamarkedfor
buriedlinesanddonotdiginmarkedareas.
Contactyourlocalmarkingserviceorutility
companytohavethepropertymarked(for
example,intheUS,call811orinAustralia,
call1100forthenationwidemarkingservice).
GeneralSafety
Alwaysfollowallsafetyinstructionstoavoidserious
injuryordeath.
•Donottransportanattachmentwiththearms
raised.Alwaystransporttheattachmentcloseto
theground;refertoTransportPosition(page9).
•Havethepropertyorworkareamarkedforburied
linesandotherobjects,anddonotdiginmarked
areas.
•ReadandunderstandthecontentofthisOperator’s
Manualbeforestartingtheengine.
•Useyourfullattentionwhileoperatingthe
machine.Donotengageinanyactivitythat
causesdistractions;otherwise,injuryorproperty
damagemayoccur.
•Neverallowchildrenoruntrainedpeopleto
operatethemachine.
•Keepyourhandsandfeetawayfromthemoving
componentsandattachments.
•Donotoperatethemachinewithouttheguards
andothersafetyprotectivedevicesinplaceand
workingonthemachine.
•Keepbystandersandpetsawayfromthemachine.
•Stopthemachine,shutofftheengine,andremove
thekeybeforeservicing,fueling,orunclogging
themachine.
Improperlyusingormaintainingthismachinecan
resultininjury.Toreducethepotentialforinjury,
complywiththesesafetyinstructionsandalways
payattentiontothesafety-alertsymbol,which
meansCaution,Warning,orDanger—personalsafety
instruction.Failuretocomplywiththeseinstructions
mayresultinpersonalinjuryordeath.
3

SlopeSafety
•Operatethemachineupanddownslopeswith
theheavyendofthemachineuphill.Weight
distributionchangeswithattachments.This
attachmentmakesthefrontofmachinetheheavy
end.
•Keeptheattachmentintheloweredposition
whenonslopes.Raisingtheattachmentona
slopeaffectsthestabilityofthemachine.
•Slopesareamajorfactorrelatedtolossofcontrol
andtip-overaccidents,whichcanresultinsevere
injuryordeath.Operatingthemachineonany
slopeoruneventerrainrequiresextracaution.
•Establishyourownproceduresandrulesfor
operatingonslopes.Theseproceduresmust
includesurveyingthesitetodeterminewhich
slopesaresafeformachineoperation.Always
usecommonsenseandgoodjudgmentwhen
performingthissurvey.
•Slowdownanduseextracareonhillsides.Ground
conditionscanaffectthestabilityofthemachine.
•Avoidstartingorstoppingonaslope.Ifthe
machinelosestraction,proceedslowly,straight
downtheslope.
•Avoidturningonslopes.Ifyoumustturn,turn
slowlyandkeeptheheavyendofthemachine
uphill.
•Keepallmovementsonslopesslowandgradual.
Donotmakesuddenchangesinspeedor
direction.
•Ifyoufeeluneasyoperatingthemachineona
slope,donotdoit.
•Watchforholes,ruts,orbumps,asuneventerrain
couldoverturnthemachine.Tallgrasscanhide
obstacles.
•Usecautionwhenoperatingonwetsurfaces.
Reducedtractioncouldcausesliding.
•Evaluatetheareatoensurethatthegroundis
stableenoughtosupportthemachine.
•Usecautionwhenoperatingthemachinenearthe
following:
–Drop-offs
–Ditches
–Embankments
–Bodiesofwater
Themachinecouldsuddenlyrolloverifatrack
goesovertheedgeortheedgecavesin.Maintain
asafedistancebetweenthemachineandany
hazard.
•Donotremoveoraddattachmentsonaslope.
•Donotparkthemachineonahillsideorslope.
SoilCultivatorSafety
•Forwheeledtractionunits,usethecounterweight
onthetractionunitwhenusingtheattachment.
•Alwayslowertheattachmenteachtimeyoushut
offthemachineorleavetheoperatingposition.
MaintenanceandStorage
Safety
•Checkfastenersatfrequentintervalsforproper
tightnesstoensurethattheequipmentisinsafe
operatingcondition.
•RefertotheOperator’sManualforimportant
detailsifyoustoretheattachmentforanextended
periodoftime
•Maintainorreplacesafetyandinstructionlabels,
asnecessary.
4
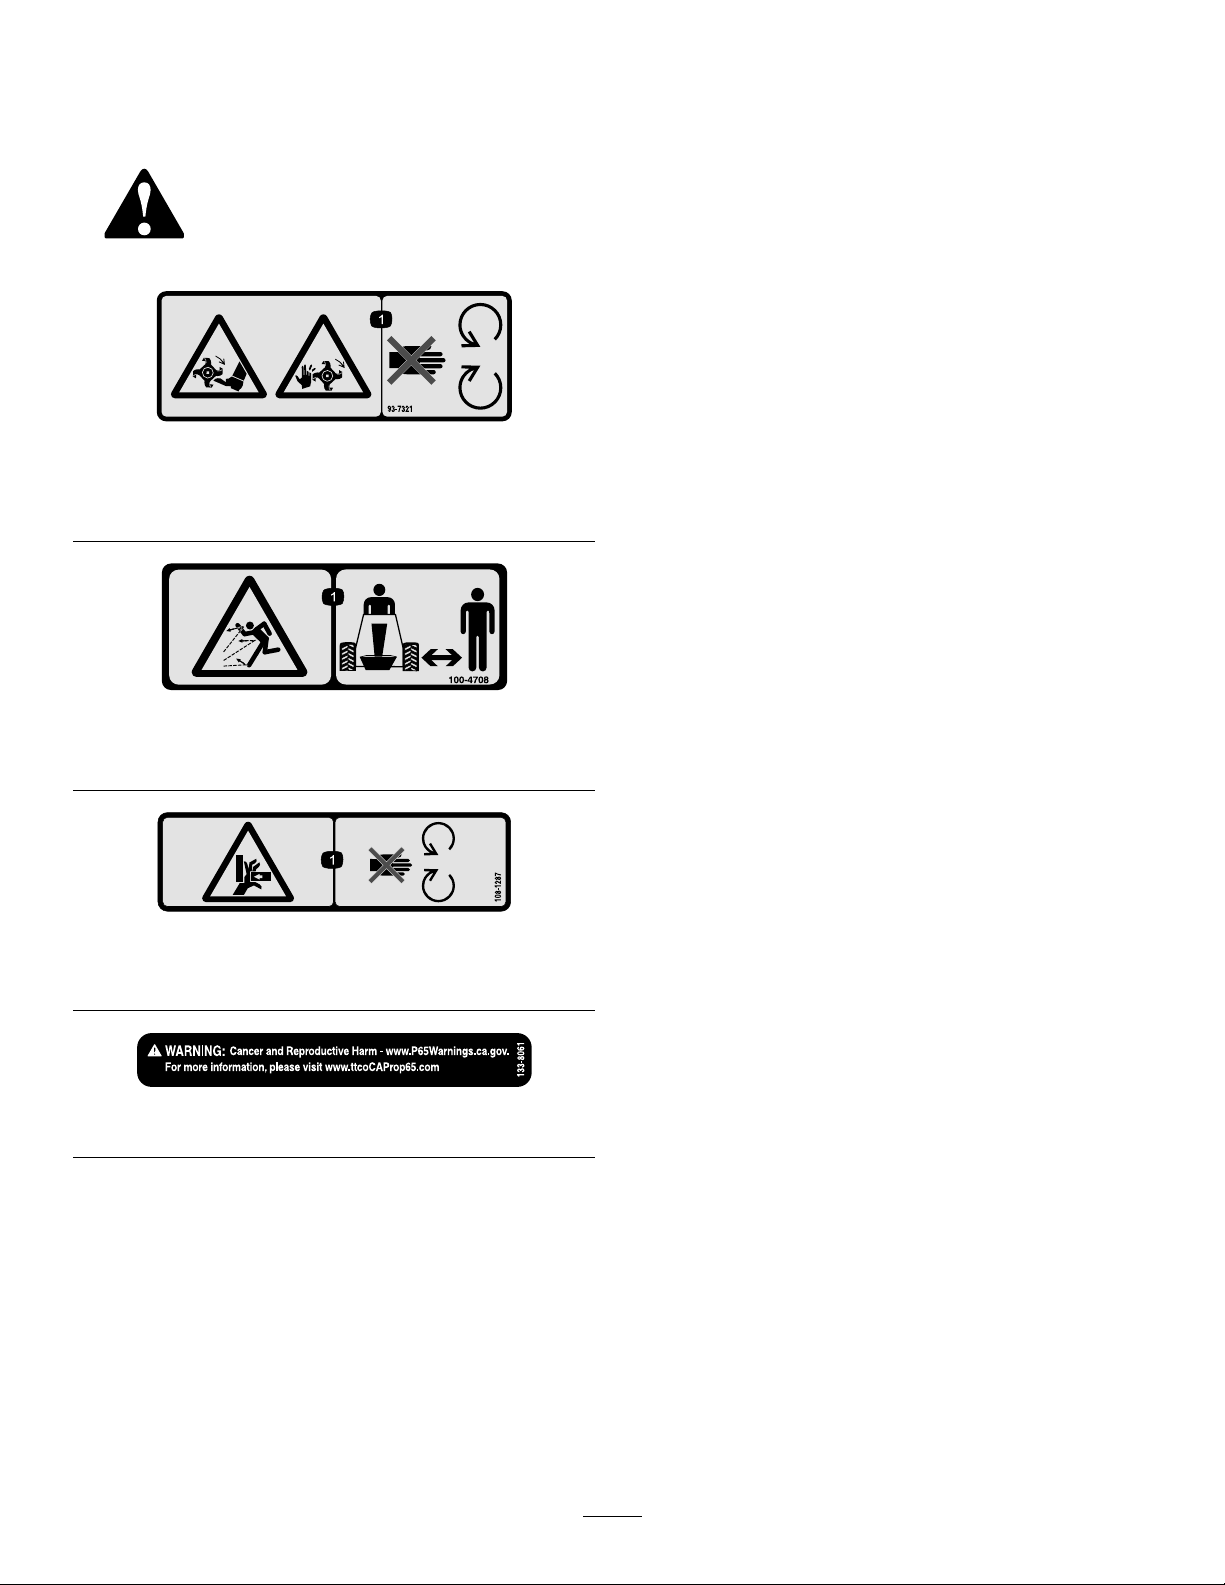
SafetyandInstructional
Decals
Safetydecalsandinstructionsare
easilyvisibletotheoperatorandare
locatednearanyareaofpotential
danger.Replaceanydecalthatis
damagedormissing.
decal93-7321
93-7321
1.Cutting/dismembermenthazardofhandsandfeet,rotating
knives/blades—stayawayfrommovingparts.
decal100-4708
100-4708
1.Thrownobjecthazard—keepbystandersaway.
decal108-1287
108-1287
1.Crushinghazard,hand—stayawayfrommovingparts.
decal133-8061
133-8061
5

Setup
InstallingtheRoller
1.Removetherollerfromtheshippingstand.
2.Installthecultivatoronthetractionunitand
removeitfromtheshippingstand.
Note:RefertoyourtractionunitOperator’s
Manualformoreinformationoninstalling
attachmentsonyourtractionunit.
3.Lowerthecultivatortotheground.
4.Removethesnap-ringclevispinsfromthedrift
pins(Figure3).
5.Removethedriftpinsfromthearmsofthe
cultivator(Figure3).
g030947
Figure3
1.Driftpin3.Cultivatorarm
2.Snap-ringclevispin4.Rollerarm
6.Slidethearmsontherollerintothearmsonthe
cultivatorandconnectthemwiththedriftpins
(Figure3).
7.Securethedriftpinswiththeattachedsnap-ring
clevispins.
ProductOverview
g008177
Figure4
1.Drive-chainhousing4.Graderblade
2.Hydraulichoses5.Roller
3.Diggingtinesandtine
guard
Specications
Note:Specicationsanddesignaresubjectto
changewithoutnotice.
Width130cm(51inches)
Length130cm(51inches)
Height53cm(21inches)
Weight250kg(550lb)
Toensureoptimumperformanceandcontinuedsafety
certicationofthemachine,useonlygenuineT oro
replacementpartsandaccessories.Replacement
partsandaccessoriesmadebyothermanufacturers
couldbedangerous,andsuchusecouldvoidthe
productwarranty.
6

Operation
Determinetheleftandrightsidesofthemachinefrom
thenormaloperatingposition.
InstallingandRemoving
theAttachment
RefertotheOperator’sManualforthetractionunitfor
theinstallationandremovalprocedure.
Important:Beforeinstallingtheattachment,
positionthemachineonalevelsurface,ensure
thatthemountplatesarefreeofanydirtordebris,
andensurethatthepinsrotatefreely.Ifthepins
donotrotatefreely,greasethem.
Note:Alwaysusethetractionunittoliftandmove
theattachment.
WARNING
Ifyoudonotfullyseatthequick-attach
pinsthroughtheattachmentmountplate,
theattachmentcouldfalloffthemachine,
crushingyouorbystanders.
Ensurethatthequick-attachpinsarefully
seatedintheattachmentmountplate.
WARNING
Hydraulicuidescapingunderpressurecan
penetrateskinandcauseinjury.Fluidinjected
intotheskinmustbesurgicallyremoved
withinafewhoursbyadoctorfamiliarwith
thisformofinjury;otherwise,gangrenemay
result.
•Ensurethatallhydraulic-uidhoses
andlinesareingoodconditionandall
hydraulicconnectionsandttingsaretight
beforeapplyingpressuretothehydraulic
system.
•Keepyourbodyandhandsawayfrom
pinholeleaksornozzlesthateject
high-pressurehydraulicuid.
•Usecardboardorpapertondhydraulic
leaks;neveruseyourhands.
CAUTION
Hydrauliccouplers,hydrauliclines/valves,
andhydraulicuidmaybehot.Ifyoucontact
hotcomponents,youmaybeburned.
•Weargloveswhenoperatingthehydraulic
couplers.
•Allowthemachinetocoolbeforetouching
hydrauliccomponents.
•Donottouchhydraulicuidspills.
RemovingtheRoller
Tousethecultivatorasatillerwithoutthegrader
orroller,ortoperformvariousadjustmentsand
maintenanceprocedures,removetherollerand
graderasfollows:
1.Parkthemachineonalevelsurface,lowerthe
attachment,tilttheattachmenttoraisetheroller
offoftheground,andengagetheparkingbrake
(ifequipped).
2.Shutofftheengineandremovethekey
3.Removethedriftpinsfromthearmsofthe
cultivator(Figure5).
g030948
Figure5
1.Driftpin3.Cultivatorarm
2.Snap-ringclevispin4.Rollerarm
4.Pulltherolleroffthecultivator(Figure5).
5.Storethepinsinthearmsoftherollerforfuture
use.
Note:Toinstalltheroller,refertoInstallingtheRoller
(page6).
7
SettingtheDiggingDepth
Setthedigdepthofthecultivatoraccordingtothe
workyouareperformingupto13.9cm(5-1/2inches).
Thedepthofcutisdeterminedbythepositionof
theroller.Youcanmovetherollerupanddownby
changingthemountinglocationofthearmsonthe
cultivatorasfollows:
1.Removetherollerfromthecultivator;referto
RemovingtheRoller(page7).
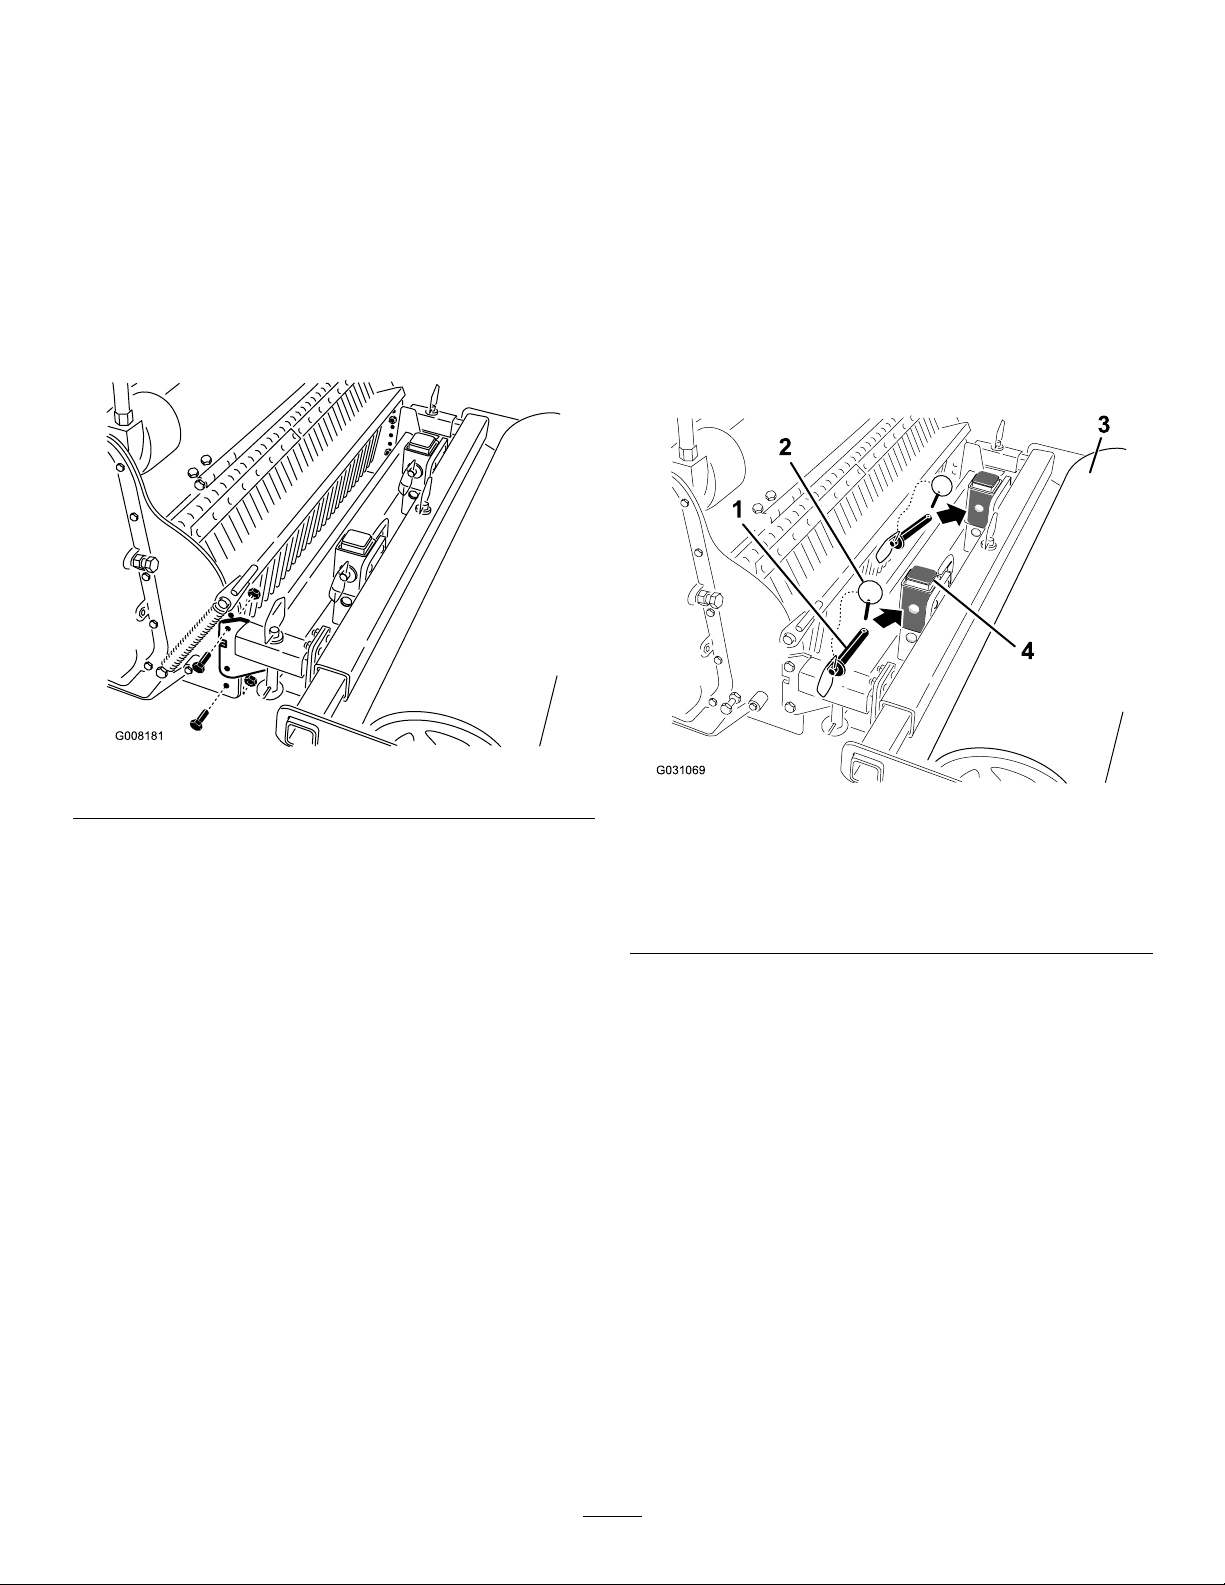
2.Removetheboltssecuringthearmstothe
cultivator(Figure6).
g008181
Figure6
3.Movethearmstothesetofholescorresponding
tothedesireddepth(Figure6).
•Movethearmsuptosetthediggingdepth
deeper
•Movethearmsdowntosetthediggingdepth
shallower.
4.Securethearmsusingtheboltsandnuts
removedpreviously.
5.Installtheroller.
AdjustingtheGraderBlade
Youcanadjustthegraderbladethatsitsjustbehind
therollertogivethedesirednish.Typically,you
shouldadjustitsothattheedgeofthebladeisjust
slightlyhigherthanthebottomoftheroller.
1.Parkthemachineonalevelsurface,lowerthe
attachment,tilttheattachmenttoraisetheroller
offoftheground,andengagetheparkingbrake
(ifequipped).
2.Shutofftheengineandremovethekey
3.Removethedriftpinsfromthegrader-blade
mountingposts(Figure7).
g031069
Figure7
1.Driftpin3.Roller
2.Snap-ringclevispin4.Grader-blademounting
post
4.Slidethegraderbladeupordowntothedesired
holeposition.
5.Placethedriftpinsintomountingposts.
6.Placetheattachedsnap-ringclevispinsintothe
2driftpins.
7.Swingthesnapringsdownovertheendsofthe
pintosecurethegraderblade.
8.Lowertherollertotheground.
8

ChangingtheHorizontal
PositionoftheRoller
Therollerhas3horizontalpositions.Tocultivatealong
theedgeoftheworkarea,aligntheedgesoftheroller
withtheedgesofthecultivator.Tocultivateandarea
withnomessyedgesbetweencultivationpasses,
offsettherollertoeithersidesothatabout15cm(6
inches)oftherolleroverlapsthelastcultivatingpass.
1.Parkthemachineonalevelsurface,lowerthe
attachment,andengagetheparkingbrake(if
equipped).
2.Shutofftheengineandremovethekey
3.Removethedriftpin(Figure8).
g030866
Figure8
1.Snap-ringclevispin3.Roller-supportbar
2.Driftpin
4.Slidetherollertothedesiredposition(Figure8).
5.Insertthedriftpinthroughtheroller-supportbar.
6.Inserttheattachedsnap-ringclevispinthrough
thedriftpintosecuretheroller.
OperatingtheCultivator
1.Lowerthecultivatortothegroundandensure
thatthechaincaseisperpendiculartothe
ground(Figure9).
g008183
Figure9
2.Pulltheauxiliary-hydraulicslevertotheoperator
griptostartthecultivator.
3.Slowlylowerthecultivatoruntilthebladesdig
intothesoilandtherollertouchestheground.
4.Slowlymoverearward.
5.Whenthepassisnished,stopthehydraulics
andraisethecultivator.
Important:Donotdrivethemachineacross
pavementorotherhardsurfaceswithoutrst
raisingthecultivator.Crossinghardsurfaces
withthetineslowereddamagesthetinesandthe
property.
TransportPosition
Whentransportingtheattachment,keepitasclose
tothegroundaspossible,nomorethan15cm(6
inches)abovetheground.Tiltitrearward.
g286182
Figure10
1.Nomorethan15cm(6
inches)abovetheground
2.Tilttheattachment
rearward.
9

OperatingTips
•Inspecttheareawherethecultivatoristobe
usedandremoveallobjectssuchaslargerocks,
trash,andbranchesbeforecultivatingtoprevent
equipmentdamage.
•Alwaysbegincultivatingwiththeslowestground
speedpossible.Increasethespeedifconditions
permit.
•Alwaysusefullthrottle(maximumenginespeed).
•Cultivateinlong,straightpasses.Turningwith
thetinesloweredcausesequipmentandproperty
damage.
•Ifarockorotherobstructiongoesintothetines,
disengagethehydraulicsanddrivethetraction
unitforwarduntiltheobstructionisdislodged.
•Ifyouareusingatractionunitwithaowdivider
(somewheeledunitshaveowdividers;referto
yourtractionunitOperator’sManual),youcanuse
theowdividertoachievetheoptimalrotorand
groundspeedforyoursoilconditionsasfollows:
1.Settheowdividertothe9o’clockposition
andthespeedselectortotheturtleposition.
2.Pulltheauxiliaryhydraulicslevertothe
operatorgriptostartthecultivator.
3.Movetheowdividerleverwhilemovingthe
tractionunitrearwarduntilthecultivation
resultsareideal.
10

Maintenance
Determinetheleftandrightsidesofthemachinefromthenormaloperatingposition.
CAUTION
Ifyouleavethekeyintheswitch,someonecouldaccidentlystarttheengineandseriously
injureyouorotherbystanders.
Removethekeyfromtheswitchbeforeyouperformanymaintenance.
RecommendedMaintenanceSchedule(s)
MaintenanceService
IntervalMaintenanceProcedure
Aftertherst5hours•Adjustthedrive-chaintension.
Aftereachuse•Cleandebrisfromtheattachment.
Every25hours•Greasethecultivator.
•Adjustthedrive-chaintension.
Every200hours•Changethedrive-chainoil.
Beforestorage•Greasethecultivator.
•Paintchippedsurfaces.
GreasingtheCultivator
ServiceInterval:Every25hours
Beforestorage
Greasethe2ttingsontheendsoftherollerand1
ttingonthe4-boltangeontheleftsideofthemain
housing.
GreaseType:General-purposegrease
Important:Greaseimmediatelyafterevery
washing
1.Parkthemachineonalevelsurface,lowerthe
attachment,andengagetheparkingbrake(if
equipped).
2.Shutofftheengineandremovethekey
3.Cleanthegreasettingswitharag.
4.Connectagreaseguntoeachtting.
5.Pumpgreaseintothettingsuntilgreasebegins
tooozeoutofthebearings.
6.Wipeupanyexcessgrease.
ChangingtheDrive-Chain
Oil
ServiceInterval:Every200hours
Checkthegearlubricationoillevelinthegearcase
every25operatinghoursandchangeitevery200
operatinghoursoronceayear,whichevercomesrst.
OilType:85W140
1.Parkthemachineonalevelsurface,engagethe
parkingbrake(ifequipped),andensurethatthe
drive-chaincoverisperpendiculartotheground.
2.Raisetheattachmenthighenoughtoplacea
panunderthedrive-chaincaseandsupportthe
attachmentwithjackstands.
WARNING
Mechanicalorhydraulicjacksorthelift
armsmayfailtosupportthecultivator
andcauseaseriousinjury;usejack
standstosupportthecultivator.
Donotusetheliftarmsaloneorhydraulic
jacks.
3.Shutofftheengineandremovethekey
4.Opentheoil-llholeontopofthedrive-chain
case(Figure11).
11
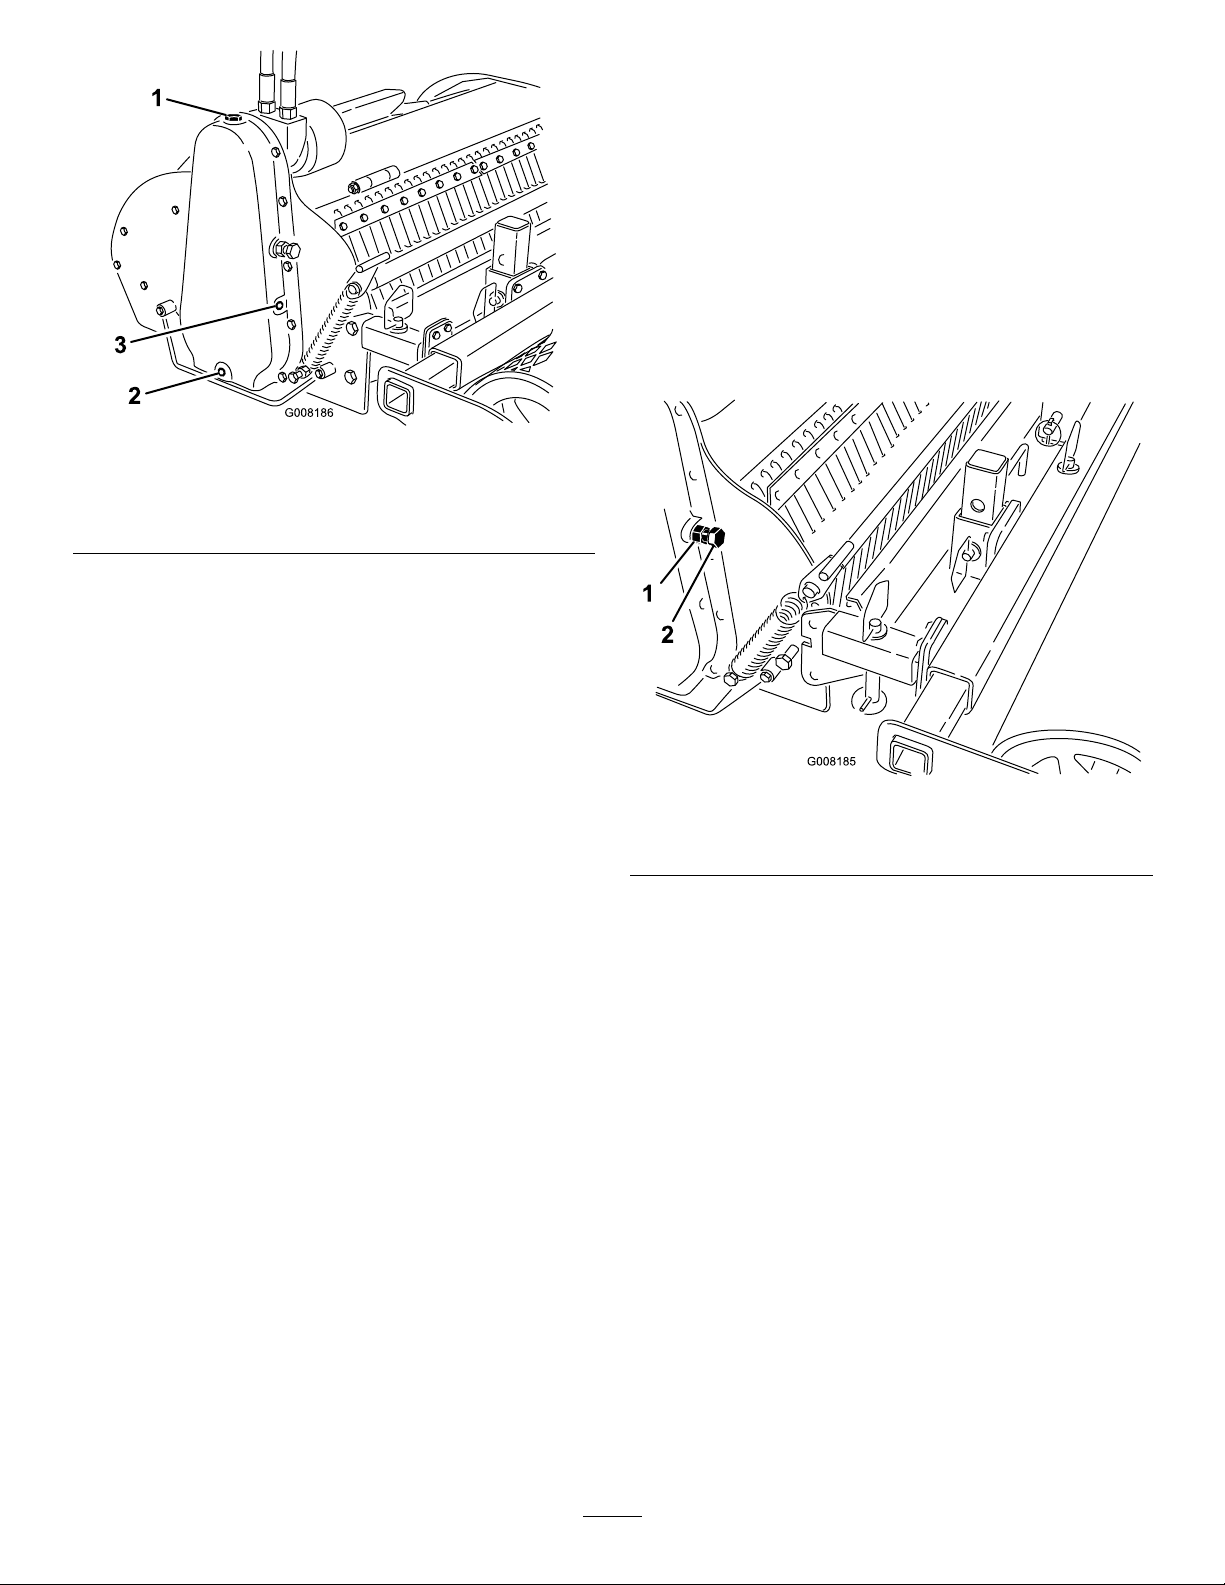
g008186
Figure11
1.Oil-llhole3.Sideplug
2.Drainplug
5.Placealargedrippanunderthedrive-chain
case.
6.Removethedrainplug(Figure11).
7.Whenalloftheoilhasdrainedfromthecase,
replaceandtightenthedrainplug.
8.Removethesideplug(Figure11).
9.Pouroilintothellholeslowlyuntiloilrunsout
theside-plughole.
10.Replacethesideplugandoil-llholeplugand
tightenthem.
11.Wipeupanyspilledoil.
AdjustingtheDrive-Chain
Tension
ServiceInterval:Aftertherst5hours
Every25hours
1.Parkthemachineonalevelsurface,lowerthe
attachment,andengagetheparkingbrake(if
equipped).
2.Shutofftheengineandremovethekey
3.Loosenthejamnutonthechain-adjustingscrew
(Figure12).
g008185
Figure12
1.Jamnut2.Chain-adjustingscrew
4.Turnthescrewbyhanduntilyoufeelresistance
(Figure12).
5.Markthescrewwithapencilandthenunscrew
it1turn.
6.Tightenthejamnut.
12
ReplacingTines
Checkandreplacetineswhentheybecomeworn
ordull.Wornordulltinesdegradetheperformance
ofthecultivator
1.Parkthemachineonalevelsurface,lowerthe
attachment,andengagetheparkingbrake(if
equipped).
2.Shutofftheengineandremovethekey
3.Removetherollerassemblyfromthecultivator.
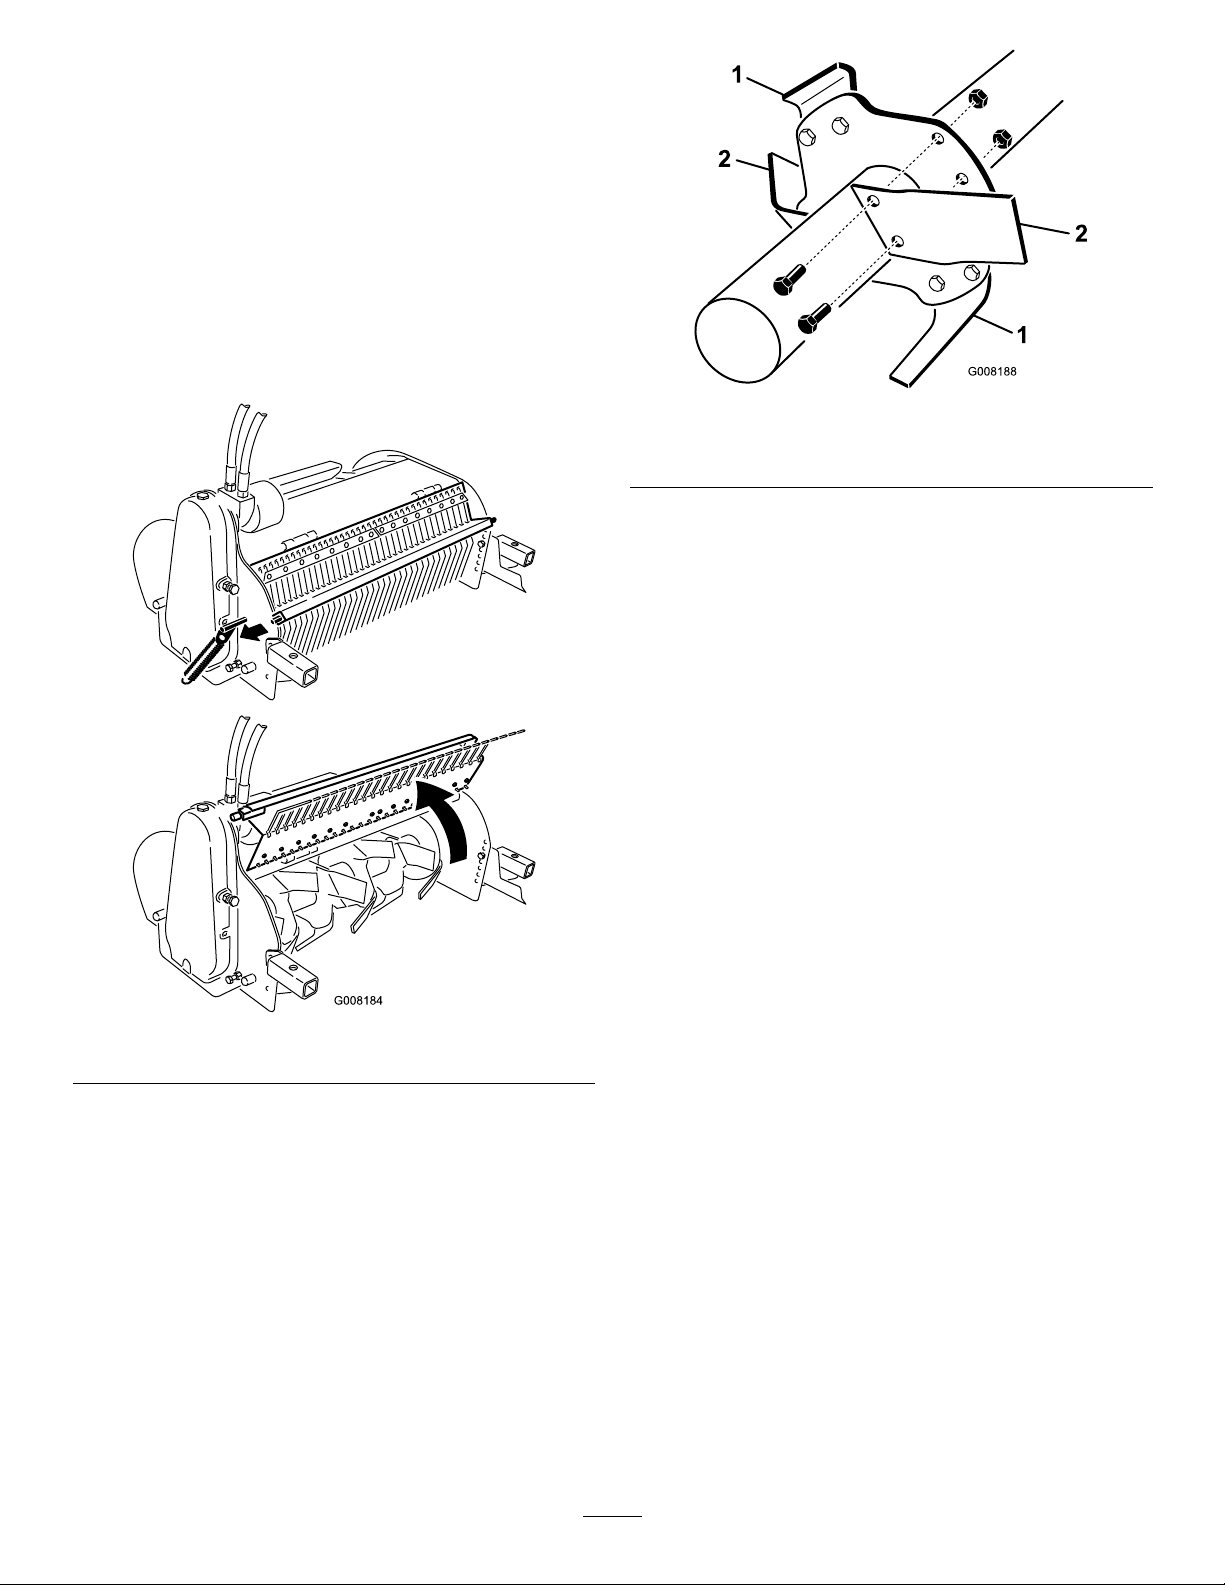
4.Liftupandreleasethespringcatchontheside
ofthecultivator(Figure13).
g008184
Figure13
5.Openthetinecover(Figure13).
6.Removeoldtines,1atatime,andinstallthe
newtines(Figure14).
Note:Eachcenterhubhas4tines(2right-hand
and2left-hand).Theleftandrighttinesare
alternatedonthehub.Ensurethatyoureplace
eachtinewiththesametypeoftinethatwas
installedpreviously.
g008188
Figure14
1.Lefttine2.Righttine
7.Torquethetine-mountingboltsto86to104N∙m
(63to77ft-lb).
8.Closethetinecoverandsecureitwiththespring
latch.
9.Installtherollerassembly.
13

Storage
1.Beforelong-termstorage,washtheattachment
withmilddetergentandwatertoremovedirtand
grime.
2.Greaseallttings.
3.Checkandadjustthetensionofthedrivechain.
4.Checkandtightenallhardware.Repairor
replaceanydamagedorwornpart.
5.Ensurethatallhydrauliccouplersareconnected
togethertopreventcontaminationofthe
hydraulicsystem.
6.Paintallscratchedorbaremetalsurfaces.Paint
isavailablefromyourAuthorizedServiceDealer.
7.Storetheattachmentinaclean,drygarageor
storagearea.Coverittoprotectitandkeepit
clean.
14

Troubleshooting
ProblemPossibleCauseCorrectiveAction
1.Ahydrauliccouplerisnotcompletely
connected.
1.Checkandtightenallcouplers.
2.Ahydrauliccouplerisdamaged.2.Checkthecouplersandreplaceany
thataredamaged.
3.Thereisanobstructioninahydraulic
hose.
3.Findandremovetheobstruction.
4.Ahydraulichoseiskinked.4.Replacethekinkedhose.
5.Theauxiliaryvalveonthetractionunit
isnotopening.
5.Repairthevalve.
6.Ahydraulicvalveorthedrivemotoris
damaged.
6.ContactyourAuthorizedService
Dealer.
7.Thereisanobstructioninthecultivator
(eg,rockorroot).
7.Findandremovetheobstruction.
8.Thedrivechainisloose.8.Adjustthechaintension.
Thecultivatordoesnotoperate.
9.Thedrivechainisbroken.9.Repairorreplacethechain.
15

Notes:

Notes:

DeclarationofIncorporation
ModelNo.SerialNo.ProductDescriptionInvoiceDescriptionGeneralDescriptionDirective
23102319000001andUpSoilCultivator,Compact
ToolCarrierSOILCULTIVATORCompactToolCarrier2006/42/EC
RelevanttechnicaldocumentationhasbeencompiledasrequiredperPartBofAnnexVIIof2006/42/EC.
Wewillundertaketotransmit,inresponsetorequestsbynationalauthorities,relevantinformationonthispartly
completedmachinery.Themethodoftransmissionshallbeelectronictransmittal.
ThismachineryshallnotbeputintoserviceuntilincorporatedintoapprovedToromodelsasindicatedonthe
associatedDeclarationofConformityandinaccordancewithallinstructions,wherebyitcanbedeclaredin
conformitywithallrelevantDirectives.
Certied:AuthorizedRepresentative:
MarcelDutrieux
ManagerEuropeanProductIntegrity
ToroEuropeNV
Nijverheidsstraat5
2260Oevel
Belgium
JoeHager
Sr.EngineeringManager
8111LyndaleAve.South
Bloomington,MN55420,USA
March7,2019

EEA/UKPrivacyNotice
Toro’sUseofYourPersonalInformation
TheToroCompany(“Toro”)respectsyourprivacy.Whenyoupurchaseourproducts,wemaycollectcertainpersonalinformationaboutyou,eitherdirectly
fromyouorthroughyourlocalT orocompanyordealer.Torousesthisinformationtofullcontractualobligations-suchastoregisteryourwarranty,
processyourwarrantyclaimortocontactyouintheeventofaproductrecall-andforlegitimatebusinesspurposes-suchastogaugecustomer
satisfaction,improveourproductsorprovideyouwithproductinformationwhichmaybeofinterest.T oromayshareyourinformationwithoursubsidiaries,
afliates,dealersorotherbusinesspartnersinconnectiontheseactivities.Wemayalsodisclosepersonalinformationwhenrequiredbylaworin
connectionwiththesale,purchaseormergerofabusiness.Wewillneversellyourpersonalinformationtoanyothercompanyformarketingpurposes.
RetentionofyourPersonalInformation
Torowillkeepyourpersonalinformationaslongasitisrelevantfortheabovepurposesandinaccordancewithlegalrequirements.Formoreinformation
aboutapplicableretentionperiodspleasecontact[email protected].
Toro’sCommitmenttoSecurity
YourpersonalinformationmaybeprocessedintheUSoranothercountrywhichmayhavelessstrictdataprotectionlawsthanyourcountryofresidence.
Wheneverwetransferyourinformationoutsideofyourcountryofresidence,wewilltakelegallyrequiredstepstoensurethatappropriatesafeguardsare
inplacetoprotectyourinformationandtomakesureitistreatedsecurely.
AccessandCorrection
Youmayhavetherighttocorrectorreviewyourpersonaldata,orobjecttoorrestricttheprocessingofyourdata.Todoso,pleasecontactusbyemail
at[email protected].IfyouhaveconcernsaboutthewayinwhichT orohashandledyourinformation,weencourageyoutoraisethisdirectlywithus.
PleasenotethatEuropeanresidentshavetherighttocomplaintoyourDataProtectionAuthority.
374-0282RevC

CaliforniaProposition65WarningInformation
Whatisthiswarning?
Youmayseeaproductforsalethathasawarninglabellikethefollowing:
WARNING:CancerandReproductiveHarm—www.p65Warnings.ca.gov.
WhatisProp65?
Prop65appliestoanycompanyoperatinginCalifornia,sellingproductsinCalifornia,ormanufacturingproductsthatmaybesoldinorbroughtinto
California.ItmandatesthattheGovernorofCaliforniamaintainandpublishalistofchemicalsknowntocausecancer,birthdefects,and/orother
reproductiveharm.Thelist,whichisupdatedannually,includeshundredsofchemicalsfoundinmanyeverydayitems.ThepurposeofProp65isto
informthepublicaboutexposuretothesechemicals.
Prop65doesnotbanthesaleofproductscontainingthesechemicalsbutinsteadrequireswarningsonanyproduct,productpackaging,orliteraturewith
theproduct.Moreover,aProp65warningdoesnotmeanthataproductisinviolationofanyproductsafetystandardsorrequirements.Infact,the
CaliforniagovernmenthasclariedthataProp65warning“isnotthesameasaregulatorydecisionthataproductis‘safe’or‘unsafe.’”Manyofthese
chemicalshavebeenusedineverydayproductsforyearswithoutdocumentedharm.Formoreinformation,gotohttps://oag.ca.gov/prop65/faqs-view-all.
AProp65warningmeansthatacompanyhaseither(1)evaluatedtheexposureandhasconcludedthatitexceedsthe“nosignicantrisklevel”;or(2)
haschosentoprovideawarningbasedonitsunderstandingaboutthepresenceofalistedchemicalwithoutattemptingtoevaluatetheexposure.
Doesthislawapplyeverywhere?
Prop65warningsarerequiredunderCalifornialawonly.ThesewarningsareseenthroughoutCaliforniainawiderangeofsettings,includingbutnot
limitedtorestaurants,grocerystores,hotels,schools,andhospitals,andonawidevarietyofproducts.Additionally,someonlineandmailorder
retailersprovideProp65warningsontheirwebsitesorincatalogs.
HowdotheCaliforniawarningscomparetofederallimits?
Prop65standardsareoftenmorestringentthanfederalandinternationalstandards.TherearevarioussubstancesthatrequireaProp65warning
atlevelsthatarefarlowerthanfederalactionlimits.Forexample,theProp65standardforwarningsforleadis0.5μg/day,whichiswellbelow
thefederalandinternationalstandards.
Whydon’tallsimilarproductscarrythewarning?
•ProductssoldinCaliforniarequireProp65labellingwhilesimilarproductssoldelsewheredonot.
•AcompanyinvolvedinaProp65lawsuitreachingasettlementmayberequiredtouseProp65warningsforitsproducts,butothercompanies
makingsimilarproductsmayhavenosuchrequirement.
•TheenforcementofProp65isinconsistent.
•CompaniesmayelectnottoprovidewarningsbecausetheyconcludethattheyarenotrequiredtodosounderProp65;alackofwarningsfora
productdoesnotmeanthattheproductisfreeoflistedchemicalsatsimilarlevels.
WhydoesToroincludethiswarning?
Torohaschosentoprovideconsumerswithasmuchinformationaspossiblesothattheycanmakeinformeddecisionsabouttheproductstheybuyand
use.T oroprovideswarningsincertaincasesbasedonitsknowledgeofthepresenceofoneormorelistedchemicalswithoutevaluatingthelevelof
exposure,asnotallthelistedchemicalsprovideexposurelimitrequirements.WhiletheexposurefromToroproductsmaybenegligibleorwellwithinthe
“nosignicantrisk”range,outofanabundanceofcaution,T orohaselectedtoprovidetheProp65warnings.Moreover,ifT orodoesnotprovidethese
warnings,itcouldbesuedbytheStateofCaliforniaorbyprivatepartiesseekingtoenforceProp65andsubjecttosubstantialpenalties.
RevA
This manual suits for next models
1
Table of contents
Other Toro Tiller manuals


Toro
Toro 29518 User manual

Toro
Toro GREENS AERATOR 09120 User manual

Toro
Toro 23515 User manual

Toro
Toro 23102 User manual

Toro
Toro 58601 User manual

Toro
Toro 33513 User manual

Toro
Toro Dingo 22445 User manual

Toro
Toro 09802 HydroJect 3010 User manual

Toro
Toro 09802 HydroJect 3010 User manual

Toro
Toro 9801 User manual


