Senquip ORB-X1-W User manual

1
www.senquip.com
This application note discusses the connection of a Senquip ORB-X1-W to a 4-20mA level sensor that would typically
be used to measure the depth of a water tank or dam.
Connecting the level sensor to an ORB will allow water level data to be delivered to the internet or a remote server
anywhere in the world.
The Sensor being used in this application can measure water in the range 0 to 5m, where 0m is represented by 4mA
and 5m is represented by 20mA.
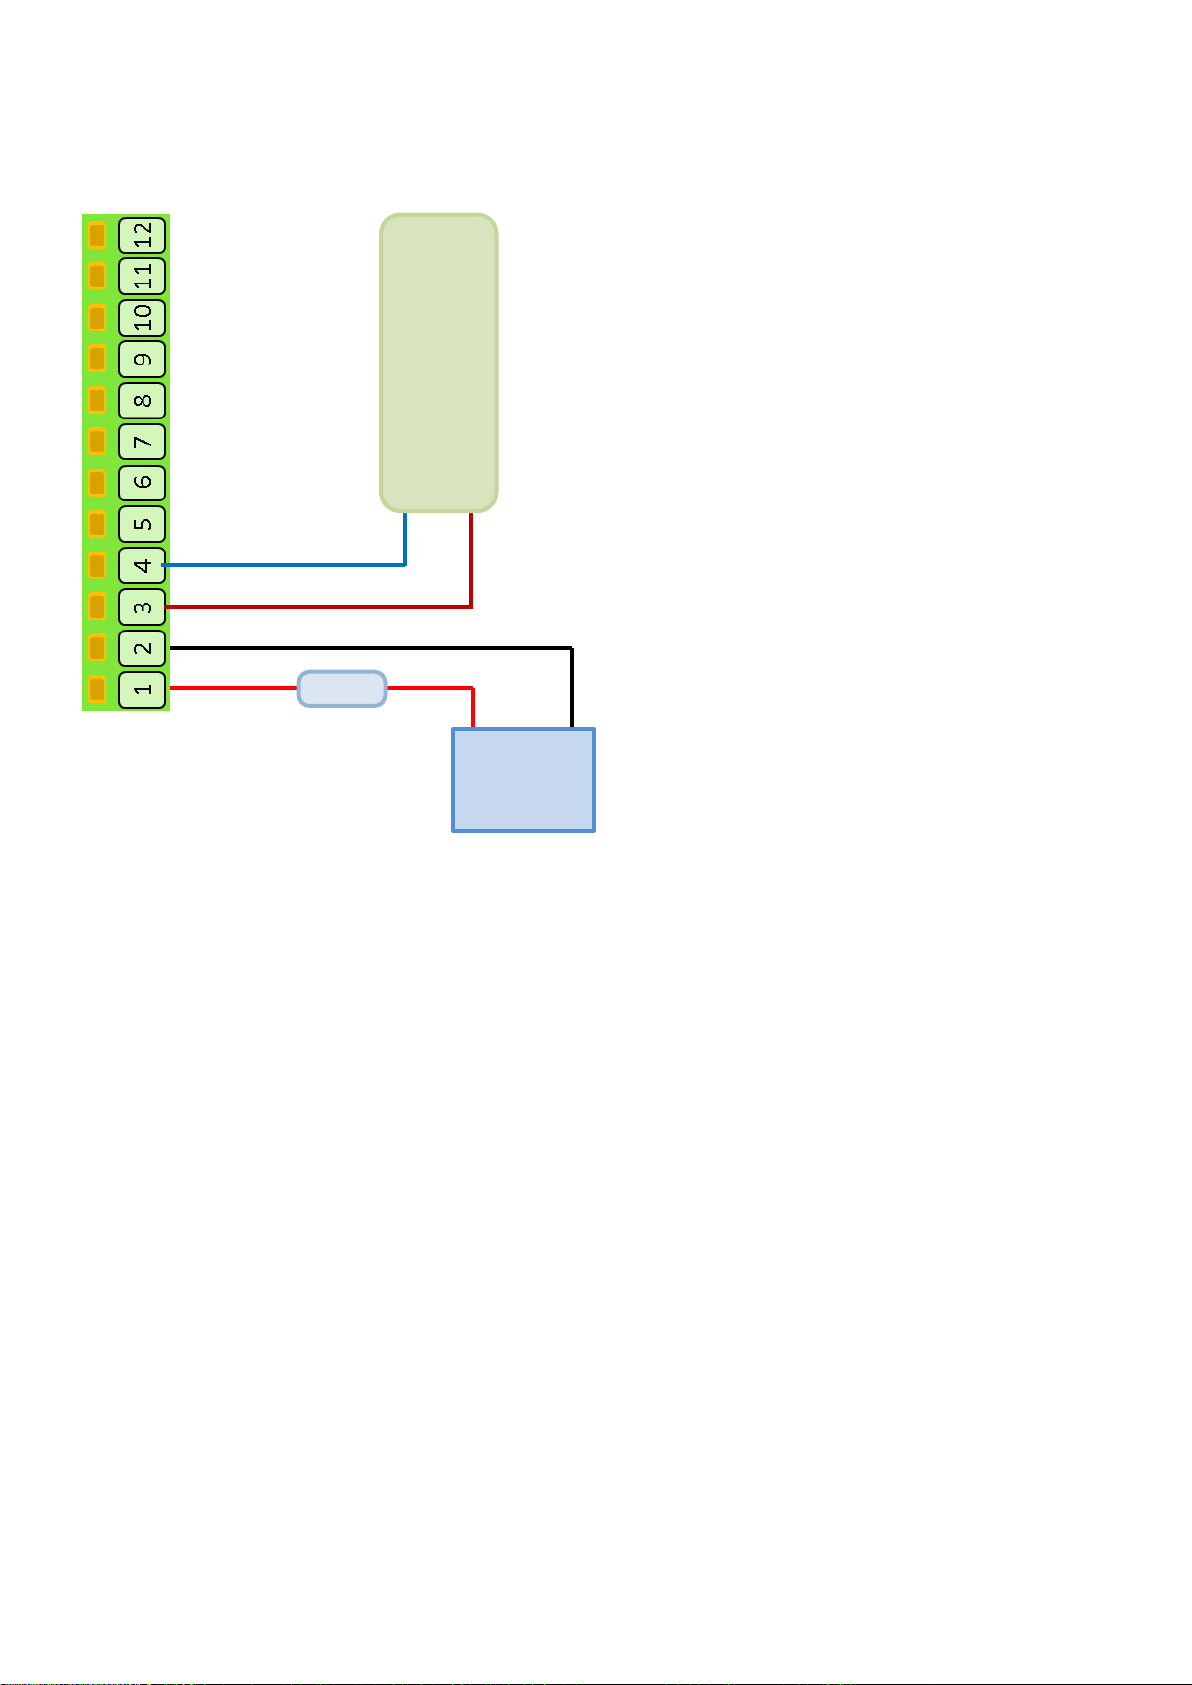
Hardware Interconnect
The ORB-X1 has two integrated current sources that can be used to drive 4-20mA sensors. The current supplied by
each source is accurately measured and reported. The current sources on the ORB generate their own 12V source,
meaning that the supply to the ORB is not critical. With an input voltage between 9V to 75V or with AA batteries,
the ORB will generate 12V on the current sources. Note that with AA batteries, the measurement interval should be
long to avoid draining the batteries.
Pins 1 and 2 of the ORB should be connected to power and ground. The power in this case is likely to be derived
from a solar panel. If solar is used, measurements can continue to be taken outside of sunlight hours as the ORB has
an internal backup battery. It is recommended that a 1A fuse be inserted between the solar panel and the power
connection of the ORB. The fuse protects the battery in the event that the ORB fails of the positive wire comes
loose. A 10W solar panel will ensure that the internal backup battery remains charged even during extended periods
of cloud.
Since the ORB has two current sources, it can measure two current devices at the same time. In this case however, a
single level sensor is used and it is decided to connect it to source 1. The level sensor should be connected between
source 1 on pin 3 and ground.
App Note: Connecting to a 4-20mA Level Sensor.
AN003
Typical 4-20mA level sensor
2
www.senquip.com
ORB Configuration
If you are configuring the ORB for the first time, use a phone, tablet or laptop to access the ORB’s integrated
webserver. To activate the webserver, press the setup key on the ORB for 2 seconds and then connect to the ORB’s
Wi-Fi on your phone, tablet or laptop. Passwords for the ORB’s Wi-Fi and webserver can be found on a tear-off
sticker under the lid of the ORB. For further details on how to access the webserver, please see the “ORB-X1 User
Guide”. If the ORB is already available on the Senquip Portal, simply login to the Portal and make the required
changes remotely.
In this application, it is assumed that the ORB is powered via solar. To conserve energy, the rate of transmission is
set to 10 minutes. The ORB can be set to transmit the level via either Wi-Fi or GSM. The configuration of the
transmission is not covered in this application note.
Note that only settings used in connecting the ORB to the level sensor are discussed in this application note.
Power
1A Fuse
Ground
ORB-X1
Ground
Source 1
Source
Level Sensor
-
+
10W Solar
Panel
3
www.senquip.com
General Setup
For general setup, use the General tab on the ORB webserver. Remember to save when complete.
1. Give the ORB a name that is meaningful
to the user, in this case, “House Tank
Level.”
2. To save energy, the ORB is set to wake
up every 10 minutes (600 seconds),
report the level and then return to sleep.
3. Set the Transmit Interval to 1 so that the
level is sent each time it is measured.
4. There are no warnings or alarms used in
this application that require faster
updates be sent and so the Exception
Interval is set to be the same as the
transit interval. Note that if alerts are
more important than actual levels, that
the transmit interval could be set to only
transmit say once a day. The ORB would
wake every 10 minutes, check the levels
and only transmit if there was a warning
or alarms. Power would be saved in this
way. If the Exception Interval was set to
1, then the ORB would transmit on every
measurement whilst a warning or alarm
was current.
5. The Device Always On and Web Server
Always On options are both not ticked in
order to save power.
6. If AA batteries are being used as a
backup to power the ORB, then an alert
should be set for when the batteries are low.
7. If solar is being used to power the ORB, then a warning indicating that the internal backup battery is low,
should be set. This is likely if the solar installation has been damaged or it is covered with dust or other
substances.
1
2
3
4
5
6
7
4
www.senquip.com
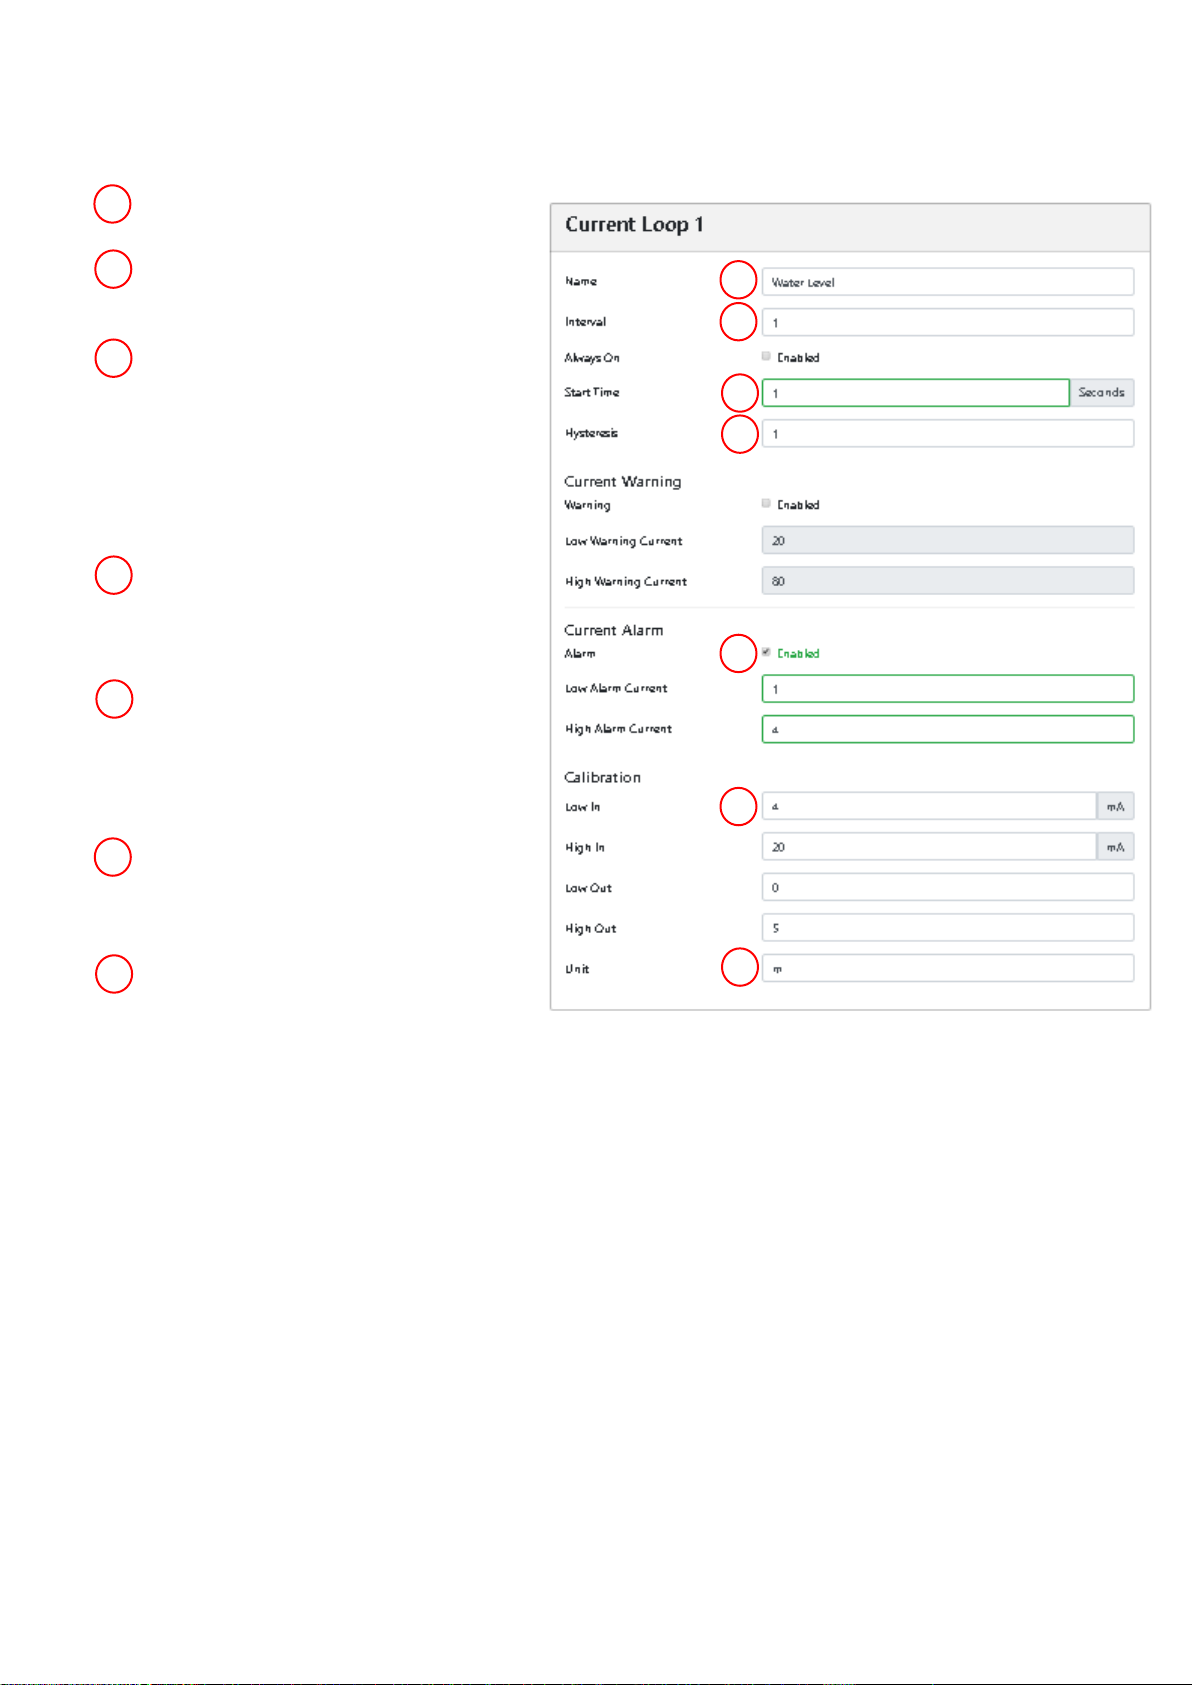
Current Source 1 Setup
The level sensor is connected to the ORB though Current Loop 1. For current loop setup, use the External tab on the
ORB webpage or Senquip Portal and select the Current Loop 1 peripheral.
1. Give the current data a meaningful name;
in this case “Water Level”.
2. Water level data is to be sent every time
the ORB wakes up and so the Interval is
set to 1.
3. Use the Start Time setting to apply power
to the sensor a short time before the
measurement is taken. This allows the
sensor data to stabilise before a
measurement is taken. Make this value
as short as possible to save energy when
operating off solar or AA batteries.
4. Hysteresis is applied when warnings and
alarms are enabled. Hysteresis prevents
multiple alerts when the measured value
is oscillating around an event level.
5. In this application, we have an alarm set if
the water level goes below 1m or above
4m. Note that if you calibrate the sensor,
warning and alarm settings are in the
calibrated units.
6. Calibration in meters has been applied in
this application. According to the water
level sensor, 4mA represents 1m and
20mA represents 5m.
7. The calibrated unit in this example is
meters (m). Note that the ORBs
webserver and the Senquip Portal will always report measured values in the calibrated units; meters in this
case.
1
2
3
4
5
6
5
7
5

5
www.senquip.com
Access to the Water Level Data
The water level data that is being sent by the ORB can be viewed in various ways:
1) Login the ORB on your local network and view the real-time serial data being sent.
2) Login to the Senquip Portal (portal.senquip.com) and view the real-time serial data or alternately view or
download the data from the table view under “Raw Data”.
3) Configure the ORB to send the data to a UDP, HTTP or MQTT server. In this case, the data will arrive on the
remote server in in JSON format. In the example below, the ORB device ID is 4A0AC62C0. Note that Current
Loop peripheral also sends the voltage that is measured on the output. This can be used to check that the
current drawn by the external device is within limits and is not applying excessive load to the ORB’s 12V
supply.
{“deviceid”:”4A0AC62C0”,”current1”:”0.41”, “v_current1”:”12.04”}
Conclusion
The physical connection and setup required to connect a 4-20mA level sensor to the ORB is quick and simple. Once
connected, the level data provided by the level sensor can be viewed anywhere in the world on the internet or on a
company server.
Table of contents


