Sensorex C110 User manual

Page 1 of 2
Introduction
1. Plug the BNC connector of the black cable or other cable
(CX2) into the top of the C110 at the BNR connector. (see
FIG 1)
2. Disconnect the pH or ORP electrode from the meter.
3. Connect the C110 to the meter in the same way the elec-
trode was connected. (see FIG 2.)
4. Turn on the C110 by pressing the desired pH or mV button
5. Press the "HIGH Ω" button to simulate pH electrode resis-
tance load (the C110 has 1000 M Ω load). See FIG 3. Note:
ORP does not require "HIGH Ω" button to be pressed since
ORP electrode have low output impedance.
6. At this time it is best to follow the pH or ORP electrode cali-
bration instructions in the manufacturer's manual.
The following instructions are given as general guidelines
for either microprocessor or manual adjust pH meters.
Parts covered by this product data sheet include:
C110
FORM: InstrC110 [Rev: 2011-06-27]
©2011 Sensorex Corporation
MODEL C110
pH/ORP SIMULATOR
pH pH pH
+_
HI
o LO BAT
mV mV
7410
HI
choose
pH
MODEL C110
pH/ORP SIMULATOR
pH pH pH
+_
HI
o LO BAT
mV mV
7410
FIG. 1
Calibration Procedure
pH Meter
pH
C
ATC
MODEL C110
pH/ORP SIMULATOR
pH pH pH
+_
HI
o LO BAT
mV mV
7410
FIG. 3
FIG. 2
C110 pH/mV Checker/Simulator
Product Instructions
PRODUCT INSTRUCTION SHEET
The C110 pH/mV checker simulator is a millivolt
source that can be used to calibrate or check the
calibration of a pH or ORP (mV) meter. It also serves
as a troubleshooting toll when pH or ORP systems
fail. For troubleshooting, the electrode is removed
and the simulator is connected in its place. The
C110 sends a signal to the meter to verify the per-
formance of the meter. Signals of pH4, pH7 and
pH10 are available, as well as +/-700mV for ORP. A
properly working meter (by process of elimination)
indicates that the electrode may be the cause of the
failure.
PRODUCT INSTRUCTION SHEET
7. With the "pH 7" light on, rotate the meter's "CALIBRATE" or
"STANDARDIZE" control until the meter's display reads "7.00"
8. Press the C110's "pH4" button to select pH4 or "pH10" to
select pH 10. The appropriate C110 light should turn on.
9. Rotate the meter's "SLOPE" button so that the meter reads
the new value from Step 8.
10. Scan through 7.00, 10.00 and 4.00 by pressing the appro-
priate button on the face of the C110 to verify that the meter
is properly calibrated.
11. Turn off the C110 by pressing the "OFF" button.
12. Disconnect the C110 and reconnect the pH electrode.
Calibrate the pH meter with the electrode attached, following
the meter manufacturer's instructions.
Calibration Procedure (cont.)
Page 2 of 2
Parts covered by this product data sheet include:
C110
FORM: InstrC110 [Rev: 2011-06-27]
©2011 Sensorex Corporation
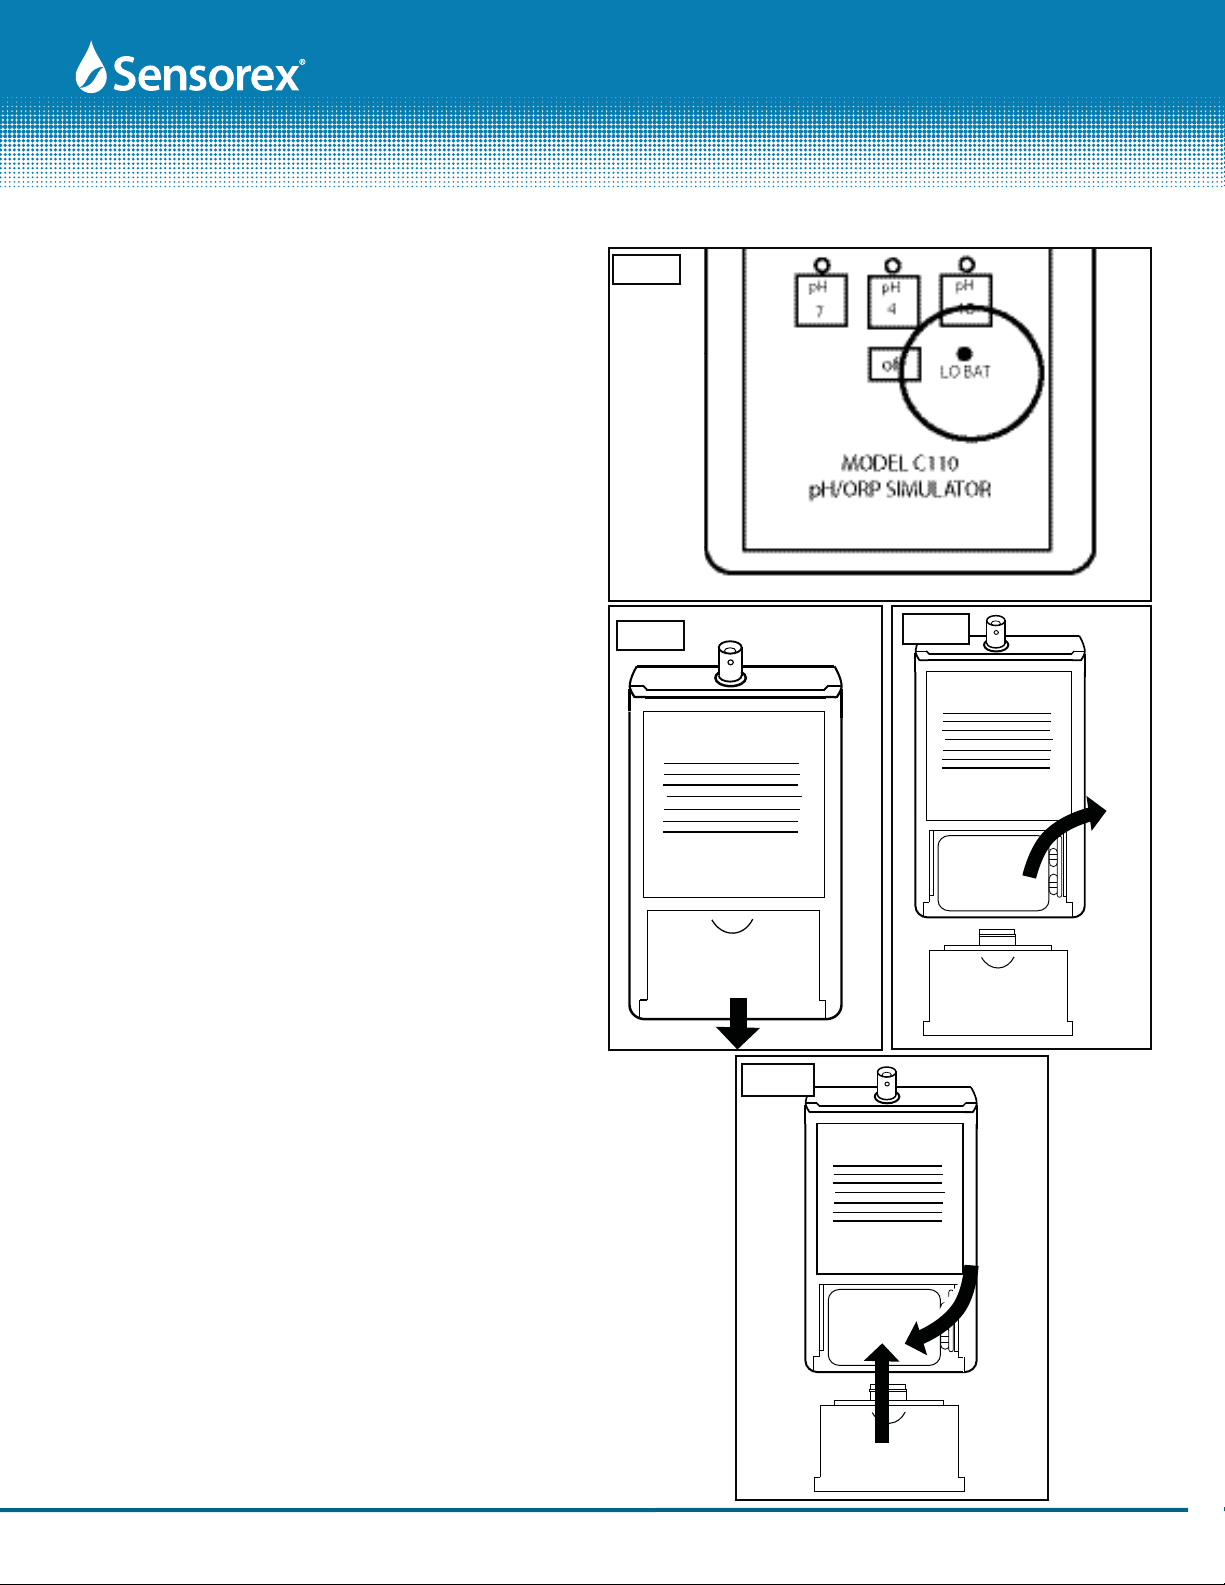
Battery Replacement
The C110 pH/ORP simulator is supplied with a 9V battery
which comes installed in the unit. When the battery is de-
pleted the LOW BATTERY light will be lit (see FIG 4). Replace
the battery before using the C110 for any further calibration
or troubleshooting. Any type of 9V battery can be used as a
replacement.
To replace the battery follow the steps below:
1. Turn over the C110 to expose the backside (see FIG 5).
2. At the bottom of the case (opposite side of the BNR connec-
tor) is the battery cover. Remove the cover by pressing the
indentation inward and pulling the cover downward (away
from the unti). See FIG 5.
3. Remove the old battery by pulling it out of the case then
removing the battery from the connectors. See FIG 6.
4. Get a new 9V battery and plug it into the connectors and
insert into case as shown in FIG 7.
5. Replace the battery cover as shown in FIG 7.
FIG. 4
OPERATING INSTRUCTIONS
Made in Mexico SN XXX
OPERATING INSTRUCTIONS
Made in Mexico SN XXX
9V battery
FIG. 5 FIG. 6
OPERATING INSTRUCTIONS
Made in Mexico
SN
XXX
9V battery
FIG. 7
Table of contents
Other Sensorex Test Equipment manuals

Popular Test Equipment manuals by other brands


AlienTech
AlienTech KESSV2 Slave Instruction manual and users guide

Brütsch Rüegger
Brütsch Rüegger MITUTOYO SURFTEST SJ 201P manual

National Instruments
National Instruments PXIe-5172 Getting started guide

UniPix
UniPix ATMOS 1000 Operation manual

Chauvin Arnoux
Chauvin Arnoux C.A 745 user manual

LaMotte
LaMotte Tracer Total Chlorine PockeTester 1740 manual

IET Labs
IET Labs HRRS SERIES User and service manual

Extech Instruments
Extech Instruments 480303 user guide

Lauper Instruments
Lauper Instruments Mocon Ametek OX-TRAN 2/22 Operator's manual

BGS technic
BGS technic 8681 instruction manual

Cirrus
Cirrus CR:514 Instrument handbook

Lindab
Lindab LTEST LT 600 operating instructions