SenTech HK-21NZ User manual

HK-21NZ HEAT ALARM INSTALLATION INSTRUCTIONS
Thank you for buying a Sentech heat alarm. Please read all instructions before
installing the heat alarm, so it will protect your home in the best possible way.
• Ifyouareinstallingtheheatalarmforsomeotherperson,leavethese
instructions or a copy of them with him/her.
• Ifthereisanyquestionastothecauseofthealarm,alwaysassumethatthisis
an actual fire and follow your fire emergency plans.
1: OPERATION AND TESTING
Normal mode: Theredlightashesonceevery55seconds.
Alarm mode: When the alarm detects high temperature the red light flashes twice
everysecondandthebuzzerbeepscontinually.Theheatalarmwillautomatically
return to normal mode when the temperature drops back below the trigger point.
Test mode: Press the test button for more than two(2) seconds and the heat alarm
will go into test mode. Release the button for the alarm to stop and the heat alarm
willreverttonormalmode.
Silence mode: During alarm mode, press the test button for 1 second to silence
the beep.
Whenthetestbuttonisreleased,theredlightashesonceevery14seconds,
indicatingthedevicehasbegunan11-minutesilencemode-thesilencemode
can’t be cancelled by pressing the button.
The heat alarm will go into alarm mode again when the temperature is high than
75°C.
Low battery: When the battery is used up, the heat alarm will beep twice at
intervalsof28seconds-pleasereplacetheheatalarmwithnewSentechheat
alarm.
Youcansilencethebeepbypressingthetestbutton-whilstthebuttonis
pressed,theredLEDwillstayonandthebeepsoundsfrequently(5beepsper
second).
Whenyoureleasethetestbutton,the‘beep’promptissilencedfor8hoursand
theredlightashesonceevery8minutes-thetestbuttonisinvalidduringthis
low battery silence mode.
Attheendofthe8hours,theaudibleindicationwillresumeifthelowbattery
condition still exists.
Thealarmwillresumeiftheheatalarmdetectthebatteryvoltagehasresumedto
normal battery power.
2. POSITIONING THE HEAT ALARM
For best protection the heat alarm should always be installed as part of a
complete fire protection system that also includes smoke alarms.
Heat alarms are best suited to areas where dust, fumes and moisture can cause
nuisance in smoke alarms, such as:
• Boilerrooms
• Kitchens
• Lofts
• Laundryrooms
• Garages
• Bathrooms
Heat alarms should not be installed in escape routes instead of smoke alarms
-theyshouldonlybeusedintheaboveapplications.(Sentechsmokealarms
shouldbeinstalledinLivingrooms,hallways,stairwellsandineveryotherroomin
the house.)
When heat alarms are installed in a room, they should be placed on the ceiling,
ideallyinthecentreoftheroom.Theyshouldbeatadistancenomorethan5.3m
fromthefarthestwall,nomorethan5.3mfromadoortoanyroominwhichare
mightstart,andnomorethan5.3mfromthenextheatalarm.
NOTE: HEAT ALARMS SHOULD NOT BE WALL MOUNTED.
Installsufcientheatalarmstocompensateforcloseddoorsandobstacleswhich
mayinterferewiththepathofheattoanalarmandmaypreventoccupantsfrom
hearing an alarm.
3. MAINTENANCE
Battery life: Theheatalarmcontainsa3Vlithiumbattery(CR123A).Thelifetimeis
10 years.
Whenthebatteryisusedup,theheatalarmwillbeeptwiceatintervalsof28
seconds-pleasereplacetheheatalarmwithnewSentechheatalarm.
WARNING: Lithium batteries can explode or cause burning if installed incorrectly.
Do not attempt to replace the battery.
Cleantheheatalarmatleastonceayear.Separatetheheatalarmcarefullyfrom
theinstallationplatebyturningitcounter-clockwise.
Cleanthedustaroundthethermistorsensorheadcarefully.Testtheheatalarm
after cleaning it.
Do not open or paint or modify the heat alarm!
Waste handing: The heat alarm should be disposed in accordance with normal
waste handing for electronics.
4. TECHNICAL INFORMATION
Operatingprinciple:NTCthermistor Warranty:5years
Alarmcurrent:<150mA Voltage:3V(built-inlithiumbattery)
Quiescentcurrent:<5uA Operationtemperature:0°C~50°C
Staticresponsetemperature:Class
A1,54°C~65°C
Soundvolume:≥85dBatadistance
of3meters
Dimensions:42.5xØ50.8mm Weight:47g
Holdingtemperatureof3M
attachmenttape-35°C~93°C
Maximumhumidity:93%RHnon-
condensing
Conformtothestandard:
EN60065:2014
5. MANUFACTURER’S GUARANTEE
Themanufacturerprovidesa5yearguarantee,startingfromthepurchasedateof
the product.
Iftheheatalarmbecomesdefectiveduringtheguaranteeperiod,theheatalarm
willbereplacedwithanewoneprovidingthedefectiveoneisreturnedtothe
distributor.Theguaranteecoversmanufacturingormaterialdefectsintheproduct,
if the heat alarm has been used according to the user instructions and the
guarantee period has not expired. The guarantee period for a heat alarm that has
been replaced with a new one is the same as that of the original heat alarm.
The guarantee is not valid if:
1) the product is used, maintained, or tested contrary to the user instructions,
2) the defect has been caused by a negligent act by other than the manufacturer,
3) iftheproducthasbeenmodiedortreatedwithforce,
4) ifittheguaranteereceiptismissing.
Theguaranteedoesnotcovercostsduetoinstallationorbatteryreplacement.
The manufacturer’s responsibility does not in any case exceed the price of a new
heat alarm. The manufacturer is not responsible for any damage or loss that has
beencausedbyanon-workingheatalarmornegligencebythemanufacturer.
This guarantee does not affect rights enacted by law.
Australasian Distributors:
CSL-CuthbertStewartLimited.
22FisherCrescent,
MtWellington,Auckland.
POBox62293,
SylviaPark1644
Freehone:0800288423
Phone:+6499281000
Fax:+6494891752
Email:[email protected]
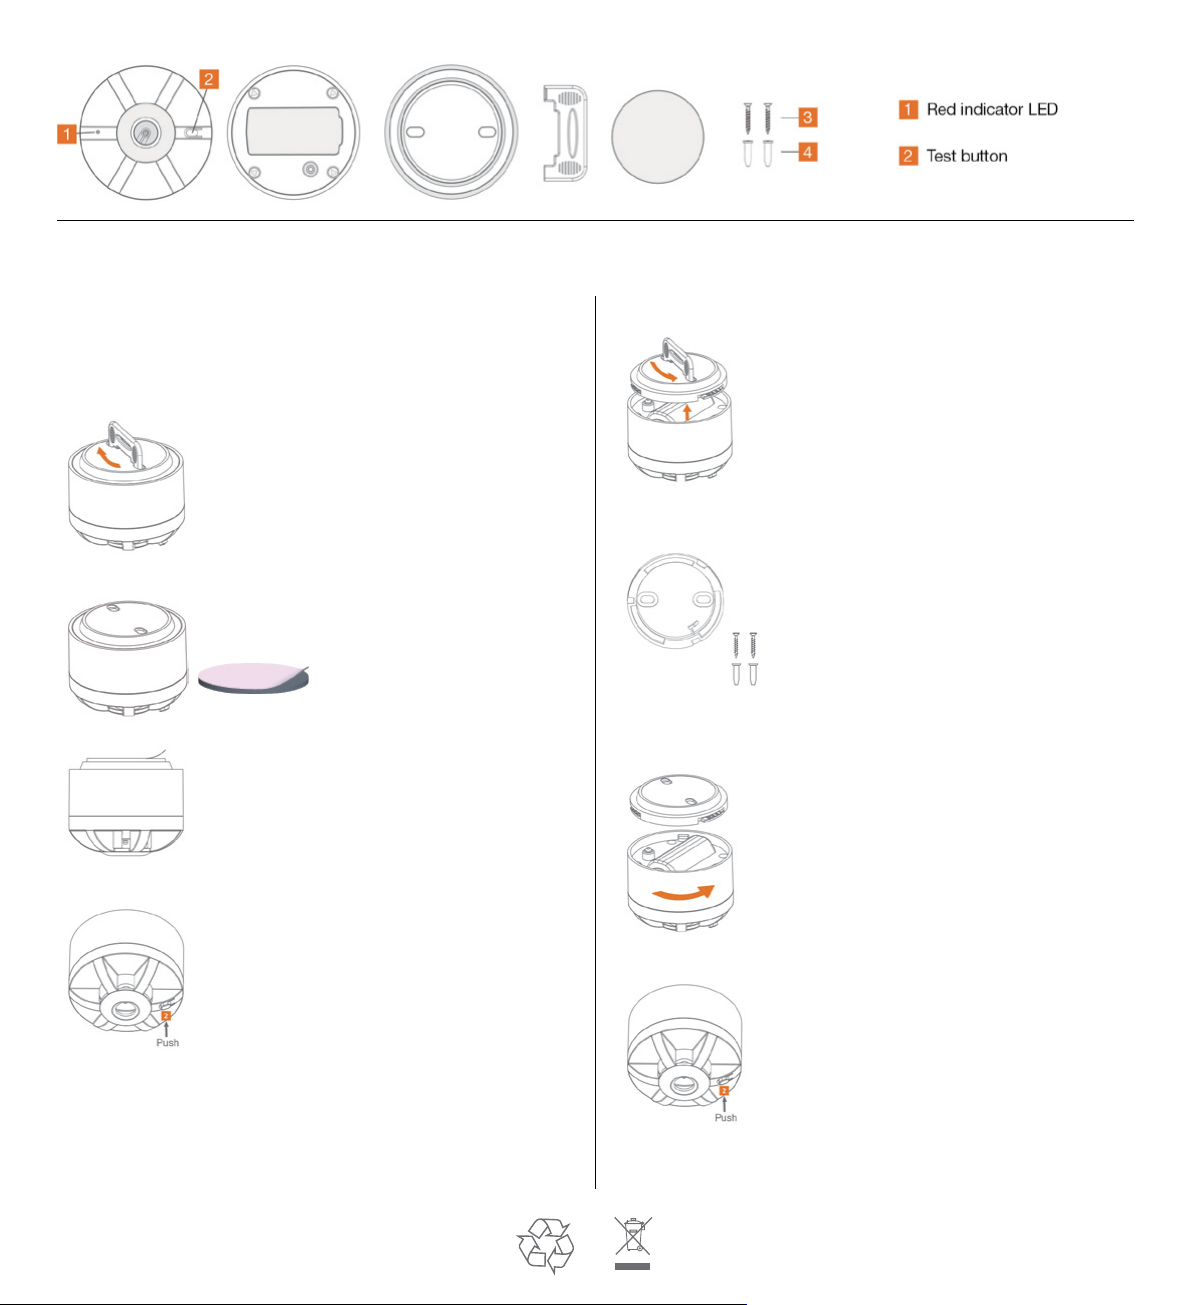
7. INSTALLATIONS
A Sentech heat alarm can be installed in two different ways:
(1) QUICK INSTALLATION WITH 3M DOUBLE-SIDE TAPE
Makesurethattheinstallationsurfaceisevenandcleanedthoroughly.Ifthe
ceilinghasanunevensurfaceorroughintexture,installtheheatalarmwiththe
screws supplied.
C) Removetheredcoveronthedouble-sidedtape.
D) Attach the heat alarm by pressing it firmly against
theceilingforapproximately60seconds.Youmay
also hear an alarm sound if the test button gets
pressed during installation.
E) Makesurethattheheatalarmisactivatedby
pressingthetestbuttonfor3seconds.When
theheatalarmgivesanalarmsound,thetestis
complete and your heat alarm is ready for use.
Note:Installationwith3Mdouble-sidedtapeisnotapprovedaccordingto
GreatBritain’sLPCBstandard.
The installation is now complete. Test your heat alarm weekly!
The installation is now complete. Test your heat alarm weekly!
(2) INSTALLATION WITH SCREWS
6. PRODUCT COMPONENTS DRAWING
A) Activatetheheatalarmbypushingthemounting
plate and turning it clockwise at the same time.
Theheatalarmisactivatedandreadytobe
installed when you feel clicks. You may also hear
an alarm sound if the test button gets pressed
duringactivation.
A) Removethemountingplateoftheheatalarmby
turningitcounter-clockwiseandliftingitaway.
C) Presstheheatalarmagainstthemountingplate
and turn it clockwise until you feel clicks.
D) Makesurethattheheatalarmisactivatedby
pressingthetestbuttonfor3seconds.When
theheatalarmgivesanalarmsound,thetestis
complete and your heat alarm is ready for use.
B) Toachievethecorrectheatalarmposition,mark
drill holes for the screws then screw the mounting
plate of the heat alarm tightly to the ceiling with
the screws.
B) Removethewhitecoveronthedouble-sidedtape,
then adhere to the mounting plate.
EN 14604:2005
0832-CPR-F1312
16
1050b/01
Other SenTech Smoke Alarm manuals


