Winext AN-102C User manual

AN-102C Photoelectric Smoke Detector User Manual
0

AN-102C Photoelectric Smoke Detector User Manual
1
Content
1. Introduction...............................................................................................................................2
2. Appearance ...............................................................................................................................4
3. How to work .............................................................................................................................5
4. Configuration ............................................................................................................................8
4.1 Precaution............................................................................................................................8
4.2 Tool list ...............................................................................................................................8
4.3 Wireless configuration ........................................................................................................8
4.3.1 Wireless configuration tool ......................................................................................8
4.3.2 Install CP210x driver for wireless configuration tool ..............................................9
4.3.3 Parameter setting....................................................................................................12
5. Installation...............................................................................................................................14
5.1 Package contents...............................................................................................................14
5.2 Quick guide.......................................................................................................................14
6. Communication Format ..........................................................................................................16
6.1 Data report.........................................................................................................................16
6.1.1 Heartbeat data frame (0x01)...................................................................................16
6.1.2 Self-test (0x02).......................................................................................................17
6.1.3 Alarm or cancel alarm frame (0x03) ......................................................................17
7. Trouble-shooting.....................................................................................................................19
7.1 Maintenance and repair.....................................................................................................19

AN-102C Photoelectric Smoke Detector User Manual
2
1. Introduction
AN-102C is a domestic photoelectric smoke detector with LoRaWANTM compliance.
It can detect smoke generated by fire and send alarm signal in time. The alarm adopts
photoelectric smoke sensing device and excellent production technology, with stable
work performance and beautiful appearance. The alarm is powered by 3V lithium
battery with low power consumption, self-check function and low voltage warning
function. It’s stable and reliable, and meets the international "independent smoke fire
detection alarm" technical requirements.
Application
Suitable for families, schools, nursing homes, hotels, factories and other types of
indoor fire safety alarm monitoring. Used to detect fire smoke from wood, cotton
fabrics, plastics and hydrocarbons and etc.
Unsuitable installation site:
A. places where dust, powder, and water vapor are present in large quantities
B. places that may produce corrosive gases
C. Garage, kitchen and places where smoke stays normally
D. places with excessive temperature and humidity.
Feature
Support LoRaWANTM
Detector head and mounting base design
Low battery voltage alarm
Easy installation

AN-102C Photoelectric Smoke Detector User Manual
3
Technical parameter
Description
Parameter
Model
AN-102C
Product Name
Photoelectric Smoke Detector
Working Voltage
DC3V(CR123A lithium battery)
Alarm LED
Indicator
Red
Alarm Sound
pressure
>80dB/3m
Working
Temperature
-10℃~+50℃
Working Humidity
≤95%RH(non-condensing)
Communication
protocol
LoRaWAN
Frequency
CN470-510/US902-928/AS923/EU863-870/AU915-928
Dimension
φ149.5mmX46.0mm(include mounting bracket)

AN-102C Photoelectric Smoke Detector User Manual
4
2. Appearance
F
Figure: Front view and side view
Figure: Dimension

AN-102C Photoelectric Smoke Detector User Manual
5
3. How to work
Smoke detection system
The whole smoke detection system consists of AN-102C photoelectric smoke detector,
LoRa gateway, cloud platform and application management platform. Users can also
use their own platforms which must be LoRaWANTM compliant.
AN-102C
AN-102C is a domestic photoelectric smoke detector with LoRaWANTM compliance.
It can detect smoke generated by fire and send alarm signal in time, and report
through gateway to platform.
LoRa gateway
The gateway is connected with AN-102C through LoRa communication technology. It
is connected to the Internet through Ethernet or wireless cellular mobile network to
backhaul data to the cloud platform.
Cloud platform
As to LoRa network server, we can provide our LoRaWAN middleware platform,
customers can deploy the middleware locally on their server or on Cloud, and the data
is in their hands, we'll provide them with API interface and MQTT message
subscription, and if they’ve already had their own application platform and want to
get LoRa data, they can get LoRa data by MQTT message subscribing with our
LoRaWAN middleware platform; If they haven’t had their own application platform,
they can develop their own based on our LoRaWAN middleware.
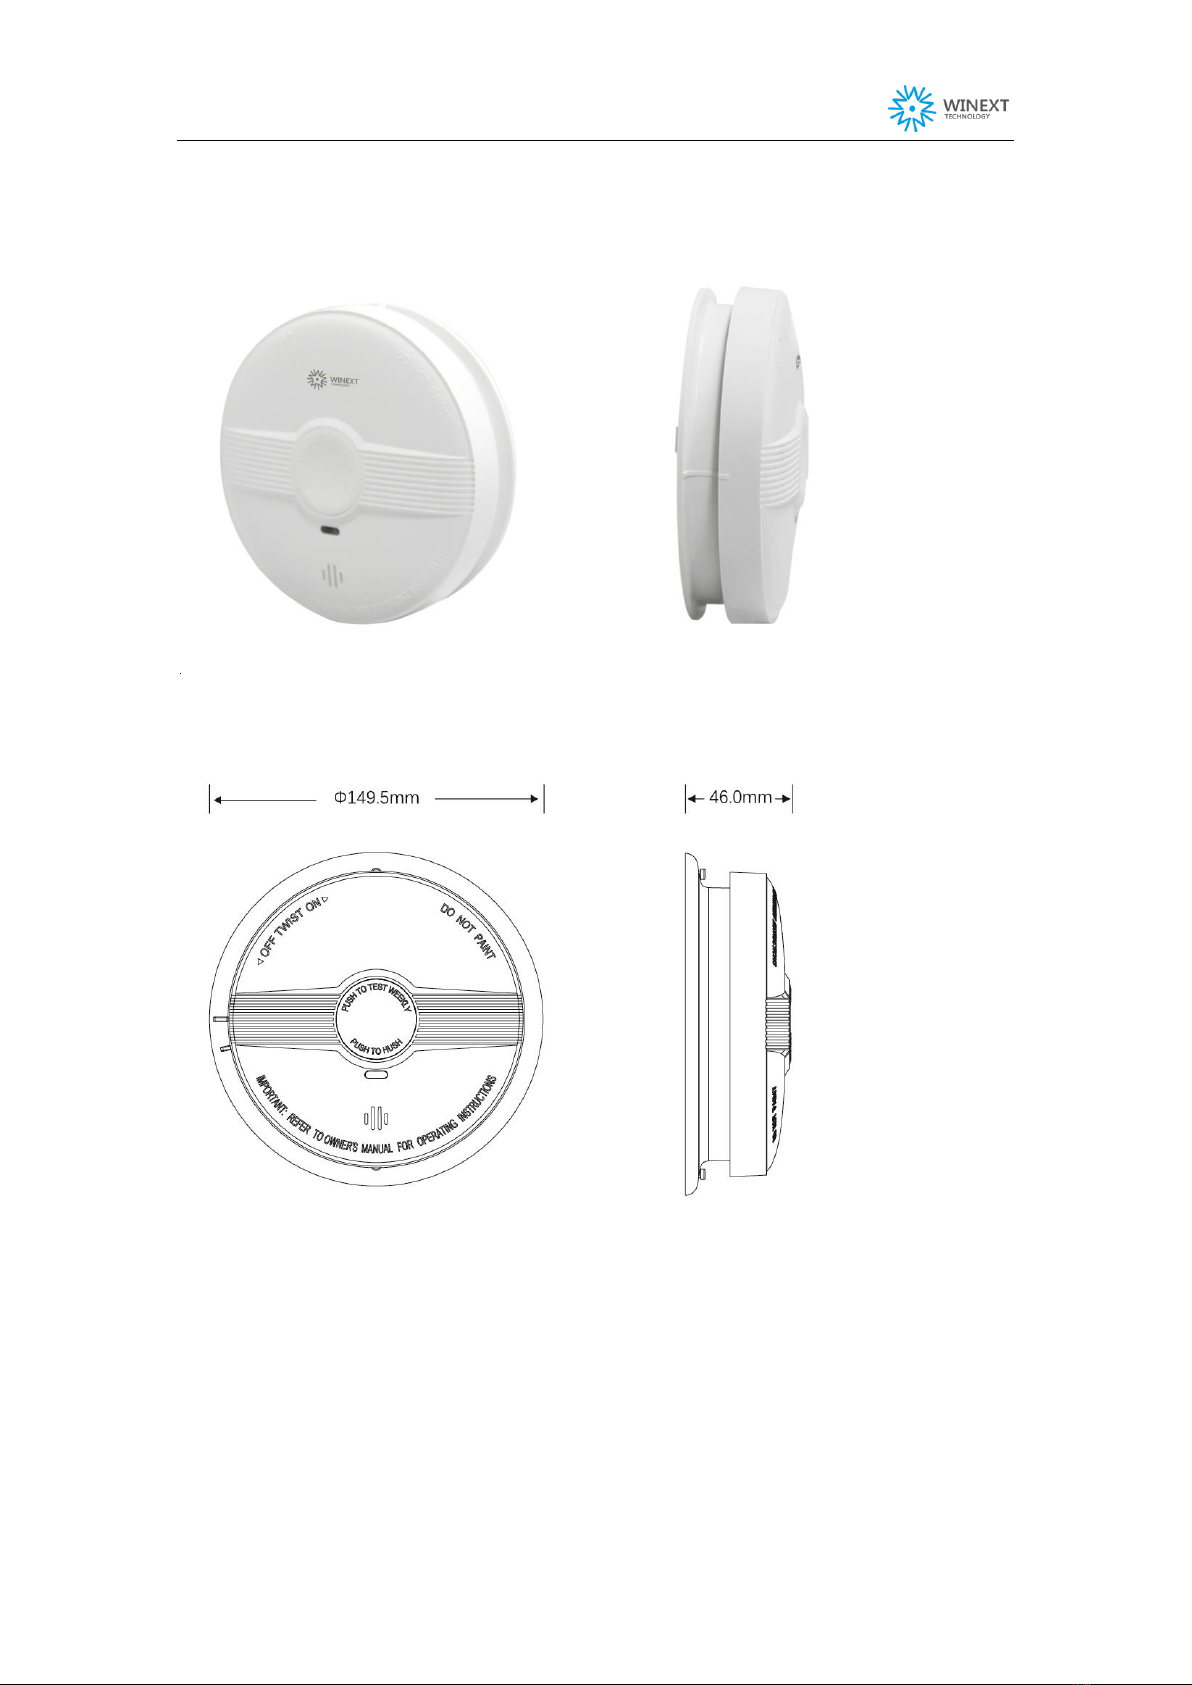
Operation:
Turn on: Take out smoke detector, take out yellow plastic piece, the device is turned
on.
Join network: Ensure that the frequency points of the node and the gateway are
consistent, and the node has been added to the platform, and will automatically join
network after powered on;
Indicator: When the device is working normal, red LED indicator flashes per 53
seconds. When the smoke alarm is triggered, red LED indicator will flash
quickly.
Buzzer: When the smoke alarm is triggered or you are doing self-check, the
smoke detector will emit urgent "beep-beep" call; When the voltage is low, the

AN-102C Photoelectric Smoke Detector User Manual
6
red indicator will flash every 53 seconds, and the buzzer will beep shortly.
Test: Press the self-check button and hold it for more than 1 second. The red LED
indicator will flash quickly and the buzzer will beep, which indicate the device is
working normal. Release the self-check button, the device will be back to normal
working status. It is recommended to test at least once a month. Please be careful
not to test with open fire. Once the alarm goes off, please pay attention to it.
Alarm: When the smoke concentration reaches the set value, the red indicator of
the alarm flashes rapidly and gives out a "beep-beep" sound. When the smoke
concentration is below the set value, the alarm returns to normal operation.
Hush: Please note that the mute function is used when there is no fire. In the case
of known non-fire alarm, do not block or block the alarm in any form. Press the
self-check/mute button to reduce the sensitivity and temporarily quell
unnecessary alarm.
Low voltage warning: When the battery level is below the set value, the red
LED indicator will flash once every 53 seconds, meanwhile the buzzer will beep
once. The smoke detector is with battery low-voltage detection function. When
the battery voltage is lower than the set value, the red indicator light of the alarm
will flash once every 53 seconds, and the buzzer will beep briefly. Pressing the
self-check/mute button (release within 1 second) will cause the low voltage
prompt to mute for about 12 hours. During the muffling process, press the
self-check/mute button twice continuously (release it within 1 second) to restore
the low-voltage prompt sound.
Signal LED indicator
LED
Indicator
Status
Green LED
indicator
Sending signals
Signal sent out
Green LED indicator
flashes quickly
(4 times/second)
Signal sent out successfully
with strong signal strength:
green LED flashes slowly
(once/2 seconds)
Signal sent out successfully
with weak signal strength:
green LED flashes slowly
(once/second)
Failed to send signals: green
LED flashes quickly and then
goes off.

AN-102C Photoelectric Smoke Detector User Manual
7
Battery replacement
Remove the device from the mounting base first.
Remove the inside module from the device, take out the battery, press and hold
test/hush button for 5 seconds and then release, so that the device can discharge
remaining power, or it may send a low battery power fault warning.
Replace with a new battery, and insert the module back to the alarm, push the
switch to power, the red LED indicator will flash once, indicating the device is
powered on successfully.
Press test/hush button, if the device does self-test and sends alarm signals, it
indicates the device is working normal. Push the switch to off position, and rotate
the device back to the base.

AN-102C Photoelectric Smoke Detector User Manual
8
4. Configuration
4.1 Precaution
For device normal operation and detection accuracy, please pay attention to the
following matters before configuration:
Before configuration, please contact our technical staff for the relevant
software and manual.
For wireless configuration, it should be done within the signal coverage area
of the wireless serial port module.
4.2 Tool list
Note: For configuration, you can use wireless configuration tool (wireless
configuration) or USB to TTL cable (cable configuration), but here we choose to tell
customer how to do wireless configuration.
Item
Description
Laptop
Installation
Wireless Configuration tool
The laptop communicates with device via
wireless configuration tool ireless
configuration tool(wireless configuration),
you should install CP210x driver for this
tool
Configuration software
Winext manage App
Figure: Tool List
4.3 Wireless configuration
4.3.1 Wireless configuration tool
Configuration tools as below:

AN-102C Photoelectric Smoke Detector User Manual
9
a) Install the CP210x driver for wireless configuration tool, file as below:
b) Install Winext manage App, file as below:
4.3.2 Install CP210x driver for wireless configuration tool
(1) Open CP210x driver for wireless configuration tool
(2) Select the driver program to install depending to the system type.
32-bit operating system selects “CP210xVCPInstaller_x86.exe”.
64-bit operating system selects "cp210xvcpinstaller_x64.exe".
(3) Install Wireless configuration tool driver
Here we take an example to use the 64-bit operating system to install the wireless
configuration tool driver
Click and select Next to the driver file "cp210xvcpinstaller_x64.exe".
As below:

AN-102C Photoelectric Smoke Detector User Manual
10
Select Accept the License Agreement and click on Next, as below:

AN-102C Photoelectric Smoke Detector User Manual
11
Wait for a while and click on Finish, as below:
Check the driver program after installation finished. Click on Computer-Attribute-
Device manager, as below:

AN-102C Photoelectric Smoke Detector User Manual
12
4.3.3 Parameter setting
(1) Insert the wireless configuration tool into the laptop USB port. Start host
configuration near the device installation location.
(2) Insert the wireless configuration tool to the USB port. Click on
Computer-Attribute-Device manager and find the correct port (Enhanced COM
Port), as below:
Note: there are two ports for wireless configuration tool, only one of them is for
configuration (Enhanced COM Port)

AN-102C Photoelectric Smoke Detector User Manual
13
(3) Open and run Winext Manage App to configure the basic parameters, please refer
to the image below:
a. Select port number, click on Open SerialPort.
b. Reboot device and its DevEUI will be shown in the pull-down menu.
c. Select the target device, click on Device Locked
d. Select the parameters to query or set. If it returns OK on the data receiving interface,
it indicates configuration done.
Note: In wireless configuration mode, if there is no operation within 15s it will exit
automatically.

AN-102C Photoelectric Smoke Detector User Manual
14
5. Installation
5.1 Package contents
Accessory
Qty(pc)
AN-102C Photoelectric Smoke
Detector
1
Self-tapping Screw
2
Expanding Plug
2
5.2 Quick guide
1. Choose a proper position for installation and make marks. Install the base to the
ceiling with screws and expanding plugs. Remove the bolts from the base.
2. Place the smoke detector head on the mounting base, fix the device on the base by
clockwise rotation. Rotating the smoke detector head cover, when the long line in
the smoke detector head cover and short line in the mounting base join together, it
indicates the device is installed correctly.
3. After the device fixed, insert bolts back to prevent from dismantling.

AN-102C Photoelectric Smoke Detector User Manual
15
Ceiling-mounted Installation
Figure: Ceiling-mounted installation
Notes:
It’s recommended to be installed in the center of the ceiling for better signal
coverage.
For installation, please avoid the places blow as possible:
Places where dust, powder and water vapor is largely retained, where corrosive
gases may be generated, the temperature or the humidity is too high. Garages,
kitchens and other places where usually has smoke in normal conditions.
Note:
1. In case of fire, please call an emergency number immediately and use fire
extinguishing equipment
2. If the fire is eliminated, please press the self-check/mute button to mute the sound
3. Please note that the following situations that may trigger the fire alarm:
A. spray insecticides, cosmetics, etc. The mist is in direct contact with the device
B. smoke generated by burning substances such as cigarettes and incense comes
into contact with the device
C. Contact the device with fumigated or evaporative insecticides
D. cooking smoke or steam etc. come into contact with the device

AN-102C Photoelectric Smoke Detector User Manual
16
6. Communication Format
Using Fport 46, data is reported in hexadecimal.
6.1 Data report
6.1.1 Heartbeat data frame (0x01)
This data consists of 11 bytes, here are definitions as below:
0
Sensor Type
1 byte
Default: 0x01
1
Frame Type
1 byte
0x01
2
Smoke density
1 byte
Range: 1~60, actual value should be
divided by 100, measured in dBm
3
Temperature
2 byte
Signed integer, big-endian, actual value
should be divided by 100, measured in ℃.
e.g.: 0xF952 represents -17.1℃
4
5
Humidity
1 byte
1~100, measured in Rh%
6
Battery Level
1 byte
1~100, measured in percentage
7
Alarm Type
1 byte
Bit0: smoke alarm status: bit0=1 represents
there is a smoke alarm, bit0=0 represents
there is no smoke alarm
Bit1: temperature alarm status, bit1=1
represents there is over-temperature alarm,
bit1=0 represents there is no temperature
alarm
Bit2: low battery voltage status, bit2=1
represents there is a low battery level
alarm, bit2=0 represents the battery voltage
is normal
8
Failure Type
1 byte
Bit0: failure state of the device, bit0=1
represents there is a failure, bit0=0
represents there is no failure
bit1: failure state of temperature humidity
sensor of the device, bit1=1 represents
there is a failure, bit1=0 represents there is

AN-102C Photoelectric Smoke Detector User Manual
17
no failure
The bits that are not used are
complemented by 0.
9
Optical Maze
Pollution Rating
1 byte
Range: 1~100, measured in percentage
10
Wireless Module
Voltage
1 byte
Actual value should be divided by 10
6.1.2 Self-test (0x02)
This data consists of 3 bytes, here are definitions as below:
0
Sensor Type
1 byte
Default: 0x01
1
Frame Type
1 byte
0x02
2
Self-check
1 byte
Bit0: self-check result of the device,
bit0=1,there is a failure, bit0=0,there is
no failure.
Bit1: self-check result of temperature
humidity sensor of the device.
bit1=1,there is a failure, bit1=0,there is
no failure.
Bit7=1, start to do self-check; bit7=0,
self-check finish.
The bits that are not used are
complemented by 0.
6.1.3 Alarm or cancel alarm frame (0x03)
This data consists of 10 bytes, here are definitions as below:
0
Sensor Type
1 byte
Default: 0x01
1
Frame Type
1 byte
0x03
2
Alarm Type
1 byte
bit0: alarm status of the device. bit0=1,
there is a smoke alarm, bit0=0 there is no
smoke alarm
bit1: high temperature alarm status of
device. bit1=1, there is a high
temperature alarm, bit1=0, there is no
high temperature alarm

AN-102C Photoelectric Smoke Detector User Manual
18
bit2: low battery voltage alarm status of
device. bit2=1, there is a low battery
voltage alarm, bit2=0, there is no low
battery voltage alarm
3
Failure state
1 byte
bit0: failure state of device. bit0=1, there
is a failure, bit0=0 there is no failure.
bit1: failure state of temperature humidity
sensor of device. bit1=1, there is a
failure, bit1=0, there is no failure
The bits that are not used are
complemented by 0.
4
Smoke density
1 byte
Range: 1~60, actual value should be
divided by 100, measured in dBm
5
Temperature Value
2 byte
Signed integer, big-endian, actual value
should be divided by 100, measured
in ℃.
e.g.: 0xF952 represents -17.1℃
6
7
Humidity Value
1 byte
Range: 1~100, measured in RH%
8
Battery Level
1 byte
Range: 1~100, measured in percentage
9
Optical Maze
Pollution Rating
1 byte
Range: 1~100, measured in percentage

AN-102C Photoelectric Smoke Detector User Manual
19
7. Trouble-shooting
Description
Analysis
Trouble-shooting
False alarm
There is a large amount of
smoke or vapor indoors
but no fire.
1. When smoke and vapor
are gone, reboot the
device.
2. Install the device to other
site
There is a short
beep
Low battery power
warning
Replace battery
The alarm keeps
hush or beeps
twice.
Circuit fault
Please contact the local
distributor.
Press the self-check
button without
alarming
The device is not correctly
installed on the base.
Check and install the device
with the mounting base again.
7.1 Maintenance and repair
1. After the alarm is installed and put into use, press the self-check button every
month to monitor the alarm.
2. When it shows a low battery level alarm, please replace the battery in time.
3. Before installation, please take measures to prevent dust, moisture and corrosion.
4. Please do not disassemble and repair without permission when the device fails to
work.
5. It is recommended to replace the device after alarm signals sent and the fire
occurred.
Attention:
1. Do not install the sensor in a place with high temperature, depth and oil smoke, and
keep the air environment around the sensor clean
2. Install the device far away from large amounts of paint or diluent that produce
colloidal suspended substances, so as not to affect the normal detection of the device.
3. This product is a household intelligent smoke sensor, which can send an alarm in
case of fire, and cannot extinguish the fire.
Table of contents
Other Winext Smoke Alarm manuals
Popular Smoke Alarm manuals by other brands

elsner elektronik
elsner elektronik KNX AQS/TH Installation and adjustment

Ei Electronics
Ei Electronics Ei650 Series operating instructions

ELRO
ELRO Sensus7M instruction manual

Ei Electronics
Ei Electronics EI129 instruction manual

DSC
DSC Meridian WLS906-433 Instructions for installation and use

Fireray
Fireray 3000 user guide