Sentier Vetcorder Pro User manual

Vetcorder Pro
1. The Basics................................................................................................1
2. Introduction ............................................................................................2
3. Getting Started........................................................................................7
4. Using Vetcorder.......................................................................................8
6. Review...................................................................................................22
7. Maintenance .........................................................................................24
9. Accessories............................................................................................27
10. Specifications ........................................................................................28
11. Electromagnetic Compatibility ..............................................................31
EVERY PATIENT EVERY TIME
User’s Manual
1
1. The Basics
This manual contains the instructions necessary to operate the
product safely and in accordance with its function and intended
use. Observance of this manual is a prerequisite for proper
product performance and correct operation and ensures user and
operator safety.
1.1 Safety
Warnings and Cautionary Advice
Before using the device, please ensure that you have read
this manual thoroughly and fully understand corresponding
precautions and risks.
The data and results displayed on the device are for
reference only and cannot be directly used for diagnostic
interpretation or treatment.
Do not use this device with a defibrillator.
Do not use this device during MRI examination.
Do not use the device in a combustible environment (i.e.,
oxygen-enriched environment).
Never submerge the device in water or other liquids. Do not
clean the device with acetone or other volatile solutions.
Do not drop this device or subject it to strong impact.
Do not place this device in pressure vessels or gas
sterilization device.
Do not dismantle the device, as this could cause damage or
malfunctions or impede the operation of the device.
Do not allow the electrodes to contact other conductive parts
(including the ground).
Do not store the device in the following locations: locations
in which the device is exposed to direct sunlight, high
temperatures or levels of moisture, or heavy contamination;
locations near to sources of water or fire; or locations that
are subject to strong electromagnetic influences.
2
2. Introduction
2.1 Intended Use
The Vetcorder Pro Multi-Parameter Monitor is intended to be used
for the measuring, displaying, reviewing, and storing of multiple
physiological parameters including ECG, pulse oxygen saturation
(SpO2), perfusion index (PI), pulse rate and internal temperature.
It is not intended for use on humans.
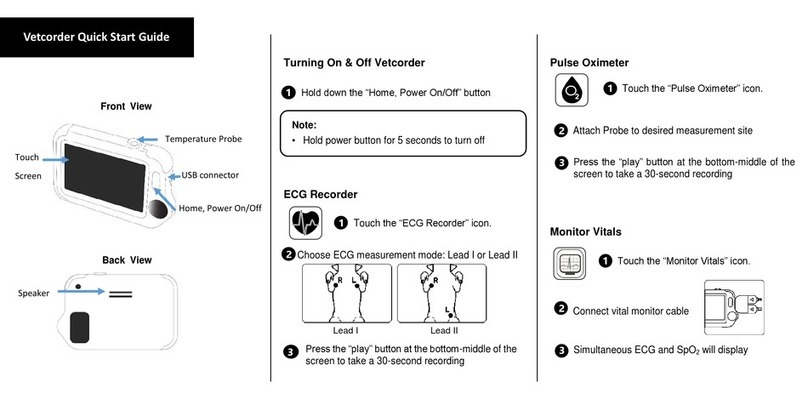
2.2 About Vetcorder
1. Touch Screen
Use the pad of your finger to tap or swipe the touch screen.
Do not use your fingernail or any other object to tap the
screen.
2. Charging Connector Port
3. Home, Power On/Off

1
1. The Basics
This manual contains the instructions necessary to operate the
product safely and in accordance with its function and intended
use. Observance of this manual is a prerequisite for proper
product performance and correct operation and ensures user and
operator safety.
1.1 Safety
Warnings and Cautionary Advice
Before using the device, please ensure that you have read
this manual thoroughly and fully understand corresponding
precautions and risks.
The data and results displayed on the device are for
reference only and cannot be directly used for diagnostic
interpretation or treatment.
Do not use this device with a defibrillator.
Do not use this device during MRI examination.
Do not use the device in a combustible environment (i.e.,
oxygen-enriched environment).
Never submerge the device in water or other liquids. Do not
clean the device with acetone or other volatile solutions.
Do not drop this device or subject it to strong impact.
Do not place this device in pressure vessels or gas
sterilization device.
Do not dismantle the device, as this could cause damage or
malfunctions or impede the operation of the device.
Do not allow the electrodes to contact other conductive parts
(including the ground).
Do not store the device in the following locations: locations
in which the device is exposed to direct sunlight, high
temperatures or levels of moisture, or heavy contamination;
locations near to sources of water or fire; or locations that
are subject to strong electromagnetic influences.
2
2. Introduction
2.1 Intended Use
The Vetcorder Pro Multi-Parameter Monitor is intended to be used
for the measuring, displaying, reviewing, and storing of multiple
physiological parameters including ECG, pulse oxygen saturation
(SpO2), perfusion index (PI), pulse rate and internal temperature.
It is not intended for use on humans.
2.2
About Vetcorder
1. Touch Screen
Use the pad of your finger to tap or swipe the touch screen.
Do not use your fingernail or any other object to tap the
screen.
2. Charging Connector Port
3. Home, Power On/Off
3
When the monitor is off, press this button to power it
on.
When the monitor is on, press and hold it for 2
seconds to turn it off.
During operation, pressing this button will switch to
Main Screen, or Calendar Screen, or return to Home
Screen.
4. Temperature Probe Connector Port
5. ECG Connector Port
6. SpO2 Connector Port
7. Speaker
8. Serial Number
2.3 Main Screen
The Main Screen is shown as below. Swiping your finger from
right to left can switch to the second page, and vice versa.
Pressing a button in the Main Screen will start a measurement,
activate a function, or open corresponding menu.
7
8

2
2. Introduction
2.1 Intended Use
The Vetcorder Pro Multi-Parameter Monitor is intended to be used
for the measuring, displaying, reviewing, and storing of multiple
physiological parameters including ECG, pulse oxygen saturation
(SpO2), perfusion index (PI), pulse rate and internal temperature.
It is not intended for use on humans.
2.2 About Vetcorder
1. Touch Screen
Use the pad of your finger to tap or swipe the touch screen.
Do not use your fingernail or any other object to tap the
screen.
2. Charging Connector Port
3. Home, Power On/Off
3
When the monitor is off, press this button to power it
on.
When the monitor is on, press and hold it for 2
seconds to turn it off.
During operation, pressing this button will switch to
Main Screen, or Calendar Screen, or return to Home
Screen.
4. Temperature Probe Connector Port
5. ECG Connector Port
6. SpO2 Connector Port
7. Speaker
8. Serial Number
2.3 Main Screen
The Main Screen is shown as below. Swiping your finger from
right to left can switch to the second page, and vice versa.
Pressing a button in the Main Screen will start a measurement,
activate a function, or open corresponding menu.
7
8
4
2.4 Calendar Screen / Standby Mode
The device will enter Calendar Screen / Standby Mode when:
No operation is detected for 120 seconds in other screen
interface, the device will automatically switch to the
Calendar Screen.
Pressing the Home button will return you to the Main Screen.
1. Current time
2. Current date
You can change the current time and date by going into the
Settings menu. Please refer to Section 5.1 for details.
3. This arrow indicates Users to press the Home button to exit
the Calendar Screen / Standby Mode.
4. Battery indicator
When the device enters Calendar Screen, it also begins to work in
Standby Mode, which is an ultra-low power consumption mode.
In Standby Mode, the touch screen operation will not function.
1
2
3
4

3
When the monitor is off, press this button to power it
on.
When the monitor is on, press and hold it for 2
seconds to turn it off.
During operation, pressing this button will switch to
Main Screen, or Calendar Screen, or return to Home
Screen.
4. Temperature Probe Connector Port
5. ECG Connector Port
6. SpO2 Connector Port
7. Speaker
8. Serial Number
2.3 Main Screen
The Main Screen is shown as below. Swiping your finger from
right to left can switch to the second page, and vice versa.
Pressing a button in the Main Screen will start a measurement,
activate a function, or open corresponding menu.
7
8
4
2.4 Calendar Screen / Standby Mode
The device will enter Calendar Screen / Standby Mode when:
No operation is detected for 120 seconds in other screen
interface, the device will automatically switch to the
Calendar Screen.
Pressing the Home button will return you to the Main Screen.
1. Current time
2. Current date
You can change the current time and date by going into the
Settings menu. Please refer to Section 5.1 for details.
3. This arrow indicates Users to press the Home button to exit
the Calendar Screen / Standby Mode.
4. Battery indicator
When the device enters Calendar Screen, it also begins to work in
Standby Mode, which is an ultra-low power consumption mode.
In Standby Mode, the touch screen operation will not function.
1
2
3
4
5
2.5 Result Screen
This device provides powerful measurement functionalities,
including Daily Check, ECG, Oximeter, and Internal
Thermometer. For each measurement, a Result report will be
provided after the measurement is finished. An example is shown
as below.
1. Measured parameters and readings.
2. Trash, replay, and back buttons.
Select to move recording to trash
Select button to re-record.
Press button to go back to the readings screen.
In the Result Screen, if there is no operation for 2 minutes, the
device will automatically return to Standby Screen.
1
2

4
2.4 Calendar Screen / Standby Mode
The device will enter Calendar Screen / Standby Mode when:
No operation is detected for 120 seconds in other screen
interface, the device will automatically switch to the
Calendar Screen.
Pressing the Home button will return you to the Main Screen.
1. Current time
2. Current date
You can change the current time and date by going into the
Settings menu. Please refer to Section 5.1 for details.
3. This arrow indicates Users to press the Home button to exit
the Calendar Screen / Standby Mode.
4. Battery indicator
When the device enters Calendar Screen, it also begins to work in
Standby Mode, which is an ultra-low power consumption mode.
In Standby Mode, the touch screen operation will not function.
1
2
3
4
5
2.5 Result Screen
This device provides powerful measurement functionalities,
including Daily Check, ECG, Oximeter, and Internal
Thermometer. For each measurement, a Result report will be
provided after the measurement is finished. An example is shown
as below.
1. Measured parameters and readings.
2. Trash, replay, and back buttons.
Select to move recording to trash
Select button to re-record.
Press button to go back to the readings screen.
In the Result Screen, if there is no operation for 2 minutes, the
device will automatically return to Standby Screen.
1
2
6
2.6 Symbols
Symbol
Meaning
Manufacturer
CE0197
In conformity with
D
irective 93/42/EEC
Symbol for “ENVIRONMENT PROTECTION
–
Waste
electrical products should not be disposed of with
household waste. Please recycle where facilities exist.
Check with your local authority or retailer for recycling
advice”.
IP22
A
gainst
ingress of solid
foreign
objects
≥12.5
mm
diameter
, Against dripping(15° tilted)
Follow operating instructions
Caution or warning that requires special attention.
7
3. Getting Started
3.1 Unpacking
Before unpacking, examine the packing case carefully for signs of
damage. If any damage is detected, contact your distributor or
Sentier. If the packing case is intact, open the package and remove
the equipment and accessories carefully. Verify all materials are
present and check for any mechanical damage. Contact Sentier in
case of any problem at 844-VETCORDER.
Warnings and Cautionary Advice
Save the packing case and packaging material as they can be
used if the device must be reshipped.
Register your warranty at www.sentierconnect.com. You will
then be notified via email of any software updates etc.
When disposing of the packaging material, be sure to
observe waste control regulations and keep it out of the
reach of children and animals.
The equipment might be contaminated during storage and
transport. Before use, please verify whether the packages are
intact, especially the packages of single use accessories. In
case of any damage, do not use. Contact Sentier at 844-
VETCORDER for assistance.
3.2 Power On/Off
Press the Power On/Off button to power on the device. Press and
hold Power On/Off button for 2 seconds from the main menu to
power off the device.
3.3 Initial Settings
The first time when the Vetcorder is powered on, you can set up
your Vetcorder monitor step by step. You can also change the
settings in the <Settings> menu.
8
3.4 Turning On/Off Bluetooth
The Vetcorder Pro has built-in Bluetooth wireless connectivity,
which enables exporting measured records from the device to
mobile devices using Bluetooth protocol.
To turn on the Bluetooth: press the Home button to enter
Main Screen.
Swipe your finger from right to left to switch to the second
page and go to SETTINGS.
On that menu you will swipe your finger up to scroll down or
use the arrow on the lower right of the screen.
Find the Bluetooth line item and toggle the switch to the right
by tapping it – when the circle in that is on the right side the
Bluetooth is on and when that circle is on the left the
Bluetooth is off.
You can exit this menu by using the X in the upper right corner or
by using the home button to return to the starting screen.
4. Using Vetcorder
4.1 Prior to Use
Warnings and Cautionary Advice
Use only cables, electrodes, sensors, and other accessories
specified in this manual.
The device has no alarms and will not sound if the
measurement reading is too low or too high.
Before using ECG
Proper electrode placement is required to get accurate ECG
readings. Places where leads attach to the body must be prepared
correctly to ensure the best possible contact. Dogs and cats
usually have enough electrolyte material on their skin and hair so
that merely moistening lead sites with 70% isopropyl alcohol is
9
appropriate. This will usually be sufficient for ECG
recording/monitoring for a short time (30 to 60 minutes),
depending upon the relative humidity. Alcohol may need to be
reapplied during longer procedures. For pets with a dense
undercoat, you may need to use the blue clips that have been
provided to assure the leads have contact with the skin.
Warnings and Cautionary Advice
When connecting external electrodes, make sure that the
connectors are attached to the Pet, to prevent them from
contacting conductive parts or earth.
If using the ECG for long-term monitoring, periodically
inspect the electrode application site to ensure skin quality. If
the skin quality changes, replace the electrodes, or change
the application site.
Do not use this device during defibrillation.
Interference from a non-grounded instrument near the animal
/ patient and electro surgery interference can cause problems
with the waveform.
The QRS algorithm has been tested for accuracy by the QRS
segment data. Inadequate QRS segment levels or distortion
will require heart rate verification by a clinician.
Before using Pulse Oximeter
Before using Daily Check or Pulse Oximeter function, pay
attention to the following points to obtain precise measurements.
The area where the SpO2 sensor is attached must be clean to
ensure proper reading.
Any of the following conditions may cause inaccurate
measurements, including but not limited to:
-Flickering or very bright light
-Poor blood circulation
-Low hemoglobin
-Hypotension, severe vasoconstriction, severe anemia, or
hypothermia
-Injection of intravascular dyes.
The Pulse Oximeter may not work if the Pet has poor

Vetcorder Pro
1. The Basics................................................................................................1
2. Introduction ............................................................................................2
3. Getting Started........................................................................................7
4. Using Vetcorder.......................................................................................8
6. Review...................................................................................................22
7. Maintenance .........................................................................................24
9. Accessories............................................................................................27
10. Specifications ........................................................................................28
11. Electromagnetic Compatibility ..............................................................31
EVERY PATIENT EVERY TIME
User’s Manual
1
1. The Basics
This manual contains the instructions necessary to operate the
product safely and in accordance with its function and intended
use. Observance of this manual is a prerequisite for proper
product performance and correct operation and ensures user and
operator safety.
1.1 Safety
Warnings and Cautionary Advice
Before using the device, please ensure that you have read
this manual thoroughly and fully understand corresponding
precautions and risks.
The data and results displayed on the device are for
reference only and cannot be directly used for diagnostic
interpretation or treatment.
Do not use this device with a defibrillator.
Do not use this device during MRI examination.
Do not use the device in a combustible environment (i.e.,
oxygen-enriched environment).
Never submerge the device in water or other liquids. Do not
clean the device with acetone or other volatile solutions.
Do not drop this device or subject it to strong impact.
Do not place this device in pressure vessels or gas
sterilization device.
Do not dismantle the device, as this could cause damage or
malfunctions or impede the operation of the device.
Do not allow the electrodes to contact other conductive parts
(including the ground).
Do not store the device in the following locations: locations
in which the device is exposed to direct sunlight, high
temperatures or levels of moisture, or heavy contamination;
locations near to sources of water or fire; or locations that
are subject to strong electromagnetic influences.
10
circulation. Rub the skin or use heat to increase circulation
or place the SpO2 sensor in another location.
The Pulse Oximeter measures oxygen saturation of
functional hemoglobin. High levels of dysfunctional
hemoglobin could affect the accuracy of the measurements.
Field strengths from fixed transmitters, such as base stations
for radio (cellular/cordless) telephones and land mobile
radios, amateur radio, AM and FM radio broadcast towers,
and TV broadcast towers may affect accuracy.
The pleth waveform displayed on the device is normalized.
Warnings and Cautionary Advice
Limit movement as much as possible when using the Daily
Check or Pulse Oximeter. Failure to do so may result in
incorrect reading or analysis.
Do not use the Pulse Oximeter on the same paw/leg when
using a blood pressure cuff or monitor.
Do not use the Pulse Oximeter outside the specified
operating and storage temperature ranges.
DO NOT USE this device during MRI (magnetic resonance
imaging).
Prolonged continuous SpO2 monitoring may increase the
risk of undesirable changes in skin characteristics, such as
irritation, reddening, blistering or burns.
Check the SpO2 sensor application site every 6-8 hours to
determine the positioning of the sensor and the circulation
and skin sensitivity of the animal. Sensitivity varies
depending on medical status or skin condition. For animals
with poor peripheral blood circulation or sensitive skin,
inspect the sensor site more frequently.
4.2 Daily Check
About Daily Check
Warnings and Cautionary Advice
Before using this function, please read the Section 4.1.
When using Daily Check, please ensure you select the
correct animal.
11
To ensure better tracking of health status, it is strongly
suggested that every Daily Check measurement is made at
the same time period when the body is in the relative same
situation. E.g., every morning or every night.
Daily Check measurement is a function that combines the
measuring of ECG (Electrocardiograph) waveform, HR (heart
rate), Pleth waveform, SpO2 (blood oxygenation) and PI
(Perfusion Index). It takes a 30 second recording and provides a
summary once completed.
When using the Daily Check function with more than one patient,
you can create individual patient profiles. Before using the Daily
Check measurement or reviewing the data, ensure that the correct
patient is selected. Please refer to Section 5.8 to know how to
manage patients (labeled “Pet Management”).
To better manage your patient’s health status, it is recommended
to take Daily Check measurements at a regular interval. To ensure
that you never forget to take a daily Check measurement, you can
set a daily reminder. When the daily reminder event is triggered,
the device gives audio alarm prompt, which will last for one
minute if you do not cancel it manually. Please refer to Section
4.5 to know how to set a daily reminder. NOTE: The reminder
will not sound if the device is in ECG Recorder, Pulse Oximeter,
Daily Check or Monitor Vitals mode.
Using Daily Check
To start a Daily Check, follow the steps as below.
1. If you have not created a Pet, then please follow the
instruction in Section 5.8 to add your Pet account.
2. Press the Home button to enter the Main Screen.
3. Tap the <Daily Check> icon in the lower right side of the
screen.
4. Choose the Pet profile associated with the animal being
checked.
5. Set up the device according to the instruction, keep the device
at the same level as the animal’s heart and keep the animal

Vetcorder Pro
1. The Basics................................................................................................1
2. Introduction ............................................................................................2
3. Getting Started........................................................................................7
4. Using Vetcorder.......................................................................................8
6. Review...................................................................................................22
7. Maintenance .........................................................................................24
9. Accessories............................................................................................27
10. Specifications ........................................................................................28
11. Electromagnetic Compatibility ..............................................................31
EVERY PATIENT EVERY TIME
User’s Manual
1
1. The Basics
This manual contains the instructions necessary to operate the
product safely and in accordance with its function and intended
use. Observance of this manual is a prerequisite for proper
product performance and correct operation and ensures user and
operator safety.
1.1 Safety
Warnings and Cautionary Advice
Before using the device, please ensure that you have read
this manual thoroughly and fully understand corresponding
precautions and risks.
The data and results displayed on the device are for
reference only and cannot be directly used for diagnostic
interpretation or treatment.
Do not use this device with a defibrillator.
Do not use this device during MRI examination.
Do not use the device in a combustible environment (i.e.,
oxygen-enriched environment).
Never submerge the device in water or other liquids. Do not
clean the device with acetone or other volatile solutions.
Do not drop this device or subject it to strong impact.
Do not place this device in pressure vessels or gas
sterilization device.
Do not dismantle the device, as this could cause damage or
malfunctions or impede the operation of the device.
Do not allow the electrodes to contact other conductive parts
(including the ground).
Do not store the device in the following locations: locations
in which the device is exposed to direct sunlight, high
temperatures or levels of moisture, or heavy contamination;
locations near to sources of water or fire; or locations that
are subject to strong electromagnetic influences.
2
2. Introduction
2.1 Intended Use
The Vetcorder Pro Multi-Parameter Monitor is intended to be used
for the measuring, displaying, reviewing, and storing of multiple
physiological parameters including ECG, pulse oxygen saturation
(SpO2), perfusion index (PI), pulse rate and internal temperature.
It is not intended for use on humans.
2.2 About Vetcorder
1. Touch Screen
Use the pad of your finger to tap or swipe the touch screen.
Do not use your fingernail or any other object to tap the
screen.
2. Charging Connector Port
3. Home, Power On/Off
10
circulation. Rub the skin or use heat to increase circulation
or place the SpO2 sensor in another location.
The Pulse Oximeter measures oxygen saturation of
functional hemoglobin. High levels of dysfunctional
hemoglobin could affect the accuracy of the measurements.
Field strengths from fixed transmitters, such as base stations
for radio (cellular/cordless) telephones and land mobile
radios, amateur radio, AM and FM radio broadcast towers,
and TV broadcast towers may affect accuracy.
The pleth waveform displayed on the device is normalized.
Warnings and Cautionary Advice
Limit movement as much as possible when using the Daily
Check or Pulse Oximeter. Failure to do so may result in
incorrect reading or analysis.
Do not use the Pulse Oximeter on the same paw/leg when
using a blood pressure cuff or monitor.
Do not use the Pulse Oximeter outside the specified
operating and storage temperature ranges.
DO NOT USE this device during MRI (magnetic resonance
imaging).
Prolonged continuous SpO2 monitoring may increase the
risk of undesirable changes in skin characteristics, such as
irritation, reddening, blistering or burns.
Check the SpO2 sensor application site every 6-8 hours to
determine the positioning of the sensor and the circulation
and skin sensitivity of the animal. Sensitivity varies
depending on medical status or skin condition. For animals
with poor peripheral blood circulation or sensitive skin,
inspect the sensor site more frequently.
4.2 Daily Check
About Daily Check
Warnings and Cautionary Advice
Before using this function, please read the Section 4.1.
When using Daily Check, please ensure you select the
correct animal.
11
To ensure better tracking of health status, it is strongly
suggested that every Daily Check measurement is made at
the same time period when the body is in the relative same
situation. E.g., every morning or every night.
Daily Check measurement is a function that combines the
measuring of ECG (Electrocardiograph) waveform, HR (heart
rate), Pleth waveform, SpO2 (blood oxygenation) and PI
(Perfusion Index). It takes a 30 second recording and provides a
summary once completed.
When using the Daily Check function with more than one patient,
you can create individual patient profiles. Before using the Daily
Check measurement or reviewing the data, ensure that the correct
patient is selected. Please refer to Section 5.8 to know how to
manage patients (labeled “Pet Management”).
To better manage your patient’s health status, it is recommended
to take Daily Check measurements at a regular interval. To ensure
that you never forget to take a daily Check measurement, you can
set a daily reminder. When the daily reminder event is triggered,
the device gives audio alarm prompt, which will last for one
minute if you do not cancel it manually. Please refer to Section
4.5 to know how to set a daily reminder. NOTE: The reminder
will not sound if the device is in ECG Recorder, Pulse Oximeter,
Daily Check or Monitor Vitals mode.
Using Daily Check
To start a Daily Check, follow the steps as below.
1. If you have not created a Pet, then please follow the
instruction in Section 5.8 to add your Pet account.
2. Press the Home button to enter the Main Screen.
3. Tap the <Daily Check> icon in the lower right side of the
screen.
4. Choose the Pet profile associated with the animal being
checked.
5. Set up the device according to the instruction, keep the device
at the same level as the animal’s heart and keep the animal
12
still.
6. Once the device detects a stable waveform, it will
automatically start the measurement. The countdown bar
moves from left to right.
7. When the bar is fully filled, the device will analyze your data
and then show the measurement result.
Please refer to Section 2.5 to understand the result screen. Daily
Check provides the trending graph of heart rate and SpO2. To
view the trend, select one record, and then tap the button. For
details, please refer to Section 6.1.
4.3 ECG Recorder
About ECG Recorder
Warnings and Cautionary Advice
Before using this function, please read the Section 4.1.
QRS segment analysis is performed on selected LEAD.
Please keep your Pet stable and calm during the measurement.
Movements may result in interference and incorrect readings or
analysis result.
Measuring
To start an ECG Recorder measurement with cable,
1. If the device is in Calendar Screen, press the Home button.

1
1. The Basics
This manual contains the instructions necessary to operate the
product safely and in accordance with its function and intended
use. Observance of this manual is a prerequisite for proper
product performance and correct operation and ensures user and
operator safety.
1.1 Safety
Warnings and Cautionary Advice
Before using the device, please ensure that you have read
this manual thoroughly and fully understand corresponding
precautions and risks.
The data and results displayed on the device are for
reference only and cannot be directly used for diagnostic
interpretation or treatment.
Do not use this device with a defibrillator.
Do not use this device during MRI examination.
Do not use the device in a combustible environment (i.e.,
oxygen-enriched environment).
Never submerge the device in water or other liquids. Do not
clean the device with acetone or other volatile solutions.
Do not drop this device or subject it to strong impact.
Do not place this device in pressure vessels or gas
sterilization device.
Do not dismantle the device, as this could cause damage or
malfunctions or impede the operation of the device.
Do not allow the electrodes to contact other conductive parts
(including the ground).
Do not store the device in the following locations: locations
in which the device is exposed to direct sunlight, high
temperatures or levels of moisture, or heavy contamination;
locations near to sources of water or fire; or locations that
are subject to strong electromagnetic influences.
2
2. Introduction
2.1 Intended Use
The Vetcorder Pro Multi-Parameter Monitor is intended to be used
for the measuring, displaying, reviewing, and storing of multiple
physiological parameters including ECG, pulse oxygen saturation
(SpO2), perfusion index (PI), pulse rate and internal temperature.
It is not intended for use on humans.
2.2 About Vetcorder
1. Touch Screen
Use the pad of your finger to tap or swipe the touch screen.
Do not use your fingernail or any other object to tap the
screen.
2. Charging Connector Port
3. Home, Power On/Off
3
When the monitor is off, press this button to power it
on.
When the monitor is on, press and hold it for 2
seconds to turn it off.
During operation, pressing this button will switch to
Main Screen, or Calendar Screen, or return to Home
Screen.
4. Temperature Probe Connector Port
5. ECG Connector Port
6. SpO2 Connector Port
7. Speaker
8. Serial Number
2.3 Main Screen
The Main Screen is shown as below. Swiping your finger from
right to left can switch to the second page, and vice versa.
Pressing a button in the Main Screen will start a measurement,
activate a function, or open corresponding menu.
7
8
11
To ensure better tracking of health status, it is strongly
suggested that every Daily Check measurement is made at
the same time period when the body is in the relative same
situation. E.g., every morning or every night.
Daily Check measurement is a function that combines the
measuring of ECG (Electrocardiograph) waveform, HR (heart
rate), Pleth waveform, SpO2 (blood oxygenation) and PI
(Perfusion Index). It takes a 30 second recording and provides a
summary once completed.
When using the Daily Check function with more than one patient,
you can create individual patient profiles. Before using the Daily
Check measurement or reviewing the data, ensure that the correct
patient is selected. Please refer to Section 5.8 to know how to
manage patients (labeled “Pet Management”).
To better manage your patient’s health status, it is recommended
to take Daily Check measurements at a regular interval. To ensure
that you never forget to take a daily Check measurement, you can
set a daily reminder. When the daily reminder event is triggered,
the device gives audio alarm prompt, which will last for one
minute if you do not cancel it manually. Please refer to Section
4.5 to know how to set a daily reminder. NOTE: The reminder
will not sound if the device is in ECG Recorder, Pulse Oximeter,
Daily Check or Monitor Vitals mode.
Using Daily Check
To start a Daily Check, follow the steps as below.
1. If you have not created a Pet, then please follow the
instruction in Section 5.8 to add your Pet account.
2. Press the Home button to enter the Main Screen.
3. Tap the <Daily Check> icon in the lower right side of the
screen.
4. Choose the Pet profile associated with the animal being
checked.
5. Set up the device according to the instruction, keep the device
at the same level as the animal’s heart and keep the animal
12
still.
6. Once the device detects a stable waveform, it will
automatically start the measurement. The countdown bar
moves from left to right.
7. When the bar is fully filled, the device will analyze your data
and then show the measurement result.
Please refer to Section 2.5 to understand the result screen. Daily
Check provides the trending graph of heart rate and SpO2. To
view the trend, select one record, and then tap the button. For
details, please refer to Section 6.1.
4.3 ECG Recorder
About ECG Recorder
Warnings and Cautionary Advice
Before using this function, please read the Section 4.1.
QRS segment analysis is performed on selected LEAD.
Please keep your Pet stable and calm during the measurement.
Movements may result in interference and incorrect readings or
analysis result.
Measuring
To start an ECG Recorder measurement with cable,
1. If the device is in Calendar Screen, press the Home button.
13
2. In the Main Screen, select <ECG Recorder>.
3. Choose ECG lead type I or II. NOTE: This selection does not
alter the measurement but puts a note in the recording. Actual
lead is based on where wires are placed on the patient.
4. Follow the instructions to connect the ECG cable and place
the ECG electrodes.
Keep Pet calm
5. The display will then show your ECG waveform.
The device will monitor the animal’s ECG continuously,
however no data will be saved until you press the button.
6. Press the button to start collecting your ECG data. The
countdown bar moves from left to right.
7. When the bar is filled, the device will analyze your data and
then show the measurement result.

2
2. Introduction
2.1 Intended Use
The Vetcorder Pro Multi-Parameter Monitor is intended to be used
for the measuring, displaying, reviewing, and storing of multiple
physiological parameters including ECG, pulse oxygen saturation
(SpO2), perfusion index (PI), pulse rate and internal temperature.
It is not intended for use on humans.
2.2 About Vetcorder
1. Touch Screen
Use the pad of your finger to tap or swipe the touch screen.
Do not use your fingernail or any other object to tap the
screen.
2. Charging Connector Port
3. Home, Power On/Off
3
When the monitor is off, press this button to power it
on.
When the monitor is on, press and hold it for 2
seconds to turn it off.
During operation, pressing this button will switch to
Main Screen, or Calendar Screen, or return to Home
Screen.
4. Temperature Probe Connector Port
5. ECG Connector Port
6. SpO2 Connector Port
7. Speaker
8. Serial Number
2.3 Main Screen
The Main Screen is shown as below. Swiping your finger from
right to left can switch to the second page, and vice versa.
Pressing a button in the Main Screen will start a measurement,
activate a function, or open corresponding menu.
7
8
4
2.4 Calendar Screen / Standby Mode
The device will enter Calendar Screen / Standby Mode when:
No operation is detected for 120 seconds in other screen
interface, the device will automatically switch to the
Calendar Screen.
Pressing the Home button will return you to the Main Screen.
1. Current time
2. Current date
You can change the current time and date by going into the
Settings menu. Please refer to Section 5.1 for details.
3. This arrow indicates Users to press the Home button to exit
the Calendar Screen / Standby Mode.
4. Battery indicator
When the device enters Calendar Screen, it also begins to work in
Standby Mode, which is an ultra-low power consumption mode.
In Standby Mode, the touch screen operation will not function.
1
2
3
4
12
still.
6. Once the device detects a stable waveform, it will
automatically start the measurement. The countdown bar
moves from left to right.
7. When the bar is fully filled, the device will analyze your data
and then show the measurement result.
Please refer to Section 2.5 to understand the result screen. Daily
Check provides the trending graph of heart rate and SpO2. To
view the trend, select one record, and then tap the button. For
details, please refer to Section 6.1.
4.3 ECG Recorder
About ECG Recorder
Warnings and Cautionary Advice
Before using this function, please read the Section 4.1.
QRS segment analysis is performed on selected LEAD.
Please keep your Pet stable and calm during the measurement.
Movements may result in interference and incorrect readings or
analysis result.
Measuring
To start an ECG Recorder measurement with cable,
1. If the device is in Calendar Screen, press the Home button.
13
2. In the Main Screen, select <ECG Recorder>.
3. Choose ECG lead type I or II. NOTE: This selection does not
alter the measurement but puts a note in the recording. Actual
lead is based on where wires are placed on the patient.
4. Follow the instructions to connect the ECG cable and place
the ECG electrodes.
Keep Pet calm
5. The display will then show your ECG waveform.
The device will monitor the animal’s ECG continuously,
however no data will be saved until you press the button.
6. Press the button to start collecting your ECG data. The
countdown bar moves from left to right.
7. When the bar is filled, the device will analyze your data and
then show the measurement result.
14
4.4 Upload Icon
The Upload feature may be used with the built-in Bluetooth
wireless connectivity, to export measured records from the
Vetcorder Pro to mobile devices.
For instructions on how download and/or share an ECG or Daily
Check recording, please visit https://www.sentierconnect.com/.
4.5 Reminder
Up to 6 reminder events can be set by user. You can add, edit, and
delete reminder events.
To add a reminder:
In the second main screen, tap <Reminder> icon.
In the <Reminder> menu, tap the + icon to add a
reminder.

3
When the monitor is off, press this button to power it
on.
When the monitor is on, press and hold it for 2
seconds to turn it off.
During operation, pressing this button will switch to
Main Screen, or Calendar Screen, or return to Home
Screen.
4. Temperature Probe Connector Port
5. ECG Connector Port
6. SpO2 Connector Port
7. Speaker
8. Serial Number
2.3 Main Screen
The Main Screen is shown as below. Swiping your finger from
right to left can switch to the second page, and vice versa.
Pressing a button in the Main Screen will start a measurement,
activate a function, or open corresponding menu.
7
8
4
2.4 Calendar Screen / Standby Mode
The device will enter Calendar Screen / Standby Mode when:
No operation is detected for 120 seconds in other screen
interface, the device will automatically switch to the
Calendar Screen.
Pressing the Home button will return you to the Main Screen.
1. Current time
2. Current date
You can change the current time and date by going into the
Settings menu. Please refer to Section 5.1 for details.
3. This arrow indicates Users to press the Home button to exit
the Calendar Screen / Standby Mode.
4. Battery indicator
When the device enters Calendar Screen, it also begins to work in
Standby Mode, which is an ultra-low power consumption mode.
In Standby Mode, the touch screen operation will not function.
1
2
3
4
5
2.5 Result Screen
This device provides powerful measurement functionalities,
including Daily Check, ECG, Oximeter, and Internal
Thermometer. For each measurement, a Result report will be
provided after the measurement is finished. An example is shown
as below.
1. Measured parameters and readings.
2. Trash, replay, and back buttons.
Select to move recording to trash
Select button to re-record.
Press button to go back to the readings screen.
In the Result Screen, if there is no operation for 2 minutes, the
device will automatically return to Standby Screen.
1
2
13
2. In the Main Screen, select <ECG Recorder>.
3. Choose ECG lead type I or II. NOTE: This selection does not
alter the measurement but puts a note in the recording. Actual
lead is based on where wires are placed on the patient.
4. Follow the instructions to connect the ECG cable and place
the ECG electrodes.
Keep Pet calm
5. The display will then show your ECG waveform.
The device will monitor the animal’s ECG continuously,
however no data will be saved until you press the button.
6. Press the button to start collecting your ECG data. The
countdown bar moves from left to right.
7. When the bar is filled, the device will analyze your data and
then show the measurement result.
14
4.4 Upload Icon
The Upload feature may be used with the built-in Bluetooth
wireless connectivity, to export measured records from the
Vetcorder Pro to mobile devices.
For instructions on how download and/or share an ECG or Daily
Check recording, please visit https://www.sentierconnect.com/.
4.5 Reminder
Up to 6 reminder events can be set by user. You can add, edit, and
delete reminder events.
To add a reminder:
In the second main screen, tap <Reminder> icon.
In the <Reminder> menu, tap the + icon to add a
reminder.
15
Tap the first row to set the day or repeat interval. Tap the
◄ or ► button to change the setting.
Tap the second row to set the event. You can define the
event by selecting “Self-Define”. You can reach this by
using the ◄ and ► buttons to scroll through menu.
Tap the third row, set the time when the reminder is
triggered, then tap ►
Tap to save this reminder.
To edit or delete a reminder, in the <Reminder> menu, choose the
reminder which you want to edit or delete. Change the repeat
interval, event, and/or time, then save the change by following the
same procedure as adding a reminder. Tap the DELETE button,
and then “yes” to delete a reminder.

4
2.4 Calendar Screen / Standby Mode
The device will enter Calendar Screen / Standby Mode when:
No operation is detected for 120 seconds in other screen
interface, the device will automatically switch to the
Calendar Screen.
Pressing the Home button will return you to the Main Screen.
1. Current time
2. Current date
You can change the current time and date by going into the
Settings menu. Please refer to Section 5.1 for details.
3. This arrow indicates Users to press the Home button to exit
the Calendar Screen / Standby Mode.
4. Battery indicator
When the device enters Calendar Screen, it also begins to work in
Standby Mode, which is an ultra-low power consumption mode.
In Standby Mode, the touch screen operation will not function.
1
2
3
4
5
2.5 Result Screen
This device provides powerful measurement functionalities,
including Daily Check, ECG, Oximeter, and Internal
Thermometer. For each measurement, a Result report will be
provided after the measurement is finished. An example is shown
as below.
1. Measured parameters and readings.
2. Trash, replay, and back buttons.
Select to move recording to trash
Select button to re-record.
Press button to go back to the readings screen.
In the Result Screen, if there is no operation for 2 minutes, the
device will automatically return to Standby Screen.
1
2
6
2.6 Symbols
Symbol
Meaning
Manufacturer
CE0197
In conformity with
D
irective 93/42/EEC
Symbol for “ENVIRONMENT PROTECTION
–
Waste
electrical products should not be disposed of with
household waste. Please recycle where facilities exist.
Check with your local authority or retailer for recycling
advice”.
IP22
A
gainst
ingress of solid
foreign
objects
≥12.5
mm
diameter
, Against dripping(15° tilted)
Follow operating instructions
Caution or warning that requires special attention.
14
4.4 Upload Icon
The Upload feature may be used with the built-in Bluetooth
wireless connectivity, to export measured records from the
Vetcorder Pro to mobile devices.
For instructions on how download and/or share an ECG or Daily
Check recording, please visit https://www.sentierconnect.com/.
4.5 Reminder
Up to 6 reminder events can be set by user. You can add, edit, and
delete reminder events.
To add a reminder:
In the second main screen, tap <Reminder> icon.
In the <Reminder> menu, tap the + icon to add a
reminder.
15
Tap the first row to set the day or repeat interval. Tap the
◄ or ► button to change the setting.
Tap the second row to set the event. You can define the
event by selecting “Self-Define”. You can reach this by
using the ◄ and ► buttons to scroll through menu.
Tap the third row, set the time when the reminder is
triggered, then tap ►
Tap to save this reminder.
To edit or delete a reminder, in the <Reminder> menu, choose the
reminder which you want to edit or delete. Change the repeat
interval, event, and/or time, then save the change by following the
same procedure as adding a reminder. Tap the DELETE button,
and then “yes” to delete a reminder.
16
4.6 Pulse Oximeter
About Pulse Oximeter
Warnings and Cautionary Advice
Before using this function, please read the Section 4.1.
The Pulse Oximeter measures the amount of oxygen in the blood,
pulse rate and perfusion index. The SpO2 sensor works by
transmitting red and infrared light through the skin to the small
blood vessels or capillaries, reflecting the amount of oxygen in the
blood and displaying the measurement on the screen. The oxygen
saturation (SpO2) is measured and displayed as a percentage of
full capacity. Pulse rate (PR) and perfusion index (PI) will also be
measured and displayed. The Perfusion Index is a relative
assessment of the pulse strength at the monitoring site.
Measuring
1. Connect the external SpO2 sensor to the Vetcorder Pro
Monitor.
2. Attach the external SpO2 sensor to your Pet.
3. If the device is in Calendar Screen, press the Home button.
4. Tap the <Pulse Oximeter> icon.
5. The display will then show your PLETH waveform, SpO2
and pulse rate.
The device will monitor continuously, however no data will
be saved until you press the button.
6. Press the button to start collecting your SpO2 data. The
countdown bar moves from left to right.
7. When the bar is filled, the device will analyze your data, and
show the measurement result.

5
2.5 Result Screen
This device provides powerful measurement functionalities,
including Daily Check, ECG, Oximeter, and Internal
Thermometer. For each measurement, a Result report will be
provided after the measurement is finished. An example is shown
as below.
1. Measured parameters and readings.
2. Trash, replay, and back buttons.
Select to move recording to trash
Select button to re-record.
Press button to go back to the readings screen.
In the Result Screen, if there is no operation for 2 minutes, the
device will automatically return to Standby Screen.
1
2
6
2.6 Symbols
Symbol
Meaning
Manufacturer
CE0197
In conformity with
D
irective 93/42/EEC
Symbol for “ENVIRONMENT PROTECTION
–
Waste
electrical products should not be disposed of with
household waste. Please recycle where facilities exist.
Check with your local authority or retailer for recycling
advice”.
IP22
A
gainst
ingress of solid
foreign
objects
≥12.5
mm
diameter
, Against dripping(15° tilted)
Follow operating instructions
Caution or warning that requires special attention.
7
3. Getting Started
3.1 Unpacking
Before unpacking, examine the packing case carefully for signs of
damage. If any damage is detected, contact your distributor or
Sentier. If the packing case is intact, open the package and remove
the equipment and accessories carefully. Verify all materials are
present and check for any mechanical damage. Contact Sentier in
case of any problem at 844-VETCORDER.
Warnings and Cautionary Advice
Save the packing case and packaging material as they can be
used if the device must be reshipped.
Register your warranty at www.sentierconnect.com. You will
then be notified via email of any software updates etc.
When disposing of the packaging material, be sure to
observe waste control regulations and keep it out of the
reach of children and animals.
The equipment might be contaminated during storage and
transport. Before use, please verify whether the packages are
intact, especially the packages of single use accessories. In
case of any damage, do not use. Contact Sentier at 844-
VETCORDER for assistance.
3.2 Power On/Off
Press the Power On/Off button to power on the device. Press and
hold Power On/Off button for 2 seconds from the main menu to
power off the device.
3.3 Initial Settings
The first time when the Vetcorder is powered on, you can set up
your Vetcorder monitor step by step. You can also change the
settings in the <Settings> menu.
15
Tap the first row to set the day or repeat interval. Tap the
◄ or ► button to change the setting.
Tap the second row to set the event. You can define the
event by selecting “Self-Define”. You can reach this by
using the ◄ and ► buttons to scroll through menu.
Tap the third row, set the time when the reminder is
triggered, then tap ►
Tap to save this reminder.
To edit or delete a reminder, in the <Reminder> menu, choose the
reminder which you want to edit or delete. Change the repeat
interval, event, and/or time, then save the change by following the
same procedure as adding a reminder. Tap the DELETE button,
and then “yes” to delete a reminder.
16
4.6 Pulse Oximeter
About Pulse Oximeter
Warnings and Cautionary Advice
Before using this function, please read the Section 4.1.
The Pulse Oximeter measures the amount of oxygen in the blood,
pulse rate and perfusion index. The SpO2 sensor works by
transmitting red and infrared light through the skin to the small
blood vessels or capillaries, reflecting the amount of oxygen in the
blood and displaying the measurement on the screen. The oxygen
saturation (SpO2) is measured and displayed as a percentage of
full capacity. Pulse rate (PR) and perfusion index (PI) will also be
measured and displayed. The Perfusion Index is a relative
assessment of the pulse strength at the monitoring site.
Measuring
1. Connect the external SpO2 sensor to the Vetcorder Pro
Monitor.
2. Attach the external SpO2 sensor to your Pet.
3. If the device is in Calendar Screen, press the Home button.
4. Tap the <Pulse Oximeter> icon.
5. The display will then show your PLETH waveform, SpO2
and pulse rate.
The device will monitor continuously, however no data will
be saved until you press the button.
6. Press the button to start collecting your SpO2 data. The
countdown bar moves from left to right.
7. When the bar is filled, the device will analyze your data, and
show the measurement result.
17
Please refer to Section 2.5 to understand the result screen.
4.7 Internal Temperature
About temperature probe
Warnings and Cautionary Advice
The thermometer is only designed for the measuring core
temperature via the esophagus or the rectum. It is
recommended to use the probe in one area on the animal and
mark probe exclusively for use in that area.
Before each use, check that the probe is intact. If it is
damaged, do not use, please contact your distributor or
Sentier.
Holding the device in your hand or carrying it in a pocket
can cause the device to warm up, which may result in
incorrect readings.
Monitor will measure temperature between 50 °F to 122 °F (10 °C
to 50 °C)
Influences on temperature include but not limited to
Individual metabolism
Age
Environmental temperature
Time of day
Activities
Taking Temperature Measurement
To start a temperature measurement,

6
2.6 Symbols
Symbol
Meaning
Manufacturer
CE0197
In conformity with
D
irective 93/42/EEC
Symbol for “ENVIRONMENT PROTECTION
–
Waste
electrical products should not be disposed of with
household waste. Please recycle where facilities exist.
Check with your local authority or retailer for recycling
advice”.
IP22
A
gainst
ingress of solid
foreign
objects
≥12.5
mm
diameter
, Against dripping(15° tilted)
Follow operating instructions
Caution or warning that requires special attention.
7
3. Getting Started
3.1 Unpacking
Before unpacking, examine the packing case carefully for signs of
damage. If any damage is detected, contact your distributor or
Sentier. If the packing case is intact, open the package and remove
the equipment and accessories carefully. Verify all materials are
present and check for any mechanical damage. Contact Sentier in
case of any problem at 844-VETCORDER.
Warnings and Cautionary Advice
Save the packing case and packaging material as they can be
used if the device must be reshipped.
Register your warranty at www.sentierconnect.com. You will
then be notified via email of any software updates etc.
When disposing of the packaging material, be sure to
observe waste control regulations and keep it out of the
reach of children and animals.
The equipment might be contaminated during storage and
transport. Before use, please verify whether the packages are
intact, especially the packages of single use accessories. In
case of any damage, do not use. Contact Sentier at 844-
VETCORDER for assistance.
3.2 Power On/Off
Press the Power On/Off button to power on the device. Press and
hold Power On/Off button for 2 seconds from the main menu to
power off the device.
3.3 Initial Settings
The first time when the Vetcorder is powered on, you can set up
your Vetcorder monitor step by step. You can also change the
settings in the <Settings> menu.
8
3.4 Turning On/Off Bluetooth
The Vetcorder Pro has built-in Bluetooth wireless connectivity,
which enables exporting measured records from the device to
mobile devices using Bluetooth protocol.
To turn on the Bluetooth: press the Home button to enter
Main Screen.
Swipe your finger from right to left to switch to the second
page and go to SETTINGS.
On that menu you will swipe your finger up to scroll down or
use the arrow on the lower right of the screen.
Find the Bluetooth line item and toggle the switch to the right
by tapping it – when the circle in that is on the right side the
Bluetooth is on and when that circle is on the left the
Bluetooth is off.
You can exit this menu by using the X in the upper right corner or
by using the home button to return to the starting screen.
4. Using Vetcorder
4.1 Prior to Use
Warnings and Cautionary Advice
Use only cables, electrodes, sensors, and other accessories
specified in this manual.
The device has no alarms and will not sound if the
measurement reading is too low or too high.
Before using ECG
Proper electrode placement is required to get accurate ECG
readings. Places where leads attach to the body must be prepared
correctly to ensure the best possible contact. Dogs and cats
usually have enough electrolyte material on their skin and hair so
that merely moistening lead sites with 70% isopropyl alcohol is
16
4.6 Pulse Oximeter
About Pulse Oximeter
Warnings and Cautionary Advice
Before using this function, please read the Section 4.1.
The Pulse Oximeter measures the amount of oxygen in the blood,
pulse rate and perfusion index. The SpO2 sensor works by
transmitting red and infrared light through the skin to the small
blood vessels or capillaries, reflecting the amount of oxygen in the
blood and displaying the measurement on the screen. The oxygen
saturation (SpO2) is measured and displayed as a percentage of
full capacity. Pulse rate (PR) and perfusion index (PI) will also be
measured and displayed. The Perfusion Index is a relative
assessment of the pulse strength at the monitoring site.
Measuring
1. Connect the external SpO2 sensor to the Vetcorder Pro
Monitor.
2. Attach the external SpO2 sensor to your Pet.
3. If the device is in Calendar Screen, press the Home button.
4. Tap the <Pulse Oximeter> icon.
5. The display will then show your PLETH waveform, SpO2
and pulse rate.
The device will monitor continuously, however no data will
be saved until you press the button.
6. Press the button to start collecting your SpO2 data. The
countdown bar moves from left to right.
7. When the bar is filled, the device will analyze your data, and
show the measurement result.
17
Please refer to Section 2.5 to understand the result screen.
4.7 Internal Temperature
About temperature probe
Warnings and Cautionary Advice
The thermometer is only designed for the measuring core
temperature via the esophagus or the rectum. It is
recommended to use the probe in one area on the animal and
mark probe exclusively for use in that area.
Before each use, check that the probe is intact. If it is
damaged, do not use, please contact your distributor or
Sentier.
Holding the device in your hand or carrying it in a pocket
can cause the device to warm up, which may result in
incorrect readings.
Monitor will measure temperature between 50 °F to 122 °F (10 °C
to 50 °C)
Influences on temperature include but not limited to
Individual metabolism
Age
Environmental temperature
Time of day
Activities
Taking Temperature Measurement
To start a temperature measurement,
18
If the device is in Calendar Screen, press the Home button.
In the Main Screen, select <Thermometer>.
Insert probe
In Temperature Mode readings will display as seen below.
The Temperature will display in the upper left corner of the
screen in Monitor Vitals.
Please refer to Section 2.5 to understand the result screen.
4.8 Monitor Vitals
About Monitor Vitals
Warnings and Cautionary Advice
Before using this function, please read the Section 4.1.
The Monitor Vitals feature on the Vetcorder allows for continuous
monitoring of ECG, SpO2, Temperature and Heart Rate. An
audible “beep” can be heard whenever a heart rate is detected by
the ECG. Up to 12 hours of battery life means you can monitor
several patients from intake through recovery before recharging.
Continuous monitoring via Bluetooth with our mobile app (called
Monitor Vitals) will allow you to monitor your patient from a
distance while performing other tasks in the clinic. Please
download Monitor Vitals on your Apple App or Google Play store.
To begin Monitoring Vitals,
Connect the external SpO2, ECG, and Internal Temperature

7
3. Getting Started
3.1 Unpacking
Before unpacking, examine the packing case carefully for signs of
damage. If any damage is detected, contact your distributor or
Sentier. If the packing case is intact, open the package and remove
the equipment and accessories carefully. Verify all materials are
present and check for any mechanical damage. Contact Sentier in
case of any problem at 844-VETCORDER.
Warnings and Cautionary Advice
Save the packing case and packaging material as they can be
used if the device must be reshipped.
Register your warranty at www.sentierconnect.com. You will
then be notified via email of any software updates etc.
When disposing of the packaging material, be sure to
observe waste control regulations and keep it out of the
reach of children and animals.
The equipment might be contaminated during storage and
transport. Before use, please verify whether the packages are
intact, especially the packages of single use accessories. In
case of any damage, do not use. Contact Sentier at 844-
VETCORDER for assistance.
3.2 Power On/Off
Press the Power On/Off button to power on the device. Press and
hold Power On/Off button for 2 seconds from the main menu to
power off the device.
3.3 Initial Settings
The first time when the Vetcorder is powered on, you can set up
your Vetcorder monitor step by step. You can also change the
settings in the <Settings> menu.
8
3.4 Turning On/Off Bluetooth
The Vetcorder Pro has built-in Bluetooth wireless connectivity,
which enables exporting measured records from the device to
mobile devices using Bluetooth protocol.
To turn on the Bluetooth: press the Home button to enter
Main Screen.
Swipe your finger from right to left to switch to the second
page and go to SETTINGS.
On that menu you will swipe your finger up to scroll down or
use the arrow on the lower right of the screen.
Find the Bluetooth line item and toggle the switch to the right
by tapping it – when the circle in that is on the right side the
Bluetooth is on and when that circle is on the left the
Bluetooth is off.
You can exit this menu by using the X in the upper right corner or
by using the home button to return to the starting screen.
4. Using Vetcorder
4.1 Prior to Use
Warnings and Cautionary Advice
Use only cables, electrodes, sensors, and other accessories
specified in this manual.
The device has no alarms and will not sound if the
measurement reading is too low or too high.
Before using ECG
Proper electrode placement is required to get accurate ECG
readings. Places where leads attach to the body must be prepared
correctly to ensure the best possible contact. Dogs and cats
usually have enough electrolyte material on their skin and hair so
that merely moistening lead sites with 70% isopropyl alcohol is
9
appropriate. This will usually be sufficient for ECG
recording/monitoring for a short time (30 to 60 minutes),
depending upon the relative humidity. Alcohol may need to be
reapplied during longer procedures. For pets with a dense
undercoat, you may need to use the blue clips that have been
provided to assure the leads have contact with the skin.
Warnings and Cautionary Advice
When connecting external electrodes, make sure that the
connectors are attached to the Pet, to prevent them from
contacting conductive parts or earth.
If using the ECG for long-term monitoring, periodically
inspect the electrode application site to ensure skin quality. If
the skin quality changes, replace the electrodes, or change
the application site.
Do not use this device during defibrillation.
Interference from a non-grounded instrument near the animal
/ patient and electro surgery interference can cause problems
with the waveform.
The QRS algorithm has been tested for accuracy by the QRS
segment data. Inadequate QRS segment levels or distortion
will require heart rate verification by a clinician.
Before using Pulse Oximeter
Before using Daily Check or Pulse Oximeter function, pay
attention to the following points to obtain precise measurements.
The area where the SpO2 sensor is attached must be clean to
ensure proper reading.
Any of the following conditions may cause inaccurate
measurements, including but not limited to:
-Flickering or very bright light
-Poor blood circulation
-Low hemoglobin
-Hypotension, severe vasoconstriction, severe anemia, or
hypothermia
-Injection of intravascular dyes.
The Pulse Oximeter may not work if the Pet has poor
17
Please refer to Section 2.5 to understand the result screen.
4.7 Internal Temperature
About temperature probe
Warnings and Cautionary Advice
The thermometer is only designed for the measuring core
temperature via the esophagus or the rectum. It is
recommended to use the probe in one area on the animal and
mark probe exclusively for use in that area.
Before each use, check that the probe is intact. If it is
damaged, do not use, please contact your distributor or
Sentier.
Holding the device in your hand or carrying it in a pocket
can cause the device to warm up, which may result in
incorrect readings.
Monitor will measure temperature between 50 °F to 122 °F (10 °C
to 50 °C)
Influences on temperature include but not limited to
Individual metabolism
Age
Environmental temperature
Time of day
Activities
Taking Temperature Measurement
To start a temperature measurement,
18
If the device is in Calendar Screen, press the Home button.
In the Main Screen, select <Thermometer>.
Insert probe
In Temperature Mode readings will display as seen below.
The Temperature will display in the upper left corner of the
screen in Monitor Vitals.
Please refer to Section 2.5 to understand the result screen.
4.8 Monitor Vitals
About Monitor Vitals
Warnings and Cautionary Advice
Before using this function, please read the Section 4.1.
The Monitor Vitals feature on the Vetcorder allows for continuous
monitoring of ECG, SpO2, Temperature and Heart Rate. An
audible “beep” can be heard whenever a heart rate is detected by
the ECG. Up to 12 hours of battery life means you can monitor
several patients from intake through recovery before recharging.
Continuous monitoring via Bluetooth with our mobile app (called
Monitor Vitals) will allow you to monitor your patient from a
distance while performing other tasks in the clinic. Please
download Monitor Vitals on your Apple App or Google Play store.
To begin Monitoring Vitals,
Connect the external SpO2, ECG, and Internal Temperature
19
cable to the Vetcorder Pro Monitor.
Attach the external SpO2 sensor and ECG clips to your Pet.
Insert the Internal Temperature Probe rectally or esophageal.
The display will show the continuous monitoring of ECG,
SpO2, Temperature and Heart Rate.
5. Opening Settings Menu
To open the Settings menu,
1. Press the Home button to enter the Main Screen.
2. Tap the <Settings> icon to open the menu as below.
In the Settings menu, you can
Tap and button to page up or down.
Tap to close the Settings menu.
5.1 Setting Date & Time
In the Settings menu, choose <General>.
Choose <Date & Time>.
Tap “+” or “-” button to change the date, then tap .
Tap “+” or “-” button to change the time. (This is a 24HR
clock)

8
3.4 Turning On/Off Bluetooth
The Vetcorder Pro has built-in Bluetooth wireless connectivity,
which enables exporting measured records from the device to
mobile devices using Bluetooth protocol.
To turn on the Bluetooth: press the Home button to enter
Main Screen.
Swipe your finger from right to left to switch to the second
page and go to SETTINGS.
On that menu you will swipe your finger up to scroll down or
use the arrow on the lower right of the screen.
Find the Bluetooth line item and toggle the switch to the right
by tapping it – when the circle in that is on the right side the
Bluetooth is on and when that circle is on the left the
Bluetooth is off.
You can exit this menu by using the X in the upper right corner or
by using the home button to return to the starting screen.
4. Using Vetcorder
4.1 Prior to Use
Warnings and Cautionary Advice
Use only cables, electrodes, sensors, and other accessories
specified in this manual.
The device has no alarms and will not sound if the
measurement reading is too low or too high.
Before using ECG
Proper electrode placement is required to get accurate ECG
readings. Places where leads attach to the body must be prepared
correctly to ensure the best possible contact. Dogs and cats
usually have enough electrolyte material on their skin and hair so
that merely moistening lead sites with 70% isopropyl alcohol is
9
appropriate. This will usually be sufficient for ECG
recording/monitoring for a short time (30 to 60 minutes),
depending upon the relative humidity. Alcohol may need to be
reapplied during longer procedures. For pets with a dense
undercoat, you may need to use the blue clips that have been
provided to assure the leads have contact with the skin.
Warnings and Cautionary Advice
When connecting external electrodes, make sure that the
connectors are attached to the Pet, to prevent them from
contacting conductive parts or earth.
If using the ECG for long-term monitoring, periodically
inspect the electrode application site to ensure skin quality. If
the skin quality changes, replace the electrodes, or change
the application site.
Do not use this device during defibrillation.
Interference from a non-grounded instrument near the animal
/ patient and electro surgery interference can cause problems
with the waveform.
The QRS algorithm has been tested for accuracy by the QRS
segment data. Inadequate QRS segment levels or distortion
will require heart rate verification by a clinician.
Before using Pulse Oximeter
Before using Daily Check or Pulse Oximeter function, pay
attention to the following points to obtain precise measurements.
The area where the SpO2 sensor is attached must be clean to
ensure proper reading.
Any of the following conditions may cause inaccurate
measurements, including but not limited to:
-Flickering or very bright light
-Poor blood circulation
-Low hemoglobin
-Hypotension, severe vasoconstriction, severe anemia, or
hypothermia
-Injection of intravascular dyes.
The Pulse Oximeter may not work if the Pet has poor
18
If the device is in Calendar Screen, press the Home button.
In the Main Screen, select <Thermometer>.
Insert probe
In Temperature Mode readings will display as seen below.
The Temperature will display in the upper left corner of the
screen in Monitor Vitals.
Please refer to Section 2.5 to understand the result screen.
4.8 Monitor Vitals
About Monitor Vitals
Warnings and Cautionary Advice
Before using this function, please read the Section 4.1.
The Monitor Vitals feature on the Vetcorder allows for continuous
monitoring of ECG, SpO2, Temperature and Heart Rate. An
audible “beep” can be heard whenever a heart rate is detected by
the ECG. Up to 12 hours of battery life means you can monitor
several patients from intake through recovery before recharging.
Continuous monitoring via Bluetooth with our mobile app (called
Monitor Vitals) will allow you to monitor your patient from a
distance while performing other tasks in the clinic. Please
download Monitor Vitals on your Apple App or Google Play store.
To begin Monitoring Vitals,
Connect the external SpO2, ECG, and Internal Temperature
19
cable to the Vetcorder Pro Monitor.
Attach the external SpO2 sensor and ECG clips to your Pet.
Insert the Internal Temperature Probe rectally or esophageal.
The display will show the continuous monitoring of ECG,
SpO2, Temperature and Heart Rate.
5. Opening Settings Menu
To open the Settings menu,
1. Press the Home button to enter the Main Screen.
2. Tap the <Settings> icon to open the menu as below.
In the Settings menu, you can
Tap and button to page up or down.
Tap to close the Settings menu.
5.1 Setting Date & Time
In the Settings menu, choose <General>.
Choose <Date & Time>.
Tap “+” or “-” button to change the date, then tap .
Tap “+” or “-” button to change the time. (This is a 24HR
clock)
Table of contents
Other Sentier Medical Equipment manuals
