Sentier Vetcorder AirMate User manual

Vetcorder AirMate
Veterinary Monitor

I
Product Information
Product Model: Vetcorder AirMate
Product Name: Veterinary monitor
Manufactured for: Sentier HC LLC
Address: 161 W. Sunset Dr. – Suite 102 Waukesha, WI
53189
1-844-VETCORDER (1-844-838-2673)
Revision History
This manual has a revision number. This revision
number changes whenever the manual is updated due to
software or technical specification change. Contents of this
manual are subject to change without prior notice.
Document No.: J/M850-O-303-001
Revision number: V1.1
Release time: Aug. 2019
CE mark

II
Statement
Manufacturer holds the copyright of this manual, and
considers it the property of the manufacturer. This manual is
only used for operation, maintenance and service of product
and may not be duplicated without explicit written
permission.
This manual contains exclusive information protected by
copyright laws and all rights are reserved This manual shall
not be photocopied or translated into other languages
without explicit written permission.
The contents contained in this manual are subject to
amendments without notification.
Manufacturer's Responsibility
Only under the following circumstances will
manufacturer be responsible for the safety, reliability and
performance of the instrument:
All the installation, expansion, adjustment, renovation
or repairs are conducted by the personnel certified by
manufacturer.
The storage conditions, operation conditions and
electrical operation of the instrument conform to the
product specifications.

III
The instrument is used in accordance with the user’s
manual.
About this manual
This manual contains the instructions necessary to
operate the product safely and in accordance with its
function and intended use. Observance of this manual is a
prerequisite for proper product performance and correct
operation to ensure animal and operator safety.
This manual is an integral part of the product. It should
remain accessible so that it can be referred to as needed.
All illustrations in this manual serve as examples only.
They may not necessarily reflect the setup or data displayed
on your product.
Conventions:
Bold Italic text is used in this manual to quote
the referenced chapter or sections.
【】is used to enclose screen texts.
→is used to indicate operational procedures.

IV
Signs in this manual:
Warning: Indicates a potential hazard or unsafe
practice that, if not avoided, will result in death or
serious injury.
Caution: Indicates a potential hazard or unsafe
practice that, if not avoided, could result in minor
personal and animal injury or product/property
damage.
Note: Provides application tips or other useful
information to ensure that you get the most from
your product.

V
Contents
Chapter 1 General Introduction...........................................1-1
1.1Intended Use ..............................................................1-1
1.2Main Unit...................................................................1-2
1.3Display Views............................................................1-7
Chapter 2 Safety.....................................................................2-1
2.1Safety Information.....................................................2-1
2.2Explanation of Symbols ............................................2-3
Chapter 3 Basic Operations..................................................3-1
3.1Unpacking and Checking ..........................................3-1
3.2Getting Started...........................................................3-1
3.3Starting the Monitor ..................................................3-2
3.4Screen Brightness Setting..........................................3-2
3.5Auto-Rotate Setting...................................................3-3
3.6Date & Time Setting..................................................3-3
3.7Animal Information Setting.......................................3-4
3.8Checking the Version ................................................3-4
3.9Restoring the Factory Configuration.........................3-4
3.10Shutting off the Monitor............................................3-5
Chapter 4 Alarm ....................................................................4-1

VI
4.1Alarm Categories.......................................................4-2
4.2Alarm Levels .............................................................4-2
4.3Alarm Indicators ........................................................4-3
4.4Alarm Status Symbol.................................................4-6
4.5Alarm Tone Configuration ........................................4-7
4.6Pausing Alarms ..........................................................4-7
4.7Alarm Reset ...............................................................4-9
4.8When an Alarm Occurs .............................................4-9
Chapter 5 Measuring CO2....................................................5-1
5.1Introduction ...............................................................5-1
5.2Safety Information.....................................................5-2
5.3Monitoring Procedure................................................5-3
5.4CO2 Display ..............................................................5-5
5.5Respiratory Rate ........................................................5-6
5.6Setting CO2 ...............................................................5-6
5.7Removing Exhaust Gases from the System ..............5-9
Chapter 6 Trend Review .......................................................6-1
6.1Introduction ...............................................................6-1
6.2Review Interface........................................................6-1
6.3Review Setup.............................................................6-2
Chapter 7 Battery ..................................................................7-1

VII
7.1Introduction ...............................................................7-1
7.2Charging the Battery..................................................7-2
7.3Optimizing Battery Performance ..............................7-2
7.4Checking the Lithium Battery ...................................7-3
7.5Disposing of the Batteries .........................................7-4
Chapter 8 Maintenance and Cleaning.................................8-1
8.1Introduction ...............................................................8-1
8.2Preventative Maintenance and Safety Checks ..........8-2
8.3Cleaning the Monitor.................................................8-4
8.4Disposal .....................................................................8-5
Chapter 9 Accessories............................................................9-1
Appendix A Product Specifications.........................................1
A.1 Safety Specifications ..................................................... 1
A.2 Physical Specifications.................................................. 1
A.3 Environmental Specifications........................................ 2
A.4 Charging Specifications................................................. 2
A.5 Hardware Specifications................................................ 3
A.6 Data Storage .................................................................. 4
A.7 Measurement Specifications.......................................... 5
Appendix B Factory Defaults ..................................................7
B.1 Alarm Setup ................................................................... 7

VIII
B.2 System Setup.................................................................. 7
B.3 CO2 Setup...................................................................... 8
B.4 Trend Setup .................................................................... 8
Appendix C Alarm Message ....................................................9
C.1 Physiological Alarm....................................................... 9
C.2 Technical Alarm ........................................................... 10
C.3 Prompt Message........................................................... 11
Appendix D Guidance and Manufacturer’s Declaration of
EMC .........................................................................................12
Appendix E Warranty Registration Card............................21

Vetcorder AirMate User’s Manual
1-1
Chapter 1 General Introduction
1.1 Intended Use
The monitor is intended to be used for monitoring,
displaying, reviewing, storing and alarming of multiple
physiological parameters of an animal, including CO2 and RR.
Warning: The monitor is intended for use only by
clinical professionals or under their
guidance. It must only be used by persons
who have received adequate training in its
use. Anyone unauthorized or untrained
shall not perform any operations on it.
Vetcorder AirMate User’s Manual
1-2
1.2 Main Unit
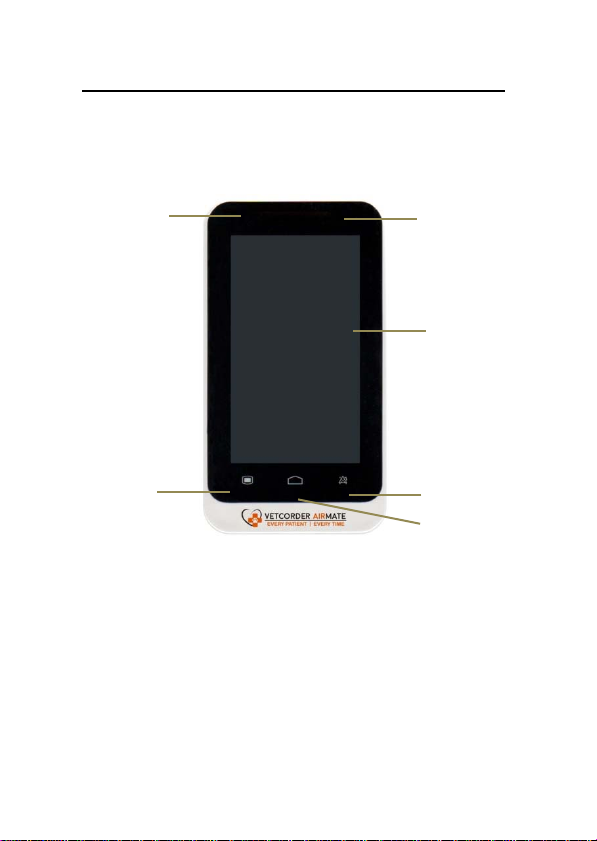
1.2.1 Front View
Fig 1-1 Front View of the Monitor
1. Alarm indicating lamp
When an alarm occurs, this lamp will light up as defined
below:
High level alarm: the lamp quickly flashes red.
Medium level alarm: the lamp slowly flashes yellow.
6 1
2
3
4
5

Vetcorder AirMate User’s Manual
1-3
Low level alarm: the lamp lights yellow without
flashing.
2. Display screen
The device uses resistive-style touch screen. You can
improve the sensitivity by using a stylus.
3. Alarm pause button
It can be used to pause the alarm when the alarm is
active.
4. Main interface button
Press this button to return to main interface when it is
on menu setting.
Press this button to shift between different displaying
modes when it is in main interface.
5. Menu
Press this button to enter into menu interface when it is
on main interface.
Press this button to return to main interface when it is
on menu setting interface.
6. Battery charging indicating lamp
It is red when the device is being charged.
It turns off when the device is plugged in but fully
charged.

Vet c
o
1.2.2 Rear Vie
w
Fig 1
-
o
rder AirMate User’s Manual
1-4
w
-
2 Rear View of the Monitor
Vet c
o
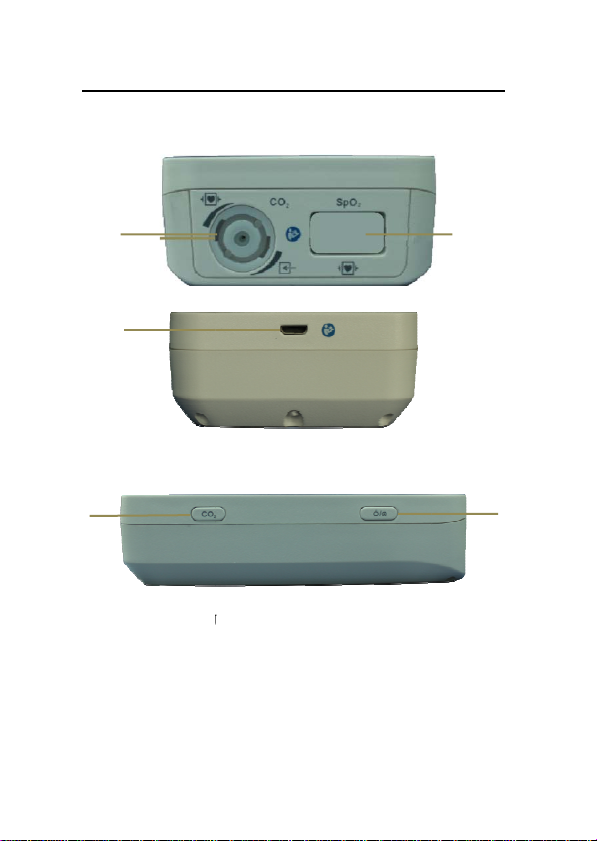
1.2.3 Side View
Topside:
Downside:
Rightside:
Fi
g
1. CO2 connect
o
2. Not available.
3. Micro USB c
o
Connect with
1
3
4
o
rder AirMate User’s Manual
1-5
g
1-3 Side View of the Monitor
or
o
nnecto
r
power adapter.
2
5

Vetcorder AirMate User’s Manual
1-6
Caution:Use only power adapters specified in this
manual. Using other power adapters may
cause damage. The power adapter is a
considered part of the product. The device
is not designed to be used while charging.
Export data to computer (possible future expansion).
Warning:
The equipment connected to the monitor must meet
the requirements of the system standard IEC 60601-1.
If you are unsure, consult the technical service
department or your local representative.
Operator shall be responsible for the safety of the
system while the monitor is connected to a computer.
Don’t touch the animal when using the USB connector,
if not, it will generate risk of electric shock.
4. Shortcut key
Press this button to start or pause the CO2 measurement.
5. Power button
Press for about two seconds to turn on when the monitor
is off.

Vetcorder AirMate User’s Manual
1-7
Press for about two seconds to turn off when the monitor
is on.
Calibration of touch screen
NOTE: Regular calibration of the touch screen is NOT
required. It is not recommended that you perform
calibration unless you are having issues with its operation.
Press shortcut key first then press the power button and
immediately release the power button. Click the center of
the crosshair on screen (requires 5 calibration points). If
the calibration passes, it will enter the normal interface. If
not, a red “X” will appear on screen and continue to
calibrate. Calibration requires very precise contact at the
center of each crosshair. We recommend you use a stylus
and press each point very carefully.
1.3 Display Views
This device includes automatic display rotation (Gravity
Activated) which provides for vertical and horizontal positioning
to maximizing space utilization and visibility.
Vetcorder AirMate User’s Manual
1-8
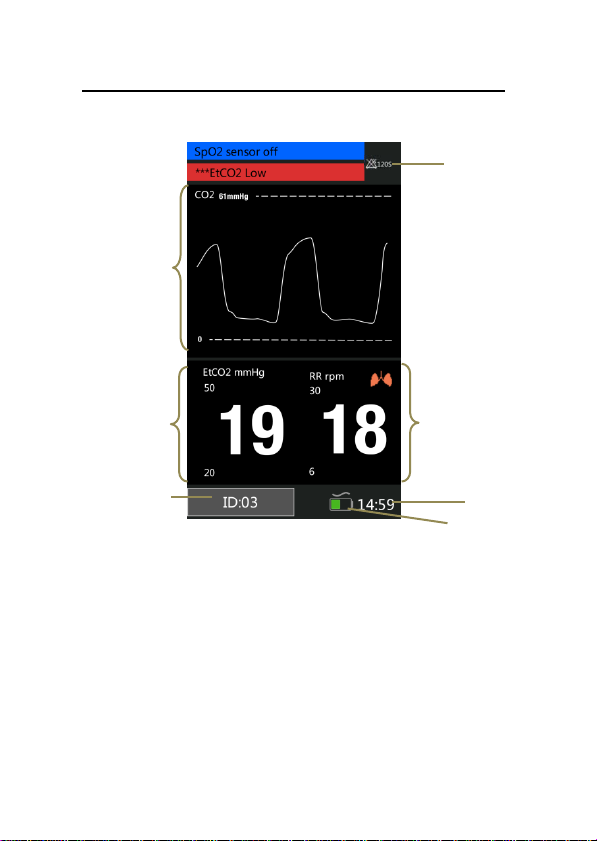
1.3.1 CO2 Waveform Display Mode
Fig 1-6 CO2 Display Mode
1. CO2
waveform display area: Waveform shown in the area
is current CO2 waveform 。
2. CO2 parameter area: The values shown in the area are
current CO2 value and its higher and lower alarm limits.
3. Animal ID No.: Click and set animal information, its
range from 1 to 96.
1
2 5
3 6
7
4

Vetcorder AirMate User’s Manual
1-9
4. Alarm status area: Alarm status symbols are shown in the
area.
5. RR parameter area: The values shown in the area are
current RR value and its higher and lower alarm limits.
6. System time: Current time is shown in the area.
7. Battery symbol: The symbol indicates the current quantity
of electricity of batteries and whether the device is
connecting power source, the alternating-current symbol
is above battery symbol when the device is connecting
power source.

Vetcorder AirMate User’s Manual
2-1
Chapter 2 Safety
2.1 Safety Information
Warning:
Explosion hazard: Do not use the monitor in the
presence of flammable anesthetics, oxygen, or
hydrogen.
When the monitor is in use, there should not be any
high power appliances such as high voltage cables,
X-ray machine, ultrasound equipment or
electro-cautery in use nearby.
Do not open the monitor housings; electric shock
hazard may exist. All servicing and future upgrades
must be carried out by the personnel trained and
authorized by manufacturer only.
When the monitor is in the presence of
high-frequency devices, sensors and cables should
avoid touching high-frequency devices to prevent
leakage current burns to animal.
Keep the monitor away from dust, vibration,
corrosive substances, explosive materials, high
temperature and moisture.

Vetcorder AirMate User’s Manual
2-2
Do not contact or touch the animal during
defibrillation as serious injury or death could result.
The monitor should be handled with care and avoid
shocks and falls.
Before the monitor is used, ensure that the batteries
have a sufficient charge to prevent phenomena such
as start-up abnormalities, inaccurate measurement
data, etc.
The physiological data and alarm messages displayed
on the monitor are for reference only and cannot be
directly used for diagnostic interpretation.
Disposable devices are intended for single use only.
They should not be reused as performance could
degrade or contamination could occur.
At the end of the products service life, the product
should be disposed of in compliance with the
guidelines regulating the disposal of such products. If
you have questions concerning disposal of products,
please contact manufacturer or its representatives.
To avoid inadvertent disconnection, route all cables in
a way to prevent a stumbling hazard. Wrap and
secure excess cabling to avoid risk of entanglement or
strangulation of animal or personnel.
Other manuals for Vetcorder AirMate
1
Table of contents
Other Sentier Medical Equipment manuals


Popular Medical Equipment manuals by other brands

Amilake Southern Limited
Amilake Southern Limited 01-1609 WendyLett manual

Acelity
Acelity V.A.C.ULTA 4 user manual

Respironics
Respironics DreamStation Wi-Fi Accessory Installation and operation

Myray
Myray hyperion Operating instruction

Vitlab
Vitlab micropipette operating manual

Roche
Roche Accu-Check Insight user manual


stemoscope
stemoscope STEMO300 instruction manual

Erbe
Erbe APC 2 user manual

Infanor
Infanor CYBELEC CybTouch 6 G-W manual

Organis
Organis TestChest V3 Operator's manual

Weinmann
Weinmann Homecare NP15 Instructions for use

AKW MediCare
AKW MediCare Euro GW90 Gravity Waste Installation and user care instructions