Sentry WF001 User manual

QR Code
UID: 12345678
KEEP SAFE
WF001
Wifi Doorbell with
Wireless Door Chime

A
B
C
D
E
F
J
K
L
M
I
H
G
N
Attention before use!
This product requires a network connection that has internet access.
In order for this product to operate as intended the mobile devices used to view and talk to the visitors
also requires either WiFi or mobile internet connection with speeds 3G or higher. Should the mobile
device have poor or no internet access then this will affect the overall performance of this product that
may cause a delay in connection, poor image and/or intermittent speech.
If your mobile device is not connected to a WiFi access point then your mobile device
will require the use of your mobile data.
Please check with your network for data charges based on your payment plans as your
network provider may charge you for this service.
CONTENTS
1x Wifi Doorbell
1x Wifi Antenna
1x 12v 1A DC Power Supply
1x Fixing pack
1x Wireless Door Chime
1x Jack Plug for Power Connection
FEATURES
Wifi Doorbell
A Wifi Doorbell
B Microphone
C Colour Camera
D Infrared LED’s (For Night Time Visibility)
E Call Button
F Speaker
GRF Antenna
H Master Power and Network Cable
I Jack Plug for Power Supply
Wireless Door Chime
J Wireless Door Chime
K Melody Selection Key
L Volume Key
M Pair Key
NWifi Antenna
WELCOME - OVERVIEW

Optional AC/DC
power supply for
door lock operation
(not supplied)
Optional AC/DC
door lock
(not supplied)
Power supply
12V DC
(included)
Orange & White
Orange
Green & White
Green
Black - Ground
Red - 12V DC
Brown
Blue
Ethernet
connection to router
(not supplied)
Wifi Antenna
(included)
Ethernet Adaptor
WIRING OVERVIEW

Black - Ground
Red - 12V DC
1. Connect the power supply to the Wifi Doorbell using the jack plug adaptor supplied.
2. Connect the antenna to the Wifi Doorbell.
3. Plug in the power supply for the Wifi Doorbell and the unit will begin to start up, after around 30
seconds you will hear a Beep that identifies unit is ready.
Using your mobile device, go to the Play or App store and search for the FREE application
UCareHome. After finding please download and install.
If not using WiFi during this process please pay attention to any network operator charges that may be
applicable based on your payment plan or data allowance.
Please ensure your mobile device is connected onto the wifi network you require the Wifi Doorbell to also be connected to.
• Open the application UCareHome, click on “add device” symbol.
• Select “Click here for NEW Wireless Device”.
• Select “Smartlink Mode”.
• Hold down CALL button on the Wifi Doorbell until you hear a beep (20 seconds).
• Release and hold down CALL button again until you hear 2 beeps, the Wifi Doorbell will now
continue to beep.
• At this point select “Next” on the UCareHome app, the app will now search for the Wifi Doorbell.
• Once found, check the network name is the same as your wifi network and enter the password for
your wifi network.
• Click “Next” and the Wifi Doorbell will stop beeping, once all settings have been saved.
Press the CALL button on the Wifi Doorbell, the device will ring and your mobile device should now also
ring, if not please check the volume control on your mobile device is turned up. Test the Video Door
Phone by answering the call and checking the video and audio quality.
We advise to test the Wifi Doorbell at its intended fixed location to ensure the wifi signal is still strong, also ensure the
wifi antenna is connected at this point.
POWER SETUP & ANTENNA
MOBILE APP
WIRELESS SETUP
To setup your mobile device
If wireless setup does not work for you please follow Wired Setup Guide.

Already connected is the Ethernet connection socket, move the Wifi Doorbell close to your network router
and connect the Wifi Doorbell to the network router using an Ethernet cable. You will see LAN sockets in
the back of your router to connect to.
See UCareHome Application guide further in this manual for details of the below.
• Open the application, click on “add device” symbol.
• Select “Click here for Connected Wired / Wireless Device”.
• Select “Scan QR Code”.
• Using the camera on your mobile device scan the QR code located on the front of this user manual.
KEEP THIS SAFE!
• At this point save the default details, they can be changed in the menu at a later time.
For security it is strongly recommended to change the password after installation, follow the
‘IN DETAIL’ guide on how to change this.
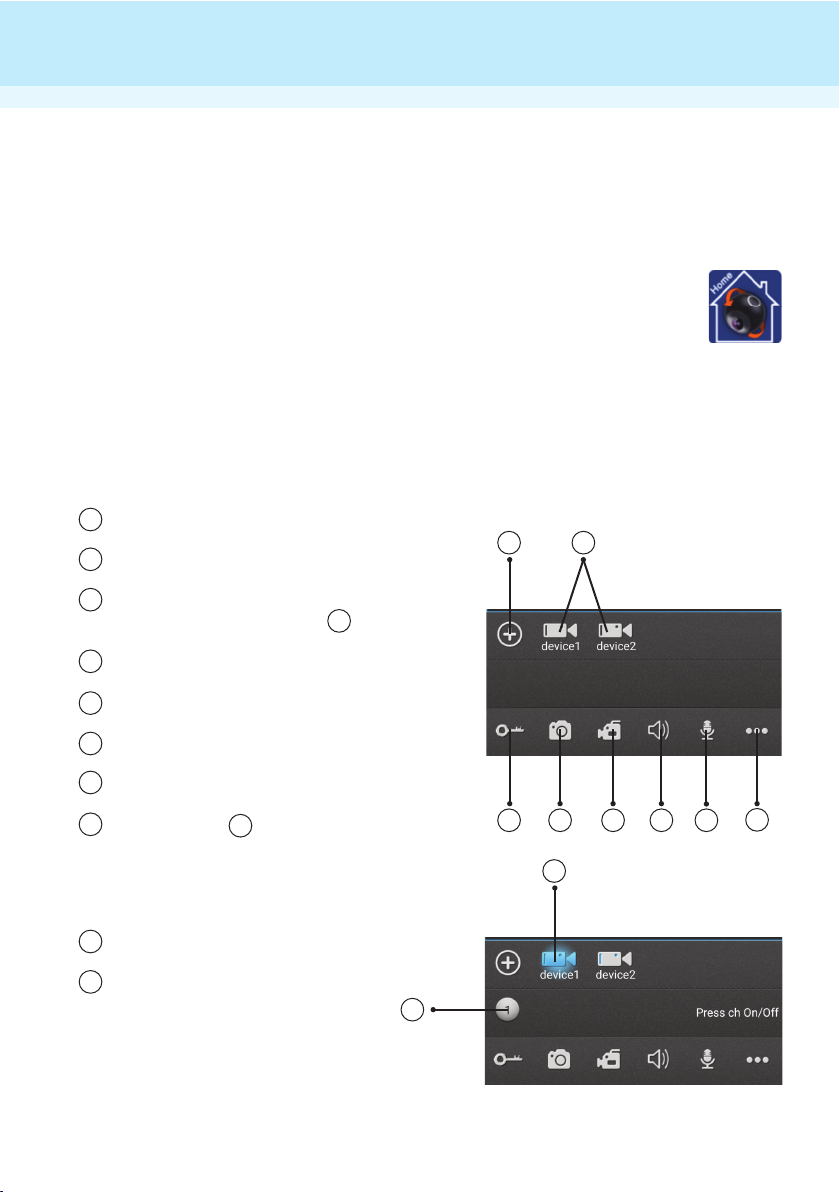
On the main screen select your device then press the key to view a live video stream, at this
point also test the audio by talking both from mobile device and Wifi Doorbell.
Hold down the CALL icon to talk from your mobile device to the Wifi Doorbell, release to talk
from the Wifi Doorbell to your mobile device.
If your mobile device is close to the Wifi Doorbell at this point then you may hear feedback or echo, this is normal,
move the mobile device away from the Wifi Doorbell to resolve this.
6. To setup the WiFi operation of the Wifi Doorbell:
Using the UCareHome application click on the symbol located bottom right of the screen.
Now select the menu button and select your device.
Now select “WiFi Settings”.
The Wifi Doorbell will search for nearby wifi networks, once found select the network you would
like to connect the Video Door Phone to, at this stage input the wifi password or key from your wifi
network into the required box and save.
You can usually find the wifi password on the back of your network router, otherwise consult the user manual of
your router.
WAIT 30 seconds then unplug the Wifi Doorbell and remove the LAN cable, after a further 30
seconds plug in the Wifi Doorbell and allow the device to start up, around 30 seconds and you
should hear a Beep to indicate the device is ready.
Press the CALL button on the Wifi Doorbell, the device will ring and your mobile device should now
also ring, if not please check the volume control on your mobile device is turned up. Test the Wifi
Doorbell by answering the call and checking the video and audio quality.
We advise to test the Wifi Doorbell at its intended fixed location to ensure the wifi signal is still strong, also ensure
the wifi antenna is connected at this point.
WIRED SETUP
If Wireless Setup does not work please use this guide.

Provided in the kit is a Wireless Door Chime that will sound once the CALL button on the Wifi Doorbell is
pressed, this is to alert you of visitors inside your home without having to locate your mobile device.
1. Remove the battery cover and insert 2x AA batteries.
Do not use ZINC batteries as these will reduce the performance of the Wirleess Door Chime.
2. Press the PAIR key and immediately after press the CALL key on the Wifi Doorbell.
3. The Wireless Door Chime should ring.
4. Press the MELODY key to change the melody.
5. Press the VOL key to increase / decrease the volume.
1. On the Wifi Doorbell unplug the power supply, remove Jack plug and remove the antenna.
2. Remove the Ethernet plug socket by lifting the clear plastic cover and pulling out the coloured
cables, this can be re-connected later if required.
3. Find the best position for the Wifi Doorbell that will allow the best picture, we advise an average
height of 1.50m from the ground.
Take into consideration where the cable entry will be drilled, and where the cable will come
into the property.
Be aware of any internal cabling and pipework that may be inside the wall before drilling.
TAKE CARE!
Direct sunlight will affect the camera performance; try to avoid this if possible.
The item is suitable for outdoor use, however try to avoid installation where the unit will
become immersed in water.
4. Using the back plate as a template mark both the cable entry point and the wall fixing points.
5. We recommend a 10mm hole to be used for the cable entry.
6. We recommend 2x 6mm holes to be drilled for the supplied fixings.
7. Once drilled feed the cables through the back plate and through wall to the inside of the property.
8. Mount the back plate using the fixings supplied, ensuring the back plate is secure.
9. Push the Wifi Doorbell into position top first then bottom, using the supplied HEX screw and HEX
key fix the Wifi Doorbell into position ensuring it is fully secure.
PORTABLE DOOR CHIME
INSTALLATION Ensure either Wireless or Wired setup & testing is completed FIRST

Optional AC/DC
power supply for door lock
operation Max 12V
(not supplied)
Optional AC/DC
door lock
(not supplied)
Brown
Blue
INSTALLATION
10. On the inside of the property re-connect the jack plug and antenna, you can stick this into position
by peeling the cover off the back of the antenna and fixing into position.
11. Connect the power supply and plug in, allow 30 seconds for start-up before testing.
To use the Door Lock function:
Connect the 1x cable from the Door Lock and 1x cable from the required power adaptor (not
supplied) to the Brown and Black cables on the Wifi Doorbell using a suitable connector block.
Max 12V
Depending on the type of door lock you require will determine the extra power supply you also
require. Check with the door lock manufacturer for the required power supply to use.
Ensure either Wireless or Wired setup & testing is completed FIRST
OPTIONAL DOOR LOCK

1 2
3 4 5 6 7 8
9
10
UCareHome APPLICATION 1
The UCareHome application is continuously updated and improved, the below guide may not represent
the current application version. Should you notice any differences between this and the application that
requires assistance for use then please contact our technical support team.
The UCareHome application currently can only be used with Android or iOS devices.
The application is FREE.
1. To find the application search for UCareHome in the Play or App store. This should be
searched as all one word without any spaces. Download and install.
If not using wifi during this process please pay attention to any network operator charges that may
be applicable based on your payment plan or data allowance.
2. For setup follow the INITIAL SETUP step 5.
3. See below for more detailed functions of the Application:
MAIN SCREEN
1Add new device (see Wireless/Wired setup guide)
2Added devices will appear here
3Door lock release (Optional) Tap to release door lock,
password protected. (see point 26 )
4Take photo of visitor (image stored on mobile device)
5Take video of visitor (video stored on mobile device)
6Enable / Disable listening from Wifi Doorbell
7Enable / Disable microphone on mobile device
8Menu (See point 12 )
9Select the device of your choice
10 Press to enable / disable live feed

11 12 13 14 15 8
17
16
18
19
20
11 Device List (See step 16 )
12 Image / Video folder, select to view stored files
13 Video Search function to search for historic
video
14 General application settings
15 Help / Application version
DEVICE LIST
16 Enable / Disable notifications when the CALL
button is pressed
17 Tap device name to enter device settings
DEVICE SETTINGS
Name: Device Name
UID: Unique Identification Code (found on QR
code).
User: Default is Admin, if a different user is setup
then this will show here. (See point 25 ).
Password: Default is 888888, it is strongly
recommended to change this after testing and
before general use.
Unlock Password: By default a password is
required to activate the door lock if connected.
Default password is 888888. See point 26 to
change.
Resolution: You can change this between quality
and smooth; Quality will ensure a good image but
may be jumpy on poor connections; Smooth will be
less jumpy but the image may not be as clear.
18 You will need to press EDIT before you
can make any changes, for example to change
resolution you tap EDIT then Smooth
19 Advanced settings for the device (see below)
20 Wifi menu to search and setup the device
onto a wifi network
UCareHome APPLICATION 2

21
22
23
24
25
26
27
28
ADVANCED DEVICE SETTINGS
Unlock duration: Once the UNLOCK key (3) is pressed the lock will remain open for the set time.
Notification: This function cannot be used with the Video Door Phone.
Motion: This function cannot be used with the Video Door Phone.
Email: This function cannot be used with the Video Door Phone.
21 If any changes are made you must press
CONFIRM to save
22 Use to Sync the time from your mobile
device to the Video Door Phone for
accurate time stamp of images and video
recordings
23 Remotely restart the device
24 It is strongly recommended to change the
default admin password after testing, this
can be done here
25 Input new users to enable basic use of
the application and Video Door Phone
without allowing access to advanced
settings
(See point 27 )
26 If the DOOR UNLOCK PASSWORD is set to
ON you can change the password here.
(See point 3)
EDIT MULTI-USER
27 Add a new user by pressing the + key
28 Once a new user is created press the
COMMIT key to save
UCareHome APPLICATION 3

PRECAUTION
Do not cover the ventilation openings with objects suchas newspaper, table cloths, curtains, etc.
Do not allow this product to get directly into contact withheat sources or naked flames.
The normal operation of the product may be disturbed bystrong electro-magnetic interference.
This equipement is built exclusively for a domestic use.
The device must not be exposed to splashes and it mustnot be submerged.
No object containing liquids, such as a vase, may beplaced on the device.
Maintain a minimum safety distance of 10cm all around theproduct in order to insure proper
ventilation.
Insure the doorbell push button is not installed where it maybe covered by water or rain.
Do not allow children to play with the device.
WARNING ABOUT BATTERIES
Only an adult may replace and install batteries.
Remove used batteries from this device.
Do not dispose of batteries in fire,they may explode or leak.
Do not short-circuit battery terminals.
DO not use any other type of battery other than therechargeable pack supplied or similar.
Do not allow this device to get directly into contact withheat sources or flames.
Do not allow water to enter into contact with thebatteries or the wires.
Install with caution to avoid damaging the batteries.
During battery installation in their compartment, insureproper polarity (+) / (-).
Only use recommended batteries.
Remove the batteries if the device remains unusedfor long periods.
Keep the device away from small children.
Keep the unused batteries in their original packaging.
At the end of its life, this product must be returned to awaste processing center in order to extract
the batteries.
SAFETY INFORMATION

Jules Verneweg 87
5015 BH Tilburg
The Netherlands
Wifi Doorbell:
110º Viewing Angle
Adaptor: 100-240VAC/50-60Hz 12VDC/1.0A.
Android / iOS Compatible
0.5m Night View
Colour Video
Door Release Function
(Door Lock not included)
Wireless Door Chime:
16 Sounds
30M Range
Adjustable volume
Complies to all relevant European directives.
Smartwares declares the device, model [WF001], complies with the requirements of the R&TTE, 1999/5/
CE directive.The compliance statement is available upon request to:Complies to all relevant European
directives.
This symbol is known as the ‘Crossed-out Wheelie Bin Symbol’. When this symbol is marked on a product
or battery, it means that it should not be disposed of with your general household waste. Some chemicals
contained within electrical/electronic products or batteries can be harmful to health and the environment.
Only dispose of electrical/electronic/battery items in separate collection schemes, which cater for the
recovery and recycling of materials contained within. Your co-operation is vital to ensure the success of
these schemes and for the protection of the environment
SPECIFICATION
Table of contents
Other Sentry Accessories manuals