Sephra TS-4000-BP User manual
CHOCOLATE DISPENSER
OPERATING MANUAL
VERSION .. AUGUST
Sephra Europe are your one-stop shop for Chocolate
Dispensers, Consumables, Spare Parts and Repairs.

3
TABLE OF CONTENTS
TABLE OF CONTENTS
THE LEGEND OF SEPHRA
DEAR SEPHRA CUSTOMER
GENERAL INFORMATION
CHOCOLATE DISPENSER PARTS LIST & ASSEMBLY
CHOCOLATE DISPENSER OPERATING INSTRUCTIONS
CHOCOLATE DISPENSER DISASSEMBLY & CLEANING INSTRUCTIONS
CHOCOLATE DISPENSER SERVING GUIDELINE
CHOCOLATE DISPENSER WIRING DIAGRAM
CHOCOLATE DISPENSER SPARE PARTS LIST
CONTACTING SEPHRA INFORMATION

4
THE LEGEND OF SEPHRA
Woven among the threads of ancient Aztec
legend lies the story of Sephra, an enchanting
goddess whose beauty could be described
only as the richness of the dark earth
combined with the lustre and glow of pure
gold. Her voice was softer than the most
delicate ower, and her presence carried the
aroma of sweet cocoa. It was Sephra who
gave the ancient Aztecs the precious gift of
the cocoa tree.
The legend reveals that the spirit of Sephra
nourished the cocoa trees and lived within
the priceless beans they produced. The Aztec
kings named the cocoa tree “Theobroma
Cacao,” meaning “food of the gods.” So
valuable were cocoa beans that they were
used to pay tribute to royalty and were given
as sacred oerings to the gods.
Montezuma, the ruler of the wealthy Aztec
Empire, was so enchanted by Sephra that
he commissioned an elite force of skilled
artisans and master craftsmen to construct a
temple in her honour. As a special oering to
the goddess, Montezuma built a magnicent
fountain in the highest room of the temple
and lled it with glistening spring water,
which owed from beneath its walls. He then
surrounded the fountain with a splendid array
of the most perfect cocoa beans, in hopes
that Sephra would continue to bless the
people with the unique and valuable crop.
So pleased was Sephra with Montezuma’s
gift that she came to him in a dream and told
him that her spirit would always live in the
fountain he had given her. Moments later,
Montezuma awoke to the sweet smell of
cocoa lingering in the air. The aroma led
him to the upper room of the temple where
Sephra’s fountain stood.
To his astonishment, the fountain no longer
owed with water, but with the richest, purest
chocolate... this was truly a gift from the gods.
For centuries, Sephra’s fountain remained
hidden beneath the ruins of the ancient Aztec
temple, waiting to be discovered. At long last
it was, and with it was unveiled the secret of
the pure, rich chocolate once coveted by gods
and kings . . .
© Sephra L.P. 2003

5
DEAR SEPHRA CUSTOMER
Thank you for choosing a Sephra Chocolate
Fountain for your business. Our fountains
have been engineered to a high standard of
quality and will provide many years of trouble-
free service. Please read through this manual,
which will walk you through the proper setup,
operation and clean-up of your Fountain.
If you have any questions after reviewing
these instructions, please call our Customer
Service Department and a trained
representative will be more than happy to
assist you.
We encourage you to use Sephra Fondue
Chocolate and Chocolate Compound,
available in Dark, Milk, and White varieties.
This specialty fondue chocolate is formulated
to ow perfectly through the fountain
every time without the mess and hassle of
mixing in oil that is required with most other
chocolate. Adding oil not only dilutes the taste
of chocolate, but it also makes it runny and
diminishes its aroma.
With Sephra Fondue Chocolate, simply melt
the chocolate chips and it is ready to use!
REMEMBER, YOUR CUSTOMERS WILL TASTE THE DIFFERENCE IF YOU SERVE ONLY THE
FINEST FONDUE CHOCOLATE.
You can order Sephra Fondue Chocolate by calling us on +44 (0) 1592 656 737 or by visiting
our website at www.sephraeurope.com
Our mission is to help you make your Sephra appliance a very protable aspect of your
business and we look forward to assisting you.
Thankyou for choosing Sephra!
The Sephra team

6
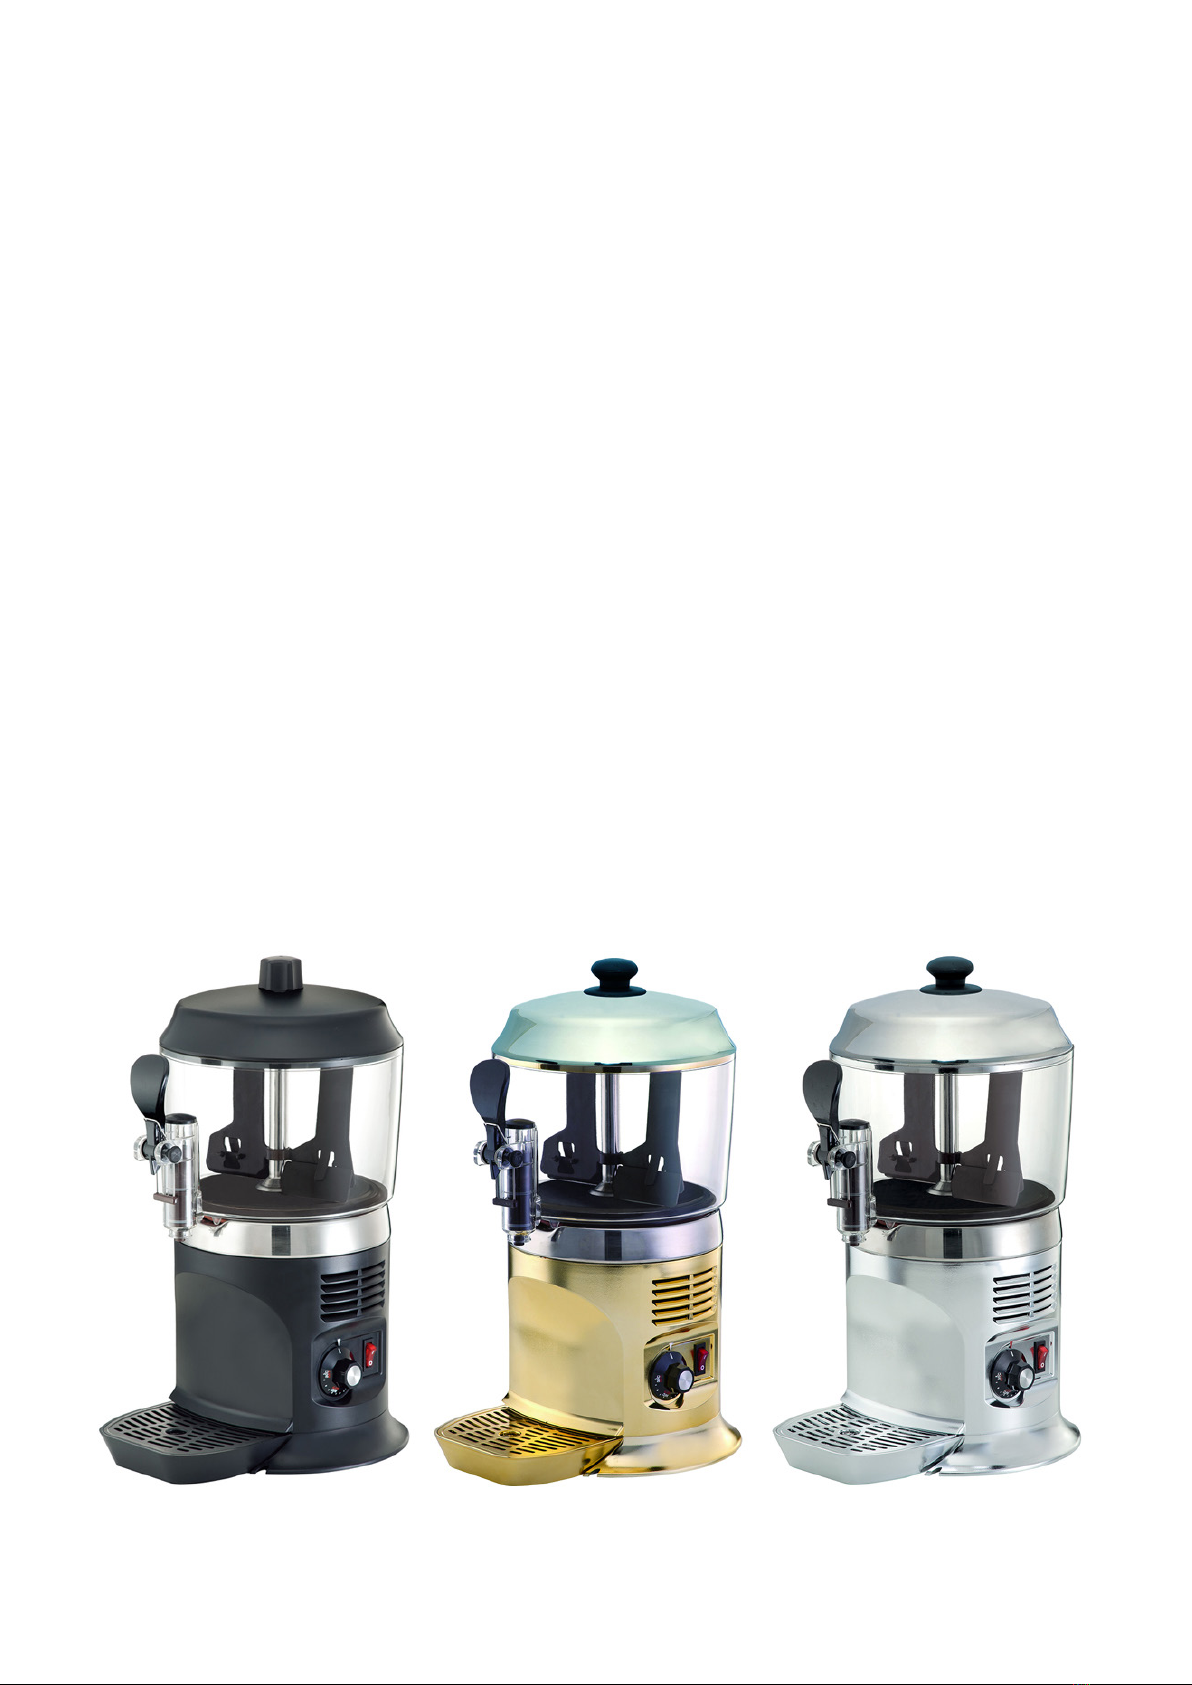
GENERAL INFORMATION
Model No. Body Colour Lid/Material Colour Voltage Wattage Capacity
TS-4000-BP Black Black Plastic 220-240v 1000-12000w 5 Litre
TS-4000-BS Black Stainless Steel 220-240v 1000-12000w 5 Litre
TS-4000-WP White White Plastic 220-240v 1000-12000w 5 Litre
TS-4000-WS White Stainless Steel 220-240v 1000-12000w 5 Litre
TS-4000-GS Gold Stainless Steel 220-240v 1000-12000w 5 Litre
TS-4000-SS Silver Stainless Steel 220-240v 1000-12000w 5 Litre
1. Read the instructions before using the Chocolate Dispenser.
2. Use the Chocolate Dispenser only if it is correctly earthed.
3. Do not use extension cords to connect the Chocolate Dispenser electrically.
4. Do not operate the Chocolate Dispenser if it is not closed.
5. Do not place ngers or objects in the Cooling Fissures and Faucet Outlet. (NUMBERS)
6. Do not open the Chocolate Dispenser for cleaning or maintenance without ensuring it has
been disconnected from the power socket.
7. Do not remove the Container when the Chocolate Dispenser is in operation. (NUMBER)
8. Do not remove the Container until the Hot Plate is cold. (NUMBERS)
9. Do not remove the Container from the Chocolate Dispenser when it contains hot liquid.
10. Place the Chocolate Dispenser on a horizontal and even surface.
11. In case of damages the power cord must be replaced by a qualied person to prevent any
shock hazards.
SPECIFICATIONS
CHOCOLATE DISPENSER ADVANTAGES
• The Chocolate Dispenser is easy to clean.
• The Chocolate Dispenser is ideal for warming Chocolate and Milk.
• Removable Dispensing Tap for easy cleaning. (NUMBER)
• Removable Bowl/Container for easy cleaning. (NUMBER)
• The Chocolate Dispenser has a clear polycarbonate 5ltr Bowl. (NUMBER)
• Thermostat for temperature adjustment. (NUMBER)
• The Container is removable even when full for refrigerated storage. (NUMBER)
• Serve as a Dessert or Aperitif or mix with Coee, Alcoholic Beverages or Ice-Cream.
• The Chocolate Dispenser has a Direct Heating System with a 15 Minute heating up time.
(NUMBER)
• The Chocolate Dispenser can also serve other warm liquids such as Sauces and Gravy.
7
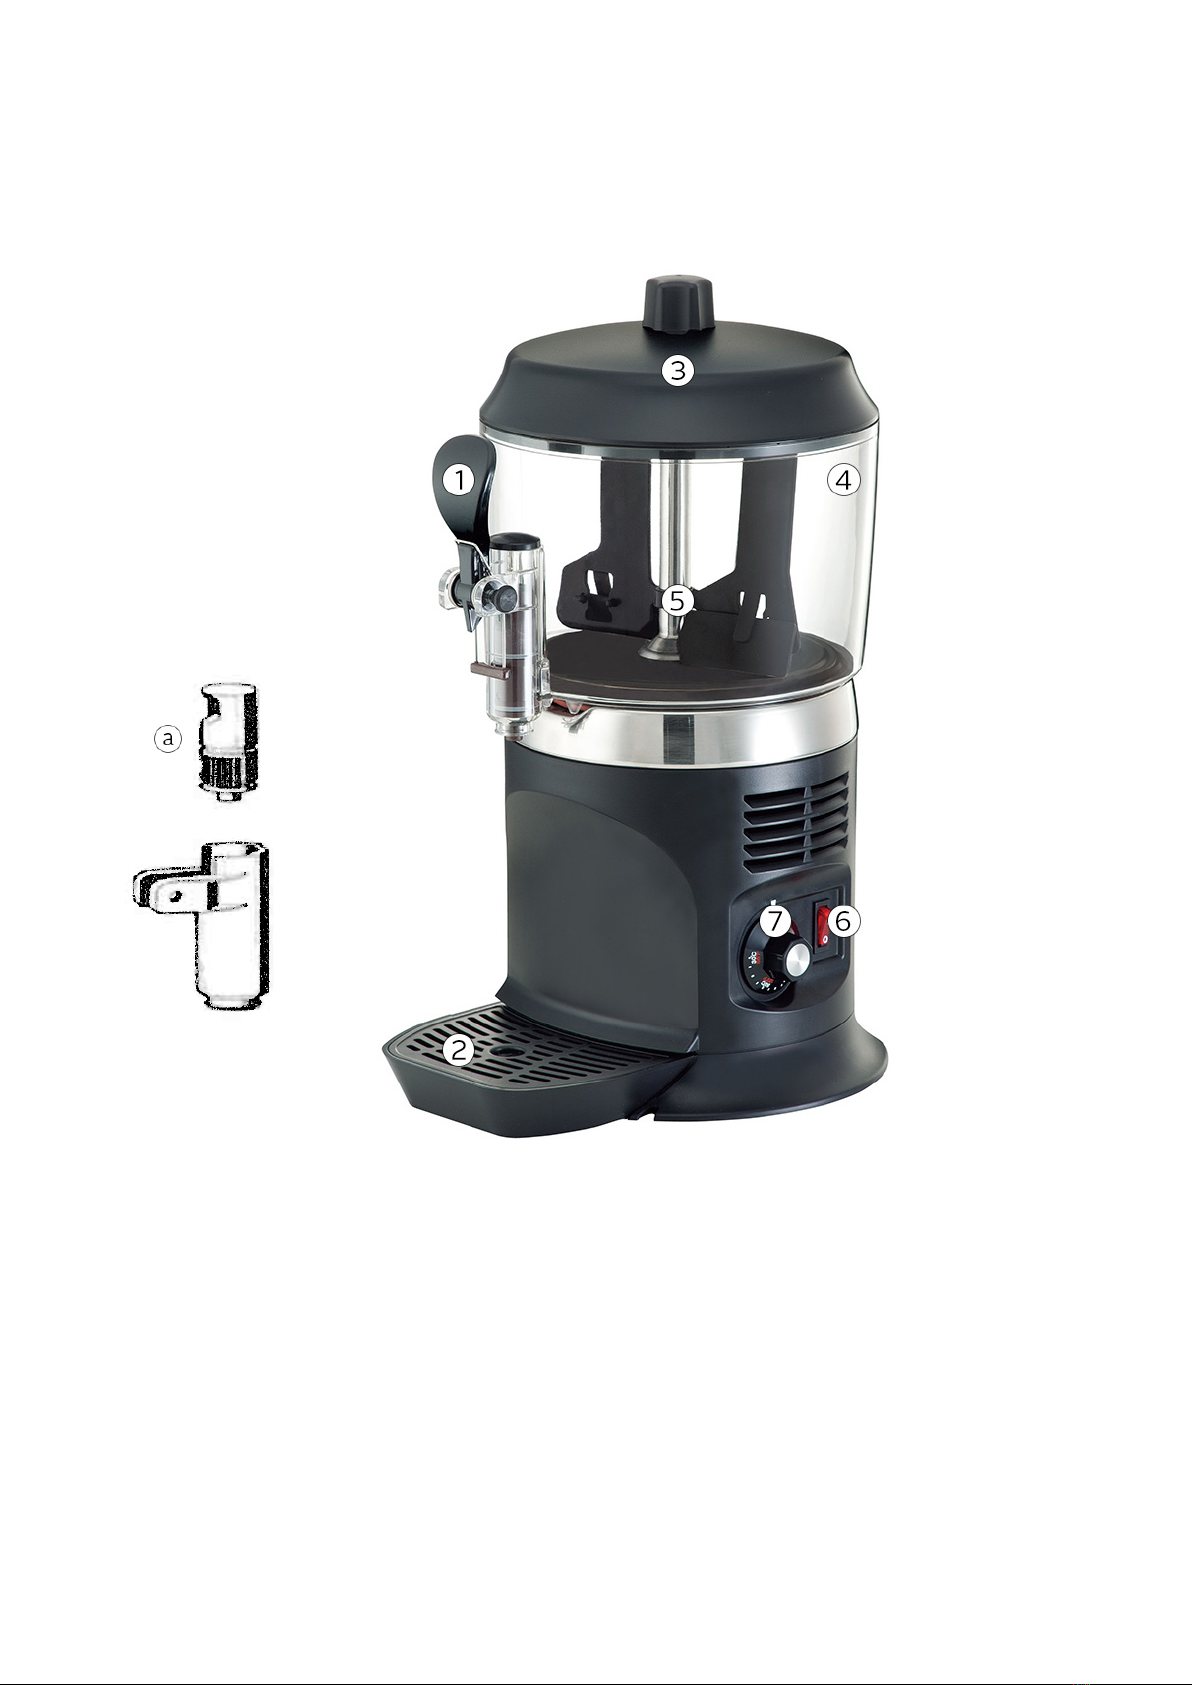
CHOCOLATE DISPENSER PARTS LIST
CHOCOLATE DISPENSER ASSEMBLY
1. Put the Drip Tray and Grill in place.
2. Lubricate the Faucet Pistonª (See Figure 1).
3. Re-assemble the Faucet assembly on the Container in the opposite way to which it was
dismantled.
4. Install the Container putting the Central Shaft in place.
5. Insert the Mixer in the Central shaft.
6. Position the Cover on the Container.
1. Faucet
2. Drip Tray
3. Lid
4. Container
5. Mixer
6. On/O Switch
7. Thermostat
Figure 1

8
OPERATING INSTRUCTIONS
1. Clean the Dispenser with warm water prior to use.
2. Fill the Bowl with the prepared product according to manufacturer's instructions.
3. Install the cover above the Container making sure that it is placed correctly.
4. Switch the Chocolate Dispenser on and the Mixing device will start to operate.
5. Adjust the Thermostat to the required temperature. When the Heat Plate has reached the
desired temperature set the Red Light goes on.
6. The Chocolate Dispenser should always operate with the cover installed in order to prevent
possible contamination of your chosen liquid product.
7. The Chocolate Dispenser must always run without interruption. Heating will stop
automatically when your chosen liquid product is ready for dispensing. The Mixing device
will continue to operate.
8. The Chocolate Dispenser is supplied with a closed removable base to facilitate cleaning and
sterilisation.
CONTROLS AND THEIR FUNCTIONS
The Chocolate Dispenser is equipped with a general ON/O switch. The Chocolate Dispenser
is equipped with a Thermostat control to adjust the liquid product temperature.
SECONDARY THERMOSTAT
The Chocolate Dispenser is also equipped with a secondary Thermostat on the underside
to regulate the temperature of the Hot Plate. The secondary Thermostat is calibrated in
the factory. If necessary it is possible to reduce the temperature of the Hot Plate to prevent
possible burns. The secondary Thermostat temperature can only be adjusted to a lower heat...
never to a higher heat.
Re-Set: Please always turn the dial knob to the correct position of 120.
9
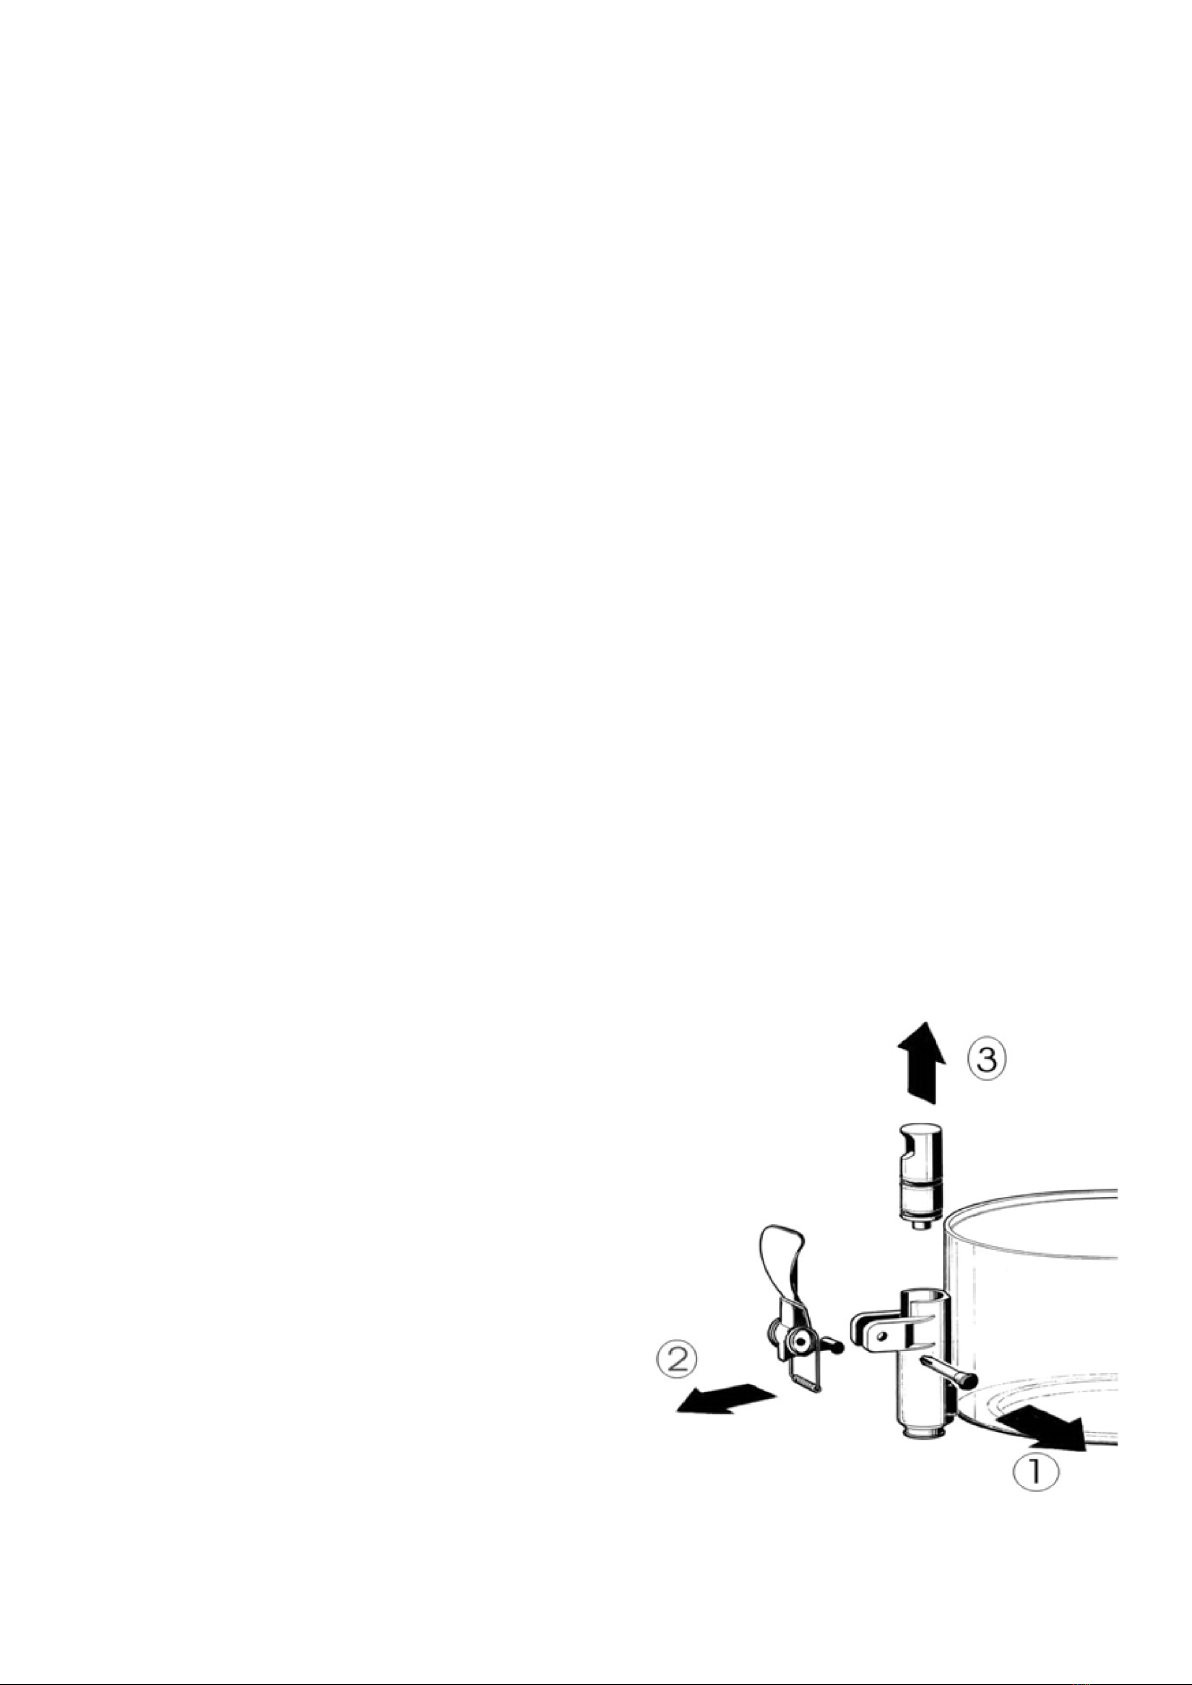
DISASSEMBLY & CLEANING
DISASSEMBLY
Before proceeding to disassemble any component of the Chocolate Dispenser always
disconnect from the power supply.
1. Empty the bowl and remove the lid.
2. Remove the Mixer from the Central Shaft.
3. Dismantle the Faucet following the sequence shown in Figure 2.
4. Remove the Container lifting it upwards.
5. Remove the Drip tray and empty it.
CLEANING YOUR CHOCOLATE DISPENSER
1. Before cleaning please disconnect the Chocolate Dispenser from the power supply.
2. Do not attempt to wash any Chocolate Dispenser components in a dish washer.
3. Prepare approximately 4ltr (2 gallons) of hot water (45-60C or 113-140F)
4. Use detergents compatible with plastic parts to avoid damaging the Chocolate Dispenser.
5. Use a suitable brush and carefully clean all the parts that come into contact with the liquid.
6. Do not use excessive amounts of water near the electrical components of the Chocolate
Dispenser when washing as this can cause an electric shock or damage the machine.
7. Rinse all the washed parts in running water.
8. The Chocolate Dispenser must be sanitised prior to starting the machine every day. Do not
allow the machine to sit for extended periods of time after sanitisation.
9. Before starting the procedure listed below wash your hands with an anti-bacterial soap.
1. Prepare approximately 4ltr (2 gallons) of hot water (45-60C or 113-140F)
2. Immerse all the parts to be sterilised in the solution for the indicated length of time.
3. Allow the sterilised parts to be air dry on a clean surface.
4. Use non-abrasive cloths to dry the external parts.
Figure 2

10
CHOCOLATE DISPENSER SERVING GUIDELINE
INSTRUCTIONS FOR SIX SERVINGS OF DRINKING CHOCOLATE
1. Scoop 24tbsp of Drinking Chocolate powder into Container.
2. Add 24oz of Milk into Container.
3. Set the temperature to approx 65-70 and turn on the Chocolate Dispenser.
4. Let the Chocolate Dispenser go to work mixing and heating the Milk and Chocolate.
5. 2 minutes into the mixing and heating process.
6. 15 minutes and almost nished.
7. Done... Time approx 25-35 minutes for large batches.
8. Serve in pre-heated Cappuccino (full serving) or Demitasse (half serving) cups.
11
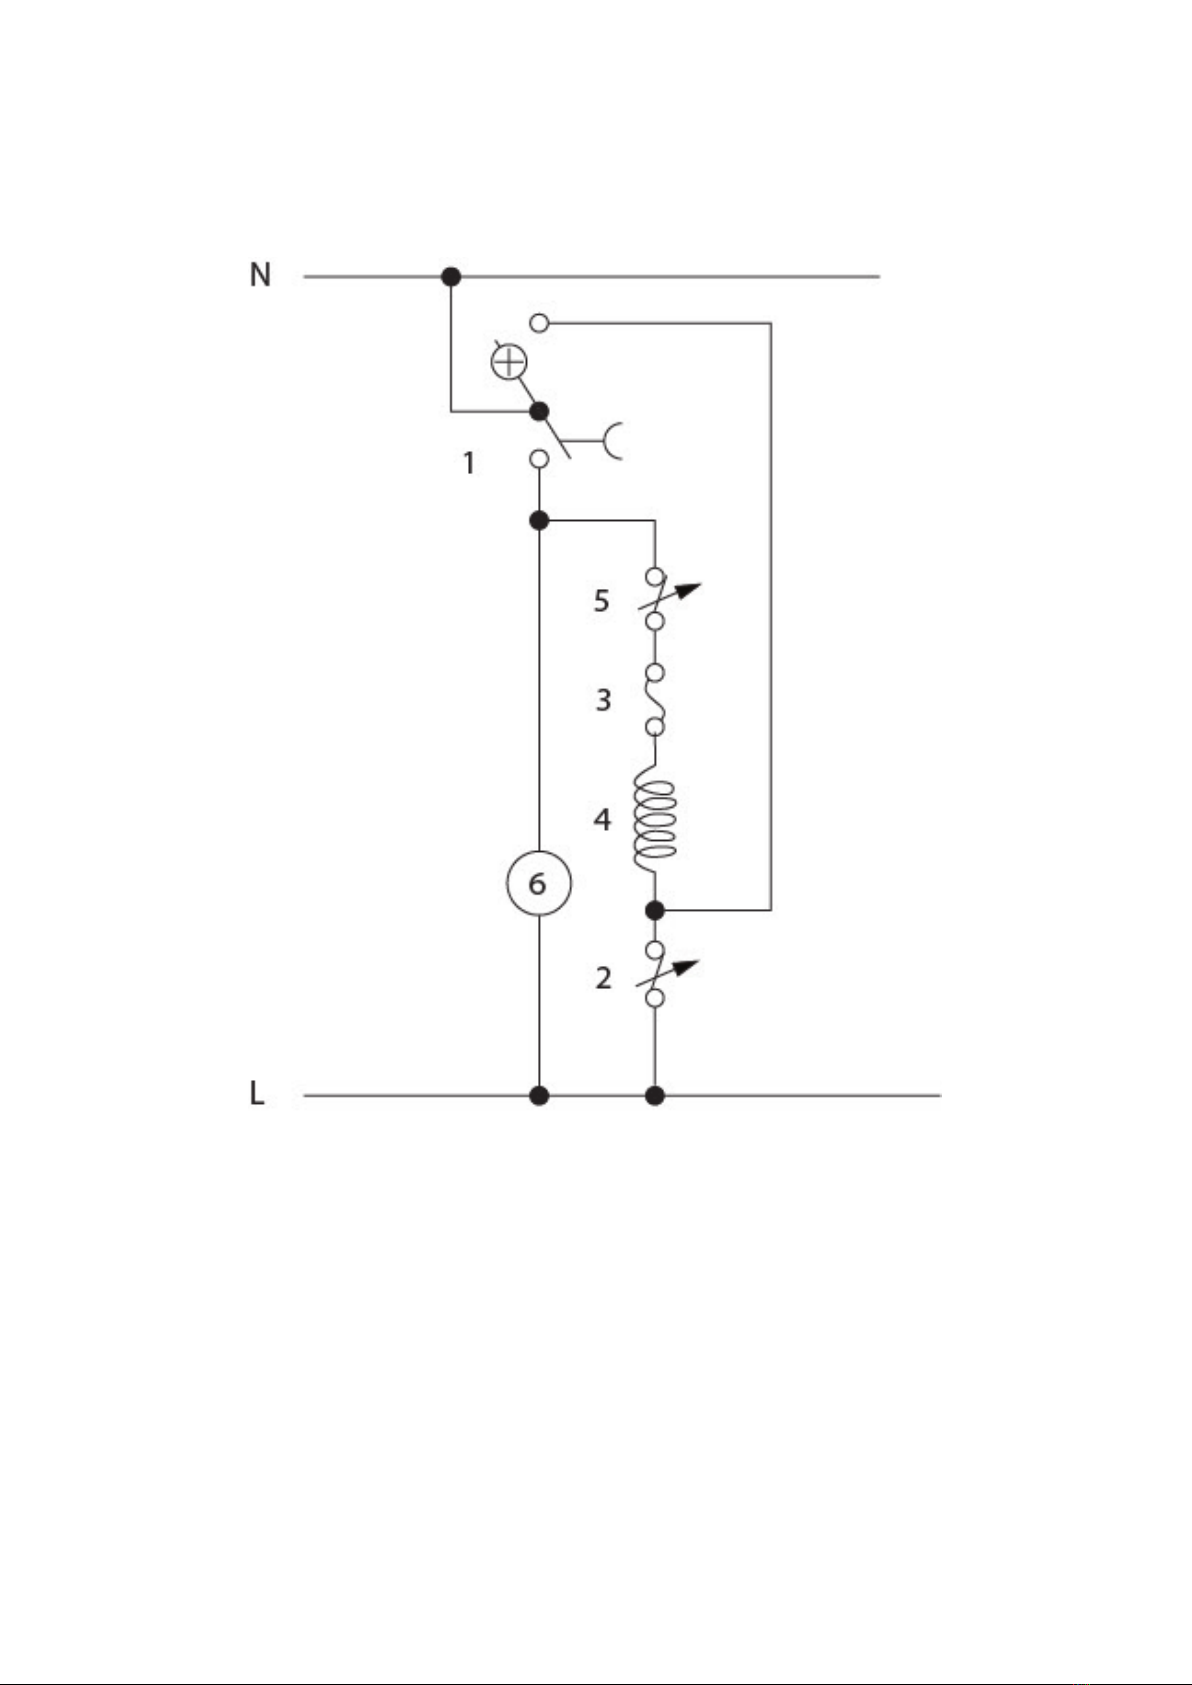
CHOCOLATE DISPENSER WIRING DIAGRAM
1. Switch.
2. 0-90 Thermostat.
3. Limit Switch 152.
4. Heating Element.
5. 0-120 Thermostat.
6. Gear motor.
12
CHOCOLATE DISPENSER SPARE PARTS

13
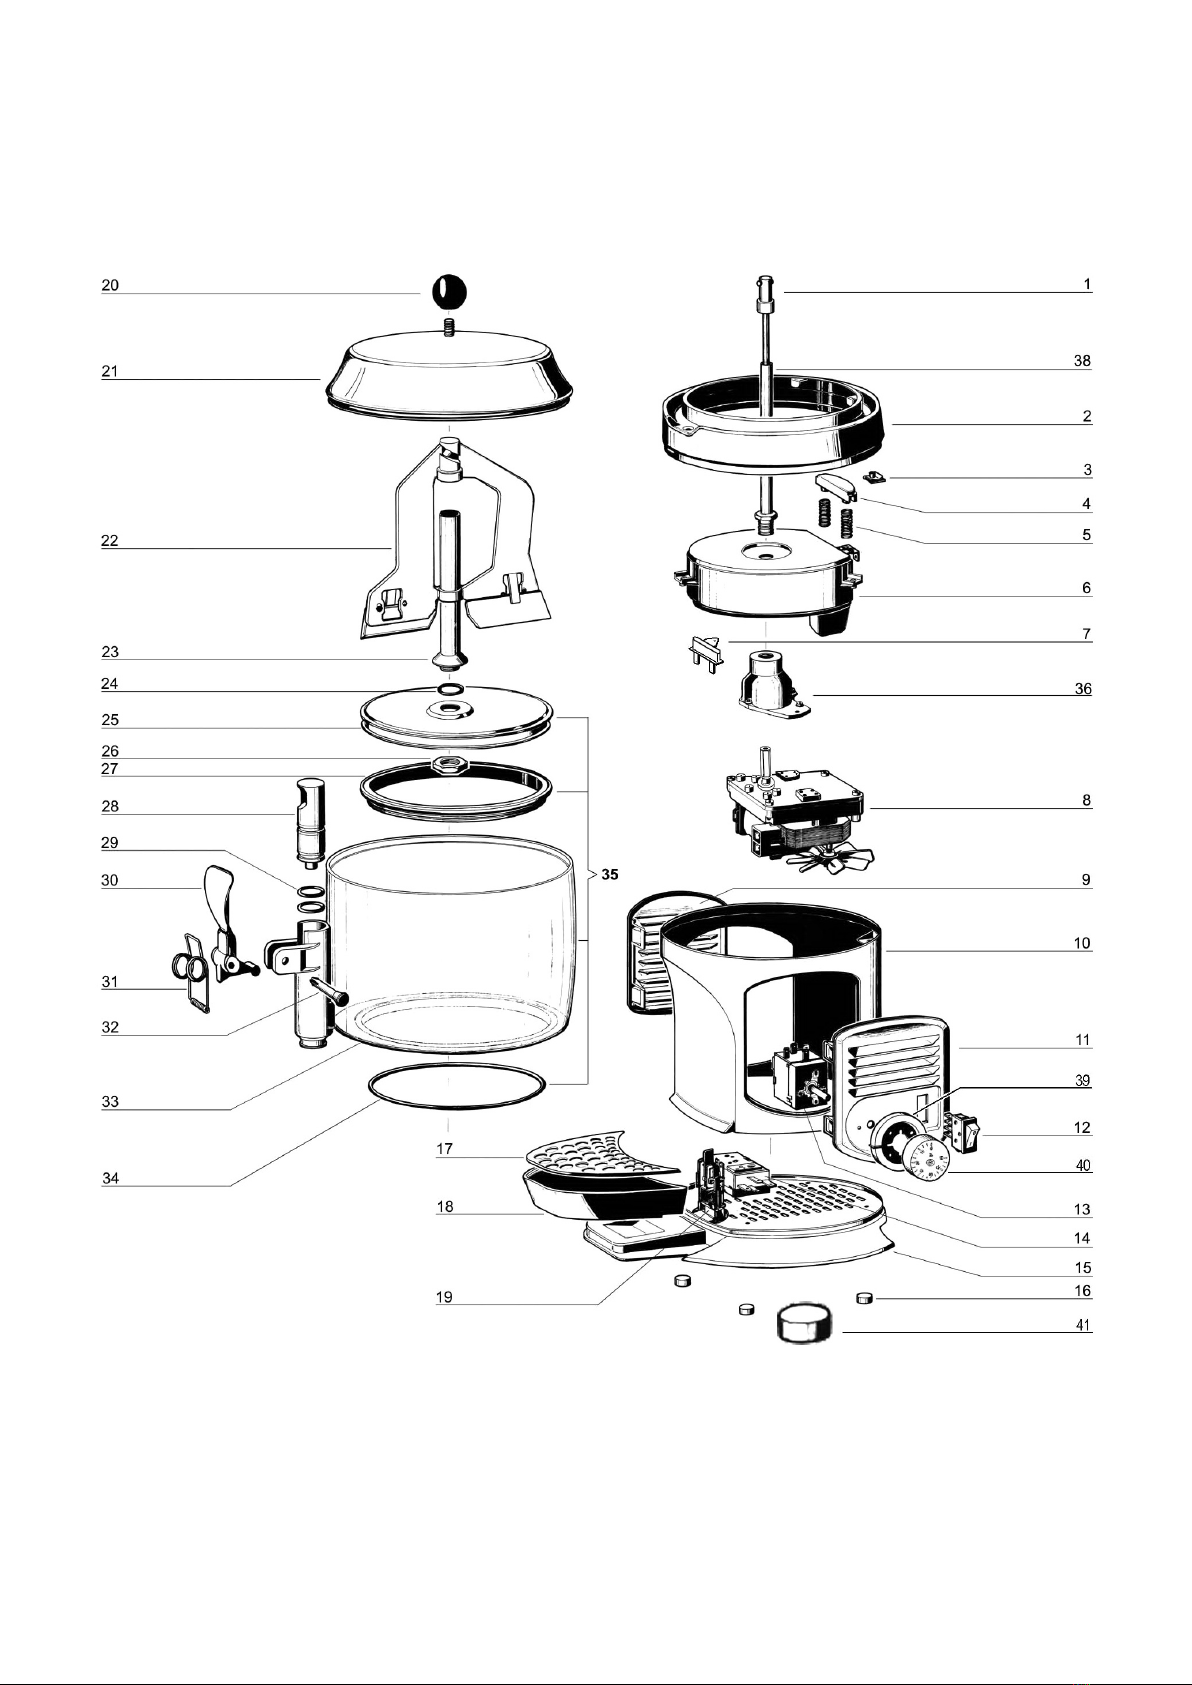
CHOCOLATE DISPENSER SPARE PARTS
1 Driving Shaft
2 Heating Plate Holder, Heating Plate Holder Gold
4 Thermostat Bulb Holder
5 Spring for Bulb Holder
6 230V 50Hz Heating Plate, 120V 60Hz Heating Plate
7 Limit Switch
8 230V 50Hz complete Gear Motor, 120V 60Hz complete Gear Motor
10 Cabinet
12 Switch
13 5-95º Thermostat
14 5-125º Thermostat
15 Base
16 Rubber Leg
17 Drip Tray Cover
18 Drip Tray
19 Strain Relief
20 Terminal Block
21 Bowl Cover
22 Plastic Mixer
22-1 Plastic Mixer Base
23 Bowl Shaft
24 Bowl Shaft O-Ring
25 Bowl Bottom Plate
26 Central Shaft Nut
27 Bowl Gasket
28 Faucet Piston
28-1 Plastic Lid covered on the top of Faucet
29 Faucet Piston O-Ring
30 Faucet Handle
31 Faucet Spring
32 Faucet Handle Pin
33 Bowl
34 Bowl O-Ring
35 Bowl Assembly
36 Gear Motor Flange
38 Central Shaft
40 Thermostat Knob
41 Thermostat Knob on Base

14
CONTACTING SEPHRA INFORMATION
Sephra Europe Ltd.
Unit 2, Block 9, Muirhead,
Mitchelston Industrial Estate,
Kirkcaldy, Fife, Scotland, KY1 3PE
+44 (0)1592 656 737
info@sephraeurope.com
www.sephraeurope.com
Sephra L.P.
11035 Technology Place, Suite 100
San Diego, CA 92127
Rev. 6-12
www.sephra.com
© Sephra LP © Sephra Europe - Sephra* is the registered trademark of Sephra, L.P.


Web: www.sephraeurope.com / Email: info@sephraeurope.com
Sephra Europe, Unit 2, Block 9, Muirhead, Mitchelston Industrial Estate, Kirkcaldy, Fife, Scotland KY1 3PE
Tel: +44 (0)1592 656 737 / Fax: +44 (0)1592 653 535
This manual suits for next models
5
Table of contents


