Sepura Home SUP-001-02 User manual

USER GUIDE

USER GUIDE
Sepura Home
SUP-001-02

Dear you,
From all us here at team Sepura, thank you so much for
supporting us. When our founder, Victor, was hunched over
under his kitchen sink disassembling his plumbing after a
bad ordeal with potato peels and a garbage disposal, he
knew there must be a better way of disposing of food waste.
Thousands of conversations, tens of thousands of man
hours, years of tinkering, and support from customers like
you have gotten us to this point. Now it's time for you to
step into the world we've been living in for the past few
years: the world of Sepura.
I'm sure we don't need to tell you this, but when food waste
is improperly disposed of, it typically ends up in landfills and
produces a LOT of greenhouse gases like methane and
carbon dioxide.
By choosing Sepura, you're doing your part to divert that
food waste away from landfills. Thank you.
540,000
240,000
1
kg food waste diverted from landfills by Sepura
happier planet
1
In the next 12 months...
- Team SEPURA
kg of CO emissions diverted by Sepura
2

IMPORTANT SAFETY INSTRUCTIONS
& WARNINGS
2
Suggested Practices
Liquids
Grease and Oils
Coffee Grinds
Refrain from pouring water or liquids down the
drain as Sepura is running to avoid getting liquids
into the Collection Centre.
Sepura can handle hardened grease. If still liquid, or
in the case of cooled oils, place directly into the
Collection Centre to avoid sending it down the drain.
Empty coffee grinds directly into the Collection
Centre to avoid sending it down the drain.
Do not put your
hands down
the drain. While
Sepura doesn't
have any
blades, fingers
can still get
pinched if
caught in the
auger (and
trust us, it
hurts).
If ice cubes are
placed in your
sink, make sure
these melt
before running
Sepura,
otherwise they
will create
unwanted
water in the
Collection
Center.
If Sepura loses
power, make
sure the valve is
closed by
reaching under
the carbon filter
and manually
closing the
valve. (see
Troubleshooting
page)
Paper Towel
While Sepura can process paper towel,
occasionally wet paper towel will get stuck until
something else knocks it free.
Be mindful of
what you pour
into your drain
as it could end
up in your
compost. If you
pour in a toxic
chemical, make
sure to rinse
carefully before
running
Sepura.
Don't Reach Ice Cubes Lost Power Chemicals
SAVE THESE INSTRUCTIONS

Parts Included
3
3-bolt sink mount
x 6
Drain Assembly
Side Clips
Screws
In addition to the beautiful Sepura unit you've received,
there are a few parts you need to make sure that Sepura is
installed correctly.
Wall Adapter
Separator
Collection Center
Bucket and Lid
Carbon Filter
Button

Dimensions
4
It's important to create enough room for Sepura under
your sink before beginning installation.

Table of Contents
5
Removing an existing garbage disposal?
Introduction ..................................................................................................................... 1
Warnings ........................................................................................................................... 2
Parts Included ................................................................................................................ 3
Dimensions ..................................................................................................................... 4
Removing Garbage Disposal ............................................................................ 6-7
Ready to install the 3-bolt sink mount?
Installing Mount ....................................................................................................... 7-8
Ready to install Sepura?
Installing Sepura ...................................................................................................... 9-11
Turning on Sepura ............................................................................................... 12-13
Installing Sepura's Button ..................................................................................... 14
Troubleshooting ......................................................................................................... 20
Using Sepura ................................................................................................................. 15
Using Sepura
Status Indicator Lights ...................................................................................... 16-18
Regular Use ....................................................................................................... 16
Booting Up ......................................................................................................... 16
Warnings ............................................................................................................. 17
Software Updates .................................................................................... 17-18
Bin Calibration ................................................................................................. 18
Maintenance ................................................................................................................. 19
Installation
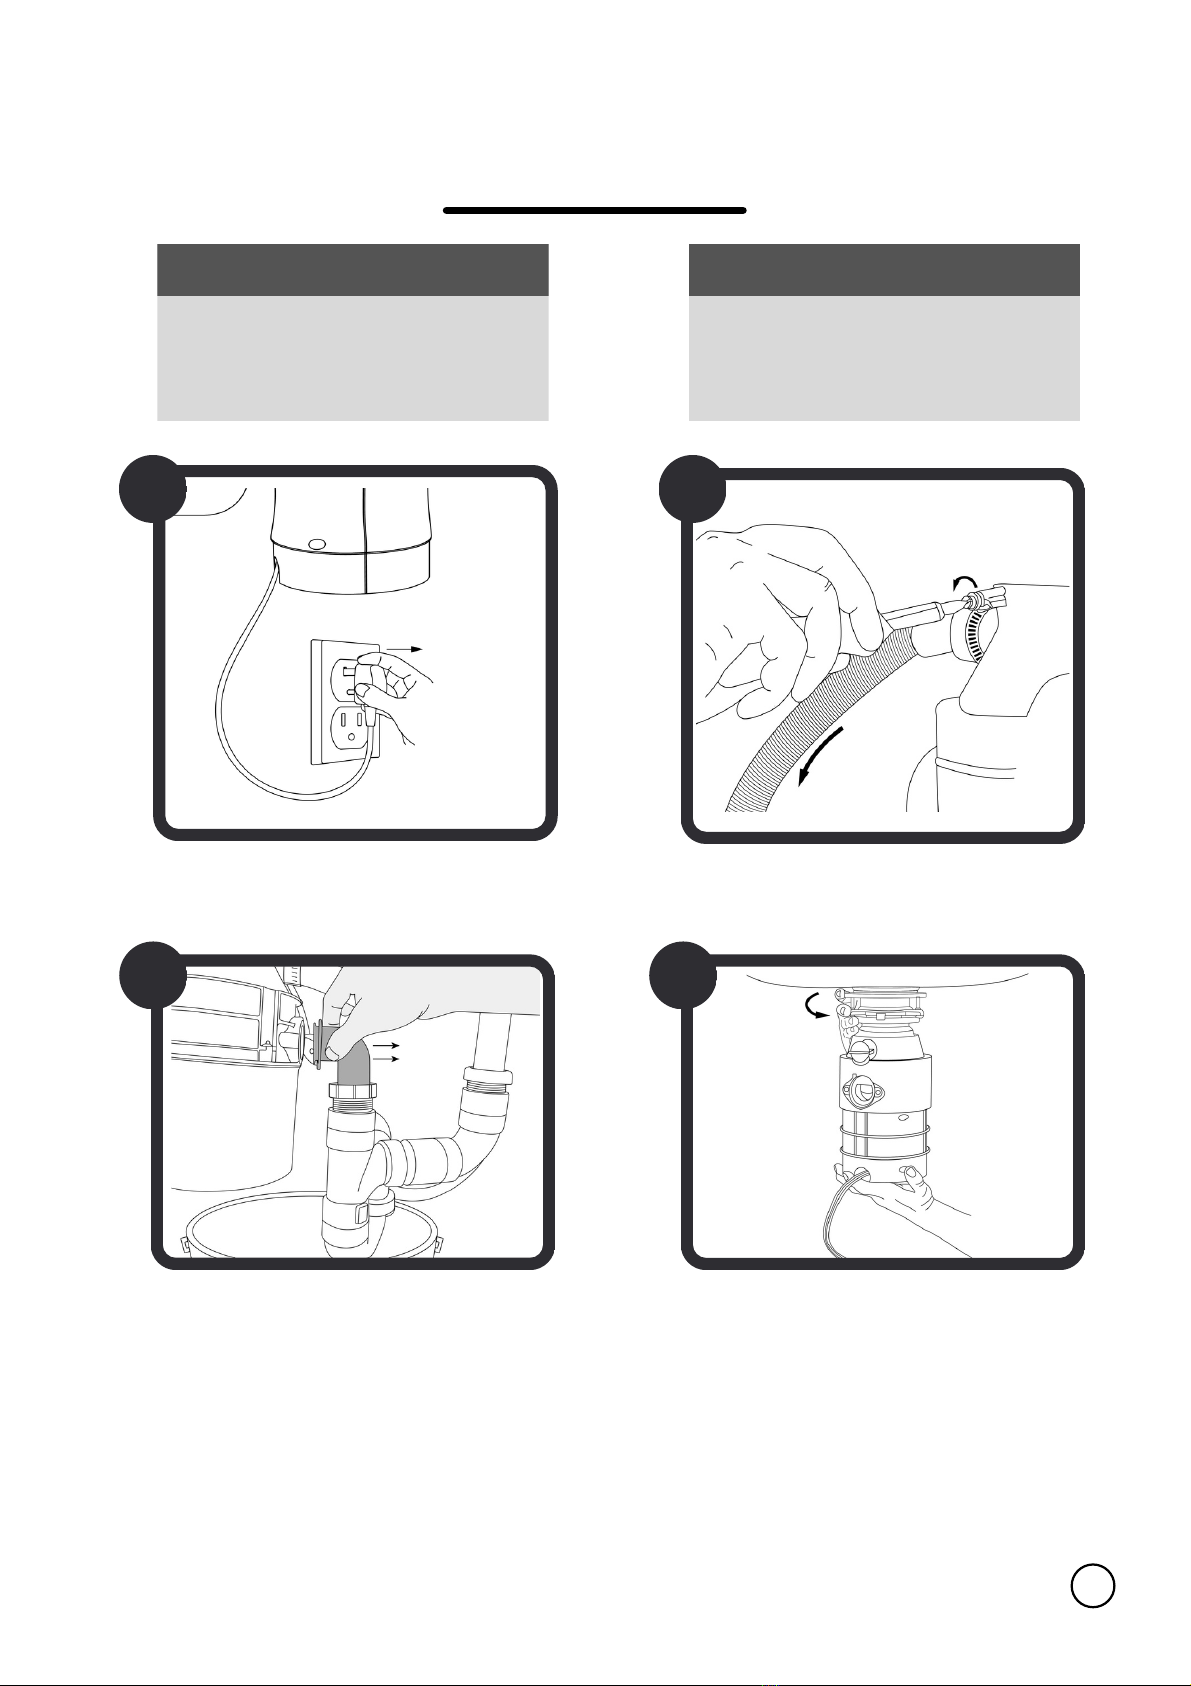
Removing Garbage Disposal
6
1
Unplug your old garbage
disposal unit.
Disconnect the dishwasher drain
tube (if installed).
3
Disconnect the drain pipe from
the rest of the plumbing (there
might be some water that drips
down at this stage, so have a
bucket handy).
4
Twist the sink mount ring
attached to free the garbage
disposal (if stuck, use your
screwdriver inside the loops to
create leverage). The disposal
unit is heavy, so prepare for that
to avoid damage to your
plumbing.
WARNING
Shock Hazard
Turn off electric power at fuse box or
circuit breaker.
CAUTION
Clean drain line before installing
Sepura. Failure to do so may result
in drain line blockage.
2

7
WARNING CAUTION
Wiggle the unit free and
remove it from under your sink.
5
Installing Mount
Plumber's
Putty
Screwdriver
A
WHAT YOU'LL NEED
Making sure all plumbing
below is disconnected and
out of the way,
unscrewing the strainer nut
below the sink to free up the
strainer flange for removal.
If needed, remove your sink's
previous strainer by:
B
Remove the flange by pushing
up underneath it and then
removing it from inside the sink.
Make sure any food waste and
glue residue is wiped clean and
dried before continuing.
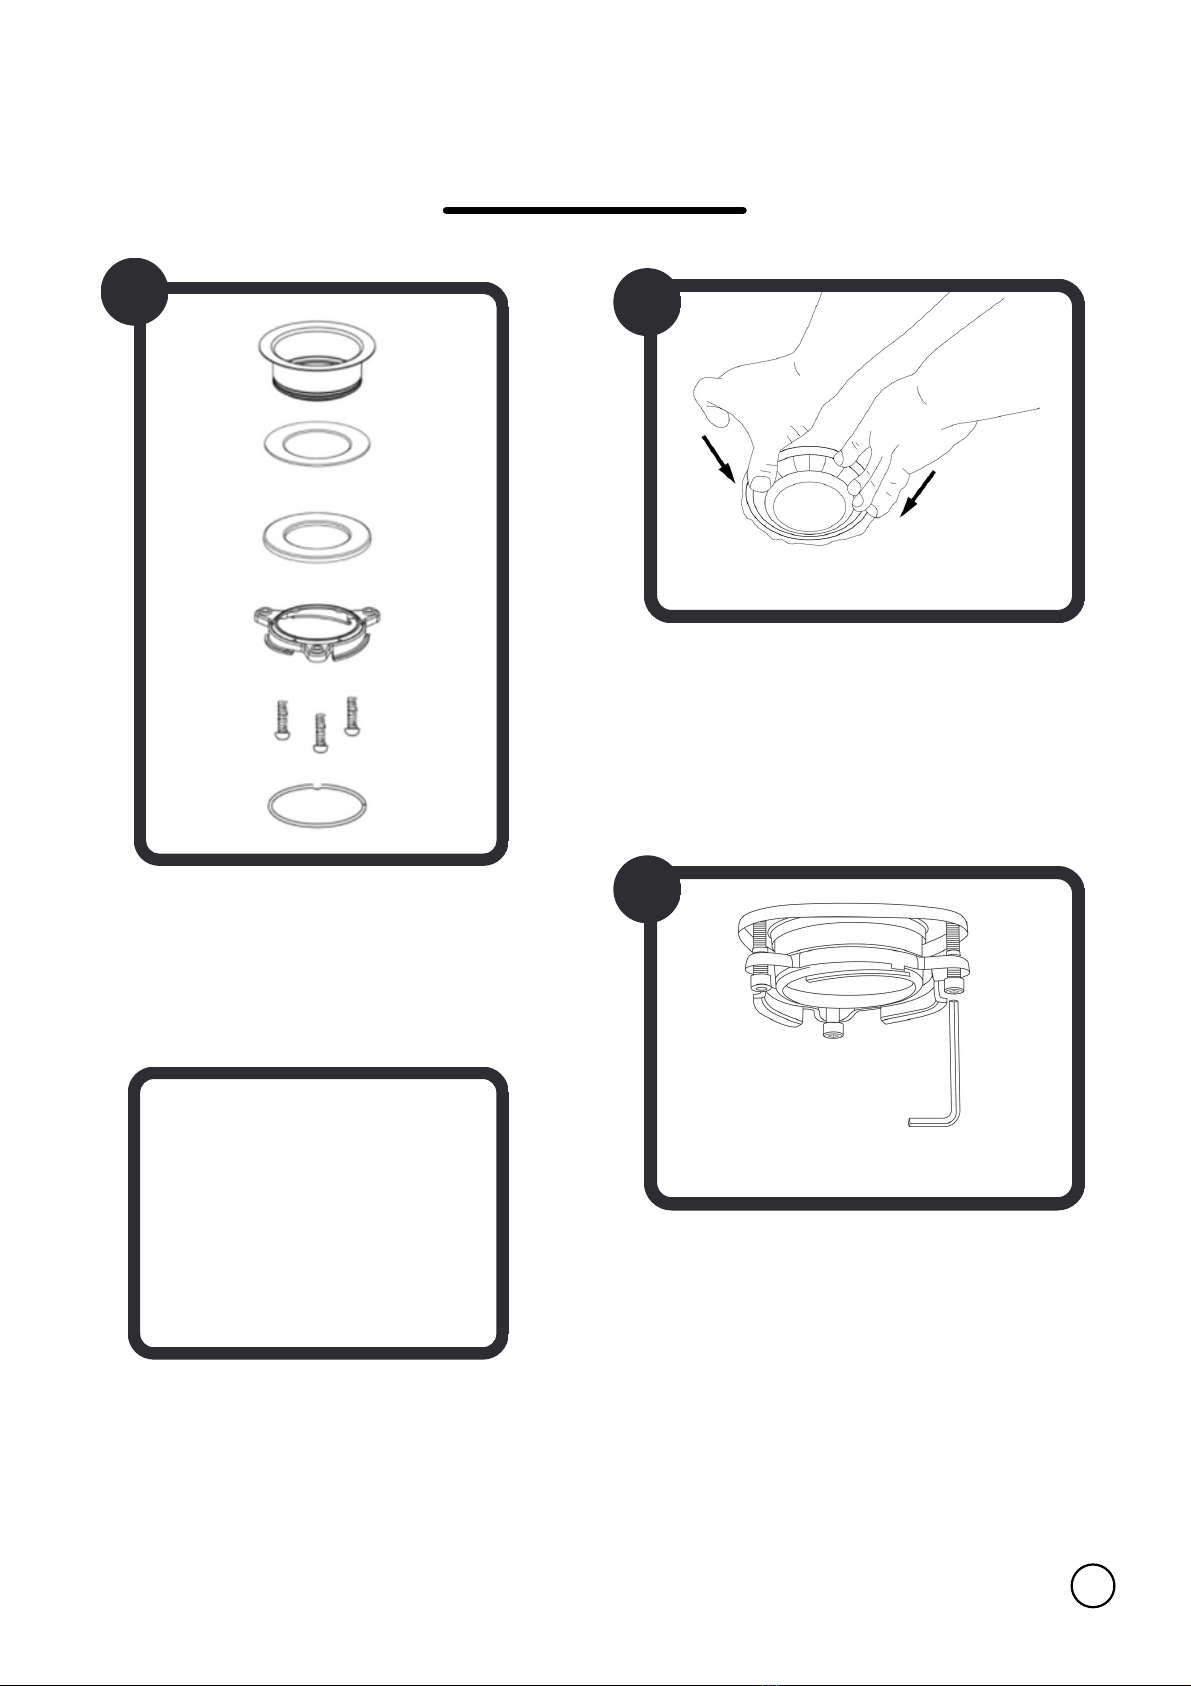
8
1
You can now grab the 3-bolt
sink mount from the box.
Separate the flange by
loosening the three bolts and
removing the snap ring.
2
3
Roll up the plumber's putty into a
thin, long roll and apply around the
bottom side of the flange ring.
Center the flange in your sink and
press down firmly to create a seal.
Go underneath your sink and re-
assemble the parts of the mount as
they were before. Use the snap ring
to lock them into place. Tighten the
3 bolts by increments like a car tire
to create an even space all around.
TIP
You can remove the
snap ring from the
sink mount with a flat
head screwdriver.
Installing Mount (continued)

Installing Sepura
9
Position the Separator under your
sink with the valve door and latch
facing you. Connect it to your sink
by twisting the bottom ring onto
the 3-bolt sink mount. Make sure
the Separator's gasket is in place
(in between the sink mount and
its drain opening) and to tighten
the mount's ring all the way up to
the notch, otherwise leaking can
occur. Then, connect the flexible
drain tube to your plumbing,
making sure it is watertight.
1
(OPTIONAL) Grab Sepura's
Separator component and if you
have a dishwasher drain, knock
out the plug with your hammer
and screwdriver.
2
Fasten the flexible drain tube at
the bottom of the Separator,
making sure it is watertight.
(Bolts might squeak when
fastening, this is normal.)
3
(OPTIONAL) If you have a
dishwasher drain, connect this
to the Separator's dishwasher
drain inlet. Make sure the plug
was knocked out in step 1.
4
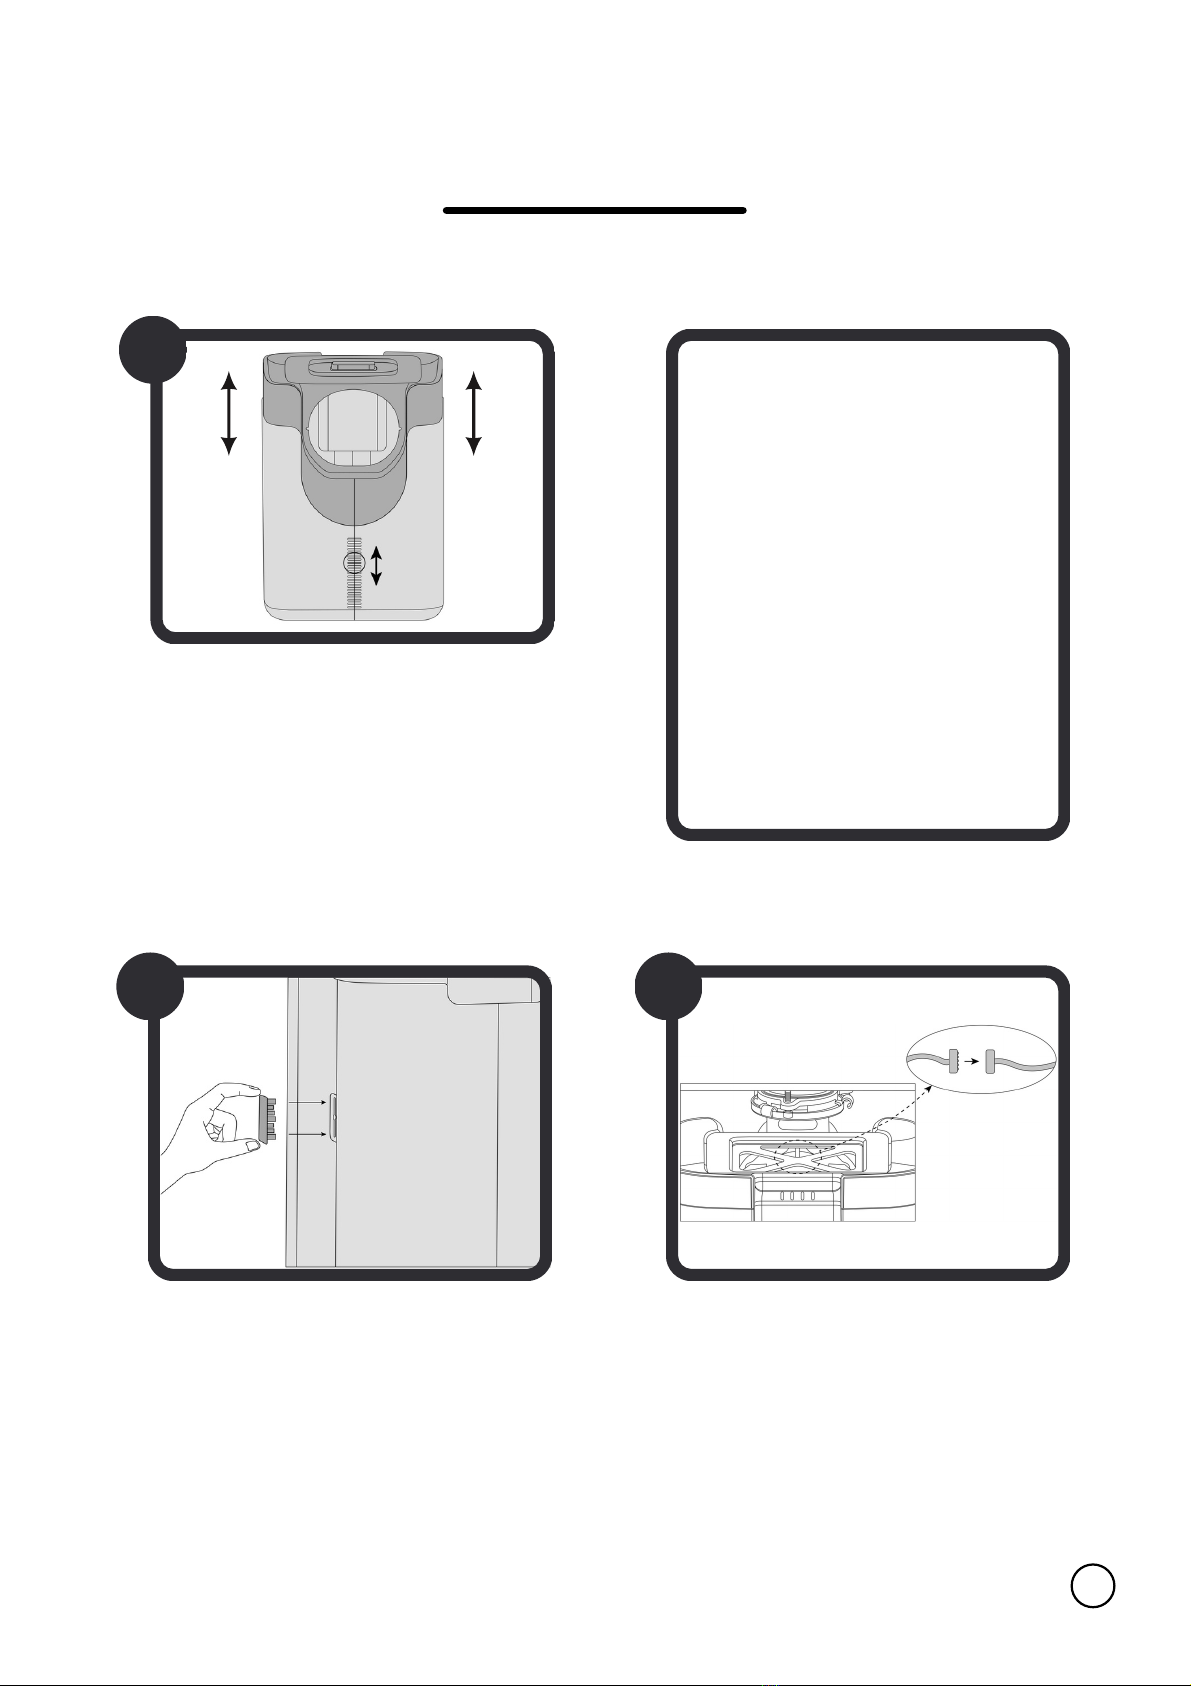
10
Now, grab Sepura's Collection
Center, remove the bucket and
lid inside, and slide into place
with the door facing you. Adjust
its height by sliding the top
compartment until the
Separator component fits inside
the back opening.
TIP
Remove the entire
door/tray of the
Collection Center
with the quick-
release tabs on the
rails so it is easier to
work with.
5
6
Once a height is reached where
the Separator can fit through
the back opening of the
Collection Center freely, lock the
height in place with the side
clips.
7
Press the Collection Center up
against the Separator's foam
ring. Then, reach in through the
opening at the top and connect
the data cable.
Installing Sepura (continued)
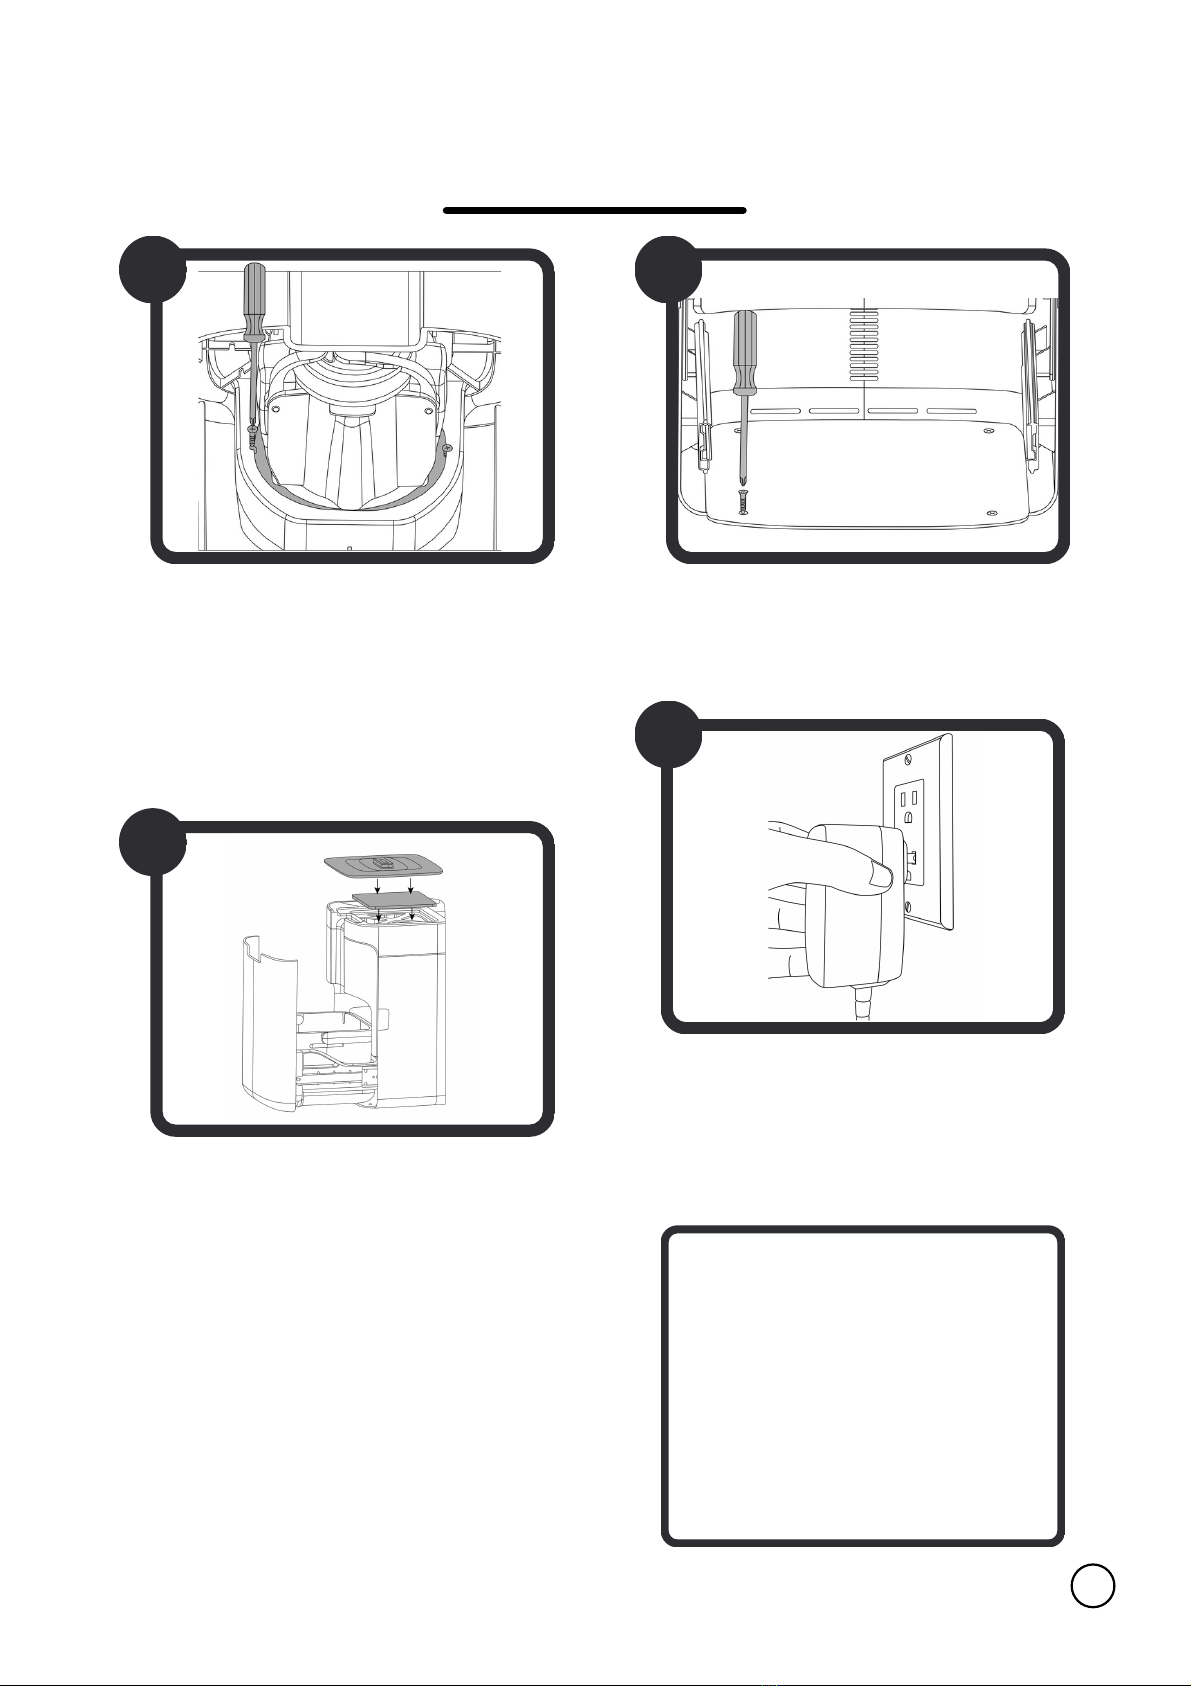
Installing Sepura (continued)
11
Make sure the Collection Center
is pressed up against the
Separator's foam ring to create
an air-tight seal, then use the 2
small screws provided to fasten
the two together.
Secure the Collection Center
into the baseboard with the 4
wood screws left.
Re-install the door if you
removed it, and place the
bucket inside. Remove the
carbon filter from its packaging
and place on top of the
Collection Center. Remember to
remove the lid from the bucket
and to place it on top of the
carbon filter as well.
8 9
10
11
Plug Sepura in and make sure
your wall socket has power (this
can now stay on indefinitely).
CHECKPOINT
The lights on the front
of the Collection Center
should now be on!
Please follow the next
steps to finish setting
up Sepura.

3
Turning on Sepura
1
Once plugged in, you will notice a
multi-colored light animation
display on the Collection Center's
LED lights.
2
Sepura will then create an Access
Point to connect to Wi-Fi. Its
progress will be shown by the
lights loading in green. Once the
Access Point is ready, the lights
will blink slowly green.
Next, connect Sepura to your
home Wi-Fi by going into the Wi-
Fi settings of your phone and
looking for the Sepura-Home
network. Depending on different
home networks, this may take up
to 10 minutes to be visible.
4
12
Once connected, this will open
our splash page. If this does not
open automatically, check your
notifications or type in your
modem's IP address in the
search bar of your browser (e.g.
192.168.1.1). This should
automatically redirect you to our
splash page.
Sepura-Home

13
5
Once on the splash page, hit
the "Scan Wi-Fi" button, this
will display a list of all available
networks. Select your home
Wi-Fi (note that only 2.4GHz is
accepted), scroll down and
enter your Wi-Fi password and
hit Connect.
6
During calibration, the lights will
progressively light up white. Once
successful, the first light will flash
white, before staying on to
indicate it is now in Normal Mode.
7
Next, it is important to calibrate
the sensors onboard the
Collection Center to its newly
adjusted height so it can
accurately display how full it is.
While still on the Splash Page,
hit the "Bin Calibration" button
to do that.
8
Once connected, the lights on the
Collection Center will flash green
and a message will also appear on
the splash page indicating a
successful connection.
Turning on Sepura

14
Installing Sepura's Button
I
Once the area is completely dry,
remove the adhesive backing from the
button.
II
III
Press the button, adhesive side down,
firmly into place. Wait 24 hours before
wetting the area again.
Test it out! Your Sepura unit should
now be ready to use.
CHECKPOINT
Decide on where you'd like to place your button. Once placed, you can't
move it. Make sure the area is wiped clean and completely dry.

Using SEPURA
15
Your Sepura unit is always learning and improving through
over-the-air updates. Please visit sepurahome.com/guide for
the most up to date information.
Normal Mode Flooded Mode Stuck Mode
To run Sepura,
simply click the
button. This will
open the
separator's valve
and your unit will
begin the
separation
process. Sepura
will turn itself off
after a few
seconds, or you
can click the
button again to
turn it off sooner.
If you try to turn
Sepura on while
the water level in
your sink is too
high, Sepura will
keep its valve
closed to prevent
liquids from
entering the
Collection Center.
Once enough
liquid has drained,
Sepura will then
start the separation
process on its own.
If too much food
waste or a solid
item like a fork
gets accidentally
dropped into the
Separator, Sepura
will try to free
itself. If that fails, it
will back up, stop
and beep. After
you hear the
beep, you can
then remove the
item.
PLEASE NOTE
You do not need to run water while
Sepura is turned on.
CAUTION - INJURY RISK
While Sepura has no blades, having
your finger get caught can cause
injury. Do not reach down the drain
with your bare hands.

Status Indicator Lights
16
Regular Use Bin Capacity
White lights indicate how full the bin is inside
the Collection Center.
empty half full almost full full
(steady white)
Booting
While Sepura is booting, a lights animation will
display in blue, green, pink and white.
(loading multicolor)
Booting Up
Creating Access Point
While Sepura is creating its Wi-Fi hotspot, lights
will progressively light up green.
(loading green)
Access Point is Live
Once the Sepura-Home hotspot is created,
lights will slowly blink green.
(slow blinking green)
Successfully Connected to Home Wi-Fi
After connecting Sepura to your home’s Wi-Fi,
lights will flash green twice when successful.
(blinking green)

17
Bin Too Full
Lights will flash white when the bin inside the
Collection Center is full.
(blinking white)
Warnings
Stuck
If Sepura gets stuck, lights will flash blue until
you safely remove the object obstructing it.
(blinking blue)
Flooded
If sink is full of water, lights will flash yellow
until Sepura is free to run again.
(blinking yellow)
Something Went Wrong
If lights are breathing red, factory reset Sepura
by clicking the button 4 times, waiting until the
lights turn purple, and then clicking the button
once more.
(slow blinking red)
Long Press (10 seconds)
Press and hold button until white lights flash
once to start the over-the-air update.
(flash once white)
Software Update

18
Connecting to Wi-Fi
Lights will progressively light up blue as Sepura
connects to your home Wi-Fi.
(loading blue)
Updating
While Sepura is undergoing an over the air
update, lights will breathe white.
(slow blinking white)
Update Successful
Once Sepura has updated successfully, lights
will flash white.
(blinking white)
Extra Long Press (15 seconds)
Press and hold button until white lights flash
twice to start calibration.
(flash twice white)
Bin Calibration
Calibrating
While the Collection Center is calibrating, lights
will progressively light up white.
(loading white)
Calibration Successful
Once calibration is successful, the first light
will flash white.
(blinking white)
Table of contents
Languages:
Popular Kitchen Appliance manuals by other brands

U-Line
U-Line UHBV024-SG00A User guide & service manual

Waring
Waring WSC160 user manual

Marcato
Marcato Atlas 150 Wellness Instructions for use and maintenance

cozze
cozze COZEL1PI13-1-EU user manual

Wood Stone
Wood Stone CASCADE WS-GFR-6 Installation and operation manual

Centurion
Centurion PN120 instruction manual


U-Line
U-Line Wine Captain UHWD524 User guide & service manual

cecotec
cecotec FUN CHOCOLICIOUS instruction manual

LEM
LEM SP3 Use and maintenance instructions

Philips
Philips HD2145/72 user manual

Küppersbusch
Küppersbusch EEH 630.0 Instructions for use and installation instructions

Elma
Elma PROFESSIONAL DIGIT 15 user manual