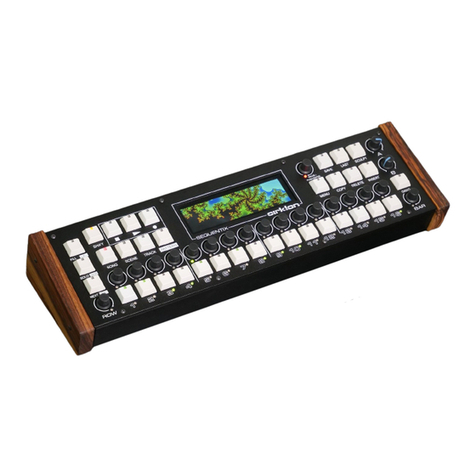
Sequentix P3 SEQUENCER User manual

SEQUENTIX MUSIC SYSTEMS Ltd.
P3 SEQUENCER
OPERATION MANUAL
V3.1.006
© 2006


Sequentix Music Systems
P3 Sequencer User Manual Page 3
Introduction................................................................................................................................................ 6
Getting Started............................................................................................................................................ 8
Making Connections............................................................................................................................... 8
Instant Gratification.............................................................................................................................. 10
Play Mode.......................................................................................................................................... 10
First Pattern Edit................................................................................................................................ 11
Modes of Operation .............................................................................................................................. 15
Play mode ................................................................................................................................................. 16
Tracks.................................................................................................................................................... 16
Parts....................................................................................................................................................... 17
Part Select .......................................................................................................................................... 17
Parts Are Not Patterns!...................................................................................................................... 18
Part Chains ........................................................................................................................................ 19
Changing Mode .................................................................................................................................... 21
Pattern Edit........................................................................................................................................ 21
Playlist Edit........................................................................................................................................ 21
Play Mode Pages and Soft-keys............................................................................................................ 22
Selecting Pages .................................................................................................................................. 22
Page 1 -Bank / FTS / Tune................................................................................................................. 23
Page 2 -Part Settings ......................................................................................................................... 30
Page 3 -Part Functions...................................................................................................................... 33
Page 5 -MIDI Config......................................................................................................................... 35
Page 6 -Bank functions..................................................................................................................... 40
Page 7 : Sysex & User Config............................................................................................................. 42
Other Play Mode Features .................................................................................................................... 45
Play Mode Knob Use......................................................................................................................... 45
Fine Tempo Adjust............................................................................................................................ 45
Status LED Displays .......................................................................................................................... 46
GBar Pos and Playlist Hold ............................................................................................................... 46
Pattern Edit............................................................................................................................................... 47
What’s In A Pattern? ............................................................................................................................. 47
Editing Step Values............................................................................................................................... 48
UPPER MODE................................................................................................................................... 48
Viewing numeric row values ............................................................................................................ 51
STEP MODE...................................................................................................................................... 52
Assigning and Using Auxiliaries .......................................................................................................... 56
The Aux Config Page......................................................................................................................... 57
Editing Aux Values............................................................................................................................ 61
Summary of Aux Usage .................................................................................................................... 63
Pattern Edit Pages and Soft-keys.......................................................................................................... 64
Selecting Pages .................................................................................................................................. 64
Page 1: Timebase and Sync................................................................................................................ 66
Page 2: Direction and Last step ......................................................................................................... 68
Page 3: Clear, Copy & Paste .............................................................................................................. 70
Page 4: Rotate and Shuffle................................................................................................................. 73
Page 5: The Note Randomizer........................................................................................................... 75

Sequentix Music Systems
P3 Sequencer User Manual Page 4
Page 6: The Upper Randomizer ........................................................................................................ 77
Page 7: Sculpt..................................................................................................................................... 79
Page 8: Config.................................................................................................................................... 81
Other Pattern Edit Functions................................................................................................................ 83
Quick Config...................................................................................................................................... 83
Quick Mute Access............................................................................................................................ 83
Leaving Pattern Edit ............................................................................................................................. 84
Save To............................................................................................................................................... 84
Playlist Edit ............................................................................................................................................... 86
Why Playlists? ....................................................................................................................................... 86
What’s Really In A Part? ....................................................................................................................... 87
What’s In A Playlist .............................................................................................................................. 88
The Default Playlists ............................................................................................................................. 89
Editing A Playlist .................................................................................................................................. 90
Changing To Playlist Edit.................................................................................................................. 91
Playlist Edit Controls......................................................................................................................... 92
Playlist Edit Display .......................................................................................................................... 92
Playlist Edit LEDs.............................................................................................................................. 93
Selecting A Different Pattern............................................................................................................. 94
A Longer Playlist................................................................................................................................... 95
Leaving Playlist Edit ............................................................................................................................. 97
Some More Editing............................................................................................................................... 98
Playlist Views ........................................................................................................................................ 98
Back To The Playlist… ........................................................................................................................ 102
Step Repeats..................................................................................................................................... 102
Step Transpose................................................................................................................................. 103
Step Sync.......................................................................................................................................... 105
Other Features Of Playlist Edit ........................................................................................................... 109
Short-cut Playlist Creation .............................................................................................................. 109
GBar Pos and Playlist Hold ............................................................................................................. 110
Quick Mute Access.......................................................................................................................... 110
Real-time Record..................................................................................................................................... 111
Differences Between Play Mode, Playlist Edit and Pattern Edit ....................................................... 111
Pattern Edit...................................................................................................................................... 111
Play Mode & Playlist Edit ............................................................................................................... 111
Record Page 1 –................................................................................................................................ 112
Record Page 2 –................................................................................................................................ 114
Record Page 3 –................................................................................................................................ 115
Use With Caution! ........................................................................................................................... 116
Leaving Record Mode......................................................................................................................... 116
Arpeggio Capture................................................................................................................................... 117
Leaving Arpeggio Capture ................................................................................................................. 119
Remote Control....................................................................................................................................... 120
User Interface Controls ....................................................................................................................... 120
Remote Part Transpose (PXPos) ......................................................................................................... 121
Using Auxiliary Events........................................................................................................................... 122
Randomizing Pattern Values .............................................................................................................. 122

Sequentix Music Systems
P3 Sequencer User Manual Page 5
How Events Work ............................................................................................................................... 124
Inter Track Events............................................................................................................................... 127
A Quick Grab................................................................................................................................... 128
Auxes With Two Values.................................................................................................................. 128
Target Values For Grab, Swap and Push ........................................................................................ 131
Transpose By Events........................................................................................................................ 132
Aux Notes ........................................................................................................................................... 134
Chord Memory................................................................................................................................ 135
Polyphonic Real-time Record.......................................................................................................... 135
Accumulator Events............................................................................................................................ 136
What Is An Accumulator? ............................................................................................................... 136
Putting An Accumulator To Work .................................................................................................. 137
Relative Accumulation.................................................................................................................... 139
Accumulator Configuration............................................................................................................ 140
The Other Two................................................................................................................................. 144
Auxiliary Value Scaling................................................................................................................... 145
The Accumulator Events................................................................................................................. 146
Accumulator Mask Events.................................................................................................................. 147
Knob Mask Events .............................................................................................................................. 147
Knob Grab Events............................................................................................................................... 148
Set Step Value Events.......................................................................................................................... 149
Repeat Events...................................................................................................................................... 149
Redirect Aux Events............................................................................................................................ 150
Pattern Control.................................................................................................................................... 151
Global Control..................................................................................................................................... 151
Appendix A -Preset FTS Scale Definitions............................................................................................ 153
Appendix B –User Conf Options........................................................................................................... 155
Appendix C -Mem ory Organisation...................................................................................................... 157
Note on Playlist Edit for 3 Bank Configuration...................................................................................... 158
Appendix D -Miscellaneous Useful Info ............................................................................................... 159
P3Tools.................................................................................................................................................... 159
Memory Initialisation ............................................................................................................................. 159
SysEx Firmware Upgrade....................................................................................................................... 159
Index ....................................................................................................................................................... 161

Sequentix Music Systems
P3 Sequencer User Manual Page 6
Introduction
It's fair to say that the word 'sequencer' has undergone a significant change in meaning since the first
devices to be called sequencers appeared, not long after the advent of the first synthesizers.
Most people nowadays think of a sequencer as a piece of computer software which provides multi-
track recording and playback of MIDI data, in a manner vaguely similar to a multi-track tape recorder.
Many sequencer applications now include audio facilities, and even virtual effects processors and
software synthesizers.
However the first sequencers, known retrospectively as analogue sequencers, were altogether
different.
An analogue sequencer was a desktop unit or synthesizer module, typically dominated by a bank of
knobs or sliders, each of which could be used to adjust the tuning of one step in asequence.
The sequencer circuitry would pass a voltage output from each knob or slider to a common CV output,
stepping through each one in turn under the control of a master clock.
With the CV output driving asynthesizer's oscillators, and the clock output driving its gate, a short,
repetitive pattern of notes could be created.
The maximum number of steps in a sequence was the number of knobs on the sequencer.
There was no storage of patterns, other than to leave the knobs in the same positions, and hope the
tuning didn't drift.
But ignoring these limitations, the analogue sequencer represented an entirely new kind of instrument
-one where the performer could dynamically interact with a pattern of notes without the burden of
actually playing them in real time.
The earliest devices, such as Raymond Scott's Circle Machine, were as likely to be used to create
abstract sonic effects as musical patterns. They brought forth a new range of rhythmic and melodic
ideas, and lead electronic musicians down interesting new paths.
The P3 Sequencer is a modern take on the analogue sequencer, but it takes the concept much further.

Sequentix Music Systems
P3 Sequencer User Manual Page 7
P3 is a pattern-based, 8 track hardware MIDI sequencer. Its user interface and primary method of
pattern entry are based directly on the classic analogue sequencers.
But it adds full storage and recall of patterns, can simultaneously drive multiple MIDI synths or
samplers each playing different patterns, allows chaining of patterns to make longer musical phrases
than the basic 16 steps, and also features sophisticated pattern modulation options.
In addition, it allows real-time capture of note input from a MIDI keyboard, so you can use P3 like a
more typical hardware MIDI sequencer if you want.
P3 allows real-time control of track mutes and simple pattern and pattern chain selection across
multiple tracks, plus analogue style editing of patterns with separate note, velocity, tie, gate, length,
gate delay, and a combination of up to four MIDI controllers, extra notes, or programmatic functions,
per step.
The unique programmatic functions, called auxiliary events, allow the simple creation of patterns that
can dynamically grab values from the patterns on other tracks, randomize step values, alter pattern
and global settings, and more -including modulation accumulators that can be configured as LFOs,
perform arpeggiation effects or enable complex self-modifying patterns.
A non-destructive Force-to-Scale function provides preset and user-defined scales to keep everything
in key (but defeat-able per pattern step if required), and a special pattern sync option allows patterns
with different lengths and/or timebases to free-run, or be synced to a global bar.
Building on ideas from various vintage and modern analogue sequencers and drum machines, P3 has
been designed to provide a direct and intuitive method for creating pattern-based electronic music.
That's not to say it will automatically do it all for you -there is a learning curve involved. To get the
best from P3 you will need to familiarise yourself with the various modes of operation, pattern and
playlist values, track and configuration settings. So, read on...

Sequentix Music Systems
P3 Sequencer User Manual Page 8
Getting Started
Making Connections
Before you can make any music with P3, it must be connected to a power supply and a MIDI
synthesizer,sound module or MIDI to CV convertor and analogue synthesizer.
The rear panel connections look like this:
From left to right, the sockets are:
•SYNC output, which carries both a clock-only MIDI signal and DIN Sync 24
•four parallel MIDI outputs (all carry the same signal –it’s a built-in thru-box)
•MIDI input
•Power supply input
The MIDI and SYNC connections are all standard 5-pin DIN sockets.
The power supply input is a 2.1mm barrel-type connector.
P3 needs a supply of 9 volts DC with centre positive polarity, or 9 volts AC.
Current rating must be at least 400mA.
With a power supply and suitab le MIDI instrument attached, you can power-on and start making
music…

Sequentix Music Systems
P3 Sequencer User Manual Page 9
P3 Sequencer front panel control diagram

Sequentix Music Systems
P3 Sequencer User Manual Page 10
Instant Gratification
Before looking at the operation of P3 in depth, let’s take a quick look at how to get a basic pattern
running and making some noise.
To save time explaining the configuration options, connect a MIDI device to P3 which will respond on
MIDI channel 1.
P3 ships with sample patterns in most memory locations, but bank 1 will be empty, and will be
selected at first power-on.
Track 1 will be assigned to MIDI channel 1.
Play Mode
P3 has three different modes of operation, each of which use the front panel controls in a different way.
The default mode at power-on is play mode.
Play mode allows the muting and un-muting of tracks, selection of parts, and access to various control
and configuration options.
These will all be described later.
On the Right Track
All we are concerned about right now is that track 1 is active.
In play mode, the first eight step keys, as shown below,are used primarily for muting and un-muting
tracks:
The LED above track 1should be green,showing that the track is active.
If the LED is off,the track is muted –in which case, press TRACK key 1and the LED will turn on.
The status of the other tracks doesn’t matter for now.

Sequentix Music Systems
P3 Sequencer User Manual Page 11
First Pattern Edit
To create a pattern, you must switch to pattern edit for track 1 as follows:
•hold the PLAY/EDIT key in the centre of the keypad
•press and release TRACK key 1
You will now be in pattern edit, editing the pattern on track 1.
To confirm this, there will be an inverse-video “E”character in the top right of the alphanumeric
display. The display should look like this:
All of the step LEDs will be off.
On The RUN
P3 is designed so that you never need to stop playback for anything other than bulk memory dump
operations.
So let’s start P3 running before you enter any pattern data.
Press the RUN key, at the bottom left of the keypad:

Sequentix Music Systems
P3 Sequencer User Manual Page 12
You should now see a blip of green running across the step LEDs, showing the current playback
position in the pattern.
You can adjust the tempo using the TEMPO knob at the bottom right of the panel if required, and see
the green blip change speed.
Setting Gates
In pattern edit, the 16 step keys are used to toggle status values in a pattern on or off.
There are several status values for each step in a pattern, but the most important is gate.
When you first enter pattern edit, the step keys are assigned to gate, as shown by the status LED just
above the STEP MODE button,labelled GATE:
Gate controls whether a note will be played on each step in the pattern or not.
With P3 running, start pressing some of the step keys, 1to 16, to turn steps on and off.
An active gate status is shown by the LED above the step lighting up red, like this:
As the green blip passes each step with gate active, you should hear a note playing on the attached
instrument.
They’ll all be the same note so far, but it’s a start.

Sequentix Music Systems
P3 Sequencer User Manual Page 13
Setting Note Values
Now let’s change som e of the note values.
This is done using the lower row of 16 knobs, which are labelled NOTE:
Simply turn the note knob sabove each step to edit the note on that step.
The note value will jump to the current knob position as soon as you move the knob, and will be
shown on the top line of the display, like this:
When you stop moving the knob, the display will return to normal after a second or so.
Now that you can choose which steps will play notes by setting gates, and select different notes with
the knobs, let’s look at the upper row of knobs.
Setting Velocity Values
On entering pattern edit, the UPPER knobs are assigned to edit the MIDI velocity on each step.
As with the step keys, there are other values the upper knobs can be used to edit. These are selected
using the UPPER MODE button, with the chosen value shown by one of the four status LEDs below.
For now we’ll just look at velocity .
As you turn the upper knobs, the top line of the display will again show the new values you are
setting, like this:
Go through your pattern, and set a different velocity value on each step. You should hear this having
an effect on your attached instrument as the pattern plays.

Sequentix Music Systems
P3 Sequencer User Manual Page 14
Saving The Pattern
By now you should have a basic pattern running, can edit note and velocity values, and control the
rhythm using the gates.
Once you’ve had fun with that for a while, let’s save the pattern, and get on with looking at the rest of
P3.
To exit pattern edit, press the PLAY/EDIT key once more.
Soft-keys
Since there are so many functions in P3, it would be impractical (read: very expensive) to provide a
dedicated key for each, so a system of soft-keys is used.
The soft-keys are labelled F1, F2 and F3, and are found on the top row of the keypad, just below the
display.
When you exit pattern edit, a special page appears that allows you to decide whether to keep your
edited pattern or not.
Three soft-key options appear on the bottom line of the display, like this:
This table shows the effect of these options:
Key Label Function
F1 save Store the edited pattern, and return to play mode
F2 back I didn’t mean to press PLAY/EDIT, return to pattern edit
F3 lose Lose any changes to the edited pattern, and return to play mode
You’ll want to save your first masterpiece, so press F1 –“save”.
P3 will return to play mode, and continue playing your saved pattern.

Sequentix Music Systems
P3 Sequencer User Manual Page 15
Modes of Operation
Now that you’ve had P3 play some notes,and hopefully satisfied the usual urge to get a new bit of
equipment doing something as soon as possible, let’s look in more depth at the full feature set.
P3 has three modes of operation.
These are:
•Play mode for control of track mutes, part selection, etc.
•Pattern edit for creation and editing of patterns
•Playlist edit for selection of patterns, or pattern chains
Play mode is the main operation mode of P3, so let’s look at it first.

Sequentix Music Systems
P3 Sequencer User Manual Page 16
Play mode
In each P3 mode, the keys, knobs and LEDs on the P3 panel take on different functions and m eanings.
This diagram shows their functions for play mode:
Tracks
The first eight step keys are called the track keys in play mode.
They are mainly used for muting and un-muting each track.
There are eight tracks in P3, so there are eight track keys, labelled TRACK 1 to 8on the panel.
If the track is active, the LED above the track key will be green .
If the track is muted, the LED will be off.
When P3 is running, only active tracks play notes.
Each track is able to play one pattern at a time, from a set of patterns unique to that track.
Normally there are 8 patterns for each track, a total of 64 patterns per bank.
There are six banks, for a total of 384 patterns.
*TIP While there are always 384 patterns in total, it is possible to re-configure the way the patterns are
distributed among the banks.
P3 supports an optional 3 bank configuration, where each track gets 16 patterns per bank, and a 12
bank configuration, where each track gets only 4 patterns per bank.
Changing memory configuration is not recommended until you have used P3 for long enough to know
that your requirements differ from the standard memory layout.
Refer to the appendix on Memory Organisation for details.

Sequentix Music Systems
P3 Sequencer User Manual Page 17
Parts
The patterns that play on each track are controlled by parts.
Parts allow you to select different patterns simultaneously across all eight tracks.
Parts also recall the mute settings for the tracks, and some other settings such as Force-to-Scale and bar
length.
These more advanced options will be explained later, when we look at the soft-keys used to control
them .
Part Select
Parts are selected using the part keys –the rightmost eight step keys, which are labelled PART 1 to 8
on the panel.
The currently selected part is indicated by a red LED above the part number.
To select a new part, press one of the other part keys.
If P3 is running when you select a part, the newly selected part LED will flash amber until the current
bar completes.
For example, if you are on part 1, and select part 5, the LEDs will look like this:
The change of part is synchronised to the end of the bar, at which time the red LED for part 1 will turn
off, and the LED for part 5 will go red.
If P3 is not running, the part change will happen immediately.

Sequentix Music Systems
P3 Sequencer User Manual Page 18
Parts Are Not Patterns!
It is important to note that parts are not the same thing as patterns.
Parts hold a pattern number, or a seq uence of pattern numbers to be played on each track.
These pattern selections arecalled playlists.
In an initialised bank, such as bank 1 in a newly supplied P3, each part will play only a single pattern
for each track –what we would refer to as a single-step playlist.
The pattern number selected will be the same as the part number.
So a table of the pattern selections across the tracks for each part would look like this:
Track
12345678
Part 111111111
222222222
333333333
444444444
555555555
666666666
777777777
888888888
Pattern numbers
This makes it seem very much like parts are just patterns –each part being made up of a pattern for
each track.
While you familiarise yourself with P3, it may be helpful to use parts in this way.
In fact, it is possible to edit the playlist for each track so that any of the patterns for atrack can be used
in any part.
One pattern could be re-used for the same track in all eight parts if required.
You can also make a playlist up to eight steps in length, so that a series of different patterns can play
on a track.
This allows you to create pattern chains longer than the individual pattern length, with different
lengths of chain on each track.
The patterns can be repeated for up to 8 bars in each playlist step and can be transposed up or down,
allowing a single pattern to be used for a progression of different keys or roots.
We’ll look at these advanced options in the later section on playlist edit.

Sequentix Music Systems
P3 Sequencer User Manual Page 19
Part Chains
Without getting into the complexities of playlist editing, there is a simpler way to chain the same
number of patterns together across all tracks -a part chain .
A part chain is a multiple selection of parts, where P3 plays each part in the chain in turn,then loops
back to the first part at the end.
This is similar to having a multi-step playlist on each track, but is considerably easier to set up and
understand, though not as flexible.
Selecting A Part Chain
To select a part chain:
•hold the PART key for the first part in the chain
•press the PART key for the last part
For example, to create a chain of parts 2 to 6:
When a part chain has been selected, all the part LEDs for the parts in the chain will flash amber,
except for the currently playing part, which will show red as normal.

Sequentix Music Systems
P3 Sequencer User Manual Page 20
For the example above, the LEDs should look like this:
To clear a pattern chain, just select another single part with one key-press.
Table of contents
Other Sequentix Recording Equipment manuals
