Sequoia LISST-ABS User manual

LISST-ABS
Acoustic Backscatter Sensor
User’s Manual
Version 1.4
February 2017
Sequoia Scientific, Inc.
2700 Richards Road Suite 107
Bellevue, WA, 98005, USA
Phone: +1 425-641-0944; Fax: +1 425-643-0595

This page intentionally left blank
FOR TECHNICAL ASSISTANCE please contact your local
Distributor, or Sequoia if the instrument was purchased directly
from Sequoia. Please be sure to include the instrument serial
number with any correspondence.
A list of local Sequoia distributors can be found at our website
http://www.sequoiasci.com/about/contact/distributors
Sequoia Scientific, Inc. can be reached at

Contents
SECTION 1: QUICK START ...........................................................................................................1
SECTION 2: INSTRUCTIONS.........................................................................................................3
2.1 INTRODUCTION.........................................................................................................................3
2.2 SDI-12 OPERATIONS................................................................................................................4
2.3 RS232 OUTPUT OPERATIONS.................................................................................................10
2.4 ANALOG OUTPUT OPERATIONS...............................................................................................15
2.5 USB OPERATIONS VIA PC SOFTWARE.....................................................................................17
2.6 FIELD DEPLOYMENT SUGGESTIONS.........................................................................................27
APPENDIX A: LISST-ABS CABLE WIRING AND CONNECTOR PINOUTS..............................28
APPENDIX B: CONVERTING UNCALIBRATED CONCENTRATION TO CONCENTRATION 30
APPENDIX C: HOW THE LISST-ABS WORKS...........................................................................31
WARRANTY ..................................................................................................................................34

1
Section 1: Quick Start
Intro
Step 1:
Unpack box
Step 2: Install
Software
Step 3:
Plug in USB
cable and
Start Program
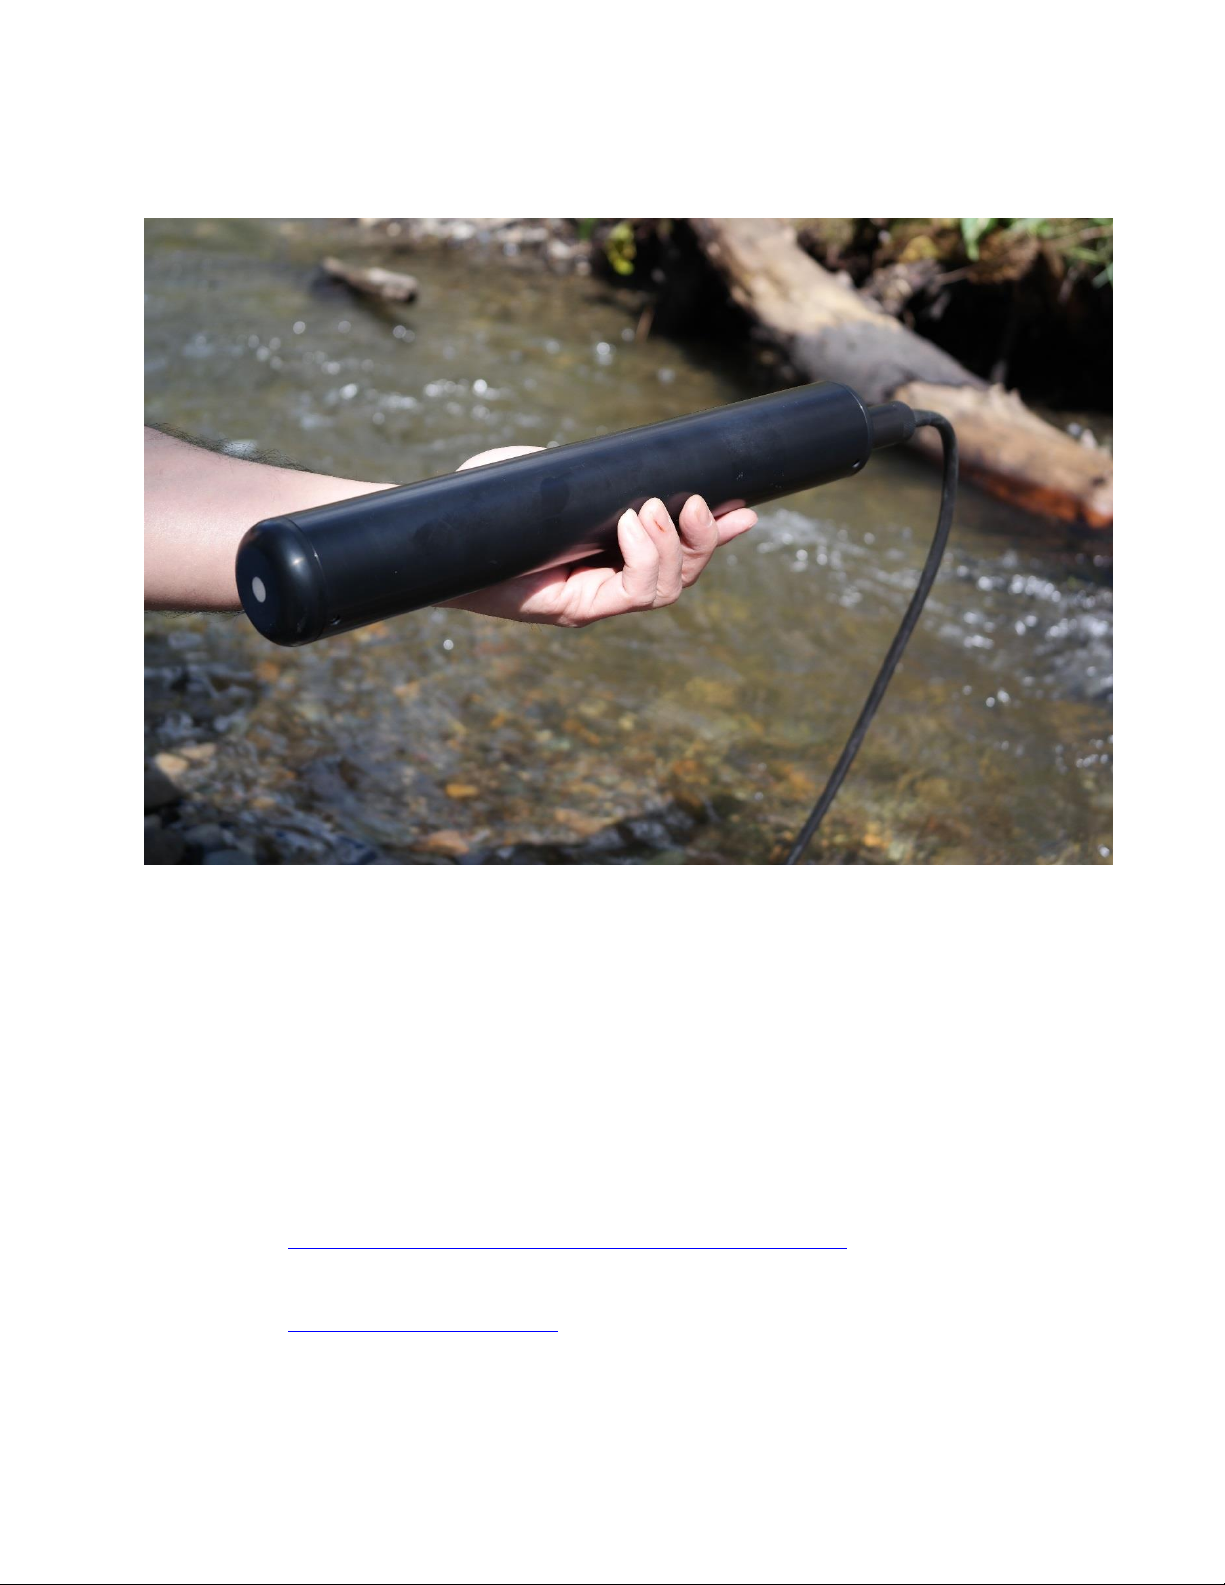
Thank you for purchasing Sequoia's LISST-ABS acoustic sediment sensor. This
Quick Start guide is intended to get you up running as quickly as possible.
Detailed instructions can be found in other sections of the manual.
The LISST-ABS uses acoustic backscatter to measure the concentration of
particles suspended in water. It outputs the Uncalibrated Concentration (or Cu).
The Uncalibrated Concentration is converted to Concentration using standard
calibration procedures such as used for turbidity sensors. For more details see
Appendix B and Appendix C.
The LISST-ABS is shipped ready for use. It takes just 3 easy steps to start
seeing some real measurements.
Inside the box should be the following items: LISST-ABS with protective red cap
and locking cap on the connector, a 5 to 50 meter long cable with underwater
connector and locking sleeve on one end and an 8-pin plastic Molex connector
on the other end, USB cable with mating Molex connector and three short
pigtails with mating Molex connectors. The three cables can be used for
connecting to dataloggers with screw terminals. There are separate pigtails for
SDI-12, RS232, and Analog Output connections. Also included is a credit card
style USB memory card with software installation files.
The sensor head is covered with a protective red cap to prevent accidental
impact and damage of the acoustic transceiver (white disc). Be sure to remove
the protective cap before use. The instrument will not work with the cap left on.
The underwater connector is also covered with a protective cap.
A simple program that can be used for testing the LISST-ABS is included on the
USB memory card. To install the software on your computer run the LISST-
ABS_installer.exe program on the memory card. This will install the LISST-ABS
software. This software requires the .NET 4.0 Framework. Most computers will
have this framework already installed as it is used by many other programs. A
message will appear if the .NET 4.0 needs to be installed. You can install .NET
using the dotNetFx40_Client.exe program on the memory card.
The LISST-ABS is a sensor only and must be connected to a power source. We
have designed a USB cable to provide power and communicate with the
instrument via one connection to a PC. Connect the long cable to the LISST-
ABS, attached the USB extension cable and then plug in the USB cable into the
PC. You should see the green LED on the LISST-ABS start to blink. Every time
the LISST-ABS blinks data is being sent up the cable to the PC.
If the LISST-ABS was purchased without a cable you will need to provide power
to the LISST-ABS and connect the RS232 output to the PC to use the provided
software.
2
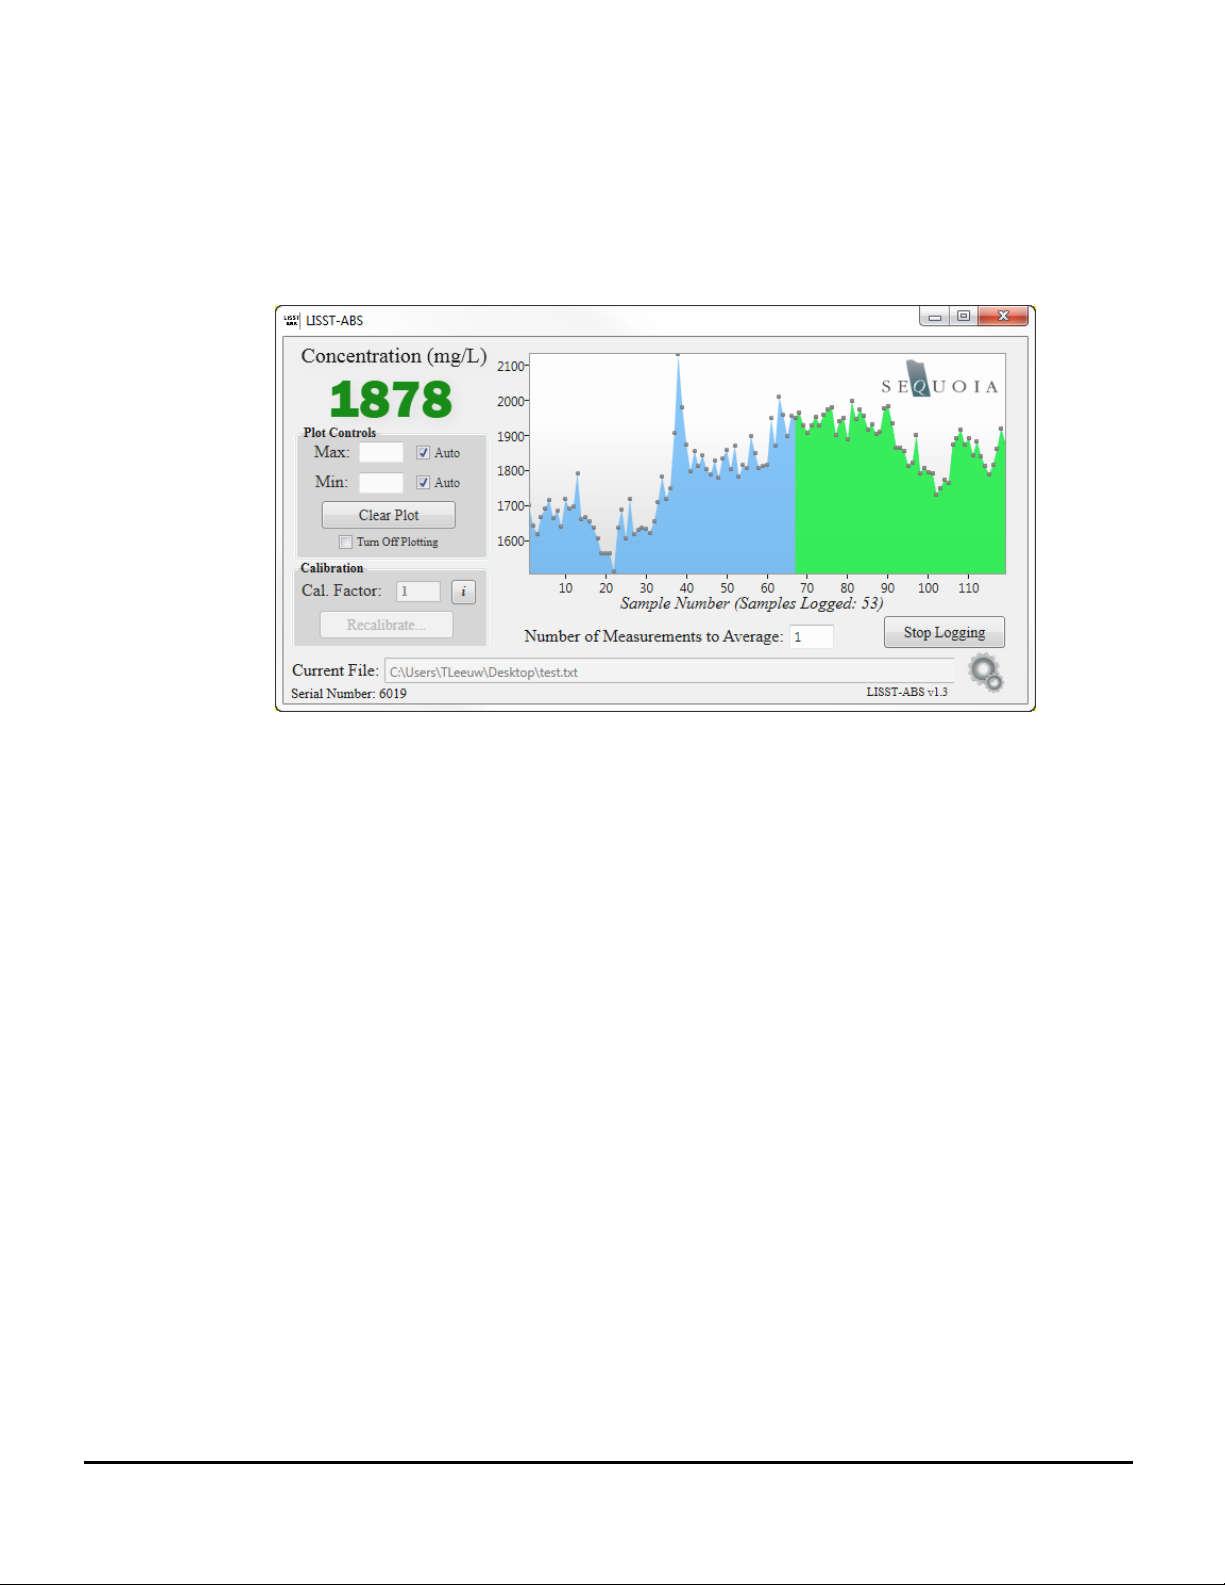
You can now start the LISST-ABS software to see the values in real time. You
can also use the software to log data. Below is a screen shot of the software
while data is being logged to text file. More details on the operation of the
software can be found in Section 2.5.
The Cal Factor is a calibration value that is used to convert Uncalibrated
Concentration (Cu) to Concentration in mg/L. The LISST-ABS is calibrated and
adjusted at the factory using 75 to 90 micron particles so that the Cal Factor for
these particles will always be 1. You may use this value for a quick
approximation of concentration, but the most accurate results require your own
calibration, as described in Appendix B.
The LISST-ABS generates a new measurement every second. If you wish, you
can reduce sample-to-sample variability by averaging. Type the desired number
of measurements to average in the box below the plot. If you enter 5, for
example, each point on the plot will show the average of 5 samples, and the
update rate will slow to one point every 5 seconds.
To save measurements to a text file press the ‘Start Logging’ button You will be
asked to select a location and name for the file. Data will be saved to the file
until ‘Stop Logging’is pressed. The log file contains a header with the Cal
Factor value, time zone, and the instrument serial number. Following the
header are three columns of data: date, time, and measured concentration
(mg/L). The Log file is a space delimited ASCII file that can be easily imported
into programs such as Excel.
Detailed instructions on connecting the LISST-ABS to your datalogger are
covered in separate sections of this manual. For SDI-12 operations see Section
2.2. For Serial/RS232 operations see Section 2.3. For Analog Output
operations see Section 2.4.

3
Section 2: Instructions
2.1 Introduction
Thank you for your purchase of Sequoia's LISST-ABS acoustic
backscatter sensor. The LISST-ABS is a single-point acoustic
sediment sensor, designed to provide higher quality data than
optical turbidity sensors. Its key advantages over optical
turbidity sensors are:
Superior response to particles of grain size >30 microns.
Relatively flat sensitivity to particles from 30-400 microns in
sizes.
Greater immunity to fouling.
Wide dynamic range of concentrations from 1mg/L to 30 g/L.
The LISST-ABS internally measures the Attenuation Corrected
Backscatter(ACB). The ACB value is converted to an
Uncalibrated Concentration (Cu) and then output. To convert the
Uncalibrated Concentration to sediment concentration a simple
multiplier is required. The multiplier, or Cal Factor, is
dependent on the specific type and size of sediment being
measured. When a user recalibrates an instrument, it is this
multiplier that is updated. For more detailed understanding of
the technology, please see Appendix C.
The LISST-ABS can output the Uncalibrated Concentration
using three different methods, SDI-12, RS232, and analog
output. All three of these outputs are available on the
underwater connector on the end of the LISST-ABS. The
output used is determined by how the instrument is connected
to a datalogger.
The LISST-ABS can be powered in two ways. For testing
purposes, a special USB cable is available. When using this
cable, power to the instrument is provided by the USB port.
When connecting to a datalogger you will need to supply a
voltage between 10-18VDC. The current drain at 12V is 100
ma when actively collecting data. If the supply voltage is too
low the LISST-ABS will output an Uncalibrated Concentration
value of -999.
When the LISST-ABS is powered up the green LED on the
endcap will start to blink at about once per second. This
indicates the instrument is powered up and operating normally.
When the LISST-ABS is actively sampling it will double blink
(two blinks in quick succession). When idle but still powered up
it will do a single blink once per second.

4
2.2 SDI-12 Operations
SDI-12 Connections
The LISST-ABS is compatible with SDI-12 protocol version 1.3.
This section is divided into two parts, Connecting to your
datalogger and SDI-12 command summary.
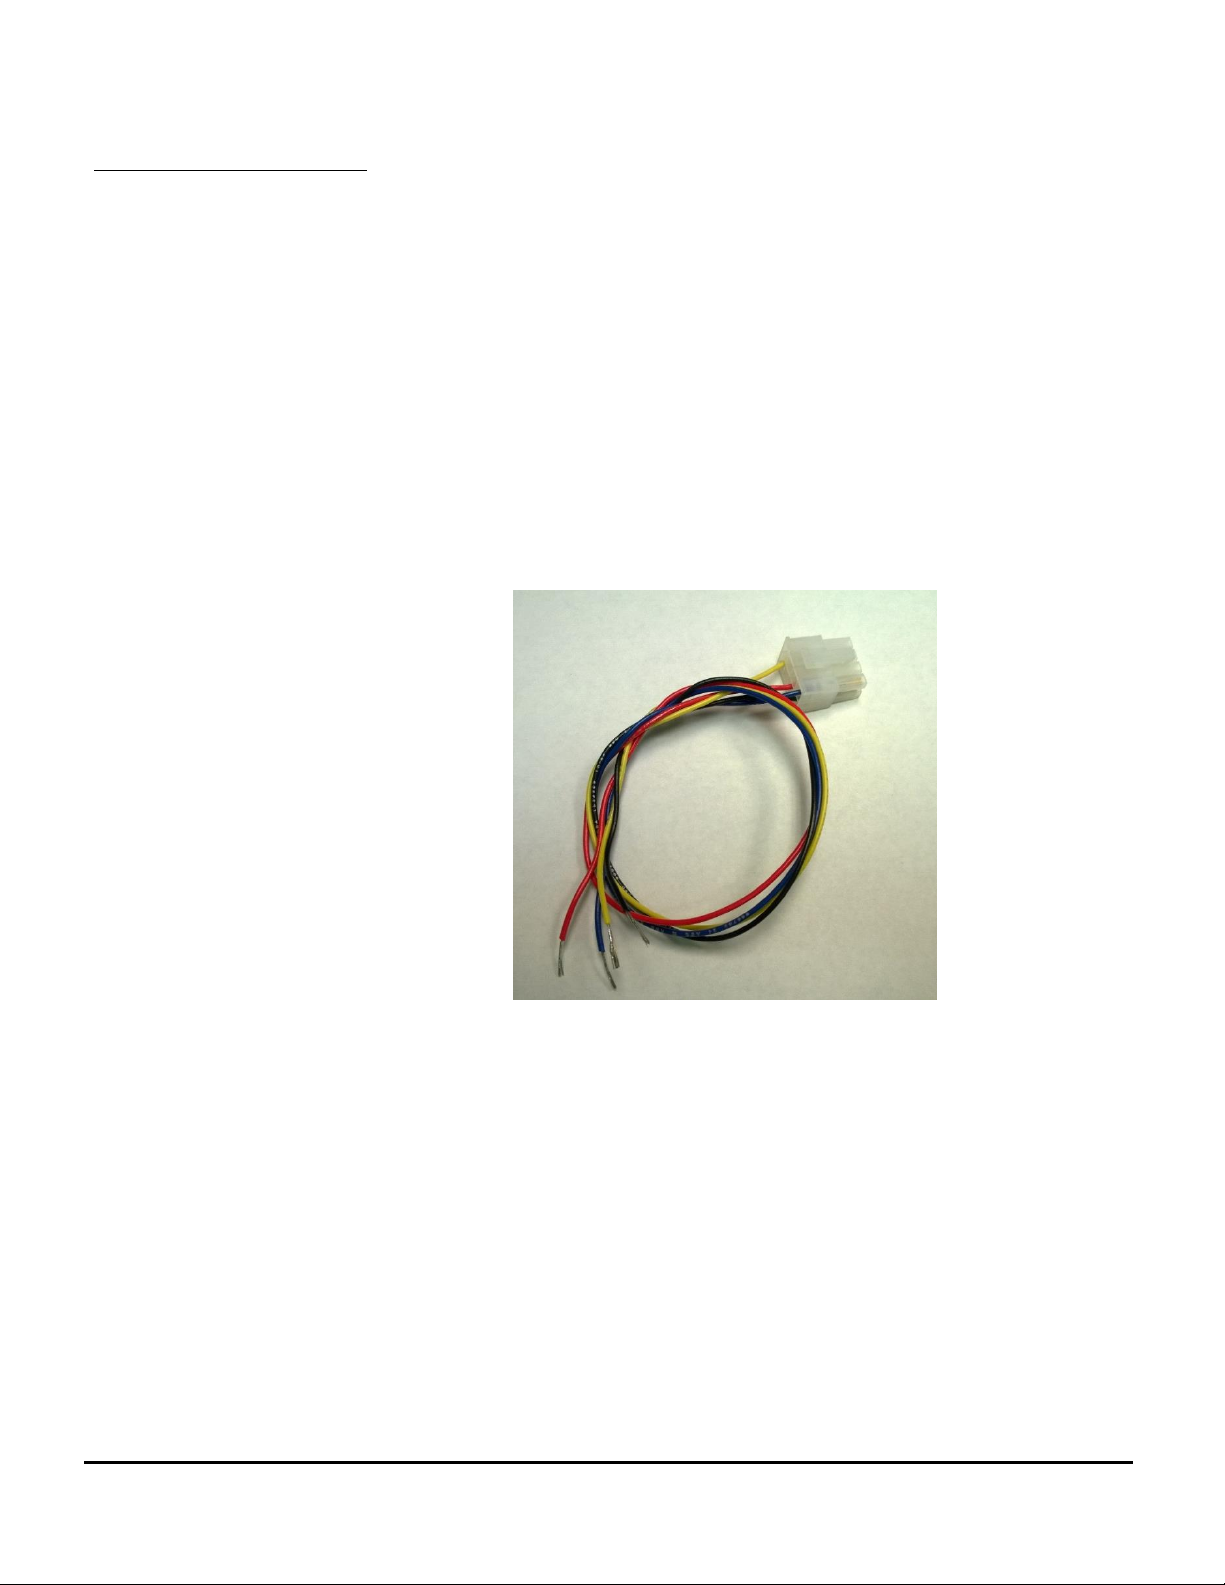
SDI-12 only requires three wires. Power, Ground and Data.
Appendix A includes detailed descriptions of the use of the
individual pins of the 8-pin connector on the LISST-ABS.
However, in most case you will be using a cable provided by
Sequoia for connecting to your SDI-12 compatible datalogger.
To make the connections easier we have provided different
cable terminations designed specifically for different connection
requirements. For example we provide a termination with only
the three individual wires that are labeled and can be easily
connected to the datalogger. The mating connector makes it
easy to remove the long cable without disconnecting the wires
from the datalogger. You can also easily switch between the
datalogger and the USB cable if needed.
The wires are labeled and color coded. Connect the Black wire
to Ground. Connect the Red wire to +12V. Connect the Green
wire to SDI-12 Data.
The LISST-ABS is shipped pre-configured with an SDI-12
instrument address of 0.
The available SDI-12 commands are described below.
Following the command descriptions are some suggested best
practices for using the LISST-ABS with SDI-12.

5
LISST-ABS SDI-12 Command Summary
Command Name
Command Code
Notes
Address Query
?!
Request address of single sensor on bus
Acknowledge Active
a!
Request response from sensor at
address a
Change Address
aAb!
Change address of sensor at address a
to b
Send Identification
aI!
Send ID string including SI address, SDI
version, Manufacturers ID, sensor model,
sensor Firmware version and device
serial number
Start Measurement
aM!, aMC!
aM1!, aMC1!
aM2!, aMC2!
aM3!, aMC3!
aM4!, aMC4!
Start a measurement, returns number of
seconds till sample is ready to be read.
Sends service request when
measurement is complete. An M
command returns a single 1 second
average. M1, M2, M3, and M4 return a
30, 60, 120, or 300 second average.
C following a command requests a CRC
code in the data return (D command).
Start Concurrent
Measurement
aC!, aCC!
aC1!, aCC1!
aC2!, aCC2!
aC3!, aCC3!
aC4!, aCC4!
Same as Start Measurement command
except does not send service request.
Send Data
aDb!
Requests output b(0-9) from Sensor a
Continuous Measurements
(Read)
aR!
Not supported
Start Verification
aV!
Not Supported
See the next page for details of SDI-12 commands.

6
LISST-ABS SDI-12 Command Details
Basic Command Set
?!
Address Query
Syntax:
?!
Description:
Request address of single sensor on bus. Note: sensor must be the only
sensor on the bus or multiple instruments will respond simultaneously.
Example:
Command: ?!
Response: 0 (responds with address of sensor, in this case 0)
a!
Acknowledge Active
Syntax:
a!
Description:
Request response from sensor at address a.
Example:
Command: 0! (request sensor at address 0 to confirm it is active)
Response: 0 (responds with address of sensor)
aAb!
Change Address
Syntax:
aAb!
Description:
Change address of sensor at address ato b
Example:
Command: 0A3! (request sensor at address 0 to change to address 3)
Response: 3 (responds with new address of sensor)
aI!
Send Identification
Syntax:
aI!
Description:
Send ID string including SI address, SDI version, Manufacturers ID,
sensor model, sensor Firmware version and device serial number.
Example:
Command: 3I! (request sensor at address 3 to send ID string
Response: 313SequoiaSABS001001123456
Where:
3 = Sensor address (1 character)
13 = SDI Version compatibility (2 characters)
SequoiaS = Manufacturers ID (8 characters)
ABS001 = Sensor Model (6 characters)
001 = Sensor Firmware (3 characters)
123456 = Sensor Serial Number (6 characters)
7
aM!
Start Measurement
Syntax:
aM!, aMC!, aM1!, aMC1!, aM2!, aMC2!, aM3!, aMC3!, aM4!, or aMC4!
Description:
Start a measurement, returns number of seconds till sample is ready to be
read. Sends service request when measurement is complete.
Examples:
Command: 3M! (request sensor at address 3 to make as measurement)
Response: 30011 (3 is the address, 001 is # of seconds, 1 is the # of values)
<after 1 second>
3 (sends address to confirm measurement is ready to be read)
Command: 3M1! (request sensor at address 3 to get a 30 second average)
Response: 30011 (3 is the address, 031 is # of seconds, 1 is the # of values)
<after 31 seconds>
3 (sends address to confirm measurement is ready to be read)
Command: 3MC1! (request sensor at address 3 to get a 30 second average
with CRC in returned data)
Response: 30011 (3 is the address, 031 is # of seconds, 1 is the # of values)
<after 31 seconds>
3 (sends address to confirm measurement is ready to be read)
aC!
Start Concurrent Measurement
Syntax:
aC!
Description:
Start a measurement, returns number of seconds till sample is ready to be
read. Does not send service request when measurement is complete.
Example:
Command: 3C! (request sensor at address 3 to make as measurement)
Response: 30011 (3 is the address, 001 is # of seconds, 1 is the # of values)
<after 1 second, measurement is ready but no response is send>
Command: 3C1! (request sensor at address 3 to get a 30 second average)
Response: 30011 (3 is the address, 001 is # of seconds, 1 is the # of values)
<after 1 second, measurement is ready but no response is send>
aDb!
Send Data
Syntax:
aDb!
Description:
Requests output b(0-9) from Sensor a
Examples:
Command: 3D0! (request sensor at address 3 to send data block 0)
Response: 3+1234.56 (responds with Uncalibrated Concentration, Cu)
Note: in response to certain commands, the data returned after a D
command may have a CRC value appended to it.
Since the LISST-ABS has only one output only the aD0! command is
required.

8
aR!
Continuous Measurements
Syntax:
aR!
Description:
Not supported. The LISST-ABS is not a continuous measurement device.
No data will be returned. The response to this command is below.
Example:
Command: 3R! (request continuous measurement)
Response: 3 (responds with address of sensor)
aV!
Start Verification
Syntax:
aV!
Description:
Not supported but the sensor will respond to the command with the
response shown below.
Example:
Command: 0A3! (request sensor at address 0 to change to address 3)
Response: 30000 (responds with current address of sensor)

9
LISST-ABS and SDI-12
Best practices
In order to obtain the most accurate results it is recommended
that the LISST-ABS collect a 30 second or longer average. The
LISST-ABS is more sensitive to larger particles and the sample
volume is smaller. Therefore, to get good representative
measurements an average of a larger volume of water is
recommended. Using the M1!, M2!, M3! Or M4! Commands will
acquire an average of 30, 60, 120, or 300 seconds.
The LISST-ABS will remain powered between SDI-12
commands. If low power consumption is required it is
suggested that the LISST-ABS be powered down between
measurements to conserve power. The M commands can be
sent immediately after power up.
For suggestions on mounting, cleaning and maintenance
please see Section 2.6.
10
2.3 RS232 Output
Operations
RS232 Connections
The LISST-ABS has also been designed to support RS232
communication in both transmit-only and two-way
communication modes.
RS232 requires four wires. Power, Ground, Transmit and
Receive. Appendix A includes detailed descriptions of the use
of the individual pins of the 8-pin connector on the LISST-ABS.
However, in most cases you will be using a cable provided by
Sequoia for connecting to your RS232 compatible datalogger.
To make the connections easier we have provided different
cable terminations designed specifically for different connection
requirements. For example we provide a termination with only
the four individual wires that are labeled and can be easily
connected to the datalogger. The mating connector makes it
easy to remove the long cable without disconnecting the wires
from the datalogger. You can also easily switch between the
datalogger and the USB cable if needed.
The wires are labeled and color coded. Connect the Black wire
to Ground. Connect the Red wire to +12V. Connect the Yellow
ABS Transmit wire to the datalogger receive input and the Blue
ABS Receive wire to the datalogger transmit output.
The LISST-ABS uses a baud rate of 9600 with 8 data bits, one
stop bit, no parity, and no flow control.
By default, the LISST-ABS will automatically start outputting the
Uncalibrated Concentration values out the RS232 connection
upon power up. The values are output at once per second.
The values are one value per line in scientific notation. The line
is terminated with a linefeed character. We call this the
Automatic Mode output.
The simplest method of collecting RS232 data is to capture and

11
store the values being returned from the LISST-ABS as it is
output. As described below in the recommended sampling
procedure, the instrument should be allow to output for 30
seconds after power up before measurements are recorded.
There are also a set of commands that can be sent to the
LISST-ABS to give more control of the flow of data. The
available RS232 commands are described below. The
commands are not case sensitive and there are multiple
command codes for the same command function.
Following the command descriptions are some suggested best
practices for using the LISST-ABS with RS232.
LISST-ABS RS-232 Command Summary
Command Name
Command Code
Notes
Display Status
DS
Status
Display the Current Status of the
instrument including instrument serial
number and firmware version
Take and Transmit Sample
(and hold)
GS
GetSample
Instrument makes a measurement, stores
it in temporary memory, and outputs the
results to the RS-232.
Take Sample and hold it
HS
HoldSample
Instrument makes a measurement and
stores it in temporary memory. The
results are NOT sent to the RS-232
output.
Transmit last sample
SL
SendLast
Transmits the last sample collected by
the issuing of a GS or HS command that
was stored in temporary memory.
Return to Automatic Mode
Return
AutoMode
Exit
Returns the LISST-ABS to automatic
mode where results are output to the
RS232 every 1 second
Help
HE
Help
Displays a list of commands available
with brief descriptions
See the next page for details of the RS232 commands.
12
LISST-ABS RS232 Command Details
Basic Command Set
DisplayStatus
Display Status
Syntax:
DS or ds or status
Description:
Display the Current Status of the instrument including instrument serial
number and firmware version
Example:
Command: DS
Response: Serial number: 6014
SDI-12 address: 0
Version Jul 8 2015 15:01:34
LISST-ABS>
GetSample
Take and Transmit Sample (and hold)
Syntax:
GS or gs or getsample
Description:
Instrument makes a measurement, stores it in memory, and outputs the
averaged Uncalibrated Concentration value to the RS-232 output.
Example:
Command: GS 30
Response: <delay of 30 seconds>
1.23456E3
LISST-ABS>
Command: GS
Response: <delay of 1 second>
1.23456E3
LISST-ABS>
HoldSample
Take Sample and hold it
Syntax:
HS or hs or holdsample
Description:
Instrument makes a measurement and stores it in memory. The results
are NOT sent to the RS-232 output. Only a LISST-ABS> prompt is
returned.
Example:
Command: HS 30
Response: LISST-ABS>
<Value in memory will be updated in 30 seconds>
Command: HS
Response: LISST-ABS>
<Value in memory will be updated in 1 second>

13
SendLast
Transmit last sample
Syntax:
SL or sl or sendlast
Description:
Transmits the last sample collected by the issuing of a GetSample or
HoldSample command.
Example:
Command: SendLast
Response: 1.23456E3
LISST-ABS>
Return
Return to Automatic Mode
Syntax:
return or exit
Description:
Returns the LISST-ABS to automatic mode where results are output to
the RS232 every 1 second
Example:
Command: Exit
Response: <delay of 1 second>
1.23456E3
<delay of 1 second>
1.23456E3 …
Help
Display Help
Syntax:
HE or help
Description:
Displays a list of commands available with brief descriptions
Example:
Command: help
Response:
**** LISST-ABS help menu ****
DS or Status Display status.
GS or GetSample Take a sample and return the ACB.
HE or Help This menu.
HS or HoldSample Take a sample and hold the ACB (nothing returned).
AutoMode, Exit, Return to 1hz sampling. Press <cr> three times to
or Return halt sampling.
SL or ShowLast Display the previous sample taken by GS or HS.
Commands are not case sensitive.
LISST-ABS>

14
LISST-ABS and RS232
Best practices
In order to obtain the most accurate results it is recommended
that the LISST-ABS be powered up and allowed to sample in
the automatic mode (green LED double blinking) for 30 seconds
or more before issuing a Start Measurement command. This 30
second wait should be done every time power is applied.
During these 30 seconds the LISST-ABS is obtaining a running
average of attenuation that is used internally to compute the
ACB value that is output. Shorter waits will result in noisier
measurements.
It is also recommended that bursts of 30 measurements or
more be recorded and averaged to obtain the best results.
Because of the small measurement volume of the LISST-ABS
the ACB measurements can be vary sample to sample as
clouds of turbidity pass by. In order to obtain a representative
value some averaging of these clouds should be done.
For example if measurements every 15 minutes are desired we
recommend the following procedure:
1) Power up the LISST-ABS 45 seconds before the beginning of
the desired sample time and allow it to sample.
2) Option 1: Start recording the values being output by the
LISST-ABS to record 60 measurements 1 second apart.
Option 2: Issue GetSample commands to record 60
measurements 1 second apart.
3) Power down the LISST-ABS and wait till the next sample time.
For suggestions on mounting, cleaning and maintenance
please see Section 2.6.
15
2.4 Analog Output
Operations
Analog Output Range
and Interpretation
The LISST-ABS also provides an analog output for use with
data acquisition systems that do not support RS232 or SDI-12
interfaces.
Using the Analog Output requires four wires. Power, Power
Ground, Signal and Signal Ground. The two grounds can be
combined, but separating them provides the best accuracy.
Appendix A includes detailed descriptions of the use of the
individual pins of the 8-pin connector on the LISST-ABS.
However, in most cases you will be using a cable provided by
Sequoia for connecting to your datalogger. To make the
connections easier we have provided different cable
terminations designed specifically for different connection
requirements. For example we provide a termination with only
the four individual wires that are labeled and can be easily
connected to the datalogger. The mating connector makes it
easy to remove the long cable without disconnecting the wires
from the datalogger. You can also easily switch between the
datalogger and the USB cable if needed.
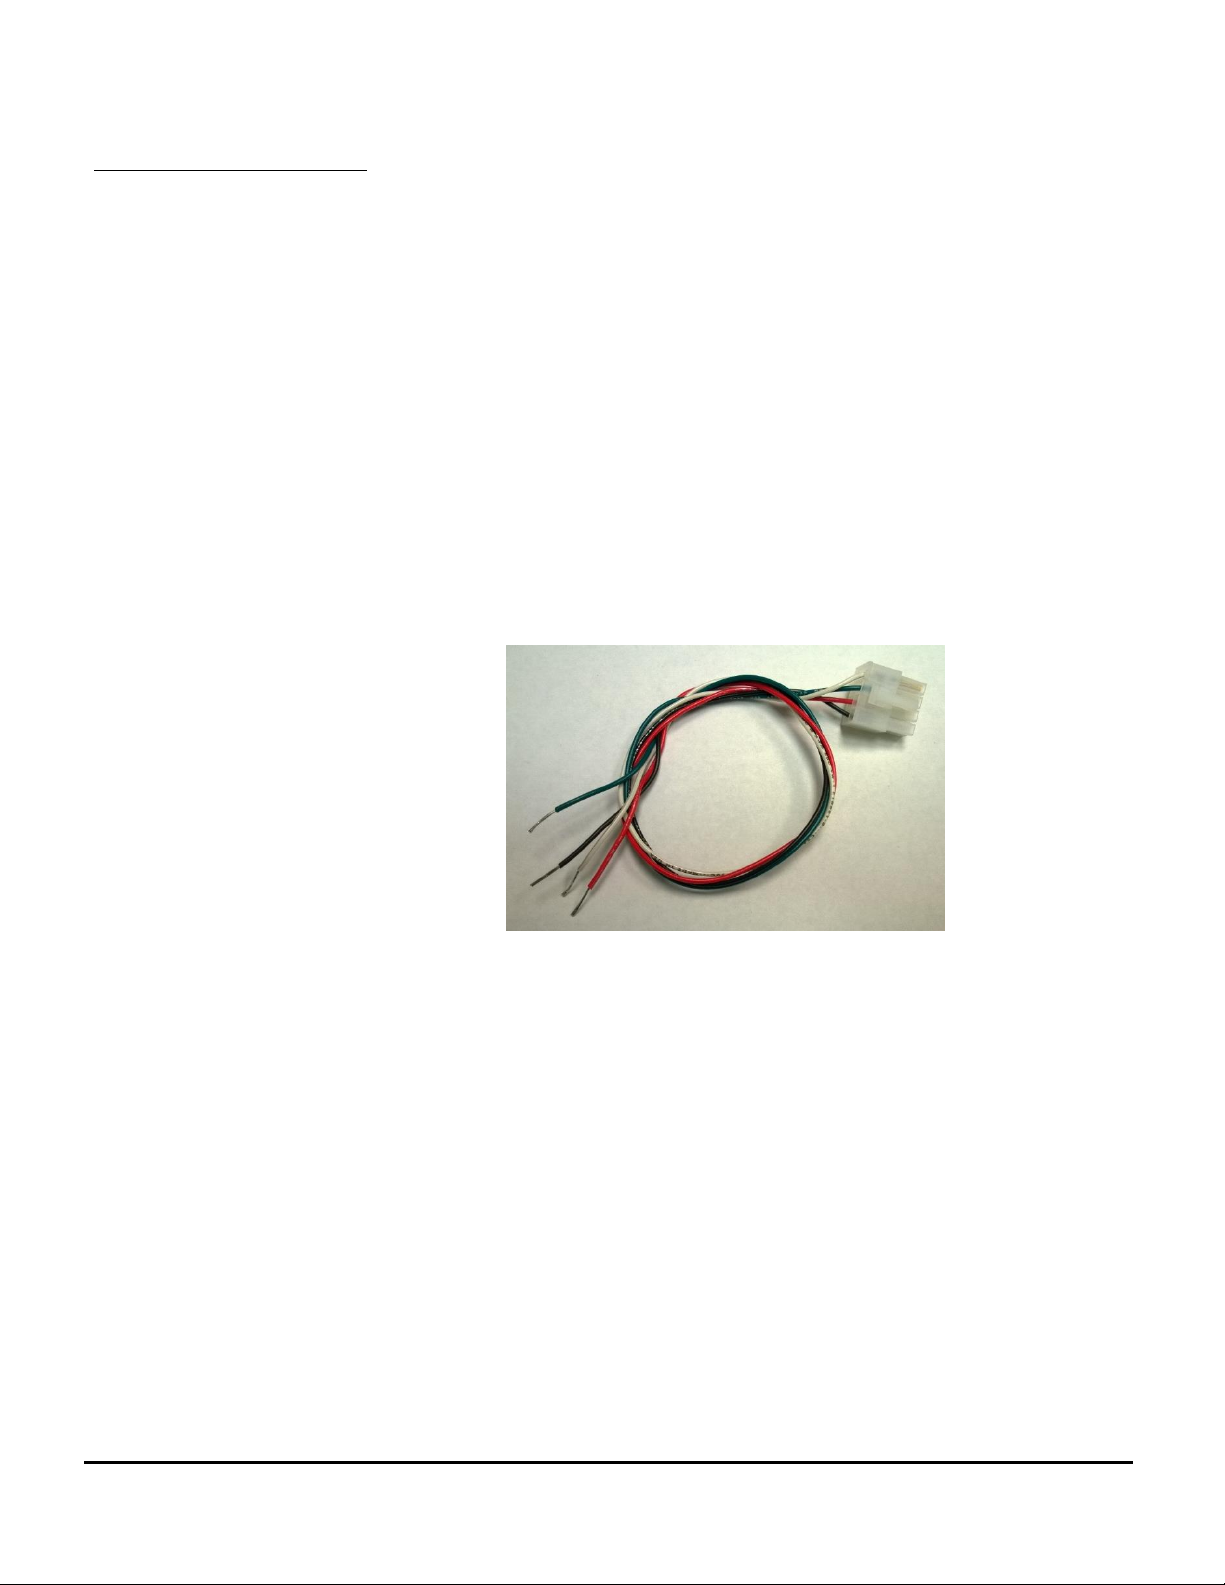
The wires are labeled and color coded. Connect the Black wire
to Power Ground. Connect the Red wire to +12V. Connect the
Green wire to Analog input and the White wire to the Signal
Ground.
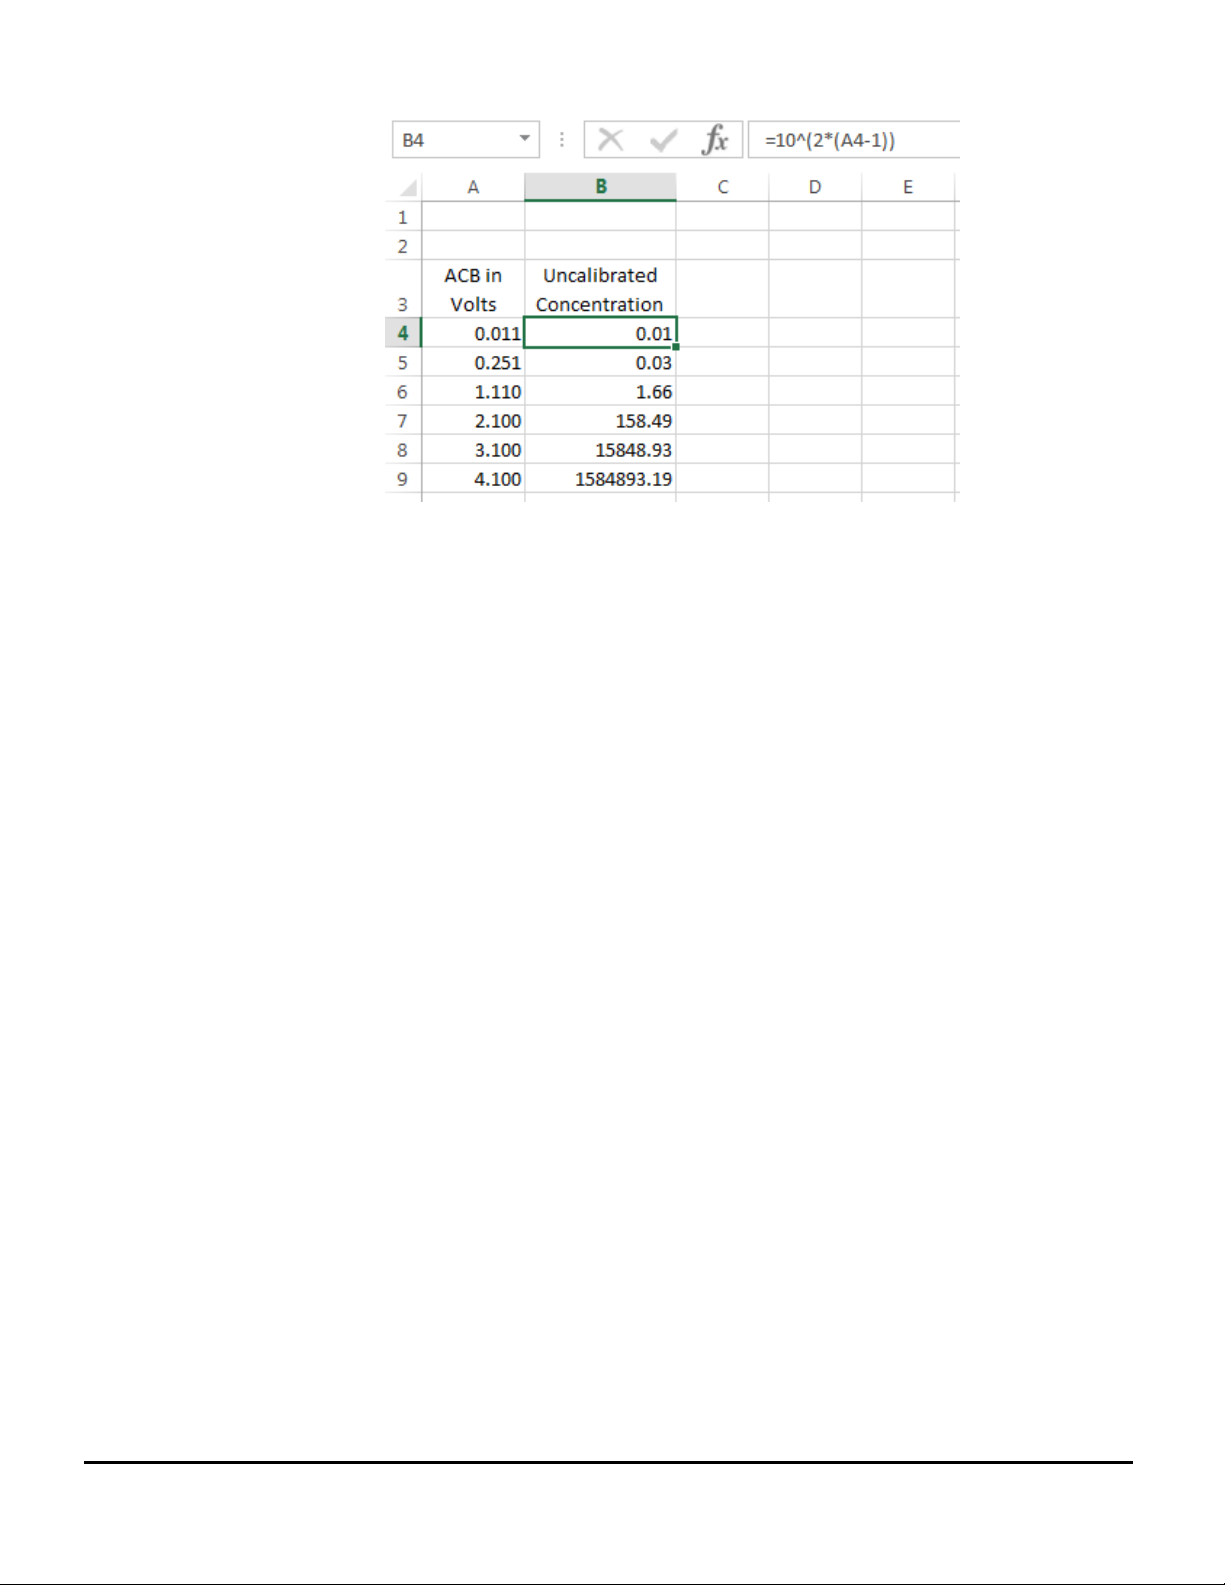
The analog output nominally ranges from 0.1 to 4.1 V. To
accommodate the full dynamic range of the ABS within this
range of voltages, the output is logarithmic. With an
uncalibrated concentration (Cu) of 1 mg/l, the analog output is
1.0 V, and each decade of increase or decrease in the
concentration changes the output by 0.5V.
To convert the analog output in volts to Uncalibrated
Concentration, use the formula:
Cu= 102*(V –1)
In Microsoft Excel, you can use the formula shown below.
16
Analog Sampling Best
Practices
Analog outputs of 0.25V and lower correspond to
concentrations that are too low for the ABS to measure, and
should be considered invalid. These readings may result from
an object in the measurement volume, or the transducer not
being fully submerged.
In order to obtain the most accurate results it is recommended
that the LISST-ABS be powered up and allowed to sample in
the automatic mode (green LED double blinking) for 30 seconds
or more before recording the analog voltage output. This 30
second wait should be done every time power is applied.
During these 30 seconds the LISST-ABS is obtaining a running
average of attenuation that is used internally to compute the
concentration value. Shorter waits will result in noisier
measurements.
It is also recommended that bursts of 30 measurements or
more be recorded and averaged to obtain the best results.
Because of the LISST-ABS measures concentration within a
small volume, natural variability in the distribution of particles
will be reflected in the ABS measurements
For example if measurements every 15 minutes are desired we
recommend the following procedure:
1) Power up the LISST-ABS 45 seconds before the beginning of
the desired sample time and allow it to sample.
2) Record 60 measurements of the analog voltage 1 second
apart.
3) Power down the LISST-ABS and wait till the next sample time.
For suggestions on mounting, cleaning and maintenance
please see Section 2.6.
Table of contents
Other Sequoia Accessories manuals

Popular Accessories manuals by other brands


Extron electronics
Extron electronics OCS 100W Setup guide

Digilent
Digilent Pmod CMPS2 Reference manual

OBI
OBI 402494 Original operating instructions

Outdoor Revolution
Outdoor Revolution Momentum Cayman Tailgate instructions

Klarstein
Klarstein Beer Baron manual

Heitronic
Heitronic 36315 Installation and operating instructions