RME Audio MADIface USB User manual

User's Guide
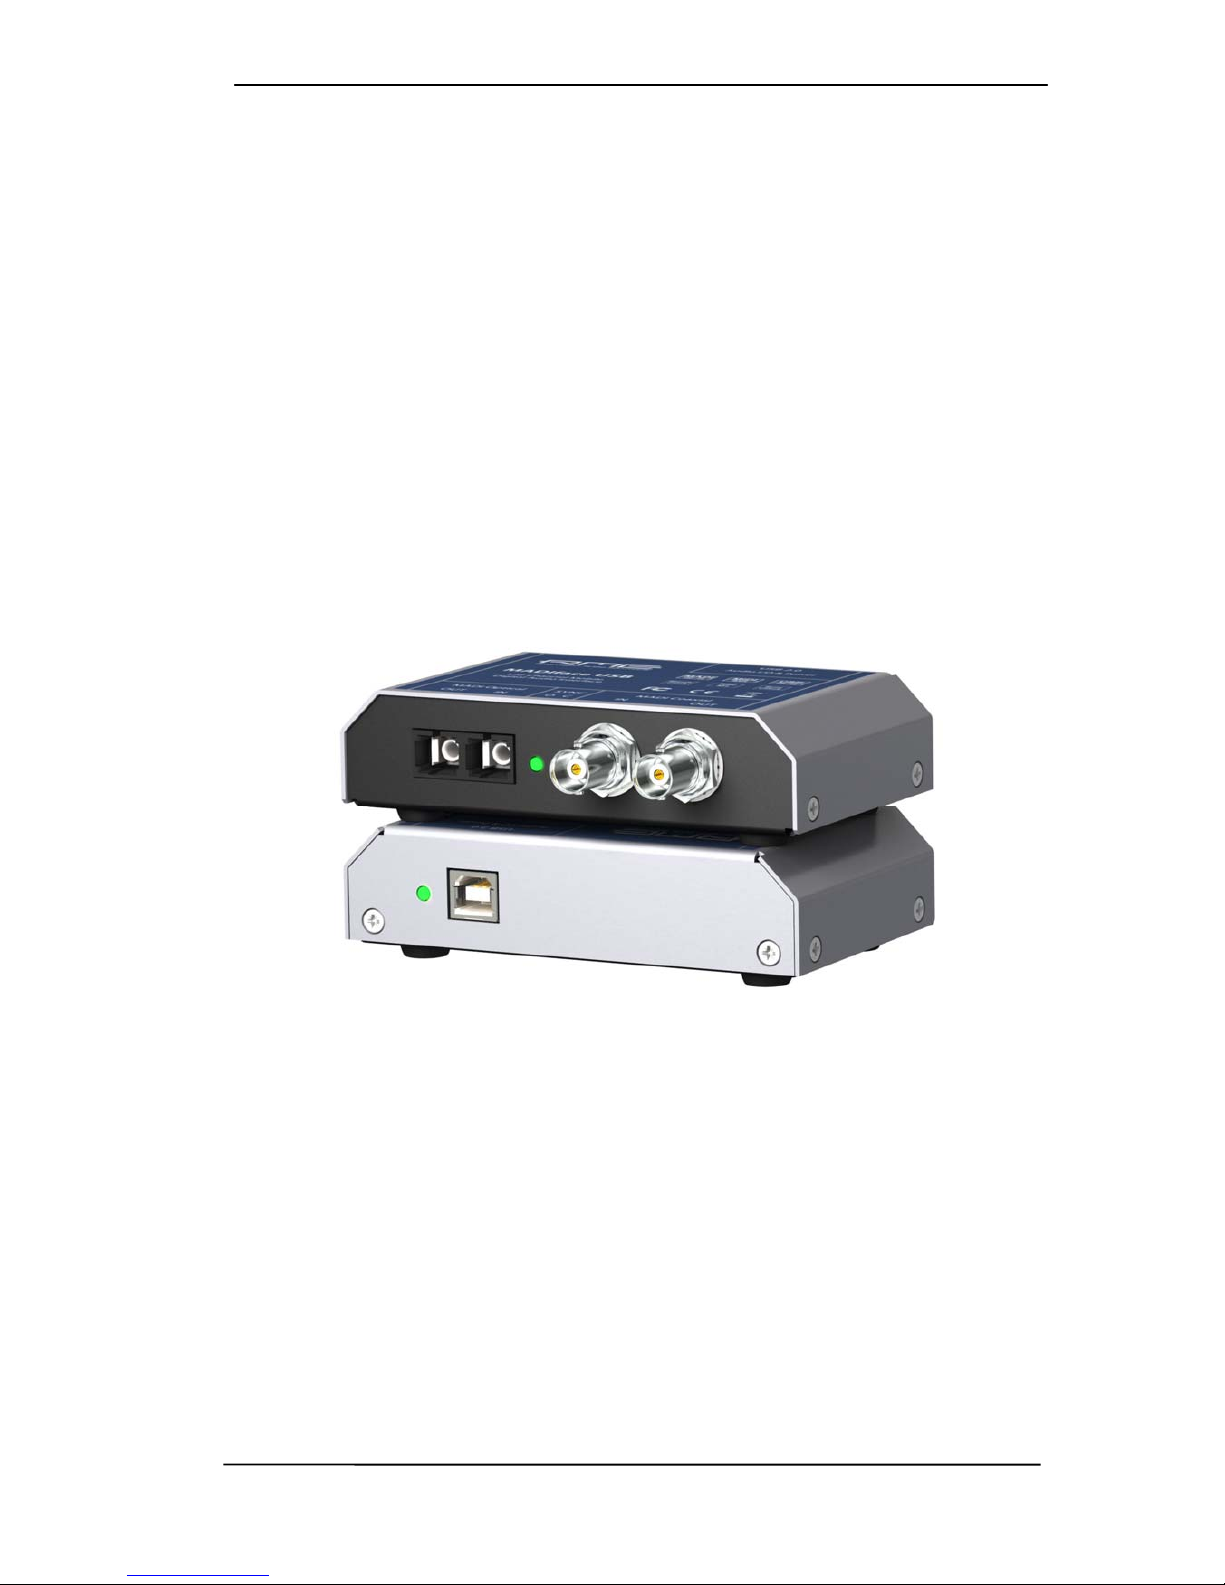
MADIface USB
Portable MADI via USB!
USB 2.0 Digital I/O System
64 Channels MADI Interface
2 Channels AES Recording
24 Bit / 192 kHz Digital Audio
128 x 128 Matrix Router
MADI, AES and Word Sync
MIDI embedded in MADI
Stand-Alone Operation
TotalMix™
SyncAlign™
24 Bit / 192 kHz 9
SyncCheck™ ZLM™
SteadyClock™

2 User's Guide MADIface USB © RME
General
1 Introduction ...............................................................6
2 Package Contents .....................................................6
3 System Requirements ..............................................6
4 Brief Description and Characteristics.....................6
5 First Usage - Quick Start ..........................................7
Installation and Operation - Windows
6 Hardware, Driver and Firmware Installation
6.1 Hardware and Driver Installation..........................10
6.2 De-installing the Drivers.......................................10
6.3 Firmware Update..................................................10
7 Configuring the MADIface USB
7.1 Settings Dialog .....................................................11
7.2 WDM Configuration..............................................13
8 Operation and Usage
8.1 Playback...............................................................16
8.2 DVD Playback (AC-3 / DTS) ................................17
8.3 Channel Count under WDM.................................17
8.4 Multi-client Operation ...........................................18
8.5 Clock Modes - Synchronization ...........................18
9 Operation under ASIO
9.1 General ................................................................19
9.2 Channel Count under ASIO .................................19
9.3 Known Problems ..................................................20
10 Using more than one MADIface.............................20
11 DIGICheck Windows ...............................................21
12 Hotline – Troubleshooting......................................22
Installation and Operation - Mac OS X
13 Hardware, Driver and Firmware Installation
13.1 Hardware and Driver Installation..........................24
13.2 De-installing the Drivers.......................................24
13.3 Firmware Update..................................................24
14 Configuring the MADIface USB
14.1 Settings Dialog .....................................................25
14.2 Clock Modes - Synchronization ...........................26
15 Mac OS X FAQ
15.1 MIDI doesn't work ................................................27
15.2 Repairing Disk Permissions .................................27
15.3 Supported Sample Rates.....................................27
15.4 Channel Count under Core Audio........................27
15.5 Various Information ..............................................28
16 Using more than one MADIface.............................28
17 DIGICheck Mac ........................................................29
18 Hotline – Troubleshooting......................................30

User's Guide MADIface USB © RME 3
Stand-Alone Operation, Connections
19 Stand-alone Operation
19.1 General ................................................................ 32
19.2 Format Converter................................................. 32
19.3 Active Repeater ................................................... 32
20 Connections
20.1 MADI I/Os ............................................................33
20.2 The BNC Input .....................................................33
20.3 MIDI over MADI ................................................... 33
TotalMix FX
21 TotalMix: Routing and Monitoring
21.1 Overview .............................................................. 36
21.2 The User Interface ............................................... 38
21.3 The Channels....................................................... 39
21.3.1 Settings ........................................................ 41
21.4 Section Control Room.......................................... 42
21.5 The Control Strip.................................................. 43
21.5.1 View Options................................................ 44
21.5.2 Snapshots - Groups..................................... 45
21.5.3 Channel Layout – Layout Presets................ 45
21.5.4 Scroll Location Marker ................................. 47
21.6 Preferences.......................................................... 48
21.6.1 Store for Current or All Users (Windows) .... 49
21.7 Settings ................................................................ 50
21.7.1 Mixer Page................................................... 50
21.7.2 MIDI Page .................................................... 51
21.7.3 OSC Page.................................................... 52
21.7.4 Aux Devices ................................................. 53
21.8 Hotkeys and Usage ............................................. 54
21.9 Menu Options....................................................... 55
21.10 Menu Window ......................................................56
22 The Matrix
22.1 Overview .............................................................. 56
22.2 The User Interface ............................................... 56
22.3 Usage...................................................................56
23 Tips and Tricks
23.1 ASIO Direct Monitoring (Windows)...................... 57
23.2 Copy a Submix..................................................... 57
23.3 Doubling the Output Signal (Mirror)..................... 57
23.4 Delete a Submix................................................... 57
23.5 Copy and Paste everywhere................................ 58
23.6 Recording a Submix - Loopback ......................... 58
23.7 MS Processing..................................................... 59
24 MIDI Remote Control
24.1 Overview .............................................................. 60
24.2 Mapping ............................................................... 60
24.3 Setup....................................................................61
24.4 Operation ............................................................. 61
24.5 MIDI Control......................................................... 62
24.6 Loopback Detection ............................................. 63
24.7 OSC (Open Sound Control)................................. 63

4 User's Guide MADIface USB © RME
Technical Reference
25 Technical Specifications
25.1 Inputs....................................................................66
25.2 Outputs.................................................................66
25.3 Digital ...................................................................66
25.4 Firmware ..............................................................67
25.5 General ................................................................67
26 Technical Background
26.1 MADI Basics.........................................................68
26.2 Lock and SyncCheck ...........................................69
26.3 Latency and Monitoring........................................70
26.4 USB Audio............................................................71
26.5 DS – Double Speed .............................................72
26.6 QS – Quad Speed................................................72
26.7 SteadyClock .........................................................73
26.8 Terminology .........................................................73
Miscellaneous
27 Accessories .............................................................76
28 Warranty...................................................................76
29 Appendix ..................................................................77
30 Declaration of Conformity ......................................78
User's Guide MADIface USB © RME 5
User's Guide
MADIface USB
General

6 User's Guide MADIface USB © RME
1. Introduction
Thank you for choosing the MADIface USB. This unique audio interface is capable of transfer-
ring digital MADI audio to a Mac or PC. The latest Plug and Play technology guarantees a sim-
ple installation, even for the inexperienced user. The numerous unique features and well
thought-out configuration dialog puts the MADIface USB at the very top of the range of com-
puter-based audio interfaces.
The package contains drivers for Windows Vista / 7 / 8 / 10 and Mac OS X x86 (Intel).
Our high-performance philosophy guarantees maximum system performance by executing as
many functions as possible not in the driver (i.e. the CPU), but directly within the audio hard-
ware.
2. Package Contents
Please check that your MADIface USB package contains each of the following:
• MADIface USB
• Cable USB 2.0, 1.8 m (6 ft)
• RME Driver CD
3. System Requirements
• Windows Vista or up, Intel Mac OS X (10.6 or up)
• 1 USB 2.0 port
• Computer with at least Pentium Core 2 Duo CPU
4. Brief Description and Characteristics
• All settings can be changed in real-time
• Buffer sizes/latencies from 32 up to 8192 samples selectable
• 32 channels 96 kHz/24 bit record/playback
• 16 channels 192 kHz/24 bit record/playback
• 2 channels AES recording
• Clock modes slave and master
• Clock sources MADI, AES or word
• SteadyClock: Jitter-immune, super-stable digital clock
• DDS technology for free setting of the sample rate
• TotalMix for latency-free submixes and perfect ASIO Direct Monitoring
• TotalMix FX: 2048 channel mixer with 46 bit internal resolution
• SyncAlign guarantees sample aligned and never swapping channels
• SyncCheck tests and reports the synchronization status of input signals
• Virtual MIDI port embedded in MADI
• DIGICheck DSP: Level meter in hardware, peak- and RMS calculation
• Stand-alone mode with repeater and format converter functionality
User's Guide MADIface USB © RME 7
5. First Usage – Quick Start
First install the drivers, see chapter 6/13 for details. After the driver installation connect the rear
USB port of the MADIface to the computer’s USB port with the included USB cable. Finally con-
nect external MADI gear to coaxial or optical input and output of the MADIface.
Start the Settings dialog. Under Clock Mode the currently used input can be set as clock
source (Optical, Coaxial). Alternatively the option Internal forces the MADIface USB to act as
clock master, all connected equipment has to be in clock mode slave then and sync to the
MADIface.
Two SYNC LEDs on the front help to set up the unit correctly. With no input signal they stay
dark. With input signal they flash. With correct clock setup the LEDs will stay constantly lit.
For quickest and a simple setup select Disable TotalMix under Options. This way the MADIface
USB operates as straight 64 channel I/O interface. For more options in routing and monitoring
with TotalMix FX select either 64 Channel Mix or 128 Channel Mix.
The MADIface USB can be used stand-alone, connected to standard USB 5V power supplies. It
does not remember any setting but uses a fixed internal mode, see chapter 19 for details.

8 User's Guide MADIface USB © RME

User's Guide MADIface USB © RME 9
User's Guide
MADIface USB
Installation and Operation - Windows

10 User's Guide MADIface USB © RME
6. Hardware, Driver and Firmware Installation
6.1 Hardware and Driver Installation
To simplify installation it is recommended to first install the drivers before the unit is connected
to the computer. But it will also work the other way round.
Insert the RME Driver CD into your CD-ROM drive. The driver installer is located in the directory
\MADIface_USB. Start rmeinstaller.exe and follow the instructions of the installer. After installa-
tion connect computer and MADIface using the supplied USB cable. Windows detects the new
hardware as MADIface USB and installs the drivers automatically.
After a reboot, the icons of TotalMix FX and Settings dialog appear in
the notification area.
Driver Updates do not require to remove the existing drivers. Simply install the new driver over
the existing one.
Possible reasons why a MADIface USB is not found after driver installation:
• The USB port is not active in the system (check the Device Manager)
• The USB cable is not, or not correctly inserted into the socket. Check that the LED beside
the USB port is lit, it indicates power.
6.2 De-installing the Drivers
A de-installation of the driver files is not necessary – and not supported by Windows anyway.
Thanks to full Plug & Play support, the driver files will not be loaded after the hardware has
been removed. If desired these files can then be deleted manually.
Unfortunately Windows Plug & Play methods do not cover the additional autorun entries of To-
talMix, the Settings dialog, and the registration of the ASIO driver. These entries can be re-
moved from the registry by a software de-installation request. This request can be found (like all
de-installation entries) in Control Panel, Software. Click on the entry 'RME MADIface USB'.
6.3 Firmware Update
The Flash Update Tool updates the firmware of the MADIface USB to the latest version. It re-
quires an already installed driver.
Start the program fut_mfusb.exe. The Flash Update Tool displays the current revision of the
MADIface USB's firmware and whether it needs an update or not. If so, then simply press the
'Update' button. A progress bar will indicate when the flash process is finished (Verify Ok).
After the update the unit needs to be reset. This is done by unplugging the MADIface USB for a
few seconds. A reboot of the computer is not necessary.
When the update fails (status: failure), the unit's Safety BIOS will be used from the next boot on,
the unit stays fully functional. The flash process should then be tried again.
User's Guide MADIface USB © RME 11
7. Configuring the MADIface USB
7.1 Settings Dialog - General
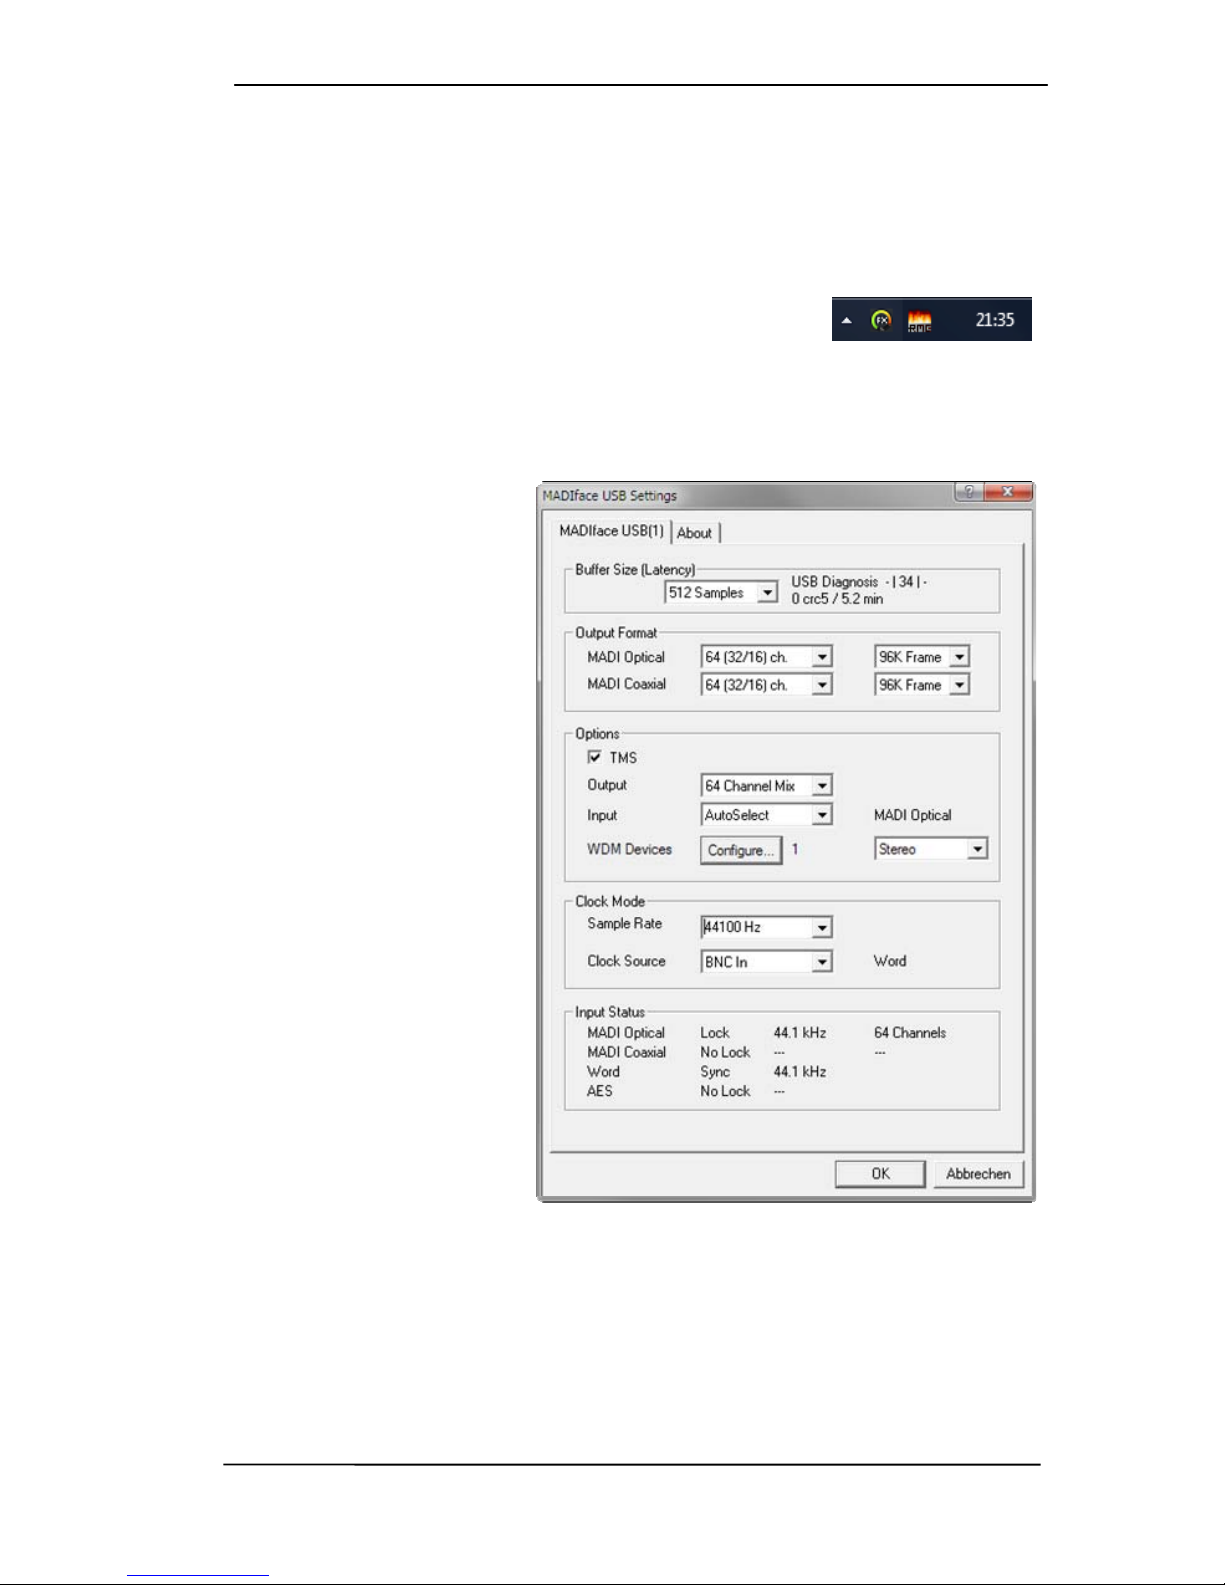
Configuration of the MADIface USB is done via its own settings dialog. The panel Settings can
be opened:
• by clicking on the fire symbol in the Task Bar's notification area
The mixer of the MADIface USB, TotalMix FX, can be opened:
• by clicking on the DSP-FX icon in the Task Bar's notification area
The hardware of the MADIface USB offers a number of helpful, well thought-of practical func-
tions and options which affect how the unit operates - it can be configured to suit many different
requirements. The following is available in the Settings dialog:
• Latency
• Configuration of digital I/Os
• Current sample rate
• Synchronization behaviour
• State of input and output
Any changes made in the
Settings dialog are applied
immediately - confirmation (e.g.
by clicking on OK or exiting the
dialog) is not required.
However, settings should not be
changed during playback or
record if it can be avoided, as
this can cause unwanted noises.
Also, please note that even in
'Stop' mode, several programs
keep the recording and playback
devices open, which means that
any new settings might not be
applied immediately.
The status display at the bottom
of the dialog box gives precise
information about the current
status of the system, and the
status of all digital signals.
Buffer Size
The setting Buffer Size determines the latency between incoming and outgoing ASIO and WDM
data, as well as affecting system stability (see chapter 8/9).
USB Diagnosis shows specific USB transmission errors (CRC5, usually 0) and general errors.
If the unit detects a record or playback error the number shown will no longer be 0. An audio
reset is performed automatically. The counter is reset on start of playback/record. More informa-
tion can be found in chapter 26.4.

12 User's Guide MADIface USB © RME
Output Format
Defines the format of the MADI output signal. MADI can be a 56 or 64 channel signal. Sample
rates in Double Speed range (64/88.2/96 kHz) can be transmitted by the normal 48K Frame, or
using a native 96K Frame.
Options
TMS activates the transmission of Channel Status data and Track Marker information from the
MADI input signal. DIGICheck allows to read out those information from the MADI stream.
Output offers three options: 64 Channel Mix, 128 Channel Mix, Disable TotalMix. In 64 Channel
Mix mode TotalMix FX shows 64 input, playback and output channels. All settings in TotalMix
use the data from one MADI input port, and send identical data to both MADI output ports. In
128 Channel Mix mode record and playback is still limited to 64 channels, with the current input
selected as Input in the Settings dialog. But the other input is also active for TotalMix, and the
output signal is not mirrored, but separated, with TotalMix having 128 output channels. Disable
TotalMix completely disables TotalMix FX. All input and output data is going straight to re-
cord/coming from playback, with no mixing or routing involved. In this mode the outputs are
mirrored, carrying the same signal.
Input defines the currently used main input, Optical or Coaxial. AutoSelect activates an auto-
matic input selection. Using both inputs with MADI at the same time, AutoSelect puts the device
into Seamless Redundancy mode. The MADIface USB will switch to the other input in real-time
if the current one fails.
WDM Devices
Allows to freely set which I/Os are available as WDM devices, if these are stereo or multi-
channel devices (up to 8 channels), and if one or multiple of the currently active WDM devices
should have the Speaker property. Reduce the number of WDM devices to the ones really
needed to improve performance of the operating system. More details are found in chapter 8.2.
Clock Mode
Sample Rate
Sets the currently used sample rate. Offers a central and comfortable way of configuring the
sample rate of all WDM devices to the same value, as since Vista this is no longer supported to
be done by the audio program. However, an ASIO program can still set the sample rate.
At ongoing record/playback the selection is greyed out, so no change is possible.
Clock Source
The unit can be configured to use its own clock (Internal = master), or one of the input signals. If
the selected source isn't available, the unit will change to the next available one (AutoSync). If
none is available then the internal clock is used. The current clock source is shown to the right.
Input Status
Indicates for each input whether there is a valid signal (Lock, No Lock), or if there is a valid and
synchronous signal (Sync). The second row shows the sample frequency measured by the
hardware. The third row shows the input’s channel format (64 or 56 channels). The BNC In
supports MADI coaxial, AES and Word.
The About tab includes information about the current driver version as well as the current firm-
ware version of the MADIface USB plus two more options:
Lock Registry
Default: off. Checking this option brings up a dialog to enter a password. Changes in the Set-
tings dialog are no longer written to the registry. As the settings are always loaded from the
registry when starting the computer, this method provides an easy way to define an initial state
of the MADIface USB.

User's Guide MADIface USB © RME 13
Enable MMCSS for ASIO activates support with higher priority for the ASIO driver. Note: At this
time, activating this option seems to be useful only with the latest Cubase/Nuendo at higher
load. With other software this option can decrease performance. The change becomes active
after an ASIO reset. Therefore it is easy to quickly check which setting works better.
7.2 WDM Configuration
Some background first.
In the older manuals one will find this explanation why it makes sense to get rid of some WDM
devices:
WDM Devices
Not before Vista the OS had been capable of handling more than 32 WDM stereo devices.
Therefore under W2k/XP it often makes sense to intentionally limit their number. Otherwise
some channels or MIDI ports might vanish from the system.
Today Microsoft gives us even more reasons to deactivate WDM devices that are unused. One
particular issue is that on any device change, but also on simple device queries (like during the
start of Cubase/Nuendo) the audioendpoint builder is started, visible as svchost.exe in the task
manager, blocking a whole CPU core for some time. On older computers with Dual Core CPU a
simple change from 44 to 48 kHz will cause one core to be fully blocked, equalling 50% CPU
load, for more than a minute. The start of Cubase is blocked at the MIDI screen for more than 3
minutes with a MADIface Pro.
The duration of this CPU load increases with the number of WDM devices (no matter if 2 or 8
channel ones). The less the quicker your CPU is back to normal – and with 0 WDM devices you
won’t even notice anything.
On a more modern i7 3770 computer with Z77 chipset and Windows 7/64 the CPU load is only
around 12% (8 cores, still Cubendo wait and wait…), and under Windows 8.1 Microsoft reduced
the load duration by 50%. Better, but not good enough!
In real-world operation you will also sometimes find the svchost.exe process hanging forever –
only a reboot will fix this completely.
On a more positive note: server based computers (x chipset) do not seem to suffer from this
effect. But this kind of computer is expensive and not widely used as DAW system.
Therefore a flexible WDM configuration is required that can minimize these effects. All current
RME drivers now support deactivating unused WDM devices. If you just need one for listening
to whatever Media player then simply disable all other devices, reducing the svchost illness
easily. If you don’t need WDM, because ASIO is all that you use, then deactivate them all. ASIO
and MIDI will still work.
The Speaker property of a WDM device changes its name to: Speaker. Many years ago, soft-
ware relying on Windows’ own sound system used the speaker configuration in the Sound con-
trol panel to decide whether it can playback surround or not. One had to set the device to 5.1
mode or similar before it would work. These days this scheme seems to be no longer neces-
sary, the software just checks whether the device is only stereo or a multi-channel one, no mat-
ter if its called speaker or not. The Speaker property became a renaming feature for home en-
tertainment users.
So while most users can disregard this function, some will use software that needs the property.
We are even aware of custom software that needs more than one ‘Speaker’ to work correctly.
RME’s driver gives the user the freedom to configure whatever is needed to work properly.

14 User's Guide MADIface USB © RME
Option WDM Devices
The WDM Devices configuration has one
button to enter the edit dialog, a status
display showing the number of currently
enabled WDM devices, and a listbox to
select between Stereo or Multi-Channel
devices.
The number represents both record and
playback devices, so ‘1’ means one input
and one output device.
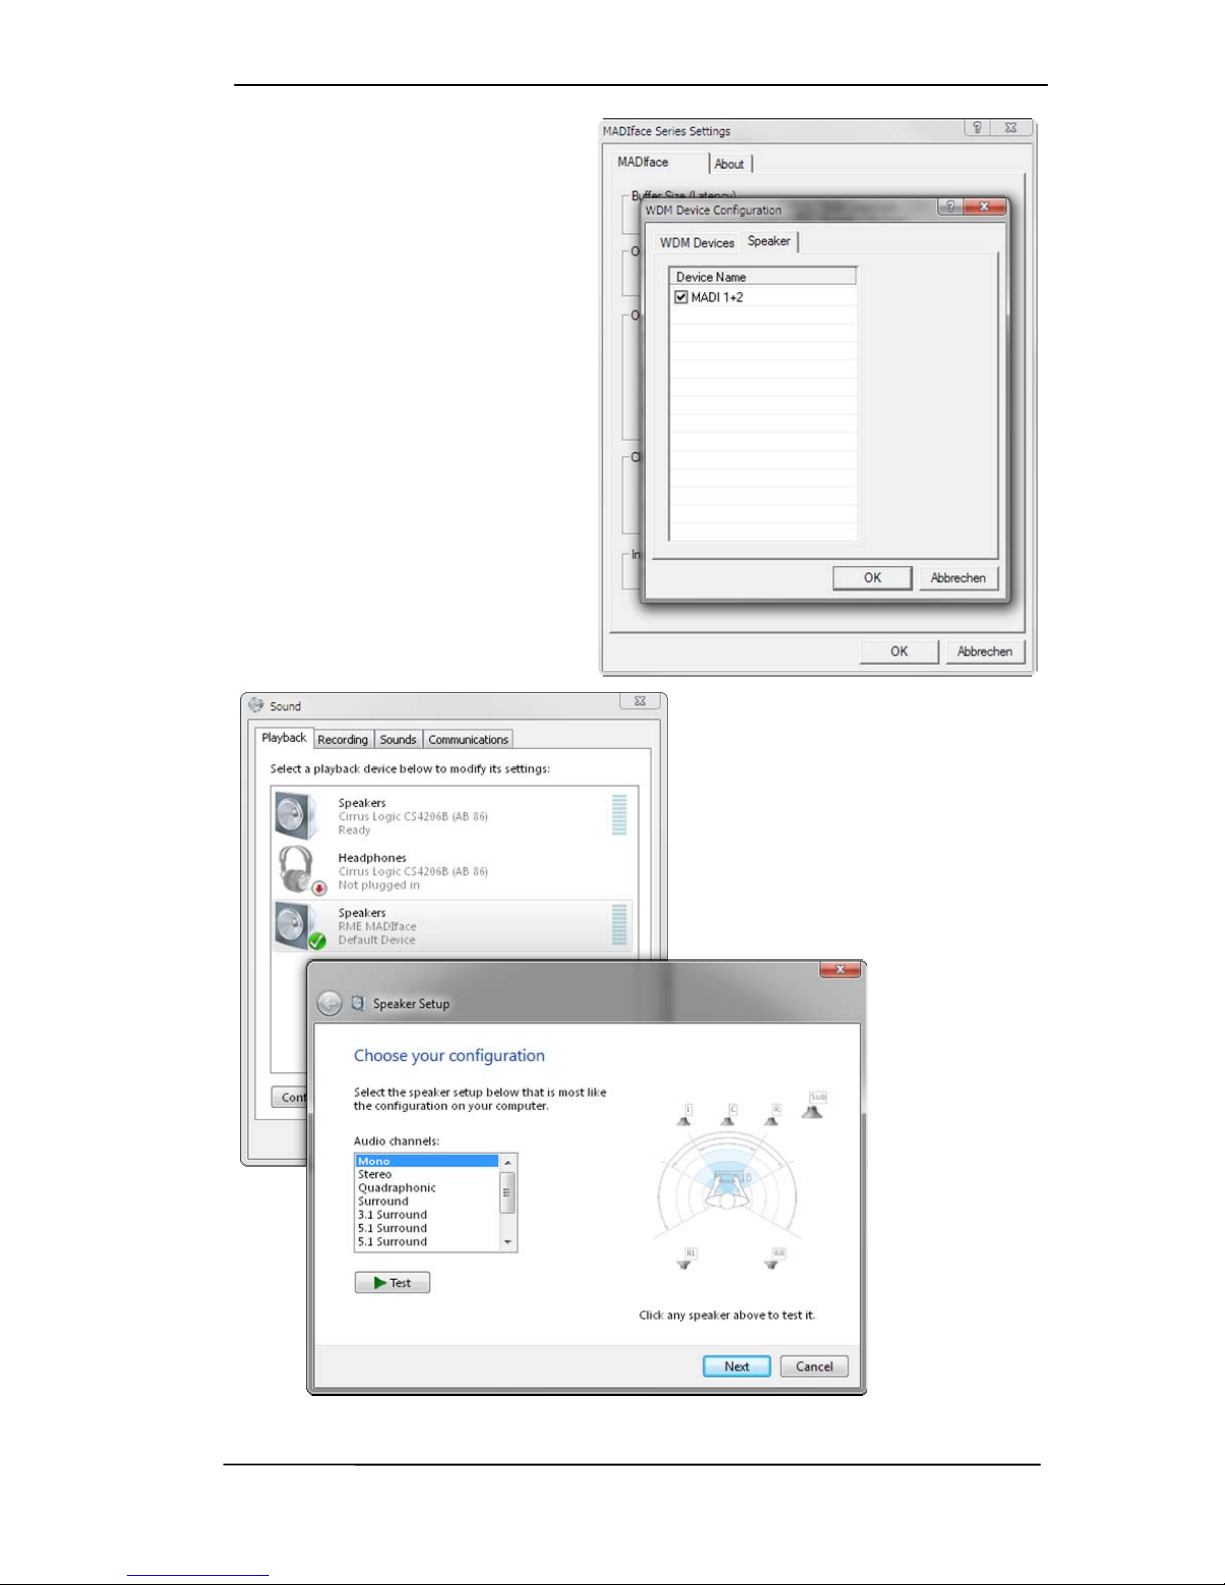
The screenshot to the right shows the
stereo WDM devices available with the
MADIface USB, and that only MADI 1/2
has been activated. Any number can be
activated. Also only higher numbered
devices might be active. For example
using MADI 9-10 for system based audio
does not require to activate the previous
devices. Only MADI 9-10 will then show
up in the Windows Sound control panel.
The checkbox All to the right allows for a
quick check/uncheck of all devices.
The screenshot to the left shows the
multi-channel WDM devices available
with the MADIface Pro after selecting
‘Multi-Channel’ in the WDM Devices
listbox and hitting WDM Configure. In
this example the device MADI 1 to 8 is
active.
Using a multi-channel WDM device
allows for the use of multi-channel
playback with specialized software as
well as Surround sound from DVD or
Blu-Ray player software.
Please note that configuring the WDM
device to a specific surround mode in the
control panel Sound requires the device
to have the Speaker property. See next
page.
Again the checkbox All to the right allows
for a quick check/uncheck of all devices.
User's Guide MADIface USB © RME 15
Changing to the tab Speaker presents a
list of all currently activated WDM de-
vices. Any of these can now get the
Speaker property.
Please note that defining more than one
device as Speaker usually makes no
sense, and the speakers also don’t get
numbered or renamed in Windows, so it
is impossible to find out which one is
which.
After leaving the dialog with OK the
WDM devices are reloaded so Windows
sees their new properties. You can now
assign any playback mode, from stereo
to 7.1, in the Windows Sound control
panel by selecting the playback device
and clicking the Configure button.
An up to 8-channel playback using the
Windows Media Player requires the
speaker setup 7.1 Surround.
16 User's Guide MADIface USB © RME
8. Operation and Usage
8.1 Playback
In the audio application being used, MADIface must be selected as output device. This can
often be found in the Options, Preferences or Settings menus as Playback Device, Audio De-
vices, Audio etc.
We recommend switching all system sounds off (via >Control Panel /Sound<). Also MADIface
should not be the Preferred Device for playback, as this could cause loss of synchronization
and unwanted noises. If you feel you cannot do without system sounds, you should consider
using the on-board sound device or buying a cheap Blaster clone and select this as Preferred
Device in > Control Panel /Sound /Playback<.
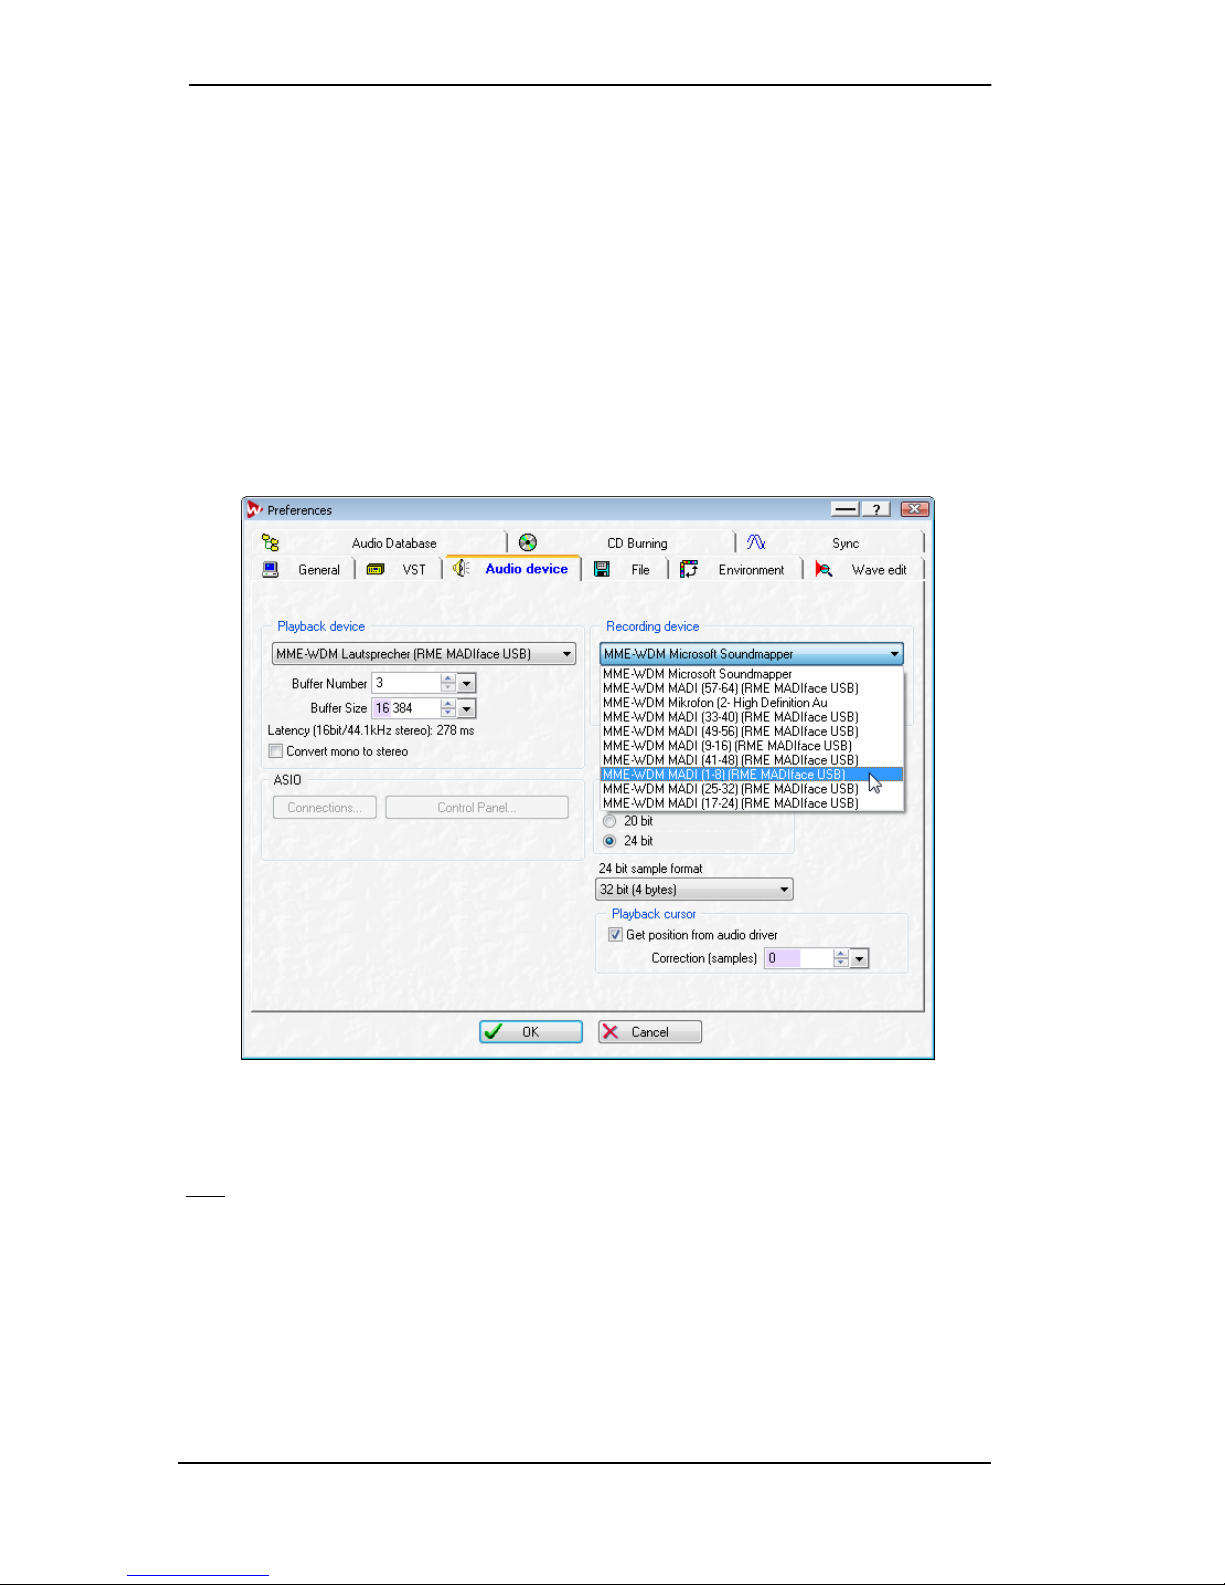
The screenshot shows a typical configuration dialog. After selecting a device, audio data is sent
to the specified channels of the MADI port, depending on which has been selected as playback
device.
Increasing the number and/or size of audio buffers may prevent the audio signal from breaking
up, but also increases latency i.e. output is delayed. For synchronized playback of audio and
MIDI (or similar), be sure to activate the checkbox ‘Get position from audio driver’.
Note: Since Vista the audio application can no longer control the sample rate under WDM.
Therefore the driver of the MADIface USB includes a workaround: the sample rate can be set
globally for all WDM devices within the Settings dialog, see chapter 7.1.

User's Guide MADIface USB © RME 17
8.2 DVD-Playback (AC-3/DTS)
AC-3 / DTS
When using popular DVD software players like WinDVD and PowerDVD, their audio data
stream can be sent to any AC-3/DTS capable receiver via the MADIface. For this to work, an
output device has to be selected in >Control Panel/ Sound/Playback< and be set as Default.
The DVD software's audio properties now show the options 'SPDIF Out' or similar. When select-
ing it, the software will transfer the non-decoded digital multichannel data stream to the MADI-
face. Naturally a successful decoding also requires a MADI to AES converter like the RME ADI-
642, converting the playback signals to stereo AES3 or SPDIF.
Note: This 'SPDIF' signal sounds like chopped noise at highest level. The first 2 MADI channels
(Loudspeaker) do not support digital AC-3/DTS playback.
Multichannel
PowerDVD and WinDVD can also operate as software decoder, sending a DVD's multichannel
data stream directly to the digital output of the MADIface. For this to work select the WDM play-
back device ’Loudspeaker’ of the MADIface Pro in >Control Panel/ Sound/ Playback < as ‘Stan-
dard’. Additionally the loudspeaker setup, found under >Configuration<, has to be changed from
Stereo to 5.1 Surround.
PowerDVD's and WinDVD's audio properties now list several multichannel modes. If one of
these is selected, the software sends the decoded analog multichannel data to the MADIface.
TotalMix can then be used to play back via any desired output channels.
The typical channel assignment for surround playback is:
1 - Left
2 - Right
3 - Center
4 - LFE (Low Frequency Effects)
5 - SL (Surround Left)
6 - SR (Surround Right)
Note 1: Selecting the MADIface to be used as system playback device is no good idea, as pro-
fessional interfaces should not be disturbed by system events. Make sure to re-assign the se-
lection after usage or to disable any system sounds (tab Sounds, scheme 'No audio').
Note 2: The DVD player will be synced backwards from the MADIface. This means when using
AutoSync and/or Pitch, the playback speed and pitch follows the incoming clock signal.
8.3 Channel Count under WDM
The MADIface allows the use of sample rates up to 192 kHz via the MADI interface. For this to
work single-channel data is spread to two or four channels using the Sample Multiplexing tech-
nique. Therefore the number of channels is reduced to 32 or 16 respectively.
Whenever the MADIface changes into Double Speed (88.2/96 kHz) or Quad Speed mode
(176.4/192 kHz) all devices no longer available vanish automatically.
WDM Double Speed Quad Speed
MADI (1 to 16) MADI (1 to 16) MADI (1 to 16)
MADI (17 to 32) MADI (17 to 32) MADI (17 to 32)
MADI (33 to 64) MADI (33 to 64) MADI (33 to 64)
18 User's Guide MADIface USB © RME
8.4 Multi-client Operation
RME audio interfaces support multi-client operation. Several programs can be used at the same
time. The formats ASIO and WDM can even be used on the same playback channels simulta-
neously. As WDM uses a real-time sample rate conversion (ASIO does not), all active ASIO
software has to use the same sample rate.
However, a better overview is maintained by using the channels exclusively. This is no limitation
at all, because TotalMix allows for any output routing, and therefore a playback of multiple soft-
ware on the same hardware outputs.
Inputs can be used from an unlimited number of WDM and ASIO software at the same time, as
the driver simply sends the data to all applications simultaneously.
RME's sophisticated tool DIGICheck is an exception to this rule. It operates like an ASIO host,
using a special technique to access playback channels directly. Therefore DIGICheck is able to
analyse and display playback data from any software, no matter which format it uses.
8.5 Clock Modes - Synchronization
In the digital world, all devices must be either Master (clock source) or Slave (clock receiver).
Whenever several devices are linked, there must always be a single master clock.
A digital system can only have one master! If the MADIface’s clock mode is set to 'Internal',
all other devices must be set to ‘Slave’.
The MADIface USB utilizes a very user-friendly, intelligent clock control, called AutoSync. In
AutoSync mode, the system constantly scans both inputs for a valid signal. If any valid signal is
found, the MADIface switches from the internal quartz (Clock Mode – Current Internal) to a
clock extracted from the input signal (Clock Mode – Current Optical, Coaxial, AES or Word).
The difference to a usual slave mode is that whenever the clock reference fails, the system will
automatically use its internal clock and operate in master mode again.
The MADIface USB inputs can be used simultaneously. In that case the MADIface USB has to
be told which one of the signals is the sync reference - a digital device can only be clocked from
a single source. The Clock Source selection is used to define a preferred input for the automatic
clock selection. This input will stay active as long as a valid signal is found.
RME’s exclusive SyncCheck technology (first implemented in the Hammerfall) enables an easy
to use check and display of the current clock status. Input Status indicates whether there is a
valid signal (Lock, No Lock) for each input, or if there is a valid and synchronous signal (Sync).
In the field Clock Mode the clock reference is shown (Current…). See chapter 26.2.
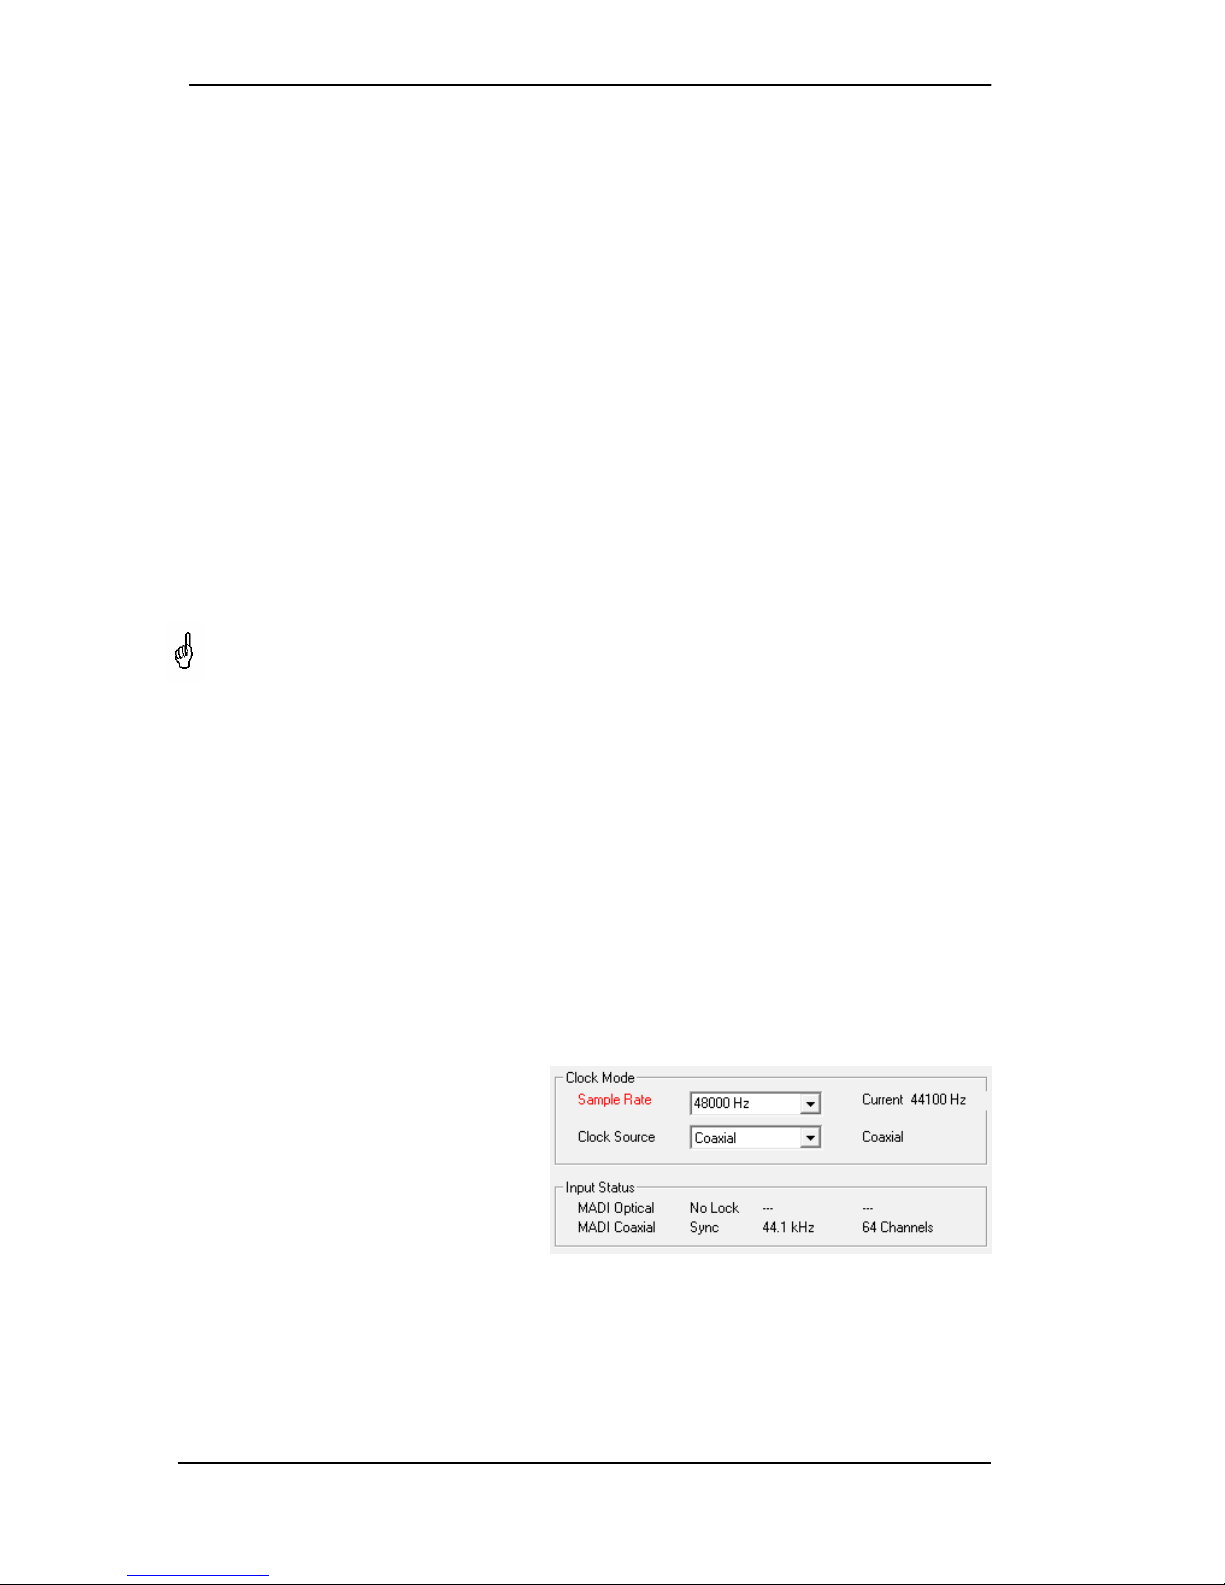
Under WDM the MADIface has to set the
sample rate. Therefore the error shown
to the right can occur. A stable signal
with a sample rate of 44.1 kHz is
detected at the Coaxial input (Sync), but
Windows audio had been set to 48000
Hz before. The red color of the text label
signals the error condition, and prompts
the user to set 44100 Hz manually as
sample rate. Under ASIO the audio software sets the sample rate, so that such an error can not
happen. If the input sample rate is different then there will be no Sync indication.
With RME’s AutoSync and SyncCheck, finally anyone can master this common source of error,
previously one of the most complex issues in the digital studio world.

User's Guide MADIface USB © RME 19
9. Operation under ASIO
9.1 General
Start the ASIO software and select ASIO MADIface USB as the audio I/O device or the audio
driver.
The MADIface USB supports ASIO Direct Monitoring (ADM). Both MME MIDI and DirectMusic
MIDI can be used.
Note: If an AES signal is applied to the BNC input, and Coaxial is selected as Input, the AES
audio signal will appear on channels 1/2 in TotalMix FX and the recording software. Channels 3
to 64 then carry no audio data.
9.2 Channel Count under ASIO
The MADIface allows the use of sample rates up to 192 kHz via the MADI interface. For this to
work single-channel data is spread to two or four channels using the Sample Multiplexing tech-
nique. Therefore the number of channels is reduced to 32 or 16 respectively.
Note: When changing the sample rate range between Single, Double and Quad Speed the
number of channels presented from the ASIO driver will change too. This may require a reset of
the I/O list in the audio software and a reassignment of the channels within the project.
Mono channels Double Speed Quad Speed
MADI (1 to 16) MADI (1 to 16) MADI (1 to 16)
MADI (17 to 32) MADI (17 to 32) MADI (17 to 32)
MADI (33 to 64) MADI (33 to 64) MADI (33 to 64)

20 User's Guide MADIface USB © RME
9.3 Known Problems
If a computer does not provide sufficient CPU-power and/or sufficient USB-bus transfer rates,
then drop outs, crackling and noise will appear. Such effects can often be avoided by using a
higher buffer setting/latency in the Settings dialog of the MADIface USB. Furthermore PlugIns
should be deactivated temporarily to make sure they do not cause these problems. More infor-
mation can be found in chapter 26.4.
Another common source of trouble is incorrect synchronization. ASIO does not support asyn-
chronous operation, which means that the input and output signals not only have to use the
same sample frequency, but also have to be in sync. All devices connected to the MADIface
USB must be properly configured for Full Duplex operation. As long as SyncCheck (in the Set-
tings dialog) only displays Lock instead of Sync, the devices have not been set up properly!
The same applies when using more than one MADIface USB. They all have to be in sync. Else
a periodically repeated noise will be heard.
MADIface USB supports ASIO Direct Monitoring (ADM). Please note that not every program
supports ADM completely or error-free. The most often reported problem is the wrong behav-
iour of panorama in a stereo channel. Also try to avoid setting the TotalMix FX hardware out-
puts (third row) to mono mode. This will most likely break ADM compatibility.
In case of a drift between audio and MIDI, or in case of a fixed deviation (MIDI notes placed
close before or behind the correct position), the settings in Cubase/Nuendo have to be
changed. At the time of print the option 'Use System Timestamp' should be activated. The
MADIface USB supports both MME MIDI and DirectMusic MIDI. It depends on the used applica-
tion which one will work better.
10. Using more than one MADIface
The current driver supports up to three MADIface USB. All units have to be in sync, i.e. have to
receive valid sync information (by feeding synchronized signals).
• If one of the MADIfaces is set to clock mode Internal, all others have to be set to clock
mode slave, and have to be synced from the master. The clock modes of all units have to
be set up correctly in the MADIface Settings dialog.
• If all units are fed with synchronous signals, i.e. all units show Sync in their Settings dialog,
all channels can be used at once. This is especially easy to handle under ASIO, as the
ASIO driver presents all units as one.
The driver takes care of the numbering of all MADIfaces, so that it doesn't change. The unit with
the lowest serial number is always 'MADIface (1)'. Please note:
• If the MADIface (1) is switched off, MADIface (2) logically turns to the first and only MADI-
face. If MADIface (1) is switched on later, the numbering changes and the unit becomes
MADIface (2) immediately.
• The driver has no control on the numbering of the WDM devices. Therefore it might happen
that the WDM devices (2) are mapped to unit (1), especially when switching on more MADI-
faces during a Windows session. A reboot with all MADIfaces already operational should
solve this problem.
Note: TotalMix is part of the hardware of each MADIface. Up to three mixers are available, but
these are separated and can't interchange data. Therefore a global mixer for all units is not
possible.
Table of contents
Other RME Audio Accessories manuals

RME Audio
RME Audio ADI-192 DD User manual

RME Audio
RME Audio Fireface UC User manual

RME Audio
RME Audio Babyface Pro User manual

RME Audio
RME Audio ADI-648 User manual

RME Audio
RME Audio ADI-6432 User manual

RME Audio
RME Audio Fireface UCX User manual

RME Audio
RME Audio Fireface UFX+ User manual

RME Audio
RME Audio ADI-648 User manual

RME Audio
RME Audio Babyface User manual

RME Audio
RME Audio Fireface 400 User manual


