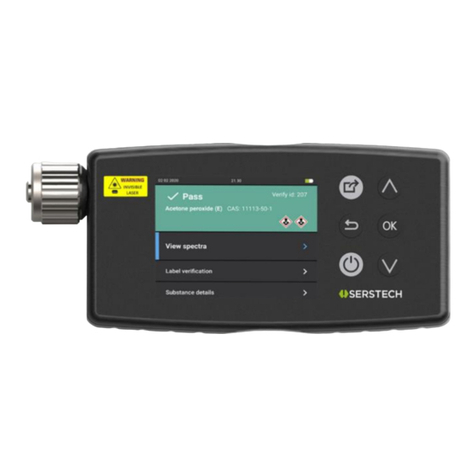
Serstech 100 User manual

Serstech 100 Indicator
User manual
version 5.4.2
© 2019 Serstech AB

Serstech 100 Indicator User Manual Vers.5.4.2
2
Table of Contents
1. Introduction to the Serstech 100 Indicator......................................................................4
1.1 Instrument safety...........................................................................................................4
1.2 Liability...........................................................................................................................4
1.3 Handling ........................................................................................................................4
1.4 Intellectual Property Rights............................................................................................5
1.5 Equipment Modifications................................................................................................5
1.6 Trademark Acknowledgments........................................................................................5
1.7 Support............................................................................................................................5
1.8 Contact Information........................................................................................................6
1.9 Invisible laser Safety Considerations .............................................................................6
2. Serstech 100 Indicator Peli case....................................................................................8
3. Accessories...................................................................................................................8
3.1 Vial holder....................................................................................................................10
3.2 Point and shoot adaptor...............................................................................................11
3.3 Bottle adaptor............................................................................................................... 12
3.4 Angled probe tip...........................................................................................................12
3.5 Calibration cap.............................................................................................................14
3.6 USB Cable...................................................................................................................14
4. Indicator....................................................................................................................... 15
1.1 Keypad ........................................................................................................................16
1.2 Log in........................................................................................................................... 17
1.3 Main menu...................................................................................................................18
1.4 Quick menu ................................................................................................................. 20
1.5 Screen.........................................................................................................................21
1.5.1 Screen analysis result ........................................................................................... 27
1.5.2 Screen review........................................................................................................28
1.5.3 Screen Settings.....................................................................................................29
1.6 Identify......................................................................................................................... 30
1.6.1 Identify analysis result...........................................................................................34
1.6.2 Identify review .......................................................................................................35
1.7 Verify........................................................................................................................... 36
1.7.1 Verify analysis result..............................................................................................40
1.7.2 Verify review.......................................................................................................... 41
1.7.3 Verify settings........................................................................................................ 42
1.8 Add substance............................................................................................................. 43
1.8.1 Add substance review ........................................................................................... 47
2. Libraries....................................................................................................................... 48
3. About........................................................................................................................... 51
4. Time and Date............................................................................................................. 52
5. Display properties........................................................................................................53

Serstech 100 Indicator User Manual Vers.5.4.2
3
6. Calibration control........................................................................................................ 54
6.1 Calibration result.......................................................................................................... 56
9.2 Calibration settings ...................................................................................................... 57
7. USB............................................................................................................................. 59
8. Language.....................................................................................................................60
9. Factory Reset ..............................................................................................................62
11. ChemDash...................................................................................................................65
14.1 ChemDash ONE.......................................................................................................... 66

Serstech 100 Indicator User Manual Vers.5.4.2
4
1. Introduction to the Serstech 100 Indicator
Raman spectroscopy is a spectroscopy technique which can be used for rapid identifi-
cations of chemicals. The Raman effect occurs when a light (e.g. from a laser) interacts
with the sample molecules. Light scattered from the molecules gives rise to a spectrum that
typically consists of a series sharp lines and constitutes molecules fingerprint.
The Serstech 100 Indicator is a hand-held Raman spectrometer which can be used
without formal training in spectroscopy to obtain chemical identity of substances as well as
verify the quality of known substances in order to be able to make immediate action deci-
sions in the field. It also includes a function to screen for regulated substances. The Indica-
tor is a standalone instrument that operates without need for other components. However,
the instrument relies on access to libraries stored in the instrument and/ or ability to create
and update these libraries externally. Basic computer knowledge is required for adminis-
trating the libraries and the users. Laser training is needed for all users since the instrument
includes class 3B invisible laser.
This manual describes the basic functions of the Indicator as well as the connection to
the software ChemDash ONE. Functions may be different depending on the hardware and/
or software version in the device. The manual covers Indicators with embedded software
functionality version 5.3.0 or later.
The software version is shown in the “About” window. The serial number of the instru-
ment is printed on the back of the instrument (S/N) and is also shown in the “About”window
for software.
Please NOTE that you can access ChemDash ONE only if your instrument is running
software version 4.0.1 or later. If your instrument is running an older version, please
upgrade the firmware first by following the instructions in the Firmware Upgrade
Guide on serstech.com
1.1 Instrument safety
This is intended for Laser Safety Officers, administrators and users of the SERSTECH
Indicator handheld Raman spectrometer instrument. Please read through this section care-
fully before using the SERSTECH product. Keep the document for further reference.
1.2 Liability
Every care has been taken in the preparation of this document. Please inform your local
reseller or SERSTECH AB of any inaccuracies or omissions. SERSTECH AB is not respon-
sible for any technical or typographical errors and reserves the right to make changes to
the product and manuals without prior notice. SERSTECH AB makes no warranty of any
kind regarding the material contained within this document, including, but not limited to, the
implied warranties of merchantability and fitness for a particular purpose. SERSTECH AB
shall not be liable nor responsible for incidental or consequential damages in connection
with the furnishing, performance or use of this material. This product is only to be used for
its intended purpose.
1.3 Handling
For a safe handling Serstech AB recommends Users to do as following:
▪Store the product in a dry and ventilated environment.

Serstech 100 Indicator User Manual Vers.5.4.2
5
▪Do not attempt to repair the product by yourself, contact SERSTECH or your SER-
STECH reseller for service matters.
▪This product shall be used in compliance with local laws and regulations.
▪Always follow your organization’s procedure and regulations for the handling of un-
known substances.
▪Always use small sample sizes to limit possible hazards.
The warranty is void if the product has been damaged by accident, unreasonable use,
neglect or if the unit has been opened or tampered with or other causes not arising from
defects in material or workmanship. This product is not designed to be intrinsically safe and
the user should take the necessary precautions when using the unit.
The product is designed to be used in an everyday field environment and is therefore
considerably more rugged than a laboratory unit. But it is important for the user to recognize
that it is a precision instrument and should be treated with care. Abuse and mistreatment
may lead to a degradation of performance or premature failure.
1.4 Intellectual Property Rights
SERSTECH AB has intellectual property rights relating to technology embodied in the
product described in this document. In particular, and without limitation, these intellectual
property rights may include patents or pending patent applications in the US and other
countries. This product contains third-party software.
1.5 Equipment Modifications
This equipment must be installed and used in strict accordance with the instructions
given in the user documentation. This equipment contains no user-serviceable compo-
nents. Unauthorized equipment changes or modifications will invalidate all applicable reg-
ulatory certifications and approvals
1.6 Trademark Acknowledgments
is a trademark of SERSTECH AB. All other company names and
products are trademarks or registered trademarks of their respective companies. Ethernet,
Internet Explorer, Linux, Microsoft, Mozilla, UNIX, Windows and WWW are registered trade-
marks of the respective holders. Java and all Java-based trademarks and logos are trade-
marks or registered trademarks of Oracle and/ or its affiliates. UPnP ™ is a certification
mark of the UPnP ™ Implementers Corporation. SD, SDHC, SDXC, miniSD, microSD, min-
iSDHC, microSDHC and microSDXC are trademarks or registered trademarks of SD-3C,
LLC in the United States, other countries or both.
1.7 Support
In case the User should requires technical assistance, should contact its SER-
STECH reseller. If the User questions cannot be answered immediately, the reseller will
forward all queries through the appropriate channels to ensure a rapid response.

Serstech 100 Indicator User Manual Vers.5.4.2
6
1.8 Contact Information
The contact information of the company is as following:
1.9 Invisible laser Safety Considerations
This operation manual includes information and warnings which must be observed
by the user. It contains information NOTEs as well as information of importance to safety
of personnel and property. The important symbols are:
This is a Class 3B laser product and complies with “Classified
according to standard EN 60825-1:2014”.
Class 3B requirements:
A class 3B device shall have a warning signal, audible or visi-
ble when the invisible laser is active. A red LED in a yellow
warning label placed adjacent to the display solves this re-
quirement. According to the standard, there shall be a yellow
label with a black border, the recommended wording is:
WARNING –INVISIBLE LASER RADIATION
AVOID EXPOSURE TO BEAM
CLASS 3B LASER PRODUCT
The backside label on the Serstech 100 Indicator solves this
requirement. Also, the frontside label has the word WARNING
according to standard requirements. Another requirement is
that the laser aperture is labelled, there is thus a yellow picto-
gram label besides the nozzle. The only source for dangerous
laser exposure is from the nozzle; the protective casing is de-
signed not to leak laser emission in any other place. With in-
tended use, there is no raised danger for laser exposure when
accessing the display controls. A remote interlock connector is
not required for handheld instruments. There are no service
panels, viewing optics or scanning elements; requirements for
these objects are thus not applicable. There shall be a me-
chanical attenuator/beam stop available to make it possible to
block the beam from the nozzle temporarily. The stop is re-
leased with the instrument enclosed Calibration Unit, which
also makes double duty as a dust cap. Class 3B is one of the
most severe classes; meaning that it is easy to permanently
harm the eye when the product is not used properly. A class
3B product is not suited as a consumer product since the op-
erator needs to be trained to use proper procedures to avoid
eye damage. A safety interlock is needed to ensure that only
trained operators use the instrument. A software requirement
solves this; the operator needs to login with a PIN number to
use the instrument. The software also turns the instrument off

Serstech 100 Indicator User Manual Vers.5.4.2
7
when inactive and a new login with PIN number is required.
Ensure the beam is always terminated at a suitable non-spec-
ular (i.e. non-mirror- like) surface. Do not direct the beam at
other people or into areas where other people unconnected
with the laser work may be present. Refer to the International
standard EN 60825-14 users’ guide for guidance on identifying
and controlling hazards associated with laser use.
Always ensure the invisible laser is turned off when
changing measuring accessories, e.g. from point-and-
shoot adaptor to the vial holder.
WARNING: Exposure to levels of invisible laser energy above
the MPE can be harmful to the eye. The minimum safety dis-
tance (Nominal Ocular Hazard Distance, NOHD) is 100 cm
from the invisible laser aperture to avoid exposure to levels
above the MPE. The output power is 300 mW at 785 nm. Al-
ways avoid exposure to the beam. Use administrative controls,
engineering controls, and/ or laser safety glasses to avoid ex-
posure to invisible laser radiation within the 100 cm hazard
zone. Use invisible laser safety eyewear of an optical density
(OD) greater than 3.
WARNING: Scanning a thermally sensitive material may
cause burning of the target. If the sample is contained in a
tightly sealed vessel (e.g. a capped vial), pressure may build
up during the scan, causing subsequent explosion of the ves-
sel.

Serstech 100 Indicator User Manual Vers.5.4.2
8
2. Serstech 100 Indicator Peli case
The Serstech Indicator 100 instrument with the Accessories is delivered in a crush
proof, dust proof and water resistant Peli case.
This is the Peli case.
3. Accessories
There are different accessories for different sample applications:
1. Sample vial
2. Vial holder
3. Vial holder insert
4. Strap attachment
5. Calibration cap
6. Angled probe tip
7. Mounting tools/wrenches
8. Bottle adaptor
9. Point and shoot adaptor
10.Probe tip
So as to know what the most suitable accessory for your measurement is, please
see the Table 1 and its explanation below:
Table 1: List of accessories according to their use
Sample
substance
Sample
holder
Holder wall
thickness
(mm)
Accessory:
Probe tip to-
gether with
Laser point dis-
tance inside the
sample (mm)
≥2.0 ml liquids
or powders
Standard vial
1.3
Vial holder
0.1-0.9
(from the sample
holder
interior wall)
Bottles
1.0-1.5
Bottle adapter
Containers
1.5-4.0
-
≤ 2.0 ml liquids
or powders
Standard vial
1.3
Vial holder + in-
sert
Solids or pow-
ders
Plastic bags
-
Pont and shoot
0.2
The purpose of the different adaptors is to keep the sample at the proper distance from
the laser focus point. If the laser focus ends up too far inside the sample, the Raman signal
will be attenuated and result to a low quality or unusable spectrum. On the other hand, e.g.

Serstech 100 Indicator User Manual Vers.5.4.2
9
if a container wall is thicker than 4 mm, the focus point will end up on the container wall and
you will sample the container material instead of its content.
1. If the User measures through a glass or plastic container with 1.5-4.0 mm thick walls
use probe tip (10. in the picture above) without any adaptor mounted. The laser focus
will then be located 4.5-5.0 mm from the tip and therefore will end up inside the sample.
2. If the User measures through the standard sample vial with 14.8 mm outer diameter and
1.3 ±0.2 mm thickness, the laser will point 0.1-0.9 mm from the vial interior wall and 14
mm from the bottom of the vial inside the vial holder. Therefore, the vial must be filled
up to 2 mL at least so that the laser focus ends up inside the sample and not in the air.
3. If the sample is less than 2 mL use the insert to raise up the vial inside the vial holder.
The laser focus will point 0.1-0.9 mm from the vial interior wall and 2 mm from the vial
bottom. Minimum sample volume is approximately 0.4 mL.
4. With the point and shoot adaptor the focus will point approximately 0.2 mm from the
adaptor tip. That's why the point and shoot adaptor is appropriate to use when measur-
ing though a thin plastic bags or flush to a solid surface of the sample.
5. If the container has 1.0-1.5 mm thick walls use the bottle adaptor.
NOTE: It is very important to reduce stray light from entering the instrument as much as
possible, e.g. by covering the container with a black cloth unless the User uses the vial
holder adaptor. It is also recommended to use the auto-exposure mode. The amber glass
vessels and fogged plastic material will reduce the quality of the signal and thus the ob-
tained spectrum. The signal quality may be also reduced for the opaque samples, e.g. pow-
ders because of the sample depth (affected by factors as the grain size), fluorescence,
sample actual Raman response etc. However, for transparent, non- fluorescent liquid sam-
ples there are a much wider margin.

Serstech 100 Indicator User Manual Vers.5.4.2
10
3.1 Vial holder
Thevialholderisusedforanalysisofliquid samplesinvials.
One
sample vial is shipped
with the instrument. Generally, the vial holder can be used with both probe tip and angled
probe tip. In this example we will use it with the straight probe tib.
Theholderaccepts4mL standard vials with 14.8
mm outer
diameter and1.3(±0.2)mmthickness.
Tomountthevial holder simplysnapitto the probe
tip.
Add the sample into the vial.
WARNING: Scanning a thermally sensitive mate-
rial may cause burning of the target. If the sample
is contained in a tightly sealed vessel (e.g. a
capped vial), pressure may build up during the
scan, causing subsequent explosion of the vial.
Place the vial intothe vial holder.
Screw the cap on and start the measurement.

Serstech 100 Indicator User Manual Vers.5.4.2
11
Vial holder inserter
The insert serves as a support for the vials filled
with a sample up to 0.4 mL.
3.2 Point and shoot adaptor
The point and shoot adaptor have a conical shape for easy measurement of any
size and shape of samples. This will ensure optimal versatility and measurement results.
Generally, the point and shoot adaptor can be used with both straight probe tip and an-
gled probe tip.
To attach the point and shoot adaptor please fol-
low the steps bellow:
1. Align bezels of adaptor to corresponding
notches on the probe tip
2. Align the adaptor into position
3. Slightly pull and rotate when removing the
adaptor
With the point and shoot adaptor the measure-
ments can be made e.g. through transparent plas-
tic bags by gently pressing the adaptor against the
bag.
NOTE: The laser focus is typically under 20μm
(0.02 mm)
WARNING: Keep the sample pressed against the
adaptor until the red diode, indicating invisible la-
ser activity, is turned off.

Serstech 100 Indicator User Manual Vers.5.4.2
12
3.3 Bottle adaptor
The bottle adaptor looks similar to the point and shoot adaptor and is used when
measuring through a transparent container with a thickness of 1.0 -1.5 mm. Generally, the
bottle adaptor can be used with both probe tip and the angled probe tip. In this example
we will use it with the straight probe tip.
To attach the bottle adaptor please follow the steps
bellow:
1. Align bezels of adaptor to corresponding
notches on probe tip
2. Align the adaptor into position
3. Slightly pull and rotate when removing the
adaptor
Measure without an adaptor if your container is 1.5-
4.0 mm thick. Place the container flush to the in-
strument probe tip and start the measurement.
3.4 Angled probe tip
The angled probe tip is used for analysis of solid samples. It can be used for meas-
urements of e.g. powders through a plastic bag when sampling potentially explosive sub-
stances.
The angled probe tip.

Serstech 100 Indicator User Manual Vers.5.4.2
13
WARNING: Before mounting the angled probe tip
make sure that the Indicator is turned off. Expo-
sure to the beam can result in serious eye dam-
age!
To mount the angled probe tip first remove the
current probe tip from the instrument. Use two
specially designed wrenches supplied with the in-
strument.
Place one wrench in the notch on the probe tip
next to the instruments main body and the other in
the similar notch between the two rubber rings.
Hold the wrench next to the instruments main
body still and turn the wrench on the probe tip
counterclockwise to remove it.
Attach the angled probe tip by gently inserting the
threaded part and screw it in place by hand. Use
the wrenches to tighten. Make sure that the tip is
securely fastened, but do not overtighten.
The angled probe tip accepts the point and shoot
adaptor, the bottle adaptor, the vial holder and the
calibration cap.
NOTE: Make sure not to damage the invisible la-
ser shutter when mounting the angled probe tip.
The invisible laser shutter prevents any accidental
exposure to the collimated laser beam.
Put the instrument on a flat surface with the adap-
tor in contact with the sample and start the meas-
urement. Since it will take some time before the in-
visible laser is turned on the operator can move
away from the instrument to a safe area.

Serstech 100 Indicator User Manual Vers.5.4.2
14
3.5 Calibration cap
The calibration cap contains a polystyrene target
and is used for the calibration control of the instru-
ment. It is also protecting the optics inside the
probe tip.
3.6 USB Cable
The supplied USB cable is the connection cable
between the Indicator and a PC, used to access
ChemDash ONE.
The USB cable is also used to connect the optional
USB charger to the Indicator.

Serstech 100 Indicator User Manual Vers.5.4.2
15
4. Indicator
All the Indicator functions are controlled through the Keypad.
On the front side of the Indicator there is a clearly visible laser warning
label with a red indicator LED that is lit when the invisible laser is oper-
ating.
On the backside of the instrument it
can be found:
▪Product ID
▪Invisible laser safety infor-
mation
▪Serial number
▪QR code
Important NOTE: Analysis of strongly reflecting samples, e. g. mir-
rors, must be avoided since this can harm the instrument and void
the warranty.
NOTE: Be aware of that any measurement is sensitive to stray light entering the instrument
through the probe tip. Stray light will not damage the instrument but may cause corruption
of the measurement. Daylight usually contains a substantial amount of near infrared

Serstech 100 Indicator User Manual Vers.5.4.2
16
radiation in the same spectral range as the Raman bands, making it difficult to filter out
without simultaneously reducing instrument detection sensitivity. When doing a scan out-
side in bright sunlight, it is recommended to scan the sample using the capped vial holder,
if possible. When scanning solid materials, e.g. in plastic bags, you should limit the amount
of stray light as much as possible, e.g. by doing the measurements in a shaded area and
cover the front lens aperture.
1.1Keypad
1. Power
Start the instrument by pressing the power button
and shut it down by keeping the power button
pressed for 5 seconds.
2. Quick Menu button
▪Back- Returns to the previous menu
▪Home- Main menu
▪USB- USB
▪Calibrate-Calibration
▪Settings-Main menu Settings
3. Arrows
Use the up and down arrow buttons to move be-
tween the different items in the menus.
4. Arrows
Use the tab button to move between the different
fields in the menus.
5. OK button
Execute choices by pressing the OK button.

Serstech 100 Indicator User Manual Vers.5.4.2
17
1.2 Log in
In order to log in the Serstech 100 Indicator, please follow all steps described below:
•
Start theinstrument bypressing the
button
•Select youridentityfromthe list in
the window:
If the instrument is started for the first
time, there are two predefined users
that may be used to access the instru-
ment:
Default, Admin
Default, User
•Scroll with the arrow keys be-
tween the alternatives.
•Press the OK button to select a
user
•Enter your four-digit personal
code that your local Indicator ad-
ministrator has supplied you with.
•Move between the four different
digits with the [Tab] key.
•Use the up and down arrows to
change the value for each of the
four digits. The value can be set
to 0-9.
•Press the OK button.
•The Main menu will be displayed
after a successful log-in.
•After 3 unsuccessful attempts
typing the wrong PIN code, the
User will automatically be locked
out. To change the PIN code and
be able to log in again, please
use ChemDash ONE.
•NOTE: When the instrument is
started for the first time the PIN
code (supplied with the instru-
ment) is 0000. It is up to the User
to change its PIN code on the de-
vice through ChemDash ONE.

Serstech 100 Indicator User Manual Vers.5.4.2
18
1.3 Main menu
Features of the Main menu are Scan, Review, Settings and Exit. You can quick access
the Main menu by using the Quick Menu button and select Home.
Select Scan if you want to:
▪Screen to search a substance(s)
▪Identify an unknown substance(s)
▪Verify a known substance(s)
▪Add new substance (s)
▪Scan settings:
oScreen Settings
oVerify Settings
oCalibration Settings
Select Review if you want to see the
history of your measurements:
▪Screen Review
▪Identify Review
▪Verify Review
▪Add substance Review
▪Back to the Main menu
Select Settings to access the options:
▪About
▪Time and Date
▪Display properties
▪Administration:
oCalibrate
oUSB
oLanguage
oFactory Reset
▪Back to the Main menu

Serstech 100 Indicator User Manual Vers.5.4.2
19
Select Exit if you want to:
▪Log of from the Indicator
▪Restart the Indicator
▪Shut down the Indicator
▪Back to the Main menu

Serstech 100 Indicator User Manual Vers.5.4.2
20
1.4 Quick menu
The Quick Menu is opened when the Quick Menu button is pressed.
Features of the Quick menu are Back, Home, USB, Calibrate and Settings.
▪Use the up and down arrows to move between the different menu items.
▪The Quick menu is closed by pressing the Quick Menu button.
Select
Back
toreturntothe previous
menu.
Select
Home
to go to the Main menu.
Select
USB
to activate the USB port.
This manual suits for next models
2
Table of contents
Other Serstech Measuring Instrument manuals
Popular Measuring Instrument manuals by other brands

Horiba Scientific
Horiba Scientific LAQUA WQ-300 Series quick guide
Bitzer
Bitzer KT-170-4 technical information
sparklike
sparklike Laser Portable 2.1 Setup guide
Tektronix
Tektronix RSA5100A Series instructions
Extech Instruments
Extech Instruments 461825 user guide

PCB Piezotronics
PCB Piezotronics IMI SENSORS 66162ANZ1 Installation and operating manual
SEO
SEO DST 30 Series Administrative guide
Hanna Instruments
Hanna Instruments HI 8734 instruction manual
Audio Precision
Audio Precision B Series Installation Instructions and Specifications
Tektronix
Tektronix SPECMON3 manual
Zoom
Zoom PodTrak P4 Operation manual
AEMC instruments
AEMC instruments 6528 user manual
