SetOne TX-8300 User manual

Seite 1
Preface
Dear Customer,
Thank you for purchasing a product from our company.
To get the most enjoyment from your viewing experience, our products constantly strict quality and
safety are subject to (GS).
With your choice of this product you have chosen for the new technologies of digital reception. These
new technologies offer a variety of features and possibilities.
Before starting to make themselves thoroughly familiar with your device. Please read this manual
carefully so that you can exhaust all the options offered on this receiver full.
This manual will help you intended, safe and benecial use of digital satellite receiver, hereinafter called
the receiver.
Keep this manual always close to the receiver. Enter the manual even further if you sell or pass on your
receiver.
We hope you enjoy your new receiver.
Your team SetOne

Seite 2
Design features
Various elements of the manual are provided with set design aspects. So you can easily distinguish
whether it is normal text,
• / ►Enumerations / action steps
Warnings
or
General Notes
Art-Nr.: 10-01-000-083
EAN: 4260141713122
Illustrations, subject to technical changes and corrections.
For printing errors, we assume no liability.
1st Edition. 1.0_DE version, as of 08/2010
Information

Seite 3
Contents
Preface 1
Design features 2
Information 2
Contents 3
General Introductions 6
INTRODUCTION 6
1. Safety Instructions 6
a) MAIN SUPPLY 6
b) OVERLOADING 6
c) LIQUIDS 6
d) CLEANING 6
e) VENTILATION 6
f) ATTACHMENTS 6
g) CONNECTION TO THE SATELLITE 7
h) CONNECTION TO THE TV 7
i) EARTHING 7
j) LOCATION 7
k) Battery handling 7
l) Protection classes 7
2. Product Overview 8
2.1 Front Panel 8
2.2 Rear Panel 9
2.3 Remote control 10
3. Connectivity 12
4. Installation 13
4.1 Connecting your Receiver 13
4.2 Preparing your Remote Control 13
4.3 TV Format Set-Up 13
4.4 Check Satellite Signal Reception 13
4.5 Fast Channel Set-Up Astra 2A/B/D/Eurobird 1 14
4.6 Chosen Satellite Scan 14
5. Menu System 15
5.1 Installation Menu 15

Seite 4
5.1.1 Selecting your Satellite 15
5.1.2 Selecting your SCAN Options 15
5.1.3 Scanning 15
6. Channel Manager Menu 16
6.1 Channel Edit 16
6.2 Delete Channel 16
6,3 Set Favourite 16
7. System Setting 17
7.1 AV Setting 17
7.2 Local Time Setting 17
7.3 Timer 18
7.4 System Information 18
8. System Setting 19
8.1 OSD Setting 19
8.2 Parental Control 19
8.3 Private Setting 20
8.4 Factory Default 20
9. USB 21
9.1 Multimedia 21
9.2 Software Upgrade 21
9.3 Database Backup 21
9.4 Database Update 22
9.5 PVR Partition Select 22
9.6 PVR Preview 22
10. Advanced Installation 23
10.1 Antenna Setting 23
10.2 Satellite List 24
10.3 Transponder List 24
10.4 Setup Motor(DiSEqC) 25
10.5 USALS (DiSEqC) Setup 25
11. Software Update 27
12. Dismantle and store 28
13. Receiver clean 28

Seite 5
14. Trouble Shooting 29
15. Discard Receiver 30
16. Technical data 31
17. Service 33
18. Guarantee 33
19. Declaration of Conformity 34
20. Sercive Hotline 34
Seite 6
General Introductions
INTRODUCTION
This manual will help you learn basic functions
such as installation, selecting channels and many
other functions of the STB. All functions can be
operated by the remote control. You can easily
install it by selecting ”Installation” function and
upgrade its software through communication
cable.
The remote control is designed for easy access
to all the functions at once and for comfortable
grab for your hand. It is programmed to control
all functions and to easily watch TV and Radio
programs via the STB.
WARNING!!!
Any problems can be caused by the use of
unofcial software. The use of software versions
other than dealers or distributors ofcial software
will void the manufacturer’s warranty. It is advised
that only the formal software released from
dealers or distributors should be used.
1. Safety Instructions
This STB has been manufactured to satisfy
the international safety standards. Please
read the following safety precautions carefully.
a) MAIN SUPPLY
AC 100/240V, 50/60Hz, 30W.
b) OVERLOADING
Do not overload a wall outlet, extension cord
or adapter as this may result in re or electric
shock.
Ensure that the power source (socket) is
easily accessible.
c) LIQUIDS
This STB shall not be exposed to dripping
or splashing and that no objects lled with
liquids, such as vases, shall be placed on the
STB.
d) CLEANING
Disconnect the STB from the main supply
before cleaning. Do not use any kind of
solvents to clean the STB, only use a soft-dry
cloth.
e) VENTILATION
The slots on top of the STB must be left
uncovered to allow proper airow to the unit.
Ensure a minimum distance of 5cm around
the apparatus for sufcient ventilation.
Ensure that the ventilation is not impeded by
covering the ventilation openings with items
such as newspapers, table-cloths, curtains,
etc.
Do not stand the STB on soft furnishings or
carpets.
Do not expose the STB to direct sunlight or do
not place it near a heater.
Do not stack electronic equipments on top of
the STB.
Do not place naked ame sources, such as
lighted candles on the apparatus.
f) ATTACHMENTS
Do not use any unrecommended attachments
as these may cause hazard or damage to the
STB.
g) CONNECTION TO THE SATELLITE
DISH LNB
Disconnect the STB from the main supply
before connecting or disconnecting the cable
from the satellite dish.
FAILURE TO DO SO CAN DAMAGE THE TV.

Seite 7
h) CONNECTION TO THE TV
Disconnect the STB from the main supply
before connecting or disconnecting the cable
from TV.
FAILURE TO DO SO CAN DAMAGE THE TV
i) EARTHING
The LNB cable MUST BE EARTHED to the
system earth for the satellite dish.
j) LOCATION
Place the STB indoor in order not to expose to
lightening , rain or Sunlight.
Use the apparatus only in moderate climates
(not in tropical climates).
k) Battery handling
Batteries may contain toxic agents that are
hazardous to the environment. Therefore,
dispose of the batteries immediately according
to the prevailing statutory regulations. Never
throw the batteries in normal household
waste.
l) Protection classes
This product with the protection
class II (Fig. icon). Apparatus
protected class II have
reinforced or double insulation
between the power circuit and
the output voltage or metal
casing and have no connection to the earth.

Seite 8
2. Product Overview
2.1 Front Panel
No. Symbol Function
1. I/O Switch to full off the receiver.
2. ▲/▼ Channel Select, marking in menus.
3. LED-DISPLAY 4-digit LED display (7 segment).
4. USB-Port Behind the ap is a USB Port For connecting external storage devices.
1 2 3 4
Seite 9
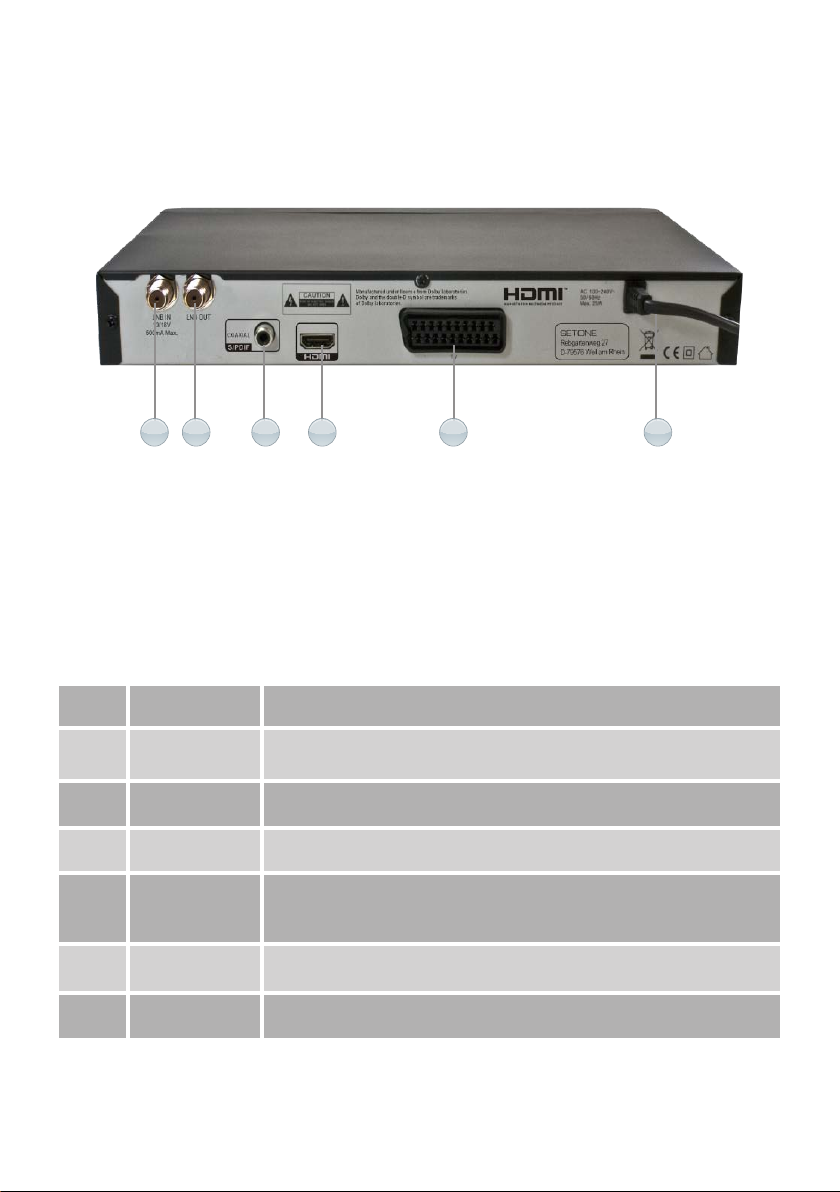
2.2 Rear Panel
No. Symbol Function
1. IF IN Use to connect an antenna.
2. IF OUT Use it when connecting to another STB.
3. S/PDiF SPDIF format sound by coaxial and optical output
4. HDMI Digitaler HDMI-Ausgang zum Anschluss Ihres digitalen HDTV-
Fernsehgerätes.
5. TV To connect the high denition media interface output to HDTV.
6. Power cord AC 100 – 250 V ~ 50 / 60Hz, Max.40W
1 2 3 4 5 6

Seite 10
2.3 Remote control
1. I/O: Switches between Operation and Standby modes.
2. SLEEP: To display the sleep timer
3. 0-9: Changes channels or selects the menu options.
4. EXIT: Press to exit the current menu.
5. VOL +/-: You can adjust the volume with this button.
6. ▲/▼: Changes channels or items from top to bottom on the menu.
7. ◄/►: Changes the page of channel list.
8. TV/Radio: You can switch between TV and Radio mode switch and / or opens a menu of
options within the menu.
9. ROT: It opens the options menu: Multifeed.
10. MENÜ: Moves to main menu during TV viewing.
11. SUB: Open the subtitle function in programs with an appropriate offer.
12. Format Format
13. TXT: Switch on the videotext.
14. MUTE: Turn off volume.
15. BACK: Back to last menu.
16. INFO: Displays the program information box on the screen.
17. CH +/-: Changes channels or items from top to bottom on the menu.
18. EPG: Electronic Program Guide button displays the TV/Radio program guide broadcasting by
Satellite TV provider.
19. OK: Displays the channel list and selects the item on the menu.
20. FAV: Open the Favorites list, or opens a menu of options within the menu.
21. BLAU: Opens the Timer list or open a menu of options within the menu.
22. AUDIO: Changes audio mode to left right and stereo.
24. PVR: Take you directly to the menu item „Media Management“.
25. << / >>: Speed up and back while USB Media playing.
26. PLAY: Starts playing a media le.
27. STOP: Stop playing.
28. PAUSE: Pauses a play or start the time shift.
29. REC: Start recording.

Seite 11
8
7
7
1
2
4
6
3
5
12
10
11
9
13
14
13
14 28
22
21
24
26
29
20
23
15
18
8
17
25
27
19
16

Seite 12
3. Connectivity
Here describes how to connect your receiver to your existing equipment to ensure proper image
and sound reproduction.
N0. Symbol Notes
1. IF IN LNB input for cable from your satellite antenna or from your satellite
connection box.
2. IF OUT Loop-through function of the LNB signal to connect a second receiver.
5. S/PDiF Digital audio output for connecting your digital stereo (5.1 sound) over
coaxial cable.
4. HDMI Digital audio output for connecting your digital stereo (5.1 sound) on a
Digitaler HDMI output for connecting your digital HDTV television set.
3. TV SCART Analogoutput for connection to a conventional tube TV, VCR, or similar.
TV-Gerät
HiFi-Anlage
(Digitalton, 5.1)
TV-Geräte
mit HDMI-Anschluss
Sat-Receiver
(optional)
SAT-Anlage
1. 2.
5.4.3.

Seite 13
4. Installation
This manual wil help you learn the basic features
and operation of your receiver such as instal ati-
on, channel selection and many other functions
of the set top box.
4.1 Connecting your Receiver
Having completed the assembly and erection of
your dish, connect the satel ite cable from your
dish to the LNB IN terminal of your receiver and
your HDMI lead from the rear of your receiver to
an available socket on your TV or AV Amplier. If
you are not using an HD compatible TV then you
will need to connect to your TV using a SCART
lead and optionally the Audio Out to an AV Amp-
lier. If you are using the HDMI socket then you
only need to connect this, as it feeds both high
quality audio and video to your TV.
4.2 Preparing your Remote Control
Your Remote Control requires 2 x AAA (LR03)
batteries to operate (not supplied). Open the
cover on the rear of the Remote Control by sli-
ding it downwards and insert two batteries taking
care to observe the polarity markings inside the
compartment.
4.3 TV Format Set-Up
You are now ready to switch on and adjust your
dish to complete alignment (for this refer to the
separate instructions). Switch on your TV and
plug in your Satel ite Receiver then proceed as
fol ows:–
• Press the POWER button on your Remote
Control or the STANDBY Button on the Front
Panel of the Receiver to turn the unit on.
• If a ‘Mode not supported’ message appears
on your TV - You need to alter the Receiver
resolution to match the resolution of your TV –
The factory default is 720p.
• The Resolution is changed by pressing the ‘V
Format’ button on your remote control. Select
between 480p, 576p, 720p and 1080i TV
Resolutions as required. 1080i is the highest
available resolution for Satellite HD channel
reception.
NOTE: The TV may icker or the picture dis-
appear briey when changing resolution
• Make sure your TV source is set to receive
the signal from your Receiver.
NOTE: If you are using this Receiver in con-
junction with a pre-installed dish which is
already aligned to ASTRA/EURO1 then after
the unit has powered up you will see “NO
CHANNEL” being displayed. At this point
press the “OK” button and your Channel list
should be displayed showing all the program-
mes that were loaded onto the receiver
during manufacture. Your Receiver is now
ready to use.
4.4 Check Satellite Signal Reception
• Press the Menu Button on the Remote Control
and the installation menu will be displayed.
• Press OK to enter the >Installation menu,
then Select Antenna Setting and press OK..
• Please note that ASTRA 2A/B/D and Eurobird
1 satellites are labelled 4.ASTRA/EURO1.
• Your Receiver has a large number of the
available Satellites already programmed into
it to make setting up easier for you. You can
see the Satellite name at the top right of the
OSD (On-Screen Display).
• Using the VOL+/- Button select the SATELLI-
TE you are aligning your dish to. The default
Is already set to 4.ASTRA / EUROBIRD 1
which is the Satellite providing the most com-
mon Free to Air English language channels
such as BBC 1 ,2, etc..
NOTE: DO NOT change any of the other
settings on the Antenna Setting Menu, these
have already been programmed into your
receiver during manufacture at the Factory.

Seite 14
4.5 Fast Channel Set-Up Astra 2A/B/D/
Eurobird 1
The HD Satellite Receiver is pre-programmed
with the most popular English Language
channels from the Astra2A/B/D and Eurobird 1
Satellites, so there is no need to scan these
channels. Simply press the Exit button twice to
come out of the >Antenna Setting menu
screen, then the Red SAT or OK buttons to go
into the channel list. All channels should now
be available.
4.6 Chosen Satellite Scan
Should you wish to obtain channels from a satel-
lite other than Astra2A/B/D and Eurobird
1, follow 4.2.4 to check your chosen satellite
signal reception strength, then press the RED
(Scan) button to scan for channels from your
chosen satellite. For full details on available
scanning options go to section 5.1.2
• Your receiver will now scan for all available
programmes on your selected Satellite.
• This may take several minutes.
• When the Scan has completed, the Program-
mes will be saved automatically.
• Press EXIT to leave the Installation Menu
• You can now enjoy all the available Program-
mes on your chosen Satellite.

Seite 15
5. Menu System
5.1 Installation Menu
In this part of the manual only the basic
installation is covered. If you wish to set up
your receiver to work with a motorised dish
then please refer to SECTION 6, “Advanced
Installation”.The MENU provides access to many
features and functions which will help to improve
your enjoyment of your new product. Press
MENU to enter the INSTALLATION Menu, then
use the CH-, CH+ keys to select the item you
wish to adjust and the VOL-, VOL+ keys to select
the new setting. Then press EXIT when you will
be prompted to save your changes. Select and
press OK to store.
5.1.1 Selecting your Satellite
Use this option within the ANTENNA SETTING
menu to select your desired Satellite.
NOTE: If you change the selected Satellite
you may need to re-adjust your dish.
When you are satised with the signal quality
and strength, Press the red “Scan” button This
reveals your Scan options drop down menu.
5.1.2 Selecting your SCAN Options
Scan Mode: Select the Scanning mode of your
chosen satellite; FTA only, ALL or Scrambled.
Select your preference and then press OK to
store.
FTA only: To Search for all the Free Channels
available with the selected satellite or
transponders. (RECOMMENDED SETTING)
ALL: To Search for all the Free Channels +
Scrambled Channels available with the selected
Satellite or Transponders.
Scrambled: To Search for all the Scrambled
Channels available with the selected Satellite.
This option will only be of benet if your Receiver
has a CAM unit tted. (Not an Option on this
version)
NOTE: Changing this setting from, for
example, ALL to FTA or FTA+NIT will reduce
the number of Programmes stored as it will
remove encrypted programmes. This will
make the task of editing / sorting programmes
easier.
5.1.3 Scanning
Finally Press the OK Button to commence
scanning.
The third bar down indicates progress of the scan
and TV and Radio channels will show as they are
found. A full scan could take over 10 minutes to
complete.
Once scan is completed, press the OK button to
save the channels.

Seite 16
6. Channel Manager Menu
This section describes how you can manage
your programmes, carrying out EDITING, a
Channel MOVE or setting FAVOURITES. Press
the MENU button and use the CH- button
to go to the CHANNEL MANAGER menu
then press OK. Make your selection from
CHANNEL EDIT, MOVE CHANNEL or SET FAV
and press OK to conrm.
6.1 Channel Edit
Using the “VOL-” and “VOL+” buttons you
can select from the options of; RENAME,
SKIPCHANNEL, LOCK CHANNEL or DELETE to
edit your TV programmes. You can press the
“CH-” or “CH+” buttons to select the channel,
and press “VOL-” or “VOL+” button to choose the
functions which are displayed towards the bottom
of the OSD. Press the “OK” button to activate
your choice.
• Rename - Select the channel you want to
rename, and then press the GREEN button
“Rename” function. To edit the channel name,
select the letters to rename using the “VOL
+-” and “CH+_” buttons. Select the save logo
at bottom right when you have nished. Then
press the “OK” button to save and exit..
• Skip Channel – Select the channel you wish
to skip and then press the YELLOW button
“Skip Channel” function. Then press EXIT and
OK to save. If you wish to remove the Skip
function from a Channel simply repeat the
process described above.
• Parental Lock - To prevent the viewing of
channels that are not suitable for Children.
Select the channel to Lock, then press the
RED “Lock Channel” function, a “ ”symbol
will appear next to your choice. Press EXIT
and then the OK button.This will lock the
selected channel from unauthorised viewing.
Pressing the “OK” button one more time
before saving, will unlock the channel.
When you press exit you will be prompted
to conrm and save your choice if you
have unlocked a channel by entering your
password. The channel will then be unlocked.
NOTE:
This feature will only work if the CHANNEL
LOCK has been set to YES in the USER
SETTINGS / PARENTAL CONTROL Menu.
• Move -Select the channel you want to move
using the VOL+- buttons, then press the RED
“Setting” button, a “s/t” will appear next to
your choice. Then using the CH+- keys move
the channel to your desired new location
and press the RED “Setting” button again to
execute the move. Press EXIT and then OK to
save your change
NOTE:
Use this feature with CAUTION as the
Channel will be permanently deleted and a
Factory Default or a Rescan will be required
to restore the deleted channel/s.
6.2 Delete Channel
• Delete -. Select the channel you want to
Delete, then press the BLUE “Delete” function
button, an “X” symbol will appear next to your
choice. Press EXIT and then OK to conrm
delete the selected channel from the set top
box. Pressing the “OK” button again prior to
saving will cancel this operation.
6,3 Set Favourite
This feature can be used to set a Channel in one
of eight FAVOURITE categories. The choices
available to you are as follows:
Music Teleplay General Sports Children News
Shopping Films,
Using the CH+- buttons select the Channel that
you wish to set as a favourite, then using the
VOL+- buttons select the FAVOURITE category
of your choice from 1-8 as per the list above.
Next, press the OK “Set FAV” button. Finally
press EXIT and OK to conrm and save your
settings.
NOTE: The various CHANNEL MANAGER
functions are also available when you are in
RADIO MODE and are used in an identical
way to the TV MODE.
Favorite Rename - Select the favorite you want
to rename, and then press the TXT button “Rena-
me” function. To edit the favorite name, select the
letters to rename using the “VOL +-” and “CH+_”
buttons. Select the save logo at bottom right
when you have nished. Then press the “OK”
button to save and exit..

Seite 17
The features in this section enable you to set up
options within AV SETTING to match your TV, ad-
just PRIVATE SETTINGS, set the LOCAL TIME,
congure and setup the timers for timed recor-
dings in TIMER and check SYSTEM INFORMA-
TION. Press MENU and then scroll down to the
SYSTEM menu using the CH- button and then
press OK. You can then use he CH+- keys to se-
lect the option of your choice from AV SETTING,
LOCAL TIME SETTING, TIMER and SYSTEM
INFORMATION, press OK to enter the menu for
your chosen option. Use the CH+- buttons to
select and the VOL+- to change, then press EXIT
and OK to conrm and save your settings.
7.1 AV Setting
• Vid Denition – This enables you to set the
Receiver to match the video resolution of
your TV, you can choose from 480i, 480p,
560i, 560p, 720p50Hz, 720p60Hz, 1080i50Hz
(RECOMMENDED SETTING FOR HDMI)
or1080i60 Hz. Using the VOL+- adjust
the resolution to suit your TV. You will be
prompted to save your new settings on
exiting.
CAUTION: Some TV’s will not accept the
1080i 60Hz setting and you may loose the
display if you select that option. If this occurs
connect to the TV using the SCART lead and
adjust the resolution to a compatible mode.
• AR Conversion: Using the VOL+- buttons
select from AUTO (RECOMMENDED OPTI-
ON), PAN SCAN or LETTER BOX. You will
be prompted to save your new settings on
exiting.
• Aspect Ratio: To select between 16:9 (wide
screen) and 4:3 TV screen mode or AUTO
(RECOMMENDED SETTING) which is the
factory default. Use the VOL+- buttons to
select your preference. You will be prompted
to save your new settings on exiting.
• TV Set Screen Ratio: Sets the Screen mode
format to match your TV. Most modern TV’s
are 16:9 this being also the factory default
setting. Use the VOL+- buttons select your
preference. You will be prompted to save your
new settings on exiting.
• Video Output Mode: To choose the Video
Output when using the SCART Connector.
Select from CVBS (RECOMMENDED SET-
TING), S_Video, YUV/YCbCr or RGB. Use the
VOL+- buttons to select your preference. You
will be prompted to save your new settings on
exiting.
• S/PDIF Output: To set the Coaxial Audio Out-
put to suit your external Amplier. Select from
PCM, RAW, AC3 or OFF S/PDIF audio format
output to AC3, MPEG2 or AUTO. Use the
VOL+- buttons to select your preference. You
will be prompted to save your new settings on
exiting.
• TV Standard: This option is not available.
7.2 Local Time Setting
Here you can set TIME, DATE and other related
functions on your Receiver.
• Time Zone: Select Time Zone. This is an
adjustable offset between GMT +12 and -12
hours. The Factory default setting is “0” which
equates to GMT. Use the VOL+- buttons to
select your preference. Press Exit, then OK
to save your new settings.
• Local Date: Select Local Date. Press OK,
then using the numeric keys set the YEAR,
MONTH and DAY. Press Exit, then OK to save
your new settings.
• Local Time: Select Local Time. Press OK,
then using the numeric keys set the HH and
MM. Press Exit, then OK to save your new
settings.
• Summer Time: Select Summer Time. Choose
between ON or OFF. ON increments the Sys-
tem Clock by 1 Hour. Use the VOL+- buttons
to select your preference. Press Exit, then OK
to save your new settings.
• Date Format: Using the VOL+- buttons select
your preference. You will be prompted to save
your new settings on exiting. Use the VOL+-
buttons to select your preference. Press Exit,
and then OK to save your new settings.
• Local System Clock: Select Local System
Clock. Choose between ON or OFF. When
set to OFF (RECOMMENDED SETTING) the
time and date is automatically set from the re-
ceived Satellite signal. Use the VOL+- buttons
to select your preference. Press Exit, then OK
to save your new settings.
NOTE: If you set the Local System Clock to
ON then you will not be able to adjust the
LOCAL DATE and LOCAL TIME.
7. System Setting

Seite 18
7.3 Timer
NOTE: You can press TIMER button to enter
directly into the TIMER menu from the remote
control.
The TIMER Menu provides access to 8
Programmable Timers for you to set to record a
programme specic day and at a particular time.
Using the VOL+- and CH+-, buttons to set the
pre-Ferred conguration, press the OK button
to set the timer, you can also set the preferred
Power On mode for TV or Radio.
• Timer Number: Select from Timer 1 to 8. You
can set 8 different Timers in total.
• Timer Enable: To activate each Timer, if the
specic Timer Set is off, no other settings can
be made.
• Timer Control: There are 3 Timer Control
settings:
Power On: Turns on the Receiver on a day
and time that you specify.
Duration: This is used when you wish to
operate the Receiver for a specic amount
of time, such as when you are making a
recording.
Power Off: This is used where you wish to
set an off time for a specic date and time.
• Timer Cycle: Use the VOL+- buttons to select
One Time, Every Day, Sunday, Every Week
as desired.
• Start Time: Use the numeric keys to enter
time and date information as determined by
the Timer Cycle setting.
• Stop Time: Use the numeric keys to enter
time and date information as determined by
the Timer Cycle setting.
• TV Type: Set to TV or Radio. Your Receiver
will then turn on to TV or Radio at the time
you have specied.
• Channel: Use the VOL+- buttons to select
the Programme that you want the Receiver to
switch to when the timer activates.
• Record: Use the VOL+- buttons to select
ON (Record), NO (No Record) or Record
& Standby (Records and then switches the
receiver into Standby).
When you have completed your settings press
OK, you can then review your timer settings and
make sure they are valid (indicated by ENABLED
or INVALID in the screen. Then press EXIT and
OK to save your settings.
7.4 System Information
• System Information: Press OK to view.
Provides details of the Software and
Hardware versions installed in your Receiver.

Seite 19
This section allows the setting of OSD settings,
PRIVATE SETTINGS, PARENTAL CONTROL
preferences and nally FACTORY DEFAULT
(resets the whole receiver back to how it left the
factory).Press MENU and then VOL+ to enter the
USER SETTINGS Menu, then use the CH-, CH+
keys to select the item you wish to adjust and the
VOL-, VOL+ to select the new setting.
8.1 OSD Setting
In this Menu you can select the preferred MENU
LANGUAGE, TRANSPARENCY, INFORMATION
BAR TIMEOUT and EPI LANGUAGE.
• Menu Language: To select the preferred
OSD language. “English” is set as the default
language. Options available are ENGLISH,
FRENCH, GERMAN, ITALIAN, SPANISH and
ARABIC. Use the VOL+- buttons to select
your preference. You will be prompted to save
your new settings on exiting.
• Transparency:This enables you to adjust
the opacity of the OSD display. The default
value is LEVEL 1. Select between OPAQUE
and LEVEL 7 (most transparent). Using the
VOL+- buttons select your preference. You
will be prompted to save your new settings on
exiting.
• Information Bar Timeout: To set the timeout
period for the Information Bar. The default
value is 5 (approximately 5 seconds). Select
between 2 and 8 seconds. Use the VOL+-
buttons to select your preference. You will
be prompted to save your new settings on
exiting.
8.2 Parental Control
To prevent unauthorised access of a range
of features on your set top box or to select
channels. Areas you can restrict access to are
–INSTALLATION LOCK, CHANNEL MANAGER
LOCK, CHANNEL LOCK, MENU LOCK, RECEI-
VER LOCK and SYSTEM SETTING LOCK...
You can also change the Parental Control
Password to your Receiver (The Factory Default
Password is: 0000). Before you can access any
of these features you will be prompted to enter
the Password.
• Installation Lock: To lock the installation
menu to prevent unauthorised Adjustment
of the Installation. Use the VOL+- buttons to
select your preference. You will be prompted
to save your new settings on exiting.
• Channel Manager Lock: To lock the Channel
Edit menu to prevent unauthorized adjustment
of Channel settings. Use the VOL+- buttons to
select your preference. You will be prompted
to save your new settings on exiting.
• Channel Lock: To lock channels from viewing
which are not suitable for children. Use the
VOL+- buttons to select your preference. You
will be prompted to save your new settings on
exiting.
• Menu Lock: To lock the menu to prevent
unauthorised access to the menu. Use the
VOL+- buttons to select your preference. You
will be prompted to save your new settings on
exiting.
• Receiver Lock: To lock the receiver to
prevent from unauthorised viewing of ALL
channels. Use the VOL+- buttons to select
your preference. You will be prompted to save
your new settings on exiting.
• System Setting Lock: To lock the Sys-
tem Setting menu to prevent unauthorised
adjustment of System Settings. Use the
VOL+- buttons to select your preference. You
will be prompted to save your new settings on
exiting.
• Change Password: Press OK to bring up the
pop-up menu, input the new password using
the numeric keys, and then repeat again to
verify the new password. Press EXIT to leave
the menu.
NOTE: If you change the password REMEM-
BER to WRITE DOWN the NEW PASSWORD
and keep it safe.
8. System Setting

Seite 20
8.3 Private Setting
This feature allows control of various items such
as STANDBY MODE AUTO PMT OPEN, AUTO
STANDBY and STANDBY DISPLAY.
• Standby Mode: Two Standby modes are
available NORMAL and LOW CONSUME.
The LOW CONSUME option offers a Standby
Power consumption of less than 1W but takes
longer to power up out of Standby than the
NORMAL setting. Using the VOL+- buttons to
select your preference. You will be prompted
to save your new settings on exiting.
• Auto PMT Open: This feature automatically
corrects changes to Audio PID information for
programmes. Default is YES (RECOMMEN-
DED SETTING).
• Auto Standby: Switches the receiver into
STANDBY after 3 hours of inactivity. Using
the VOL+- buttons select1Min, 5Min, 10Min,
30Min, 60Min, 20Min, 180Min, 240Min, your
preference. You will be prompted to save your
new, Default is 180Min settings on exiting.
NEEDS CONFIRMATION.
• Standby Display: Turns the CLOCK DIS-
PLAY on or OFF when in LOW CONSUME
setting (See STANDBY MODE).
8.4 Factory Default
This enables the User to return the receiver to
the settings that were made in the Factory. It is
useful if some changes that you have made have
stopped your Receiver from working properly.
There are two options in this menu - DEFAULT
ALL and DELETE ALL CHANNELS. Press OK to
access these two choices.
• Default All: This provides the full FACTORY
DEFAULT reset. Press OK, you will then be
prompted to enter the PASSWORD (this is
the same as the Parental Control password)
and then nally prompted to conrm that you
wish to carry out the reset operation. Press
CANCEL if you have changed your mind or
OK to conrm.
• Delete All Channels: Press the CH- button
to select DELETE ALL CHANNELS, Press
OK, you will then be prompted to enter the
PASSWORD (this is the same as the Parental
Control password) and then nally promp-
ted to conrm that you wish to carry out the
deletion operation. Press CANCEL if you have
changed your mind or OK to conrm.
NOTE: If you carry out a DELETE ALL CHAN-
NELS you will need to perform a DEFAULT
ALL afterwards in order to restore your pre-
loaded programmes.
This manual suits for next models
1
Table of contents
Other SetOne Receiver manuals


Popular Receiver manuals by other brands


Sirius Satellite Radio
Sirius Satellite Radio Xact XTR1 quick start guide

Audio & Design
Audio & Design ProDAB-1 Plus quick start guide

Boss Audio Systems
Boss Audio Systems MGV500B user manual

Panasonic
Panasonic SAHT210 - RECEIVER operating instructions

NAD
NAD T762 Service manual

Rain Bird
Rain Bird TBOS ADAPTOR Technotes


