Seville Classics ULTRASlimline 10222 User manual
PLEASE READ AND SAVE THESE INSTRUCTIONS
© 2014 Seville Classics Inc.
Toll Free: 1-800-323-5565 or 1-310-533-3800
www.sevilleclassics.com
ULTRASlimline
®
Instruction Manual
Model: 10222 (with remote control)
Voltage: 120V AC
Frequency: 60 Hz
Power: 1500 W
The warranty is extended by Seville Classics, Inc. to all original purchasers of Seville
Classics Appliances.
Seville Classics, Inc. warrants that this product is free from defects in materials for a
period of 1 year and free from defects in workmanship under normal use for a period of
1 year from the date of purchase. In the case of defective product, simply return the unit
to Seville Classics, Inc. No agent, employee, or representative of Seville Classics, Inc.
has any authority to affirm, represent or warrant anything concerning Seville Classics
Appliances, except for the affirmation and representation, which is specifically included
within this warranty.
This warranty will not apply if the product has been misused, abused, or altered. The
warranty will apply only if the appliance is defective. Seville Classics, Inc. shall make
the final decision, in fairness to all concerned, as to the legitimacy of any such claim on
this warranty. Upon discovery of any defective Seville Classics HEATER&FAN,
please contact our Customer Service Department for further instructions as to how
to repair or replace the defective unit.
Seville Classics, Inc
19401 South Harborgate Way, Torrance, CA 90501 – 1322 U.S.A.
Tel: (800) 323-5565 U.S.A. toll free (310) 533-3800 U.S.A.
Fax: (310) 533-3899
Website: www.sevilleclassics.com
SEVILLE CLASSICS HEATER&FAN
1 YEAR LIMITED WARRANTY Heater &Fan

12
CAUTION – Failure to cooperate with any of the following safety instructions could
result in fire, injury or death.
YOUR RESPONSIBILITIES
Operating electrical appliances improperly may cause a hazard such as a fire, injury,
death, electrical shock, and electrical system damage. The following information is
intended to give clear instructions on how to use this product to avoid such hazards.
CAUTION – Read all instructions completely before operating this heater fan.
CAUTION – Extreme caution is necessary when the heater fan is used while
children or pets are near by or if the heater fan is left on while unattended.
CAUTION – Always unplug the heater fan when not in use.
CAUTION – This heater fan may be hot when in use. Do not let bare skin touch hot
surfaces to avoid burn. Use the product handle when moving this heater. Keep any
flammable materials such as: furniture, pillows, bedding, papers, clothes, and
curtains at least 3 feet (0.9 m) distance from the front of the heater fan. Keep the
sides and rear clear of any objects.
CAUTION – Do not operate any heater fan with a damaged cord and plug. Do not
operate any heater fan that has had a malfunction, has been dropped, or has been
damaged in any manner.
CAUTION – Do not use this product outdoors.
CAUTION – For floor use only
CAUTION – Place the cord away from walkway where it will not be tripped over. Do
not run the electrical cord under carpeting. Do not cover the cord with a throw rug,
runner, or like object. Do not route under furniture or appliances. Arrange cord away
from traffic area and where it will not be tripped over.
CAUTION – This heater fan is not intended to be used in bathrooms, laundry areas,
and similar indoor locations. Never place this product where it can fall into a bathtub
or other water container.
CAUTION –To prevent overloading a circuit, do not plug the heater fan into a circuit
that already has other appliances operating.
CAUTION – To prevent electric shock match wide blade of plug to wide shot, fully insert.
CAUTION –To reduce the risk of electrical shock, place the plug into the outlet
properly. If the plug does not fit securely into the outlet, reverse the direction of the
plug. If the plug still does not fit, contact a qualified electrician. DO NOT attempt to
defeat this safety feature.
READ & SAVE THESE INSTRUCTIONS
Important Safety Instructions
CAUTION – It is normal for the plug to feel warm to the touch. However, a loose fit
between the AC outlet (receptacle) and plug may cause excessive heating and
distortion of the plug. Contact a qualified electrician to replace a loose or worm
outlet.
CAUTION – Never insert foreign objects into the ventilation or exhaust openings of
this product as this may cause an electric shock, fire, or damage the heater fan.
CAUTION – Always turn the heater fan’s power off before unplugging from the wall.
Grip the plug and pull it from the wall outlet, NEVER pull by the cord.
CAUTION – To prevent a possible fire, never block the air intakes or exhaust in any
manner. Do not place this product on or near soft surfaces, such as a bed or
curtains, where openings may become blocked.
CAUTION – Only use this heater fan as described in this manual. Any other use not
recommended by the manufacturer may cause fire, electric shock, or serious injury.
CAUTION – A heater fan has hot or sparking parts inside. Do not use in areas where
gasoline, paint or flammable liquids are used or stored.
CAUTION – To minimize the possible overheating or risk of fire, avoid using an
extension cord.
CAUTION – Do not remove any product warning labels or safety instructions.
CAUTION – Never tamper with the manufacturing of this product or attempt to fix it.
Any modification of this product can result in serious injury, death, fire, or risk of
electric shock. Do not open this product; there are no user serviceable parts inside.
CAUTION – Before cleaning or storing this product; turn the heater fan power to the
off position, unplug from the electrical outlet, and allow the product to cool.
CAUTION – The temperature of this heater fan may vary and its temperature may
become intense enough to burn exposed skin. Use of this heater fan is not
recommended for persons with increased sensitivity to heat or the inability to react to
avoid burns.
CAUTION – Place the heater fan on a firm, level, and open surface. Clear a 3 foot
(0.9 m) area away from any flammable materials. DO NOT use on an unstable
surface such as bedding or deep carpeting. Be sure the heater fan is not in a
position where it may be tripped over by small children or pets.
CAUTION – If your home has aluminum wiring, have a licensed electrician check
your receptacle’s connection. When using any 1500 watt heater fan, aluminum wire
connections can cause a safety issue.
CAUTION – SAVE THESE INSTRUCTIONS
BEFORE OPERATING THIS PRODUCT, READ ALL INSTRUCTIONS
THOROUGHLY AND COMPLETELY. FOR FURTHUR INSTRUCTIONS,
PLEASE CALL
604 946-8929 or 1-800-745-5656
Important Safety Instructions
1-800-323-55651-310-533-3800 or

3
Heater/Fan-Body
BASE-Front BASE-Back
Heater/Fan-Body
SCREWS
Remote Control
ABC
DE
4
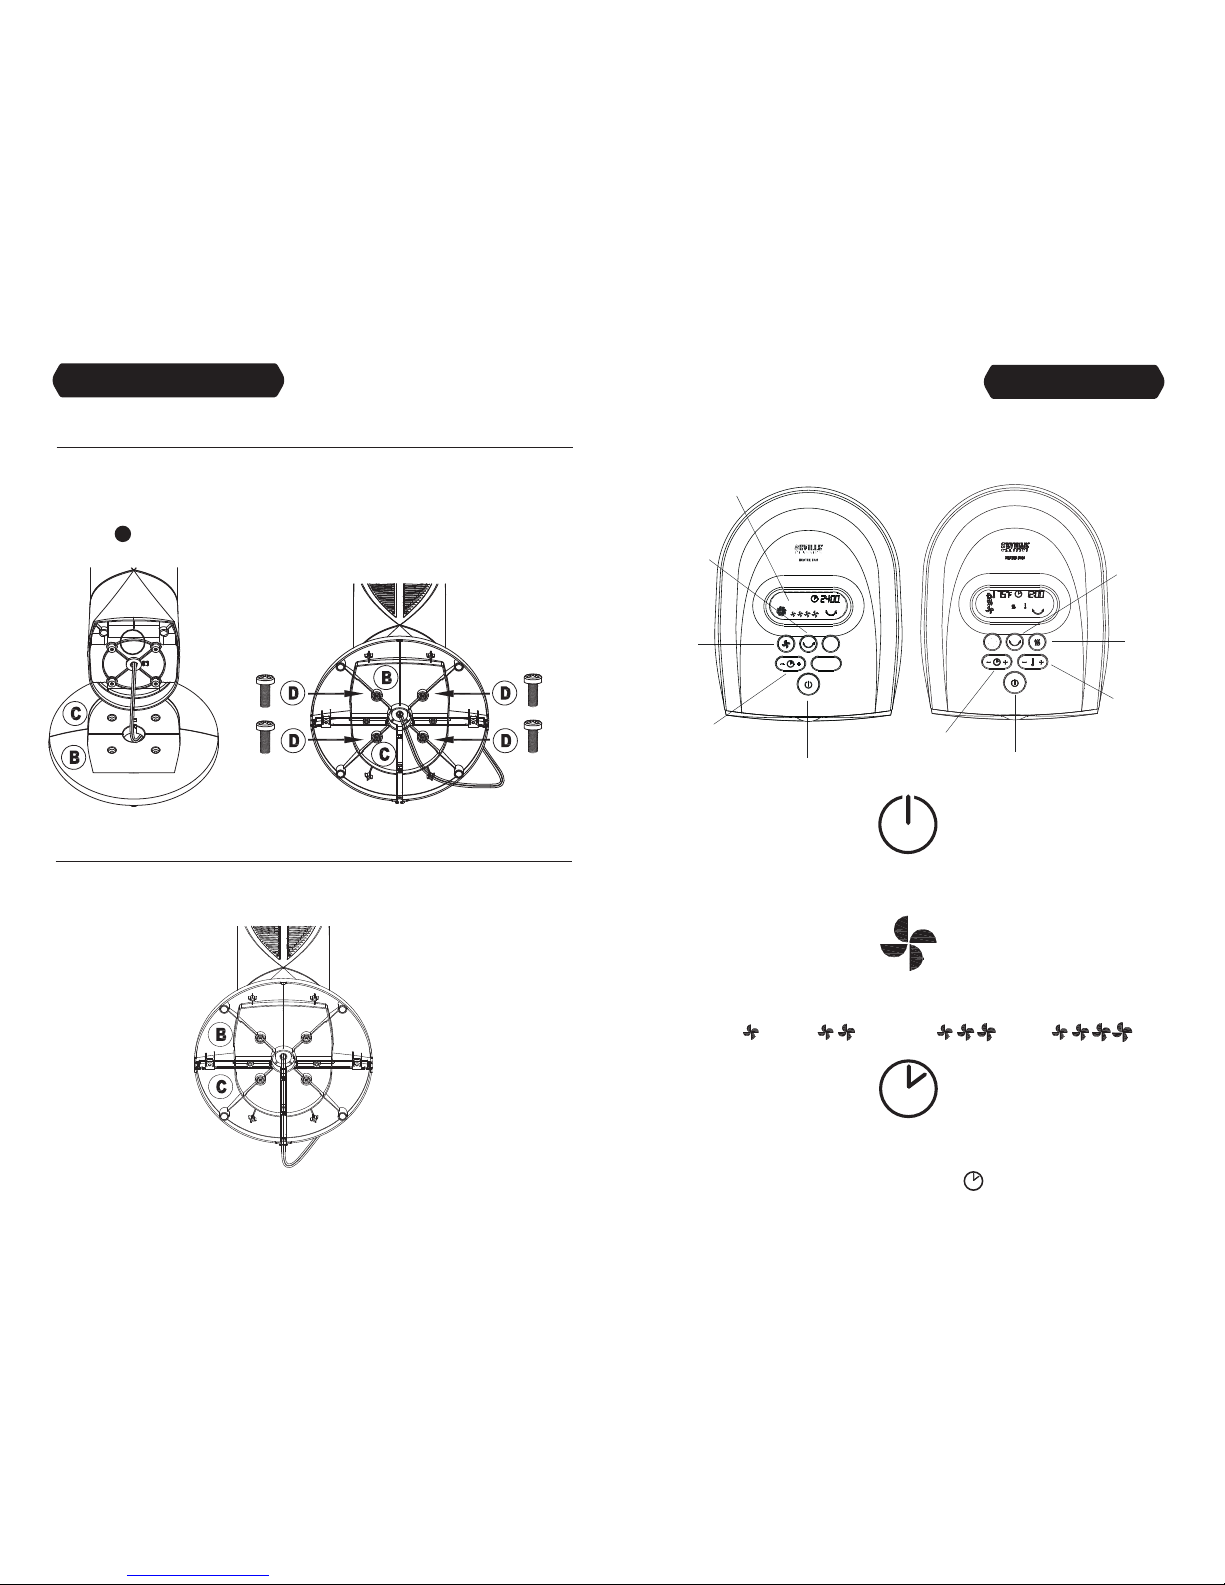
STEP 1
Turn the base upside down.
Firmly lock the BASE-front onto the BASE-back by aligning the four holes onto
the four posts.
Fan Assembly
STEP 2
Remove the 4 Fan-Body SCREWS from the center post on the bottom of the FAN - body .
C
B
DA
(Gold Screws)
Parts List
SUGGESTION:
When attaching the base to the bottom of the fan, place the TOP PACKING block from the top
of the box on the floor upside down. Then, place the top of the fan into the FOAM PACKING
block to secure the top of the fan from moving while attaching the bottom base. This will give
you a more secure platform for assembly and better protect the top of the fan.
A
5
STEP 4
Run the power cord through the guide on the bottom of the BASE-back by tucking the
cord under the tabs. Set fan upright on the base and it is ready for use.
STEP 3
Pass the Power Cord through the center hole of the BASE.
Align the BASE front with the FAN front and insert the four posts on the FAN body into
the four holes on the top of the BASE. It will only go one way. Place the 4 Fan-Body
SCREWS into the holes through the bottom of the base and securely tighten.
6
ON/OFF: Turns power ON & OFF
(10 second air blow after shut down)
Fan Speed Selection: Allows four different speed settings
Setting the Timer: There are 48 total settings. The time can be set in 1/2 hour
increments with each push of the button. 1/2 hour, 1 hour, 1-1/2 hour, 2 hours,
up to 24 hours. To set the timer, hold down the button for 2 seconds, then
add or reduce time on the clock.
HighLow Medium
D
See further instructions on use, care and safety.
Heater&Fan Assembly Control Panel
-
+
Fan Speed
LCD Display
Power
Oscillating
Timer
ECO
Fan Mode Heater Mode
AHeater
Auto/Low/High
Control
Oscillating
Heater
Thermostat
Setting
Power
Timer

8
7
Heater Speed Selection:
There are 3 settings: Auto , Low and High . Press to switch between the
power settings
Control Panel
Adjusting the heater temperature: The system will default to Auto mode.
Press the –
/ + key, to adjust the temperature of the heater.
Remark:
Celsius/Fahrenheit Conversion
Under working mode, press both and either –
or + for 2 seconds, the temperature
unit will be converted between Celsius and Fahrenheit. This setting will be memorized
once the unit is powered off. For this setting to be memorized, the remote control will
also need to be programmed or it will automatically convert to the remote pre-setting.
See remark on page 8.
Oscillating Selection:
Pressing the button will start & stop the oscillation of the fan.
Remote Control
ON/OFF: Turns power ON & OFF
(10 second air blow after shut down)
Setting the Timer: There are 48 total settings. The time can be set
in 1/2 hour increments with each push of the button. 1/2 hour, 1
hour, 1-1/2 hour, 2 hours, up to 24 hours. To set the timer, hold
down the button for 2 seconds, then add or reduce time on the
clock.
-
+
-
+
-
+
Oscillating Selection: Pressing the
button will start & stop the oscillation of
the fan.
HEATER MODEFAN MODE
Heater/Fan Control Panel Modes
High
Low MediumECO
Heater Speed Selection: There are 3 settings: Auto , Low and High .
Press to switch between the power settings
Adjusting the heater temperature: The system will default to Auto mode.
Press the –
/ + key, to adjust the temperature of the heater.
Remark:
Celsius/Fahrenheit Conversion
Under working mode, press both and either –
or + for 2 seconds, the
temperature unit will be converted between Celsius and Fahrenheit. This
setting will be memorized once the unit is powered off.
If “E3” appears on the LCD display, eliminate any obstacles near the
back air inlet grille. Unplug the heater fan for 10-20 minutes (until cool),
then plug back in to resume use.
Fan Mode
Time Duration
Oscillating
Timer
ECO / LOW / MEDIUM / HIGH
Time DurationTimerTempHeat Mode
OscillatingLOW / HIGH / AUTO
10
9
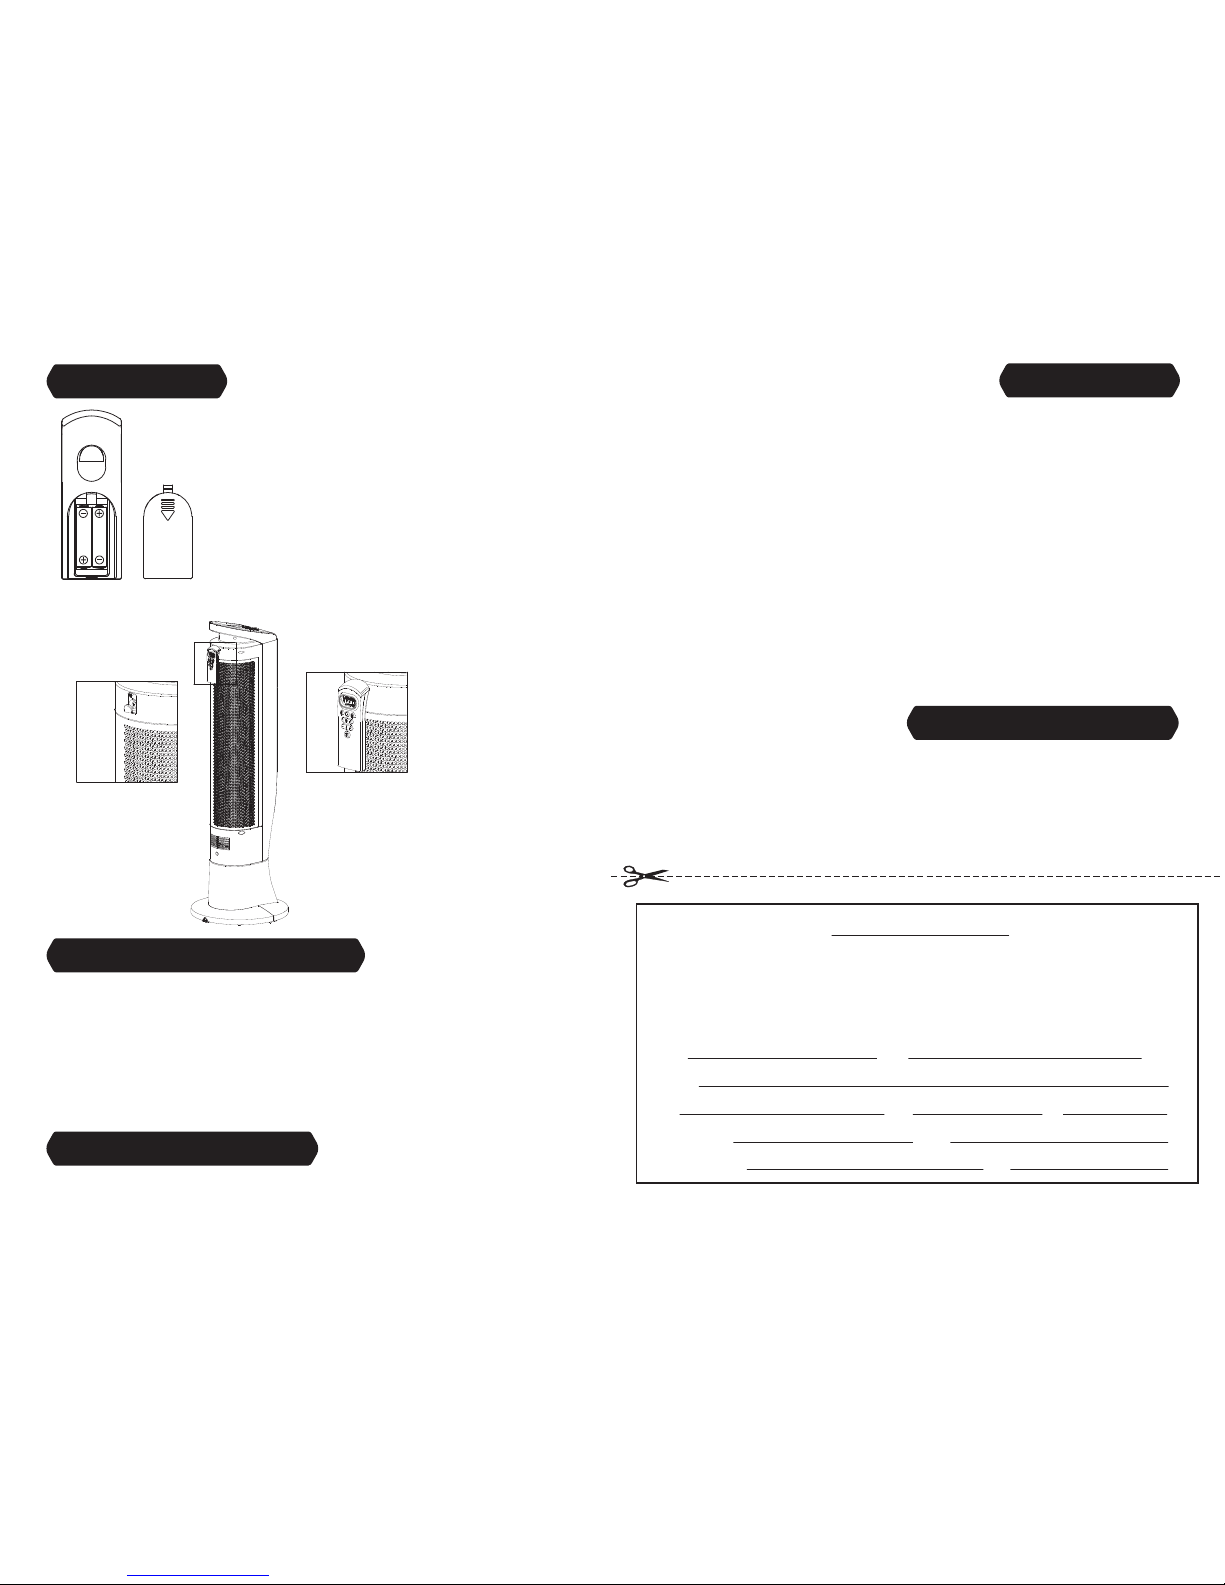
*The remote control operates on 2 AAA batteries.
*DO NOT MIX OLD AND NEW BATTERIES
*DO NOT MIX ALKALINE, STANDARD
(CARBON-ZINC) OR RECHARGEABLE
(NICKEL-CADMIUM) BATTERIES.
*It is recommended that the batteries
be removed should the remote not be in use for an extended time.
*Install the two “AAA” batteries as shown on drawing.
1) To clean your fan, first turn it OFF & UNPLUG it.
2) Use a soft cloth to wipe the housing. DO NOT use water, gasoline, polish, or any
chemical solution. Do NOT soak or immerse fan in water or liquid.
3) You can use a vacuum cleaner (narrow hose attachment or with the brush attachment)
to clean all intake and exhaust vents. This will remove dirt and lint that may accumulate
over time. DO NOT ATTEMPT TO TAKE FAN APART.
4) For a deep cleaning, we suggest you take fan outdoors and use a “can of compressed air”
5) Store in a dry place away from excessive heat and direct sunlight.
This equipment has been tested and found to comply with the limits for Class B digital
device, pursuant to part 15 of the FCC Rules. These limits are designed to provide reason-
able protection against harmful interference in a residential installation. This equipment
generates, uses, and can radiate radio frequency energy, and if not installed and used in
accordance with the instructions, may caused harmful interference to radio or television
reception, which can be determined by turning the equipment off and on. The user is
encouraged to try to correct the interference by one or more of the following measures:
.Reorient or relocate the receiving antenna.
.Increase the separation between the equipment and the receiver.
.Connect the equipment into an outlet on a circuit different from that to
which the receiver is connected.
.Consult the dealer or experienced radio/TV technician for help.
WARNING: Changes or modifications to this unit not expressly approved by the party
responsible for compliance could void the user authority to operate the equipment.
Storage & Cleaning Instructions
Batteries
Back of Remote
Note
*The remote control storage on the back
of the Heater&Fan.
Parts & Accessories
For ULTRASlimline
®
Heater&Fan Parts & Accessories, please visit:
www.sevilleclassics.com
Folding Hook
PROOF OF PURCHASE
Please fill out the information below and forward this form and a copy of your original receipt with your defective
appliance and/or parts (per the specific direction of the Customer Service representative) to the address listed below:
Seville Classics, Inc
19401 South Harborgate Way
Torrance, CA 90501 – 1322
U.S.A.
Name: (First) (Last)
Address:
City: State: Zip:
Phone Number: E-mail:
Place of Purchase: Date:
Should you have any questions, comments or suggestions please contact us at:
Tel: (800) 323-5565 or (310) 533-3800
Hours: 9:00 AM - 4:30 PM Pacific Time / Monday to Friday
Customer Service
Table of contents
Popular Heater manuals by other brands


Cedar Ridge
Cedar Ridge MD3TPF user manual

DBK
DBK Blizzard Series User instructions

Harvia
Harvia E Virta HLS6U1SA Owner's/operator's manual

Serene
Serene S2022 Operating instructions manual

Heat Outdoors
Heat Outdoors UMBRA Plinth Safety instructions and operation manual

heidenfeld
heidenfeld HF-GK100C manual

HearthRite
HearthRite HR06ML-1 OWNER'S OPERATION AND INSTALLATION MANUAL

EUROLAMP
EUROLAMP HB-3000R instructions

Zehnder Rittling
Zehnder Rittling Fare LCD manual

HeatStar
HeatStar HSU200NG Operating instructions and owner's manual

Teddington
Teddington FRIGUVENT Original operating manual

Kooper
Kooper 2191365 User instructions