Shadow 903677 Operation and maintenance manual

Shadow 4.5kW and 6kW
Industrial Infrared Heaters
Safety Instructions and Operation Manual
903677 Shadow 4.5kW Horizontal
903678 Shadow 4.5kW Vertical
903673 Shadow 6kW Horizontal
903674 Shadow 6kW Vertical
Available at
www.shadowindustrial.co.uk
01279 466500
Unit 9, Stort Valley Industrial Estate
Stansted Road, Bishop’s Stortford
Hertfordshire, United Kingdom
CM23 2TU

2Contents
Contents
Important Information . . . . . . . . . . . . . . . 3
Safety Instructions . . . . . . . . . . . . . . . . . 4
Cleaning & Maintenance . . . . . . . . . . . . . . 5
Assembly Instructions . . . . . . . . . . . . . . . 6
Wiring Diagram . . . . . . . . . . . . . . . . . . 8
Technical Specications Table . . . . . . . . . . . . 9
Customer Service . . . . . . . . . . . . . . . . 10

3
Brief Introduction
Brief Introduction
Shadow industrial and warehouse infrared heaters combine the market-leading Ultra Low
Glare infrared lamp technology with advanced outer casing construction, allowing you to
achieve instant short-wave infrared heat in the desired area.
The Shadow 4.5kW and 6W Industrial Heaters can be mounted wherever you like and are
designed for heating large-sized industrial spaces.
Important Information
Please carefully read all instructions provided before using this appliance. This heater
must be installed and used as instructed.
This Operation Manual contains the important safety information, as well as some
recommendations on correct use, installation and maintenance of the appliance.
When operating this infrared heater observe necessary safety precautions, as improper
use may result in injury or damage to property.
Ensure to keep this manual along with your sales receipt, and if possible, cardboard
package and packing material in case return of the unit is necessary.
• Unpack the infrared heater making sure that all the items are
present, there are no components left in the box and the heater head
is free from any packing material.
• Using the detailed diagrams follow the steps to assemble your
infared heater.
• Do NOT connect the infrared heater to the power supply until the
assembly is complete.
• Do NOT connect the infrared heater to the power supply if any of the
components are damaged in any way.

Safety Instructions
4
Safety Instructions
Read these instructions before using.
WARNING
Potential re risk if the heater is covered by any ammable materials.
• CAUTION — Some parts of the heater can become very hot and cause burns.
Do NOT touch the appliance during operation to avoid the risk of injury.
• Check that the voltage indicated on the nameplate of the appliance corresponds to
the local mains voltage before the appliance is hardwired.
• The power supply to the appliance should correspond to the relevant regulations of
the power supply companies and the regional construction regulations.
• To avoid overheating do NOT cover the heater.
• The heater must NOT be located immediately below a socket outlet.
• The heater must be installed at least 3m or 3.5m (6kW Vertical ONLY)above
the oor.
• After xing to a wall or ceiling, adjustments to the direction of radiation must only
be made with the appropriate tools.
• It can become a re risk if the heater is covered or positioned incorrectly.
• It’s dangerous to install the heater close to combustible materials.
• Do NOT use in unventilated areas.
• Do NOT use where gas, petrol, paint or other ammable materials are stored.
• Do NOT push any items through, obstruct or cover the grills of the heater head.
• Do NOT move the heater when it is connected to the power supply.
• Always wait till the heater has cooled down completely before putting into storage.
• The heater must be placed with a clearance of 200cm to the wall and 25cm to
the ceiling.
• Improper use of the appliance can result in electric shock or re hazard.
• In case of damage, the heater must only be repaired by a professional electrician.

5
Cleaning & Maintenance
Cleaning & Maintenance
• Isolate the appliance from the power supply system and wait until it has sufciently
cooled off.
• After the appliance has cooled down, the housing can be wiped clean with a
damp cloth.
• Wipe the appliance only with a clean and lint-free cloth or a soft brush.
• Do NOT touch the bulb element with your ngers. Stains can build up from touching
the bulb and may cause the bulb to malfunction.
• Do NOT use any abrasive or hard cleaning products on any part of this heater.
• Wait until the unit is completely dry before use.
• When cleaning the reector, contact a qualied electrician to see if the reector
needs to be removed.
https://www.heat-outdoors.co.uk/help-desk/useful-articles/heater-and-lamp-
maintenance.html
Any maintenance or repairs should only be carried out by a qualied electrician if you’re
unsure how to do so. For further information and guidance, visit our online help articles
and videos.

Installation
When unpacking the heater, please make sure that all the items are present, there are no
components left in the box, that all the parts are free from any packing material, and are
not damaged. Ensure that the items used for mounting (dowels and screws) are stable
and secure enough to mounting and holding the appliance in place.
Do NOT connect the heater to the electrical supply until all the assembly is done.
Do NOT connect the heater to the electrical supply if any of the components are damaged
in any way. If in doubt, please contact your local supplier.
Wall Mounting
1. Mark and drill 4 holes 10mm in diameter on the wall.
2. Insert 4 expansion bolts into the holes, align the
heater onto the bolts and lock with 4 nuts tightly.
Assembly Instructions
The diagram below demonstrates the minimum safe mounting distance between the
appliance and the ceiling, wall, and oor.
Assembly Instructions
6
4
3
5
mm
M
i
n
.
0
.
2
5
M
M
i
n
.
3
.
0
M
M
i
n
.
2
.
0
M
M
i
n
.
3
.
0
M
M
i
n
.
2
.
0
M
M
i
n
.
0
.
5
M
4
5
.
0
°

7
Assembly Instructions
Bracket Mounting
• Loosen the nuts on both sides, adjust
the heater to the desired angle.
Tighten the nuts to seal in place.
Ensure the screws are securely
connected.The screws could loosen
due to mechanical bearing pressure
and oscillation.
Operation
• The heater needs to be hardwired to
the circuit, only a qualied electrician
should install appliance.
Product Dimensions
Horizontal
Vertical
422mm422mm 184m184mmm
525mm525mm
1292m1292mmm
255m255mmm
184mm184mm
435m435mmm

8Wiring Diagrams
Wiring Diagrams
L
1
L
2
L3
N
PE
L
240
V
~
2000
W
240
V
~
2000
W
240
V
~
2000
W
N
9
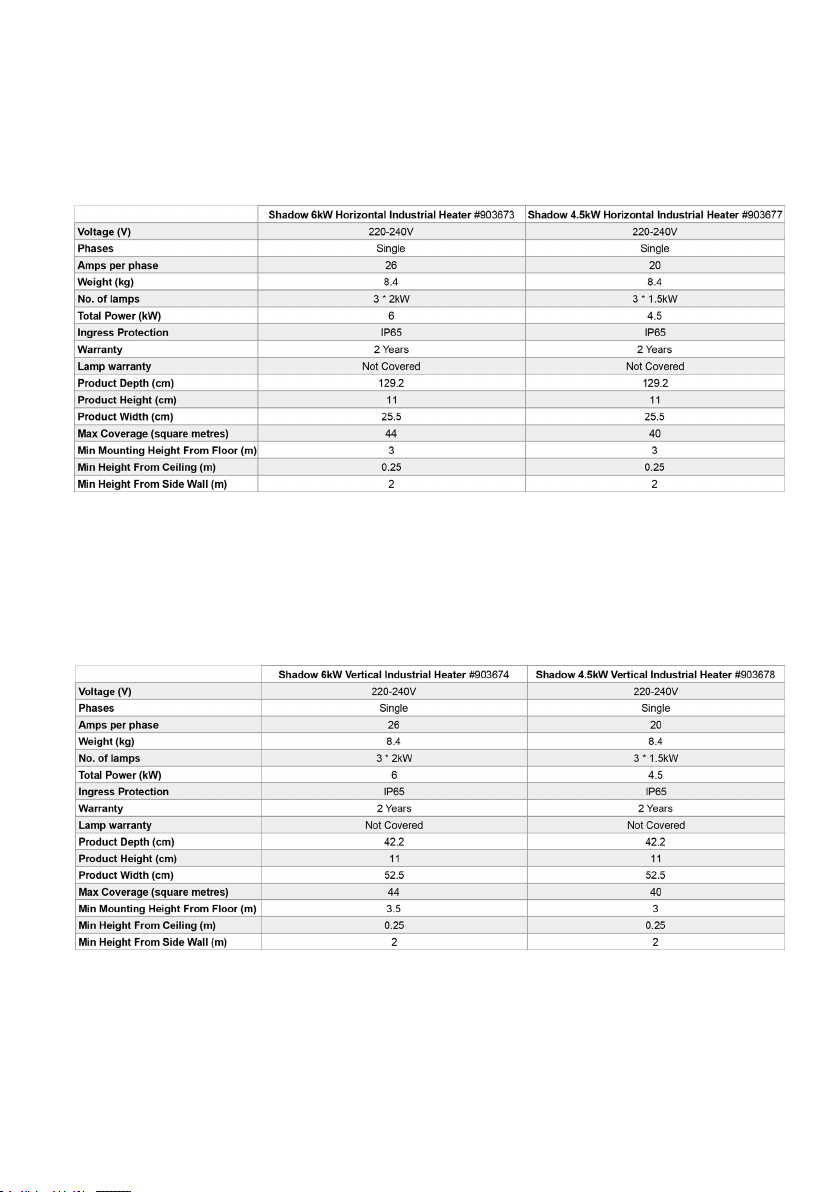
Technical Specications
Technical Specications
Horizontal
Vertical

10 Customer Service
Disposal
In accordance with European Directive 2001/96/EG concerning used
electrical and electronic appliances (waste electrical and electronic
equipment – WEEE), please return any electrical equipment that you are
no longer using to the collection points provided for their disposal.
This symbol indicates that the appliance cannot be treated as normal domestic waste, it
must be handed to a collection point for recycling electric and electronic appliances.
Information concerning where the equipment can be disposed of can be obtained from
your local authority.
Storage
If the heater isn’t going to be used for a long period of time, store it in a cool, dry location.
To prevent dust and dirt build-up, use the original packaging to repack the heater.
Customer Service
• Repairs must carried out by authorised specialists, thus ensuring electrical safety.
• Please contact us or a suitably qualied electrician.
• Improper repairs could lead to danger to the user.
Warranty does NOT cover damage or failure which results from alteration, accident,
misuse, abuse, neglect, commercial use or improper maintenance. In line with our policy
of continuous product development we reserve the right to change the product and
documentation specications without notice.

Unit 9, Stort Valley Industrial Estate
Stansted Road, Bishop’s Stortford
Hertfordshire, United Kingdom
CM23 2TU
Avaiable at
www.shadowindustrial.co.uk
01279 466500
This manual suits for next models
3
Table of contents
Other Shadow Heater manuals


Popular Heater manuals by other brands


Electrorad
Electrorad ThermaStoreHHR Installation manual and instructions for use

EQUATION
EQUATION IFH04-33E Assembly, Use, Maintenance Manual

TriangleTube
TriangleTube Delta Elite F-25 instructions

STIEBEL ELTRON
STIEBEL ELTRON CK 20 Premium Operation and installation instruction

Cuisinart
Cuisinart COH-500 manual

Ideal Heating
Ideal Heating Halo installation guide


