Shaklee Get Clean Water Pitcher Quick reference guide
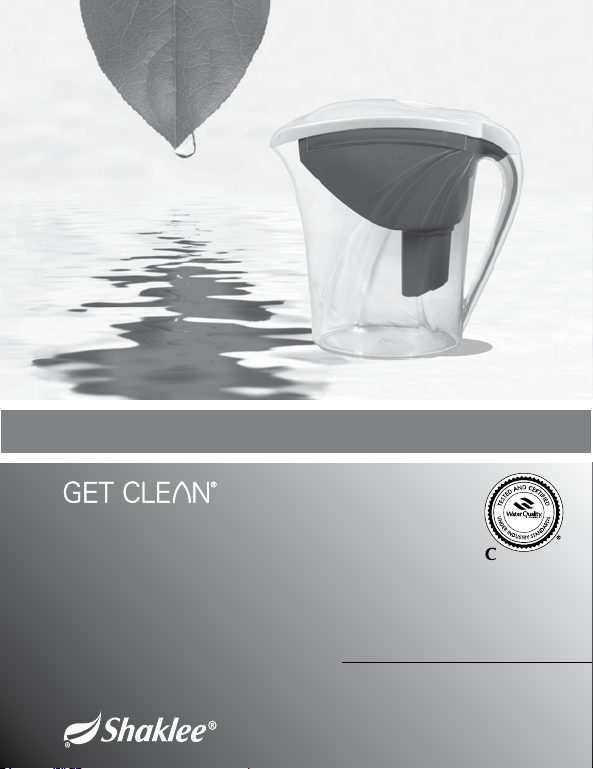
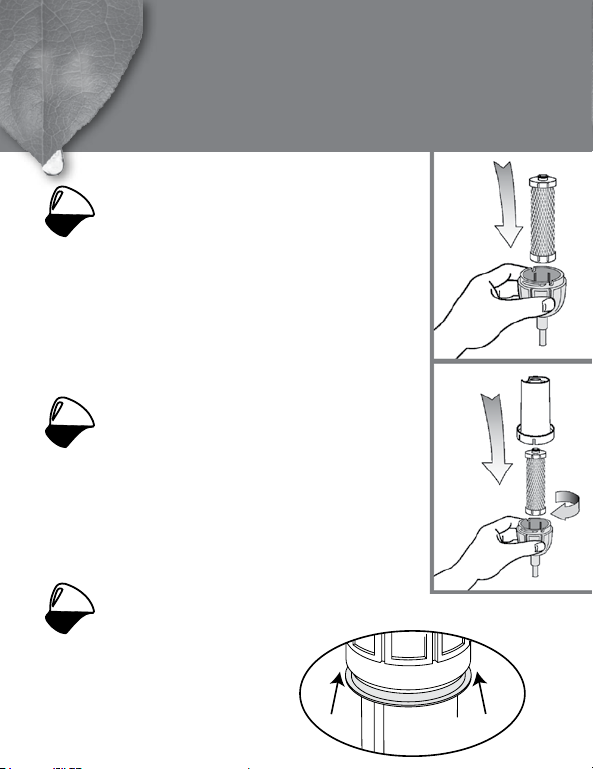
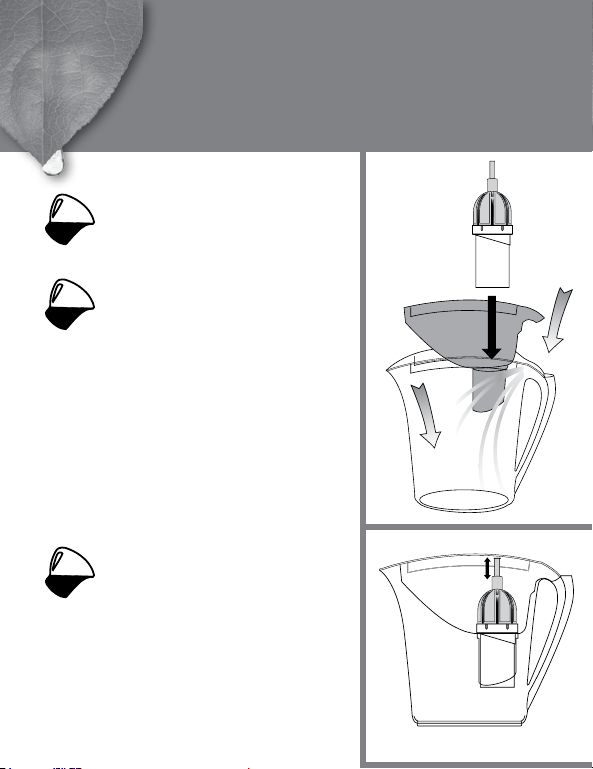
USE & CARE INSTRUCTIONS
Water Pitcher
10-CUP
CAPACITY
Proprietary Automatic
Filter Life Meter
Safe for you, your home,
and your planet.®
Pour consulter les instructions en français,
veuillez vous reporter à la page 22.
Para instrucciones en español,
por favor reérase a la página 11.
Independently tested and certified to improve
taste and water quality.
This system has been tested and certified by
WQA to NSF/ANSI 42 & 53 for the reduction of
aesthetic chlorine, taste and odor, particulate
class III, cadmium, lead, mercury, and VOC.

1
V2.1
GET CLEAN® WATER PITCHER
COMPONENTS AND FEATURES
1 Get Clean® Water Pitcher
1 Reservoir
1 Lid with built-in filter life meter
1 Water Refillable Filter
Housing Kit with cap and base
(not included with pitcher)
1 Water Filter Refill
(not included with pitcher)
TOOLS AND MATERIALS REQUIRED FOR INSTALLATION:
• Cold running water
• One tall water glass or pan large enough to soak the carbon-block filter
• Mild soap for washing the pitcher
Lid with built-in
filter life meter
Reservoir
Water Pitcher
Water Filter
Refill
Water Refillable
Filter Housing Kit

2
V2.1
Keeping your Get Clean® Water Pitcher clean
and ready to pour starts with clean hands and
a clean work surface.
Place Get Clean Water Filter Refill in clean
glass or pan of water.
Soak filter for at least one
hour (ensure filter is
fully submerged).
Wash all other parts with
soap and warm water.
Rinse thoroughly. Not for
use in dishwasher.
CLEAN START
Flush the filter under
water tap and rinse
thoroughly. There could
be some fine carbon
particles in the washings.
Continue washing until
water is clear and free of
carbon particles.

3
V2.1
WATER REFILLABLE FILTER
HOUSING KIT ASSEMBLY
Insert Water Filter Refill in filter
housing cap. Use either end of
filter. Be sure filter port on the
end of the filter fits into the air
vent opening port centered in
the top of the filter housing cap.
Place filter housing base over
the other end of carbon-block
filter. The filter port on the end
of the filter should fully seat with
the drain port in the bottom of
the filter housing base.
Twist base clockwise to
lock and seal.
Gasket seats securely
in cove.
NOTICE:
Always make sure
gasket is properly
positioned with
flange fully
seated under rim
of housing base.

4
V2.1
FINAL ASSEMBLY
Place reservoir into the
Water Pitcher.
Place assembled Water
Refillable Filter Housing
Kit into the reservoir,
aligning slot with
reservoir rib. Housing
Kit must be securely
seated to ensure a
tight seal.
Pull upward to fully
extend the air vent tube
until top of tube is above
fill-line indicator in
the reservoir.

5
V2.1
AUTOMATIC FILTER
LIFE METER
Turn filter life meter counterclockwise until set.
The filter life meter advances with open and
close action of the flip-to-fill lid. This action
assumes that the user will fill the reservoir to
the fill line and let all the water in the reservoir
filter down to the pitcher. Please see instructions on the
next page on how to ensure accuracy of the filter life meter.
"Set" should appear in the filter life meter
window when the meter is set.
S
E
T

6
V2.1
FILL FOR
FILTERED WATER
To ensure accuracy of the filter life meter
readings, always be sure to do the following:
1.
2.
3.
4.
*For a filter with a 40-gallon capacity, replace filter at
40-gallon mark and reset the filter life meter.
5.
Fully open and close the flip-to-fill lid with each fill of the
reservoir. This action advances the meter in your filter life
meter.
Always fill the reservoir through the flip-to-fill lid.
Always fill the reservoir to the fill line with each reservoir
fill and let it drain completely before refilling.
Make sure the water in the reservoir does not rise to cover
the vent holes in the air vent tube.
Replace the filter with a
Water Filter Refill once
it reaches the stated
filter capacity. The filter
should be replaced and
the meter reset when
the '80' is centered in
the meter window.*
Reset meter per steps
on Page 5.
6.

7
V2.1
KEEPING YOUR
PITCHER PERFECT
Wipe the exterior of the pitcher with warm
water and soap, and rinse whenever there is
a buildup of residue from daily handling.
Monitor the reading on the filter life meter to
anticipate the need to replace the Water
Filter Refill.
Replace the filter once it has reached stated
capacity or every four months, whichever
comes first. Reset the filter life meter with
each Water
Filter Refill of
the Filter
Housing Kit. 10 11 12 13 14
15 16 17 18 19 20 21
22 23
29 30
24 25 26 27 28
1234 5 67
89

8
V2.1
INSTRUCTIONS FOR USE
To use your Get Clean® Water Pitcher, open
the flip-to-fill lid in the top of your pitcher. Fill
the reservoir with cold water to the fill line. The
water will filter by gravity and fill the pitcher
with filtered water.
If you prefer to have your water chilled, place
the entire pitcher in the refrigerator.
At the end of four months or 80 gallons,
whichever comes first, replace the water filter
using the instructions in this manual.
1.
2.
3.
Operation/Maintenance Data
These units are intended for noncommercial use. They should be
used only in ambient air temperature of between 35°F (2°C) and
85°F (29°C). Placement of these units in direct sunlight or use
of electrical heating equipment on these units must be avoided.
Replace filter cartridge when and as directed in the installation/
operation instructions included with each cartridge. Replacement
filter cartridges are available through your Shaklee Independent
Distributor or by calling 1.800.SHAKLEE (1.800.742.5533).

9
V2.1
IMPORTANT REMINDERS
• These lters are not water puriers. Do not use with water that is microbiologically unsafe or of unknown
quality without adequate disinfection before or after use of the system.
• This unit is not designed to lter sulfur (rotten-egg odor). Use of carbon lters to treat sulfur may intensify
taste/odor problems.
• Please comply with all state and local regulations regarding the installation of water treatment devices.
• The contaminants or other substances reduced by the water lter device are not necessarily in your water.
CAUTION
For testing information and performance claims, see Performance Data Sheet.
Replacement Filters
Shaklee® Get Clean® Water Pitcher
Usage and quality of water in your incoming water line affect the life of filter cartridges and determine when the
filter should be changed. Filters should be replaced sooner if the water-flow rate begins to slow noticeably or if
the filter fails to perform satisfactorily.
All Shaklee® Get Clean® Water Pitchers and Get Clean Water Filter Refills are interchangeable. All Get Clean Water
Filter Refills are designed to filter water in any Get Clean or BestWater® system. A filter's stated reduction capacity
is tied to the filter's performance within a specific filtration system for which it has been tested and certified. Please
see the Performance Data Sheet for the certified performance of specific systems with stated filters.
Original System Certification Required Filter Kit or Refills
Get Clean® Water Pitcher
(#52114 USA; N°42114 Canada)
Get Clean® Water Refillable Filter Housing Kit
(#52117 USA; N°42117 Canada)
Get Clean® Water Refillable Filter Housing Kit
(#52117 USA; N°42117 Canada)
Get Clean® Water Filter Refill 1-Pack
(#52115 USA; N°42115 Canada)
Get Clean® Water Filter Refill 3-Pack
(#52116 USA; N°42116 Canada)

10
V2.1
GET CLEAN® WATER
FILTRATION PRODUCTS
INFORMATION AND ASSISTANCE
www.ShakleeGetClean.com
1.800.SHAKLEE
4747 Willow Road
Pleasanton, CA 94588
UNITED STATES:
www.ShakleeGetClean.com
1.888.5SHAKLE
(1.888.574.2553)
3100 Harvester Road, Unit 7
Burlington, ON L7N 3W8
CANADA:
Get Clean® Water Refillable Filter
Housing Kit (#52117 USA; N°42117 Canada)
Get Clean® Water Pitcher
(#52114 USA; N°42114 Canada)
Get Clean® Water Filter Refill 3-Pack
(#52116 USA; N°42116 Canada)
Get Clean® Water Filter Refill 1-Pack
(#52115 USA; N°42115 Canada)

INSTRUCCIONES DE USO Y CUIDADO
Jarra de agua
CAPACIDAD
10 TAZAS
Medidor automático de vida de ltro
de propiedad exclusiva
Safe for you, your home,
and your planet.®
Examinado y certificado independientemente
para mejorar el sabor y la calidad del agua.
Este sistema ha sido examinado y certificado
por la Asociación de calidad del agua (Water
Quality Association [WQA]) contra las normas
NSF/ANSI 42 y 53 para la disminución de cloro
estético, sabor y olor, partículas clase III,
cadmio, plomo, mercurio, y VOC.

12
V2.1
COMPONENTES Y
CARACTERÍSTICAS DE LA
JARRA DE AGUA GET CLEAN®
1 Get Clean® Jarra de agua
1 Depósito
1 Tapa con medidor de vida de
filtro integrado
1 Kit de alojamiento de filtro de
agua reutilizable con tapa y base
(no se incluye con la jarra)
1 recambio del filtro de agua
(no se incluye con la jarra)
IMPLEMENTOS Y MATERIALES NECESARIOS PARA LA INSTALACIÓN:
• Agua corriente fría
• Un vaso de vidrio alto o recipiente lo suficientemente grande para
remojar el filtro de bloque de carbón
• Jabón suave para lavar la jarra
Tapa con
medidor de
vida de filtro
integrado
Depósito
Jarra de agua
Recambio del
filtro de agua
Kit de alojamiento
de filtro rellenable

13
V2.1
Jarra de agua
Conservar su jarra de agua Get Clean® limpia y
lista para usar comienza con una superficie de
trabajo y manos limpias.
Coloque recambio del filtro de agua en el vidrio o
la cacerola limpios de agua. Remoje el filtro por
lo menos una hora
(compruebe que el filtro
esté totalmente sumergido).
INICIO LIMPIO
Sostenga el filtro debajo
del grifo y enjuáguelo
meticulosamente. Podrían
haber algunas partículas
finas de carbón en el
enjuague. Continúe
lavando hasta que el agua
quede transparente y sin
partículas de carbón.
Lave todas las otras partes
con agua tibia y jabón y
enjuague meticulosamente.
No apto para lavaplatos.

14
V2.1
ENSAMBLE DE KIT DE
ALOJAMIENTO DE FILTRO DE
AGUA RELLENABLE
Inserte el recambio del filtro
de agua en la tapa que aloja el
filtro. Utilice cualquier extremo
del filtro. Cerciórese de que el
puerto del filtro en el extremo
del mismo encaje en el puerto
de abertura para ventilación
centrado en la parte superior de
la tapa que aloja el filtro.
Coloque la base que aloja el
filtro sobre el otro extremo del
filtro de bloque de carbón. El
puerto del filtro en el extremo
del mismo debe encajar
totalmente en el puerto de
desagüe en la parte inferior de
la base que aloja el filtro.
Gire la base en el sentido
horario para trabar y sellar.
Gasket seats securely
in cove.
La NOTA: Siempre aségurese
junta de culata es posicionada
apropiadamente con reborde
sentó completamente bajo borde
de albergar base. La junta de culata
sienta firmemente
en ensenada.

15
V2.1
ENSAMBLE FINAL
Coloque el depósito en la
jarra de agua.
Coloque el kit
ensamblado del
alojamiento del filtro de
agua rellenable en el
depósito, alineando la
ranura con la nervadura.
El kit de alojamiento
deberá quedar asentado
de forma segura para
lograr un cierre ajustado.
Hale completamente
hacia arriba el tubo de
ventilación hasta que
la parte superior del
mismo esté sobre el
indicador de la línea de
llenado del depósito.

16
V2.1
MEDIDOR AUTOMÁTICO DE
VIDA DE FILTRO
Gire el medidor de vida del filtro en el sentido
antihorario hasta que llegue al tope.
La palabra "Set" debe aparecer en la ventana del
medidor de vida del filtro cuando el medidor esté
debidamente situado.
S
E
T
El medidor de vida del filtro avanza con la acción
de abrir y cerrar la tapa articulada. Este movimiento
asume que el usuario llenará el depósito hasta
la línea superior y permitirá que toda el agua del
depósito filtre hacia abajo en la jarra. Por favor refiérase
a la página siguiente para las instrucciones sobre cómo lograr la
precisión del medidor de vida del filtro.

17
V2.1
LLENE PARA
AGUA FILTRADA
Para garantizar la precisión la lectura del medidor
de vida del filtro siempre haga lo siguiente:
1.
2.
3.
4.
5.
Abra completamente y cierre la tapa flip-to-fill cada vez
que llene el depósito. Esta acción permite que avance el
medidor de su medidor de vida del filtro.
Siempre llene el depósito a través de la tapa articulada.
Siempre llene el depósito hasta la línea superior de cada
vez y deje que se vacíe completamente antes de rellenarlo.
Cerciórese de que el agua del depósito no cubra los
agujeros de ventilación del tubo de ventilación.
Reemplace el filtro con
un recambio del filtro de
agua una vez que haya
alcanzado la capacidad
de filtración establecida.
Debe cambiar el filtro y
reiniciar el medidor cuando
el ‘80’ esté centrado en la
ventana del medidor.*
Reinicie el medidor según
los pasos de la página 16.
6.
*Para un filtro con capacidad de 40 galones (152 L),
reemplace el filtro cuando llegue a la marca de
40 galones, y reinicie el medidor de vida del filtro.

18
V2.1
CÓMO CONSERVAR
PERFECTA SU JARRA
Limpie el exterior de la jarra con agua
tibia y jabón y luego enjuague donde
encuentre acumulación de residuos de la
manipulación diaria.
Reemplace el filtro una vez que haya
alcanzado la capacidad establecida o
cada cuatro meses, lo que ocurra primero.
Reinicie el
medidor de vida
del filtro con
cada recambio
del filtro de
agua del kit de
alojamiento
del filtro.
10 11 12 13 14
15 16 17 18 19 20 21
22 23
29 30
24 25 26 27 28
1234 5 67
89
Monitorice la lectura del medidor de vida
del filtro para prever la necesidad de
reemplazar el filtro de agua de recambio.

19
V2.1
INSTRUCCIONES DE USO
Para usar la jarra Get Clean®, abra la tapa
flip-to-fill en la parte superior de su jarra. Llene
el depósito con agua fría hasta la línea de
llenado. El agua filtrará por gravedad y llenará
la jarra con agua filtrada.
Si prefiere enfriar el agua, coloque la jarra
completa en el refrigerador.
1.
2.
3.
Información de funcionamiento/
mantenimiento
Estas unidades no están destinadas para uso comercial. Deben
utilizarse sólo en temperatura ambiente entra 35°F (2°C) and 85°F
(29°C). Debe evitar colocar estas unidades en la luz solar directa o
el uso de equipo de calefacción. Cambie el cartucho del filtro como
y cuando lo indiquen las instrucciones de instalación/operación que
se incluyen con cada cartucho. Los cartuchos de reemplazo del
filtro están a disposición a través de su Distributor independiente
Shaklee o llamando al 1.800.SHAKLEE (1.800.742.5533).
A los cuatro meses u 80 galones (303 L), lo que
ocurra primero, reemplace el filtro de agua
según las instrucciones de este manual.
Table of contents
Languages:
Popular Water Dispenser manuals by other brands

Halsey Taylor
Halsey Taylor Hydroboost HACFSCDWSBL Series owner's manual

Watts
Watts HCTA-200-PPSM ACCOMPANIMENT TO THE INSTALLATION, OPERATION AND MAINTENANCE MANUAL

Pentair Pool Products
Pentair Pool Products PB4RO-75 user manual

Franke
Franke KEP16FAWHD instructions

Connect
Connect 23 WG Installation, use and maintenance handbook

Elkay
Elkay OFA25 1E Series Installation, care & use manual