Shark Shield Techology Ocean Guardian Freedom+ Surf User manual

DRAFT

DRAFT
FREEDOM+ Surf User Manual v2.0
© Ocean Guardian 2018
2
Table of Contents
1 Introduction 3
2How to Use the Documentation 6
3Warnings & Safety Information 7
4Quick Start FREEDOM+ Surf Install 10
5Attach the Power Module and Turn On 13
6Operational LED Status Indications 15
7Charging the FREEDOM+ Surf 17
8Essential Maintenance and Testing 19
9Product Specifications 21
10 Warranty 22
11 Accessories 26
DRAFT
© Ocean Guardian 2018
3
FREEDOM+ Surf User Manual v2.0
1 Introduction
Ocean Guardian is for ocean lovers. It is the world’s only scientifically
proven and independently tested electrical shark deterrent
technology.
Sharks have small short-range electrical receptors in their snouts used
for finding food. Ocean Guardian’s unique three-dimensional electrical
waveform instantly turns sharks away by causing unbearable spasms
in these sensitive receptors.
Trusted by professional adventurers around the world, Ocean Guardian
is a safety device providing peace of mind while supporting the
conservation of sharks. If you’re serious about adventure, you use
Ocean Guardian.
About the FREEDOM+ Surf
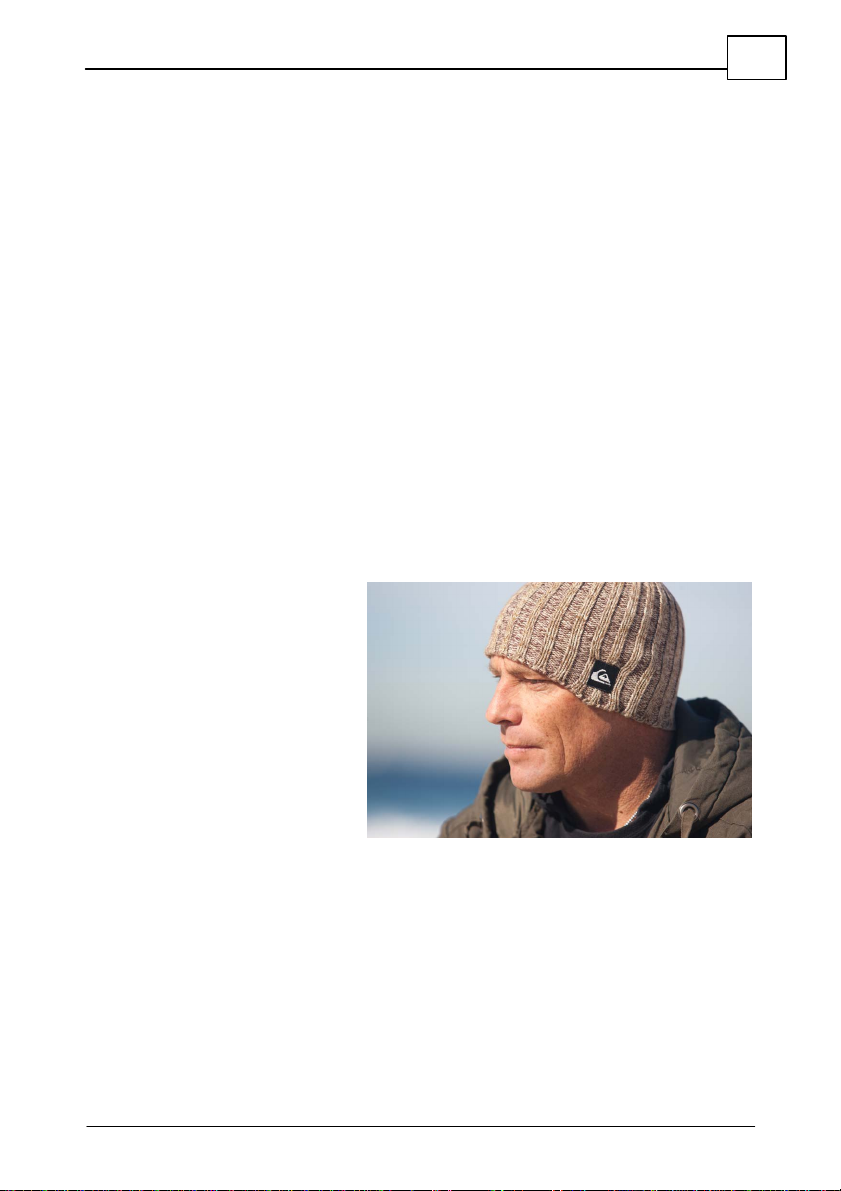
World Champion Surfer Tom Carroll
The Ocean Guardian
FREEDOM+ Surf supersedes
the SURF7 and includes vast
improvements in design and
operation. The design of the
FREEDOM+ Surf is the result
of collaboration with Ocean
& Earth and 2 x World Surfing
Champion Tom Carroll.
It features a transferable
Power Module housed in the custom-designed Ocean & Earth Tail Pad
kicker. This allows you to easily charge and move the Power Module
between boards. When you buy a new surfboard, simply purchase a
new Ocean Guardian Ocean & Earth Tail Pad and Decal Antenna and
attach it to your new surfboard. If you have an existing board, simply
remove the old grip pad and fit the new Ocean Guardian Ocean & Earth
Tail Pad and Decal Antenna, then attach the Power Module and you are
ready to go.

DRAFT
© Ocean Guardian 2018
4FREEDOM+ Surf User Manual v2.0
The all-important antenna electrodes have been designed as a sticker
thin adhesive decal, which is applied to the underside of the surfboard.
With the Power Module weighing just 250 grams, and the near zero
drag of the 500 microns thin adhesive Decal Antenna, there is no
impact on surfing performance. The FREEDOM+ Surf includes
everything you need to turn your surfboard into an electrical shark
deterrent and at the same time have the confidence to push yourself
and your board to the limits.
How does it work?
Ocean Guardian devices generate a protective electric field which is
detected by a shark via its short range sensory receptors called
Ampullae of Lorenzini. These Ampullae of Lorenzini are found on the
snouts of predatorial sharks.
Ampullae of Lorenzini on the snout of a shark (left) and under magnification (right)
The electric field causes discomfort to a shark and this increases the
closer it gets to the electric field, until it becomes intolerable. The
electrical field transmitted by Ocean Guardian devices has no known
long term effect on sharks. It also has no effect on other marine
creatures.
IMPORTANT: Ocean Guardian devices do NOT attract sharks. This is a
myth and independent scientific research has shown that electrical
deterrents do not attract sharks. As electrical currents can only travel
very short distances through water, the Ocean Guardian creates only a
very localized electrical field.

DRAFT
© Ocean Guardian 2018
5
FREEDOM+ Surf User Manual v2.0
Shark electroreceptors can only sense electrical currents at very short
distances, typically less than half a meter. When a shark approaches
an Ocean Guardian, these electroreceptors are over-sensitized,
causing the shark to turn away.
Ocean Guardian FREEDOM+ Surf Electrical Fields
Ocean Guardian has been scientifically proven and independently
tested to be effective at turning sharks away. The following image
displays the electronic fields surrounding the FREEDOM+ Surf when
active.
For detailed scientific research which validates the Ocean Guardian
capability, please visit our website at www.ocean-
guardian.com/technology, or our Ocean Guardian YouTube channel.

DRAFT
© Ocean Guardian 2018
6FREEDOM+ Surf User Manual v2.0
2How to Use the Documentation
Overview of this User Manual
Use this manual to learn how to:
·
Mount your Ocean Guardian unit.
·
Turn the Ocean Guardian on and monitor operational status.
Manual Conventions
Warnings: Instructions that, if ignored, could result in death or
serious personal injury caused by dangerous voltages or
incorrect operation of the equipment. These must be observed
for safe operation.
Cautions: Instructions warning against potential hazards, or to
detail practices that must be observed for safe operation and to
prevent damage to equipment or personnel.
Important Note: Information important to installation,
attachment or operation of equipment.
Typographic Conventions
·
Operation states are in bold, e.g. On/Off
·
Hardware elements are in bold capitals, e.g. GREEN LED

DRAFT
© Ocean Guardian 2018
7
FREEDOM+ Surf User Manual v2.0
3Warnings & Safety Information
1. Sharks can be dangerous and often unpredictable creatures
and we encourage people to use an Ocean Guardian when
working in, or enjoying the sea, to minimize the risk of shark
attack. While extensive testing has been performed, and
great care taken to develop and manufacture the Ocean
Guardian range of products, it is impossible to guarantee
that all sharks will be deterred under all circumstances.
Water based activities in the presence of sharks is inherently
dangerous; therefore, we recommend that if a shark is
sighted, the user gets to safety rather than continue with
their water activity.
2. A large pulsing current is emitted from the Ocean Guardian
antenna to produce the protective electric field. Anyone
with any electronic medical device (EMD) such as a
pacemaker, who is pregnant, or has a health condition which
could be affected by the electric field, SHOULD NOT USE
THE DEVICE. Some examples of health conditions include
heart disease, a history of heart problems, peripheral
vascular decease, stroke, a history of fainting or epilepsy, or
lung disease. Users unintentionally being in close proximity,
or in contact with the antenna, may possibly suffer muscle
spasms in varying degrees; we recommend that users may
need to make adjustments to limit contact in these
situations.
3. Positioning of the Ocean Guardian antenna/electrodes is
critical to the device's performance. Do not attempt to use
the Ocean Guardian in any way other than what is described
in this user manual.
4. Ocean Guardian is designed for sea water use only.
5. Ocean Guardian has been designed and tested as a personal
device. Do not attempt to join multiple Ocean Guardians
together or wear multiple devices.

DRAFT
© Ocean Guardian 2018
8FREEDOM+ Surf User Manual v2.0
6. Some bottom-dwelling and non-predatory sharks such as the
Wobbygong, Carpet and Port Jackson sharks have limited active
Ampullae of Lorenzini. Therefore, the Ocean Guardian may have
limited or no effect on these sharks.
7. Power Module Battery Warnings:
·
Do not use any charger other than that specifically provided
for use with the Power Module.
·
The Power Module contains Li-ion batteries. Ensure it is not
stored in high temperatures.
·
Do not expose batteries to heat or fire. Avoid storage in direct
sunlight.
·
Do not short-circuit the Power Module.
·
Avoid subjecting the Power Module to mechanical shock.
·
Do not store batteries longer than 1 month in a discharged
state.
·
Do not store batteries longer than 1 year without recharge.
·
The batteries in the Power Module must be recycled or
disposed of properly.
·
If lithium-ion batteries are packed with, or contained in
equipment, then it is the responsibility of the shipper to
ensure that the consignment is packed in compliance with
the latest edition of the IATA Dangerous Goods Regulations
section II of either Packing Instruction 966 or 967 in order for
that consignment to be declared as NOT RESTRICTED (non-
hazardous/non-Dangerous). If lithium-ion batteries are
packed with or contained in equipment, UN No. is UN3481.
·
For worldwide sea transportation see the IMO-IMDG code and
special provision 188.
·
For European road transportation see ADR special provision
188.
·
Do not ship your Transferable Power Module with your
surfboard when flying. Lithium-ion batteries must be carried
in personal carry-on luggage.

DRAFT
© Ocean Guardian 2018
9
FREEDOM+ Surf User Manual v2.0
Disclaimer
Whilst every effort has been made to ensure the accuracy of this
manual we are not responsible for any errors or omissions within it.
The product specifications and descriptions within this manual will be
subject to improvements and modifications over time without notice,
as changes to software and hardware are implemented. For the most
up-to-date version of this user manual please visit our website.

DRAFT
© Ocean Guardian 2018
10 FREEDOM+ Surf User Manual v2.0
4Quick Start FREEDOM+ Surf Install
Before getting started, ensure you have the following Ocean Guardian
FREEDOM+ Surf bundle items:
1. FREEDOM+ Surf Transferable Power Module.
2. Charging Dock with international power adapter charging
options.
3. Ocean & Earth Tail Pad / Decal Antenna.
4. E-field Control Kit.
5. Tail Pad Kicker Support.
Visit www.ocean-guardian.com/video to view videos showing how to
remove an existing tail pad and how to install the new Tail Pad / Decal
Antenna. You may wish to ask your local surf shop to affix the Tail Pad /
Decal Antenna to your surfboard.
Step 1. Thoroughly clean the board, the tail pad area, the underside of
the board where the decal antenna is to be positioned, and the rail
area where the antenna rolls around. Use a solvent such as mineral
turpentine (follow safety instructions) to remove all traces of wax, dust,
dirt, etc., along with fresh water and soap. Remove all traces of the
solvent and allow to dry completely for 24 - 48 hours before
application. Even new surfboards must be cleaned.
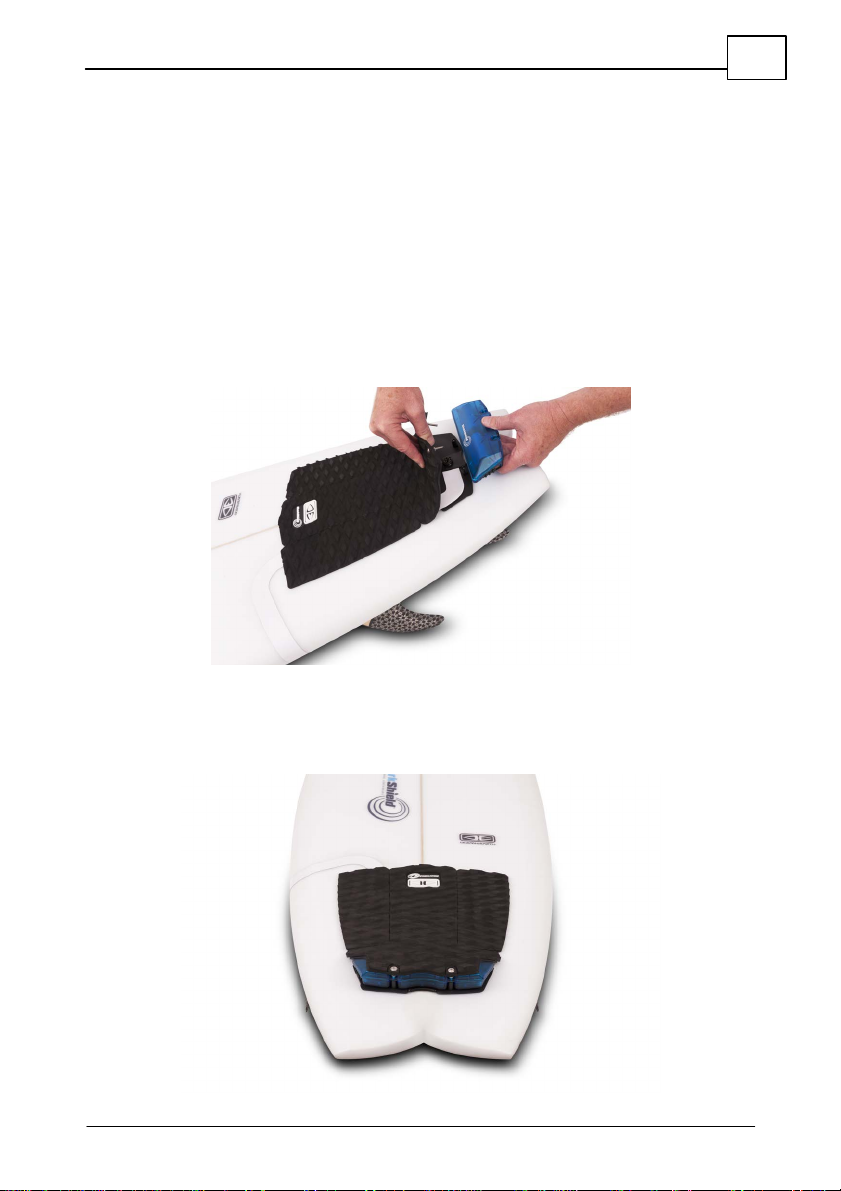
Step 2. Place the diamond shaped decal antenna electrodes in the
center of the underside of the board. Use the stringer to align the
center of the diamond shaped electrodes. Mark out the position of the
decal with a pencil before sticking the decal to the surfboard.

DRAFT
© Ocean Guardian 2018
11
FREEDOM+ Surf User Manual v2.0
Step 3. Slide the antenna down the board and ensure the part of the
ribbon cable that wraps around the board rail to the tail pad is no
more than 25mm (1”) in front of the most forward left fin. Now peel off
the backing of the tape that has an A on it for the bottom electrode.
Apply.
Step 4. Remove the tape backing from the center ribbon cable
marked B. Apply using the stringer as a straight line.
Step 5. Remove the tape backing from the top electrode marked C.
Apply.
Step 6. Remove the tape backing from the ribbon cable marked D.
Apply.
DRAFT
© Ocean Guardian 2018
12 FREEDOM+ Surf User Manual v2.0
Step 7. Remove the tape backing from the ribbon cable marked E.
Hold tightly and apply as you roll around the rail ensuring no gaps or
folds as you roll the ribbon cable around the tail to the top of the
board.
Step 8. With your board rolled over to the top, position the deck
housing that holds the Transferable Power Module slightly forward of
your leg rope attachment. Ensure it is centered and that you do not
have a twist in the ribbon cable. Remove tape backing of the deck
housing marked F, apply.
Step 9. Now remove the remaining adhesive from the ribbon cable
marked G, and fold the excess of the ribbon cable so that it fits flat and
neatly under the tail pad. Folding does not damage the cable.
Step 10. Remove the tape backing from the center tail pad marked H,
and apply carefully starting at the top of the deck housing aligning
with the screw holes, rolling forward slowly pressing down and
ensuring it is centered. Then apply both sides of the tail pad marked I
& J. Allow 24 hours for maximum bond of all tail pad and decal
antenna components before use – strongly recommended.
Important Note: Insert the supplied foam Tail Pad Kicker
Support when the FREEDOM+ Surf Power Module is not fitted to
the kicker.
Adjusting Electrode Power Output
The power output from the Ocean Guardian FREEDOM+ Surf decal
antenna electrodes may affect users in different ways. If an
individual is overly sensitive to transmissions from the decal
antenna electrodes, an E-Field control kit can be purchased from
our website, to partially cover the surface area of the decal
electrode, to reduce the power and/or size of the electrical field.
WARNING: Covering the surface area of the decal electrode will
reduce the device’s effectiveness. Each decal sticker applied to
an electrode will reduce the power output and size of the
electric field by approximately 25% from that electrode.
DRAFT
© Ocean Guardian 2018
13
FREEDOM+ Surf User Manual v2.0
5Attach the Power Module and Turn On
1. Use the supplied hexagonal Allen key to unscrew the two bolts
holding the Tail Pad Kicker Support in place if installed and remove
it.
2. Ensure the Power Module is Off, pull back the tail pad and place
the Transferable Power Module down (do not slot in) on to the
ANTENNA CONNECTOR positioned under the tail pad. Ensure the
unit is firmly seated onto the connector.
3. Carefully insert the two bolts through the guide holes in the Power
Module and tighten them until firm. DO NOT OVER-TIGHTEN.
DRAFT
© Ocean Guardian 2018
14 FREEDOM+ Surf User Manual v2.0
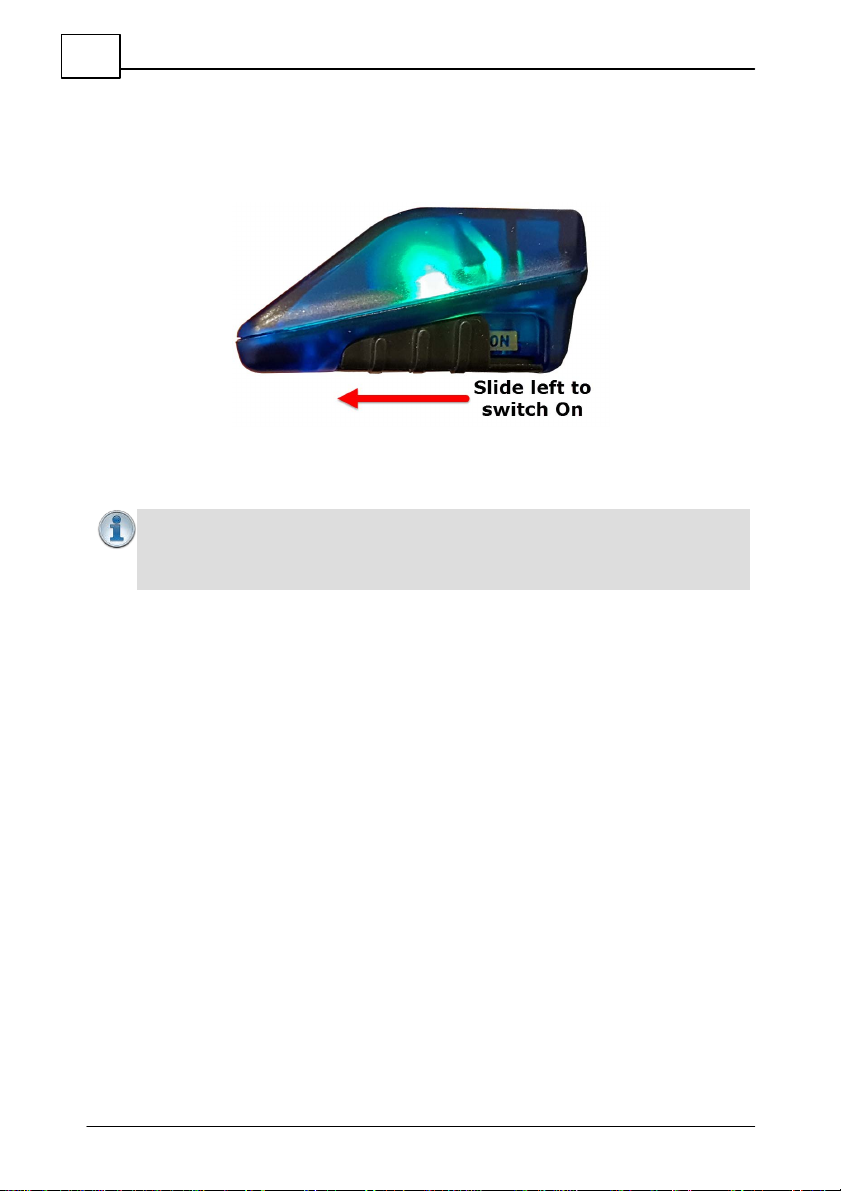
4. Slide the ON/OFF switch to the left to turn the Power Module On.
GREEN LED flashes indicate the charge level of the battery. RED
LED flashes indicate low battery and are accompanied by warning
tone beeps.
5. Slide the ON/OFF switch to the right to turn the Power Module Off.
Important Note: The water sensor is an automatic feature
measuring an electrical connection between the two electrodes.
It cannot be manually switched on or off.

DRAFT
© Ocean Guardian 2018
15
FREEDOM+ Surf User Manual v2.0
6Operational LED Status Indications
The FREEDOM+ Surf Transferable Power Module has a GREEN LED and
RED LED to indicate operation states and the battery charge level. It
also provides warning tone beeps in various operation states.
LED State
LED Indication
Start-up Self-check
RED LED illuminates for 1 second and then
flashes quickly twice. If it passes the self-check
the unit will beep and at the same time the
RED LED will turn Off. The device then displays
the Battery Status Condition LED flashes.
Battery Status (after
self- check)
100% Battery: GREEN LED flashes 10 times
90% Battery: GREEN LED flashes 9 times
80% Battery: GREEN LED flashes 8 times
70% Battery: GREEN LED flashes 7 times
60% Battery: GREEN LED flashes 6 times
50% Battery: GREEN LED flashes 5 times
40% Battery: GREEN LED flashes 4 times
30% Battery: GREEN LED flashes 3 times
20% Battery: RED LED flashes twice with
simultaneous beeps
10% Battery: RED LED flashes 10 times with
simultaneous beeps
Not Submerged
GREEN LED flashes approximately 4 times a
second
Submerged -
normal operation
GREEN LED is illuminated
Low Battery - ½
hour of operation
remaining
The standard GREEN LED indication is
interrupted every 3 seconds by a RED LED
which illuminates for less than 1 second. A
beep occurs when the RED LED turns On.
Fault or Antenna
Short Circuit
GREEN LED and RED LED will flash alternately
with continuous beeps

DRAFT
© Ocean Guardian 2018
16 FREEDOM+ Surf User Manual v2.0
LED Charging Indications
LED State
LED Indication
Charging
RED and GREEN LED illuminated
Fully Charged
RED LED illuminated GREEN LED Off

DRAFT
© Ocean Guardian 2018
17
FREEDOM+ Surf User Manual v2.0
7Charging the FREEDOM+ Surf
The FREEDOM+ Surf can be charged using two methods:
1. FREEDOM+ Surf Charging Dock, or
2. FREEDOM+ Surf 12VDC Car Charger.
Caution: Thoroughly dry the charger pin area on the Ocean
Guardian Power Module before connecting it to the charger. Be
especially vigilant when charging the Ocean Guardian
immediately after it has been used in water.
FREEDOM+ Surf Charging Dock
1. Attach the 12VDC power supply to the FREEDOM+ Charging
Dock and connect it to a power source. Note: A RED LED
indicates power is connected to the Charging Dock.
2. Attach the FREEDOM+ Power Module to the Charging Dock.
3. A solid RED and GREEN LED illuminates when the FREEDOM+ is
charging.
4. The GREEN LED is no longer illuminated when the FREEDOM+
Transferable Power Module is fully charged . Note: A full
charging cycle takes approximately 2-3 hours.

DRAFT
© Ocean Guardian 2018
18 FREEDOM+ Surf User Manual v2.0
External Power Pack
1. Attach the Car Charger to a 12VDC power source and connect it
to the FREEDOM+ Power Module.
2. A RED LED illuminates when the power pack is connected to
power.
3. A solid RED and GREEN LED illuminates while the Power
Module is charging.
5. When the Power Module is fully charged the GREEN LED is no
longer illuminated. Note: A full charging cycle takes
approximately 2-3 hours.
Important Note: We recommend each Ocean Guardian device
is stored with some charge when stored for long periods of time.

DRAFT
© Ocean Guardian 2018
19
FREEDOM+ Surf User Manual v2.0
8Essential Maintenance and Testing
1. The Ocean Guardian FREEDOM+ Surf electronics should be rinsed in
fresh water after use, dried, and stored in a cool, dry place out of the
sun.
2. Both connectors should be kept free of dirt and sand at all times.
Ensure both connectors are clean before installing the Transferable
Power Module.
3. Leave your Ocean Guardian to dry before placing it in storage.
Avoid direct sunlight when drying the unit.
4. Please be sure to protect the Decal Antenna from any deep
scratches which could damage the electrodes or the covering
decal.
5. The tail pad should never be used without either the Transferable
Power Module, or the foam Tail Pad Kicker Support in place.
6. We recommend each Power Module is stored with some charge
when stored for long periods of time.
7. You may notice that the stainless-steel electrodes can discolor.
This is called "tea staining" and is the result of electrolysis. There
are no materials currently available that this will not occur with.
This does not affect Ocean Guardian performance, but we
recommend you clean the stainless steel (marine grade 316L) with
either WD40, or an electronic circuit board cleaner.
8. The base plate deck housing has an O-ring which provides a seal
between the base and the Transferable Power Module. Assuming
you surf regularly every week, you should change this O-ring once a
year.
9. Ocean Guardian devices perform a self-check each time they are
turned on. To confirm the device functions effectively you can also:
a. Place your hand close to the antenna/electrodes to feel the
electric field pulsing when the device is submerged salt
water .
b. Purchase an Ocean Guardian Tester to verify whether the
Ocean Guardian is producing an electric field.

DRAFT
© Ocean Guardian 2018
20 FREEDOM+ Surf User Manual v2.0
Warning:
·
Thoroughly dry the charger pin area on the Ocean Guardian
before connecting the charger. Be especially vigilant when
charging the Ocean Guardian immediately after it has been
used in water.
·
Under no circumstances should you attempt to repair the
Ocean Guardian as this will void any warranty.
Table of contents
Popular Accessories manuals by other brands


Sensopart
Sensopart FT 50 C S1 Series Mounting and operating instructions

IntelliSense
IntelliSense IS-2260 Installation instructions manual

Dryve Designs
Dryve Designs Dryve 2600 user manual
ORION TELESCOPES & BINOCULARS
ORION TELESCOPES & BINOCULARS AutoTracker 8976 instruction manual

AKO
AKO DS-KP Series operating instructions

SunSetter
SunSetter OASIS Series installation instructions