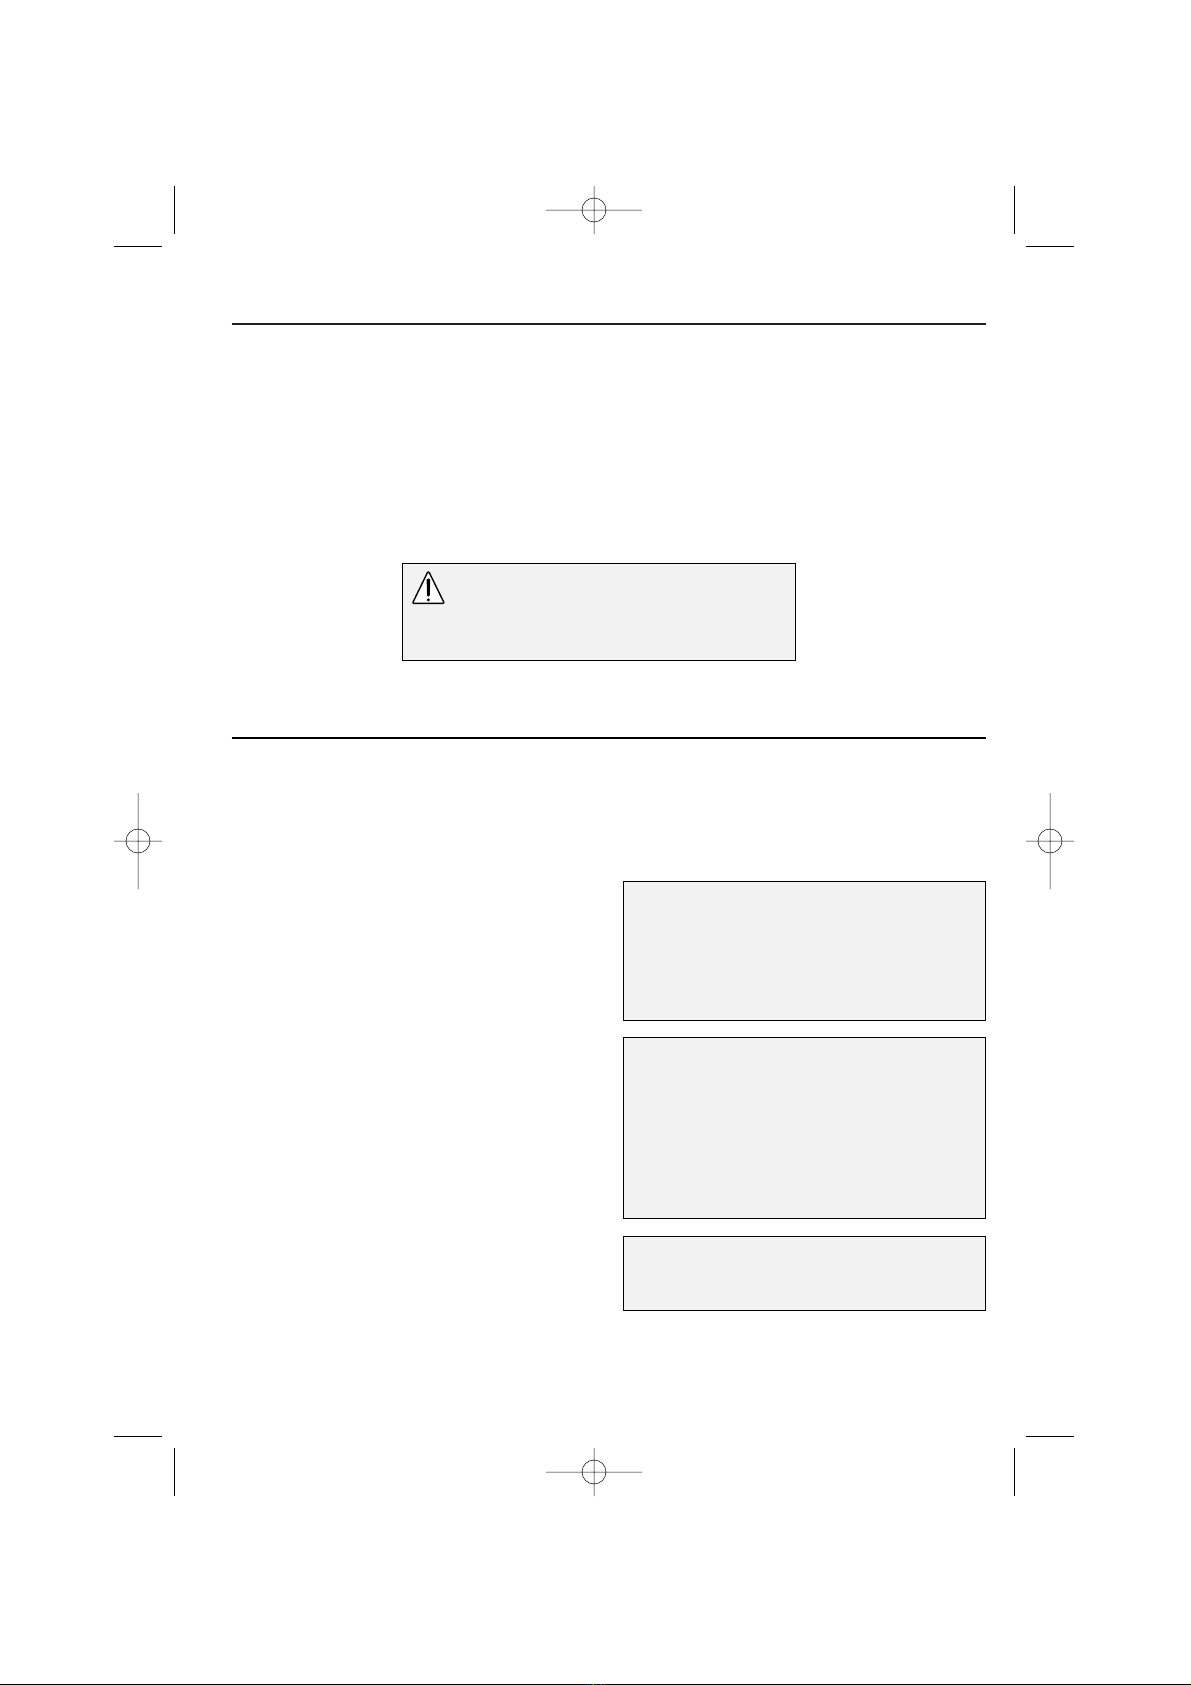
Sharp R-895M Instruction Manual

1
CONTENTS
YOUR OVEN AND ACCESSORIES . . . . . . . . . . . . . . . . . . . . . . . . . . . . . . . . . . . . . . . . . . . . . . .2
CONTROL PANEL . . . . . . . . . . . . . . . . . . . . . . . . . . . . . . . . . . . . . . . . . . . . . . . . . . . . . . . . . . .3
SAFETY:
Installation . . . . . . . . . . . . . . . . . . . . . . . . . . . . . . . . . . . . . . . . . . . . . . . . . . . . . . . . . . . . .4 - 5
Important Safety Instructions . . . . . . . . . . . . . . . . . . . . . . . . . . . . . . . . . . . . . . . . . . . . . .5
OPERATION:
Heating Category . . . . . . . . . . . . . . . . . . . . . . . . . . . . . . . . . . . . . . . . . . . . . . . . . . . . . . . .6
How Your Oven Works . . . . . . . . . . . . . . . . . . . . . . . . . . . . . . . . . . . . . . . . . . . . . . . . . . .6
Before Operation . . . . . . . . . . . . . . . . . . . . . . . . . . . . . . . . . . . . . . . . . . . . . . . . . . . . . . . .7
Microwave Power Levels . . . . . . . . . . . . . . . . . . . . . . . . . . . . . . . . . . . . . . . . . . . . . . . . . .7
Energy Save Mode . . . . . . . . . . . . . . . . . . . . . . . . . . . . . . . . . . . . . . . . . . . . . . . . . . . . . . .8
Setting the Clock . . . . . . . . . . . . . . . . . . . . . . . . . . . . . . . . . . . . . . . . . . . . . . . . . . . . . . . .9
How to Operate Your Oven . . . . . . . . . . . . . . . . . . . . . . . . . . . . . . . . . . . . . . . . . . . . . . .10 - 11
Grill Cooking . . . . . . . . . . . . . . . . . . . . . . . . . . . . . . . . . . . . . . . . . . . . . . . . . . . . . . . . . . .12
Preheating the Oven . . . . . . . . . . . . . . . . . . . . . . . . . . . . . . . . . . . . . . . . . . . . . . . . . . . . .13
Convection Cooking . . . . . . . . . . . . . . . . . . . . . . . . . . . . . . . . . . . . . . . . . . . . . . . . . . . . .14
Dual Cooking . . . . . . . . . . . . . . . . . . . . . . . . . . . . . . . . . . . . . . . . . . . . . . . . . . . . . . . . . . .15 - 16
Express Cook/Express Defrost . . . . . . . . . . . . . . . . . . . . . . . . . . . . . . . . . . . . . . . . . . . . .17 - 21
Meal In One . . . . . . . . . . . . . . . . . . . . . . . . . . . . . . . . . . . . . . . . . . . . . . . . . . . . . . . . . . . .22
Breakfast/Pizza . . . . . . . . . . . . . . . . . . . . . . . . . . . . . . . . . . . . . . . . . . . . . . . . . . . . . . . . . .23 - 24
CONVENIENT FUNCTIONS
Sequence Cooking . . . . . . . . . . . . . . . . . . . . . . . . . . . . . . . . . . . . . . . . . . . . . . . . . . . . . . .25
Less and More . . . . . . . . . . . . . . . . . . . . . . . . . . . . . . . . . . . . . . . . . . . . . . . . . . . . . . . . . .26
Kitchen Timer . . . . . . . . . . . . . . . . . . . . . . . . . . . . . . . . . . . . . . . . . . . . . . . . . . . . . . . . . .27
Auto Minute . . . . . . . . . . . . . . . . . . . . . . . . . . . . . . . . . . . . . . . . . . . . . . . . . . . . . . . . . . . .27
Information Guide . . . . . . . . . . . . . . . . . . . . . . . . . . . . . . . . . . . . . . . . . . . . . . . . . . . . . . .28
COOKING ADVICE:
Microwave Cooking Advice . . . . . . . . . . . . . . . . . . . . . . . . . . . . . . . . . . . . . . . . . . . . . . . .29 - 30
Suitable Cookware . . . . . . . . . . . . . . . . . . . . . . . . . . . . . . . . . . . . . . . . . . . . . . . . . . . . . . .31
Defrosting Advice . . . . . . . . . . . . . . . . . . . . . . . . . . . . . . . . . . . . . . . . . . . . . . . . . . . . . . .32
Reheating Advice . . . . . . . . . . . . . . . . . . . . . . . . . . . . . . . . . . . . . . . . . . . . . . . . . . . . . . . .33
AFTERCARE:
Cleaning and Maintenance . . . . . . . . . . . . . . . . . . . . . . . . . . . . . . . . . . . . . . . . . . . . . . . . .34
Troubleshooting . . . . . . . . . . . . . . . . . . . . . . . . . . . . . . . . . . . . . . . . . . . . . . . . . . . . . . . . .35 - 36
To Replace the Mains Plug . . . . . . . . . . . . . . . . . . . . . . . . . . . . . . . . . . . . . . . . . . . . . . . . .37
Calling for Service . . . . . . . . . . . . . . . . . . . . . . . . . . . . . . . . . . . . . . . . . . . . . . . . . . . . . . .37
COOKBOOK . . . . . . . . . . . . . . . . . . . . . . . . . . . . . . . . . . . . . . . . . . . . . . . . . . . . . . . . . . . . . . .38- 68
GUARANTEE . . . . . . . . . . . . . . . . . . . . . . . . . . . . . . . . . . . . . . . . . . . . . . . . . . . . . . . . . . . . . . .69
SPECIFICATIONS . . . . . . . . . . . . . . . . . . . . . . . . . . . . . . . . . . . . . . . . . . . . . . . . . . . . . . . . . . . .Back cover
R-895M New style Op man 4/8/02 9:10 AM Page 1
Downloaded from: http://www.usersmanualguide.com/

2
YOUR OVEN AND ACCESSORIES
14
2
1
9
3678 5 4
10
NOTES:
•The waveguide cover is fragile. Care should be taken when cleaning inside the oven to ensure that it is not
damaged.
•After cooking fatty foods without a cover, always clean the cavity and especially the grill heating elements
thoroughly. These must be dry and free from grease. Built-up grease may overheat and begin to smoke or
catch fire.
•Always operate the oven with the turntable fitted correctly. This promotes thorough, even cooking. A
badly fitted turntable may rattle, may not rotate properly and could cause damage to the oven.
•The turntable rotates clockwise or anti-clockwise. The rotary direction may change each time you start
the oven. This does not affect cooking performance.
•When you order accessories, please quote both the PA RT NAME and MODEL NUMBER to your dealer
or SHARP approved service facility. The model number is located at the bottom of the control panel.
WARNING:
The door, outer cabinet, oven cavity, turntable, dishes, accessories and especially the grills
will become very hot during operation. To prevent burns, always use thick oven gloves.
ACCESSORIES:
Check to make sure the following accessories are
provided:
14. Turntable
15. High rack
16. Low rack
•Place the turntable on to the turntable motor
shaft, ensuring it is located firmly.
•To avoid turntable damage, ensure dishes or
containers are lifted clear of the turntable rim
when removing them from the oven.
•For use of the racks, refer to the grilling, dual
grilling and convection sections on pages
12 to 16.
Never touch the grills when they are hot.
OVEN:
1. Oven lamp
2. Control panel
3. Waveguide cover (DO NOT REMOVE)
4. Bottom grill heating element
5. Turntable motor shaft
6. Oven cavity
7. Door seals and sealing surfaces
8. Door latches
9. Door opening handle
10. Top grill heating element
11. Ventilation openings
12. Outer cabinet
13. Power cord
11
13
12
16 15
R-895M New style Op man 08/05/2002 15:49 Page 2
Downloaded from: http://www.usersmanualguide.com/

3
CONTROL PANEL
1. DIGITAL DISPLAY
KEYS:
2. TIME
3. PIZZA
4. EXPRESS COOK
5. EXPRESS DEFROST
6. MEAL IN ONE
7. CONV. (0C)
8. DUAL CONV./GRILL
9. LESS/MORE
10. INFO
11. START/AUTO MINUTE
12. STOP/CLEAR
13. KITCHEN TIMER/CLOCK SET
14. WEIGHT UP/DOWN
15. POWER LEVEL
16. GRILL
17. BREAKFAST
DIGITAL DISPLAY
INDICATORS:
1. LESS/MORE
2. INFO
3. MICROWAVE POWER LEVEL
4. WEIGHT
5. MICROWAVE
6. CONVECTION
7. BOTTOM GRILL
8. TOP GRILL
9. COOK
10. DEFROST
11. AUTO
1
3
4
5
6
8
9
10
11
2
7
16
13
12
14
15
17
1
4
11
10
9
3 256
7
8
R-895M New style Op man 4/8/02 9:10 AM Page 3
Downloaded from: http://www.usersmanualguide.com/

4
INSTALLATION
WARNING:
Inspect the Oven:
•Check the oven carefully for damage
before and regularly after installation.
•Make sure the door closes properly,
that it is not misaligned or warped.
•Check the hinges and door safety
latches are not broken or loose.
•Ensure the door seal and sealing
surfaces are not damaged.
•Inspect the oven interior and door for
dents.
IMPORTANT:
If any damage is apparent, do not
operate the oven in any way, until it has
been repaired by a SHARP trained
engineer.
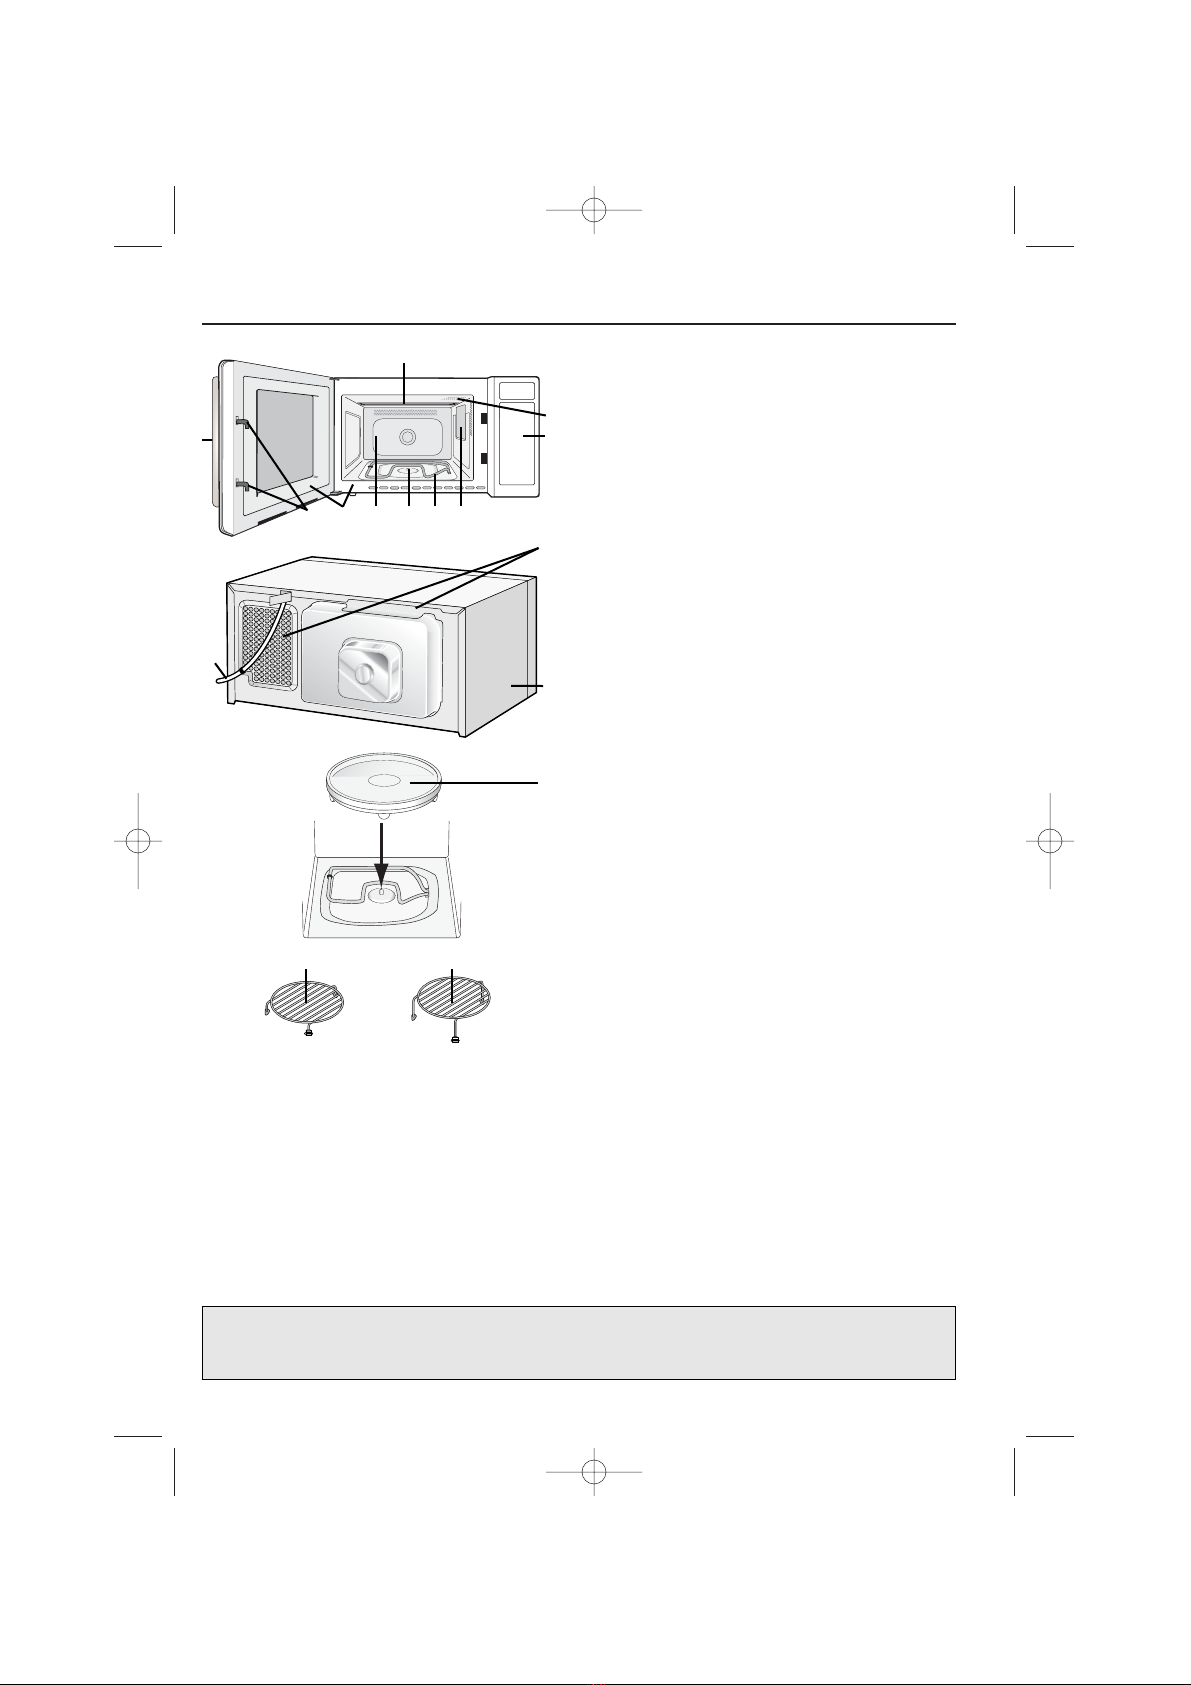
1. Remove all packing materials including the
feature sticker (if applicable). Do not remove
the plastic film from the inside of the oven
window as this protects it from dirt. The
waveguide cover prevents food and grease
from entering the waveguide area where it
could cause damage. DO NOT REMOVE
THE WAVEGUIDE COVER.
2. The oven door will become hot during
cooking. Place oven on a secure, level surface
so that the bottom of the oven is 85cm or
more above the floor. Ensure it is strong
enough to take the oven weight, plus the
heaviest item likely to be cooked in the oven.
3. The minimum height of
free space necessary
above the top surface
of the oven is 19cm.
4. Do not place the oven where heat, moisture
or high humidity are generated, (for example,
near or above a conventional oven) or near
combustible materials (for example, curtains).
Do not block or obstruct air vent openings.
Do not place objects on top of the oven.
5. Make sure the power supply cord is
undamaged (See “ELECTRICAL
CONNECTION” opposite). Do not allow
the power supply cord to run over any
hot or sharp surfaces, such as the hot
air vent area at the top rear of the oven.
6. The socket must be readily accessible so that
it can be easily unplugged in an emergency.
7. Do not use the oven outdoors.
BUILDING-IN-KIT.
An installation frame is available which enables
the microwave oven to be integrated within a
kitchen unit.
The microwave oven is not designed to be built
above or near a conventional oven.
SHARP recommend the use of the build in kit
EBR-5000, available from your SHARP dealer.
Only the use of this frame will guarantee the
quality and safety of the oven.
ELECTRICAL CONNECTION.
•Do not allow water to come into contact with
the power supply cord or plug.
•Insert the plug properly into the socket.
•Do not connect other appliances to the same
socket using an adaptor plug.
•If the power supply cord is damaged, it must
be replaced by a SHARP approved service
facility or a similarly qualified person to avoid a
hazard.
•When removing the plug from the socket
always grip the plug, never the cord as this may
damage the power supply cord and the
connections inside the plug.
•If the plug fitted to your oven is a rewireable
type and in the event of the socket outlet in
your home not being compatible with the plug
supplied, remove the plug properly (do not
cut off).
•If the plug fitted to your oven is a non-
rewirable type and in the event of the socket
outlet in your home not being compatible with
the plug supplied, cut-off the mains plug.
•Refit with a suitable type, observing the wiring
code given in `To replace the mains plug’ on
page 37.
19cm
R-895M New style Op man 4/8/02 9:10 AM Page 4
Downloaded from: http://www.usersmanualguide.com/

5
INSTALLATION
WARNING: THIS APPLIANCE MUST
BE EARTHED
To wire an appropriate plug, follow the wiring code
given in `To replace the mains plug’ on page 37.
IMPORTANT SAFETY INSTRUCTIONS
WARNING: Only allow children to use
the oven without supervision when
adequate instructions have been given so
that the child is able to use the oven in a
safe way and understands the hazards of
improper use.
Pacemaker: If you have a heart pacemaker,
consult your doctor or the pacemaker
manufacturer prior to oven use.
Oven Use:
•The oven is for food use only.
•Never operate when empty, except as directed
in the Grill cooking section on page 12.
•Do not leave or store anything inside the oven
when not in use.
•Never attempt to use the oven with the door
open. It is important not to force or tamper
with the door safety latches.
•Never operate the oven with any object caught
in the door.
•Do not insert fingers or objects in the holes of
the door latches or air-vent openings as this may
damage the oven and cause an electric shock.
•If water or food drops inside the air vent
openings switch off the oven immediately,
unplug it and call a SHARP approved service
facility (see page 37).
•Never move the oven while it is operating.
•The door, outer cabinet, oven cavity, turntable,
dishes, accessories and especially the grills will
become very hot during operation. Care
should be taken to avoid touching these areas
when using or cleaning the oven.
To prevent burns, always use thick oven gloves.
FIRE: If smoke is observed, switch off
and unplug the appliance and keep the
door closed in order to stifle any flames.
PLEASE READ CAREFULLY AND KEEP FOR FUTURE REFERENCE
LIQUIDS: Microwave heating of
beverages can result in delayed eruptive
boiling, therefore care has to be taken
when handling the container. Stir the
liquid prior to and during heating/
reheating, LET LIQUID STAND FOR AT
LEAST 20 SECONDS IN THE OVEN
AFTER COOKING.
IMPORTANT!
•The fuse from the cut-off plug should be
removed and the plug disposed of in a safe
manner.
•Under no circumstances should the cut-off
plug be inserted into a socket outlet as a
serious electric shock may occur.
•The plug must not be used without the fuse
cover fitted.
•If you have any doubt about your microwave
oven obtain the help of a qualified electrician.
•When replacing the plug please ensure that
you use a BSI or ASTA approved plug to
BS1363, this should be fitted with a brown
coloured 13 amp fuse approved by BSI or
ASTA to BS1362. If you have any doubt about
electrical connection seek the help of a
qualified electrician.
R-895M New style Op man 4/8/02 9:10 AM Page 5
Downloaded from: http://www.usersmanualguide.com/

6
HEATING CATEGORY
The heating category (a letter A to E) developed
by MAFF (Ministry of Agriculture, Fisheries and
Food) with microwave oven and food
manufacturers indicates the ability of the oven to
heat small quantities of food (up to 500g [1lb
2oz]). It does not represent the general
performance of the oven.
HOW YOUR OVEN WORKS
Microwaves are energy waves, similar to those
used for TV and radio signals.
Electrical energy is converted into microwave
energy, which is directed into the oven cavity via
a waveguide. To prevent food and grease entering
the wave guide it is protected by the waveguide
cover.
Microwaves cannot pass through metal, because
of this the oven cavity is made of metal and there
is a fine metal mesh on the door.
During cooking the microwaves bounce off the
sides of the oven cavity at random.
Microwaves will pass through certain materials,
such as glass and plastic, to heat the food.
(See “Suitable Cookware” on page 31).
Water, sugar and fat in food absorb microwaves
which cause them to vibrate. This creates heat by
friction, in the same way your hands get warm
when you rub them together.
The outer areas of the food are heated by the
microwave energy, then the heat moves to the
centre by conduction, as it does in conventional
cooking. It is important to turn, rearrange or stir
food to ensure even heating.
Once cooking is complete, the oven
automatically stops producing microwaves.
Standing time is necessary after cooking, as it
enables the heat to disperse equally throughout
the food.
Microwave output power
in Watts (based on
international (IEC 60705)
standard).
600 700 800 900 1000 Watts
OVEN
OUTPUT
POWER
Less heating time required
More heating time required
OVEN
OUTPUT
CATEGORY
Less heating time required
More heating time required
Letter representing the
oven heating category.
Microwave Symbol.
A B C D E
Food packs carry cooking instructions for heating
categories A to E. Follow instructions for the
letter corresponding to the oven’s heating
category. The higher the output power and
heating category of the oven the less heating time
is required as shown opposite.
R-895M New style Op man 4/8/02 9:10 AM Page 6
Downloaded from: http://www.usersmanualguide.com/

7
MICROWAVE POWER LEVELS
BEFORE OPERATION
1.
2.
3.
PowerPress the Percentage
Level POWER
LEVEL key
HIGH x 1 100%
MEDIUM HIGH x 2 70%
MEDIUM x 3 50%
MEDIUM LOW x 4 30%
(Defrost)
LOW x 5 10%
(Defrost)
•Your oven has 5 power levels, as shown
opposite.
•To change the power level for cooking, enter
the cooking time and then press the POWER
LEVEL key,
• Power level
The microwave power level is varied by the
microwave energy switching on and off.
When using power levels other than 100% you
will be able to hear the microwave energy pulsing
on and off as the food cooks or defrosts.
IMPORTANT: The microwave power level will
cook at 100% unless you press the POWER
LEVEL key to the desired setting.
• Check the power level
To check the microwave power level during
cooking, press the POWER LEVEL key.
As long as your finger is pressing the POWER
LEVEL key the power level will be displayed.
The oven continues to count down although the
display will show the power level.
MICROWAVE
POWER LEVEL
KEY
Your oven comes pre-set in Energy Save Mode.
(See page 8 for details).
To operate the oven in Energy Save Mode:
1. Plug in the oven. Nothing will appear on the
display at this time.
2. Open the door. The display will flash the
message shown.
3. Close the door. The display will show “ . 0”.
NOTES:
•To avoid smoke and odour, heat the oven using
the top & bottom grills, without food, for 20
minutes. (Please refer to note on page 12.)
•In Energy Save Mode, if you do not operate the
oven for 3 minutes or more (i.e. closing the
door, pressing the STOP/CLEAR key, or at
the end of cooking), you will not be able to
operate the oven until you open and close the
oven door.
R-895M New style Op man 4/8/02 9:10 AM Page 7
Downloaded from: http://www.usersmanualguide.com/

8
ENERGY SAVE MODE
Notes:
•If you unplug your oven at any stage you will have to reset the clock to cancel Energy Save Mode.
•If the clock has been set, cancelling Energy Save Mode, then your oven has a safety feature which
prevents START/AUTO MINUTE key from working if the oven has not been in use for more
than 3 minutes. Press the STOP/CLEAR key or open and close the door to re-use the oven.
1. Time of day
appears on
the display.
2. Press the KITCHEN
TIMER/CLOCK SET
key 3 times.
3. Press the START/AUTO
MINUTE key. The power
will be off and the display will
show nothing.
x3 x1
Your oven has an Energy Save Mode.
This facility saves electricity when the oven is not
in use.
•If the oven is not used, it will default to Energy
Save Mode after 3 minutes. The display is blank
and the oven cannot be operated.
To restart Energy Save Mode, follow the procedure below.
•To operate the oven, open and then close the
door. “0” will be displayed and the oven is
ready to use.
•To cancel Energy Save Mode, set the clock.
(Please refer to page 9.)
R-895M New style Op man 4/8/02 9:10 AM Page 8
Downloaded from: http://www.usersmanualguide.com/

9
SETTING THE CLOCK
Your oven has a 12 hour clock.
•To set the 12 hour clock, press the
KITCHEN TIMER/CLOCK SET key twice.
To set the time of day follow the instructions below:
1. Select the clock. 2. Enter the hours by
pressing the TIME keys.
3. Press the KITCHEN
TIMER/CLOCK SET
key once.
4. Enter the minutes by
pressing the TIME keys.
5. To start the clock, press
the KITCHEN TIMER/
CLOCK SET key once.
NOTES:
•Press the STOP/CLEAR key if you make a mistake during programming.
•If you press any of the TIME keys too many times, continue to press the key until the desired time
re-appears.
•To check the time of day during a cooking process, press the KITCHEN TIMER/CLOCK SET
key and the time of day will remain on the display as long as you keep your finger on the key. This
does not affect the cooking process.
•If the clock is set, when cooking is complete, the display will show the correct time of day.
If the clock has not been set, the display will only show when cooking is complete.
•If the electrical power supply to your microwave oven is interrupted, the display will be blank as the
oven will default to Energy Save Mode after the power is reinstated. If this occurs during cooking,
the programme will be erased. The time of day will also be erased.
•When you want to reset the time of day, follow the above example again.
x2
x2
x1
x1
R-895M New style Op man 4/8/02 9:10 AM Page 9
Downloaded from: http://www.usersmanualguide.com/

10
HOW TO OPERATE YOUR OVEN
MANUAL COOKING
•Enter the cooking time and use microwave power levels 10% to 100% to cook (refer to page 7).
•Stir or turn the food, where possible, 2 - 3 times during cooking.
•After cooking, cover the food and leave to stand.
•Refer to the cooking charts in the cookbook section, pages 40 - 43.
Example:
To cook for 2 minutes 30 seconds on 70% microwave power.
Your oven enables you to cook and defrost food
using the automatic programmes, or to cook and
defrost food manually.
Automatic cooking and defrosting allows you to
cook and defrost using preset programmes
where the timings have been calculated for you,
e.g Express Cook and Express Defrost.
Manual cooking and defrosting allows you to
cook/defrost foods and weights which are not
included in the automatic programmes.
The following are examples of manual cooking
and defrosting.
For automatic cooking and defrosting refer to
pages 17 - 24.
1. Enter the cooking time by
pressing the 1 MIN. key
twice, then the 10 SEC.
key three times.
2. Input the power level by
pressing the POWER
LEVEL key twice.
3. Press the START/
AUTO MINUTE key
once to start cooking.
The display will count down
through the cooking time.
x2 x1
x2
x3
Opening and closing the door:
To open the oven door, pull the door opening handle.
Starting the oven:
Close the door and press the START/AUTO MINUTE key.
Stopping the oven:
If you want to stop the oven during cooking, press the
STOP/CLEAR key once or open the oven door.
If you want to cancel the cooking programme, press the
STOP/CLEAR key twice.
R-895M New style Op man 4/8/02 9:10 AM Page 10
Downloaded from: http://www.usersmanualguide.com/

11
HOW TO OPERATE YOUR OVEN
NOTES:
•When the oven starts, the oven lamp will light and the turntable will rotate clockwise or
anti-clockwise.
•Your oven can be programmed up to 99 minutes, 90 seconds (99.90).
•If the door is opened during cooking/defrosting to stir or turn over food, the cooking time on the
display stops automatically. The cooking/defrosting time starts to count down again when the door is
closed and the START/AUTO MINUTE key is pressed.
•When cooking/defrosting is complete, the time of day will reappear on the display, if the clock has
been set.
•If you want to know the power level during cooking, press the POWER LEVEL key.
As long as your finger is touching the key, the power level will be displayed.
MANUAL DEFROSTING
•Enter the defrosting time and use microwave power levels 10% or 30% to defrost (refer to page 7).
•Stir or turn the food, where possible, 2 - 3 times during defrosting.
•After defrosting, cover the food in foil and leave to stand until thoroughly defrosted.
•Refer to the defrosting charts in the cookbook section, page 39.
Example:
To defrost for 10 minutes on 30% microwave power.
1. Enter the defrosting time
by pressing the 10 MIN.
key once.
2. Input the power level by
pressing the POWER
LEVEL key 4 times.
3. Press the START/
AUTO MINUTE key
once to start defrosting.
The display will count down
through the defrosting time.
x1 x1
x4
R-895M New style Op man 4/8/02 9:10 AM Page 11
Downloaded from: http://www.usersmanualguide.com/

12
GRILL COOKING
To select the grill(s) required (Top, Bottom or
Combined), enter the grilling time and follow the
table below.
NOTE: When using the grills for the very first time, smoke and odour will be given off.
To avoid this happening when food is being cooked, heat the grills without food for approx.
20 minutes.
Example:
To grill for 20 minutes, using GRILL-3.
1. Enter the grilling time by
pressing the 10 MIN.
key twice.
2. Select GRILL-3 by pressing
the GRILL key 3 times.
3. Press the START/
AUTO MINUTE key
once to start grilling.
The display will count down
through the grilling time.
WARNING:
The door, outer cabinet, oven cavity, turntable, dishes, accessories and especially the grills
will become very hot during operation. To prevent burns, always use thick oven gloves.
Cooking Mode Press
GRILL key
GRILL-1 (Top Grill) Once
GRILL-2 (Bottom Grill) Twice
GRILL-3 (Top and 3 Times
Bottom Grill)
The oven has top and bottom grills which can be
used separately or combined. These have one
power setting only. The grill is assisted by the
turntable which rotates to ensure even browning.
The high rack can be used for grilling small items
of food such as bacon, gammon and teacakes, turn
over halfway through grilling.
Food can be placed directly onto the high rack,
into a flan dish/heat-resistant plate on the high
rack or directly onto the turntable.
NOTES:
•It is not necessary to preheat the grill before cooking.
•Follow the recommended grilling times and procedures in the charts on page 44.
•When browning foods in a deep container, place on the turntable or low rack.
•After cooking is complete the cooling fan will continue working for a short time to lower the
temperature of the electrical and mechanical parts. The display may show “NOW COOLING”.
x2 x1
x3
R-895M New style Op man 4/8/02 9:10 AM Page 12
Downloaded from: http://www.usersmanualguide.com/

13
PREHEATING THE OVEN
x5 x1
Example:
To preheat the oven to 180ºC.
1. Enter the temperature
by pressing the CONV.
(ºC) key 5 times.
2. Press the START/
AUTO MINUTE key
once to start preheating.
3. When the oven reaches 180ºC,
the audible signal will sound
and the oven will display
180ºC. Place food in the oven,
enter the desired cooking time
and press the START/AUTO
MINUTE key.
NOTES:
•When the oven reaches the desired temperature, the audible signal will sound and the temperature
will be displayed in ºC. Do not press the STOP/CLEAR key after opening and closing the
door, as this will cancel the Convection mode.
•The preheated temperature will be maintained for approximately 30 minutes.
After this time, preheat will be cancelled.
•During preheating and convection cooking, you will hear the cooling fan cycling on and off.
This is completely normal and will not affect the cooking.
•You can check the actual temperature during preheating by pressing the CONV. (ºC) key.
The temperature will appear on the display. This will not affect the oven operation.
•If you prefer not to preheat the oven where recommended in the cookbook section, allow extra
cooking time.
Your oven can be preheated to a
desired temperature prior to
convection cooking.
WARNING:
The door, outer cabinet, oven cavity, turntable, dishes, accessories and especially the grills
will become very hot during operation. To prevent burns, always use thick oven gloves.
R-895M New style Op man 4/8/02 9:10 AM Page 13
Downloaded from: http://www.usersmanualguide.com/

14
CONVECTION COOKING
Example:
To cook for 20 minutes at 200ºC convection.
1. Enter the cooking time
by pressing the 10 MIN.
key twice.
2. Input the temperature by
pressing the CONV. (ºC)
key 4 times.
3. Press the START/ AUTO
MINUTE key once to start
cooking.
NOTES:
•Follow convection times and procedures in the charts and recipes in the cookbook section.
•Food manufacturers instructions are only a guideline so cooking times may need to be adjusted.
•Pressing the CONV. (ºC) key during cooking will display the programmed temperature. This will
not affect the programme or cooking time.
•Temperature measurements taken whilst the oven is in convection mode will differ from the
displayed level. This is due to the grill elements turning on and off in order to regulate the oven
temperature. This will not affect the cooking results as long as the operation manual and cook book
are followed correctly.
•After cooking is complete the cooling fan will continue working for a short time to lower the
temperature of the electrical and mechanical parts. The display may show “NOW COOLING”.
•Heat generated by the oven during convection cooking may cause the backplate of the oven to
discolour. This is completely normal and will not affect the performance of the oven.
•This oven is not suitable for baking Yorkshire Puddings.
•Convection cooking is ideal for roasting and baking.
•When using the CONVECTION key, all metal cookware can be used. (See “Suitable Cookware”
on page 31).
Your oven can be programmed to
cook with ten different temperatures
by combining the top and bottom
grills with the convection fan.
(Please refer to the notes below.)
WARNING:
The door, outer cabinet, oven cavity, turntable, dishes, accessories and especially the grills
will become very hot during operation. To prevent burns, always use thick oven gloves.
The temperatures available in ºC are:
250ºC, 230ºC, 220ºC, 200ºC, 180ºC,
160ºC, 130ºC, 100ºC, 70ºC, 40ºC.
The display will count down
through the cooking time.
x2 x1
x4
R-895M New style Op man 4/11/02 8:45 AM Page 14
Downloaded from: http://www.usersmanualguide.com/

15
DUAL COOKING
Dual Cook combines microwave
power with convection or grill.
The combination of microwave power with
convection or grill reduces cooking time and
provides a crisp, brown finish.
There are three Dual Cook modes:
1. Dual-1 - Convection with microwave.
2. Dual-2 - Top grill with microwave.
3. Dual-3 - Bottom grill with microwave.
Dual Cook is preset with 30% microwave power.
If you wish to change the microwave power level,
press the POWER LEVEL key until the desired
power level is shown on the display.
To select the dual cook mode required, enter the
cooking time and follow the table opposite.
Dual Cook Mode Press DUAL
CONV./GRILL key
DUAL-1 (Convection Once
and Microwave*)
DUAL-2 (Top Grill Twice
and Microwave*)
DUAL-3 (Bottom Grill 3 Times
and Microwave*)
NOTE:
*You can select power levels 10%, 30%, 50%
for DUAL-1.
*You can select power levels 10%, 30%, 50%,
70% and 100% for DUAL-2 and DUAL-3.
*DUAL-1 is preset with 250ºC convection.
To adjust the convection temperature, press
the CONV. ºC key.
Example 1:
To cook for 20 minutes using Dual-1, 230ºC, 10% microwave power.
1. Enter the cooking
time by pressing the
10 MIN. key twice.
2. Select Dual-1 by pressing
the DUAL CONV./
GRILL key once.
4. Change the power level by
pressing the POWER
LEVEL key once.
5. Press the START/
AUTO MINUTE key
once to start cooking.
3. Change the temperature
by pressing the CONV.
ºC key once.
x2
x1
x1 x1
x1
R-895M New style Op man 4/8/02 9:10 AM Page 15
Downloaded from: http://www.usersmanualguide.com/

16
DUAL COOKING
WARNING:
The door, outer cabinet, oven cavity, turntable, dishes, accessories and especially the grills
will become very hot during operation. To prevent burns, always use thick oven gloves.
NOTES:
•For DUAL-2 and DUAL-3 it is not necessary to preheat the grill.
•Follow the recommended dual cooking times and procedures in the charts on pages 45 - 47.
•When browning foods in a deep container, place on the turntable or low rack.
•Temperature measurements taken whilst the oven is in convection mode will differ from the
displayed level. This is due to the grill elements turning on and off in order to regulate the oven
temperature. This will not affect the cooking results as long as the operation manual and cook book
are followed correctly.
•After cooking is complete the cooling fan will continue working for a short time to lower the
temperature of the electrical and mechanical parts. The display may show “NOW COOLING”.
Example 2:
To cook for 15 minutes using Dual-2, 50% microwave power.
The display will count down
through the cooking time.
1. Enter the cooking time by pressing the 10
MIN. key once and the 1 MIN. key 5 times.
2. Select Dual-2 by pressing the
DUAL CONV./GRILL key twice.
3. Change the power level by pressing
the POWER LEVEL key 4 times.
4. Press the START/AUTO MINUTE
key once to start cooking.
x1
x1
x2
x5
x4
R-895M New style Op man 4/8/02 9:10 AM Page 16
Downloaded from: http://www.usersmanualguide.com/

17
EXPRESS COOK / EXPRESS DEFROST
EXPRESS COOK enables you to cook 9 popular foods from
frozen or chilled. Please refer to the chart on pages 18 - 20.
EXPRESS DEFROST enables you to defrost 3 popular foods.
Please refer to the chart on page 21.
Follow the examples below for details on how to operate
these functions.
EXPRESS COOK Example: To cook 0.6kg of Roast Beef from frozen.
1. Press the ROAST BEEF/
LAMB key once to select
cooking from frozen.
2. Enter the weight by
pressing the WEIGHT
UP key once.
3. Press the START/
AUTO MINUTE key
once to start cooking.
The display will count down
through the cooking time.
x1 x1
EXPRESS DEFROST Example: To defrost a 1.8kg Meat Joint.
1. Press the MEAT JOINT
key once.
2. Enter the weight by
pressing the WEIGHT
DOWN key once.
3. Press the START/
AUTO MINUTE key
once to start cooking.
The display will count down
through the defrosting time.
NOTES:
•If the DOWN ( ▼) WEIGHT key is pressed the display will count down from the highest weight
range, each time the key is pressed.
•If the UP ( ▲) WEIGHT key is pressed the display will count up from the lowest weight range,
each time the key is pressed.
•You can enter the weight by holding down or pressing the WEIGHT keys until the desired weight
is displayed.
x1 x1
x1
x1
R-895M New style Op man 4/8/02 9:10 AM Page 17
Downloaded from: http://www.usersmanualguide.com/

18
EXPRESS COOK / EXPRESS DEFROST
MENU WEIGHT RANGE COOKING PROCEDURE
Roast Beef/Lamb 0.6kg - 1.8kg • Place meat in a flan dish on the low rack.
•Turn meat over when the audible signal sounds (for
frozen only).
•After cooking, leave meat to stand wrapped in
aluminium foil for 10 minutes.
x1: Frozen NOTE: Select MORE for well done.
x2: Chilled It is not possible to use the LESS key for beef/lamb.
Roast Pork 0.6kg - 1.8kg • Place meat in a flan dish on the low rack.
•Turn meat over when the audible signal sounds (for
frozen only).
•After cooking, leave meat to stand wrapped in
x1: Frozen aluminium foil for 10 minutes.
x2: Chilled NOTE: It is not possible to use the LESS key for pork.
Roast Poultry 1.2kg - 1.8kg • Pierce skin (chilled only) a few times and place
poultry, breast side up, in a flan dish on the low rack.
•Turn poultry over when the audible signal sounds (for
frozen only).
When cooking frozen poultry with giblets, remove
x1: Frozen the giblets at first or second turn over.
x2: Chilled • After cooking, leave poultry to stand wrapped in
aluminium foil for 10 minutes.
NOTE: It is not possible to use the LESS key for poultry.
This menu is only suitable for cooking whole poultry.
Ready Meals 0.3kg - 1.0kg • For one section containers use a
skewer to pierce film in 5 places.
(See and follow the • For two section containers,
IMPORTANT NOTE pierce using a skewer.
x1: Frozen FOR READY MEAL Pierce meat/main section 3 times and rice/pasta
x2: Chilled on page 20.) section twice.
•For food contained in bag(s), pierce 5 times on one
Stirrable: side. Cook pierced side-up.
e.g. Spaghetti • Where bags come already perforated, do not pierce.
bolognese, • Place in a flan dish on the low rack.
Beef stew • Stir, if possible, when the audible signal sounds.
•After cooking, leave to stand for 2 minutes before
Non-stirrable: serving.
e.g. Lasagne, NOTES:
Cottage pie • For stirrable foods, including food in bags, stir or
manipulate contents when the audible signal sounds.
•For non-stirrable foods, use the MORE key.
(It is not necessary to stir.)
•It is not possible to use the LESS key for these menus.
EXPRESS COOK CHART
R-895M New style Op man 4/8/02 9:10 AM Page 18
Downloaded from: http://www.usersmanualguide.com/
Table of contents
Other Sharp Microwave Oven manuals

Sharp
Sharp YC-MG01U-S User manual

Sharp
Sharp R860S User manual

Sharp
Sharp R-556D Instruction Manual

Sharp
Sharp R-898M User manual

Sharp
Sharp R-248 User manual

Sharp
Sharp R-84A0STV User manual

Sharp
Sharp R-232F Instruction Manual

Sharp
Sharp R260 User manual

Sharp
Sharp R-21J User manual

Sharp
Sharp YC-QC254AE-B User manual

Sharp
Sharp SMC1655bS User manual

Sharp
Sharp R-200K Use and care manual

Sharp
Sharp Carousel R-350F User manual

Sharp
Sharp YB-S6192AE Operation instructions

Sharp
Sharp R98STM-AA Instruction Manual

Sharp
Sharp R-230BK User manual

Sharp
Sharp Carousel R-9H94B User manual

Sharp
Sharp R-308KK User manual

Sharp
Sharp SMD2470AS Operating instructions

Sharp
Sharp YC-QC254A User manual