Sharp XL-B510 User manual

Lietošanas pamācība


LAT
Svarīgi drošības norādījumi
UZMANĪBU
ELEKTRISKĀS STRĀVAS
TRIECIENA RISKS
NEATVERIET!
Pirms ierīces lietošanas, lūdzu, izlasiet šos drošības
norādījumus un ievērojiet šos brīdinājumus:
Vienādmalu trīsstūrī esošs zibens simbols ar bultu galā ir
paredzēts, lai brīdinātu lietotāju par neizolētu „bīstamu
spriegumu” ierīces iekšpusē, tas var būt pietiekami liels, lai
radītu cilvēkam elektriskās strāvas trieciena risku.
Vienādmalu trīsstūrī esoša izsaukuma zīme ir paredzēta, lai
brīdinātu lietotāju par svarīgiem lietošanas un uzturēšanas
(apkopes) norādījumiem ierīces pavaddokumentācijā.
Šis simbols norāda, ka šo produktu ir jāpārstrādā videi
draudzīgā veidā, neizmetot to kopā ar citiem
mājsaimniecības atkritumiem.
AC (maiņstrāvas) spriegums
DC (līdzstrāvas) spriegums
II klases aprīkojums
Lai novērstu aizdegšanās risku,
nekad šī produkta tuvumā
neturiet sveces vai citus atklātās
liesmas avotus.
Brīdinājums:
•Lietojot šo ierīci, vienmēr ievērojiet galvenos drošības pasākumus, it īpaši,
ja tuvumā ir bērni.
•Bērni ir jāuzrauga, lai nodrošinātu to, ka viņi ar šo ierīci nespēlējas.
•Nebojājiet strāvas vadu, neuzlieciet uz tā smagus objektus, nestiepiet to
un nesalokiet to. Nepievienojiet arī pagarinātājus. Strāvas vada bojājumi
var radīt aizdegšanos vai elektriskās strāvas triecienu.
•Ja barošanas vads ir bojāts, tas ir jānomaina ražotājam, servisa pārstāvim
vai līdzīga līmeņa kvalificētām personām, lai izvairītos no iespējamā riska.
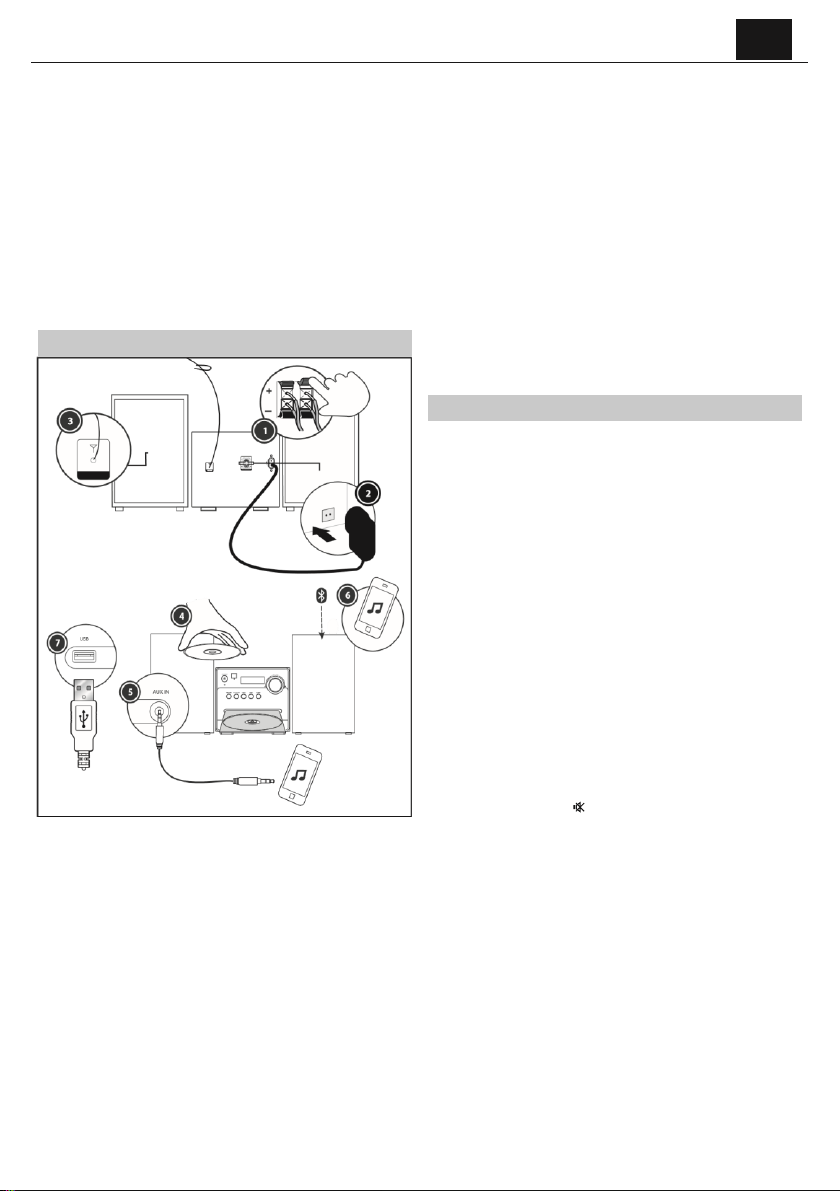
•Pārliecinieties, ka ierīce tiek pievienota AC 220-240V 50Hz strāvas izejai.
Augstāka sprieguma izmantošana var izraisīt ierīces darbības traucējumus
un pat aizdegšanos.
•Ja strāvas kontaktdakša nav atbilstoša strāvas kontaktligzdai, nemēģiniet
to iestumt ar spēku.
•Pirms ierīces atvienošanas no strāvas, lai to pilnībā izslēgtu, vispirms
izslēdziet to.
•Neatvienojiet un nepievienojiet strāvas vadu ar mitrām rokām. Tas var
radīt elektriskās strāvas tiecienu.
•Ja ierīce ilgu laiku netiek lietota, atvienojiet strāvas vadu.
•Pārliecienieties, ka ierīces vada kontaktdakša vienmēr ir viegli pieejama.
•Šis produkts nesatur nekādas detaļas, kuras var labot pats lietotājs.
Kļūmes gadījumā sazinieties ar ražotāju vai pilnvarotu servisa pārstāvi.
Ierīces iekšējo detaļu atklāšana var būt dzīvībai bīstama. Ražotāja
garantija neattiecas uz defektiem, kas radušies neautorizētu trešo
personu veiktu remontu rezultātā.
•Nelietojiet šo produktu uzreiz pēc izpakošanas. Pagaidiet, līdz tas sasniedz
istabas temperatūru, un tikai tad lietojiet to.
•Nodrošiniet, ka šis produkts tiek lietots tikai mērenā klimatā (ne tropu/
subtropu klimatā).
•Novietojiet produktu uz gludas, līdzenas virsmas, kas netiek pakļauta
vibrācijām.
•Pārliecinieties, vai produkts un tā detaļas nav izvirzītas pāri atbalsta
mēbelēm.
•Lai samazinātu aizdegšanās, elektriskā šoka vai šī produkta bojājumu
risku, nepakļaujiet to tiešiem saules stariem, putekļiem, lietum un
mitrumam. Nekad nepakļaujiet to apšļakstīšanai vai apliešanai un
nenovietojiet produkta tuvumā ar šķidrumu pildītus priekšmetus.
•Nenovietojiet uz ierīces objektus, kas pildīti ar šķidrumiem, piemēram,
vāzes.
•Neuzstādiet to jebkādu karstumu izstarojošu avotu tuvumā, piemēram,
pie radiatoriem, plītīm vai citām ierīcēm(ietverot pastiprinātājus), kas
izstaro karstumu.
•Nenovietojiet ierīci vietās, kurās ir augsts mitruma līmenis un vāja
ventilācija.
•Pietiekamai ventilācijai nodrošiniet apkārt ierīcei vismaz 5cm brīvu
attālumu. Nebloķējiet nekādas šīs ierīces ventilācijas atveres. Vienmēr
pārliecinieties, ka ventilācijas atveres nepārsedz tādi priekšmeti kā avīzes,
galdauti, aizkari u.c.
•NEKAD neļaujiet nevienam, īpaši bērniem, likt kaut ko ierīces caurumos,
atverēs, jo tas var radīt nāvējošu elektrisko šoku.
•Vētras rada bīstamību visām elektriskajām ierīcēm. Ja tīkla vai antenas
vadu skar zibens, ierīce var tikt bojāta pat tad, ja tā attiecīgajā brīdī ir
izslēgta. Pirms vētras ieteicams atvienot visus vadus un savienotājus.
•Pārmērīgs skaņas spiediens no austiņām var izraisīt dzirdes traucējumus.
•Nepārvietojiet ierīci diska atskaņošanas laikā. Atskaņošanas laikā disks
rotē lielā ātrumā. Atskaņošanas laikā neceliet un nepārvietojiet ierīci,
šādas darbības var bojāt disku vai ierīci.
•Nepalieliniet skaļumu, klausoties sadaļu ar ļoti zemu skaļuma līmeni vai
bez audio signāliem. Pretējā gadījumā skaļruņi var tikt bojāti brīdī, kad
skaņa pēkšņi tiek atskaņota augstākajā līmenī.
Apkope
•Pirms ierīces tīrīšanas, atvienojiet vadu no strāvas.
•Ārpuses tīrīšanai izmantojiet mīkstu un tīru drānu. Nekad netīriet to ar
ķīmiskām vielām vai ar mazgāšanas līdzekļiem.
Baterijas
•Ievietojot baterijas, ievērojiet pareizo polaritāti.
•Nepakļaujiet baterijas augstai temperatūrai un
nenovietojiet tās vietās, kurās temperatūra var
strauji paaugstināties, piemēram, ugunskura
tuvumā vai tiešos saules staros.
•Nepakļaujiet baterijas pārmērīga karstuma
starojuma iedarbībai, nemetiet tās ugunī, neizjauciet tās un nemēģiniet
atkārtoti uzlādēt vienreiz lietojamās baterijas. Tās var iztecēt vai
eksplodēt.
•Nekad nelieciet kopā dažādas baterijas un nejauciet jaunas baterijas kopā
ar vecām.
•Ja tālvadības pults ilgu laiku netiek lietota (ilgāk kā mēnesi), izņemiet
baterijas no tāladības pults, lai novērstu to iztecēšanu.
•Ja baterijas ir iztecējušas, noslaukiet bateriju nodalījumā radušos noplūdi
un samainiet baterijas pret jaunām.
•Nelietojiet baterijas, kas neatbilst noteiktajām.
Nelieciet baterijas mutē, tas var radīt ķīmisko apdegumu!
•Ja baterijas tiek norītas, tas 2 stundu laikā var izraisīt vairākus iekšējos
apdegumus, kam var būt letāls iznākums. Glabājiet jaunas un lietotas
baterijas bērniem nepieejamā vietā. Ja bateriju nodalījums droši
neaizveras, pārtrauciet lietot šo produktu un glabājiet to bērniem
nepieejamā vietā. Ja jums rodas aizdomas, ka baterijas ir norītas vai

4
ievietotas jebkurā ķermeņa daļā, vērsieties pēc neatliekās medicīniskās
palīdzības.
Šī aprīkojuma un tā bateriju iznīcināšana
•Neatbrīvojieties no šīm baterijām kā no nešķirotiem
sadzīves atkritumiem. Nogādājiet tās šķirošanas punktā
EEIA (nolietotu elektroiekārtu) pārstrādei. Šādi rīkojoties,
jūs palīdzēsiet saglabāt rezursus un aizsargāt vidi.
•Lielākajā daļā ES dalībvalstu bateriju šķirošanu nosaka
likums. Sainieties ar izplatītāju vai vietējo pašvaldību, lai
iegūtu plašāku informāciju.
•Augstāk attēlotais simbols parādās uz elektriskā un
elektroniskā aprīkojuma un uz baterijām (vai to
iepakojuma) kā atgādinājums augstāk minētajam. Ja zem
šī simbola parādīts "Hg" vai 'Pb', tas nozīmē, ka baterija satur attiecīgi
dzīvsudrabu (Hg) vai svinu (Pb).
•Lietotājiem tiek lūgts izmantot esošās lietoto iekārtu un bateriju
atgriešanas iespējas.
UZMANĪBU:
•Ierīces ar iebūvētu CD atskaņotāju ir apzīmētas ar šo brīdinājuma
marķējumu.
•ŠIS IR 1. KLASES LĀZERA PRODUKTS.
ŠAJĀ IERĪCĒ IR REDZAMS LĀZERA
STARS, KAS PAVĒRSTĀ VEIDĀ VAR RADĪT BĪSTAMU RADIĀCIJAS
IEDARBĪBU.
PĀRLIECINIETIES, VAI ATSKAŅOTĀJS TIEK LIETOTS ATBILSTOŠI
NORĀDĪJUMIEM.
JA IERĪCE IR PIEVIENOTA STRĀVAI, NETUVINIET ACIS IERĪCES ATVERU
TUVUMĀ, LAI PASKATĪTOS IERĪCES IEKŠPUSĒ.
•VADĪBAS RĪKU VAI PIELĀGOJUMU IZMANTOŠANA SAVĀDĀK KĀ NORĀDĪTS
ŠAJĀ PAMĀCĪBĀ VAR RADĪT BĪSTAMU RADIĀCIJAS IEDARBĪBU.
•NEATVERIET PĀRSEGU UN NEMĒĢINIET IERĪCI LABOT SAVIEM SPĒKIEM.
UZTICIET APKOPI TIKAI KVALIFICĒTAM PERSONĀLAM.
CE paziņojums:
•Ar šo UMC Poland Sp. z o.o.apliecina, ka šī audio ierīce atbilst RED
Direktīvas 2014/53/EU pamatprasībām un citiem saistošajiem
noteikumiem. Pilna ES atbilstības deklarācijas versija atrodama šajā
interneta vietnē http://www.sharp.eu/av/ documents-of-confi rmity
Preču zīmes:
Bluetooth vārda marķējums un logo ir reģistrētas, Bluetooth SIG,. Inc.
piederošas preču zīmes.
1. AVOTA poga: nospiediet, lai izvēlētos režīmus
2. ATSKAŅOŠANAS/APTURĒŠANAS poga: nospiediet, lai atskaņotu vai apturētu mūziku. 1.GAIDSTĀVE: nospiediet šo pogu lai ierīci ieslēgtu vai pārslēgtu
3. Poga „ATPAKAĻ”: nospiediet, lai pārslēgtu iepriekšējo dziesmu/staciju. uz gaidstāves režīmu.
4. Poga „NĀKOŠAIS”: nospiediet, lai pārslēgtu nākošo dziesmu/staciju. 2. ATKĀRTOT: nospiediet šo pogu, lai atkārtotu dziesmu.
5. ATVĒRŠANAS poga: nospiediet, lai atvērtu diska nodalījumu. 3. ATSKAŅOT/APTURĒT: sākt/apturēt atskaņošanu
6. Enerģijas indikators: norāda statusu. 4. ĀTRI ATTĪT: nospiediet, lai ātri attītu atskaņoto ierakstu.
7. GAIDSTĀVES poga: nospiediet, lai iestatītu gaidstāves režīmu vai ieslēgtu ierīci. 5. DISKANTS (TREBLE): nospiediet šo pogu, lai pielāgotu
8. Tālvadības sesnsors: pavērsiet tālvadības pulti līdz sensoram diskanta režīmu, izmantojiet pogas” +” vai „–„, lai diskantu

LAT
7 metru attālumā. samazinātu/palielinātu.
9. Attēlošanas ekrāns: tiek attēlota informācija par staciju. 6. SKAĻUMS-: nospiediet, lai samazinātu skaļuma līmeni.
10. SKAĻUMS+/- poga: pagrieziet to, lai pielāgotu skaļuma līmeni. 7. PROGRAMMĒŠANA: izmantojiet šo, lai ieprogrammētu atskaņošanas secību.
11. USB ieeja: tiek izmantota ,lai pievienotu USB zibatmiņas karti. 8. JAUKTI: nospiediet šo pogu, lai atskaņotu mūziku jauktā secībā.
12. Audio ieejas ligzda: tiek izmantota, lai pievienotu ārējos audio avotus. 9. CIPARI (0-9): atveriet datu uzglabāšanas vietu, ievadiet frekvenci, izvēlieties
13. FM antena: FM signāla uztveršanai. ierakstu.
14. Skaļruņu termināli: skaļruņu savienošanai ar galveno ierīci. 10. ATVĒRŠANA: nospiediet šo, lai atvērtu diska nodalījumu.
15. Strāvas kontaktligzda: pievienojiet strāvas vadu. 11. AVOTS: izvēlieties darbības režīmu: CD, FM, USB, Bluetooth® (BT), AUX.
12. PĀRTRAUKT/MO/ST: pārtraukt atskaņošanu, pārslēgt starp mono un
stereo, kad ieslēgts FM režīms.
13. IEPRIEKŠĒJAIS: nospiediet, lai pārslēgtu uz iepriekšējo ierakstu.
14. ĀTRA PATĪŠANA UZ PRIEKŠU: nospiediet, lai atskaņoto ierakstu ātri
patītu uz priekšu.
15. NĀKAMAIS: pārslēdziet nākamo ierakstu/staciju.
16. BASS: nospiediet šo pogu, lai pielāgotu basu, izmantojiet pogas „+” vai
„—„, lai samazinātu/palielinātu basu.
17. SKAĻUMS+: nospiediet, lai palielinātu skaļumu.
18. KLUSUMS: nospiediet vienu reizi, lai izslēgtu skaņu, nospiediet vēlreiz,
lai ieslēgtu to atpakaļ. Jūs varat izslēgt skaņu, arī izmantojot skaļuma
kontroles pogas.
Aizmugures panelis 19. DSP: nospiediet, lai izvēlētos skaņas ekvalaizeru.
20. SKAĻI: nospiediet „skaļi”, lai palielinātu paaugstinātu basa līmeni zema
līmeņa skaļumā.
21. SAGLABĀT: nospiediet, lai saglabātu savas iecienītākās stacijas.
22. FREQ: frekvence, FM režīmā nospiediet, lai atvērtu savu iecienītāko
frekvenci.
Tālvadības pults bateriju ievietošana un nomaiņa
1. Piespiediet bateriju nodalījuma fiksatoru virzienā, kuru norāda
bultiņa, kas atroda tālvadības pults aizmugurē.
2. Piespiežot fiksatoru, atveriet bateriju nodalījumu.
Kastē ietvertais:
1x galvenā ierīce
2x skaļruņi
1x tālvadības pults
2x AAA baterijas
1x lietošanas pamācība
1x ātrā lietošanas pamācība
1x ES strāvas vads
3. F
i
t
t
w
o
b
a
t
t
e
r
i
e
s
o
b
s
e
r
v
i
n
Vadības rīki
Tālvadības pults

6
g
p
o
l
a
r
i
t
y
+
,
-
a
s
s
h
o
w
n
.
W
h
e
n
r
e
p
l
a
c
i
n
g
t
h
e
b
a
t
t
e
r
i
e
s
,
u
s
e
o
n
l
y
t
h
e
s
a
m
e
t
y
p
e
o
f
b
a
t
t
e
r
y
s
u
p
p
l
i
e
d
.
R
e
-
f
i
t
t
h
e
b
a
t
t
e
r
y
c
o
v
e
r
a
n
d
c
l

LAT
i
p
i
t
i
n
p
l
a
c
e
.
Sagatavošana lietošanai
1. Novietojiet skaļruni jebkurā no ierīces pusēm, ieteicams tādā pašā
augstumā un ar 150mm atstarpi starp katru skaļruni un galveno
ierīci.
Pievienojiet skaļruņa kontaktdakšas pie ierīces aizmugures.
Pārliecinieties, vai tiek kreisās puses skaļrunis tiek pievienots kreisajā
izejā ierīces aizmugurē, un labās puses skaļrunis – labajā.
Kreisais sarkanais vads savienojas ar kreiso sarkano termināli, un labais
sarkanais kabelis savienojas ar labo sarkano termināli. Abi melnie
kabeļi savienojas ar attiecīgajiem melnajiem termināliem.
2. Lūdzu, pārliecinieties, ka spriegums, kas norādīts uz marķējuma
ierīces aizmugurē atbilst spriegumam vietā, kurā tā tiks pieslēgta.
Izvēlieties atbilstošu strāvas vadu, ievietojiet vienu tā galu strāvas
kontaktligzdā ierīces aizmugurē, un pēc tam ievietojiet otru tā galu
sienā esošajā strāvas kontaktligzdā.
3. Nospiediet pogu „gaidstāve” (STANDBY) uz galvenās ierīces, lai
ieslēgtu ierīci. Pagariniet antenu, lai sasniegtu vislabāko uztveršanu.
Nospiediet pogu „avots” (SOURCE), lai atvērtu FM režīmu. Lai
lietotu radio FM režīmā, sekojiet norādījumiem šīs lietošanas
pamācības nodaļā „FM radio darbība”.
4. Nospiediet pogu „avots” (SOURCE), lai atvērtu CD režīmu.
Nospiediet pogu „atvērt„ (EJECT), lai atvērtu disku nodalījumu un
ievietotu disku, vēlreiz nospiediet šo pašu pogu, lai aizvērtu. Sāksies
CD atskaņošana no pirmā ieraksta.
5. Nospiediet pogu „avots” (SOURCE), lai atvērtu Aux In (Audio)
režīmu. Pievienojiet savu audio ierīci AUX IN kontaktligzdai,
izmantojot 3.5mm aux in kabeli. Pārvaldiet atskaņošanu, izmantojot
pievienoto ierīci.
6. Nospiediet pogu „avots” (SOURCE), lai atvērtu Bluetooth režīmu.
Aktivizējiet Bluetooth iespējoto ierīci un izvēlieties “SHARP XL-
B510”. Izvēlieties dziesmu, kuru vēlaties atskaņot, un nospiediet
„atskaņot”.
7. Nospiediet pogu „avots”( SOURCE), lai atvērtu USB režīmu.
Pievienojiet USB ierīci, izmantojot ierīces priekšpusē esošo USB
ieeju, tā automātiski nolasīs un atskaņos USB.
PAMATFUNKCIJAS
Režīmu pārslēgšana
Režīmu pārslēgšana: CD, FM, Bluetooth, USB un AUX IN. Lai pārslēgtu
režīmus, nospiediet pogu „avots”( SOURCE) uz ierīces vai uz tālvadības
pults.
Skaļuma vadība
1. Pagrieziet skaļuma vadības rīku pulksteņrādītāja
virzienā vai nospiediet pogu „+”, lai paaugstinātu
skaļuma līmeni.
2. Pagrieziet skaļuma vadības rīku pretēji
pulksteņrādītāja virzienam vai nospiediet pogu „-”, lai
samazinātu skaļuma līmeni.
DSP efekti
Vairākas reizes nospiediet pogu DSP, lai apskatītu visus iespējamos
ekvalaizera iestatījumus skaņas mainīšanai. Izvēlieties starp klasisko,
rokmūziku, popmūziku, džezu, deju mūziku, dzīvo mūziku un izslēgtu.
Skaļuma funkcija
Šī funkcija palielinās basa līmeni zema skaļuma līmenī. Nospiediet uz
tālvadības pults pogu „skaļums”(LOUD), lai šo efektu iespējotu. Nospiediet
šo pogu vēlreiz, lai atspējotu.
Klusuma funkcija
Jebkurā brīdī nospiediet pogu , lai izslēgtu skaļumu. Nospiediet vēlreiz,
lai ieslēgtu to atpakaļ.
Signāla vadība
Ja nepieciešams, noregulējiet basa un augstā toņa vadības rīkus.
Nospiediet uz tālvadības pults pogas BASS vai TREBLE, lai uzreiz izvēlētos
basu vai augsto toni, pēc tam izmantojiet pogas „+” vai „-„, lai pielāgotu.
Gaidstāves režīms
Nospiediet uz ierīces vai tālvadības pults pogu „gaidstāve” (STANDBY), lai
ieslēgtu gaidstāves režīmu. Nospiediet šo pogu vēlreiz, lai atgrieztos pie
normālas darbības.
PIEZĪME: Šī ierīce izveidota tā, ka tā automātiski pāriet gaidstāves režīmā
pēc aptuveni 10 minūtēm, kuru laikā nav notikusi nekāda aktivitāte. Lai
„pamodinātu” ierīci, nospiediet gaidstāves pogu.
PIEZĪME:Kad ieslēdzat ierīci no gaidstāves režīme, tā atgriezīsies pie pēdējā
izmantotā režīma.

8
FM radio darbība
1. Nospiediet u ierīces vai tālvadības pults pogu „avots” (SOURCE),
lai atvērtu FM režīmu. (FM frekvences: 87.50-108.00MHz)
2. Nospiediet / pogas uz tālvadības pults, lai palielinātu vai
samazinātu frekvenci par 0.05MHz.
3. Nospiediet un paturiet pogas „iepriekšējais/nākošais” vai pogas /
, ,lai ātri skenētu frekvenču diapazonu. Skenēšana tiks
pārtraukta, tiklīdz tiks atrasta kāda stacija.
4. Nospiediet un paturiet pogu , lai ātri skenētu frekvenču
diapazonu; tas automātiski saglabās visas atrastās stacijas.
5. Stacijas SAGLABĀŠANA
Jūs varat saglabāt ierīces atmiņā līdz 40 FM stacijām.
–Nospiediet pogu „frekvence” (FREQ), un pēc tam, izmantojot ciparu
pogas, ievadiet frekvenci, kuru vēlaties saglabāt.
–Nospiediet pogu „saglabāt” (SAVE), ekrānā tiks attēlots " P01".
–Nospiediet pogu, lai izvēlētos no stacijām numuru, kuru vēlaties
saglabāt.
–Vēlreiz nospiediet pogu „saglabāt” (SAVE),lai apstiprinātu.
6. Atsaukt iestatītās stacijas:
–Nospiediet pogu, lai atsauktu saglabātās stacijas.
CD darbība
1. Lai atvērtu CD režīmu, nospiediet pogu „avots” (SOURCE) uz ierīces
vai uz tālvadības pults. Nospiediet pogu „atvērt” (EJECT), lai atvērtu
diska nodalījumu, ievietojiet CD un nospiediet šo pašu pogu vēlreiz.
2. Nospiediet pogu, lai apturētu vai atskaņotu dziesmu.
3. Nospiediet pogu „pārtraukt/mo/st” (STOP/MO/ST) uz tālvadības
pults, lai pārtrauktu atskaņošanu, nospiediet šo pogu vēlreiz, lai
atsāktu.
4. Nospiediet pogu „iepriekšējais/nākošais”vai pogu uz tālvadības
pults, lai pārslēgtu iepriekšējo vai nākošo dziesmu.
5. Nospiediet / pogu uz tālvadības pults, lai ātri patītu uz priekšu
vai atpakaļ, nospiediet to vēlreiz, lai atgrieztos pie normāla
atskaņošanas ātruma.
6. Lai uzreiz izvēlētos noteiktu dziesmu, nospiediet ciparu 0-9 pogas
uz tālvadības pults. Piemēri:
–ja ieraksta numurs sastāv no 2 zīmēm, piemēram 25, nospiediet
pogu „2”un pēc tam pogu „5”, lai izvēlētos 25. ierakstu.
–ja ieraksta numurs sastāv no 1 cipara, piemēram, 9, vispirms
nospiediet „0” un pēc tam „9”, lai pārslēgtu uz 9. ierakstu.
7. ATKĀRTOŠANAS poga:
Lai iestatītu atkārtošanas režīmu, atskaņošanas režīma laikā, nospiediet
pogu „atkārtot” (REPEAT).
–CD un CD-R diskiem nospiediet pogu „atkārtot” (REPEAT), lai
atkārtotu atskaņotās dziesmas.
–Nospiediet vienu reizi, lai atkārtotu esošo dziesmu. Nospiediet
vēlreiz, lai atkārtotu visus ierakstus. Nospiediet trešo reizi, lai atceltu.
8. Nospiediet uz tālvadības pults pogu „jaukti” (SHUFFLE),lai
atskaņotu disku jauktā secībā. Nospiediet vēlreiz, lai turpinātu.
9. Jūs varat iestatīt disku atskaņošanai ieprogrammētā secībā:
–Lai pārtrauktu atskaņošanu, nospiediet uz tālvadības pults esošo
pogu „pārtraukt/mo/st” (STOP/MO/ST).
–Nospiediet uz tālvadības pults esošo pogu „programma” (PROGRAM)
Ekrānā tiks attēlots: P01.
–Nospiediet uz tālvadības pults ciparu pogas, lai izvēlētos ierakstus,
kurus ieprogrammēt.
–Nospiediet uz tālvadības pults pogas , lai pārslēgtu
ieprogrammētos ierakstus.
–Nospiediet uz tālvadības pults pogu „programma” (PROGRAM), lai
apstiprinātu.
–Lai sāktu atskaņot ieprogrammētajā secībā, nospiediet pogu .
–Lai atceltu ieprogrammēto secību, nospiediet pogu
„pārtraukt/mo/st” (STOP/MO/ST) divas reizes.
Piezīmes:
–tiek atbalstīti MP3 un WAV formāti.
–neatbalstītie failu formāti tiek izlaisti. Piemēram, Word dokumenti
(.doc) un MP3 faili ar pagarinājumu .dlf tiek ignorēti un netiek
atskaņoti.
Bluetooth darbība
Micro sistēmai ir Bluetooth iespējas, un tā spēj uztvert signālu 7 metru
attālumā. Lai savienotu Micro sistēmu ar Bluetooth ierīci:
1. Lai atvērtu Bluetooth režīmu, vairākas reizes nospiediet pogu „avots”
(SOURCE) , ekrānā parādīsies un mirgos paziņojums“bt“.
2. Aktivizējiet savu Bluetooth ierīci un izvēlieties meklēšanas režīmu.
3. No meklēšanas saraksta izvēlieties “SHARP XL-B510” un savienojiet.
4. Ja tiek vaicāta parole, ievadiet “0000“.
5. Kad ierīces viena ar otru ir savienotas, tiks atskaņota apstiprinājuma
skaņa. Ekrānā beigs mirgot „bt”.
6. Tagad jūs varat baudīt mūziku no savas ierīces.
7. Lai izslēgtu Bluetooth funkciju, Micro sistēmā pārslēdziet citu funkciju
vai atspējojiet šo funkciju savā Bluetooth ierīcē.
Citu audio ierīču pievienošana
Audio ļauj jūsu ierīcei viegli un vienkārši savienoties ar MP3 atskaņotāju vai
citiem ārējiem avotiem.
1. Izmantojiet 3.5mm audio kabeli, lai pievienotu savu ārējo audio
ierīci ierīces priekšpusē esošajai AUX IN ieejai.
2. Savienojiet Micro sistēmas galveno kontaktdakšu ar strāvas
padevi.
3. Nospiediet pogu „avots” (SOURCE), lai pārslēgtu uz AUX IN
režīmu.
4. Iespējams, ka atskaņošanas funkciju nodrošināšanai būs
jāizmanto ārējā audio ierīce.
5. Optimālam skaļuma līmeniem pielāgojiet skaļumu savā ārējā
audio ierīcē.
USB darbība
Ir iespējama mūzikas klausīšanās, izmantojot ierīces USB interfeisu.
Savienošana ar USB ierīci:
1. Ieslēdziet ierīci un izvēlieties USB režīmu, nospiežot
pogu „avots” (SOURCE).
2. Pievienojiet USB ierīci šīs ierīces priekšpusē esošajai
USB kontaktligzdai.
3. Radio atskaņos dziesmas, kas ir saglabātas USB ierīcē.
Piezīmes:
–MP3 un WAV formāti tiek atbalstīti.
–Neatbalstīti failu formāti tiek izlaisti. Piemēram, Word dokumenti
(.doc) vai MP3 faili ar pagarinājumu .dlf tiek izlaisti un netiek
atskaņoti.
–Pat tad, ja faili ir formātā, ko ierīce atbalsta (MP3), daži var netikt
atskaņoti atkarībā no saderības.
–Dažos gadījumos failu nolasīšana var aizņemt līdz pat 60 sekundēm,
tā nav kļūme.
–Atkarībā no datu daudzuma un medija ātruma, USB ierīces nolasīšana
var aizņemt ilgāku laiku.
–Maksimālais USB atmiņas izmērs ir 64GB.

LAT
–USB atmiņas ierīce ir jāformatē kā FAT, FAT16 vai FAT32.
Traucējummeklēšana
Ierīce neieslēdzas
Iemesls
•Strāvas vads nav pievienots sienas kontaktligzdai
•Strāvas kontaktligzda nav ieslēgta
Risinājums
•Pārliecinieties, vai kontaktdakša ir savienota
•Ieslēdziet ierīci, strāvas kontaktligzdu
Nav skaņa CD/AUX/RADIO, nav skaņa no AUX ieejas
Iemesls
•Skaļuma līmenis ir pārāk zems
•AUX avota skaļuma līmenis ir pārāk zems
Risinājums
•Palieliniet skaļuma līmeni
•Palieliniet AUX avota skaļuma līmeni
Skaņa ir traucēta, skaņa ir traucēta no AUX ieejas
Iemesls
•Skaļas līmenis ir pārāk augsts
•AUX avota skaļuma līmenis ir pārāk augsts
Risinājums
•Samaziniet skaļuma līmeni
•Samaziniet AUX avota skaļuma līmeni
CD netiek atskaņots
Iemesls
•Nav ievietots disks
•Disks nav pareizi ievietots
•Disks ir netīrs
Risinājums
•Ievietojiet savienojamu disku
•Pārbaudiet, vai disks ir ievietots
•Notīriet disku
Statiska skaņa
Iemesls
•Vājš uztveršanas signāls
Risinājums
•Mainiet antenas novietojumu (FM)
Nepieciešamā stacija nav atrasta
Iemesls
•Vājš signāls
•Stacija jūsu atrašanās vietā nav pieejama
Ierīce izslēdzas 10 minūtes pēc pēdējās aktivitātes
Iemesls
• Ir iestatīts automātiskās gaidstāves režīms
Risinājums
• Šī ierīce ir veidota, lai tā automātiski, 10 minūtes pēc tam, kad nav bijusi
neviena aktivitāte, pāriet gaidstāves režīmā. Lai ierīci ieslēgtu, nospiediet
pogu „gaidstāve” (STANDBY).
Tehniskā specifikācija
Modelis
XL-B510
Radio signāls
87.5-108MHz
Enerģijas padeve
AC 220-240V~ 50Hz
Enerģijas patēriņš
28 W
Enerģijas patēriņš gaidstāvē
<0,5 W
Izejas jauda
2 x 7 W (RMS)
Pretestība
2 x 8 Ω
Frekvences reakcija
60Hz - 20KHz
Bluetooth
Versija
V 2.1 + EDR
Maksimālā pārvadītā jauda
<20 dbm
Frekvenču joslas
2402 MHz ~ 2480 MHz
CD atskaņotājs
Disku formāti
CD, CD-R, CD-RW, MP3, WMA
Tālvadības pults
Bateriju tips
2x AAA / 1.5V
1
,75kg
KG
0
,95kg
KG

10
Important safety instructions
CAUTION
RISK OF ELECTRIC SHOCK DO
NOT OPEN
Please, read these safety instructions and respect the
following warnings before the appliance is operated:
The lightning fl ash with arrowhead symbol, within an
equilateral triangle, is intended to alert the user to the presence
of uninsulated “dangerous voltage” within the product’s
enclosure that may be of suffi cient magnitude as to constitute
a risk of electric shock to persons.
The exclamation point within an equilateral triangle is intended
to alert the user to the presence of important operating and
maintenance (servicing) instructions in the literature
accompanying the appliance.
This symbol means that the product should be disposed of in
an environmentally friendly manner and not with general
household waste. AC voltage
DC voltage
Class II equipment
In order to prevent fi re always
keep candles and other open fl
ames away from this product.
Warning:
•Always follow basic safety precautions when using this applience,
especially when children are present.
•Children should be supervised to ensure that they do not play with the
appliance.
•Do not damage the power cord, neither do not place any heavy objects
on it, do not strech it or bend it. Also do not attach extension cables.
Damage to the power cord may occur fi re or electric shock.
•If the supply cord is damaged, it must be replaced by the manufacturer, a
service agent or similarly qualied persons in order to avoid a hazard.
•Ensure that the unit is plugged into an AC 220-240V 50Hz power outlet.
Using higher voltage may cause the unit to malfunction or even fi re
catching.
•If the power plug does not fi t into your outlet, do not force the plug into
an electrical socket if it does not fi t.
•Turn off the unit before unplugging it from power source to completely
switch it off .
•Do not disconnect or connect the power cord with wet hands. It may
cause an electric shock.
•Disconnect the power cord if it is not used for a long time.
•Ensure that the mains plug is always easily accessible.
•This product does not contain any parts that are serviceable by the user.
In case of a fault, contact the manufacturer or authorised service
department. Exposing the internal parts inside the device may endanger
your life. The manufacturers guarantee does not extend to faults caused
by repairs carried out by unauthorised third parties.
•Do not use this product immediately after unpacking. Wait until it warms
up to room temperature before using it.
•Ensure this product is used in moderate climates only (not in tropical/
subtropical climates).
•Place product on a fl at, stable surface that is not subject to vibrations.
•Ensure the product and its parts is not overhanging the edge of the
supporting furniture.
•To reduce the risk of fire, electric shock or damage to this product, do not
expose it to direct sunlight, dust, rain and moisture. Never expose it to
dripping or splashing and do not place objects filled with liquids on or
near the product.
•Do not place objects fi lled with liquids, such as vases, on the apparatus.
•Do not install near any heat sources such as radiators, heat registers,
stoves, or other apparatus (including amplifi ers) that produce heat.
•Do not place the product where the humidity is high and ventilation is
poor.
•Ensure a minimum distance of 5 cm around the apparatus for suffi cient
ventilation. Do not block any ventilation openings of this product. Always
ensure that the ventilation openings are not covered with items such as
newspapers, table-cloths, curtains, etc.
•NEVER let anyone, especially children, push anything into holes, slots or
any other openings in the unit’s casing as this could result in a fatal
electric shock.
•Storms are dangerous for all electric appliances. If the mains or aerial
wiring is struck by lightning, the appliance might get damaged, even if it is
turned off . You should disconnect all the cables and connectors of the
appliance before a storm.
•Excessive sound pressure from earphones and headphones can cause
hearing loss.
•Do not move the unit during disc playback. During playback, the disc
rotates at high speed. Do not lift or move the unit during playback, as
doing so may damage the disc or the unit.
•Do not turn up the volume while listening to a section with very low level
inputs or no audio signals. lf you do, the speaker maybe damaged when a
peak level section is suddenly played.
Maintenance
•Unplug the power cable from the power source before cleaning the
appliance.
•Use a soft and clean rag to clean the outside of the unit. Never clean it
with chemicals or detergent.
Batteries
•Observe the correct polarity when inserting the
batteries.
•Do not expose batteries to high temperatures and
do not place them on locations where the
temperature might increase quickly, e.g. near the fi
re or on the direct sunshine.
•Do not expose batteries to excessive radiant heat, Cd do not throw
them into the fi re, do not disassemble them and do not try to recharge
un-rechargeable batteries. They could leak or explode.
•Never use diff erent batteries together or mix new and old ones.
•When the Remote Control is not to be used for a long time (more than a
month), remove the battery from the Remote Control to prevent it from
leaking.
•If the batteries leak, wipe away the leakage inside the battery
compartment and replace the batteries with new ones.
•Do not use any batteries other than those specied.
Do not ingest battery, chemical burn hazard
•If the battery is swallowed, it can cause severe internal burns in just 2
hours and lead to death. Keep new and used batteries away from
children. If the battery compartment does not close securely, stop using
the product and keep it away from children. If you think batteries might

EN
have been swallowed or placed inside any part of the body, seek
immediate medical attention.
Disposal of this equipment and Batteries
•Do not dispose of this product or its batteries as unsorted
municipal waste. Return it to a designated collection point
for the recycling of WEEE in accordance with local law. By
doing so, you will help to conserve resources and protect
the environment.
•Most of the EU countries regulate the disposal of batteries
by law. Contact your retailer or local authorities for more
information.
•The shown above appears on electrical and electronical
equipment and batteries (or the packaging) to remind
users of this. If "Hg" or 'Pb' appears below the symbol, this mean that the
battery cantains traces of mercury (Hg) or lead (Pb), respectively.
•Users are requested to use existing return facilities for used equipment
and batteries.
CAUTION:
•Appliances with built in CD player are marked with this caution label
•THIS UNIT IS A CLASS 1 LASER
PRODUCT. THIS UNIT USES A VISIBLE
LASER BEAM WHICH COULD CAUSE
HAZARDOUS RADIATION EXPOSURE IF
DIRECTED. BE SURE TO OPERATE THE
PLAYER CORRECTLY AS INSTRUCTED.WHEN THIS UNIT IS PLUGGED INTO
THE WALL OUTLET, DO NOT PLACE YOUR EYES CLOSE TO THE OPENINGS
TO LOOK INTO THE INSIDE OF THIS UNIT.
•USE OF CONTROLS OR ADJUSTMENTS OR PERFORMANCE OF
PROCEDURES OTHER THAN THOSE SPECIFIED HEREIN MAY RESULT IN
HAZARDOUS RADIATION EXPOSURE.
•DO NOT OPEN COVERS AND DO NOT REPAIR YOURSELF. REFER SERVICING
TO QUALIFIED PERSONNEL.
CE Statement:
•Hereby, UMC Poland Sp. z o.o. declares that this audio device is in
compliance with the essential requirements and other relevant provisions
of RED Directive 2014/53/EU. The full text of the EU declaration of
conformity is available by following the link http://www.sharp.eu/av/
documents-of-confi rmity
Trademarks:
The Bluetooth word mark and logos are registered trademarks owned by
Bluetooth SIG,. Inc.
5. SOURCE button: Press to select the modes.
6. PLAY/PAUSE button: Press to pause or play the music.
16. EJECT button: Press to pop out the disc drawer. 2. REPEAT: Press this to repeat the song.
17. Power Indicator: Indicate the status. 3. PLAY/PAUSE: Start/ Pause playback.
18. STANDBY button: Press to set to standby mode or turn on. 4. FAST REWIND: Press this to fast-rewind the
19. Remote Sensor: Point the remote control track that is currently playing.

12
to the sensor within 7 meters. 5. TREBLE: Press this button to adjust the treble, use the
+ or - buttons to increase/decrease the treble.
20. Display Screen: Display the station information.
6. VOLUME- : Press this to decrease volume.
21. VOLUME+/- knob: Turn to adjust the volume level.
7. PROGRAM: Use this to program the playback order.
22. USB Port: Used to connect with the USB fl ash disk.
8. SHUFFLE: Press this to play music in the random order.
23. Audio Input Socket: Used to connect external audio sources.
9. NUMBER (0-9): Go to storage location, enter frequency,
select track
10. EJECT: Press this to pop out the disc drawer
11. SOURCE: Select mode of operation: CD, FM, USB, Bluetooth®
(BT), AUX
12. STOP/ MO/ST: Stop playback, switch between mono and
stereo while in FM mode.
13. PREVIOUS: Press this to skip to the previous track.
14. FAST FORWARD: Press this to fast forward the track that is
currently playing.
15. NEXT: Jump to next track/ station.
16. BASS: Press this button to adjust the bass, use the + or -
buttons to increase/decrease the bass.
17. VOLUME+: Press this to increase volume.
18. MUTE: Press once to mute the sound, press again to unmute. You can also unmute by pressing the volume control buttons.
Rear panel 19. DSP: Press this to select the sound equalizer.
24. FM Antenna: To receive the FM signal.
20. LOUD: Press LOUD to increase the level of bass at low volume levels.
25. Speaker Terminals: Connect the speakers to the main unit. 21. SAVE: Press to save your favourite stations.
26. Power socket Connect the power cord to the power supply. 22. FREQ: Frequency, in FM mode, press to enter your favourite frequency.
Fitting or replacing the remote control batteries
4. Push the catch on the battery cover in the direction of the embossed
arrow on the rear of the remote.
5. While pushing the catch, open the battery cover.
6. F
i
t
t
w
o
b
a
t
t
e
r
i
e
s
o
b
s
e
r
v
i
n
g
p
o
l
a
r
i
t
y
+
,
-
a
What is included in the box
Remote control

EN
s
s
h
o
w
n
.
W
h
e
n
r
e
p
l
a
c
i
n
g
t
h
e
b
a
t
t
e
r
i
e
s
,
u
s
e
o
n
l
y
t
h
e
s
a
m
e
t
y
p
e
o
f
b
a
t
t
e
r
y
s
u
p
p
l
i
e
d
.
7. R
e
-
f
i
t
t
h
e
b
a
t
t
e
r
y
c
o
v
e
r
a
n
d
c
l
i
p
i
t
i
n
p
l
a
c
e
.

14
Preparation for use
8. Place a speaker on either side of the main unit, preferably at the
same height and with at least 150mm space between each speaker
to the main unit.
Connect the speaker plugs to the rear of the unit. Take care to match
the speaker placed to the LEFT to the LEFT output on the rear of the
unit. Repeat for the RIGHT speaker.
The LEFT RED cable connects to the LEFT RED terminal, the RIGHT RED
cable to the RIGHT RED terminal. Both BLACK cables connect to the
corresponding BLACK terminals.
9. Please ensure that the voltage marked on the rating label, located
on the rear panel, is the same as the voltage in your area. Choose a
suitable Power Cord, insert the end of the cord into the Power
Socket on the rear panel of the unit. Then plug the other end of the
cable in to the wall socket.
10. Press the STANDBY button on the main unit to turn ON the unit.
Extend the ANTENNA to get the best reception. Press the SOURCE
button to enter the FM mode. To use the radio in FM mode, follow
the instructions in the FM RADIO OPERATION chapter of the User
manual.
11. Press the SOURCE button to enter the CD mode. Press the EJECT
button to open the disc drawer and insert a disc. Press the EJECT
button again to close. The CD will begin playing from the fi rst track.
12. Press the SOURCE button to enter the Aux In (Audio) mode.
Connect your audio device to the AUX IN socket via a 3.5mm aux in
cable. Control playback via your connected audio device.
13. Press the SOURCE button to enter the Bluetooth mode. Activate the
Bluetooth enabled device and select the “SHARP XL-B510”. Select
the song you want and press to play.
14. Press the SOURCE button to enter the USB mode. Plug the USB
device to USB port on the front panel of the unit, and it will read
the USB and play automatically.
BASIC FUNCTIONS
Switching modes
To switch between the modes: CD, FM, Bluetooth, USB and AUX IN. Press
SOURCE button on the unit or the remote control to switch modes.
Volume control
3. Rotate the VOLUME control clockwise or press the “+”
button to increase the volume level.
4. Rotate the VOLUME control anti-clockwise or press
the “ - “ button to decrease the volume level.
DSP eff ects
Press the DSP button repeatedly to cyclethrough a set of equalizer presets
to alter the sound. Choose from CLASSIC, ROCK, POP, JAZZ, DANCE, LIVE
and Off .
Loudness function
This function will increase the level of bass at low volume levels. Press the
LOUD button on remote to enable the eff ect. Press again to disable the eff
ect.
Mute function
Press the button at any time to mute the sound output. Press again to
unmute.
Tone controls
Adjust the bass and treble tone controls if required.
Press the BASS or TREBLE button on remote control directly to select bass
or treble, then use the“+”or “ - “ buttons to adjust.
Standby mode
Press the STANDBY button on the unit or the remote to put the system into
standby mode. To resume normal operation, press this button again.
NOTE: This unit is designed to enter STANDBY mode automatically, after
about 10 minutes (approximately) of inactivity. Press STANDBY button to
wake the unit.
NOTE: When you power on the unit from standby, the last used mode will
resume.
FM radio operation
7. Press the SOURCE button on the panel or the remote control to
enter the FM mode. (FM frequency: 87.50-108.00MHz)
8. Press the / buttons on remote control to decrease
or increase the frequency in 0.05MHz increments.
9. Press and hold the PREV/NEXT buttons on the panel or the /
buttons on remote control to scan through the
frequency range quickly. The scan will stop once it has found a
station.
10. Press and hold the button to scan through the frequency
range quickly; it will store any stations found automatically.
11. SAVE a station:
You can store up to 40 FM stations in memory.
–Press the FREQ button and then, using the number
buttons enter the frequency that you want to store.
–Press the SAVE button, it will show " P01" on the
display.
–Press the / button to select through the
station number you want to save.
–Press the SAVE button again to confi rm.
12. Recall the preset stations:

EN
–Press the / button to recall your stored
stations.
CD operations
10. Press the SOURCE button on the panel or the remote control to
enter the CD mode. Press the EJECT button to pop out the disc
drawer, put a CD on, then press the EJECT button again.
11. Press the button to pause or play the song.
12. Press the STOP/MO/ST button on remote control to stop playing,
press the button to re-start.
13. Press the PREV/NEXT button or / button on
remote control to skip to the previous or next song.
14. Press the / button on remote control to fast forward
or fast rewind the playback, press repeatedly to resume normal
speed.
15. To directly select a specifi c song press the number buttons 0-9 on
remote control. Example:
–If the track number consists of two digits, for example25, press
button “2“, and then button “5“ to select the 25th track.
–If the track number is a one digit number, for example
9, press “0“ fi rst, then “9“ to skip to the 9th track.
16. REPEAT button:
While in playing mode, press the REPEAT button to set repeat mode.
–For CD and CD-R discs, press the REPEAT button to repeat
playing songs.
–Press once to repeat current song. Press again to repeat all tracks. –
Press a third time to cancel.
17. Press the SHUFFLE button on remote control to play the disc in
random order.Press again to resume.
18. You can set the disc played in a programmed order:
–Press the STOP/MO/ST button on remote control to
stop playing.
–Press the PROGRAM button on remote control. The
screen displays: P01.
–Press the number buttons on remote control to select the tracks to
program.
–Press the buttons on remote control to skip
between the program tracks.
–Press the PROGRAM button on the remote control to confi rm.
–To begin the programmed order, press the button.
–To cancel the program sequence, press the STOP/MO/ST button
twice.
Notes:
–MP3 and WAV formats are supported.
–Unsupported fi le formats are skipped. For example, Word
documents (.doc) or MP3 fi les with extension .dlf are ignored and
not played.
Bluetooth Operation
The Micro system has Bluetooth capability and is able to receive a signal
within 7 meters. To pair the Micro system with a Bluetooth device:
8. Press the SOURCE button repeatedly to enter the Bluetooth mode,
the“bt“ message appear and fl ash on the display.
9. Activate your Bluetooth device and select the search mode.
10. Select “SHARP XL-B510” from the search list and connect.
11. Enter “0000“ for password if prompted.
12. When the devices are connected to each other, a confi rmation sound
will be made. “bt” will stop fl ashing in the display.
13. Now you can enjoy the music from your device.
14. To turn off the Bluetooth function, switch to another function on the
Micro system, or disable the function on your Bluetooth device.
Connect other audio devices
Audio allows your unit quickly and easily to connect to an MP3 player or
other external sources.
6. Use a 3.5mm audio cable to connect your external audio device
to the AUX IN socket on the front panel.
7. Connect the Micro System mains plug to the power supply.
8. Press the SOURCE button to switch to the AUX IN mode.
9. You may need to operate the external audio device directly for
playback features.
10. For optimum volume levels, adjust the volume on the external
audio device.
USB Operation
It is possible to listen to the music using the USB device interface of the
unit.
Connecting a USB device:
4. Switch the unit on and select USB mode by pressing
the SOURCE button.
5. Connect the USB device to the USB connection socket
on the front panel of the unit.
6. The radio will now play songs which are saved on the
USB device.
Notes:
–MP3 and WAV formats are supported.
–Unsupported fi le formats are skipped. For example, Word documents
(.doc) or MP3 fi les with extension .dlf are ignored and not played
–Even when the fi les are in a supported format (MP3), some may not
play or display depending on the compatibility.
–In some case, reading may be as long as 60 seconds, this is not a
malfunction.
–Depending on the amount of data and media speed, it may take
longer for the unit to read the USB device.
–The maximum USB memory size is 64GB.
–USB memory device must be formatted in FAT, FAT16 or FAT32
Troubleshooting
No Power
Reason
•Power cable not connected to wall socket
•Power socket is not switched on
Solution
•Make sure the plug is connected
•Switch the power on
No Sound CD/AUX/RADIO No Sound from AUX input
Reason
•Volume is too low
•AUX source volume is too low
Solution
•Increase the volume
•Increase the output volume of the AUX source
Sound is distorted Sound is distorted from AUX Input
Reason
•Volume is too high
•AUX source volume is too high

16
Solution
•Reduce the volume
•Reduce the output volume of the AUX source
Unable to play CD
Reason
•No disc in the tray
•Disc not loaded properly
•Disc is dirty
Solution
•Insert a compatible disc
•Check the disc loaded
•Clean the disc
Static Sound
Reason
•Poor reception
Solution
•Re-locate the antenna (FM)
Desired station not found
Reason
•Weak signal
•Station not available in your area
Unit switches off after 10 minutes of inactivity
Reason
• Auto standby mode in operation
Solution
• This unit is designed to enter STANDBY mode automatically after 10
minutes of inactivity. Press the STANDBY button to wake up the unit.
Technical specifi cation
Model
XL-B510
Radio Signal
87.5-108MHz
Power Supply
AC 220-240V~ 50Hz
Power Consumption
28 W
Standby Power Consumption
<0,5 W
Output Power
2 x 7 W (RMS)
Impedance
2 x 8 Ω
Frequency Response
60Hz - 20KHz
Bluetooth
Version
V 2.1 + EDR
Maximum power transmitted
<20 dbm
Frequency bands
2402 MHz ~ 2480 MHz
CD player
Disc format
CD, CD-R, CD-RW, MP3, WMA
Remote Control
Battery Type
2x AAA / 1.5V
1
,75kg
KG
0
,95kg
KG

DE
Wichtige Sicherheitsanweisungen
VORSICHT
GEFAHR AUF STROMSCHLAG NICHT
ÖFFNEN
Bitte lesen Sie sich diese Sicherheitsanweisungen durch
und beachten Sie, bevor Sie das Gerät in Betrieb
nehmen, auf die folgenden Warnhinweise:
Warnung:
•Halten Sie sich während der Nutzung dieses Geräts immer an die
allgemeinen Sicherheitshinweise, insbesondere, wenn Kinder in der Nähe
sind.
•Kinder sollten beaufsichtigt werden, um sicherzustellen, dass sie nicht mit
dem Gerät spielen.
•Das Stromkabel darf weder beschädigt, noch dürfen schwere Objekte
darauf abgelegt werden, außerdem dürfen Sie es nicht dehnen oder
verbiegen. Schließen Sie auch keine Verlängerungskabel an. Schäden am
Stromkabel können zu einem Feuer oder Stromschlag führen.
•Wenn das Stromversorgungskabel beschädigt ist, muss es vom Hersteller,
einem Servicetechniker oder einer ähnlich qualifi zierten Person
ausgetauscht werden, um Gefährdungen zu vermeiden.
•Stellen Sie sicher, dass die Einheit an eine AC 220-240V 50Hz Steckdose
angeschlossen wird. Eine höhere Spannung kann zu Fehlfunktionen oder
sogar zu einem Brand führen.
•Wenn der Stecker nicht in die Steckdose passt, dürfen Sie keine Gewalt
anwenden, um einen nicht passenden Stecker in die Steckdose zu
drücken.
•Schalten Sie die Einheit aus, bevor Sie sie von der Stromversorgung
trennen, um sie so vollständig abzuschalten.
•Vermeiden Sie es, das Stromkabel mit nassen Händen anzuschließen oder
zu trennen. Dies könnte andernfalls zu einem Stromschlag führen.
•Trennen Sie das Stromkabel, wenn es längere Zeit nicht verwendet wird.
•Stellen Sie sicher, dass der Hauptstecker immer leicht zugänglich ist.
•Dieses Produkt enthält keine Teile, die vom Benutzer gewartet werden
können. Setzen Sie sich im Fall eines Defekts mit dem Hersteller oder der
autorisierten Kundenabteilung in Verbindung. Teile aus dem Inneren des
Geräts freizulegen kann lebensgefährlich sein. Die Garantie der Hersteller
gilt nicht für Defekte, die durch von nicht autorisierte Dritten
durchgeführte Reparaturen entstehen.
•Benutzen Sie dieses Produkt nicht direkt nach dem Auspacken. Warten
Sie, bis es sich auf Zimmertemperatur erwärmt hat, ehe sie es einschalten.
•Stellen Sie sicher, dass dieses Produkt ausschließlich in Umgebungen mit
mildem Klima verwendet wird (kein tropisches oder subtropisches Klima).
•Stellen Sie das Produkt auf eine fl ache, stabile Oberfl äche, die keinen
Erschütterungen ausgesetzt ist.
•Das Produkt und dessen Teile dürfen nicht über die Kante delelte
tragenden Möbelstücks hinausragen.
•Um das Risiko eines Feuers, Stromschlags oder Schäden an diesem
Produkt zu reduzieren, sollten Sie es nicht direktem Sonnenlicht, Staub,
Regen oder Feuchtigkeit aussetzen. Setzen Sie es niemals tropfendem
oder spritzendem Wasser aus und positionieren Sie keine mit
Flüssigkeiten gefüllten Objekte auf oder neben dem Produkt.
•Setzen Sie keine mit Flüssigkeit gefüllten Objekte wie Vasen auf das Gerät.
•Installieren Sie das Produkt nicht in der Nähe von Heizquellen, wie etwa
Heizungen, Heizregister, Öfen oder anderen Apparaten (einschließlich
Verstärker), die Hitze produzieren.
•Platzieren Sie das Gerät nicht an Orten mit hoher Feuchtigkeit und
mangelhafter Belüftung.
•Sorgen Sie für einen Mindestabstand von 5 cm rund um das Gerät, um
eine ausreichende Belüftung sicherzustellen. Vermeiden Sie es,
Belüftungsöff nungen an diesem Produkt zu blockieren. Sorgen Sie immer
dafür, dass die Belüftungsöff nungen nicht durch Gegenstände, z. B.
Zeitungen, Tischdecken, Gardinen usw. verdeckt sind.
•Lassen Sie NIEMALS jemanden, ganz besonders nicht Kinder, etwas in die
Löcher, Spalten oder anderen Öff nungen des Gerätegehäuses stopfen, da
dies zu einem folgenschweren Stromschlag führen kann.
•Gewitter sind für alle elektrischen Geräte gefährlich. Wenn das Strom-
oder Antennenkabel vom Blitz getroff en wird, kann das Gerät, auch wenn
es ausgeschaltet ist, beschädigt werden. Bei einem herannahenden
Gewitter sollten Sie alle Kabel und Stecker des Gerätes ausstecken.
•Ein exzessiver Schalldruck von Kopfhörern kann zu einem Hörverlust
führen.
•Bewegen Sie das Gerät nicht während der Disc-Wiedergabe. Während der
Wiedergabe rotiert die Disc sehr schnell. Heben Sie das Gerät während
der Wiedergabe nicht an und bewegen Sie das Gerät während der
Wiedergabe nicht, denn dies könnte die Disc oder das Gerät beschädigen.
•Drehen Sie die Lautstärke niemals hoch, während Sie einen sehr leisen
Abschnitt hören oder kein Audiosignal empfangen. Anderenfalls könnte
der Lautsprecher beschädigt werden, wenn plötzlich ein lauter Abschnitt
wiedergegeben wird.
Netzadapter
•Der Netzstecker oder die Merhfachsteckdose wird als Trennvorrichtung
verwendet. Verwenden Sie nur den mitgelieferten Stromversorger.
Andernfalls kann es zu einem Sicherheitsrisiko/einer Beschädigung des
Gerätes kommen.
Wartung
•Trennen Sie vor dem Reinigen des Geräts das Stromkabel von der
Stromquelle.
•Verwenden Sie einen weichen und sauberen Lappen, um die Außenfl
ächen der Einheit zu reinigen. Verwenden Sie beim Reinigen niemals
Chemikalien oder Reinigungsmittel.
Batterien
•Achten Sie beim Einlegen der Batterien auf die
richtige Polarität.
•Setzen Sie Batterien keinen hohen Temperaturen
aus und legen Sie sie nicht an Stellen ab, wo sich die
Temperatur schnell erhöht, z. B. neben einem Feuer
oder in die direkte Sonneneinstrahlung. Cd
•Setzten Sie Batterien keiner übermäßigen Strahlungswärme aus, werfen
Sie sie nicht ins Feuer oder bauen sie auseinander und versuchen Sie

18
nicht, nicht aufl adbare Batterien aufzuladen. Sie könnten undicht werden
oder explodieren.
•Verwenden Sie niemals unterschiedliche Batterien oder vermischen neue
mit alten.
•Wenn Sie die Fernbedienung für längere Zeit nicht verwenden (länger als
einen Monat), sollten Sie die Batterie aus der Fernbedienung nehmen, um
ein Auslaufen zu verhindern.
•Wenn die Batterien auslaufen, wischen Sie die ausgelaufene Flüssigkeit im
Batteriefach weg und ersetzen die Batterien durch neue.
•Verwenden Sie immer nur die angegebenen Batterien.
• Batterie nicht verschlucken, Gefahr von chemischen Verbrennungen
•Wenn die Batterie verschluckt wird, kann dies zu schweren inneren
Verbrennungen innerhalb von nur 2 Stunden führen und tödlich sein.
Bewahren Sie neue und gebrauchte Batterien für Kinder unzugänglich auf.
Wenn das Batteriefach nicht fest geschlossen werden kann, sollten Sie
das Gerät nicht weiter verwenden und es für Kinder unzugänglich
aufbewahren. Wenn Sie vermuten, dass Batterien verschluckt oder in
irgendein Körperteil eingeführt wurden, müssen Sie sofort medizinische
Hilfe in Anspruch nehmen.
Entsorgung dieses Geräts und von Batterien
•Entsorgen Sie dieses Produkt oder dessen Batterien
niemals über den normalen Hausmüll. Geben Sie es
entsprechend den gesetzlichen Regelungen vor Ort bei
dem für das Recycling von WEEE vorgesehenen
Sammelpunkt ab. Damit helfen Sie, Ressourcen
einzusparen und die Umwelt zu schützen.
•In den meisten EU-Ländern gelten für die Entsorgung von
Batterien besondere Gesetze und Vorschriften. Weitere
Informationen erhalten Sie von Ihrem Händler oder den
örtlichen Behörden.
•Der oben aufgeführte Text erscheint auf elektrischen und
elektronischen Geräten und Batterien (oder der Verpackung), um Nutzer
entsprechend zu erinnern. Wenn unter dem Symbol „Hg“ oder „Pb“
erscheint, bedeutet dies, dass die Batterie jeweils Spuren von Quecksilber
(Hg) oder Blei (Pb)enthält.
•Nutzer werden darum gebeten, für gebrauchte Geräte und Batterien
bestehende Rückgabeeinrichtungen zu nutzen.
VORSICHT::
•LASERPRODUKT DER KLASSE 1
•Geräte mit eingebautem CD-Player
sind mit diesem Warnetikett
gekennzeichnet.
•Dieses Warnschild befi ndet sich auf
der Rückseite des Geräts
•DIESES GERÄT IST EIN LASERPRODUKT DER KLASSE 1. DIESES GERÄT
NUTZT EINEN SICHTBAREN LASERSTRAHL, BEI DEM ES ZUM AUSTRITT
GEFÄHRLICHER STRAHLUNG KOMMEN KANN, WENN ER GERICHTET
WIRD. BETREIBEN SIE DEN PLAYER NUR ORDNUNGSGEMÄSS
ENTSPRECHEND DER ANLEITUNG.
•WENN DIESES GERÄT IN DIE STECKDOSE EINGESTECKT WIRD, HALTEN SIE
IHRE AUGEN VON DEN ÖFFNUNGEN FERN UND SEHEN SIE NICHT IN DAS
GERÄT.
•EINE NUTZUNG DER STEUERUNG ODER ANPASSUNGEN ODER EINE
DURCHFÜHRUNG VON AKTIONEN AUSSER DENEN, DIE HIER BESCHRIEBEN
WERDEN, KÖNNEN ZUM AUSTRITT GEFÄHRLICHER STRAHLUNG FÜHREN.
•ÖFFNEN SIE DIE ABDECKUNGEN NICHT UND NEHMEN SIE SELBST KEINE
REPARATUREN VOR. LASSEN SIE DAS GERÄT NUR VON FACHPERSONAL
REPARIEREN.
CE-Konformitätserklärung:
•Die UMC Poland Sp. z o.o. erklärt hiermit, dass dieses Audiogerät die
wesentlichen Anforderungen und weitere entsprechende Vorschriften der
RED-Verordnung 2014/53/EU einhält. Der vollständige Text der EU-
Konformitätserklärung ist unter folgender Internetadresse erhältlich:
http://www.sharp.eu/av/documents-of-confi rmity
Markenzeichen:
Die Bluetooth® Wortmarke und Logos sind geschützte Marken der
Bluetooth SIG Inc.

DE
5. Taste AUSWERFEN: CD-Fach auswerfen.
6. Betriebsanzeige: Zeigt den Status an.
7. Taste STAND-BY: In den Stand-by-Modus schalten oder einschalten.
8. Fernbedienungssensor: Mit der Fernbedienung in einem Abstand von
bis zu 7 Metern auf diesen Sensor zielen.
9. Displayanzeige: Informationen zum Sender anzeigen.
10. Drehknopf LAUTSTÄRKE +/-: Lautstärke durch Drehen regeln.
11. USB-Anschluss: Verbindung mit dem USB-Flash-Laufwerk.
12. Audio-Eingangsbuchse: Verbindung mit externen Audioquellen.
Rückseite
13. FM-Antenne: Empfang des FM-Signals.
14. Lautsprecheranschlüsse: Verbindung der Lautsprecher mit dem
Hauptgerät.
15. Steckdose Stecken Sie das Netzkabel in die Steckdose.
2. REPEAT: Titel wiederholen.
3. WIEDERGABE/PAUSE: Wiedergabe starten/pausieren.
4. SCHNELLER RÜCKLAUF: Derzeit gespielten Titel schnell zurückspulen.
5. HÖHEN: Höhen anpassen; Höhen mit den Tasten + oder - einstellen.
6. LAUTSTÄRKE -: Lautstärke verringern.
7. PROGRAMM: Wiedergabereihenfolge programmieren.
8. ZUFÄLLIGE WIEDERGABE: Musik in einer zufälligen Reihenfolge
wiedergeben.
9. ZAHLEN (0 –9): Zum Speicherplatz gehen, Frequenz eingeben, Titel
auswählen
10. AUSWERFEN: CD-Fach auswerfen
11. SOURCE: Betriebsmodus auswählen: CD, FM, USB, Bluetooth® (BT), AUX
12. STOP/MO/ST: Wiedergabe anhalten, im FM-Modus zwischen Mono
und Stereo umschalten.
13. ZURÜCK: Drücken, um zum vorherigen Titel zurückzuschalten.
14. SCHNELLER VORLAUF: Derzeit gespielten Titel schnell vorspulen.
15. WEITER: Weiter zum nächsten Titel/Sender.
16. BASS: Bass anpassen; Bass mit den Tasten + oder - einstellen.
17. LAUTSTÄRKE +: Lautstärke erhöhen.
18. MUTE: Drücken Sie die Taste einmal, um den Ton auf stumm zu
schalten. Drücken Sie die Taste erneut, um den Ton erneut
einzuschalten. Sie können den Ton auch mit den Tasten der
Lautstärkeregelung erneut einschalten.
19. DSP: Equalizer auswählen.
20. LAUT: Basslevel bei niedriger Lautstärke erhöhen.
21. SAVE: Drücken, um Ihre Lieblingssender abzuspeichern.
22. FREQ: Frequenz, im FM-Modus; drücken, um Ihre Lieblingsfrequenz
einzugeben.
Batterien der fernbedienung einlegen oder ersetzen
1. Drücken Sie die Arretierung auf der Batterieabdeckung auf der
Rückseite der Fernbedienung in Richtung des eingeprägten Pfeils.
2. Halten Sie die Arretierung gedrückt und öff nen Sie das Batteriefach.
3. Legen Sie zwei Batterien mit der richtigen Polarität (+/-
Inhalt der Verpackung
Fernbedienung
1. 2.
3.

20
) wie angezeigt ein. Verwenden Sie beim Ersetzen der
Batterien nur den gleichen Batterietyp wie mitgeliefert.
4. Setzen Sie die Batterieabdeckung wieder ein und lassen Sie sie
einrasten.
Vorbereitung für die inbetriebnahme
1. Stellen sie die Lautsprecher links und rechts vom Hauptgerät
auf, optimalerweise auf gleicher Höhe und mit einem Abstand
von jeweils zumindest 150 mm zum Hauptgerät.
Schließen Sie die Lautsprecherstecker an der Rückseite des Geräts an.
Achten Sie darauf, den LINKEN Lautsprecher an der Rückseite des
Geräts am LINKEN Ausgang anzuschließen. Wiederholen Sie dies für
den RECHTEN Lautsprecher.
Das LINKE ROTE Kabel wird mit dem LINKEN ROTEN Anschluss, das
RECHTE ROTE Kabel mit dem RECHTEN ROTEN Anschluss verbunden.
Beide SCHWARZEN Kabel werden mit dem entsprechenden
SCHWARZEN Anschluss verbunden.
2. Bitte achten Sie darauf, dass die auf dem Typenschild an der
Rückseite angegebene Spannung jener in Ihrer Region
entspricht. Verwenden Sie ein geeignetes Netzkabel und
stecken Sie es in den Anschluss an der Rückseite des Gerätes.
Stecken Sie dann das andere Ende in die Steckdose.
3. Drücken Sie am Hauptgerät auf die Taste STAND-BY, um das
Gerät EINzuschalten.
Ziehen Sie die ANTENNE aus, um den bestmöglichen
Empfang zu gewährleisten. Drücken Sie die Taste SOURCE
(QUELLE), um in den FM-Modus zu gelangen. Um das Radio im
FM-Modus zu verwenden, befolgen Sie die Anleitung im Kapitel
„FM-RADIOBETRIEB“ des Benutzerhandbuchs.
4. Drücken Sie die Taste SOURCE, um in den CD-Modus zu
gelangen. Drücken Sie die Taste AUSWERFEN, um das CDFach
zu öff nen, und legen Sie eine CD ein. Drücken Sie
erneut die Taste AUSWERFEN, um das Fach zu schließen. Die
Wiedergabe der CD beginnt mit dem ersten Titel.
5. Drücken Sie die Taste SOURCE, um in den Aux-In (Audio)Modus
zu gelangen. Schließen Sie ihr Audiogerät mit einem 3,5-mm-
Aux-in-Kabel am AUX-IN-Anschluss an. Steuern Sie die
Wiedergabe über Ihr verbundenes Audiogerät.
6. Drücken Sie die Taste SOURCE, um in den Bluetooth-Modus zu
gelangen. Aktivieren Sie das Bluetooth-Gerät und wählen Sie
„Sharp XL-B510“ aus. Wählen Sie den Titel aus, den Sie
abspielen möchten, und drücken Sie auf WIEDERGABE.
7. Drücken Sie die Taste SOURCE, um in den USB-Modus zu
gelangen. Stecken Sie das USB-Gerät in den USB-Anschluss an
der Vorderseite des Geräts ein und das USB-Gerät wird
automatisch abgelesen und die Wiedergabe gestartet.
Grundfunktionen
Modus umschalten
Umschalten zwischen den Modi: CD, FM, Bluetooth, USB und AUX IN.
Drücken Sie die Taste SOURCE am Gerät oder der Fernbedienung, um
zwischen den Modi umzuschalten.
Lautstärkeregelung
1. Drehen Sie den Drehknopf LAUTSTÄRKE im Uhrzeigersinn oder drücken
Sie die Taste „+“, um die Lautstärke zu erhöhen.
2. Drehen Sie den Drehknopf LAUTSTÄRKE gegen den Uhrzeigersinn oder
drücken Sie die Taste „-“, um die Lautstärke zu verringern.
DSP-Eff ekte
Drücken Sie wiederholt die Taste DSP, um zwischen unterschiedlichen
Equalizereinstellungen umzuschalten und den Sound zu verändern. Wählen
Sie aus Klassik, Rock, Pop, Jazz, Dance, Live und Off .
Tonstärkefunktion
Diese Funktion erhöht den Basslevel bei niedriger Lautstärke. Drücken Sie
auf der Fernbedienung die Taste LAUT, um den Eff ekt zu aktivieren.
Drücken Sie die Taste erneut, um den Eff ekt zu deaktivieren.
Stummschaltfunktion
Drücken Sie jederzeit die Taste , um die Wiedergabe stumm zu schalten.
Drücken Sie die Taste erneut, um die Stummschaltung aufzuheben.
Tonsteuerung
Sie können den Bass und die Höhen bei Bedarf anpassen.
Drücken Sie auf der Fernbedienung die Taste BASS oder HÖHEN, um den
Bass oder die Höhen auszuwählen, und passen Sie die Einstellungen mit „+“
oder „-“ an.
Stand-by-Modus
Drücken Sie am Gerät oder auf der Fernbedienung die Taste STAND-BY, um
das System in den Stand-by-Modus zu versetzen.
Um den Normalbetrieb wiederaufzunehmen, drücken Sie die Taste erneut.
HINWEIS: Dieses Gerät wurde entwickelt, um nach etwa 10 Minuten
Inaktivität automatisch in den STAND-BY-Modus zu wechseln. Drücken Sie
die Taste STAND-BY, um das Gerät einzuschalten.
HINWEIS: Beim Starten des Geräts aus dem Stand-by-Modus wird der zuletzt
verwendete Modus fortgesetzt.
FM-Radiobetrieb
1. Drücken Sie am Bedienfeld oder auf der Fernbedienung die Taste
SOURCE (QUELLE), um in den FM-Modus zu gelangen. (FM-Frequenz:
87,50 bis 108,00 MHz)
2. Drücken Sie auf der Fernbedienung die Tasten , um die Frequenz
in Schritten zu je 0,05 MHz zu erhöhen oder zu verringern.
3. Halten Sie die Tasten PREV/NEXT (ZURÜCK/WEITER) am Panel oder die
Tasten / auf der Fernbedienung gedrückt, um den
Other manuals for XL-B510
2
Table of contents
Languages:
Other Sharp Stereo System manuals

Sharp
Sharp CD-C405W User manual

Sharp
Sharp CD-BA1200H User manual

Sharp
Sharp CD-M10000W User manual

Sharp
Sharp CD-BA3100 User manual

Sharp
Sharp Illustration XL-HP535H User manual

Sharp
Sharp GF-500 User manual

Sharp
Sharp CD-BK133W User manual

Sharp
Sharp CD-E67 User manual

Sharp
Sharp CD-BK133W User manual

Sharp
Sharp MD-E9000H User manual

Sharp
Sharp MD-X7 User manual

Sharp
Sharp XL-530H User manual

Sharp
Sharp CD-BK2100V User manual

Sharp
Sharp CMS-R600X User manual

Sharp
Sharp XL-MP80H User manual

Sharp
Sharp CD-BA180 User manual

Sharp
Sharp XL-HP888V User manual

Sharp
Sharp CD-XP305V User manual

Sharp
Sharp CMS-R70CDH User manual

Sharp
Sharp XL-UR250H(BK) User manual