Sharp 21HM-10C User manual

21HM-10C
ENGLISHČESKYMAGYARPOLSKI
SLOVENČINA
TV
COLOUR TELEVISION
BAREVNÝ TELEVIZOR
SZÍNES TELEVÍZIÓ
KOLORWY TELEWIZOR
ЦBETHOЙ TEЛEBNЗOP
RECEPTOR DE TELEVIZIUNE ÎN CULORI
FAREBNÝ TELEVÍZOR
OPERATION MANUAL
NÁVOD K OBSLUZE
HASZNÁLATI UTASÍTÁS
INSTRUKCJA OBSŁUGI
CБОPHИK ИHCTPУKЦИЯ
INSTRUC©IUNI DE UTILIZARE
NÁVOD NA OBSLUHU
Downloaded from: http://www.usersmanualguide.com/

1
ENGLISH
Safety Precautions
This equipment complies with the requirements of Directives 89/336/EEC and 73/23/EEC as amended
by 93/68/EEC.
;;;;;;;;
;;;;;;;;
;;;;;;;;
;;;;;;;;
;;;;;;;;
;;;;;;;;
;;;;;;;;
;;;;;;;;
;;;;;;;;
;;;;;;
;;;;;;
;;;;;;
;;;;;;
;;;;;;
;;;;;;
;;;;;;
;;;;;;
;;;;;;
;;;;;;
;;;;;;
;;;;;;
;;;;;;
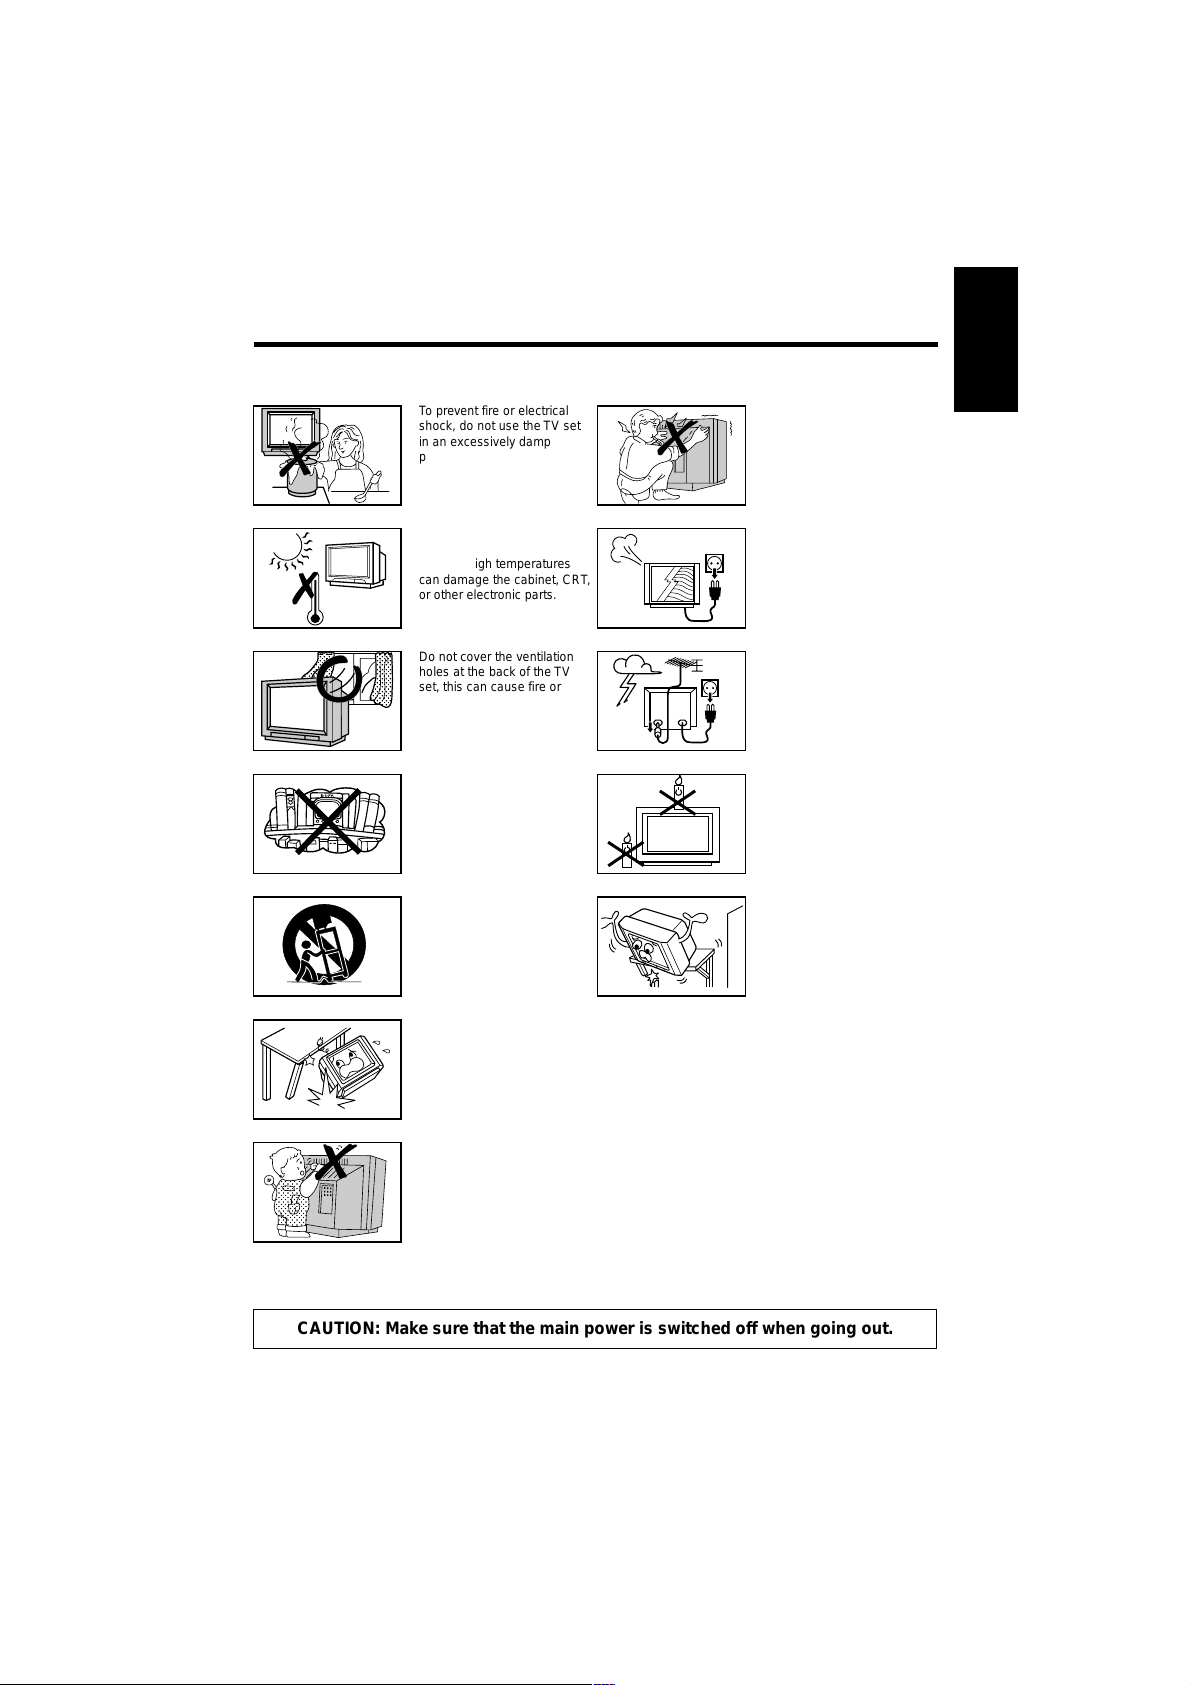
CAUTION: Make sure that the main power is switched off when going out.
;;;;;;;;;
;;;;;;;;;
;;;;;;;;;
;;;;;;;;;
;;;;;;;;;
;;;;;;;;;
;;;;;;;;;
;;;;;;;;;
;;;;;;;;;
;;;;;;;;;
;;;;;;;;;
;;;;;;;;;
;;;
;;;
;;;
;;;;;
;;;;;
;;;;;
;;;
;;;
;;;
;;;;
;;;;
;
;
;
To prevent fire or electrical
shock, do not use theTV set
in an excessively damp
place.
Position the TV set out of
direct sunlight and away from
heat, as high temperatures
can damage the cabinet, CRT,
or other electronic parts.
Do not cover the ventilation
holes at the back of theTV
set, this can cause fire or
other serious problems. Leave
an adequate open space
behind the TV set for good
ventilation.
Do not install this equipment
in a confined space, such as a
bookcase or built-in cabinet.
Television equipment and cart
combination should be moved
with care. Quick stops,
excessive force, and uneven
surfaces may cause the
equipment and cart
combination to overturn.
Never remove the back of the
cabinet, as there is high
voltage inside the TV set.
Please call for service.
Unplug the power cord from
the wall outlet immediately if
the TV set begins to make
unusual noises or gives off
smoke or an odd smell, then
call your dealer for service.
Even if your television is switched
off, it can still be damaged by
lightning striking the mains and/or
aerial cables. For this reason, you
should always disconnect your
television from the mains and the
aerial cable during thunderstorms.
To prevent fire, never place
any type of candle or naked
flames on the top or near the
TV set.
Wall or shelf mounting should
follow the manufacturer’s
instructions, and should use a
mounting kit approved by the
manufacturer.
Do not place this television equipment on an unstable cart, stand, or table.The television
equipment may fall, causing serious injury to a child or an adult, and serious damage to the
equipment.
Use only with a cart or stand recommended by the manufacturer, or sold with the television
equipment.
Never insert or drop any metallic or inflammable objects into the venitilation holes of the TV
set.This can cause fire, electrical shock or electrical failure.Do not place a flower vase or
anything else containing liquid on the TV set, as liquid spilt on the TV set can cause
serious problems.
Downloaded from: http://www.usersmanualguide.com/

2
Remote control Size-AA Dry batteries
Contents
Dear SHARP Customer
Congratulations!You are now the proud owner of a SHARP Colour Television Receiver.To
ensure proper operation, please read this manual carefully. After reading, keep this manual in a
safe place for future reference.
Accessories
1 2 3
4 5 6
7 8 9
0
MENU
TV/VIDEO
TV
CH
CH
Operation Manual
Remote Control Battery Installation
Before using theTV set for the first time, install the supplied dry batteries in the remote control.
• Remove batteries if weak or if the unit is not in use for long periods.
• Do not mix old and new batteries.
• Incorrect installation of the batteries may damage the remote control.
NOTE
#Replace the battery cover.!With your thumbnail, pull up
the slit as indicated by the
arrow to remove the battery
cover.
@Insert two batteries 1.5 V (size
“AA”). Be sure to match the
battery /terminals with
the /marks inside the
compartment.
General Information
Safety Precautions............ 1
Accessories....................... 2
Remote Control Battery
Installation ...................... 2
Installing your TV
Aerial Connections............ 3
Typical Connections.......... 3
Location of Controls .......... 4
Channel Setting
Auto Tuning....................... 5
Manual Tuning .................. 6
Fine Tuning ....................... 8
Skipping programmes ....... 9
Manual Channel Sorting .. 11
Channel Sorting .............. 12
Basic Operation
Watching aTV programme ...
13
Useful Features
Picture Adjustment.......... 14
Timer Setting................... 15
Child Lock ....................... 17
Other Functions
Flashback & Sound Mute ...
20
TV/VIDEO & Call............. 21
Reference
Troubleshooting............... 22
Specifications.................. 23
21HM-10C
ENGLISHČESKYMAGYARPOLSKI
SLOVENČINA
TV
COLOURTELEVISION
BAREVNÝ TELEVIZOR
SZÍNES TELEVÍZIÓ
KOLORWYTELEWIZOR
ЦBETHOЙ TEЛEBNЗOP
RECEPTORDE TELEVIZIUNE ÎN CULORI
FAREBNÝ TELEVÍZOR
OPERATIONMANUAL
NÁVODK OBSLUZE
HASZNÁLATI UTASÍTÁS
INSTRUKCJA OBSŁUGI
CБОPHИK ИHCTPУKЦИЯ
INSTRUC©IUNI DE UTILIZARE
NÁVOD NA OBSLUHU
Downloaded from: http://www.usersmanualguide.com/

3
ENGLISH
75-ohm coaxial cable (round cable)
Rear of TV
Typical connection (VCR and TV)
through the RF terminal
LINE2 IN/DECODER
LINE1 IN/OUT
TESTSIG
ON
OFF
CHANNEL
ANTENNAIN
RFOUT
Back of VCR
Rear of TV
Scart Terminal
Aerial IN
Aerial Lead
(not supplied)
Aerial Lead
(not supplied)
Aerial Lead
(not supplied)
Antenna in
RF Out
SCART Lead
(not supplied)
Outdoor aerial
(not supplied)
Aerial Connections
•To enjoy a clearer picture, we recommend that you use an outdoor aerial lead.The following is a
brief explanation of the types of connection that are used for coaxial:
Aerial Lead: Connect the cable from the aerial to a
standard DIN45325 plug (IEC169-2) and plug it
into the aerial terminal at the back of the TV set.
Downloaded from: http://www.usersmanualguide.com/

4
Location of Controls
Remote Control
TV Front
MENU CH
Power ( ) button
Power/On Timer indicator
Remote Control Sensor Menu button Volume Up ( )/Down ( ) buttons
Channel Up ( )/Down ( ) buttons
1 2 3
4 5 6
7 8 9
0
MENU
TV/VIDEO
TV
CH
CH
CALL ( )button
Infrared Transmitter Window
Aim this window at the infrared sensor
on your TV set
FLASHBACK ( ) buttons
Returns to previously viewed
programme
21
~ CHILD LOCK ()button
17
TV/VIDEO Select button
21
19
SOUND MUTE ( )button 20
POWER/STANDBY ( )button 13
Programme Select buttons 13
20
VOLUME UP ( )/DOWN ( ) buttons
( ) Increases sound
( ) Decreases sound
(These are also used for menu set up)
13
MENU button
5
Single/Double Entry button ( )
13
CHANNEL (PROGRAMME) UP ( )/
DOWN ( ) buttons
( ) Selects next higher programme
( ) Selects next lower programme
(These are also used for menu
set up)
6
Downloaded from: http://www.usersmanualguide.com/

5
ENGLISH
NOTE
Channel Setting
This function will automatically tune all local channels for you.
The following steps are carried out using the remote control
Initial setting AutoTuningtunes in and presets receivable TV stations
Automatically tunes in and presets receivable TV stations
1
Press the main POWER ( )
button on theTV.When you install
the TV at first time, it will appears
this picture.
2
AUTOTUNING will start when
selecting “START”, using
CH
and
CH
and pressing MENU on
the remote control, or pressing
MENU
on the TV.
All the TV stations in your area
that can be received by the TV set
are automatically preset between
programme position 1 to 99.
The screen shows whatever is on
programme position 1 when full
auto channel preset is finished.
NOTE:Make sure to execute AUTO TUNING until tuning is complete.When EXIT has been
selected during tuning or when the power has been turned off and then turned on again,
the AUTO TUNING screen will be displayed.
After initial setting Auto tuning
Automatically tunes in and presets receivable TV stations
The AUTOTUNING screen will
appear by holding down
MENU
on
the TV for more than 2 seconds.
2
Repeat step 2 above from page 5 (Initial seting)
•To stop AUTO TUNING, press
MENU
on the
remote control.
•When AUTOTUNING is not done, select EXIT
by using
CH
and
CH
on the remote control
or press
MENU
on the TV to return to the TV
screen.
• Make sure to start AUTO TUNING after connecting the antenna, as the AUTO TUNING
screen will be displayed when the power is turned on for the first time.
•Make sure to execute AUTO TUNING until tuning is complete.When EXIT has been
selected during tuning or when the power has been turned off and then turned on again,
the AUTO TUNING screen will be displayed.
• When the Child Lock is set, it is not possible to enter theTuning mode.This is to make
sure that Child Lock is not over-ridden by re-tuning the set.(To cancel Child Lock please
refer to page 19.)
MENU CH
1 2 3
4 5 6
7 8 9
0
MENU
TV/VIDEO
TV
CH
CH
AUTO TUNING
START EXIT
AUTO TUNING
START EXIT
PR 1
AUTO TUNING
PR
0
2 CH
0
2
1
AUTO TUNING
START EXIT
Downloaded from: http://www.usersmanualguide.com/

6
Channel Setting (Continued)
This section describes how to tune your TV manually and to store channels in the order you prefer.
The following steps are carried out using the remote control.
Manual Tuning
Setting a TV station to a desired programme position
1
Press MENU to call the MAIN menu
screen.
2
Press
CH
or
CH
to select
“<PR>”, and press
MENU
.
3
Press
CH
or
CH
to select
the “PR” position, and select the
programme number (1–99) with
or .
4
Press
CH
or
CH
to select
“CH”, and directly select the
channel number if known, using
or .
5
Press
CH
or
CH
to select
“SYS”, and press MENU to change
the SYSTEM.
The system switches between
SECAM-B/G, D/K and PAL-B/G,
D/K.
Sound System On screen
display
SECAM-D/K D/K
PAL -D/K
SECAM-B/G B/G
PAL-B/G
1 2 3
4 5 6
7 8 9
0
TV/VIDEO
TV
CH
CH
MENU
SORT
EXIT
<PR>
EXIT
SORT
<PR>
PR1 CH1
SKIP OFF
FINE
OFF
EXIT
SYS D/K
PR1 CH1
SKIP OFF
FINE
OFF
EXIT
SYS D/K
PR1 CH1
SKIP OFF
FINE
OFF
EXIT
SYS D/K
Downloaded from: http://www.usersmanualguide.com/

7
ENGLISH
NOTE
Channel Setting (Continued)
Repeat steps 3 and 5 if you wish
to set other channels.
Press
CH
or
CH
to select
“EXIT”, and press MENU to return to
the normal screen.
If there is no sound and the key mark ( ) is displayed after setting the channels, the
Child Lock Mode has been activated.To cancel the settings, make sure to set key mark
() to OFF.
1 2 3
4 5 6
7 8 9
0
TV/VIDEO
TV
CH
CH
MENU
PR1 CH1
SKIP OFF
FINE
OFF
EXIT
SYS D/K
PR1 CH1
SKIP OFF
FINE
OFF
EXIT
SYS D/K
6
7
Downloaded from: http://www.usersmanualguide.com/

8
1 2 3
4 5 6
7 8 9
0
TV/VIDEO
TV
CH
CH
MENU
Channel Setting (Continued)
Fine Tuning
This function lets you easily fine-tune the TV set to improve reception and picture quality.
1
Press
MENU
to call the MAIN menu
screen.
2
Press
CH
or
CH
to select
“<PR>”, and press
MENU
.
3
Press
CH
or
CH
to select
the “FINE” position.
4
Press and hold or until
the best tuning position is found.
5
Press
CH
or
CH
to select
“EXIT”, and press
MENU
to return to
the normal screen.
PR1 CH1
SKIP OFF
FINE
EXIT
OFF
SYS D/K
PR1 CH1
SKIP OFF
FINE
EXIT
OFF
SYS D/K
PR1 CH1
SKIP OFF
FINE
EXIT
OFF
SYS D/K
SORT
EXIT
<PR>
EXIT
SORT
<PR>
Downloaded from: http://www.usersmanualguide.com/

9
ENGLISH
Channel Setting (Continued)
Skipping Programmes
This function lets you skip vacant channels or channels that you never watch when you select
channels with
CH
or
CH
.
Setting Skip
1
Press
MENU
to call the MAIN menu
screen.
2
Press
CH
or
CH
to select
“<PR>”, and press
MENU
.
3
Press
CH
or
CH
to select
the “PR” position, and select the
programme number (1–99) you
wish to skip with or .
4
Press
CH
or
CH
to select
“SKIP”, and press
MENU
to select
“SKIP ON”.
The programme number will turn
from white to red.
5
Repeat steps 3 and 4 if you wish
to skip other programmes.
6
Press
CH
or
CH
to select
“EXIT”, and press
MENU
to return to
the normal screen.
1 2 3
4 5 6
7 8 9
0
TV/VIDEO
TV
CH
CH
MENU
SORT
EXIT
<PR>
EXIT
SORT
<PR>
PR3 CH4
SKIP OFF
FINE
EXIT
OFF
SYS D/K
PR3 CH4
SKIP ON
FINE
EXIT
OFF
SYS D/K
PR3 CH4
SKIP ON
FINE
EXIT
OFF
SYS D/K
Downloaded from: http://www.usersmanualguide.com/

10
Channel Setting (Continued)
Cancelling Skip
1
Press
MENU
to call the MAIN menu
screen.
2
Press
CH
or
CH
to select
“<PR>”, and press
MENU
.
3
Press
CH
or
CH
to select
the “PR” position, and select the
programme number (1–99) for
which you wish to cancel skip with
or .
Select a skipped programme
number displayed in red.
4
Press
CH
or
CH
to select
“SKIP”, and press
MENU
to select
the “SKIP OFF”.
The displayed programme number
will turn from red to white.
5
Repeat steps 3 and 4 if you wish
to cancel skip other programmes.
6
Press
CH
or
CH
to select
“EXIT”, and press
MENU
to return to
the normal screen.
1 2 3
4 5 6
7 8 9
0
TV/VIDEO
TV
CH
CH
MENU
SORT
EXIT
<PR>
EXIT
SORT
<PR>
PR1 CH1
SKIP ON
FINE
EXIT
OFF
SYS D/K
PR3 CH1
SKIP OFF
FINE
EXIT
OFF
SYS D/K
PR1 CH1
SKIP OFF
FINE
EXIT
OFF
SYS D/K
Downloaded from: http://www.usersmanualguide.com/

11
ENGLISH
Channel Setting (Continued)
Manual Channel Sorting
When moving channel 20 from pre-set channel 12 to pre-set channel 30, follow the steps below:
1
Press
MENU
to call the MAIN menu
screen.
Using
CH
or
CH
, and select
“SORT” by pressing MENU .
2
Select channel 20 of the preset
channel 12 using
CH
or
CH
and or and set it by
pressing
MENU
.
3
Move the cursor to “MOVE” using
CH
or
CH
and or
and select it by pressing
MENU
.
4
Using
CH
or
CH
and or
move to the next screen and
select preset channel 30.
5
Pressing
MENU
will insert channel
20 in the preset channel 30 field.
Preset channels over pre-set
channel 31 will be automatically
sorted.
6
Select “EXIT” using
CH
or
CH
and or and press
MENU
to return to the TV Screen.
SORT 1/6
1CH 2 7CH1 13CH7
2CH 3 8CH12 14CH71
3CH19 9CH13 15CC 1
4CH 5 1CH16 16CC 2
5CH 8 11CH17 17CC 3
6CH 9 12CH2 18CC 4
EXIT
SORT 1/6
1CH 2 7CH1 13CH7
2CH 3 8CH12 14CH71
3CH19 9CH13 15CC 1
4CH 5 1CH16 16CC 2
5CH 8 11CH17 17CC 3
6CH 9 12CH2 18CC 4
SELECTED:CH 2
MOVE DELETE
EXIT
SORT 2/6
19CC9 25CC14 31CC44
2CC1 26CC18 32CC45
21CC11 27CC19 33CC46
22CC12 28CC21 34CC47
23CC13 29CC23 35CC48
24CH 6 3CC433CC43 36CC5
EXIT
SORT 2/6
19CC1 25CC18 31CC44
2CC11 26CC19 32CC45
21CC12 27CC21 33CC46
22CC13 28CC23 34CC47
23CC 6 29CC43 35CC48
24CH14 3CH2 36CC5
EXIT
SORT 2/6
19CC1 25CC18 31CC44
2CC11 26CC19 32CC45
21CC12 27CC21 33CC46
22CC13 28CC23 34CC47
23CC 6 29CC43 35CC48
24CH14 3CC2 36CC5
EXIT
1 2 3
4 5 6
7 8 9
0
TV/VIDEO
TV
CH
CH
MENU
EXIT
SORT
<PR>
If you are using a decoder (Premiere Decoder, Canal Plus, etc.)
please disconnect it before using the tuning (<PR>) and sort (SORT) menus.
NOTE
Downloaded from: http://www.usersmanualguide.com/

12
Channel Setting (Continued)
Channel Sorting (Delete)
1
Press
MENU
to call the MAIN menu
screen.
Using
CH
or
CH
, and select
“SORT” by pressing MENU .
2
Select channel 13 in the preset
channel 9 field using
CH
or
CH
and or and set it
by pressing
MENU
.
3
Using
CH
or
CH
and or
select “DELETE” and press
MENU
.
4
Pressing
MENU
will delete channel
13 in the preset channel 9 field
and replace it by channel 16.
5
Select “EXIT” using
CH
or
CH
and or , and press
MENU
to return to the TV Screen.
1 2 3
4 5 6
7 8 9
0
TV/VIDEO
TV
CH
CH
MENU
SORT 1/6
1CH 2 7CH1 13CH7
2CH 3 8CH12 14CH71
3CH19 9CH13 15CC 1
4CH 5 1CH16 16CC 2
5CH 8 11CH17 17CC 3
6CH 9 12CH2 18CC 4
EXIT
SORT 1/6
1CH 2 7CH1 13CH7
2CH 3 8CH12 14CH71
3CH19 9CH13 15CC 1
4CH 5 1CH16 16CC 2
5CH 8 11CH17 17CC 3
6CH 9 12CH2 18CC 4
SELECTED:CH 13
MOVE DELETE
EXIT
SORT 1/6
1CH 2 7CH1 13CH71
2CH 3 8CH12 14CC 1
3CH19 9CH16 15CC 2
4CH 5 1CH17 16CC 3
5CH 8 11CH2 17CC 4
6CH 9 12CH7 18CC 5
EXIT
SORT 1/6
1CH 2 7CH1 13CH71
2CH 3 8CH12 14CC 1
3CH19 9CH16 15CC 2
4CH 5 1CH17 16CC 3
5CH 8 11CH2 17CC 4
6CH 9 12CH7 18CC 5
EXIT
EXIT
SORT
<PR>
Downloaded from: http://www.usersmanualguide.com/

13
ENGLISH
CH
CH
1 2 3
4 5 6
7 8 9
0
TV/VIDEO
TV
CH
CH
MENU
Basic Operation
Watching a TV Programme
Preparation |Turning on the power on the TV set.
Press .
If a picture appears on the screen, go to step 2.
If a picture does not appear on the screen, go to step 1.
1
Turning on the power
Press .
A picture appears on the screen.
2
Selecting the programmes
Example:
When selecting programme
position 5
5
When selecting programme
position 23
23
3
Adjusting the volume
Decreases
the volume
Increases
the volume
PR 1
PR 1
PR 5
PR 23
PR --
PR 2-
NOTE
If you go away on a trip or will not be at home for a considerable length of time, as a
safety precaution, please unplug the cord from the outlet.
VOLUME UP or
DOWN button
CHANNEL UP or
DOWN button
POWER/ON TIMER
indicator
POWER
button
Downloaded from: http://www.usersmanualguide.com/

14
1 2 3
4 5 6
7 8 9
0
TV/VIDEO
TV
CH
CH
MENU
SORT
EXIT
<PR>
EXIT
SORT
<PR>
Selected item
CONTRAST
COLOUR
BRIGHTNESS
SHARPNESS
TINT
NORMAL
TINT
N
TINT
N O EXIT
TINT
N O EXIT
TINT
N ON EXIT
TINT
N ON EXIT
Picture Adjustment
Adjusting the Picture
Picture quality (CONTRAST, COLOUR, BRIGHTNESS, SHARPNESS) are adjustable in this menu.
1
Press
MENU
to call the MAIN menu
screen.
2
Press
CH
or
CH
to select
“ ”, and press
MENU
.
3
Press
CH
or
CH
to select
the items to adjust.
4
Adjust the picture quality to your
liking with or .
5
Repeat steps 3 and 4 above to
adjust other items.
6
By selecting “N” you can reset the
picture parameters to the factory
setting.
Press
MENU
to restore the factory
setting “N ON” mode.
7
You can clear the on-screen
display by selecting “EXIT” using
CH
or
CH
, and press
MENU
.
Downloaded from: http://www.usersmanualguide.com/

15
ENGLISH
NOTE
Timer Setting
ON Timer
Automatically turns the power ON after the set time has passed.
1
Press
MENU
to call the MAIN menu
screen.
2
Press
CH
or
CH
to select
“”, and press MENU .
3
Press
CH
or
CH
to select
“ON” mode.
4
Press or to set the time.
(from 10 min. to 12 hour 50 min.,
in 10 min. increments)
5
Press to set the TV into
Standby mode. The Power/On
Timer indicator flashes red.
When the preset time (in the
above example, 8 hours and 30
minutes) has passed, the power
turns ON.
• In order to know when the ON Timer programme has been run properly, when the TV is
in the standby mode, the ON Timer indicator remains flashing in red.
• As a safety precaution, in case nobody is at home when the television switches on
automatically, the television will disconnect itself automatically within 120 minutes; any
button of the remote control functions should be pressed, if it is to remain ON.
• In the event of a power cut, disconnection from the plug, or the television is switched off
at the mains switch, all the data in the ON Timer will be cancelled.
• The TIMER settings will remain if you exit the TIMER setting screen after setup.
1 2 3
4 5 6
7 8 9
0
TV/VIDEO
TV
CH
CH
MENU
EXIT
<PR>
SORT
ON .
OFF .
EXIT
ON 8.3
OFF .
EXIT
Downloaded from: http://www.usersmanualguide.com/

16
NOTE
Timer Setting (Continued)
OFF Timer
Automatically turns the power OFF after the set time has passed.
1
Press
MENU
to call the MAIN menu
screen.
2
Press
CH
or
CH
to select
“”, and press MENU .
3
Press
CH
or
CH
to select
“OFF” mode.
4
Press or to set the time.
(from 10 min. to 12 hour 50 min.,
in 10 min. increments)
The timer starts to count down.
5
After setting the time, select
“EXIT” by pressing
CH
or
CH
and press
MENU
.
When the preset time (in the
above example, 1 hour and 30
minutes) has passed, the TV set
turns to Standby mode.
•In the event of a power cut, disconnection from the plug, or the television is switched off
at the mains switch, all the data on the OFF Timer will be cancelled.
•The TIMER settings will remain if you exit the TIMER setting screen using EXIT after
setup.
1 2 3
4 5 6
7 8 9
0
TV/VIDEO
TV
CH
CH
MENU
EXIT
<PR>
SORT
ON .
OFF .
EXIT
ON .
OFF 1.3
EXIT
ON .
OFF 1.3
EXIT
Downloaded from: http://www.usersmanualguide.com/

17
ENGLISH
NOTE
Child Lock (Channel Block)
You can lock a TV channel to prevent unsupervised TV viewing by following these procedures:
Setting Child Lock
1
Press
MENU
to call the MAIN menu
screen.
2
Press
CH
or
CH
to select
“<PR>” and press MENU .
3
Select the programme you want
to lock using or . (You can
also select the programme using
the 0~9 digit buttons.)
4
Press
CH
or
CH
to select
“ON”, then press MENU .
The channel is now locked.
5
Repeat steps 3 and 4 if you wish
to lock other programmes.
6
Press
CH
or
CH
to select
“EXIT” and press
MENU
.
You can also block the SCART connection.
CAUTION
• When you select a locked channel, the TV picture will be blue and the mark “ ” appears
on the screen.
• Press to unlock the channel.
• Since the remote control is the “Key” to unlock TV channel you must remember not to let
the remote control out of your supervision.
1 2 3
4 5 6
7 8 9
0
TV/VIDEO
TV
CH
CH
MENU
EXIT
SORT
<PR>
PR1 CH1
SKIP OFF
FINE
OFF
EXIT
SYS D/K
PR1 CH1
SKIP OFF
FINE
ON
EXIT
SYS D/K
PR1 CH1
SKIP OFF
FINE
ON
EXIT
SYS D/K
Downloaded from: http://www.usersmanualguide.com/

18
Child Lock (Continued)
Opening Child Lock
Watching a programme position set with the Child Lock.
1
Select the child lock programme
position.
2
Hold down for more than 2
seconds.
The screen of the child locked
programme is displayed.
1 2 3
4 5 6
7 8 9
0
TV/VIDEO
TV
CH
CH
MENU
PR 5
Downloaded from: http://www.usersmanualguide.com/

19
ENGLISH
Child Lock (Continued)
Cancelling Child Lock
Releasing the Child Locked programme.
1
Select the child lock programme
position.
2
Press MENU to call the MAIN menu.
3
Press
CH
or
CH
to select
“<PR>” and press MENU .
4
When the Child Lock symbol re-
appears on the screen, press and
hold down for four seconds
to enter Fine Tuning menu.
5
Tuning screen is displayed.
Press
CH
or
CH
to select
“OFF”and press MENU .
6
If you wish to unlock other locked
programmes, choose the locked
programme position, and then
repeat step 5.
7
Press or to select “EXIT”
and press MENU .
1 2 3
4 5 6
7 8 9
0
TV/VIDEO
TV
CH
CH
MENU
SORT
EXIT
<PR>
EXIT
SORT
<PR>
PR1 CH1
SKIP OFF
FINE
OFF
EXIT
SYS D/K
PR1 CH1
SKIP OFF
FINE
OFF
EXIT
SYS D/K
Downloaded from: http://www.usersmanualguide.com/
Other manuals for 21HM-10C
1
Table of contents
Other Sharp TV manuals

Sharp
Sharp 32C540 User manual

Sharp
Sharp LC-40CUG8062K User manual

Sharp
Sharp BI Series User manual

Sharp
Sharp 29K-F200A User manual

Sharp
Sharp SX66NF100 User manual

Sharp
Sharp BJ3E User manual

Sharp
Sharp 28LF-96EC User manual

Sharp
Sharp 32UF6 User manual

Sharp
Sharp 25N S100 User manual

Sharp
Sharp 29H-FD1S User manual

Sharp
Sharp LC-26D44 Installation guide

Sharp
Sharp 14V-L70M User manual

Sharp
Sharp R771M-006 User manual

Sharp
Sharp 70FS-57S User manual

Sharp
Sharp 21N52-E1 User manual

Sharp
Sharp LC-32AV22U User manual

Sharp
Sharp 21KF-80S User manual

Sharp
Sharp LC32DV24U - 31.5" LCD TV User manual

Sharp
Sharp LC-32CHG6452E User manual

Sharp
Sharp AQUOS LC-19SB24U User manual