Sharp AQUOS LX959H User manual

1
Dear SHARP customer
Contents
Thank you for your purchase of the SHARP LCD colour TV product. To ensure safety and many years of
trouble-free operation of your product, please read the Important Safety Precautions carefully before
using this product.
OPERATION MANUAL
Introduction
Dear SHARP customer ................................................................................................................. 1
Contents......................................................................................................................................... 1
Precautions for daily use.............................................................................................................. 5
Important safety precautions....................................................................................................... 6
Trademarks.................................................................................................................................... 8
Accessories ................................................................................................................................. 10
Supplied accessories..................................................................................................... 10
Optional accessories ..................................................................................................... 10
Preparation
Attaching the stand unit ............................................................................................................. 11
How to make a simple platform (For LC-70LX959H only) ....................................................... 12
Protection against overturning .................................................................................................. 13
Handling and precautions with the wall-mounted TV ............................................................. 13
Part names................................................................................................................................... 14
TV (Side/Front) ............................................................................................................... 14
TV (Rear) ........................................................................................................................ 15
Remote control unit ....................................................................................................... 16
Before turning on the power ...................................................................................................... 17
Connecting external devices ..................................................................................................... 18
Connecting an AV amplier ........................................................................................... 19
Using digital audio output.............................................................................................. 19
Connecting a USB hard disk drive (HDD) ..................................................................... 19
Connecting to the Network............................................................................................ 19
Insert a SD/SDHC memory card.................................................................................... 19
Inserting the batteries ................................................................................................................ 20
Using the remote control unit .................................................................................................... 20
Cautions regarding the remote control unit................................................................... 20
Turning the TV on/off.................................................................................................................. 21
Turning on/off the power ............................................................................................... 21
Standby mode ............................................................................................................... 21
Initial auto installation................................................................................................................. 21
Supplying electric power to the antenna .................................................................................. 22
Checking signal strength and channel strength ...................................................................... 22
About Menu operations .............................................................................................................. 23
What is Menu?............................................................................................................... 23
Basic menu operations .................................................................................................. 23
About guide display ....................................................................................................... 23
Watching TV
Setting channels automatically.................................................................................................. 24
Selecting programmes ............................................................................................................... 25
Adjusting the volume .................................................................................................................. 25
Setting channels to your preference......................................................................................... 26
Digital settings ............................................................................................................... 26
Manual setting for each channel (Analogue).................................................................. 27
Sorting programmes (Analogue).................................................................................... 29
Erasing programmes (Analogue).................................................................................... 29

2
Contents
Watching TV (Continued)
Useful viewing functions ............................................................................................................ 30
Freezing the image ........................................................................................................ 30
Returning to the previously selected channel................................................................ 30
Muting the audio temporarily......................................................................................... 30
Outputting only audio .................................................................................................... 30
Quick start ..................................................................................................................... 30
Illumination..................................................................................................................... 30
Menu language settings................................................................................................. 31
Switching subtitle languages......................................................................................... 31
Digital audio language ................................................................................................... 31
Switching the analogue audio format ............................................................................ 32
Switching the digital audio format ................................................................................. 32
Password setting for the child lock ............................................................................... 33
Parental rate................................................................................................................... 34
Programme title display................................................................................................. 34
Key lock ......................................................................................................................... 34
Favourite channel information ....................................................................................... 34
BluetoothTM .................................................................................................................... 35
Miracast ......................................................................................................................... 36
Energy conservation settings .................................................................................................... 37
Auto power-off at a designated time ............................................................................. 37
ECO picture control ....................................................................................................... 37
Energy save ................................................................................................................... 37
Auto power-off after the end of broadcast .................................................................... 38
Auto power-off when there are no operations performed ............................................. 38
Picture size settings ................................................................................................................... 38
Auto wide....................................................................................................................... 38
4:3 Mode........................................................................................................................ 38
Selecting the picture size manually ............................................................................... 39
Selecting a preset AV mode....................................................................................................... 40
Manual picture settings.............................................................................................................. 41
Picture adjustment......................................................................................................... 41
Advanced picture settings ............................................................................................. 42
Other picture settings................................................................................................................. 44
Adjusting the image position ......................................................................................... 44
Game play time ............................................................................................................. 44
Wallpaper setting........................................................................................................... 45
Boot picture .................................................................................................................. 45
Indicating time on the screen ........................................................................................ 46
Audio adjustment ........................................................................................................................ 47
Adaptive volume ............................................................................................................ 47
Harmonics enhancer extended...................................................................................... 47
Clear voice ..................................................................................................................... 47
Wall mount audio setup................................................................................................. 48
Digital audio output........................................................................................................ 48
Headphone/Audio out select ......................................................................................... 48
Headphone out setting .................................................................................................. 48
TV buttons.................................................................................................................................... 49
Info................................................................................................................................. 49
EPG............................................................................................................................................... 50
Basic settings ................................................................................................................ 50
EPG display settings...................................................................................................... 50
Selecting a programme using EPG ........................................................................................... 51
Basic operation.............................................................................................................. 51
Selecting a programme ................................................................................................. 51
Timer setting using EPG............................................................................................................. 53
Cancelling the timer setting ....................................................................................................... 53
Switching subtitle languages..................................................................................................... 53
Text............................................................................................................................................... 53
Enjoying 3D image
Display format for 3D and 2D images ....................................................................................... 54
Preparing for the 3D glasses ..................................................................................................... 55
Accessories for supplied 3D glasses............................................................................. 55
Parts name..................................................................................................................... 55
Battery assembly ........................................................................................................... 56

3
Contents
Enjoying 3D image (Continued)
Using the 3D glasses .................................................................................................................. 56
Turn on/off the power .................................................................................................... 56
Selecting the 2D and 3D modes.................................................................................... 56
Usage range of the 3D Glasses ..................................................................................... 56
Viewing 3D images...................................................................................................................... 57
Receiving a 3D image signal that can be detected automatically................................. 57
Switching 3D to 2D mode.............................................................................................. 57
Receiving a 3D image signal that cannot be detected automatically............................ 57
Watching 2D images in 3D ............................................................................................ 58
Switching to the previous mode .................................................................................... 58
3D menu ........................................................................................................................ 58
Configuring the TV settings to enhance 3D image viewing .................................................... 58
3D picture adjustments.................................................................................................. 58
3D setup ........................................................................................................................ 59
Specifications - 3D glasses........................................................................................................ 59
Settings when using external devices
Settings when using HDMI output devices............................................................................... 60
Controlling HDMI devices .......................................................................................................... 61
Audio select for connecting HDMI ............................................................................................ 61
Selecting the input source ........................................................................................................ 61
Labelling input sources .............................................................................................................. 62
Skipping an input ........................................................................................................................ 62
Colour system settings............................................................................................................... 62
Channel selecting effect............................................................................................................. 62
AQUOS LINK
Controlling HDMI devices using AQUOS LINK......................................................................... 63
AQUOS LINK connection............................................................................................................ 64
Connecting an AQUOS BD player via the AQUOS LINK-compatible audio system..... 64
Connecting an AQUOS BD player only ......................................................................... 64
Regarding “Select recording device”........................................................................................ 64
AQUOS LINK setup ..................................................................................................................... 64
AQUOS LINK control ..................................................................................................... 64
AQUOS LINK auto power on ......................................................................................... 64
Selecting recorder ......................................................................................................... 65
Selecting channel key.................................................................................................... 65
Audio return channel (ARC) ........................................................................................... 65
Operating an AQUOS LINK device ............................................................................................ 66
Recorder power on/off................................................................................................... 66
Playback of titles using AQUOS LINK ........................................................................... 66
Setup menu .................................................................................................................. 66
Selecting media type for CEC-compatible recorder...................................................... 67
Recording via the CEC-compatible recorder’s EPG (only for recorders) ...................... 67
HDMI device selection................................................................................................... 67
Using a Smartphone with the TV ............................................................................................... 68
Connecting a PC
Analogue connection.................................................................................................................. 69
PC compatibility chart ................................................................................................................ 69
HDMI connection ........................................................................................................................ 70
Audio select for connecting a PC.............................................................................................. 70
Displaying a PC image on the screen ....................................................................................... 70
Selecting the picture size............................................................................................... 70
Adjusting the PC image automatically........................................................................... 72
Adjusting the PC image manually.................................................................................. 72
PC control of the TV.................................................................................................................... 73
Communication conditions for IP .................................................................................. 73
Communication conditions for RS-232C....................................................................... 73
RS-232C Commands List ........................................................................................................... 74

4
Contents
Network function
Connecting to the Network........................................................................................................ 75
Wired installation ............................................................................................................75
Wireless installation ........................................................................................................75
LAN Setting.....................................................................................................................75
Specifications (Wireless LAN) .....................................................................................................77
Home UI ........................................................................................................................................77
Basic operation ...............................................................................................................77
Selecting in the HOME ...................................................................................................78
Clear browser setting......................................................................................................79
About links ......................................................................................................................79
Other useful features
USB recording ............................................................................................................................ 80
Connecting a USB HDD................................................................................................. 80
USB HDD registration.................................................................................................... 80
Disconnecting the USB HDD......................................................................................... 80
How to operate USB recording ................................................................................................ 81
USB recording .............................................................................................................. 82
USB recording timer setting ......................................................................................... 82
Timer list ....................................................................................................................... 82
USB recording playback ............................................................................................... 82
View setting .................................................................................................................. 83
Multimedia/Home network......................................................................................................... 84
Playing back files on a media drive........................................................................................... 85
Photo mode ................................................................................................................... 85
Music mode ................................................................................................................... 87
Video mode.................................................................................................................... 87
DivX®setup.................................................................................................................... 89
Game ............................................................................................................................................ 89
List of file formats compatible with USB mode ....................................................................... 89
Connecting a home network server.......................................................................................... 90
Playing back files on a home network server .......................................................................... 91
Photo mode ................................................................................................................... 91
Music mode ................................................................................................................... 92
Video mode.................................................................................................................... 92
List of file formats compatible with home network mode ...................................................... 92
Selecting the picture size for video mode in USB and home network mode........................ 92
Playing back files from a portable device or PC...................................................................... 93
Easy share setting.......................................................................................................... 93
Appendix
Troubleshooting .......................................................................................................................... 94
Troubleshooting - Digital broadcasting .................................................................................... 94
Troubleshooting - 3D images..................................................................................................... 95
Reset ............................................................................................................................................ 96
Download setup .......................................................................................................................... 96
Downloading the software............................................................................................. 96
Information .................................................................................................................................. 96
Picture / Audio test ........................................................................................................ 96
Message list................................................................................................................... 97
Receiver report .............................................................................................................. 97
Identication .................................................................................................................. 97
Updating your TV via USB/Network .......................................................................................... 97
Information on the software license for this product.............................................................. 97
Specifications.............................................................................................................................. 98
Dimensional drawings ................................................................................................................ 99
Clearing the password.............................................................................................................. 100

5
Observe the following items
Maintenance of the cabinet
•When cleaning the cabinet, use a soft cloth (made of cotton, floss, etc.) to clean gently.
Do not use a dry or damp rag mixed with chemicals, as this could cause the ingredients of the cabinet body to deteriorate or crack.
• Becarefulnottouseanabrasiveclothforcleaningorcleanwithexcessiveforce,asthiscouldscratchthesurfaceofthecabinet.
• Ifthecabinetisgreatlysoiled,cleanwithasoftcloth(madeofcotton,oss,etc.)soakedwithasmallamountofdilutedneutral
detergent and wrung out, and then clean with a soft dry cloth.
• Becausethecabinetismadeofplastic,solventssuchasbenzene,alcoholorthinnercouldcauseittodeteriorate,ormakeits
coatingcomeoff.Thereforedonotusesuchsolventstocleanthecabinet.
• Becauseplasticizerisincludedintheplastics,deteriorationorthecoatingpeelingoffcouldoccurwhenthecabinetcomesinto
contactwithsomesubstances.Thereforekeepitawayfromvolatilesubstancessuchasinsecticide.Inaddition,donotletitcome
into contact with objects made of rubber, resin, etc. for a long time.
Maintenance of the LCD panel
• BeforecleaningtheLCDpanel,besuretoturnofftheTVsetandunplugthepowercordfromtheoutlet.
• WhencleaningtheLCDpanel,useadryandsoftcloth(madeofcotton,oss,etc.)tocleanthesurfaceoftheLCDpanelgently.For
protectingtheLCDpanel,donotcleanwithadirtycloth,detergent,oradryordampragmixedwithchemicals,asthiscouldcause
peeling of the panel surface.
• Becarefulnottocleanwithanabrasiveclothorwithexcessiveforce,asthiscouldcausethepanelsurfacetobescratched.
• IftheLCDpanelisgreatlysoiled,cleanitgentlywithasoftcloth(madeofcotton,oss,etc.)soakedwithasmallamountofwater(Do
notcleanwithexcessiveforce,soastoavoidthescratchofthepanelsurface).
• IfduststicksonthesurfaceoftheLCDpanel,cleanthepanelwithacommerciallyavailablecleaningbrush(anti-staticbrush).
Precautions for daily use

6
Important safety precautions
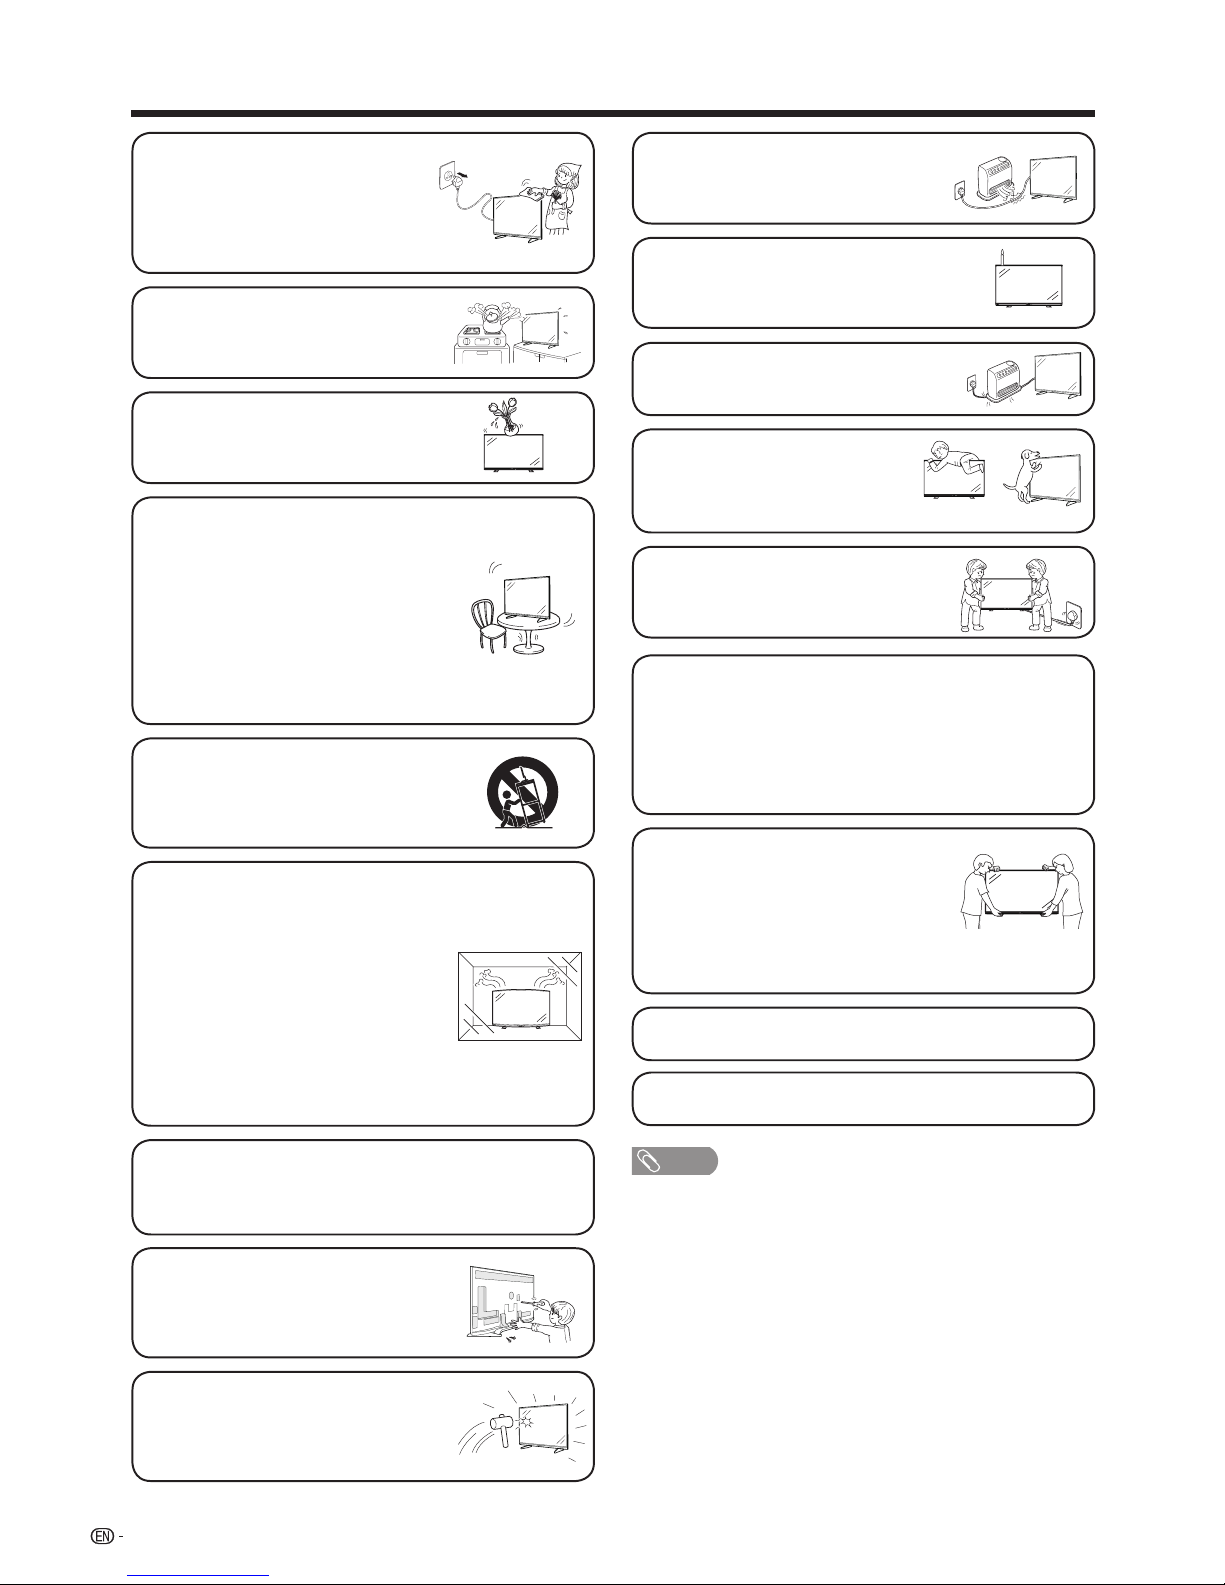
• Waterandmoisture—Donotusethe
product near water, such as bathtub,
washbasin, kitchen sink, laundry tub,
swimming pool and in a wet basement.
• Donotplacevasesoranyotherwater-lled
containers on this product.
The water may spill onto the product
causingreorelectricshock.
• Stand—Donotplacetheproducton
an unstable cart, stand, tripod or table.
Doing so can cause the product to fall,
resulting in serious personal injuries as
well as damage to the product. Use only
a cart, stand, tripod, bracket or table
recommended by the manufacturer or
sold with the product. When mounting the
product on a wall, be sure to follow the
manufacturer’s instructions. Use only the
mounting hardware recommended by the
manufacturer.
• Whenrelocatingtheproductplacedona
cart,itmustbemovedwithutmostcare.
Suddenstops,excessiveforceanduneven
floor surface can cause the product to fall
from the cart.
• Ventilation—Theventsandotheropenings
inthecabinetaredesignedforventilation.
Donotcoverorblocktheseventsand
openingssinceinsufcientventilationcan
causeoverheatingand/orshortenthelife
of the product. Do not place the product
on a bed, sofa, rug or other similar surface,
sincetheycanblockventilationopenings.
Thisproductisnotdesignedforbuilt-in
installation; do not place the product in
an enclosed place such as a bookcase or
rack,unlessproperventilationisprovided
or the manufacturer’s instructions are
followed.
• TheLCDpanelusedinthisproductismade
of glass. Therefore, it can break when the
product is struck forcefully or with a sharp
object.IftheLCDpanelisbroken,becareful
not to be injured by broken glass.
• Heatsources—Keeptheproductaway
from heat sources such as radiators,
heaters,stovesandotherheat-generating
products(includingampliers)
• Topreventre,neverplaceanytypeof
candle or naked flames on the top or near
theTVset.
• Topreventreorshockhazard,donot
placetheACpowercordundertheTVset
orotherheavyitems.
• Donotplaceheavyobjectsonthis
product or stand on it. Doing so
could cause injury if the product
overturns.Takespecialcarenear
children and pets.
TheLCDpanelisaveryhightechnologyproductwith
2,073,600pixels,givingyounepicturedetails.
Duetotheverylargenumberofpixels,occasionallyafew
non-activepixelsmayappearonthescreenasaxed
point of blue, green, red or yellow.
Thisiswithinproductspecicationsanddoesnot
constitute a fault.
• Donotdisplayastillpictureforalongtime,asthiscouldcause
an afterimage to remain.
• InstalltheproductontheplacewheretheACcordcanbe
unpluggedeasilyfromtheACoutlet.
Precautions when transporting the
TV
• WhentransportingtheTV,nevercarryitby
holding or otherwise putting pressure onto
the display.
BesuretoalwayscarrytheTVbytwo
peopleholdingitwithtwohands—one
handoneachsideoftheTV.
• Incasetheproductisdroppedandthecabinetisdamaged,be
sure to turn off the power of the product, and unplug the power
cord.Ifyoucontinuetousetheproduct,itmaycausereor
electric shock.
• Donotopentherearcoverofthecabinet
to reconstruct the circuits. There exists high
voltagewithinthecabinetanditmaycause
electricshockandinjury.Ifmaintenanceis
required, contact your dealer.
• Unplugthepowercordbeforeyoumove
theTVset.Ifnotunpluggedbeforehand,
the power cord may become damaged and
cause electric shock.
NOTE
• Theabovearepicturesforreferenceonly;theactualitemmightbe
different.
• Cleaning—UnplugtheACcordfromthe
ACoutletbeforecleaningtheproduct.
Use a damp cloth to clean the product.
Do not use alcohol cleaners, spray
cleaners or chemical cloth when cleaning
because these types of materials may
damage the product.

7
Important Safety Precautions
3D glasses
Prevention of accidental ingestion
• Keeptheaccessoryoutofthereachofsmallchildren.Smallchildrencanaccidentallyswallowtheseparts.
• Ifachildaccidentallyswallowsanyoftheseparts,seekimmediatemedicalattention.
Do not disassemble
• Donotdisassemblethe3Dglasses.Donotmodifythe3Dglasses.
Caution for button battery
• Donotexposethebatterytoexcessiveheat,sunlightorthere,etc.
• Replaceonlywiththesametypeofbattery.Thebatterymayexplodeifimproperlyreplaced.
• Pleasepayspecialattentiontothepolaritiesofthebattery.Improperinstallationmaycausethedamageofthebatteryor
leadstotheleakageofthechemicalmaterialthuscausethereandbodydamage.
Handling the 3D glasses
• Donotdrop,exertpressureon,orsteponthe3Dglasses.Doingsomaydamagetheglasssection,whichmayresultin
injury.
• Becarefulnottotrapyourngerinthehingesectionofthe3Dglasses.Doingsomayresultininjury.
• Payspecialattentionwhenchildrenareusingthisproduct.
Using the 3D glasses
• The3Dglassesvisionshouldbelimited.Securityadvisoryestablishesamaximumof3hoursvisualization,andinanycase
no more than one show length, break included.
• Useonlythe3DglassesrecommendedforthisTV.
• Usethe3Dglassesonlyforthespeciedpurpose.
• Donotmovearoundwhilewearingthe3Dglasses.Thesurroundingareaappearsdark,whichmayresultinfallingorother
accidents that may cause injury.
Caring for the 3D glasses
• Useonlysoftclothtocleanthelenses.Removedustandsoilfromthecloth.Anydustorothersoilingontheclothmay
resultinscratchesontheproduct.Donotusesolventssuchasbenzeneorthinnersasdoingsomaycausethecoatingto
peel off.
• Whencleaningthe3Dglasses,takecarenottoallowwaterorotheruidstocomeintocontactwiththeglasses.
• Whenstoringthe3Dglasses,avoidveryhumidorhotlocations.
Viewing 3D images
•Ifyouexperiencedizziness,nausea,orotherdiscomfortwhileviewing3Dimages,discontinueuseandrestyoureyes.
• Donotusethe3Dglassesiftheyarecrackedorbroken.
Keep away from heat
•Donotplacethe3Dglassesinare,nearheatorinanareawithhighhumidity.Thisproductmaycauseareorinjury
from ignition or explosion of the button battery.

8
Trademarks
• The terms HDMI and HDMI High-Definition Multimedia Interface, and the HDMI Logo are trademarks or
registered trademarks of HDMI Licensing LLC in the United States and other countries.
• Manufactured under license from Dolby Laboratories.
Dolby and the double-D symbol are trademarks of Dolby Laboratories.
• LCフォント、LCFONT、エルシ-フォントand LC logo mark are registered trademarks of SHARP Corporation.
This product is embedded with LC Font technology, which was developed by SHARP Corporation for clearly displaying
easy-to-read characters on an LCD screen. However, other non-LCD fonts are used for displaying some screen pages.
• “x.v.Colour”and are trademarks of Sony Corporation.
• DivX®, DivX Certified®, DivX Plus® HD and associated logos are trademarks of Rovi Corporation or its
subsidiaries and are used under license.
• DivX Certified® to play DivX® and DivX Plus® HD (H.264/MKV) video up to 1080p HD, including premium
content.
• ABOUTDIVXVIDEO:DivX®isadigitalvideoformatcreatedbyDivX,LLC,asubsidiaryofRoviCorporation.
This is an official DivX Certified® device that plays DivX video. Visit divx.com for more information and
software tools to convert your files into DivX videos.
• ABOUT DIVX VIDEO-ON-DEMAND: This DivX Certified® device must be registered in order to play
purchased DivX Video-on-Demand (VOD) movies. To obtain your registration code, locate the DivX VOD
section in your device setup menu. Go to vod.divx.com for more information on how to complete your
registration.
•For DTS patents, see http://patents.dts.com. Manufactured under license from DTS Licensing Limited.
DTS, the Symbol, & DTS and the Symbol together are registered trademarks, and DTS 2.0+Digital Out is a
trademark of DTS, Inc. © DTS, Inc. All Rights Reserved.
•The Wi-Fi CERTIFIED Logo is a certification mark of the Wi-Fi Alliance.
• TheWi-FiProtectedSetupMarkisamarkoftheWi-FiAlliance.
•Wi-Fi CERITIFIED Miracast™ and Miracast™ are trademarks of Wi-Fi Alliance.
•MHL and the MHL logo are a trademark, registered trademark or service mark of MHL, LLC in the United
States and/or other countries.
•THX and the THX logo are trademarks of THX Ltd. which are registered in some jurisdiction. All rights
reserved.
•SDHC Logo is a trademark of SD-3C, LLC.
•XT9 (R) is a registered trademark of Nuance Communications, Inc. and its affiliates in the United States and
other countries. Copyright (c) 2012 Nuance Communications, Inc. All rights reserved.
•T9 Output(TM) is a trademark of Nuance Communications, Inc. and its affiliates in the United States and
other countries.
•The Bluetooth® word mark and logos are registered trademarks owned by Bluetooth SIG, Inc. and any use
of such marks by SHARP Corporation is under license. Other trademarks and trade names are those of their
respective owners.
•YouTube and the YouTube logo are trademarks of Google Inc.
• DLNA®,theDLNALogoandDLNACERTIFIED™aretrademarks,servicemarks,orcertificationmarksof
theDigitalLivingNetworkAlliance.
• ThisproductincludesDLNASoftware'DiXiM'developedbyDigiOn,Inc.

9
Trademarks
DISCLAIMERS
This Sharp device facilitates the access to content and services provided by third parties. The content and services
accessible via this device belong to and may be proprietary to third parties. Therefore, any use of such third party
content and services must be in accordance with any authorization or terms of use provided by such content or
service provider. Sharp shall not be liable to you or any third party for your failure to abide by such authorization or
terms of use. Unless otherwise specifically authorized by the applicable content or service provider, all third party
content and services provided are for personal and non-commercial use; you may not modify, copy, distribute,
transmit, display, perform, reproduce, upload, publish, license, create derivative works from, transfer or sell in any
manner or medium any content or services available via this device.
Sharp is not responsible, nor liable, for customer service-related issues related to the third party content or services.
Any questions, comments or service-related inquiries relating to the third party content or service should be made
directly to the applicable content or service provider.
You may not be able to access content or services from the device for a variety of reasons which may be unrelated
to the device itself, including, but not limited to, power failure, other Internet connection, or failure to configure your
device properly. Sharp, its directors, officers, employees, agents, contractors and affiliates shall not be liable to you
or any third party with respect to such failures or maintenance outages, regardless of cause or whether or not it
could have been avoided.
ALL THIRD PARTY CONTENT OR SERVICES ACCESSIBLE VIA THIS DEVICE IS PROVIDED TO YOU ON AN
“AS-IS” AND “AS AVAILABLE” BASIS AND SHARP AND ITS AFFILIATES MAKE NO WARRANTY OR
REPRESENTATION OF ANY KIND TO YOU, EITHER EXPRESS OR IMPLIED, INCLUDING, WITHOUT LIMITATION,
ANY WARRANTIES OF MERCHANTABILITY, NON-INFRINGEMENT, FITNESS FOR A PARTICULAR PURPOSE
OR ANY WARRANTIES OF SUITABILITY, AVAILABILITY, ACCURACY, COMPLETENESS, SECURITY, TITLE,
USEFULNESS, LACK OF NEGLIGENCE OR ERROR-FREE OR UNINTERRUPTED OPERATION OR USE OF THE
CONTENT OR SERVICES PROVIDED TO YOU OR THAT THE CONTENT OR SERVICES WILL MEET YOUR
REQUIREMENTS OR EXPECTATIONS.
SHARP IS NOT AN AGENT OF AND ASSUMES NO RESPONSIBILITY FOR THE ACTS OR OMISSIONS OF THIRD
PARTY CONTENT OR SERVICE PROVIDERS, NOR ANY ASPECT OF THE CONTENT OR SERVICE RELATED TO
SUCH THIRD PARTY PROVIDERS.
IN NO EVENT WILL SHARP AND/OR ITS AFFILIATES BE LIABLE TO YOU OR ANY THIRD PARTY FOR ANY
DIRECT, INDIRECT, SPECIAL, INCIDENTAL, PUNITIVE, CONSEQUENTIAL OR OTHER DAMAGES, WHETHER
THE THEORY OF LIABILITY IS BASED ON CONTRACT, TORT, NEGLIGENCE, BREACH OF WARRANTY, STRICT
LIABILITY OR OTHERWISE AND WHETHER OR NOT SHARP AND/OR ITS AFFILIATES HAVE BEEN ADVISED OF
THE POSSIBILITY OF SUCH DAMAGES.
• This product contains fonts provided by Monotype Imaging Inc.
• Monotype® is a trademark of Monotype Imaging Inc. registered in the United States Patent and Trademark Office
and may be registered in certain jurisdictions.
• Tioga™ is a trademark of Monotype Imaging Inc. and may be registered in certain jurisdictions.
• Letter Gothic™ is a trademark of The Monotype Corp. and may be registered in certain jurisdictions.
• iType® is a trademark of Monotype Imaging Inc. registered in the United States Patent and Trademark Office and
may be registered in certain jurisdictions.
• This product contains the iType® font engine from Monotype Imaging Inc.
http://www.espial.com

Accessories
10
Supplied accessories
Silveryscrews
(g12)
Clamps
(g2)
Screwsfor
clamps (g2)
Blackscrews
(g2)
Stand Supportingpost B
racket
cover
Makesurethefollowingaccessoriesareprovidedwiththeproduct.
Remotecontrolunit
“AAA”sizealkalinebattery
(g2) Convert Cable
Used with batteries inserted.
Page16 Page20
Standunit Safetyrestraint
Page11 Page13
3D glasses accessories
(g2) Operation manual
Page55
Optional accessories
ThelistedoptionalaccessoriesareavailableforthisLCDcolourTV.Pleasepurchasethematyournearestshop.
• Additionaloptionalaccessoriesmaybeavailableinthenearfuture.Whenpurchasing,pleasereadthenewestcataloguefor
compatibilityandchecktheavailability.
Part name Part number Note
3D glasses AN-3DG30 Rechargeable
3DGlasses(×2) Buttonbattery*
CR2025(×2)
NOTE
• Theoptionalglassesaredifferentfromthesuppliedones.Pleaserefertotheoperationmanualoftheoptionfortheoperation
details.
*Alreadyinstalledin3Dglasses.

11
Preparation
• Beforeattaching(ordetaching)thestand,unplugtheACpowercordfromtheACpoweroutlet.
•
Beforeperformingwork,spreadcushioningoverthesurfaceonwhichyouwillbelayingtheTV.Thiswillpreventitfrombeingdamaged.
CAUTION
• Attach the stand in the correct direction.
•
Be sure to follow the instructions. Incorrect installation of the stand may result in the TV falling over.
NOTE
•Wheninstallingthestand,youneedtoputyourTVonaat
surface.Beforethat,putasoft cushion on the surface.
•Todetachthestandunit,performthestepsinreverse
order.
•Theangleofthestandisnot adjustable.
•Ascrewdriverisnotsuppliedwiththisproduct.
•Intheinstallationprocedure,becarefulnottocatchyour
fingersbetweentheTVsetandthefloor.
Attaching the stand unit
2
Attachingandxingthestandunit
LaytheTVatonasoftcushionasshownin
thegure,andinsertthestandbracketsintothe
openingsonthebottomoftheTV.Makesure
that the screw holes at the lower part of the main
unit are homocentric with those on the brackets.
(Ifnoproperplatformisavailable,thepacking
box can be used to make a simple platform as
asubstitute.Forthemethod,see“Howtomake
asimpleplatform”onPage12.Thismethodis
applicableonlytoLC-70LX959H.)
After the stand unit is attached, secure it with
foursilveryscrews(M5×14)inthesupplied
accessories.
3
Attachingandxingthebracketcover
Puttheplasticcoveronthestandbracket,move
it to the bottom in the arrow direction as shown
inthegure(ensuringthatthescrewholeon
thecoverishomocentricwiththatonthestand
bracket),andthenxthecoverwithtwoblack
screws(M4×8)inthesuppliedaccessories.
Now the installation of the stand unit is complete.
1
Assemblingandxingthestandandthestand
brackets
Asshowninthegure,attachthebentprojection
portions of the two stand brackets in the square
recesses on the top surface of the stand reliably,
andthenuseeightsilveryscrews(M5×14)inthe
suppliedaccessoriestoxthem.
Softcushion

12
Preparation
How to make a simple platform (For LC-70LX959H only)
Tomakesuchasimpleplatform,youneedtousethepackingboxandthefourfoamblocksinsideit:TOP-L,
TOP-C,TOP-RandSIDE-R.
Asshowninthefollowinggure,removethe
threefoamblocksTOP-L,TOP-CandTOP-R
on the top.
Asillustratedinthefollowinggure,
disassemble the packing box from one side.
Andremovethetwofoamblocksonboth
sides.
1 AsshowninFigureA,reassemblethepacking
box from the side, and place it face down.
2 AttachthefoamblocksTOP-LandTOP-Ronto
the left side and right side of the packing box
respectively
(asshowninFigureB).
3
InsertthefoamblocksTOP-C,SIDE-Rintothe
packingbox(asshowninFigureB).Now,a
simple platform is ready.
NOTE
• Puttheplatformontheatoorafteryouhavemadeit.
•Wheninstallingthestand,youneedtoputtheTVface
downonthesimpleplatform.Beforethat,putashockpad
on the platform to protect the screen.
•The simple platform is just for temporary use. Do not apply
anyloadexceedingtheweightoftheLCDTVontothis
platform.
FigureA
FigureB
1
2
3
Front

13
Preparation
Protection against overturning
Thereisadangeroftheproductoverturninginthecaseofadisasterorsuddencollision.Carryoutthefollowing
tip-resistantmeasurementforyoursafety.
1
2
Usethe2screws(supplied)toattachthe2clamps(supplied)totherearoftheTV.
AttachtheTVtothewallusingextrastrongties(commerciallyavailable).
Anchoring the TV to the wall or a pillar
CAUTION
• As this product is heavy, use a table that is wide enough to support the product and capable of withstanding the
product’s weight. The table should be set where it will not be overturned.
• BesuretouseatleasttwopeoplewhenmovingtheTV.
View from the top
NOTE
• The illustrations of this page are according to LC-60LX959H.
wall
Cuphook(commerciallyavailable)
Tie(commerciallyavailable)
Screwsforattachingclamps(supplied)
Clamps(supplied)
Handling and precautions with the wall-mounted TV
• YoucanmounttheTVonthewallusingtheoptionalbracket.
• Fordetails,refertotheinstructionssuppliedwiththeoptionalbracket.
CAUTION
• This TV should be mounted on a wall only with a wall mount bracket recommended by SHARP. The use of other wall
mount brackets may result in an unstable installation and may cause serious injuries.
• Installing the TV requires special skills that should only be performed by qualified service personnel. Customers
should not attempt to do the work themselves. SHARP bears no responsibility for improper mounting or mounting
that results in accident or injury.
Using a SHARP recommended bracket to mount the TV
• YoucanaskaqualiedserviceprofessionalaboutusingaSHARPrecommendedbrackettomounttheTVtothewall.
• Carefullyreadtheinstructionsthatcomewiththebracketbeforebeginningwork.
NOTE
• IfyouwanttomounttheTVonthewall,usethescrewsprovidedwiththewall-mountbrackettoafxthebrackettotherearof
theTV.

14
Preparation
Part names
• Theillustrationsandon-screendisplaysinthisoperationmanualareforexplanationpurposesandmayvaryslightlyfromthe
actual operations.
• TheillustrationsusedthroughoutthisoperationmanualarebasedonLC-60LX959H.
TV (Side / Front)
6 7 890
1POWER(On/Off) button
2MENU button
3INPUT button
4CH r/s(Channelup/down)buttons
5VOL k/l(Volumeup/down)buttons
6OPC sensor*
7Remotecontrolsensor
8Illumination
9POWER indicator
0TIMER/REC indicator
Infraredemitter
* OPC: Optical Picture Control
(Seepage42fordetails.)
1
2
3
4
5

15
Preparation
TV (Rear)
HDMI2(HDMI)
terminal(INPUT2)
Antenna terminal
USB3(HDD)terminal*4
LANterminal
Regarding the headphone jack
• Useheadphoneswithastereominiplug(Ø3.5mm).
• Besuretounplugheadphonesfromthejackwhentheyarenot
in use.
• Thespeakersdonotoutputvolumewhenheadphonesare
plugged in.
• The“Audio”menucannotbeoperatedwhenheadphonesare
plugged in.
• Youcansetthevolumetodifferentlevelsforeachinputsource.
Volume display when headphones are plugged in
30
OUTPUT
(Headphone/AUDIO
(R/L))terminal
HDMI3(HDMI/ARC)
terminal(INPUT3)*1
DIGITALAUDIO
OUTPUTterminal
HDMI1(HDMI)
terminal(INPUT1)
SD/SDHCcardslot
HDMI4(HDMI/MHL)
terminal(INPUT4)*2
AUDIO IN (HDMI2/PC)
terminal*3
INPUT 5 (AV IN)
AUDIO(R/L) terminal*5
PCterminal
USB1terminal
USB2terminal
*1 Audio Return Channel ( ARC ) (Seepage65.)
*2
Mobile High-Definition Link (MHL) can also be used. (Seepage68.)
*3 TheHDMI2andPCterminalscanbothusethesameaudioinputterminal(AUDIOIN(HDMI2/PC)).However,theproperitem
mustbeselectedinthe“Audioselect”menu.(Seepages61and70.)
*4 UsethisterminaliftherechargingoftheUSBHDDisbyUSB.
*5 WhenusingINPUT5,youneedtheconvertcablesupplied.
7
INPUT 6
6
COMPONENT
SD/
SDHC
USB 1
AUDIO(R/L)
(DC 5V 900mA)
ARC
OUTPUT
RS-232Cterminal
INPUT6(COMPONENT/AUDIO(L/R)/VIDEO)
terminal

16
Preparation
Remote control unit
EXT MEDIA
TV INFO
MENU
GUIDE
SLEEP
5
6
15
16
2
11
12
8
9
10
7
1
27
28
13
4
17
*
18
14
25
26
22
23
20
19
21
24
3
1. <(Standby/On)
Toswitchthepoweronandoff(Page21).
2. EXT MEDIA buttons
AQUOSLINK
IfexternalequipmentsuchasaAQUOSBDplayerisconnected
viaHDMIcablesandisAQUOSLINKcompatible,youcanuse
theseEXTMEDIAbuttons.Seepages66fordetails.
USB-recording
Recordaprogrammeyouarewatching.(Pages81).
3. >
PresstoaccessanalogueordigitalTVmode.
4. INFO
DTV:Displaytheprogrammeinformation(Page49).
ATV:Displaythechannelinformation.
5. 0–9*
Setthechannel(Page24).
6. A(Flashback)*
Presstoreturntothepreviouslyselectedchannelorexternalinput
(Page30).
7. HOME
Displaythe“HOME”screentoenjoyInternetconnectionand
HomenetworkfunctionandtoperformsettingsfortheTV(Page
77).
8. 3D
Selectbetween3Dand2Dimageviewing(Pages57–58).
9. a/b/c/d(Cursor)
Selectadesireditemonthesettingscreen.
?(ENTER)
Executeacommand.
10. B
TurnofftheOn-ScreenDisplay.
11. e(Mute)
Mutethesound(Page30).
12. VOL+/–
Setthevolume(Page25).
13. MPX
Selectasoundmultiplexmode(Page32).
14. WIDE
Changeawideimagemode(Pages39,70and92).
15. CONTROL
Presstodisplaythepaneltooperatesomefunctionsonthescreen
(Pages81,88and92).
16. FREEZE
Freezeamotionpictureonthescreen(Pages30).
17. m(text)
D-TVonly:TodisplayMHEG-5broadcasts(Page53).
18. [(Subtitle)
Switchsubtitlelanguageson/off(Page31,53and88).
19. b(INPUT SOURCE)*
Selectaninputsource(Pages18,35,36,61,62and64).
20. @
Displaysthemenuscreen(Page23).
21. C
Menumode:Returntothepreviousmenuscreen(Page23).
22. GUIDE
DTV:TodisplayEPG(ElectronicProgrammeGuide)screen(Pages
50–53).
ATV:Displaythechannellist.
23. CHr/s
TVinputmode:Selectthechannel(Page25).
AQUOS.NET:Selectthepage(Page78).
24. R/G/Y/B (Colour) buttons
The coloured buttons are correspondingly used to select the
coloureditemsonthescreen(e.g.,AQUOSLINK,Multimedia,
Homenetwork,teletext).
25. DISPLAY
Display the channel or input information.
26. AV MODE
Selectaudio/videosettings(Page40).
27. ECO
Select“Energysave”setting(Page37).
28. SLEEP
Setthesleeptimer(Page37).
NOTE
* “0−9”,“A”, “b” are used by string input like a mobile
phone.

Preparation
17
1
Before turning on the power
Notes on installing the TV
• AvoiddirectsunlightandplacetheTVinawell-ventilatedlocation.
• PlacetheTVinalevellocation.
• DonotturnonthepoweroftheTVbeforeconnectingtheACcord.
CAUTION
• TO PREVENT RISK OF ELECTRIC SHOCK, DO NOT TOUCH UN-INSULATED PARTS OF ANY CABLES WITH THE
AC CORD CONNECTED.
Bundling the cables
Asthepictureillustrated,insertthecableclipintotheholeontheTV,andputthecableintothecableclip
for banding.
4
Plug the AC cord in to the AC outlet.
• PlacetheTVclosetotheACoutlet,andkeepthepowerplugwithinreach.
• DisconnecttheACcordfromtheACoutletiftheTVwillnotbeusedforalongperiodoftime.
TV (rear view)
Connecting the antenna cable
To enjoy a clearer picture, use an outdoor antenna. The following is a brief explanation of the types of
connections that are used for coaxial cable.
StandardDIN45325
plug(IEC169-2)
75-ohmcoaxialcable
(round cable)
Roomantennaterminal
(75-ohmtype)
Antenna cable
(commerciallyavailable)
Connecting external devices
Seepages18to19forconnectingexternalequipment,suchasaVCRandDVDplayer.
2
3
To antenna
terminal
ACcord
ACoutlet
or

18
Preparation
CAUTION
• Toprotectallequipment,alwaysturnofftheTVbeforeconnectingtoaVCR, game console, camcorder,DVDplayer,Digital
TVSetTopBox(STB),PCorotherexternalequipment.
• Refertotherelevantoperationmanual(VCR,DVDplayer,etc.)carefullybeforemakingconnections.
Connecting external devices
YoucanconnectmanytypesofexternalequipmenttoyourTV,likeaVCR,gameconsole,camcorder,DVD
player,DigitalTVSetTopBox(STB)andPC.Toviewexternalsourceimages,selecttheinputsourcefrombon
the remote control unit or INPUTontheTV.
When using component cable (commercially available)
When using composite cable (commercially available)
Video(Yellow)
Video(Yellow)
L– AUDIO – R Y P
B
(C
B
)
P
R
(C
R
)
INPUT 6
6
COMPONENT
INPUT 6
6
COMPONENT
PR(Red)
PB(Blue)
Y(Green)
Digital TV STB/VCR/Game
Console/Camcorder/DVD Player
Audio-R(Red)
Audio-L(White)
Digital TV STB/VCR/
Game Console/
Camcorder/DVD Player
Audio-R(Red)
Audio-R(Red)
Audio-L(White)
Audio-L(White)
When using HDMI cable (commercially available)
Digital TV STB/VCR/
Game console/
Camcorder/DVD Player
• WhenusingaDVI-HDMIadaptor,inputtheaudiosignalfromtheHDMI2/PC AUDIO INPUTterminal.(Seepage70.)
• Somecommerciallyavailabledevicesmayhavenotbeenproperlycertied.WhentheyareconnectedtotheTVviaHDMI,
theremaybenosoundatall.Inthiscase,itisrecommendedtouseHDMI2andHDMI2/PCAUDIOINPUTterminaltoinput
audio signals.
NOTE
(DC 5V 900mA)
ARC
or
AVcable
(supplied)

19
HDMI OUT
HDMI
IN
HDMI
OUT
(DC 5V 900mA)
ARC
Preparation
Using digital audio output
ItispossibletooutputaudiothroughtheDIGITAL
AUDIO OUTPUT terminal.PCMorBitstream(Dolbyor
DTSDigitalaudio)outputsfromtheterminal.
Connecting to the Network
Seepages75to76.
Insert a SD/SDHC memory card
Itprovidesaccesstophotos,video,music,andother
lesinSD/SDHCmemorycards.
Insert a SD/SDHC memory card that stores your files
into the SD slot. Refer to the method of playing files
stored in the multimedia device specified on Page 84
for details.
To optical digital input of
external audio devices
Opticalbrecable
(commercially
available)
NOTE
• TheDIGITALAUDIOOUTPUTterminalusuallyoutputsthe
same audio from the speakers. (The audio of the content
youareviewingisoutputfromtheterminal.)
• TheDIGITALAUDIOOUTPUTterminaldoesnotoutput
somesignals,dependingondevicesandsoftware.
Connecting a USB hard disk drive (HDD)
YoucanuseUSB3(HDD)terminalwhenconnectingaUSB
harddiskdrive.
USB hard disk drive
Connecting an AV amplifier
Set Top Box (STB) HDMI-certiedcable
(commerciallyavailable)
NOTE
• Iftheimageisnotinsyncwiththeaudio,checkthesettings
of the connected surround system.
• LettingtheTVoutputtheaudiotoanAVamplier:
- WhenyouconnectARC-compatibleequipment,usethe
HDMI3(ARC)terminal.
- Iftheequipmenttobeconnectedisnotcompatiblewith
theARC,connectanopticalbrecable.
When using RGB cable (commercially
available) connecting to a PC (see page 72 )
NOTE
• Macintosh adaptor may be required for use for some
Macintosh computers.
PC
7
3
SD/
SDHC
NOTE
• Insertthememorycardintotheslotinthedirectionshown
inthegure.
• The SD slot supports SD and SDHC memory cards.
However some memory cards may not be supported.
• This product supports memory cards with a maximum
storage of 32 GB. We recommend that you use a memory
card with at least a speed of Class 4 for a higher read-write
speed, thus guaranteeing the system performance.
• Unplug the memory card after you have safely unloaded it
or the TV has been turned off.
• Do not unplug the memory card while data is being
transferred. Otherwise the TV may malfunction.
• Regularly back up data in the memory card to prevent data
corruption or operating errors of the TV. (SHARP shall not
bear any responsibility for data corruption or destruction.)

20
Preparation
CAUTION
Improperuseofbatteriescanresultinchemicalleakageorexplosion.Besuretofollowtheinstructionsbelow.
• Donotmixbatteriesofdifferenttypes.Differenttypesofbatterieshavedifferentcharacteristics.
• Donotmixoldandnewbatteries.Mixingoldandnewbatteriescanshortenthelifeofnewbatteriesorcausechemical
leakage in old batteries.
• Removebatteriesassoonastheyhavewornout.Chemicalsthatleakfrombatteriescancausearash.Ifyoundany
chemical leakage, wipe thoroughly with a cloth.
• Thebatteriessuppliedwiththisproductmayhaveashorterlifeexpectancyduetostorageconditions.
• Ifyouwillnotbeusingtheremotecontrolunitforanextendedperiodoftime,removethebatteriesfromit.
• Batteriesshallnotbeexposedtoexcessiveheatsuchassunshine,reorthelike.
Remotecontrolsensor
1 Openthebatterycover.
• Placebatterieswiththeirterminals
corresponding to the (e) and (f)
indications in the battery compartment.
2Insertthetwosupplied“AAA”size
alkaline batteries.
3Closethebatterycover.
Use the remote control unit by pointing it towards the
remote sensor window.
Objects between the remote control unit and sensor
windowmaypreventproperoperation.
Cautions regarding the remote control unit
• Donotsubjecttheremotecontrolunittoshock.
Inaddition,donotsoaktheremotecontrolunitwithliquidsorplaceitin
an area with high humidity.
• Donotinstallorplacetheremotecontrolunitunderdirectsunlight.
The heat may cause deformation of the unit.
• The remote control unit may not work properly if the remote sensor
window of the TV is under direct sunlight or strong lighting. In such
cases, change the angle of the lighting or TV, or operate the remote
control unit closer to the remote sensor window.
Inserting the batteries
BeforeusingtheTVforthersttime,inserttwo“AAA”sizealkalinebatteries(supplied).Whenthebatteries
becomedepletedandtheremotecontrolfailstooperate,replacethebatterieswithnew“AAA”sizealkaline
batteries.
Using the remote control unit
EXTMEDIA
TV INFO
MENU
GUIDE
SLEEP
Table of contents
Other Sharp TV manuals

Sharp
Sharp LC-37DB5U User manual

Sharp
Sharp LC-22CFE4000E User manual

Sharp
Sharp 28LF-94E User manual

Sharp
Sharp 32UC4 User manual

Sharp
Sharp 32R-S50 User manual

Sharp
Sharp 20BM2-GMK2 User manual

Sharp
Sharp 81GF-63E User manual

Sharp
Sharp Aquos 2T-C50BG1X User manual

Sharp
Sharp 27L-S500 User manual

Sharp
Sharp 32K-X2000 User manual

Sharp
Sharp Aquos LC-40LE820X User manual

Sharp
Sharp 63CS-03SC User manual

Sharp
Sharp 29K-FG1SA User manual

Sharp
Sharp 32JF-74E User manual

Sharp
Sharp 32SC260 User manual

Sharp
Sharp 25R S100 User manual

Sharp
Sharp 26PL83M User manual

Sharp
Sharp 29H-FG3RU User manual

Sharp
Sharp 20MR10 User manual

Sharp
Sharp 14GT-16C User manual