Sharp SX-51A7 User manual

\‘\
COLOUR TELEVISION
OPERATION MANUAL
MODEL IA7
sx-51A8
(OPTIONAL
TELETEXT FACILITY)
(TELETEXT MODEL)

Dear SHARP Customers
a radio receiver.
Before using this COLOUR TELEVISION RECEIVER please read this Operation Manual carefully. Be
sure to save this manual for future use, especially SX51A7owners that may update to the Teletext option.
This manual covers two models, the SX51A8which is fitted with teletext facilities and the SX51A7 which
is sold without the Teletext facilities but can be updated to the SX51A8 model with Teletext at a later
date by purchasing the Teletext kit (No. AN222TX) from the retailer and having it installed for a fee
at a SHARP service centre.
NOTE: As purchased, the SX51A7 remote control Teletext buttons will be inoperative until the Teletext
kit has been installed in your TV.

Controls & Terminals
C
Opening the door
Press the upper centre of the door as
illustrated, opening it slightly. Hook your
finger inside and pull open.
1 Behind the Door 1
I I
-Remote control sensor
Red I green power
indicator
Power on/off butto-
Channel selector up (A)/dow
(V) buttons
Volume. channel tunin
and picture adjustment
buttons
I I
1 I Sh P i *.i QESET 3 MODE \.‘A/\ \/CH/\
BL’JE
t3ACh Oi
Q
Blueback (on /off) butrow
I
Picture mode select button
(contrast, colour, brightness)
Preset button
1
Fine tuning button
kip/Call button
2

1 Infrared Remote Control
Channel/timer call button-
TV/Video selector
Channel selectors
d
Top/Bottom/Full button---
Browse butto-
Reveal buttor+----
Store button
Reset button
Colour button (Red)-
Colour button (Green)-
Picture normal button-
Mono button
Audio mode selector-
(Stereo/Mono
Main/Sub/Main + Sub)
Sound mute button--- J I I
SHARP
TV.TEXT I
-Off-timer button
--Power on/off button
-Channel selectors (V/A) and
Page selectors (V/A)
4 lashback button
-Picture button
IextlMix button
-Time button
-Cancel button
--Index button
Hold button
-Colour button (Blue)
-Colour button (Yellow)
picture and sound
adjustment buttons
-Picture mode select button
‘Sound mode select button
-Volume button (V/A)
NOTE: The SX51A7 Remote Control Teletext buttons will be inoperative until the AN222TX Teletext
kit has been fitted.
3

0
1 Back 1
Battery mounting
. Insert two AA or UM-3 1.W batteries as
illustrated and replace the cover.
Notes
1.
2.
The infrared transmitter requires 3 volts for
operation. If the transmitter operating
power is insufficient, replace the batteries.
Position the positive and negative sides of
the batteries properly. Use of batteries other
than those specified may make the remote
control transmitter inoperative.
---_
====
----
----
---_
==-- ====
----
ntenna terminal
ain power on/off button
CAUTION:
Remove the power plug from the power point if
the TV is not to be used for an extended period.
1
)‘ideo Input terminal
I Video output terminal
Audio output terminals
4

@Power source and TV system
This TV set can be operated on 240V AC,
50 Hz. It is designed exclusively for PAL-B
(Australian STD) broadcast systems.
(Back) @ Power Supply “On/Off” with 2-Colour
(Red/Green) Power Indicator
When the main power on/off button (&I ) at
the rear of the set is pressed, the TV set
will be in standby with the power indicator
illuminated red. Then, when the power
on/off button behind the door or on the
(Behind the Door) remote control is pressed, the power
indicator will turn green and a picture will
appear on the screen. The channel
programme number is also displayed in the
upper right corner of the screen. Press the
power on/off button (01) behind the door
or on the remote control to return the set
(Infrared Remote Control) to standby mode (the power indicator will
4 # be illuminated red).
NOTE:
TV/VIDEO 0
on&i If the TV fails to turn ON, please check that
the Child Lock mode has not been
&&&I previously engaged (see page 22).
&A&
ISAGiEl
P-MODE V/IA @ Sound volume “(V 4 A)”
The volume can be adjusted by pressing
a volume button on the set or on the remote
control. Press the Voiume (A) button to
increase the volume and the Volume (V)
button to decrease the volume. The volume
level is indicated by the number of
rectangles “I n . . ” displayed after the
“ 4 ” in the screen.
VAA
&
5

VCHA 04 Channel Selection “ V CH A”
99
The channel number is displayed on the
screen when the Channel selector Up (A)
button or Down (V) button is pressed on the
I I set or on the remote control.
When the Channel (A) button is pressed, the
channel number will change as follows:
AiS&& 1.2.3...38.39.1.2... Each time the Channel (V)
button is pressed, the channel number will
AA&& change as follows: 39.38.37 .... 2.1.39.38 .....
Channel lSA6z5 The Channel selector buttons on the
remote control can also be pressed to
select V CH A
buttons A &I directly select the desired channel. If the
factory preset channel frequencies do not
& match your local channel frequencies, refer
to Presetting the Channels.
_------------_--___------------------~~
Channel Selection Using the Infrared Remote Control
Channel to be selected Channel selector button to be pressed.
Channel 1 - 9 Press the & - & buttons.
Channel 10 - 19 Press the & button (“l-” displayed for about 6 seconds), and
then the& - & button.
Note: Be sure to press the buttons within 5 seconds after the
& button is pressed. because the & button is
cancelled in about 6 seconds.
Channel 20 - 29 Press the ‘O’ button (‘12-” displayed for about 6 seconds), and
then the&e& button.
Note: Refer to the note for Channel 10 - 19.
Channel 30 - 39 Press the & button (“3-” displayed for about 6 seconds on the
screen), and then the ,$-A button.
Note: Refer to the note for Channel 10 - 19.
Notes:
11) The selected channel number will appear on the screen for about 3 seconds before it
disappears and the TV screen returns to its normal state.
12) When the Channel selector (A) or (V) button on the TV set or on the remote control
is held down, the channel number changes once per second. Release the Channel (A)
or (Vj button when the desired channel number appears on the screen.
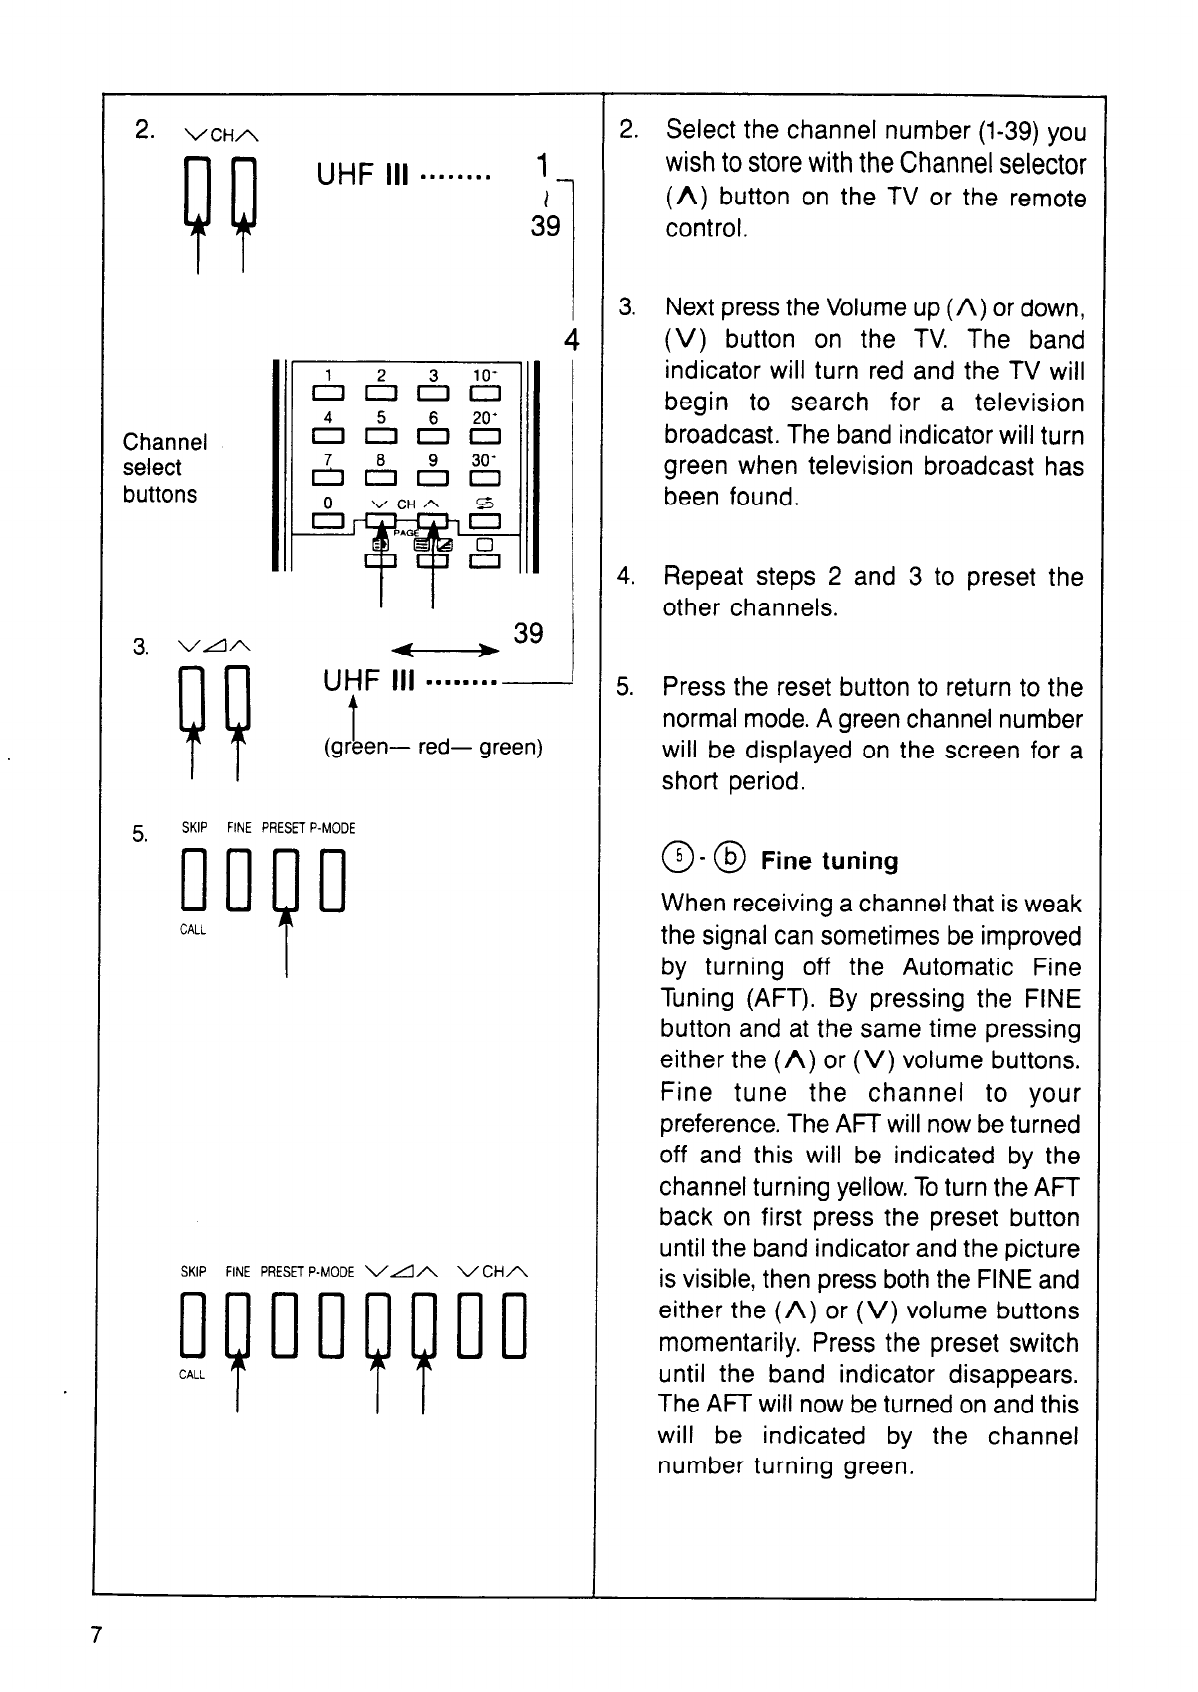
1. SKIP FINE PRESET P-MODE @ - @ Presetting the Channels
oop (AUTO SEARCH TUNING SYSTEM)
Note: Most channels are preset at the factory.
CALL To avoid unnecessary resetting, check the
(ON SCREEN) tuning of all channels before resetting them.
1 1. Press the Preset button behind the door
VHF-L 111... . . . . . . . .
“1 1
T
and the band, VHF or UHF, that you wish to
M mory TV preset. Press the button once for the VHF
band. Press again for the UHF band. Press
station again when you have finished presetting the
Band lndicato
(VHF-L, VHF-H, UHF) Channel channel. (VHF-L l-5, VHF-H 5a-11, UHF
Number 28-69).

2. VCHA
UHF 111. . ... ... 1
4
:hannel
elect
uttons
,,39 I
UHF 111 I
. . . . . . ..-
t
(green- red- green)
SKIP FINE PRESET P-MODE
SKIP FINE PRESET P-MODE V/1/Y VCHA
2. Select the channel number (l-39) you
wish to store with the Channel selector
(A) button on the TV or the remote
control.
3. Next press the Volume up (A) or down,
(V) button on the TV. The band
indicator will turn red and the TV will
begin to search for a television
broadcast. The band indicator will turn
green when television broadcast has
been found.
4. Repeat steps 2 and 3 to preset the
other channels.
5. Press the reset button to return to the
normal mode. A green channel number
will be displayed on the screen for a
short period.
a- @ Fine tuning
When receiving a channel that is weak
the signal can sometimes be improved
by turning off the Automatic Fine
Tuning (AFT). By pressing the FINE
button and at the same time pressing
either the (A) or (V) volume buttons.
Fine tune the channel to your
preference. The AFT will now be turned
off and this will be indicated by the
channel turning yellow. Toturn the AFT
back on first press the preset button
until the band indicator and the picture
is visible, then press both the FINE and
either the (A) or (V) volume buttons
momentarily. Press the preset switch
until the band indicator disappears.
The AFT will now be turned on and this
will be indicated by the channel
number turning green.
7

SKIP FINE PRESET P-MODE
oopn
CALL
3.
5
SKIP FINE PRESET P-MODE
a
000
LL
SKIP FINE PRESET P-MODE
1
4.
1. SKIP FINE PRESET P-MODE @ -@ Resetting Skipped Channels
1.
2.
3.
4.
5.
CALL
.I
2. VCHA I
Pp
4.
3 SKIP FINE PRESET P-MODE
ml I
5. SKIP FINE PRESET P-MODE
00~0
CALL
I
@ - @ Skipping Channels
The Channel selector (A) button and (V
button on the set and remote control normally
cycle through all the channels, 1 through 39
If you wish, you can set the TV so that onl)
selected channels are tuned in while other
perhaps empty channels, are skipped.
1.
2.
3.
4.
5.
Press the Preset button.
Select a channel number you wish to skif
with the Channel selector (A) or (V
button on the TV set or remote control.
Press the Skip button. The displayed than
nel number will turn from green to red.
Repeat steps 2 and 3 if you wish to skip
other channels.
Press the Preset button again to return tc
normal mode. A green channel number wili
be displayed on the screen.
Note:
Ifyou select the channels to be skipped with the
Channel select buttons on the remote control,
the channel number will be displayed in red.
Press the Reset button.
Select a skipped channel number, displayed
in red, with the Channel selector (A) or (V)
button on the set or on the remote
control.
Press the Skip button, the displayed
channel number will turn green, and the
channel will no longer be skipped.
Repeat steps 2 and 3 for any other
channels you wish to stop skipping.
Press the Preset button again to return
to normal mode.
Notes:
1) It is most practical to start this process at
channel number 1, and repeat as needed up
to channel number 39.
2) The n/ will return to normal mode if you do
not proceed to the next step within about 10
seconds after pressing the Preset button. If it
does, press the Preset button again to execute
the following step.
3. When the received broadcast signal is weak,
the picture may appear in black and white only
or you may be able to preset the channel. In
this case, please check the antenna or consul?
your appliance store.

1.2
3.
FINE PRESET P-MODE
mJ
I
P-MODE V/1A
(ON SCREEN)
Contrast Mark
4
f---e
Decrease Increase
Colour Mark
4
f---e
Decrease Increase
Brightness Mark
(ON SCREEN)
Contrast Mark
4
@ I I I I I I I I I ¤==~.==.‘=
----_)
Decrease Increase
0
6 Additional Picture Adjustments
(Contrast, Colour, Brightness)
1.
2
3.
Press the Picture mode (P-MODE) button
behind the door or the Picture mode
(P-MODE) button on the remote control.
l ON-SCREEN
Contrast Mark @ -99 Red
Colour Mark @ n -- Green
Brightness Mark -lG.- l mmGreen
When you press the Picture mode
(P-MODE) button two times the Colour
Mark will change from green to RED; when
You press the Picture mode
(P-MODE) button three times the
Brightness Mark will change from green to
RED.
Press the P-mode control until the control
you wish to adjust is red in colour. Press
the volume (A) or (V) or the (A) or the
(V) button on the remote control to adjust
the picture to your liking.
Note:
The display will disappear after about 6 seconds.
Adjust the mode you selected with the Mode
button within this time.
4. When you press only the Adjustment (I‘ V
or (A”) buttons without pressing the
Picture mode (P-MODE) button on the
remote control you can adjust the
contrast with one touch).
9

P-N ” A
Treble Mark
Decrease Increase
2.3
Bass Mark
Decrease Increase
Balance Mark
JI
[14 . . . . . . . . 1 [ i . . . . . . . . . .
--
Left Speaker Right Speaker
Volume Mark
Low High
II P-N ” A
BLUE
BACK
Q (BLUEBACK
PUSH ON
PUSH OFF)
(ON SCREEN)
I
cl
Blueback
sign (blue)
@ Additional Sound Adjustments
(Treble, Bass, Balance, Volume)
1.
2.
3
Press the Sound mode (S-MODE) button
on the remote control.
l ON-SCREEN
Treble Mark --Q Red
Bass Mark $... Green
Balances Mark e, 4.. . Green
Volume Mark A-9 Green
Treble 6 and Bass 7
Low sounds are adjusted by the bass
control and high sounds by the treble
control according to the required sound
quality.
Balance
Select the balance control mode by
pressing the sound mode button. Press the
adjustment (“V or A”) buttons to balance
the sound from the left and right speakers.
When you press the Sound Mode
(S-MODE) button two times the Bass Mark
will change from green to RED; when you
press the Sound Mode (S-MODE) button
three times the Balance Mark will change
from green to RED; when you press the
Sound Mode (S-MODE) button four times
the Volume Mark will change from green
to RED.
Adjust the RED Mark to the position you
desire and press the Adjustment (W or
A”) buttons to set the sound to your liking.
Note:
The display will disappear after about 6 seconds.
Adjust the mode you selected with the Mode
button within this time.
0
8 Blueback
By pushing this Blueback button, there are
no fears of wasting power if you were to fall
asleep watching television. When the TV
broadcasting ends at night, sound is muted
and the screen turns blue in 5 seconds.
Fifteen minutes later, the TV set will
automatically go into standby, so power is
saved. If broadcasting restarts while the
screen is blue, the TV will resume displaying
pictures and producing sound.
10

SKIP FINE PRESET
Lm
;. iL
1
l-V/VIDEO B
f
I
0
J
23 M
~ OCh
9 annel/Timer call button (1) ( @ )
~ The channel number and the mode, if the
channel is broadcasting in stereo or bilingual,
is displayed on the screen by pressing the
Channel/Timer call button. Press the button
again and the display will disappear.
If the Channel/Timer call button is pressed
while the Off-Timer is set, the time remaining
on the Off-Timer, the channel number and the
mode, if the channel is broadcasting in stereo
or bilingual is displayed.
If the button is pressed again, the Off-Timer
will disappear leaving the channel number
and the mode, if the channel is broadcasting
in stereo or bilingual. Press the button again
and the display will disappear.
Operation of Infrared Remote Control
@ Normal button (P-N)
(Contrast, Colour, Brightness)
Pressing this button cancels any previous
contrast, colour, and brightness adjustments,
and resets these to the original factory
standard settings.
@ Off-Timer Button ([‘)
The TV can be turned off automatically after
120, 90, 60 or 30 minutes by using the Off-
Timer button. When the Off-Timer button is
pressed once while watching TV, a El 120 M
display will appear, indicating that the TV will
be turned off automatically after 120 minutes.
Press the button twice for 90 minutes, three
times for 60 minutes, and four times for 30
minutes. When the button is pressed five
times, the mode is cancelled, and nothing will
appear on the screen.

I Notes:
0
J 39 1. When the Off-Timer is set the remaining
120 M time until the TV is turned off, is displayed
in 5-minute increments on the screen.
2. When a channel is preset after the Off-
Timer is activated, the timer countdown
stops until the TV is put into the normal
mode.
@Sound Mute Button ( 0% )
I
When this button is pressed, the sound is
0% VAA
v
00 muted and the mute indicator mark “ 0%“,
is displayed on the screen.
SHARP Press the button again to restore the sound
TV.TEXl level.
@ Flashback Button (5 )
*
I&&&& Pressing this button selects the channel that
&&A& was tuned immediately before the one being
watched. For example if channels were
IS&&& selected in the order of Ch2, Ch3, then Ch6,
0 v CH A s pressing the button returns tuning to Ch3.
Press the button again to return to Ch6.
@ TV/VIDEO selector (TV/VIDEO)
When you press the TV/VIDEO selector, the
TV is switched to receive Audio/Video signals
through the A/V terminals, and “AV”
(Audio/Video Indicator) will be displayed for
about 3 seconds in the upper corner of the
screen. When the TV/VIDEO selector is
I
/
AV pressed again, the set is switched to receive
on-air TV broadcasting, and the channel
programme number will be displayed for
about 3 seconds in the upper right corner of
the screen.
12

l-
MONO
0
P-N
1
MONO
P
3 Audio Mode Selector ( I$‘a )
ihe audio mode selector is used to select the
nain, sub or main t sub audio modes of
)ilingual broadcasting, and to select the
;tereo or mono mode while receiving stereo
signals.
f this button is pressed during the main audio
node, reception switches over to the sub
audio mode. If it is pressed again, reception
iwitches over to the main t sub audio mode.
f it is pressed a third time reception returns
3 the main audio mode. When this button is
bressed while receiving stereo signals, the
nono mode will be selected. When this button
5 pressed a second time, the stereo mode will
beselected.
lath audio mode indicator will be displayed
In the screen as shown below.
Audio Mode On Screen Display
Main audio MAIN
Sub audio 1 SUB I
Main + sub audio 1 MAIN + SUB I
Stereo
Mono
STEREO
MONO
3Mono button (MONO)
f a stereo broadcast suffers from annoying
loise and the stereo indicator (on the screen)
s blinking, press the mono button to change
he audio to the mono mode.
?I switch the mode back to stereo, press this
jutton again.
NOTE:
If you press the mono button when receiving
a bilingual programme, the audio channel is
switched to the main channel.
“MAIN”, “SUB”, or “MAIN + SUB” on the
screen will go off. To switch back the audio
channel into the original mode, press the
button again. (The built-in stereo decoder
uses the Australian system.)
13

[ TELETEXT MODE (SX51A8 ONLY) 1
Text/Mix Button ( ‘_1 / @J )
v CHA
&-PP-t~.
l When the Text/Mix button is pressed the
@I El/c3 0 first time, the initial position (the text page
n?!n
number memorized in the red block of a
a m @I
IO 0 Teletext broadcast will be displayed on the
@ screen.
o??l~~ l When the Text/Mix button is pressed the
NES3==
OIII second time, a Teletext broadcast will be
superimposed on the TV programme.
Press the button again to return to a Teletext
broadcast only.
Top/Bottom/Full Button ( @J )
l When the Top/Bottom/Full bu#on is pressed
the first time, the top half of the Teletext
‘4 CH A
&j-qpJ& page will be magnified and displayed on
I3 OK3 0 the screen.
3
II l When the Top/Bottom/Full button is pressed
a @j
oc!l the second time, the bottom half of the
@ ELI a EII Teletext page will be magnified and dis-
IcJOll played on the screen.
lc”I---
InI1 l When the Top/Bottom/Full button is pressed
the third time, the Bottom mode will be
cancelled and the Full Teletext page will
appear on the screen. Press the button
again to return to theTop mode.
Picture Button ( 0 )
V CH A
G-Psh~ l When the Picture button is pressed in the
@I s/c3 0 Text or Mix mode, the mode will be changed
II
a @I @
?
to an ordinary TV programme screen.
11111El Press the Text/Mix button again to return
EJ a a to the Teletext page previously displayed on
OOOII the screen.
I~I-~
I1I1
Reveal Button ( @ )
l When the Reveal button is pressed the first
time, any hidden information such as the
v CHA
Am& answer to a quiz will be revealed on the
I3 331LZl 0 screen.
III l When the Reveal button is pressed the
second time, the information will disappear.
Press the button again to reveal the
information.
NOTE: Ifthe REVEAL BUTTON is pressed when
in Television mode, the receiver will scan through
the channels and stop at the channel that you
were viewing when the REVEAL BUTTON was
pressed.
14

irowse Button ( a )
When the Browse button is pressed, a
random Teletext page may be displayed on
the screen.
Notes:
1. The above random Teletext page selection
depends on the broadcasting station’s
programming.
2. This button is only effective for pages with
consecutive page numbers, e.g. 111,112,
113and 114.
‘ime Button ( @ )/Cancel Button ( @ )
When timer setting is required for some
Teletext page, press the Time button, and
then input the time%as required. Press the
Cancel button to return to an ordinary TV
programme. When the Time button is
pressed while viewing a TV programme,
the current time appears on the screen for
approximately 6 seconds.
-
T
l
r
/
I
I
L
-
S
a
Notes:
1. When the Time button is pressed again
after timer setting, the timer setting will be
cancelled.
2. The Teletext page must have timer setting
signals transmitted from the Teletext
broadcasting station.
4ore Button ( @ )
First input the desired Teletext page num-
ber into the red, green, yellow, and/or blue
block, then press the Store button for a
second. The block will change to white for
a second, then will change back to the
original colour. The page numbers are now
stored in the corresponding page
memories.
75

Reset Button ( a )
l When the Reset button is pressed in the
Teletext mode, previously set Teletext
functions except the page number memory
will be reset and an ordinary TV
programme will apear while the Teletext
decoder is set up to display the initial
position (the page number stored in the red
block) of a Teletext broadcast.
Hold Button ( m )
l Any Teletext page can be held on the
screen by pressing the Hold button when
watching a Teletext broadcast. Press the
button again to cancel the hold mode.
Index Button ( a )
l Used to recall the page number you stored
yourself.
When this button is pressed, the page
number stored in the red block will be
displayed on the screen.
Colour Button (l----I)
(Red, Green, Yellow, Blue)
l When any of these colour buttons is
pressed, the block will move to the position
that corresponds to the pressed button,
where you can input the page number you
want to store. (See store button).
l When each colour button is pressed after
storing your desired page number, each
stored Teletext page number will be
displayed on the screen.
Text Page Selector (V/A)
l These buttons allow sequential selection of
16

How to Make 16-Programme 4-Page
Number Memory Setting
In channel positions 1 to 16, four Teletext
pages can be stored in each channel, a total
of 64 pages. Initially the channel that
transmits Teletext in your area i.e. channel
7 in Sydney, must be preset into channels
1 to 16 (see page 6) or a channel for each
set of four pages required.
1.
2.
3.
4.
Preset the channels 1 to 16 to the
channel transmitting Teletext
area.
Select channel 1.
1
in your
Press the Text/Mix button to
Teletext mode. set the
For 4-page number memory setting, first
press the red colour button. Input the
desired Teletext page number into the red
block in the lower area of the screen.
Then, press the green colour button.
Input the desired page number into the
green block.
Example:
P300
5.
6.
Then, press the yellow colour button.
Input the desired page number into the
yellow block.
Then, press the blue colour button. Input
the desired page number into the blue
block.
Finally, press and hold the store button
until every coloured block changes to
white. Four page numbers have now
been stored in the page number memory
at the same time.
Press the Picture button to set the TV
mode.
Select programme position “2” by
pressing the channel selector button “2”.
Then, repeat steps 2 and 3 again.
For programme positions 1 to 16 repeat
the same procedure as explained above.
NOTE:
1.
2.
It is only possible to store teletext pages
in positions l-16.
Stored Teletext page numbers remain
stored even when the power is turned off.
If there is no page that matches the page
numbers that are stored, the stored
number will blink.

Audio/Video In/Out Terminals
udio Input terminals
ideo Input terminal
Video Output terminal
L- Audio Output terminals
Enjoy the stunning visuals of a VCR or a video disk by connecting them to this unit through
the AUDIO/VIDEO IN terminals.
You can also bask in dynamic sound by connecting an amplifier through the AUDIO OUT
terminals.
NOTES:
1. With this TV, you can play back stereo-recorded video cassettes in stereo.
2. For monaural audio input, connect the external source to the AUDIO Input Left terminal (AUDIO
IN L (MONO)) to hear the same sound from both speakers.
3. If monaural equipment is connected to the AUDIO Input Right terminal, you will hear sound
from only one of the speakers. Connect monaural audio to the Left AUDIO Input terminal.
r-AUDIO IN L (MONO)
v v
AUDIO OUT
18

VCRlCTV or DlSClCTV Combinations Note:
As this Colour TV set has only 1 set of Audio/
/ Visual input terminals, either a-VCR or a VIDEO
DISC player can be connected, but not both.
Y IN (ANTENNA)
(AN
TENNA)
VIDEO/AUDIO IN
VIDEO/AUDI
OUT
I\+--JJp&
IN (ANTENNA)
r-
AUDIO OUT
D O- - ’ VIDEO OUT
(VCR)
AUDIO OUT
I-------- --- -- -
VIDEO OUT
(DISC)
AUDIO IN
VIDEO IN
(Portable VCR without tuner)
Reception System
l PAL-B (Australian STD)
-’
19
This manual suits for next models
1
Table of contents
Other Sharp TV manuals

Sharp
Sharp Aquos LC-32M400M User manual

Sharp
Sharp 70DS-01FP User manual

Sharp
Sharp AQUOS LC-60LE650U User manual

Sharp
Sharp 42CL1IA User manual

Sharp
Sharp 27SF560 User manual

Sharp
Sharp LC-40FG5241KF User manual

Sharp
Sharp XFlat 20F650 User manual

Sharp
Sharp LC-40UG7252E User manual

Sharp
Sharp 21V-R70M User manual

Sharp
Sharp LC-32D42U User manual

Sharp
Sharp 20N-S100S User manual

Sharp
Sharp 8C221 User manual

Sharp
Sharp 21HF2-SS User manual

Sharp
Sharp LC-26SH12U - 26" LCD HDTV User manual

Sharp
Sharp LC-40FI6522KF User manual

Sharp
Sharp 21J-FH1RU User manual

Sharp
Sharp LC-22LE250V User manual

Sharp
Sharp 21JF2-GA User manual

Sharp
Sharp CX34L3 User manual

Sharp
Sharp 54CS-05S User manual