Sharper Image NI500 User manual

Flickering
Solar Lantern
NI500 Instructions
Read and save these instructions.

Dear Sharper Image Customer,
Thank you for your purchase of a Sharper Image product. We appreciate
your business very much.
Please accept my personal assurance of your complete satisfaction with
this product’s quality and performance. We offer generous return
privileges and excellent warranties on all our products.
For more than 25 years, The Sharper Image has shared the fun of
discovering innovative products that make life easier and more enjoy-
able. We’ve been in business a long time because we are an exciting
place to shop and — just as importantly — we strive to deliver great
customer service that exceeds your expectations.
Enjoy your purchase!
Respectfully,
Richard Thalheimer
Founder, Chairman and Chief Executive Officer
Call 1-800-344-4444 for 24-7 ordering and customer service,
or go to , our complete online store.

•To ensure maximum performance of the Flickering Solar
Lantern, read and save these instructions.
•When replacing batteries, ensure that they are inserted correctly.
Observe proper polarities as indicated in the battery compart-
ment. Failure to do so may shorten the battery life or cause the
battery to explode or leak.
•Do not dispose of batteries in a fire. Batteries may explode
or leak. Do not mix old and new batteries together. Use only
rechargeable NiCad or NiMH batteries, but do not mix
together.
Important
When using the lantern for the first time, do not slide the
ON/OFF switch to the On position until the lantern receives a
full 8 hours of direct sunlight. This allows the rechargeable bat-
teries to reach maximum capacity.
Caution

1. Select an outdoor location where there’s direct sunlight. The
location should not be near light sources such as porch lights
or streetlights.
2. Charge the lantern for 8 to 10 hours in the sun. When using
the lantern for the first time, do not slide the ON/OFF switch
to the On position until it receives a full 8 hours of sunlight.
3. Place the lantern on a deck, patio or picnic table. You can
also hang the lantern from the included Shepherd’s Hook to
cast a wider light in a garden, on a deck or along a pathway.
(See Assembling the Post section.)
Quick Start

During the day, the solar panels on the top of the lantern convert
sunlight into electricity and recharge the built-in rechargeable
1.2V 600mAh AA NiCad batteries. At sunset, the light turns on
automatically after an 8- to 10-hour solar charge. The lantern
provides up to 15 hours of illumination. The number of hours
the lantern remains illuminated depends on geographic location,
weather conditions and the availability of seasonal sunlight.
Once the lantern is charged, slide the ON/OFF switch to On.
The lantern will automatically turn on at dusk. The Flickering
Solar Lantern also directs light from an additional LED located
in the bottom of the unit. Hang it from the included 3-foot
Shepherd’s Hook to cast a wider light in a garden, on a deck
or along a pathway.
How the Lantern Works

Select an outdoor location where there’s direct sunlight so the
lantern can receive at least 8 hours of sunlight each day.
Shadowed locations prevent the batteries from fully charging and
reduce the number of hours the lantern illuminates. The selected
location should not be near light sources such as porch lights or
streetlights. These lights may affect the photocell in the lantern
and may cause the lantern to turn off automatically. To resolve
this, turn the lantern away from that light source. The lantern is
ideal for illuminating a garden, lawn, patio, walkway or wherever
accent lighting is needed.
Note:
•If the lantern does not turn on after 8 hours of charging, make
sure the ON/OFF switch is in the On position.
•Check the batteries to ensure they are inserted properly and
securely.
•Ensure that the lantern is in a bright, sunny location and not in
a shady area.
•Ensure that the lantern’s photocell is not affected by other light
sources.
Choosing a Location

1. Remove all contents from packaging and lay
them out on a smooth surface.
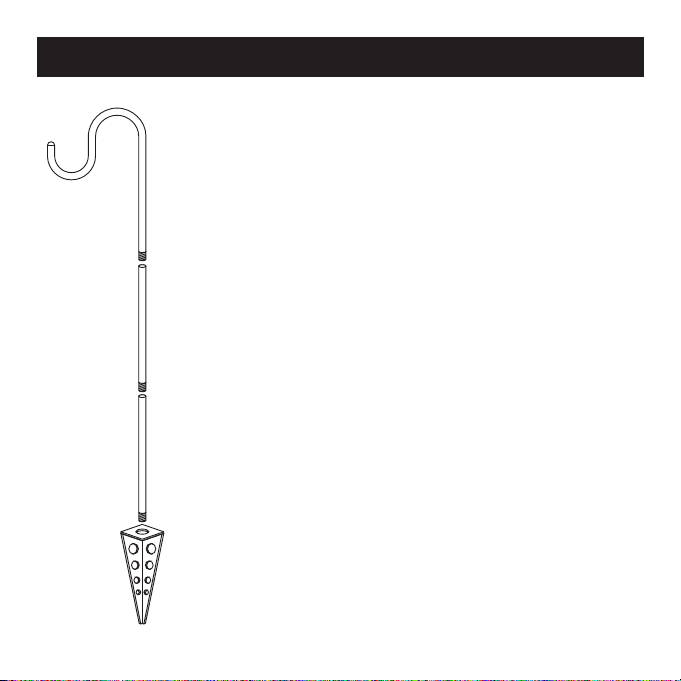
2. Assemble the post by connecting the
Shepherd’s Hook (I) with the straight section
(J). Thread them together until secure.
3. Insert the male threaded end of the straight
section (J) into the female threaded end of
the straight section (K) and twist together until
secure.
4. Insert the male threaded end of the straight
section (K) into the female threaded end of
the spike (L) and twist together until secure.
5. Carefully insert the pointed end of the stake
(L) into the ground at the desired location.
Do not push the stake into the ground from
the top of the Shepherd’s Hook (I). If the soil
is loose, sandy or an organic type, grasp the
post with both hands and firmly push it into
the ground. If the soil is heavy or stony, dig a
small hole, insert the fixture spike, replace
the soil and tap down.
Assembling the Post
I
J
K
L

6. Hang the lantern on the Shepherd’s Hook (I).
7. Once the lantern has been charged in direct sunlight for a
least 8 hours, slide the ON/OFF switch to the On position
and the lantern automatically turns on at sunset and off at
dawn.
Assembling the Post

Caution:
•When replacing batteries, ensure that they are inserted correctly.
Observe proper polarities as indicated in the battery compart-
ment. Failure to do so may shorten the battery life or cause the
battery to explode or leak.
•Do not dispose of batteries in a fire. Batteries may explode
or leak. Do not mix old and new batteries together. Use
only rechargeable NiCad or NiMH batteries, but do not mix
together.
E
solar panels
F
batteries
G
candle light
LED
H
amber light
LED
D
on/off switch
C
photocell
B
cover
A
hanging loop
Replacing Batteries <

1. If the lantern is hanging on the post, remove it from the
hook.
2. Slide the ON/OFF switch (D) to the Off position.
3. Loosen and remove the hanging loop (A) by turning it coun-
terclockwise.
4. Lift the top cover (B), be careful not to inflict any stress on
the wires that connect the solar panels to the cover.
5. Remove the old batteries (F) and replace them with two new
rechargeable 1.2V 600mAh AA NiCad batteries. Ensure that
you insert batteries in the proper direction. Batteries should be
recycled or disposed of at your local recycling center. See
Caution section.
6. Replace the top cover (B).
7. Replace the hanging loop (A) and tighten it by turning it
clockwise. Do not overtighten.
8. Hang the assembled lantern back on the stand and allow it to
receive a full 8 hours of sunlight so the rechargeable batteries
can reach maximum capacity.
9. Slide the ON/OFF switch (D) to the On position.
Replacing Batteries <

For optimal performance, use a soft cloth every two weeks to
wipe off any dust and debris from the solar panels.
Cleaning

What Is Covered
This warranty covers any defects in materials or workmanship, with the exceptions stated below.
How Long Coverage Lasts
This warranty runs for 90 days from the date of original purchase.
What Is Not Covered
This warranty does not cover damage caused by misuse or use other than as intended and described in the
product instruction manual, or loss or damage to batteries or removable parts.
What The Sharper Image Will Do
The Sharper Image will repair any defects in materials or workmanship. In the event repair is not possible,
The Sharper Image will either replace this product with one of similar features and price, or refund the full
purchase price of the product, whichever you prefer.
How to Obtain Service
Return the product and receipt, along with a brief explanation of the problem, to:
T.S.I. - Returns Department
2901-A West 60th Street
Little Rock, AR 72209
If you have questions please feel free to contact our customer service representatives at 1-800-344-5555 or
This warranty gives you specific legal rights, and you may have other legal rights that vary from state to state.
Copyright 2003
Sharper Image Corporation
650 Davis St., San Francisco, CA 94111
(415) 445-6000
Shop online:
Due to continuing improvements, actual product may differ slightly from the product described herein.
V1 03/03
WARRANTY
Table of contents
Popular Lantern manuals by other brands

Sunny
Sunny SN Series user manual

BEGA
BEGA 3479 Instructions for use

olympia electronics
olympia electronics Double Easy Light GR-391/L quick start guide

WHITECROFT LIGHTING
WHITECROFT LIGHTING Aerial Industry installation instructions

BEGA
BEGA 33 880 Instructions for use

ubbink
ubbink Multi Bright Float 3 LED manual

AS LED Lighting
AS LED Lighting MidPower Line HML-057057 Mounting instructions

ETC
ETC IRIDEON AR500 Disassembly instructions

KingShield
KingShield ELTSLED65NM Installation & operating instructions

Eaton
Eaton Corelite Series installation instructions

superbrightleds
superbrightleds HPLA2 Series user manual

Lighting Technologies
Lighting Technologies KRK Series manual