SHENZHEN PUMP MEDICAL SYSTEM BF5000B User manual

Rev. A1
1
Arm Automatic Blood Pressure Monitor
Instruction Manual
BF5000B
Thanks for purchasing the Arm Automatic Blood Pressure Monitor manufactured by
Bpump.
Please read the instruction manual before usage;
Please dispose the Arm Automatic Blood Pressure Monitor and battery in accordance
with local regulations.

Rev. A1
2
Table of Contents
1. Safety Information...................................................................................................3
1.1. Warning.............................................................................................................................3
1.2. Contraindications.............................................................................................................4
1.3. Care and maintenance.....................................................................................................4
2. Product Feature .......................................................................................................5
3. Power source.............................................................................................................6
4. Clock mode...............................................................................................................7
5. First touch mode ......................................................................................................7
6. Standby mode...........................................................................................................8
7. System Setting..........................................................................................................8
7.1 User conversion...................................................................................................................8
7.2. Setting................................................................................................................................8
2) Unit with broadcast. .............................................................................................8
8. Take a measurement................................................................................................9
8.1. Important Noted...............................................................................................................9
8.2. Fitting the cuff................................................................................................................10
8.3. Body posture during measurement...............................................................................10
8.4. Take Measurement.........................................................................................................11
8.5. Average value .................................................................................................................13
8.6. Memory...........................................................................................................................14
9. Data transmission ..................................................................................................15
10. Power off...............................................................................................................15
11. Error Indication ...................................................................................................15
12. Trouble Shooting..................................................................................................15
13. Environment protection ......................................................................................16
14. Specification .........................................................................................................16
8. About Blood Pressure ............................................................................................18
8.1. What is Blood Pressure?................................................................................................18
8.2. What is high blood pressure?........................................................................................18
8.3. What is morning hypertension (morning surge)?.......................................................19
Reference Standard....................................................................................................19
Blood Pressure Measurement Chart........................................................................20
Guarantee Card .........................................................................................................20
Explanation of Symbols.............................................................................................21
After-Sale Service.......................................................................................................21

Rev. A1
3
1. Safety Information
1.1. Warning
1) Self diagnosis and treatment which use measured results may be dangerous. Follow the
instructions of your physician or licensed healthcare provider.
2) If cuff inflation doesn’t stop, remove the cuff or power off the unit, otherwise, it may
result in a hazard condition.
3) Only take measurement with the manufacturer supplied cuff, or else it will lead to
inaccurate results.
4) Do not use the blood pressure monitor when you are close proximity to strong static
electricity or electromagnetic fields, and avoid using the mobile during measurement.
5) Do not use in combination with a hyperbaric oxygen therapy device, or in an
environment where combustible gas may be generated.
6) Do not use in combination with other monitoring device at the same limb, because the
pressurization of the CUFF can temporarily cause loss of function of simultaneously
used monitoring ME EQUIPMENT on the same limb;
7) Do not install or use the unit in the following locations:
Locations subject to vibration such as ambulances and emergency helicopters.
-A location where there is gas or flame.
-A location where there is water or steam.
-A location where chemicals are stored.
-A location where the unit may easily fall.
8) Measurements or stores need to take into account environment variables, or else it
would lead to the inaccurate measurement.
9) Do not kink the connection tube, or it may cause blood flow interference and result in
harmful injury to the PATIENT due to continuous CUFF pressure;
10) Do not use Luer lock. If Luer lock connectors are used in the construction of tubing,
there is a possibility that they might be inadvertently connected to intravascular fluid
systems, allowing air to be pumped into a blood vessel.
11) This product is suitable for use to self- monitoring of blood pressure in home or used by
the licensed healthcare personnel in hospital.
12) Blood pressure measurements determined with the device are equivalent to those
obtained by a trained observer using the cuff/stethoscope auscultatory method, within
the limit prescribed by the American National Standard, Manual, electronic or
automated sphygmomanometers.
13) Keep out of reach of infants, small children, and compromised people who cannot
express their consent. Playing the air tube may result in suffocate children, and Children
may swallow small parts and lead to suffocation.
14) Children must be supervised to ensure that they are not play with the device.
15) Use only manufacturer authorized parts and accessories. Parts and accessories not
approved for use with the device may damage the unit.
16) Be careful not to rest your arm on the air tube. This will restrict the flow of air to the
cuff.

Rev. A1
4
17) Do not measurement too frequent, or else it may result in bruising where the cuff is
applied.
18) Do not apply the cuff over a wound or inflamed area.
19) Do not apply the cuff on the same limb where intravascular access or therapy or an
arterio-venous (A-V) shunt is present, because of temporary interference to blood flow
and could result in injury to the patient.
20) Do not apply the cuff on the arm on the side where a mastectomy has done, because of
temporary interference to blood flow and could result in injury to the patient.
21) The application of the cuff and its pressurization on the arm can cause temporary
interference to blood flow, but it would not result in injury to the patient.
22) Operation of the device does not result in prolonged impairment of the circulation of the
blood of the patient.
23) Direct plug is considered as disconnect device, please do not place the equipment in a
difficultly operation position.
24) When using the device, the patient is an intended operator.
25) Do not serviced or maintained while in use with the patient.
1.2. Contraindications
1) Do not use the blood pressure monitor for any other purpose except measuring the blood
pressure of human body.
2) Those who have arrhythmia, diabetes, blood circulation or apoplexy problem, please use
under the physician’s instruction.
3) Clinical testing has not been conducted on newborn infants and pregnant women. Do not
use in infants and pregnant women.
4) The common arrhythmia such as atria premature beats, premature ventricular and atrial
fibrillation will lead to inaccurate results or error.
1.3. Care and maintenance
1) The battery can’t be replaced, do not attempt to disassemble, repair or modify the unit or
cuff.
2) Avoid high temperature, moisture, dust and direct sunlight.
3) Clean the body with soft clean wet cloth, do not wipe with alcohol or other corrosive
liquids.
4) Do not wet or clean the cuff with water.
5) Clean the cuff with soft dry cloth after measurement.
6) Do not use at extremely high temperature, high humidity, or high altitude.
7) Do not drop or expose the device to heavy shock.
8) Do not use the unit near large equipment that uses a switching relay for power ON/OFF.
9) Turn off the power switch if the unit will not use for a long time.
10) The blood pressure monitor has gone through several trials of testing to ensure the
measurement accuracy. It is recommended that the performance be checked every 2 years
and after maintenance and repair.
11) Do not disassemble or modify the structure of the unit and damage the safety
performance. If you need service, please contact the manufacturer, the maintenance

Rev. A1
5
should be done by authorized persons of manufacturer. Maintenance of the necessary
technical document, including the schematics, key components list and etc., will
provided by the manufacturer for maintenance personnel.
12) Care and maintenance of lithium battery:
Please keep the unit away from the fire or heat source, do not put the waste of the
unit or battery into fire.
When the battery is full charged, please unplug the AC adapter as soon as possible.
Do not frequently run out of battery , avoid affecting the battery life.
Do not forcibly boot after battery runs out ,avoid irreversible damage to the battery.
Use the correct adapter designed for your local voltage (AC 100-240 V)
If the unit is to remain unused for an extended period(more than 7 days), please
ensure that the battery retains a certain amount of electricity , turn off the power
switch to disconnect the lithium battery.
Precaution!Please read the enclosed instruction.
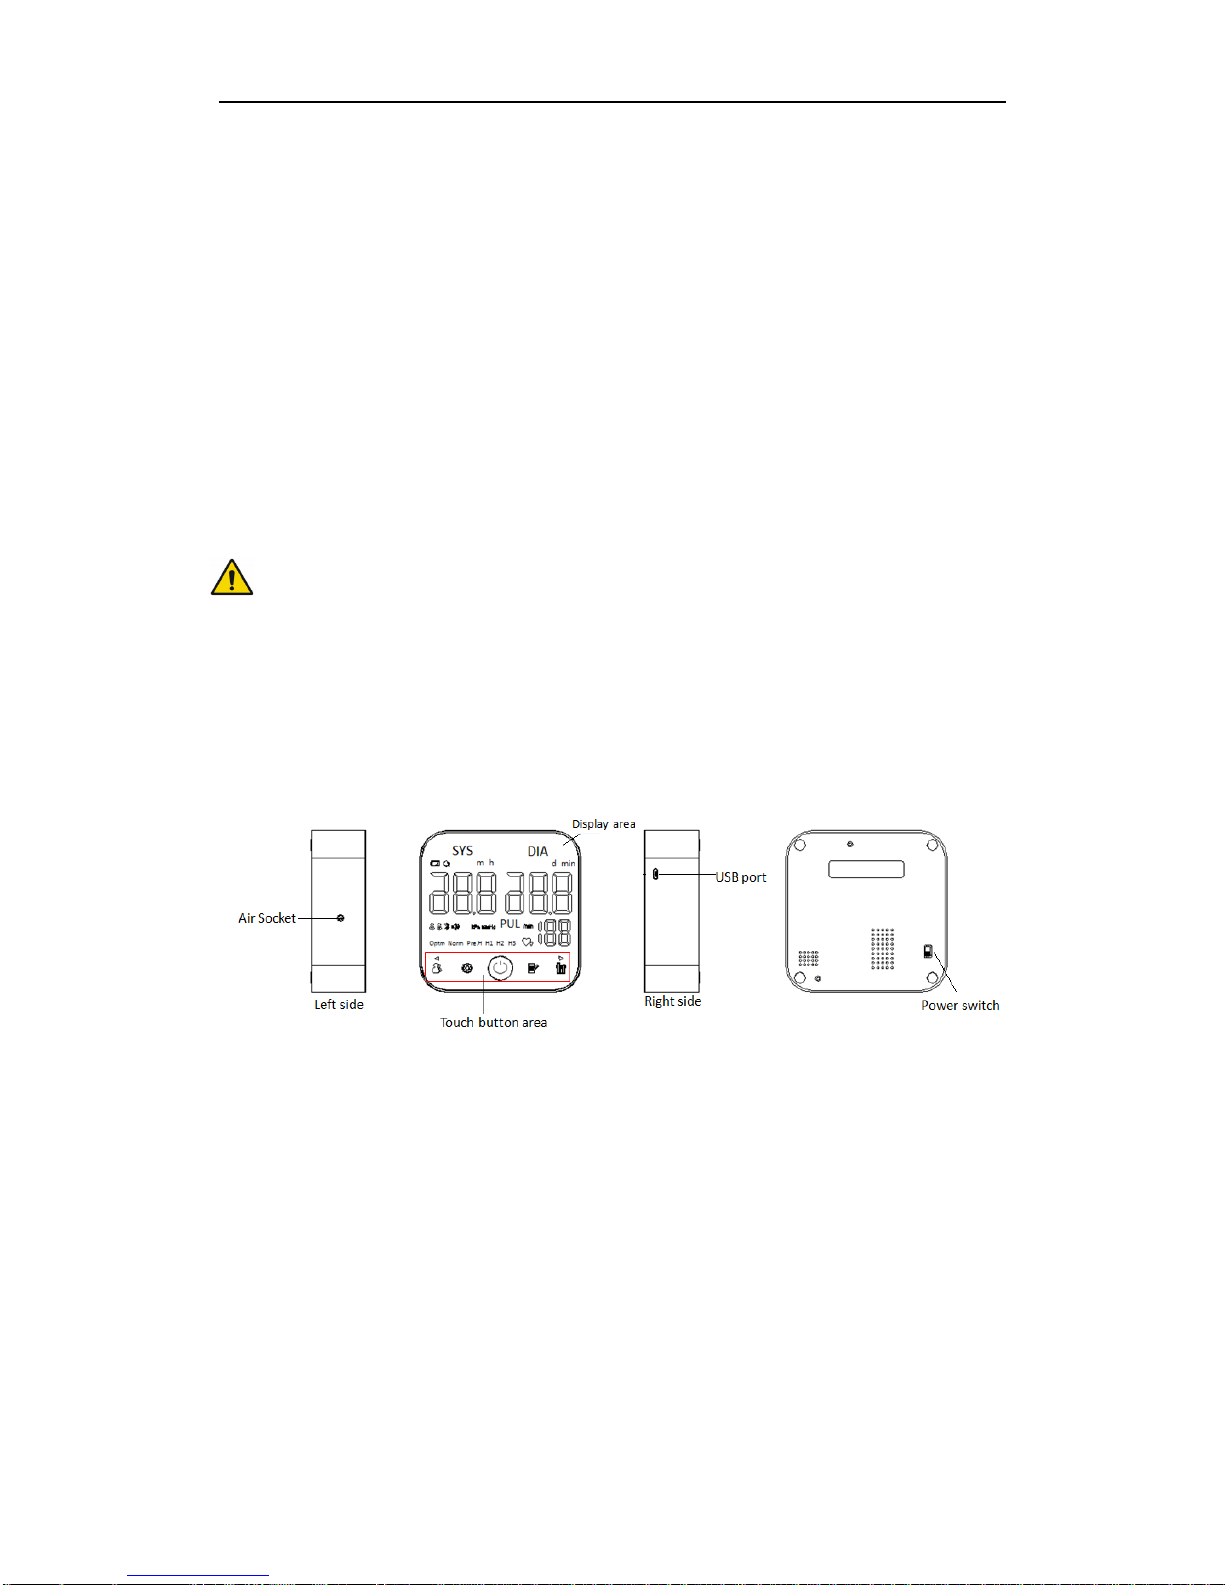
2. Product Feature
Intended Use
It is intended for measuring systolic, diastolic blood pressure and pulse rate of an
adult over the counter.
Body
Fig 1
Cuff(Type BF Applied Part)
Model:BC1000
Applicable Arm Circumference:
BC1000: 22cm to 36cm (8.7in to 14.2in)

Rev. A1
6
Cuff Label
Fig 2
Note:
Symbol for‖TYPE BF APPLIED PART‖
Display
Fig 3
3. Power source
The device is power by lithium battery, and can be charge using USB cable.
Turn on the power switch when first used, the power switch is located at the back side of the
device. When the battery is connected to the unit ,the LED display will lit -up for 3
second ,then the device power off.
When the battery is running low, the battery symbol will turn red and flicker , please connect
the USB cable to charge.
Connect the AC adapter with USB cable to the USB port of the main unit.
Plug the socket into electric outlet.
Use the correct adapter designed for your local voltage (Recommend: Power adapter
specification, AC100-240V, 50/60Hz, 400mA; Output: 5.0V 1.0A.) Which comply IEC
6061-1 standard.
Model: BC××××

Rev. A1
7
Do not plug in multiple plugs into same power outlet.
Use the manufacturer USB cable only.
If the battery is not charged when the low battery symbol is display ,the red battery symbol
will continue display, and the device could not measure. The device will automatic shut off
when the battery voltage is too low.
When the battery is charging, the battery symbol is green and flicker, when the green battery
symbol continues display ,the battery is full charged, unplug the AC adapter to avoid
damaging the battery.
Unplug the AC adapter or wires if the device is damaged.
Do not touch the AC adapter with wet hand.
When operating the unit please do not tangle the power cords.
The battery can not be replaced, when the battery reaches to its lifetime, the device scraped.
The scrapped device and battery should be handled in accordance with the provisions of the
state.
In order to extend the lifetime of lithium battery, turn off the power switch if the unit will not
use for a long time.
Reset the time and date after turn on the power switch.
4. Clock mode
With monitor power off, touch the 【 】 button into the clock mode, display the current
time (hour/minute).(Fig4)
Under any mode, press and hold the 【 】button for 3 seconds will enter the clock mode.
Under the clock mode, press and hold the【 】button for 3 seconds or unattended 3 minutes
will shut off the monitor.
5. First touch mode
Under the clock mode, press the 【 】button to lit up the touch button area,(Fig5) press the
button into next step.
Fig4
Fig5

Rev. A1
8
6. Standby mode
Under the first touch mode, without operation 2s to enter the standby mode, which can
automatically detect the current settings and display the Bluetooth symbol, Horn symbol, blood
pressure unit and user group.(Fig6)
Press the 【 】button or without operation 20s during setting, memory and average value
viewing will return to the standby mode.
7. System Setting
7.1 User conversion
The blood pressure monitor is capable to hold 2 sets of memory data. Select the correct user
group before measurement.
User conversion:
Under the first touch mode and standby mode, press the【 】button will automatically
change the user conversion either from user 1 or user 2.
7.2. Setting
1) Press the【 】button into the setting mode, and Year digits display.
a) Change number.
Press the 【►】button to increase one number.
Press the【◄】button to decrease one number.
Hold down the 【◄】or 【►】button, the number will change rapidly.
b) Enter the digit of year number.(Fig7)
c) Press the 【 】button will proceed to month setting.
d) Repeat step a) to c) to set month, day, hour and minutes.(Fig8 to Fig11)
2) Unit with broadcast.
Fig6

Rev. A1
9
a) Continues the broadcast setting, press the 【◄】or【►】button will
automatically turn on or off the broadcast system as shown on Fig 12 or Fig 13.
b) Press the 【 】button to confirm.
3) Unit coversion (mmHg to kPa ).
a) Press the【◄】or【►】button will automatically change the unit conversion either
from mmHg or kPa as shown on Fig 14 or Fig 15.
b) Press the 【 】button to confirm and return to standby mode.
Time is set to 24 hours.
Press the 【 】button or unattended 20s during setting will stop setting and return standby
mode.
When press the 【 】button to exit during setting, the items had been confirmed will be
saved, the no confirmed items retain original status.
Under the setting mode, press the 【 】button for 3s will enter the clock mode, press the
【 】button for 6s ,the device will be shut off .
8. Take a measurement
8.1. Important Noted
Don't eat, drink alcohol, smoke, take a shower or exercise for at least 30 minutes before you
take your blood pressure and don't use any medicines that can raise blood pressure.
Fig7
Fig8
Fig9
Fig10
Fig11
Fig12
Fig13
Fig14
Fig15

Rev. A1
10
Try not to take your blood pressure if you are nervous or upset. If we are nervous, anxious,
or agitated our blood pressure will rise.
Rest for 5~10 minutes before taking a reading. Sit in a comfortable, relaxed position. Don't
move around or talk while taking the blood pressure. Leave your legs in one position, breath
freely and calmly.
The blood pressure cuff should fit over about 3/4 of your upper arm. It should easily go
around the arm and the Velcro should close tightly.
If you can, use the same arm for every reading.
Measuring blood pressure at the same time on different days should give about the same
reading (excluding outside influences like exercise).
Changes in medication or nutritional supplement can alter your result. Please consult your
doctor before taking or stopping medications or supplement.
8.2. Fitting the cuff
1) Plug in the air tube connector into the main unit
2) Wrap the cuff around the upper left arm or upper right arm.
3) Tighten the cuff around the arm, make sure the cuff is approximately 2cm~3cm (1in~2in)
above the elbow.(Fig 16)
Fig 16
4) Make sure cuff air tube outlet is facing your finger. Do not over tighten. Approximate
one finger should be able to fit underneath the cuff after tightening.
5) Relax, place the elbow on the desk with palm facing up; the cuff should be level with
your heart. If the cuff doesn’t fit your arm, the reading accuracy may be affected.
Do not bend with the cuff or the air tube.
To detach the cuff, unplug the air tube connector from the main unit
Do not inflate prior fitting the cuff.
Change the cuff, if it there is a leakage or if the cuff is not working properly.
Only use the manufacturer cuff to ensure the measurement accuracy.
8.3. Body posture during measurement
Relax, place the elbow on the desk with palm facing up; cuff should be at the heart level (Fig
17).The reading accuracy may be affected if the cuff is not fitted properly. The arm should be
at the same level of your heart. If your arm is too low, your reading will be too high. If your
arm is too high, your reading will be too low.

Rev. A1
11
Fig 17
8.4. Take Measurement
After setting and wearing the cuff, the unit is ready for measurement:
1) For the most accurate result please relax, do not smoke, take deep breath, speak loudly
or move around during the measurement.
2) Press the 【 】 button under the first touch mode or standby mode to start the
measurement.
3) The "0" on the diastolic pressure position is flashing ,the monitor will send out a
broadcast and the cuff is inflated.(Fig18).
4) Pressure gradually increased, the current pressure is displayed on the diastolic pressure
position .When the device detects a pulse, the heart symbol will flash as shown on Fig
19. The cuff inflates, and your pulse and blood pressure measurement is taken.
5) If the cuff is too loose, the cuff self-test symbol will flash for 30 seconds, at this case,
please confirm the cuff is wrapped up correctly, and take the measurement again.
6) When completing the test, the cuff will automatically deflate and the test result will
display on the screen , the device will broadcast the result. WHO blood pressure level
(Optm, Norm, Pre.H, H1,H2,H3) display from left to right,(Fig 20) and then the level
not for the test disappear from right to left, only the blood press level for the
measurement display on the screen as show on Fig21. The blood pressure level
classification and definition as show in Table 1.
7) You may turn off the unit or compare with the previous results.
8) If a problem occurs during the test, ―Err‖ will display on the screen.
9) In the end of measurement, ― ‖ will display on the screen when irregular pulse is
detected.
10) Complete the measurement, press the 【 】button to take a measurement again; Press
down the 【 】button for 3s to return the standby mode.
11) Press down the【 】button exceed 6s to shut off the unit, or automatic shut off without
operation for 3min.

Rev. A1
12
8.4.1 The blood pressure level indicator
Please refer to Table 1 for the blood pressure level classification and definition.
Table 1
WHO Blood pressure level
Blood pressure range
Severe hypertension (H3)
Systolic≥180mmHg or/and Diastolic≥110mmHg
Moderate hypertension (H2)
Systolic≥160mmHg or/and Diastolic≥100mmHg
Mild hypertension (H1)
Systolic≥140mmHg or/and Diastolic≥90mmHg
Prehypertension(Pre.H)
Systolic≥130mmHg or/and Diastolic≥85mmHg
Normal (Norm)
Systolic≥120mmHg or/and Diastolic≥80mmHg
Optimal (Optm)
Systolic <120mmHg and Diastolic <80mmHg
Notes:
Do not self-diagnosis according to measurement results. Follow the instructions of your
physician or licensed healthcare provider.
If the device caused any discomfort during measurement or fail to perform as indicated, press
the 【 】button to discontinue measurement.
The time of the pressure reduced from 260mmHg (34.67kPa) to 15mmHg (2kPa) does not
exceed 10s.
If cuff inflated up to 300 mmHg (40 kPa) doesn’t stop, please remove the cuff or power off
the unit.
8.4.2. Broadcast Function
Broadcast will automatically start at following situations:
Table 2 Broadcast Context
Broadcast Situation
Broadcast Content
1. During
Measurement
1) at the beginning of
measurement:
(1) ―Put the cuff at the same level as your heart,
don’t move and keep. quiet‖;
(2) ―It is ok, let`s begin.‖;
2) in case of error
(1) ―Error. please measure again.‖;
3) measurement
completed
(1) notification tone
(2) ―The measure result is:‖;
(3) ―Your systolic pressure is‖ + measured systolic
value + ―Millimeter of mercury/Kilopascal.‖;
Fig18
Fig19
Fig20
Fig21

Rev. A1
13
(4) ―Your diastolic pressure is‖ + measured diastolic
value + ―Millimeter of mercury/Kilopascal.‖;
(5) ―Your pulse is‖ + measured pulse value + ―pulse
per minute.‖;
(6) ―According to World Health organization
standard, your blood pressure level is
optimal/normal/pre_hypertension/mild_hypertension/
moderate_hypertension/severe_hypertension.‖;
2. Data Review
1) reviewing average
value:
(1) ―Your average for the last three times:‖;
(2) ―Your systolic pressure is‖ + measured systolic
value + ―Millimeter of mercury/Kilopascal.‖;
(3) ―Your diastolic pressure is‖ + measured diastolic
value + ―Millimeter of mercury/Kilopascal.‖;
(4) ―Your pulse is‖ + measured pulse value + ―pulse
per minute.‖;
2) reviewing measured
value:
(1) ―The measure result is‖
(2) ―Your systolic pressure is‖ + measured systolic
value + ―Millimeter of mercury/Kilopascal.‖;
(3) ―Your diastolic pressure is‖ + measured diastolic
value + ―Millimeter of mercury/Kilopascal.‖;
(4) ―Your pulse is‖ + measured pulse value + ―pulse
per minute.‖;
3. Low Battery
1) in case of low battery
―Low battery, please charge the battery‖
Note:
―/‖ means ―OR‖
text in ―‖ is detail content of broadcast
8.5. Average value
1) Press the 【 】button to read the average value.
2) The screen will display the average data of the most recent 3 sets as show on Fig22 and
broadcast the data.
3) Press the 【 】button to change user group.
Press the 【 】button when viewing the average value, the average data will flick
and the device broadcasts the data again.
Without any operation for 20s, the unit will automatically turn to standby mode.
Under average value mode, press down the 【 】button for 3s to return the clock
Fig22

Rev. A1
14
mode, press down the 【 】button exceed 6s to shut off the unit.
8.6. Memory
The Memory 1 and Memory 2 can hold up to 60 readings each.
1) Enter the memory reading mode.
Press the 【 】 button to enter the memory reading mode.
2) Read the memory values.
Under the Memory reading mode, press 【►】button to view the latest value to the
earliest value. Press the【◄】button to view the earliest value to the latest value.
a) Enter the memory reading mode, the month, day and data number of the memory
data being viewed will display for 1s,(Fig23) and then turns to b).
b) Hour, minute and data number of the memory data being viewed will display for
1s,(Fig24) and then turns to c).
c) Display the systolic, diastolic, pulse rate and the blood pressure level as show on
Fig25. Press the 【 】 button to return a).
When viewing the memory, if the result shows the heart mark, it is suggested that the
irregular pulse is detected.
.Refer 7.1 to change user group.
Without any operation for 20s, the unit will automatically turn to standby mode.
Under memory reading mode, press down the 【 】button for 3s to return the
clock mode, press down the 【 】button exceed 6s to shut off the unit.
3) Delete the memory values
a) Enter the memory reading mode.
b) Press and hold the 【 】 button until the ―—― displays.
c) The unit will only delete the present memory data set, the other memory data set
will not be affected.
d) The device is not capable to delete a single data.
Fig23
Fig24
Fig25

Rev. A1
15
9. Data transmission
The Bluetooth function of Blood pressure monitor turns on automatically simultaneously
with device’s powering on, which can be searched by corresponding app used for
physiological indexes management on Mobile phone for data transportation.
10. Power off
(1)Under the clock mode, press the 【 】button for 3s.
(2)Press and hold the 【 】button for 6s except the clock mode.
(3)While completing the measurement or under the standby mode, without operation for
3min, the device will automatically shut off.
11. Error Indication
List of Error code.
Error
Cause
How to correct
cuff self-test
symbol
Power on, cuff inflation rate is
too low or main unit does not
connect with the cuff.
(1) Reconnect the air tube connector with
the main unit .
(2) Cuff or bladder leakage, if necessary
purchased a new one.
(3) Confirm the cuff is wrapped up
correctly (ref 8), retake the measurement .
Er 02
Weak Signal or cuff is too
loose;
Heavy shock during the
measurement;
Bad Signal,moving or
talking during the
measurement;
Abnormal measurement
results.
Cuff too loose,Confirm the cuff is
wrapped up correctly(ref 8)retake the
measurement.
Remain still, retake the measurement
(ref 8)
Remain still, retake the measurement.
Cuff should be at the heart level, quiet
and relaxed when measuring.
Lo
Low battery power, cannot
inflate
Charge the battery(ref 3).
12. Trouble Shooting
When the unit encounters malfunction during the use, refer to table below:

Rev. A1
16
Abnormal
How to correct
Press the 【 】button, the LED
without any display.
(1) Check the power switch is turn on.
(2) Connect the USB cable to charge the unit ,then try
again.
Measured value are abnormally
high or low
(1) Confirm the cuff is wrapped up correctly。
(2) If the user clothing restricts the normal flow, please
remove the obstructing clothing and retake the
measurement
(3) Relax, place the elbow on the desk with palm facing up;
cuff should align with heart level. Retake the
measurement
Cuff inflation rate is too low or
does not inflate
(1)Reconnect the air tube connector with the main unit
(2)Cuff or bladder leakage, if necessary purchased a
new one.
Cuff deflates too quickly.
(1)Cuff too loose,confirm the cuff is wrapped up
correctly.
Measure value is different from the
hospital or the value is inconsistent
(1)Blood pressure value is varied during the day which
also will affect by the human emotional and physical
condition
(2)Record the variance and consult to the doctor
*If the above suggestion doesn’t remediable, please consult the manufacturer.
13. Environment protection
The battery can not be replaced, when the battery reaches to its lifetime, the device scraped.
The scrapped device and battery should be handled in accordance with the provisions of the state.
The device is not recommended to continue to use after the battery reach to it’s lifetime, avoid
effecting the user and environment.
Affect the measurement results.
Low battery will lead to inaccurate measurement results .
May cause battery leakage, environment pollution.
14. Specification
Description
Arm automatic blood pressure
monitor
Model
BF5000B
Display
LED Digital Display
Measuring
principle
Oscillometric Method
Measurement
Range
Pressure: 0mmHg~280mmHg
(0kPa~37.3kPa)
Pulse: 40 pulse/min ~180 pulse/min
Accuracy
Pressure : ±3mmHg (±0.4kPa)
Pulse: ±5%
Memory
2 Memory sets, 60 reading each set.
Automatic
power off
Unattended 3 minutes
Power source
Lithium battery(DC3.7V,1800mA)
Data
transmission
Bluetooth
Protection
against
Type BF
IP
classification
IP21

Rev. A1
17
electric shock
Mode of
operation
Continuous
Applied part
Cuff
Operating
Environment
Temperature:+5℃~+40℃;
Humidity:15%~93%
Pressure: 70.0kPa~106.0kPa
Altitude: ≤3000 m
Storage and
transport
Environment
Temperature:-25℃~+70℃;
Humidity:10%~95%
Pressure:50.0kPa~106.0kPa
Weight
382g
Size
120 mm×120mm×40mm
Life time
(Body)
Body
10000 times
Contents
·Cuff
·USB cable
·Storage case (Optional)
·Instruction Manual
Cuff
10000 times
This unit is intended for home use and the specification may be changed without prior notice.
This device complies with Part 15 of the FCC Rules. Operation is subject to the following two
conditions:
(1) This device may not cause harmful interference, and
(2) This device must accept any interference received, including interference that may cause
undesired operation
Note: This equipment has been tested and found to comply with the limits for a Class B digital
device, pursuant to Part 15 of the FCC Rules. These limits are designed to provide reasonable
protection against harmful interference in a residential installation. This equipment generates, uses,
and can radiate radio frequency energy, and if not installed and used in accordance with the
instructions, may cause harmful interference to radio communications. However, there is no
guarantee that interference will not occur in a particular installation. If this equipment does cause
harmful interference to radio or television reception, which can be determined by turning the
equipment off and on, the user is encouraged to try to correct the interference by one or more of
the following measures:
–Reorient or relocate the receiving antenna.
–Increase the separation between the equipment and receiver.
–Connect the equipment into an outlet on a circuit different from that to which the receiver is
connected.
–Consult the dealer or an experienced radio/TV technician for help.
You are cautioned that changes or modifications not expressly approved by the party responsible
for compliance could void your authority to operate the equipment.
The device complies with RF specifications when the device used at 0mm form your body.

Rev. A1
18
Disposal
This product must not be disposed together with the domestic waste.
All users are obliged to hand in all electrical or electronic devices, regardless of whether or not
they contain toxic substances, at a municipal or commercial collection point so that they can be
disposed of in an environmentally acceptable manner.
Please remove the battery before disposing of the equipment. Do not dispose of old batteries with
your household waste, but dispose of them at a battery collection station at a recycling site or in a
shop.
Consult your municipal authority or your dealer for information about disposal.
8. About Blood Pressure
8.1. What is Blood Pressure?
Blood pressure (BP) is the pressure exerted by circulating blood upon the walls of blood vessels,
and is one of the principal vital signs.
Two pressures are measured for a blood pressure reading:
Systolic blood pressure is a measure of blood pressure while the heart is beating.
Diastolic pressure is a measure of blood pressure while the heart is relaxed.
8.2. What is high blood pressure?
High blood pressure, also known as HBP or hypertension, is a widely misunderstood medical
condition. Some people think that those with hypertension are tense, nervous or hyperactive, but
hypertension has nothing to do with personality traits. The truth is, you can be a calm, relaxed
person and still have HBP. Let's look at the facts about blood pressure so you can better
understand how your body works and why it is smart to start protecting yourself now, no matter
what your blood pressure numbers are.
By keeping your blood pressure in the healthy range, you are:
Reducing your risk of your vascular walls becoming overstretched and injured
Reducing your risk of your heart having to pump harder to compensate for blockages
Protecting your entire body so that your tissue receives regular supplies of blood that is rich in
the oxygen it needs.
According to World Health organization standard, the blood pressure level classification and
definition as following:
Category
Systolic(mmHg)
Diastolic(mmHg)
Desirable
120 and
80
Normal
120-129 and/or
80-84
Pre hypertension
130-139 and/or
85-89
Hypertension:
≥140 and/or
≥90
Stage 1 Hypertension
140-159 and/or
90-99

Rev. A1
19
Stage 2 Hypertension
160-179 and/or
100-109
Hypertensive Crisis
≥180 and/or
≥110
These categories were defined by the American Heart Association. This chart applies to adults
age 20 and older.
8.3. What is morning hypertension (morning surge)?
Morning high blood pressure or morning surge is defined as the weekly average for morning
blood pressure reading measured within 1 hour to 2 hours after awakening in the morning and
exceeding 135/85mm Hg. Studies have shown that exaggerated morning blood pressure surge is a
risk for cardiovascular events which includes ischemic and hemorrhagic stroke. Cardiovascular
events have been shown to be exaggerated in the morning to coincide with morning high blood
pressure. In fact heart attack, stroke and heart failure have been shown to fall particularly on a
Monday amongst all the other days of the week.
Organ damage and diabetic complications have also been shown to be linked with morning blood
pressure surges just in the same way as small artery disease and multiple cerebral infarcts in elder
members of society. Morning high blood pressure has shown some correlation with initial stage
and progression of atherosclerosis. Patients with well controlled blood pressure may still have
high morning blood pressure and this happens in 50% of the cases. Patients with morning
hypertension have a 78% more chance of stroke compared with 48% of other hypertensive
patients without morning high blood pressure. Morning hypertension has also been associated
with changes in heart size and rhythm. This may lead to heart attack or heart failure.
Morning Hypertension can only detect within 1 hour to 2 hours after awakening, recommended
user monitor their own blood pressure at home.
Reference Standard
·IEC 60601-1:2005+A1:2012 Medical electrical equipment - Part1: General requirements for
safety and essential performance.
·IEC 60601-1-2:2014 Medical electrical equipment - Part1-2: General requirements for basic
safety and essential performance - Collateral standard: Electromagnetic compatibility –
Requirements and tests
·IEC 80601-2-30:2009+A1:2013 Medical electrical equipment - Part 2-30: Particular
requirements for the basic safety and essential performance of automated non-invasive
sphygmomanometers.
·ANSI/AAMI/ISO 81060-2:2009 Non-invasive sphygmomanometers - Part 2:Clinical validation
of automated measurement type

Rev. A1
20
Blood Pressure Measurement Chart
Date
Time
SYS/DIA
Pulse
Remark
Date
Time
SYS/DIA
Pulse
Remark
Guarantee Card
Product Model
Product SN
Date of Purchase
Distributor
Customer Name
Tel
Address
Details of the faults:
Warranty Rule
·The unit of this product is guaranteed by PUMP for a period of 1year after the date of
purchase.
·The guarantee does not cover any of the following:
-- Risks of transport.
-- Damages caused by the operating environment which is not in accordance with the
product requirements.
-- Defects resulting from repair by unauthorized persons.
-- Damages caused by user whom disassemble or modify the structure of the unit and
damage the safety performance.
-- Product guarantee card is not accord with the serial number or the guarantee card is
changed
·This product is medical device, to ensure the accuracy of the product when using it, we
would like to continue to provide you with paid services after the guarantee periods.
Table of contents
Other SHENZHEN PUMP MEDICAL SYSTEM Blood Pressure Monitor manuals