Shenzhen VDWALL A63 User manual

SHENZHEN VDWALL CO.,LTD www.videowall.cn
ADD: Room 1001,10th Floor, Tower 4, Fangda-City, Longzhu 4th Road,
Nanshan District, Shenzhen, China TEL: 0755-26750210
____
________________________
______________________
______
A63
User Quick Setup Guide
@
Configure Mode 0 (CfgM0)
1
A63 User Quick Setup Guide
@Configure Mode 0(CfgM0)
(Version 1.1)
Shenzhen VDWALL Co.,Ltd
2020.03
SHENZHEN VDWALL CO.,LTD www.videowall.cn
ADD: Room 1001,10th Floor, Tower 4, Fangda-City, Longzhu 4th Road,
Nanshan District, Shenzhen, China TEL: 0755-26750210
____
________________________
______________________
______
A63
User Quick Setup Guide
@
Configure Mode 0 (CfgM0)
2
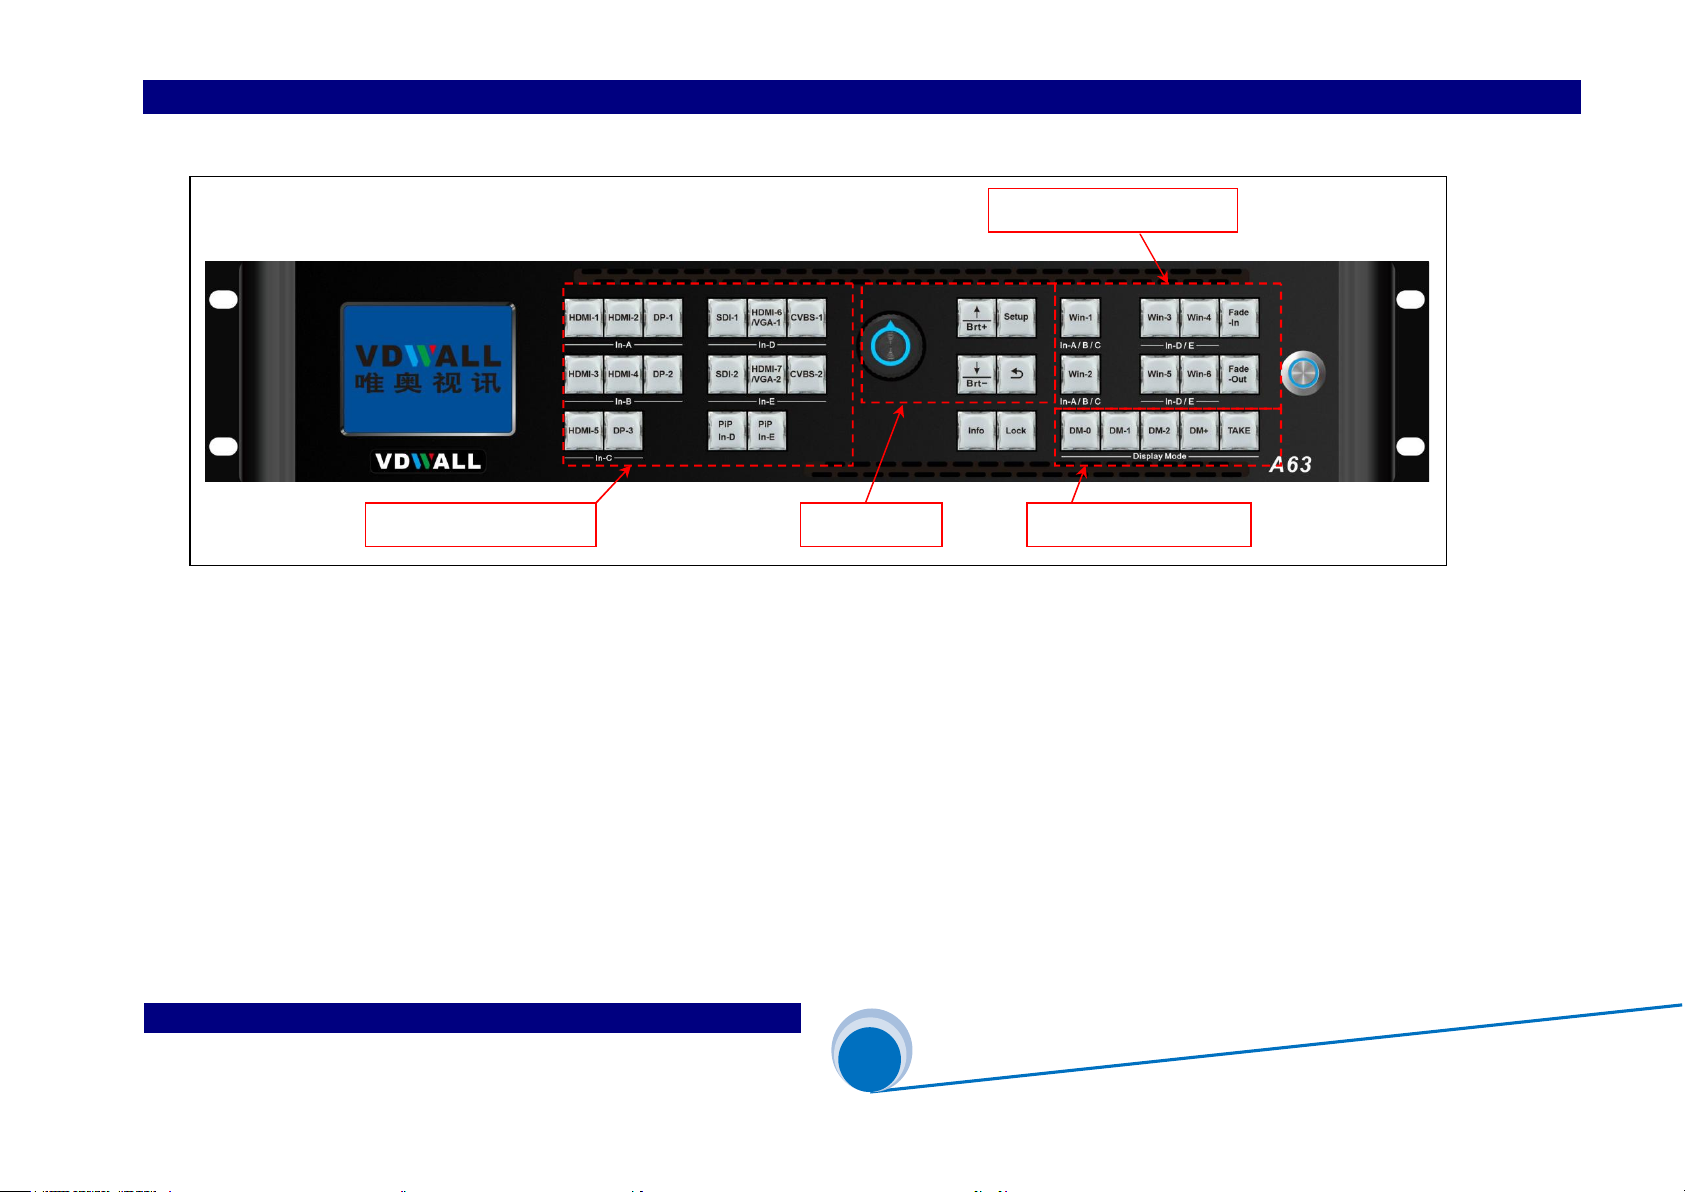
1. Front Button Description
Multi-window operation
Display mode button
Input signal selection
Menu setup

SHENZHEN VDWALL CO.,LTD www.videowall.cn
ADD: Room 1001,10th Floor, Tower 4, Fangda-City, Longzhu 4th Road,
Nanshan District, Shenzhen, China TEL: 0755-26750210
____
________________________
______________________
______
A63
User Quick Setup Guide
@
Configure Mode 0 (CfgM0)
3
Category
Buttons Description
Input signal
selection
HDMI-1、HDMI-2、 DP-1、
SDI-1、HDMI-6、CVBS-1、
HDMI-3、HDMI-4、 DP-2、
SDI-2、HDMI-7、CVBS-2、
HDMI-5、DP-3
A63 contains 5 input cards,identified as:In-A、In-B、In-C、In-D and In-E. In-A、In-B can access
4K or 2K signal,In-C only support 4K2K signal,In-D、In-E support 2K signal. Press corresponding
button to select input channel for each input card, if selected channel have valid signal, button
light indicator on, or else, light indicator flicker
PIP In-D、 PIP In-E
In-D、In-E card support PIP/POP(dual image) function. Press this button directly,button indicator
will light up,PIP/POP function will be activated for associated input card. Henceforth, select the
sub-image signal.
Multi-win
operation
button
Win-1、
Win-3、
Win-4、
Win-2、 Win-5、 Win-6
Window selection button. A63 provides 6 windows display simultaneously,identified as Win1、
Win2、 Win3、 Win4、Win5、Win6. In CfgM0,user just configure Win2、Win5 and Win6 essentially
Fade-In、 Fade-Out
Fade-Out , assign window on top; Fade-In, assign window at bottom. In CfgM0, both buttons are
invalid
Lock
Info button
Lock
Button lock. When this button light up,all button will be invalid except Lock button itself, hence
avoid misoperation. Press this button 3 times continually to exit button lock mode, button indicator
will light off.
Info
Information button,display A63 configuration data and software version etc, press this button to
turn page. In Cascading mode, when slave A63 GenLock successfully locked, Info button light up,
or else flicker
SHENZHEN VDWALL CO.,LTD www.videowall.cn
ADD: Room 1001,10th Floor, Tower 4, Fangda-City, Longzhu 4th Road,
Nanshan District, Shenzhen, China TEL: 0755-26750210
____
________________________
______________________
______
A63
User Quick Setup Guide
@
Configure Mode 0 (CfgM0)
4
Category Buttons Description
Menu setup
button
Setup Menu button. When A63 in operation mode,press this button to enter menu setup
Ok
Knob button, rotate this button to change configuration value or press this button to confirm and apply
configuration
Up and Down selection button. After enter menu setup, press this button to select menu item.
When A63 in operation mode, press this button directly to adjust output image brightness.
Return button. Press this button to exit present menu and return to previous menu,
until A63 exit menu setup and enter operation mode.
Display mode
select button
DM-0、 DM-1、DM-2
Display mode selection button. Preset display mode parameters include: window composition,window
signal source,window overlay sequence,window size&position,In operation mode, press DM-0、
DM-1、DM-2 to switch different display mode;In menu setup mode,press DM-0、DM-1、DM-2 so as
to save present setup parameters automatically at target mode.
DM+
Extended display mode selection button,press this button to enter more preset mode selection menu, the
menu includes:DM0、DM1、DM2、DM3、 DM4、DM5、DM6、DM7、 DM8、DM9、DM10、
DM11. Select target display mode by pressing ↓、↑ button.
TAKE When A63 in switcher mode(CfgM0), “Preselect+TAKE” switching is available. In Take switching mode,
user can quickly switch display mode between main output(Out B) and preview output(Out A) without
latency.

SHENZHEN VDWALL CO.,LTD www.videowall.cn
ADD: Room 1001,10th Floor, Tower 4, Fangda-City, Longzhu 4th Road,
Nanshan District, Shenzhen, China TEL: 0755-26750210
____
________________________
______________________
______
A63
User Quick Setup Guide
@
Configure Mode 0 (CfgM0)
5
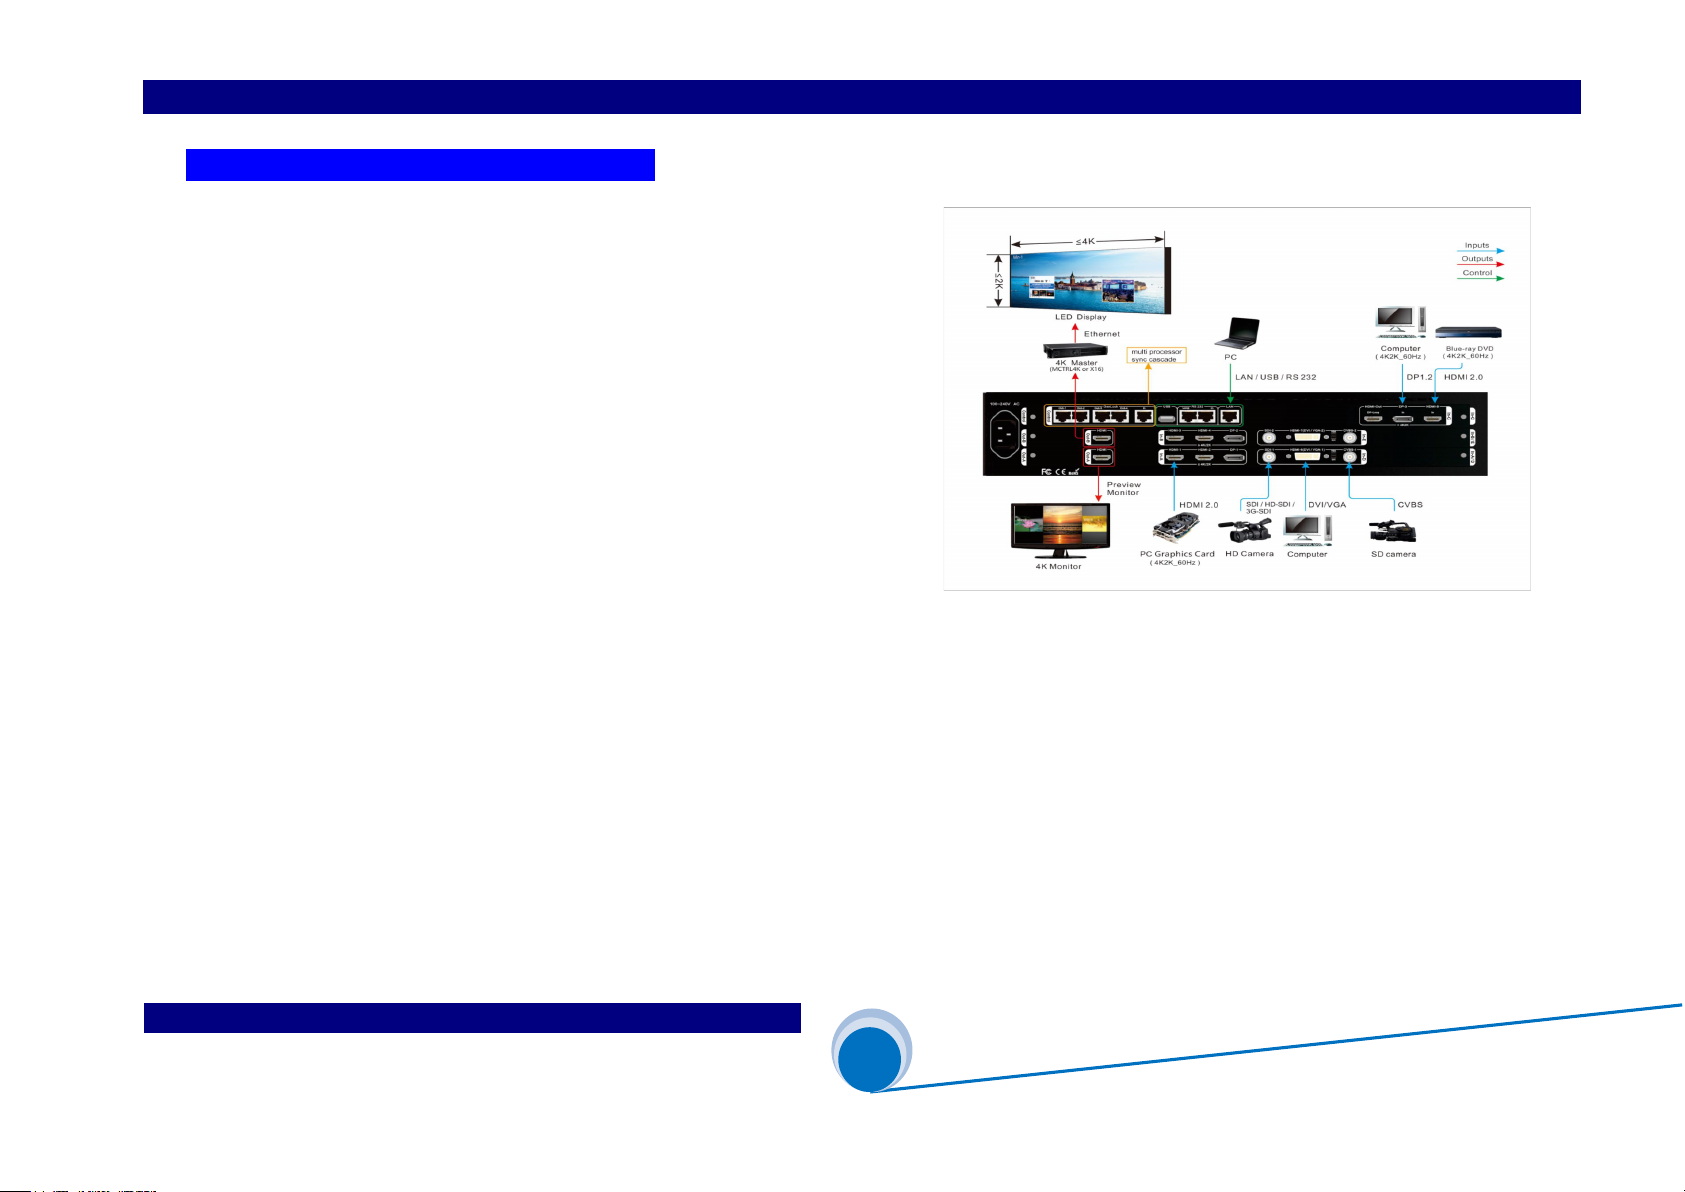
2. Back Panel Port Description
1) Input signal port
A63 can build in 5 input cards utmost:
In-A、In-B is 4K input card,each card contains HDMI2.0×2 and DP1.2×1,support 4K2K_60Hz UHD Signal and 2K HD signal access in
In-C is 4K input card,contains HDMI2.0×1 and DP1.2×1,only support 3840*2160_60/50/30/25/24 Hz UDH signal
In-D、In-E is 2K input card,each card consists of CVBS×1、3G-SDI×1、HDMI(DVI / VGA)×1 ,HDMI version is 1.3 . HDMI input port is compatible with DVI、VGA
signal,when access in VGA signal,set the DIP switcher to VGA side.
2) Output signal port
A63 provides 2 HDMI output port,identified as OUT-A、OUT-B. Both ports support output resolution 3840*2160_60Hz or 3840*2160_50Hz
In configuration mode 0(CfgM0), Out-A is preview output, Out-B is main output
GenLock Cascading port
Communication port
Ou
tput port
Input port

SHENZHEN VDWALL CO.,LTD www.videowall.cn
ADD: Room 1001,10th Floor, Tower 4, Fangda-City, Longzhu 4th Road,
Nanshan District, Shenzhen, China TEL: 0755-26750210
____
________________________
______________________
______
A63
User Quick Setup Guide
@
Configure Mode 0 (CfgM0)
6
3) Communication port
LAN:TCP / IP Enthernet control port
USB and RS232 control port
4) GenLock Cascading port
A63 support multi-device cascading,realize extended input and output resolution driving
In cascading mode, slave A63 receive synchronous command from master A63 VIA GenLock In port, master A63 send out synchronous command VIA GenLock Out port .
A63 provides Out-1、Out-3、Out-3、Out-4 total 4 GenLock output,supports 5 device cascading.

SHENZHEN VDWALL CO.,LTD www.videowall.cn
ADD: Room 1001,10th Floor, Tower 4, Fangda-City, Longzhu 4th Road,
Nanshan District, Shenzhen, China TEL: 0755-26750210
____
________________________
______________________
______
A63
User Quick Setup Guide
@
Configure Mode 0 (CfgM0)
7
3. In CfgM0 Mode, A63 Image Processing Procedure
Win1
Win2
Win3
Win4
S1: Input signal selection
S2: Window signal selection
Win5
Win6
1 from 2
1 from 2
1 from 2
1 from 2
Out-B
S3: Window size&position setup
2160
Win2
Win5
Win6
2160
3840
Win1
3840
Out-A
Win3
Win4
2K input
In-D
SDI-1
HDMI-6
CVBS-1
2 from 3
2K input
In-E
SDI-2
HDMI-7
CVBS-2
2 from 3
4K input
In-C
HDMI-5
DP-3
DP-Loop
4K input
In-B
HDMI-3
HDMI-4
DP-2
4K input
In-A
HDMI-1
HDMI-2
DP-1
1 from 3 1 from 3
1 from 3
1 from 2
1 from 3

SHENZHEN VDWALL CO.,LTD www.videowall.cn
ADD: Room 1001,10th Floor, Tower 4, Fangda-City, Longzhu 4th Road,
Nanshan District, Shenzhen, China TEL: 0755-26750210
____
________________________
______________________
______
A63
User Quick Setup Guide
@
Configure Mode 0 (CfgM0)
8
Description:
1) A63 image processing procedure is divided into 3 main steps:
S1:Select input signal channel for input card
S2:Select signal source for Multi-window
S3:Adjust size&position of Multi-window
2) Select input signal channel for input card(S1)
2.1)A63 contains 3 types of input card:
4K input card:In-A 、In-B
4K direct input card:In-C
2K input card:In-D、In-E
2.2) In-A support both 4K and 2K input,select one channel from HDMI-1、HDMI-2 or DP-1 for In A
2.3) In-B support both 4K and 2K input,select one channel from HDMI-3、HDMI-4 or DP-2 for in B
2.4) In-C is direct 4K input,can only access in 3840×2160_60Hz/50 Hz/30 Hz/25 Hz/24Hz/23Hz standard 4K UHD signal,
select HDMI-5 or DP-3 for In C
2.5)In-D is 2K input card,can select signal from SDI-1、HDMI-6 or CVBS-1. when open PIP-D,can select one another channel as sub image
2.6)In-E is also 2K input card,can select signal from SDI-2、HDMI-7 or CVBS-2. when open PIP-E,can select one another channel as sub image
2.7)All the signals mentioned above can be selected by A63 front panel button
3) Select signal source for each window(S2)
3.1) A63 supports 6 windows display,identified as:Win1、Win2、Win3 、Win4、Win5 、Win6
3.2) Win1、Win2 can select signal source from In-A、In-B or In-C
3.4) Win3、Win4、Win5、Win6 can select signal source from In-D or In-E

SHENZHEN VDWALL CO.,LTD www.videowall.cn
ADD: Room 1001,10th Floor, Tower 4, Fangda-City, Longzhu 4th Road,
Nanshan District, Shenzhen, China TEL: 0755-26750210
____
________________________
______________________
______
A63
User Quick Setup Guide
@
Configure Mode 0 (CfgM0)
9
4) Adjust size&position of each window(S3)
4.1)Out – A display Win2、Win5、Win6 image
4.2)Out – B display Win1、Win3、Win4 image
4.3)In CfgM0 mode,just set Win2、Win5、Win6 image size&position,among which:
Win2 can randomly set image size&position within 4K2K
Win6 can set image size&position within 2K2K
When Win6 is open,Win5 can only set size& position within2K2K on left side of Win 6
When Win6 is closed,Win5 can randomly set image size&position within 4K2K

SHENZHEN VDWALL CO.,LTD www.videowall.cn
ADD: Room 1001,10th Floor, Tower 4, Fangda-City, Longzhu 4th Road,
Nanshan District, Shenzhen, China TEL: 0755-26750210
____
________________________
______________________
______
A63
User Quick Setup Guide
@
Configure Mode 0 (CfgM0)
10
4. Menu Setup
A63 supports 3 configuration mode:
Configuration mode 0(CfgM0) ------ Switcher mode
Configuration mode 1(CfgM1) ------ Mosaic mode
Configuration mode 2(CfgM2) ------- 4 image mode
Detailed description of 3 configuration mode please refer to
《A63 configuration mode definition》
When A63 in operation mode,Press Setup button to enter setup menu,
press ↑ 、↓ and Setup enter “8.1 Config Mode ”
Rotate Knob to select target configuration mode
Then press ↓ button,enter “8.3 Reset Data ”,press OK to apply,
A63 will automatically reboot and apply the selected configuration mode
Usually no need change A63 configuration mode unless in essential
Usually,user need adjust “ 8.2 Resolution ”. A63 provides 2 output resolution:
3840×2160_60H、3840×2160_50Hz
When apply “ 8.3 Reset Data ” ,all existed configuration data in A63 will be initialized and reset to default values.
In the following paragraph, we will illustrate configuration mode 0(CfgM0)step by step
8. System
--------------------------------------
8.1 Config Mode CfgM1 CfgM0 ?
8.2 Resolution 3840×2160_60Hz
8.3 Reset Data OK To Apply
--------------------------------------
(Switcher)
(OutA=PV OutB=PG)
Figure 4-1
SHENZHEN VDWALL CO.,LTD www.videowall.cn
ADD: Room 1001,10th Floor, Tower 4, Fangda-City, Longzhu 4th Road,
Nanshan District, Shenzhen, China TEL: 0755-26750210
____
________________________
______________________
______
A63
User Quick Setup Guide
@
Configure Mode 0 (CfgM0)
11
(Step1):Input And Output Signal Conection
1.1) Connect input signal to A63 input card
1.2) Connect OUT-B to main display device(LED 4K controller or 4K LCD etc,)
1.3) Connect OUT-A to 4K LCD monitor
1.4) Usually,system connection as Figure 4-2:
Figure 4-2

SHENZHEN VDWALL CO.,LTD www.videowall.cn
ADD: Room 1001,10th Floor, Tower 4, Fangda-City, Longzhu 4th Road,
Nanshan District, Shenzhen, China TEL: 0755-26750210
____
________________________
______________________
______
A63
User Quick Setup Guide
@
Configure Mode 0 (CfgM0)
12
(Step2):PowerOn Processor
2.1) A63 power on, wait for boot up
2.2) As Figure 4-3,Configuration mode 0 boot up image
2.3) “ Win-M4 ” is the window group of current display,Out-A output image
is composed of Win2 + Win5 + Win6
2.4) Win2 select In-A as signal source
Win5 select In-D as signal source
Win6 select In-D as signal source
2.5) “ PV=DM1 ” stands for preview(Out-A), display mode 1(DM1)
“ PG=DM0 ” stands for main output(Out-B), display mode0(DM0)
(Step3):Select Input Signal
3.1)Press signal selection button to select input signal channel
3.2)If selected channel have valid signal, button indicator will light up, or else, button indicator will flicker
3.3)If selected signal channel have valid signal, A63 LCD will display the input signal format
3.4)Press PIP In-D button to activate In-D PIP/POP function,select the sub image signal source for In-D
3.5)Press PIP In-E button to activate In-E PIP/POP function,select the sub image signal source for In-E
Figure 4-3
In-A:HDMI1
In-B:HDMI3
In-C:HDMI5
In-D:HDMI6 PIP:off
In-E:HDMI7 PIP:off
--------------------------------------------
Config Mode: CfgM0(Switcher)
Out-A: Win-M4(Win2 + Win5 + Win6)
Input Card: Wi(In-A In-D In-D)
Display Mode: PV=DM1 PG=DM0
SHENZHEN VDWALL CO.,LTD www.videowall.cn
ADD: Room 1001,10th Floor, Tower 4, Fangda-City, Longzhu 4th Road,
Nanshan District, Shenzhen, China TEL: 0755-26750210
____
________________________
______________________
______
A63
User Quick Setup Guide
@
Configure Mode 0 (CfgM0)
13
(Step4):Window Composition Setup
4.1) Press Setup 、↓、↑ button enter menu 3.1 Win Mode ”
4.2) Press DM-0 、DM-1 or DM-2 to select target display mode,
As the Figure 4-4,A63 current display mode is “DM-0” ,
Press M+ button for more display mode
4.3)Rotate Knob to select display mode
A63 provides 5 multi-window display mode:
Figure 4-4
3.Out-A Win Picture DM0
------------------------------------------
3.1 Win Mode Win-M4 ?
3.2 Win2 Source In-A
3.3 Win5 Source In-D
3.4 Win6 Source In-D
3.5 Null
3.6 Pos.&Size >>
3.7 Border >>
3.8 Color & Brightness, etc >>
显示模式:
Display mode
Multi-win mode Window group
(PIP or POP)
Remarks
Win-M0 Win2 Win5 /Win6 Off
Win-M1 Win5 Win2/Win6 Off ,Win5 can set
size&position within 4K2K
Win-M2 Win2 + Win5 Win6 Off, Win5 can set size&position
within 4K2K
Win-M3 Win5 + Win6 Win2 Off,Win5 on left side 2K2K,
Win6 on right side 2K2K
Win-M4 Win2 + Win5 +
Win6
All 3 windows activated,Win5 on left
side 2K2K,Win6 on right side 2K2K
SHENZHEN VDWALL CO.,LTD www.videowall.cn
ADD: Room 1001,10th Floor, Tower 4, Fangda-City, Longzhu 4th Road,
Nanshan District, Shenzhen, China TEL: 0755-26750210
____
________________________
______________________
______
A63
User Quick Setup Guide
@
Configure Mode 0 (CfgM0)
14
(Step5):Multi-Window Signal Source Selection
5.1)Enter menu “3.2 Win2 Source”,
rotate Knob to select Win2 signal source
5.2)Enter menu “3.3 Win5 Source”,
rotate Knob to select Win5 signal source
5.3)Enter menu “3.4 Win6 Source”,
rotate Knob to select Win6 signal source
5.4)All above configuration data is saved in “DM-0” , As Figure 4-5
red frame show, current display mode is “DM0” ,
press DM-1 、DM-2 or DM+ button to select other display mode
Figure 4-5
3.Out-A Win Picture DM0
------------------------------------------
3.1 Win Mode Win-M4
3.2 Win2 Source In-B ?
3.3 Win5 Source In-D
3.4 Win6 Source In-D
3.5 Null
3.6 Pos.&Size >>
3.7 Border >>
3.8 Color & Brightness, etc >>
Display mode
SHENZHEN VDWALL CO.,LTD www.videowall.cn
ADD: Room 1001,10th Floor, Tower 4, Fangda-City, Longzhu 4th Road,
Nanshan District, Shenzhen, China TEL: 0755-26750210
____
________________________
______________________
______
A63
User Quick Setup Guide
@
Configure Mode 0 (CfgM0)
15
(Step6):Multi-Window Size&Position Setup
6.1) A63 in display mode 0(CfgM0),can adjust Win2、Win5、
Win6 size&position
6.2) Window position is identified by coordinates, the start point is
top left(0.0), position range within 3840×2160,
defined as H_Start (Horizontal start), V_Start (vertical start)
6.3)window size defined as Width and Height
6.4)As Figure 4-6 , Win6 size and position setup
6.5)Refer to Figure 4-6, Win2 position is(0,0),size is
3840×2160,whole image display
Figure 4-6
Win2
Win5
Win6
3840
2160
Width
Height
(0, 0)
(3839, 2159)
V_Start
H_Start
SHENZHEN VDWALL CO.,LTD www.videowall.cn
ADD: Room 1001,10th Floor, Tower 4, Fangda-City, Longzhu 4th Road,
Nanshan District, Shenzhen, China TEL: 0755-26750210
____
________________________
______________________
______
A63
User Quick Setup Guide
@
Configure Mode 0 (CfgM0)
16
6.6) Enter menu “3.6 Pos.&Size”,as Figure 4-7
6.7) press Win-2、Win-5、Win-6 button to select target window
(As Figure 4-7:the selected window is Win2)
6.8)Press DM-0、DM-1、DM-2 、DM+ to select display mode
As the right picture, the red arrowhead select DM0 )
A63 can preset 13 display modes
6.9) Enter menu “ 3.6.1 Out Width”,rotate Knob to adjust value,
press OK to save setup value
6.10) Enter menu “3.6.2 Out H_Start”,rotate Knob to adjust value,
press OK to save setup value
6.11) Enter menu “ 3.6.3 Out Height ”,rotate Knob to adjust value,
press OK to save setup value
6.12) Enter menu “ 3.6.4 Out V_Start ”,rotate Knob to adjust value,
press OK to save setup value
6.13) Repeat procedure 6.7)-6.12), adjust the other window’s size&position(Win n)
save more multi-window display mode DM-n
Figure 4-7
3.6 Pos.&Size DM0/Win2
---------------------------------------------
3.6.1 Out Width 3840 -> 3600
3.6.2 Out H_Start 0
3.6.3 Out Height 2160
3.6.4 Out V_Start 0
3.6.5 In Width 3840
3.6.2 In H_Start 0
3.6.3 In Height 2160
3.6.4 In V_Start 0
Display mode Selected window
SHENZHEN VDWALL CO.,LTD www.videowall.cn
ADD: Room 1001,10th Floor, Tower 4, Fangda-City, Longzhu 4th Road,
Nanshan District, Shenzhen, China TEL: 0755-26750210
____
________________________
______________________
______
A63
User Quick Setup Guide
@
Configure Mode 0 (CfgM0)
17
(Step7):Input Signal Image Cropping
7.1)Win2 can arbitrarily crop 4K2K input image at any size&position
7.2)As the Figure4-8, the input image size in red frame is 3840×2160,
the size&position of cropped image in red dot frame are defined by
the following 4 parameters:
Input width (In_Width)
Input horizontal start (In_H_Start)
Input height (In_Height)
Input vertical start (In_V_Start)
Figure 4-8
(0, 0)
3840
2160
In_H_Start
In_Width
In_Height
In_H_Start

SHENZHEN VDWALL CO.,LTD www.videowall.cn
ADD: Room 1001,10th Floor, Tower 4, Fangda-City, Longzhu 4th Road,
Nanshan District, Shenzhen, China TEL: 0755-26750210
____
________________________
______________________
______
A63
User Quick Setup Guide
@
Configure Mode 0 (CfgM0)
18
7.3) Enter menu “3.6 Pos.&Size”,as Figure 4-9
7.4) Press Win2 button to set target window,(as the Figure 4-9:win2)
A63 can crop any size&position of input signal
7.5) Press DM-0、DM-1、DM-2 、DM+ to select the target preset mode,
all parameters will be automatically saved in this mode
(As the right picture, the selected mode is DM0)
A63 can preset maximum 12 display modes
7.6) Enter menu “3.6.5 In Width”,rotate Knob to adjust value,
press OK to save setup value
7.7) Enter menu “3.6.6 In H_Start”,rotate Knob to adjust value,
press OK to save value
7.8) Enter menu “3.6.7 In Height”,rotate Knob to adjust value,
press OK to save value
7.9) Enter menu “3.6.8 In V_Start”,rotate Knob to adjust value,
press OK to save value
7.10) Repeat procedure 7.5)-7.9), adjust the other window size&position(Win-n)
save more multi-window display mode DM-n
Figure 4-9
3.6 Pos.&Size DM0/Win2
---------------------------------------------
3.6.1 Out Width 3600
3.6.2 Out H_Start 0
3.6.3 Out Height 2160
3.6.4 Out V_Start 0
3.6.5 In Width 3840 -> 1920
3.6.6 In H_Start 0
3.6.7 In Height 2160
3.6.8 In V_Start 0
Selected window Display mode
SHENZHEN VDWALL CO.,LTD www.videowall.cn
ADD: Room 1001,10th Floor, Tower 4, Fangda-City, Longzhu 4th Road,
Nanshan District, Shenzhen, China TEL: 0755-26750210
____
________________________
______________________
______
A63
User Quick Setup Guide
@
Configure Mode 0 (CfgM0)
19
5. A63 Display Mode Operation
(1) A63 Display Mode Switching
The main operation to A63 is Display Mode switching in switcher mode
1.1) “Seamless switching”operation illustration
Press button DM-0、DM-1、DM-2,Out-A and Out-B will instantly apply new display mode without latency. Out-B is main output,Out-A is preview output
Press DM+ button for more display mode selection,press ↑ 、↓ button to select DM0、DM1、DM2、DM3、DM4、DM5、DM6、DM7、DM8,then press OK
button to apply the selected mode, Out-A and Out-B will apply the new display mode without latency.
1.2) “Preselect+TAKE” switching:
Directly press DM-0、DM-1 or DM-2 button,preview Out-A will instantly apply the new display mode
Or press DM+ button for more display mode selection,press ↑ 、↓ button to select DM0、DM1、DM2、DM3、DM4、DM5、DM6、DM7 or DM8,then press
OK button to apply the selected mode, Out-A will apply the new display mode.
Finally,press “TAKE” button,Out-B will shift to Out-A(preview) without latency or image cracking. Take switching provides seamless and Fade in/Fade out
switching effect, user may enter menu “ 6. Switch Time ” for switching duration setup.
SHENZHEN VDWALL CO.,LTD www.videowall.cn
ADD: Room 1001,10th Floor, Tower 4, Fangda-City, Longzhu 4th Road,
Nanshan District, Shenzhen, China TEL: 0755-26750210
____
________________________
______________________
______
A63
User Quick Setup Guide
@
Configure Mode 0 (CfgM0)
20
(2) Display Mode Duplication
Display mode can preset parameters that consists of window composition、signal source and overlay sequence
A63 in switcher mode, usually need preset several display modes. Refer to chapter 4 Menu Setup to configure different display mode. In pursuit of fast save and apply
new display mode, we may use mode duplication function to copy current DM to target DM, then modify current mode efficiently
Press DM+ and ↑ 、↓ button, select “ Source Mode DM0 ” , rotate Knob to select source mode
Press ↓ button,enter“ Destination mode DM1 ”,rotate Knob to select destination mode
Press ↓ button,enter “ Copy OK To Apply ”,press OK button,mode duplication accomplish
Source Mode and Destination Mode can be selected from DM0-DM11, be aware that DM9-DM11 as backup mode can't be edited directly, but permit being modified by
duplication, hence to avert important display mode destroyed by mis-operation
Other manuals for A63
2
Table of contents
Other Shenzhen VDWALL Media Converter manuals


Popular Media Converter manuals by other brands

Connecticut Electric
Connecticut Electric Parallax Power Supply Powercenter 7100... Owner's Operation/Warranty Manual

Goobay
Goobay RCA/HDMI Converter user manual

Televes
Televes KLT1310 user manual

hager
hager coviva Smartbox TKP100A quick start guide

GeoVision
GeoVision GV-IP user manual

Vista
Vista VIP Kit2 VK2-ENCODER installation guide


Revo
Revo Supersystem owner's guide

IMC Networks
IMC Networks iMediaChassis/20 quick reference

Lenz Elektronik
Lenz Elektronik DIGITAL plus LE1000W instructions

SMART
SMART SR135 Installation and operation manual

Siemens
Siemens Synco 200 SEZ220 Documentation on basics

MSB Technology
MSB Technology The Select DAC user guide